Search Results for: SSD guide

Radxa Zero Debian SSD Boot Guide

Radxa Zero SSD Boot Guide

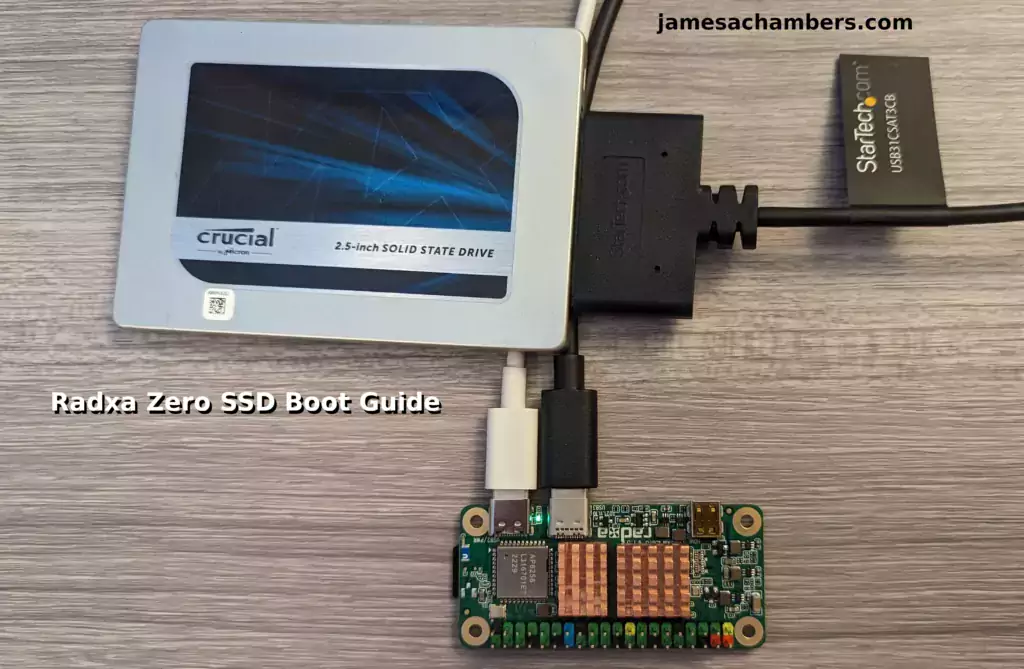
The Radxa Zero can definitely be set up to boot from USB storage / using a SSD. You can do this trick using both the eMMC and an SD card. Given that the board also has a quad-core processor you can actually make a tiny and pretty powerful server setup with something like this achieving pretty impressive I/O speeds for such a small package.

In this guide I’ll show you how to set up SSD booting on the Radxa Zero using their official Debian operating system. Let’s get started!

StarFive VisionFive 2 Official Debian SSD Boot Guide

StarFive VisionFive 2 SSD Boot Guide

The StarFive VisionFive 2 comes with a M.2 M-key PCIe 2.0 slot that we can use with a 2280 NVMe drive. Unfortunately at release it’s not possible to boot from the NVMe drive but this is expected to be added to the device through some combination of SPI+NVMe booting.

In the meantime we are going to bootstrap the boot process using a SD card and then clone that SD card to our SSD to be used as the root partition. This essentially will let us have our system’s root partition on the SSD (much faster).

Let’s get started!

Orange Pi 5 NVMe/SATA SSD Boot Guide

Orange Pi 5 with Heat Sinks

The Orange Pi 5 has a nice M.2 NVMe slot but unfortunately most of the official images will not boot if you try to directly image a NVMe drive. Fortunately there is an easy way to get this working that people who frequent the blog will almost certainly have seen before.

We are going to bootstrap the boot process using a SD card and then clone that SD card to our SSD to be used as the root partition. This essentially will let us have our system’s root partition on the SSD (much faster).

Let’s get started!

Radxa Rock Pi 4C Plus SSD Boot Guide

Radxa Rock Pi 4C Plus SSD Boot Guide

The Rock Pi 4C Plus is a bit different to boot with a SSD than it’s predecessors. It does not have a SPI flash (nor can you solder one onto the board) so to use the NVMe slot for our root filesystem we need to use a SD card as the boot loader.

In this guide I’ll walk you through the process to clone a working SD card installation to your NVMe drive and then use some tricks with the drive’s UUID identifiers and essentially pass the boot process off from the SD card and have the NVMe SSD take over.

Let’s get started!

Libre “Renegade” SSD Booting Guide

Libre Computers "Renegade" SSD Boot Guide

The “Renegade” by Libre Computers is a $50 single board computer. You actually get USB 3.0 with the “Renegade” which is going to make it even more worth it to use a SSD with than the “Le Potato”.

This method requires a sacrificial SD card to serve as the bootloader. After booting though it will use your SSD for the system’s root filesystem. We will then benchmark it to measure the improvement/gains.

In this guide I’ll walk you through the process. Let’s get started!

Libre “Le Potato” SSD Boot Guide

Libre "Le Potato" SSD Boot Guide

The “Le Potato” by Libre Computers is a $40 single board computer. That is incredibly cheap in 2022 as anyone who has tried to buy a Raspberry Pi recently can tell you. There aren’t a lot of guides out there for how to best utilize it though so today I’d like to publish a guide for it for one of the best upgrades you can do with any SBC: upgrade to SSD storage!

This method requires a sacrificial SD card to serve as the bootloader. After booting though it will use your SSD for the system’s root filesystem. We will then benchmark it to measure the improvement/gains.

Let’s begin!

ODROID XU4/XU4Q SSD Booting Guide

ODROID XU4 / XU4Q SSD Boot Guide

The ODROID XU4 and XU4Q can be a bit more tricky to boot from USB drives such as a SSD due to them not using the fantastic Petitboot bootloader like many of their newer boards have. It is still completely achievable though using an old trick and a sacrificial SD card.

The performance gains as well as access to much higher capacity drives can makes it more than worth it to set up SSD storage (as it is on nearly all single board computers).

Let’s get started!

Tinker Board SSD / USB Booting Guide

Tinker Board SSD Booting Guide

I recently wrote a getting started guide for the Tinker Board as even though the newer models tend to be quite expensive the older models can often be found for a lot cheaper. In this guide we are going to do something more advanced and are going to actually move our root filesystem to a SSD!

I have the original variant (the Tinker Board 1 S) and that is what I will be using for this guide but this should work on all Tinker Boards (including models without the eMMC). The Tinker Board 2 will have faster performance as the USB ports are USB 3.0 vs. USB 2.0 on the original Tinker Board. If you don’t have the S model with the eMMC this method will require a sacrificial SD card to serve as the bootloader.

This is an old method that I first covered for the Raspberry Pi before it supported native USB booting. I’ve also covered it here for the Orange Pi Zero 2. The SD card/eMMC serves as the bootloader but our root filesystem will be on the SSD. This is a fantastic method for any board that doesn’t natively support booting the OS from a USB storage device.

Let’s begin!

Orange Pi Zero 2 USB SSD Boot Guide

Orange Pi Zero 2 SSD Boot Guide

During my recent coverage of SBCs I’ve been benchmarking them using SSDs. The process for booting from a SSD varies across different boards. I’ve found the documentation for some of these to be lacking / nonexistent and the Orange Pi Zero 2 is one of these.

Today I wanted to benchmark the Orange Pi Zero 2 with the SSD and given the lack of documentation I’m going to document my process for setting it up. The Orange Pi Zero 2 will require a sacrificial SD card to bootstrap the process and has USB 2.0 ports. With those limitations in mind let’s set it up and see how it performs!

ODROID N2+ Petitboot SSD Boot Guide

ODROID N2+ SSD Boot Guide

Configuring the ODROID N2+ for USB booting can be a little bit tricky. There are guides out there that will both use a SD card to bootstrap the SSD booting and other guides that use Petitboot but have complex setup instructions.

Today I want to show you a simple method that I used to get SSD booting set up on the ODROID N2+ so I could perform my storage benchmarking on the device for my review. I will be using a NVMe SSD but you may use other types of SSDs as well. Let’s get started!

Raspberry Pi 400 Overclocking / NVMe SSD Setup Guide

Raspberry Pi 400 Setup w/ NVMe SSD

The Raspberry Pi 400 is the first offering from the Raspberry Pi lineup that is meant to approach desktop level performance. The official raspberrypi.org site lists the Pi 400 kit as the “Raspberry Pi 400 Personal Computer Kit“. It comes in the very interesting form factor of a keyboard with all the ports right in the back!

Although the performance on stock clock speeds and with a SD card was really great, especially for a Raspberry Pi, I would not call it desktop class performance. Fortunately we *can* make it desktop class performance with a few tweaks! This guide will show how to overclock the Pi 400 as well as set it up with a NVMe SSD to get the maximum possible performance we can out of it!

Raspberry Pi 4 USB Boot Config Guide for SSD / Flash Drives

Raspberry Pi 4 with Samsung 950 Pro NVME SSD

The Raspberry Pi 4 is finally here and has a lot of exciting changes. One very major downside is that it doesn’t support true USB booting yet out of the box (like the 3 series did).
The Raspberry Pi foundation states that it is being worked on and will be added back with a future update. No timeline has been given yet for that to happen but they state it’s one of their top priorities.

Most of my projects heavily depend on having good performing storage so sitting and waiting was not an acceptable solution. In this guide I’ll show you a workaround to use USB devices as your rootfs device and use a Micro SD card as bootloader only which gives us full SSD performance after boot!

Raspberry Pi Cheap SSD Upgrade Guide

SSD now cheaper than Micro SD cards

I’ve covered the benefits of taking your Raspberry Pi to a solid state drive (SSD) before extensively in this article but in a nutshell you get around a 280% increase in raw throughput and a 1000% increase in 4k random read/writes over a MicroSD card.

In this article I will teach you how to upgrade to a SSD on your Raspberry Pi for under $30.

XAIO ESP32-C3 Expansion Board Getting Started Guide

Seeed Studios XAIO Expansion Board Getting Started Guide

I recently covered using the XAIO-ESP32-C3 with the Grove Expansion shield to create a sensor panel to be used within Home Assistant via ESPHome. That shield is only around $7 and doesn’t have very many bells and whistles on it. That is a really fantastic and inexpensive solution to expand your available Grove ports and add more sensors or other Grove accessories to your build.

Today I want to cover Seeed Studio’s larger and more capable expansion shield. Instead of using ESPHome to program the device for us though we’re going to set up the Arduino IDE to work with the XAIO-ESP32-C3. That means we’ll be able to run our own code and test out the various capabilities of the larger expansion board.

Let’s get started!

StarFive VisionFive 2 Firmware / Bootloader Update Guide

StarFive VisionFive 2

If you’ve just received a new StarFive VisionFive 2 you may be having trouble to get it to boot with the latest images. This is because your firmware needs to be updated before using the latest version.

In this guide we’ll cover how to update the firmware on the StarFive VisionFive 2. Let’s begin!