
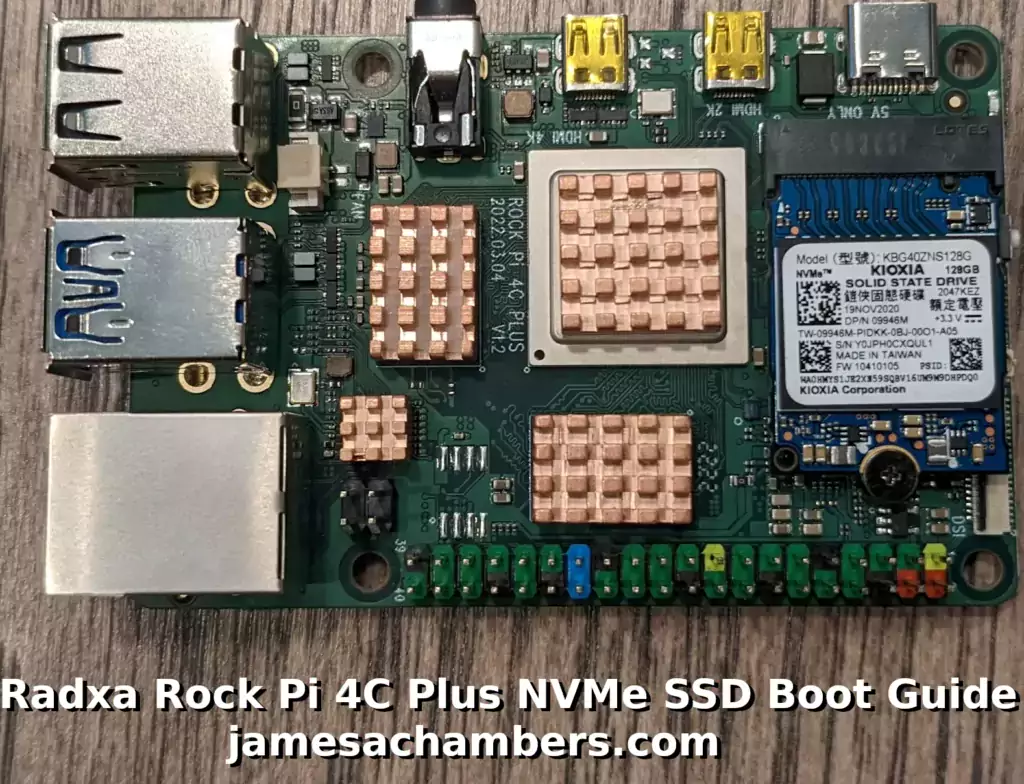
The Rock Pi 4C Plus is a bit different to boot with a SSD than it’s predecessors. It does not have a SPI flash (nor can you solder one onto the board) so to use the NVMe slot for our root filesystem we need to use a SD card as the boot loader.
In this guide I’ll walk you through the process to clone a working SD card installation to your NVMe drive and then use some tricks with the drive’s UUID identifiers and essentially pass the boot process off from the SD card and have the NVMe SSD take over.
Let’s get started!
Hardware Used

The Rock Pi 4C Plus model always comes with 4GB of RAM. It has a hexa-core processor (6 cores) and a Mali T860MP4 GPU as well as a top-mounted M.2 slot (2230).
Links: AliExpress*, Amazon.com*, Amazon.ca*, Amazon.co.uk*, Amazon.de*, Amazon.es*, Amazon.fr*, Amazon.it*, Amazon.nl*, Amazon.pl*, Amazon.se*
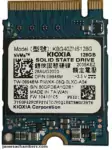
The Kioxia (Toshiba) 128GB M.2 2230 PCIe NVMe drive is much shorter than most NVMe drives (full size is 2280). It fits great with single board computers / tablets / other smaller form factors.
Links: Amazon.com*, Amazon.ca*, Amazon.co.uk*, Amazon.co.jp*, Amazon.com.au*, Amazon.de*, Amazon.es*, Amazon.fr*, Amazon.it*, Amazon.nl*, Amazon.pl*, Amazon.se*, Amazon.sg*
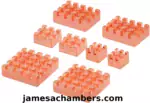
The Geekworm copper heat sink set is designed to fit many different single board computers. It uses thermal conductive adhesive which many “cheap” heat sink kits for SBCs don’t have. Eliminates hot spots and reduces throttling. Can be further enhanced by powered cooling over the heat sinks.
Links: Amazon.com*, Amazon.ca*, Amazon.co.jp*, Amazon.co.uk*, Amazon.de*, Amazon.es*, Amazon.fr*, Amazon.it*
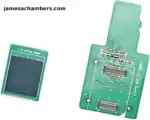
The eMMC module compatible with the Rock 4C+/5B. Available from 16GB up to 128GB.
Links: Amazon.com*, AliExpress*, Amazon.com.au*, Amazon.ca*, Amazon.co.uk*, Amazon.co.jp*, Amazon.de*, Amazon.es*, Amazon.fr*, Amazon.it*, Amazon.nl*, Amazon.pl*, Amazon.se*
Preparing SD Card
First you should have a completely working installation on a SD card of the OS that you would like to use. I used the official Debian desktop image for this guide (recommended) so if your partitions are different it may be your flavor of Linux and need slightly altered instructions.
If you have an already working installation you want to move to your SSD you can use this as well most likely.
You should completely update first with:
sudo apt update && sudo apt full-upgradeMounting SSD
Mounting your SSD in the board should look like this:
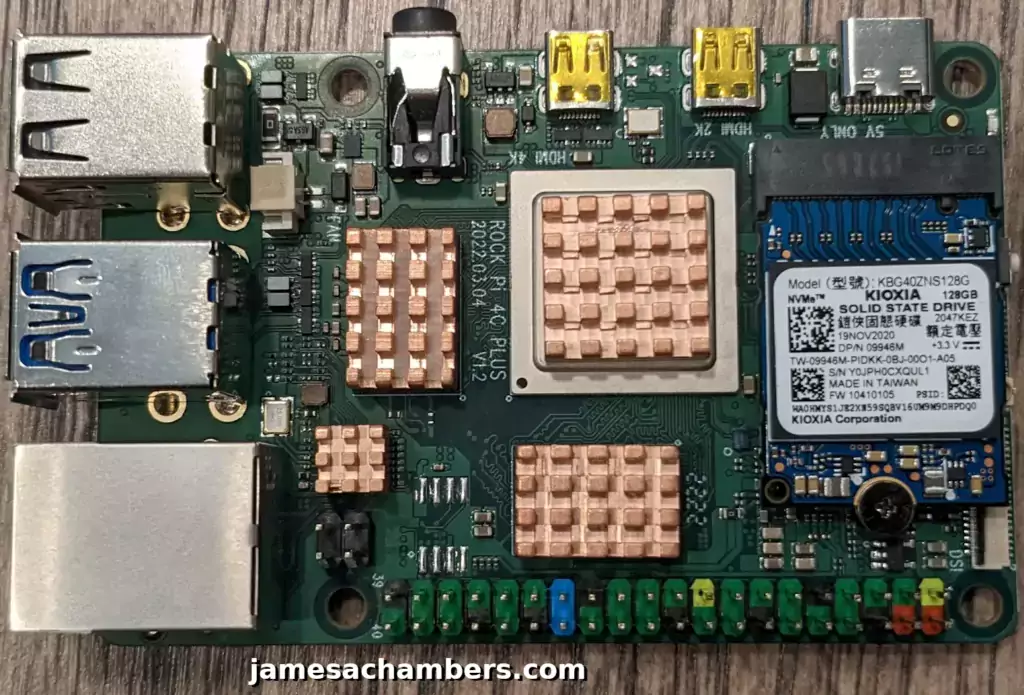
Preparing SSD
First we are going to completely remove all partitions from the drive so it’s completely blank. Your drive should typically be /dev/nvme0n1:
sudo gdisk /dev/nvme0n1
Now remove all partitions from the device. If you press “p” it will print out the partitions. You can then use “d” to delete them.
Here’s an example on mine:
rock@rockpi-4cplus:/boot$ sudo gdisk /dev/nvme0n1
GPT fdisk (gdisk) version 1.0.6

Partition table scan:
  MBR: protective
  BSD: not present
  APM: not present
  GPT: present

Found valid GPT with protective MBR; using GPT.

Command (? for help): p
Disk /dev/nvme0n1: 250069680 sectors, 119.2 GiB
Sector size (logical/physical): 512/512 bytes
Disk identifier (GUID): E3017ECA-4571-4F62-A39F-4BA2A4323BD8
Partition table holds up to 128 entries
Main partition table begins at sector 2 and ends at sector 33
First usable sector is 34, last usable sector is 250069646
Partitions will be aligned on 64-sector boundaries
Total free space is 8350 sectors (4.1 MiB)

Number  Start (sector)    End (sector)  Size       Code  Name
   1              64            8063   3.9 MiB     0700  loader1
   2           16384           24575   4.0 MiB     0700  loader2
   3           24576           32767   4.0 MiB     0700  trust
   4           32768         1081343   512.0 MiB   EF00  boot
   5         1081344       250069646   118.7 GiB   8300  rootfs

Command (? for help): d
Keep pressing d until all the partitions are deleted. Once they are gone use the ‘w’ command to write your changes.
Cloning Installation to SSD
We’re now ready to clone your installation to the SSD. We can now copy your drive to the SSD with the following command:
cat /dev/mmcblk0 > /dev/nvme0n1
Wait for the operation to complete (there won’t be any output but you will have a cursor again and be able to type new commands). Remember that you are copying an entire drive from one to another basically with that one command.
Mine took about 30-45 minutes (although I was using a 64GB SD card and the larger SD card you use the longer it will take to copy the whole drive).
If you are having any trouble with permissions try becoming “root” first with:
sudo su
Now try running the command again and as the superuser you should not encounter any permission errors.
Change SD card’s rootfs UUID
We need to change our SD card’s UUID so that it doesn’t try to boot from that partition. We can set it to a random one with the following command:
sudo tune2fs -O metadata_csum_seed -U random /dev/mmcblk0p5
We can verify that it has changed with blkid like this:
rock@rockpi-4cplus:~$ sudo blkid
/dev/nvme0n1p1: PARTLABEL="loader1" PARTUUID="5a15e3e6-dd19-480e-811a-7d9ba59b1963"
/dev/nvme0n1p2: PARTLABEL="loader2" PARTUUID="469f0b94-69ab-442d-aa9c-9b34c317a851"
/dev/nvme0n1p3: PARTLABEL="trust" PARTUUID="1263ff37-cd88-4bb1-952c-8dca6a25d854"
/dev/nvme0n1p4: UUID="AAAA-1111" BLOCK_SIZE="512" TYPE="vfat" PARTLABEL="boot" PARTUUID="256f45f9-30af-4374-85c9-2b8eaa1cc816"
/dev/nvme0n1p5: LABEL="rootfs" UUID="4d9b395f-fc57-41f9-8cad-54ea930a6506" BLOCK_SIZE="4096" TYPE="ext4" PARTLABEL="rootfs" PARTUUID="0cc2b5ce-8997-4920-a9fb-3a1db3303230"
/dev/mmcblk0p1: PARTLABEL="loader1" PARTUUID="5a15e3e6-dd19-480e-811a-7d9ba59b1963"
/dev/mmcblk0p2: PARTLABEL="loader2" PARTUUID="469f0b94-69ab-442d-aa9c-9b34c317a851"
/dev/mmcblk0p3: PARTLABEL="trust" PARTUUID="1263ff37-cd88-4bb1-952c-8dca6a25d854"
/dev/mmcblk0p4: LABEL_FATBOOT="boot" LABEL="boot" UUID="8138-1398" BLOCK_SIZE="512" TYPE="vfat" PARTLABEL="boot" PARTUUID="256f45f9-30af-4374-85c9-2b8eaa1cc816"
/dev/mmcblk0p5: LABEL="rootfs" UUID="101adf3b-0bbf-4891-8a20-d8d789b3a232" BLOCK_SIZE="4096" TYPE="ext4" PARTLABEL="rootfs" PARTUUID="0cc2b5ce-8997-4920-a9fb-3a1db3303230"
Notice that /dev/nvme0n1p5 and /dev/mmcblk0p5 no longer have matching UUIDs. This is exactly what we want.
Change SSD’s boot UUID
Next we are going to change the boot partition’s UUID on the SSD. This will make it so that the mounted /boot folder inside your operating system actually mounts the SD card (which is your actual boot loader in this configuration).
First make sure you have mtools with:
sudo apt install mtools -y
Now we can change the UUID with:
sudo mlabel -N aaaa1111 -i /dev/nvme0n1p4 ::
You can verify these are different using the same sudo blkid command as the previous section.
Run fsck
Before we reboot run fsck on the drive like this:
sudo fsck -yf /dev/nvme0n1p5
This will prevent you from having to run fsck on the CLI the first time you try to boot.
Reboot and Verify
Now reboot the Rock Pi 4C Plus with:
sudo rebootWith any luck you should be booted using your SSD! We can verify this with the mount command like this:
rock@rockpi-4cplus:~$ mount
/dev/nvme0n1p5 on / type ext4 (rw,relatime,data=ordered)
/dev/mmcblk0p4 on /boot type vfat (rw,relatime,fmask=0022,dmask=0022,codepage=936,iocharset=utf8,shortname=mixed,errors=remount-ro,x-systemd.automount)
Here we can see that our root partition (/) is indeed on /dev/nvme0n1p5 and not /dev/mmcblk0p5. We can also see that my /boot folder is properly mounted is /dev/mmcblk0p4 (the SD card which is serving as our boot loader). Success!
Testing Performance
You can verify the performance of your SSD on Pi Benchmarks using the following command:
sudo curl https://raw.githubusercontent.com/TheRemote/PiBenchmarks/master/Storage.sh | sudo bash
Here are the results:
     Category                  Test                      Result
HDParm                    Disk Read                 370.59 MB/s
HDParm                    Cached Disk Read          349.16 MB/s
DD                        Disk Write                211 MB/s
FIO                       4k random read            47962 IOPS (191850 KB/s)
FIO                       4k random write           12760 IOPS (51040 KB/s)
IOZone                    4k read                   56308 KB/s
IOZone                    4k write                  56392 KB/s
IOZone                    4k random read            38025 KB/s
IOZone                    4k random write           59999 KB/s

                          Score: 14,003
The full Rock Pi 4C Plus benchmark can be viewed here on Pi Benchmarks.
Conclusion
The Rock Pi 4C Plus is a bit of a pain to get to boot from the NVMe storage but it’s well worth the performance gains. If you are using a different OS than the official OS you may need to adjust some of the partitions to get this to work but you can follow the same process.
I highly recommend the little M.2 NVMe modules. They will save you money over SD cards and give you much higher performance and access to much greater storage capacities. If you want to spend more than $13 then you can get much, much higher storage capacities (but the price rises accordingly). It’s definitely worth it!
Other Resources
I’ve written a review about the Rock Pi 4C Plus here


Thanks for the post, I was wondering Rock PI 4C pro doesn’t seem for sale from Radax, whats the differences to 4C light?
Am I reading the benchmarks correct, nvme max read/write is around 300/mbps there isn’t a single board computer that supports native nvme SSD speeds like 1,000/mbps etc?
Hey JsWhisperer,
Great question. The PCIe version supported on most SBCs is PCIe 1.0 and some of them support PCIe 2.0. This does indeed limit raw transfer speeds.
These are definitely not very common but they do already exist. As time goes on we will see PCIe 3.0 and higher make it into more and more SBCs which will allow you to take advantage of full speeds.
Hopefully that helps!
Hi James,
I have a kind of off-topic question: I installed Debian Desktop from here.
and I am experiencing a slow Plasma KDE UI. It is not extremely slow but it’s slow enough to be quite annoying, both on 2K HDMI port and on 4K. I could not find anything online that could clarify what I should install / update / turn on or off to make it at least usable.
Is it expected to be slow? I was under impression that these boards are past that issue but it looks like they are not. It’s just basic OpenGL KDE and it should run with decent speed on a 6 core CPU and even more core GPU, shouldn’t it ?
thanks
fr33s7yl0r
Hey fr33s7yl0r,
I’d guess that the driver support is not fully enabled out of the box. This is pretty common. Check out this thread here where people are discussing this. It looks like there’s an additional 3D package that needs to be installed. It should be the “Panfrost” drivers for this board.
Hopefully that helps!
Hi James,
I ended up using Armbian as I am setting up a server. That image only has a single root partition with reserved space for loaders etc. This is the same as the desktop Debian image now. For some reason i had to use a simpler version of tune2fs with just -U random /dev/xxx. I just created a new data partition with the remainder of the NVMe instead of figuring out how to expand the #1 partition. Many thanks for your most helpful information. cheers.
Hey Richard,
Thanks for your comment! That’s great that you got the tunefs command tweaked for your partitioning. These can vary slightly and I bet this will help others as well.
Enjoy and take care!
Hi,
Thanks a lot it work well on ROCK 4 SE debian.
One question ! Do you think it is possible to boot android from nvme using this method?
Hey Banana,
Great question! So basically Android works a lot differently and this method won’t help unfortunately. Android basically needs to be “flashed” usually using proprietary software unfortunately.
Hopefully that helps!
Hi,
If i want HAOS to boot directly on NVME instead of loading debian, how would this guide help?
this author provide a miniloader but it does not seem to work with RockPi 4C Plus.
Hey Gavin,
I believe the issue is that the Rock Pi 4C does not have any SPI flash chip. There’s nowhere to store a boot loader to tell it to load directly to NVMe in other words. I don’t know of any way to do it without using a SD card unfortunately.
Hopefully that helps!
Hi James,
Since Home assistant OS is based on linux but i cant access a lot of the command in your post once I installed the HAOS on the SD card. How do i go about cloning the data to the SSD and remove the rootfs partition on the SD so with the SD card loaded it will check the bootloader and pass it to the SSD drive to boot instead?
Hope you understand my question as I only need HAOS to load on SSD and I don’t mind using a SD card to make the SSD to load at the end.
Hey Gavin,
Basically you would follow these steps on another computer running a regular Linux distribution. That’s about it. There’s no requirement to run these on the device itself. You can run all of the same commands by simply plugging your SSD into another computer running Linux and use the appropriate device paths that the drive gets assigned when plugging it in.
Hopefully that helps!
Hi James,
here are the partitions that show up when i type blkid:
/dev/zram0: UUID="1dd3499a-5afd-4a80-ae88-d101348e987a" TYPE="swap"/dev/nvme0n1p1: SEC_TYPE="msdos" LABEL_FATBOOT="hassos-boot" LABEL="hassos-boot" UUID="AF9E-3A66" BLOCK_SIZE="512" TYPE="vfat" PARTLABEL="hassos-boot" PARTUUID="b3dd0952-733c-4c88-8cba-cab9b8b4377f"
/dev/nvme0n1p2: TYPE="squashfs" PARTLABEL="hassos-kernel0" PARTUUID="26700fc6-b0bc-4ccf-9837-ea1a4cba3e65"
/dev/nvme0n1p3: TYPE="squashfs" PARTLABEL="hassos-system0" PARTUUID="8d3d53e3-6d49-4c38-8349-aff6859e82fd"
/dev/nvme0n1p4: PARTLABEL="hassos-kernel1" PARTUUID="fc02a4f0-5350-406f-93a2-56cbed636b5f"
/dev/nvme0n1p5: PARTLABEL="hassos-system1" PARTUUID="a3ec664e-32ce-4665-95ea-7ae90ce9aa20"
/dev/nvme0n1p6: PARTLABEL="hassos-bootstate" PARTUUID="33236519-7f32-4dff-8002-3390b62c309d"
/dev/nvme0n1p7: LABEL="hassos-overlay" UUID="71137d73-3ddd-4caa-8e89-21dbdc7afec2" BLOCK_SIZE="1024" TYPE="ext4" PARTLABEL="hassos-overlay" PARTUUID="f1326040-5236-40eb-b683-aaa100a9afcf"
/dev/nvme0n1p8: LABEL="hassos-data" UUID="e74482ef-35b1-4db2-8e58-f35e44dc26d2" BLOCK_SIZE="4096" TYPE="ext4" PARTLABEL="hassos-data" PARTUUID="a52a4597-fa3a-4851-aefd-2fbe9f849079"
/dev/mmcblk0p1: LABEL_FATBOOT="config" LABEL="config" UUID="51F0-4454" BLOCK_SIZE="512" TYPE="vfat" PARTLABEL="config" PARTUUID="244666e0-77b3-4449-a979-8781bd73a32a"
/dev/mmcblk0p2: LABEL="rootfs" UUID="8087ba46-93d3-4f58-a640-231fd0aa806c" BLOCK_SIZE="4096" TYPE="ext4" PARTLABEL="rootfs" PARTUUID="9b205584-09ad-4537-af38-c6827a11976e"
/dev/sda1: SEC_TYPE="msdos" LABEL_FATBOOT="hassos-boot" LABEL="hassos-boot" UUID="AF9E-3A66" BLOCK_SIZE="512" TYPE="vfat" PARTLABEL="hassos-boot" PARTUUID="b3dd0952-733c-4c88-8cba-cab9b8b4377f"
/dev/sda2: TYPE="squashfs" PARTLABEL="hassos-kernel0" PARTUUID="26700fc6-b0bc-4ccf-9837-ea1a4cba3e65"
/dev/sda3: TYPE="squashfs" PARTLABEL="hassos-system0" PARTUUID="8d3d53e3-6d49-4c38-8349-aff6859e82fd"
/dev/sda4: PARTLABEL="hassos-kernel1" PARTUUID="fc02a4f0-5350-406f-93a2-56cbed636b5f"
/dev/sda5: PARTLABEL="hassos-system1" PARTUUID="a3ec664e-32ce-4665-95ea-7ae90ce9aa20"
/dev/sda6: PARTLABEL="hassos-bootstate" PARTUUID="33236519-7f32-4dff-8002-3390b62c309d"
/dev/sda7: LABEL="hassos-overlay" UUID="71137d73-3ddd-4caa-8e89-21dbdc7afec2" BLOCK_SIZE="1024" TYPE="ext4" PARTLABEL="hassos-overlay" PARTUUID="f1326040-5236-40eb-b683-aaa100a9afcf"
/dev/sda8: LABEL="hassos-data" UUID="4f6b4651-f4fa-45a2-9d55-14ad1a07f6a1" BLOCK_SIZE="4096" TYPE="ext4" PARTLABEL="hassos-data" PARTUUID="a52a4597-fa3a-4851-aefd-2fbe9f849079"
the dummy sd is connected with a usb reader (sda) and i cloned the data to the nvme ssd. did i renamed the rootfs UUID correctly (sda8)?
Hey Gavin,
Theoretically but I think it’s a long shot for this to work. Check out this article here:
The Home Assistant Operating System (HAOS) partition layout is a bit different than what is typically used on a Linux system.This does not bode well for following a guide like this. The first thing they say about it is that it’s nothing like typical Linux systems. You’ll probably need to find a HAOS specific guide to get this to work completely.
Hopefully that helps!