
I’ve previously covered creating a Home Assistant air quality monitor system using a XAIO ESP32-C3 module and ESPHome / Home Assistant to create a 7-in-1 air quality monitor sensor. My previous article though did require a little bit of soldering to get it going.
Today I’m going to show you my latest sensor build which has completely eliminated the soldering. It’s plug and play using ESPHome and Home Assistant. I did this using the Adafruit QT Py module which has a built-in connector for connecting to a I2C (Stemma QT) device like the Grove SEN54 environmental sensor. In addition to eliminating any soldering this also saved me money by not having to buy an expansion board.
Today I’ll show you the updated build for my air quality sensor setup I’ll be using throughout my home. Let’s get started!
Hardware Used
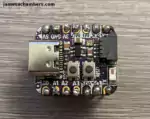
The Adafruit QT Py ESP32-C3 is an incredibly tiny board that has WiFi/Bluetooth capabilities and is powered through USB-C
Links: Adafruit.com, Amazon.com*
The Seeed Studios SEN54 All-in-one Environmental Sensor includes measurements for particles of PM1.0/2.5/4/10, temperature and humidity and VOC (volatile organic compounds).
Links: AliExpress*, SeeedStudios.com
Overview
This updated build only consists of these two parts:
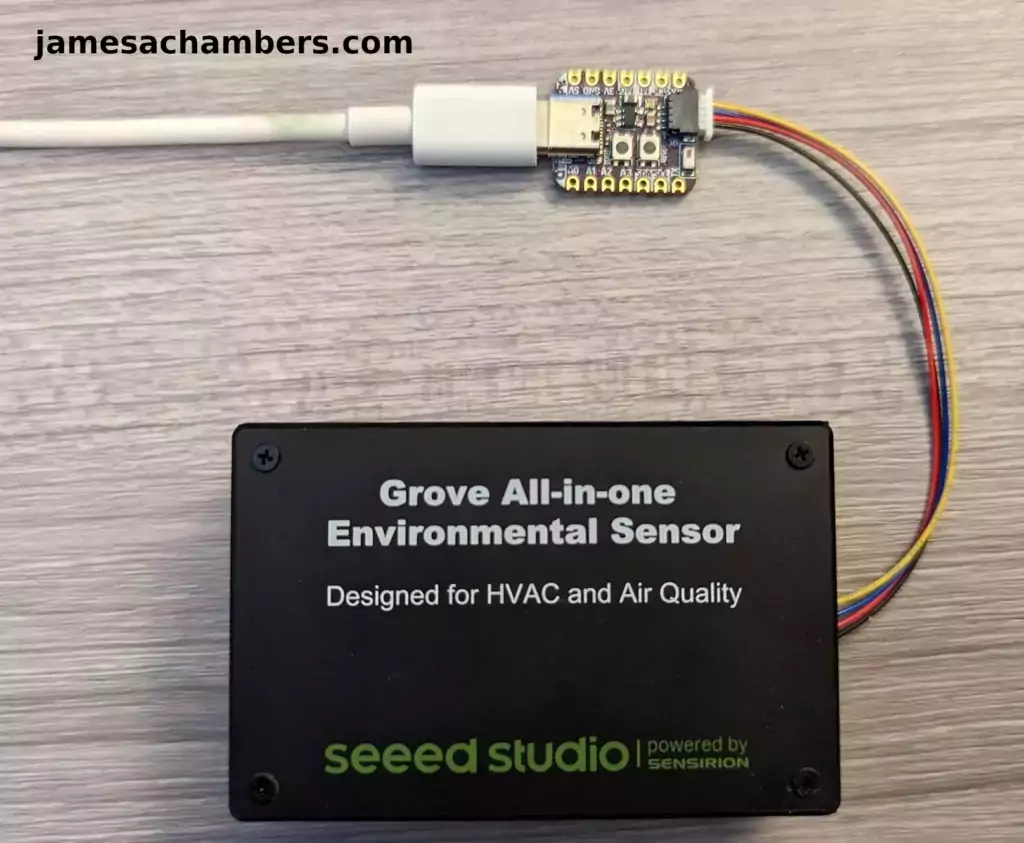
We simply have the QT Py and the Grove All-in-one environmental sensor from Seeed Studio. We also have a Stemma QT to Grove cable to connect the two.
All you need besides these two components is Home Assistant and ESPHome. This is a plug-and-play setup!
Adding ESPHome to Home Assistant
We are going to assume you have Home Assistant installed as installing Home Assistant is outside the scope of this guide. You can absolutely follow along though and see if it looks like something you’d like to explore. I have it installed as a supervised installation on an Orange Pi 5.
Sign into your Home Assistant instance and go to “Settings” and then “Add-ons”. Next click the “Add-on Store”.
ESPHome has it’s own section like this:
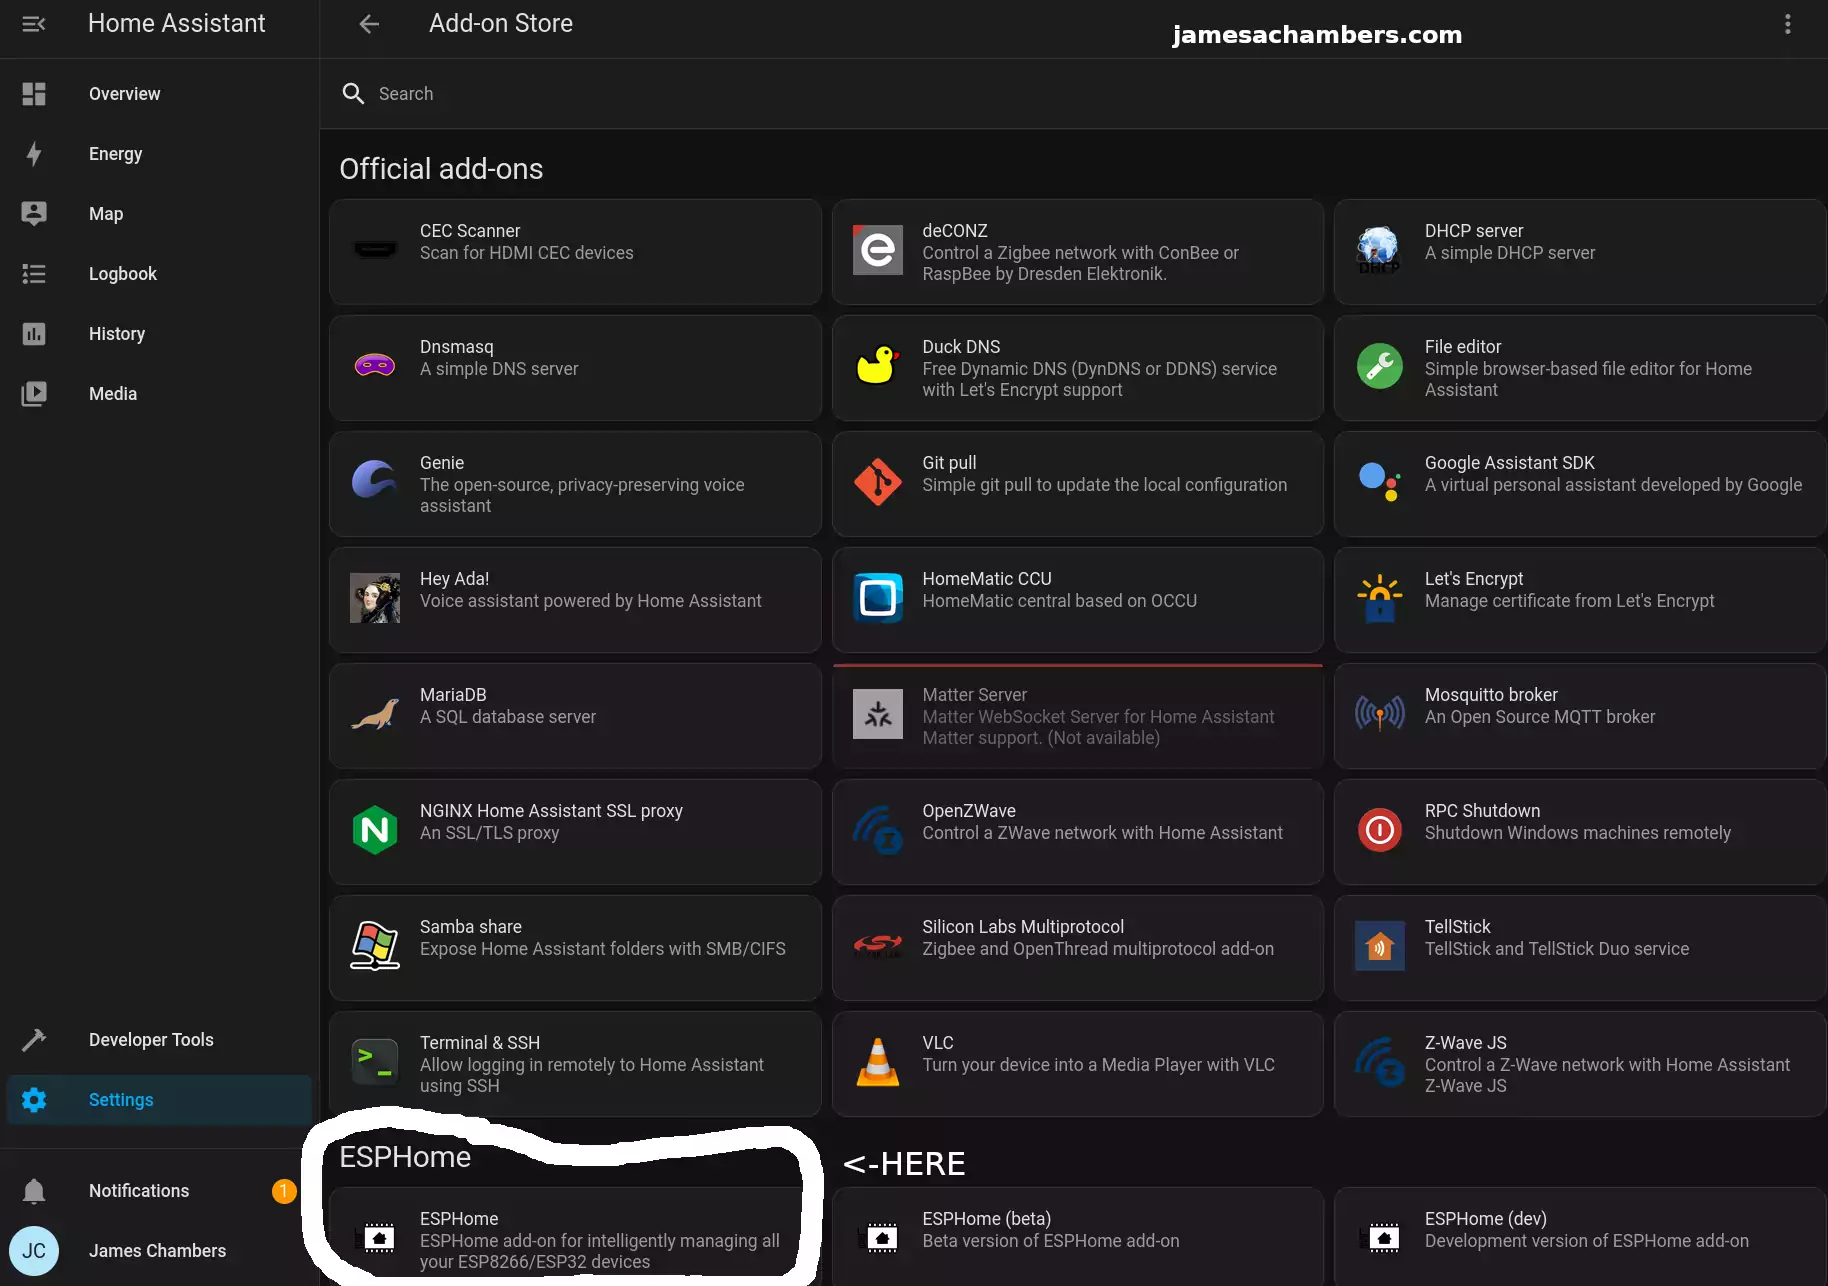
Select ESPHome and then click “Install”. Once the installation is finished you can click “Start” to start the service.
To make things easier choose to add the ESPHome option to your sidebar. That way you’ll see a menu choice specifically for ESPHome going forward.
Configuring ESPHome
First head to the ESPHome menu option:
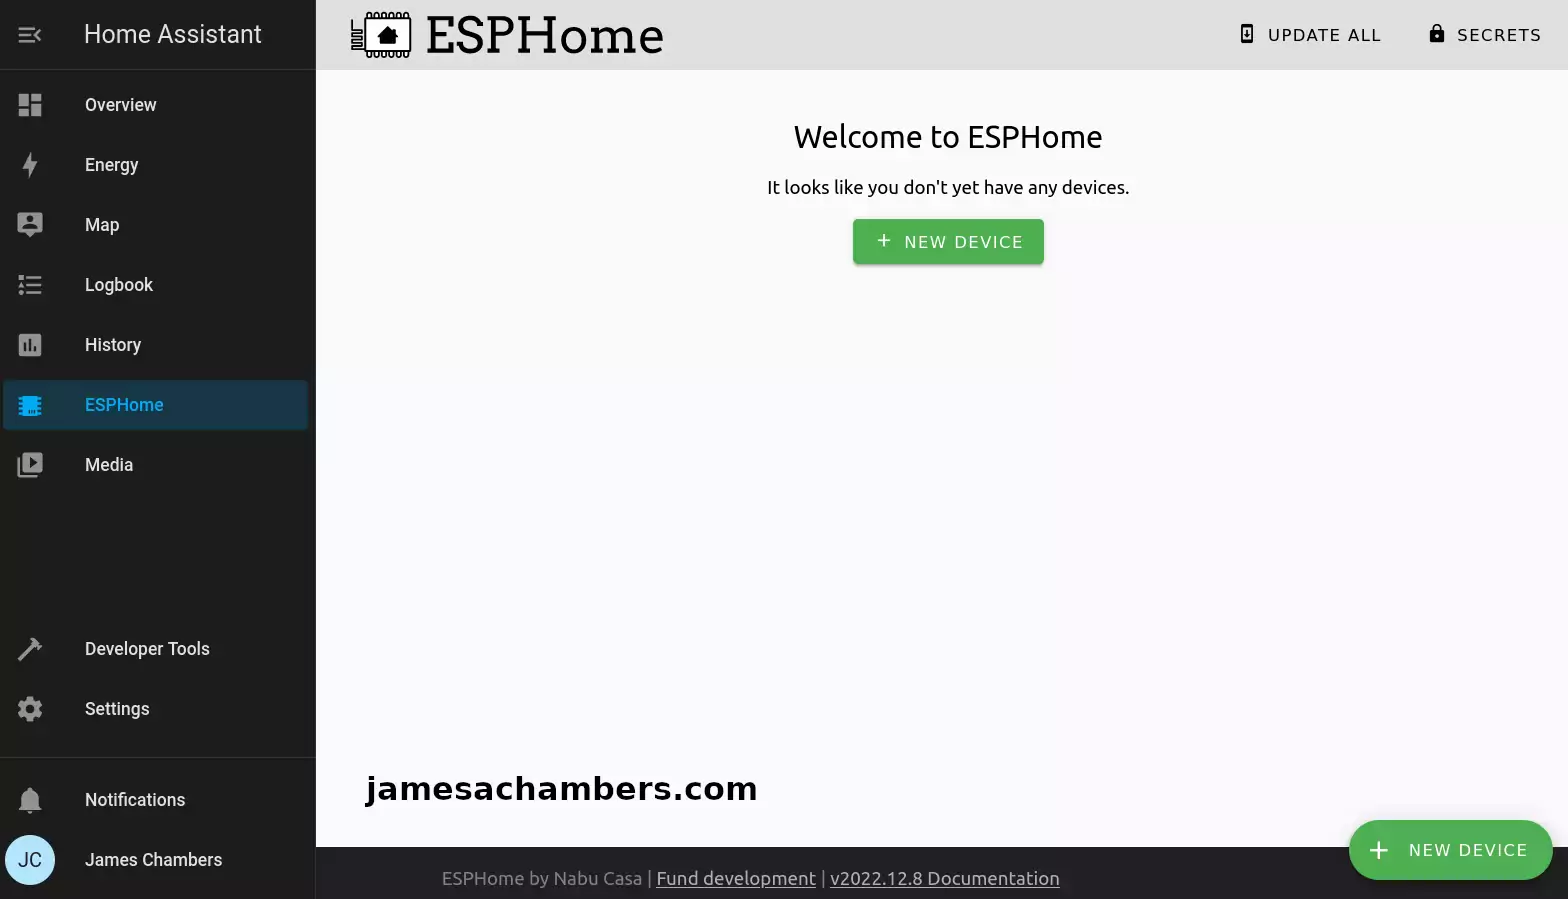
If you don’t see the ESPHome menu option then go back to the “Add-on Store” from the previous step. Select ESPHome and enable “Show in sidebar”.
For setup we need to connect your QT Py to your device running Home Assistant with USB. This is only required for setup. It will communicate wirelessly after you’ve completed setup (if you configure it that way).
You also have the option of connecting it to a different computer but *only* if your Home Assistant instance is configured to run in HTTPS.
Click “New Device” in the bottom right hand menu. Follow the menus to add the device into your ESPHome instance.
Editing YAML Configuration
Click “Edit” on the new sensor/device you created. We are going to change the esphome and esp32 sections to this:
esphome:
  name: sensors-garage
  platformio_options:
    board_build.flash_mode: dio
  friendly_name: sensors-garage

esp32:
  board: adafruit_qtpy_esp32c3
  variant: esp32c3
  framework:
    type: esp-idf
Note that YAML is very sensitive to spacing. The editor will underline errors in red for you which definitely helps to spot them as long as you’re watching for them.
While we are in here you should save your encryption key to your clipboard or keep it handy for reference. We are going to need it in the step to add the device to Home Assistant later.
Install Configuration to Device
Finally you can begin programming the device. Click to “Install”. Select the device type and your USB device again and with any luck:
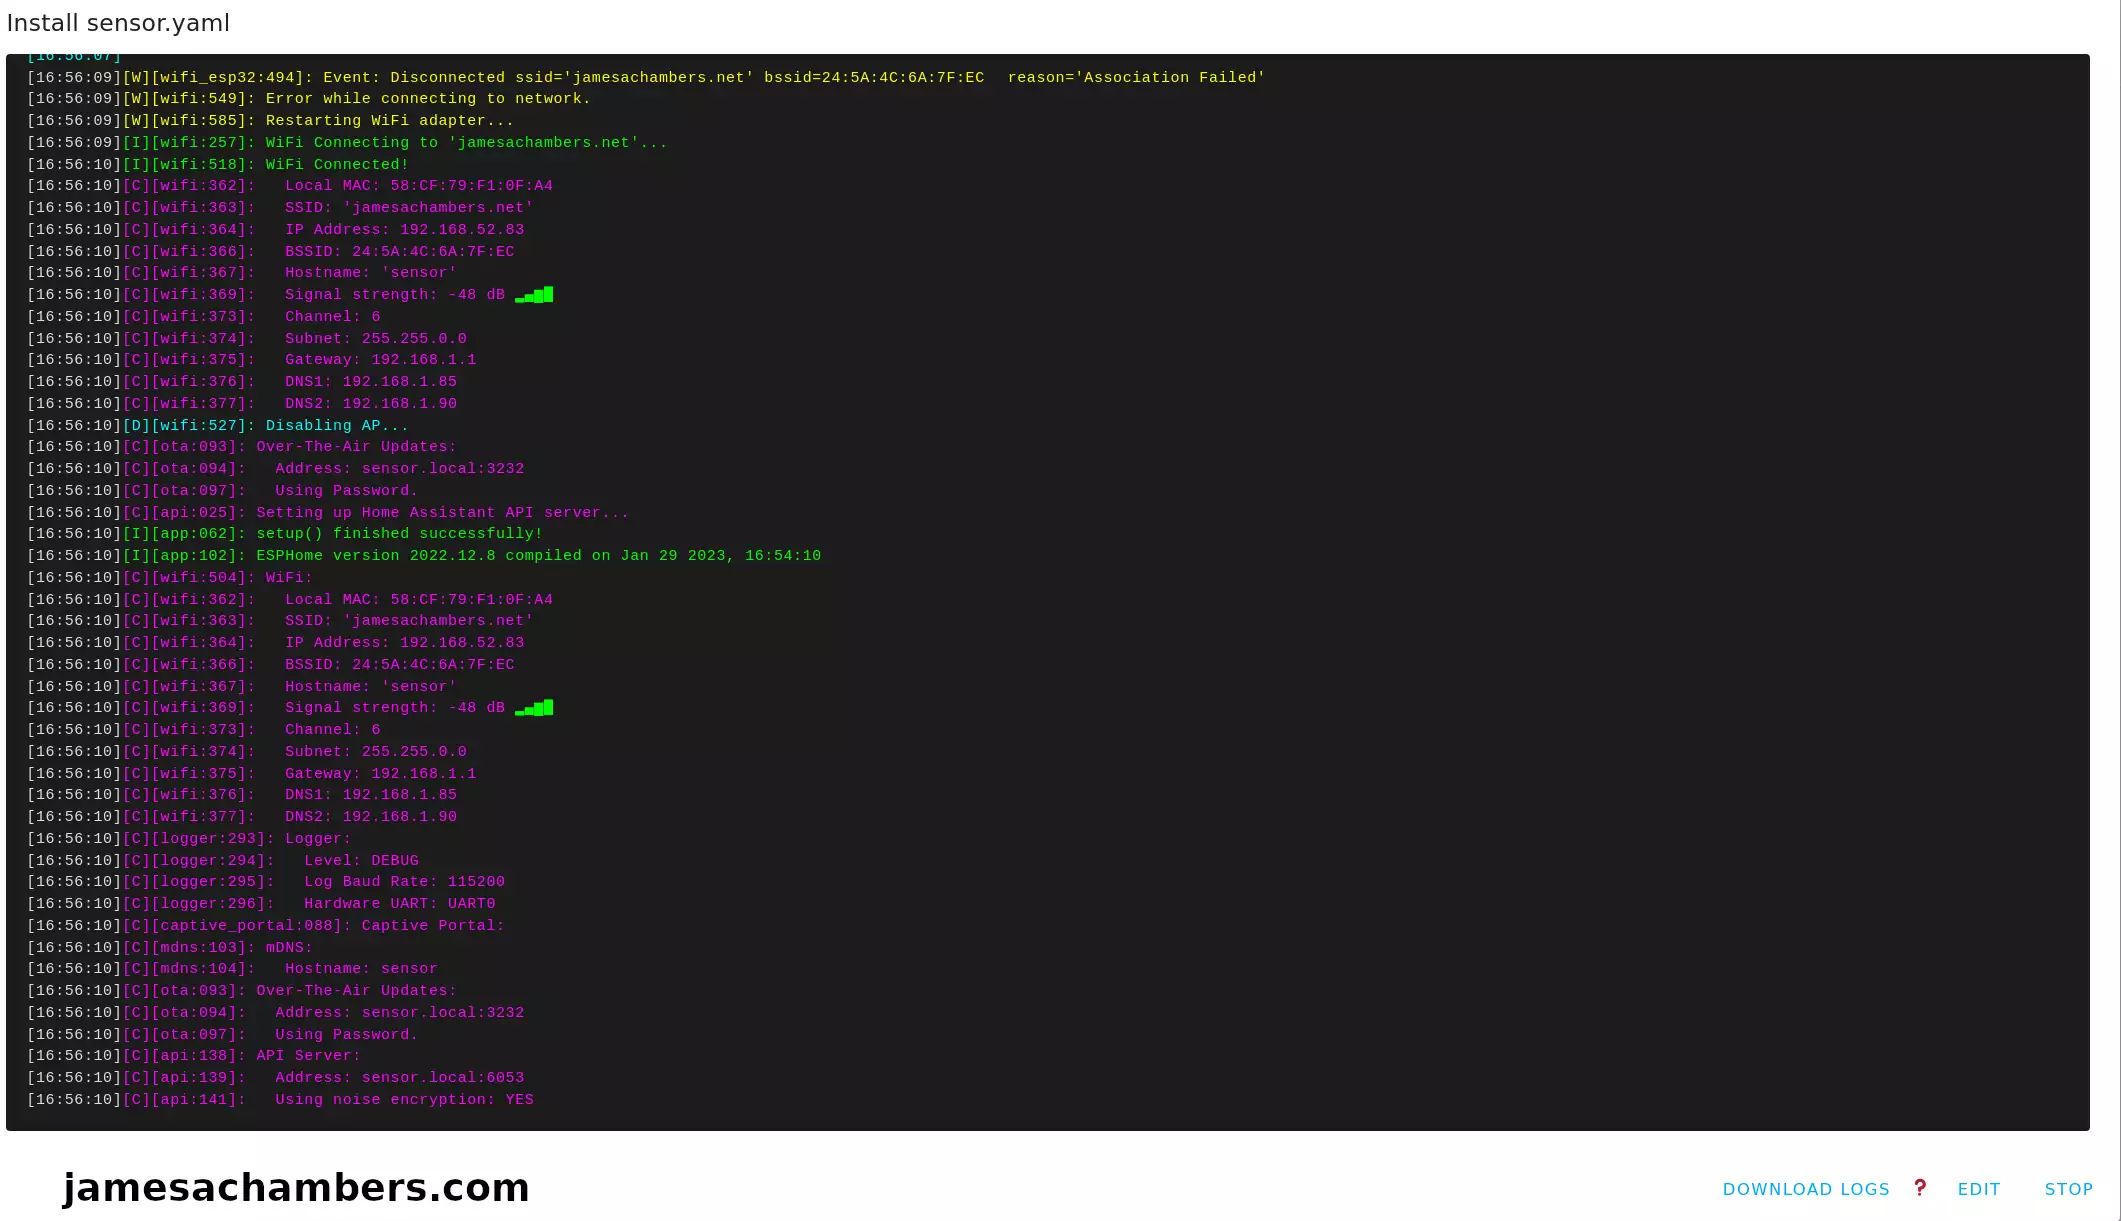
Above you can see it connected to my WiFi point and that everything ran successfully. That is without ever programming the ESP32. ESPHome did all of the programming for us!
Adding Device to Home Assistant
Now head back to your “Settings” menu for Home Assistant and click “Devices”. You should see your new sensor with the name you specified in the configuration.
Check to see if the sensor is online. With any luck it is like my example above. Now click “Configure”:
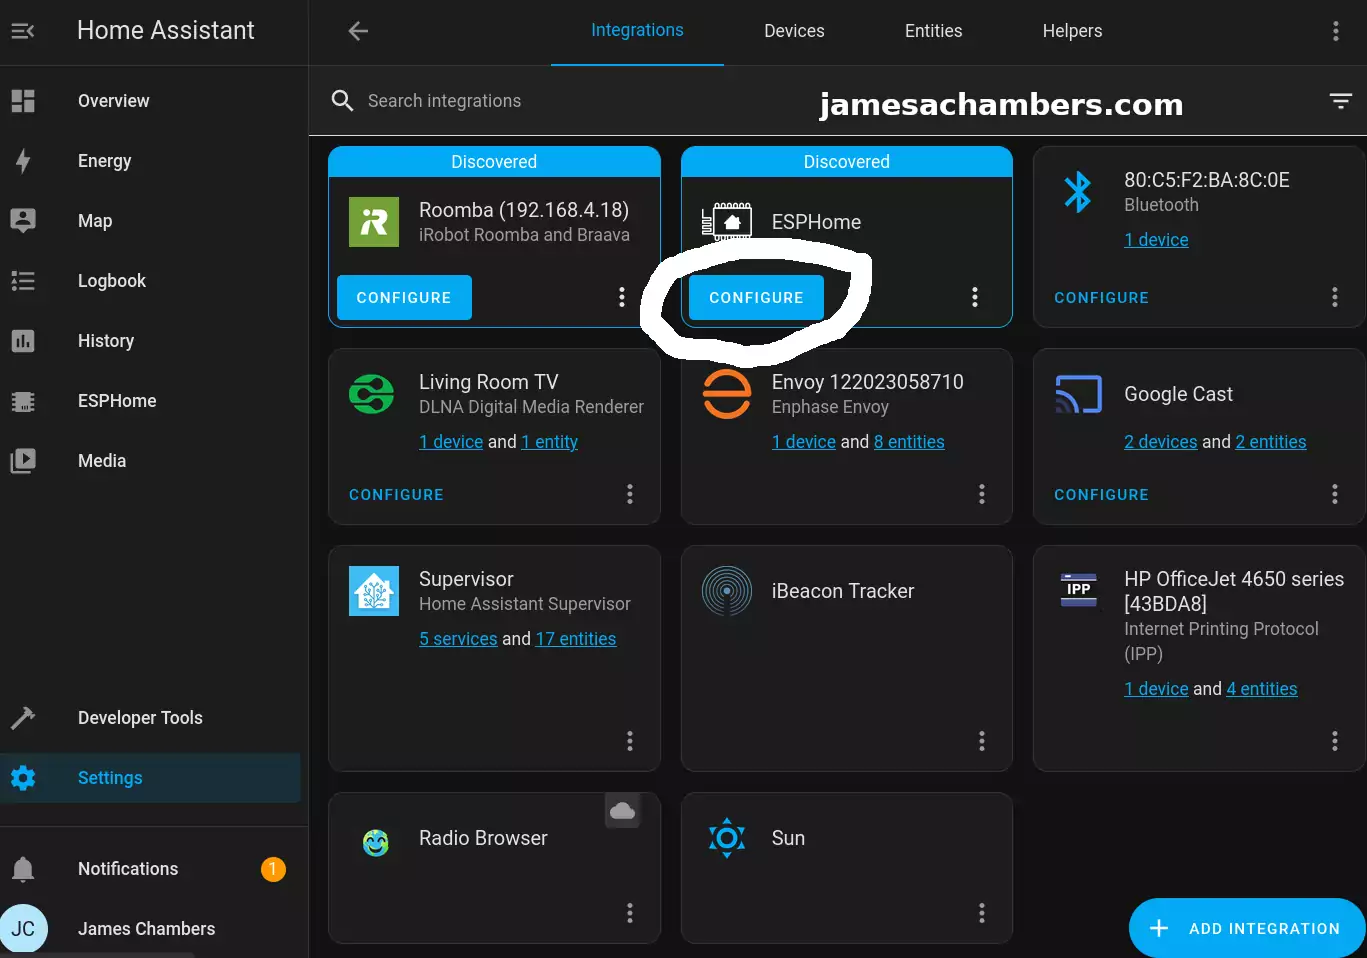
It should ask you if you want to add the node to Home Assistant. Select “Submit” and then it will ask you for your encryption key it gave us earlier. If you don’t have this just go back to the ESPHome menu and select “Edit”. You will see the key in plain text under “encryption” and then “key”.
If everything goes well the device should come online and be successfully paired with Home Assistant. From this point forward we will be able to update and push the configuration wirelessly to the device.
Adding Sensor to YAML Configuration
Here’s the full configuration I used for the sensor:
esphome:
  name: sensors-garage
  platformio_options:
    board_build.flash_mode: dio
  friendly_name: sensors-garage

esp32:
  board: adafruit_qtpy_esp32c3
  variant: esp32c3
  framework:
    type: esp-idf

# Enable logging
logger:

# Enable Home Assistant API
api:
  encryption:
    key: "XXX"

ota:
  password: "XXX"

wifi:
  ssid: !secret wifi_ssid
  password: !secret wifi_password
  domain: .jamesachambers.net
  power_save_mode: none

i2c:
  sda: 5
  scl: 6

sensor:
  - platform: sen5x
    id: sen54
    pm_1_0:
      name: " PM <1µm Weight concentration"
      id: pm_1_0
      accuracy_decimals: 1
    pm_2_5:
      name: " PM <2.5µm Weight concentration"
      id: pm_2_5
      accuracy_decimals: 1
    pm_4_0:
      name: " PM <4µm Weight concentration"
      id: pm_4_0
      accuracy_decimals: 1
    pm_10_0:
      name: " PM <10µm Weight concentration"
      id: pm_10_0
      accuracy_decimals: 1
    temperature:
      name: "Temperature"
      accuracy_decimals: 1
    humidity:
      name: "Humidity"
      accuracy_decimals: 0
    voc:
      name: "VOC"
      algorithm_tuning:
        index_offset: 100
        learning_time_offset_hours: 12
        learning_time_gain_hours: 12
        gating_max_duration_minutes: 180
        std_initial: 50
        gain_factor: 230
    temperature_compensation:
      offset: 0
      normalized_offset_slope: 0
      time_constant: 0
    acceleration_mode: low
    store_baseline: true
    address: 0x69
    update_interval: 10s
Save and install the configuration to the device.
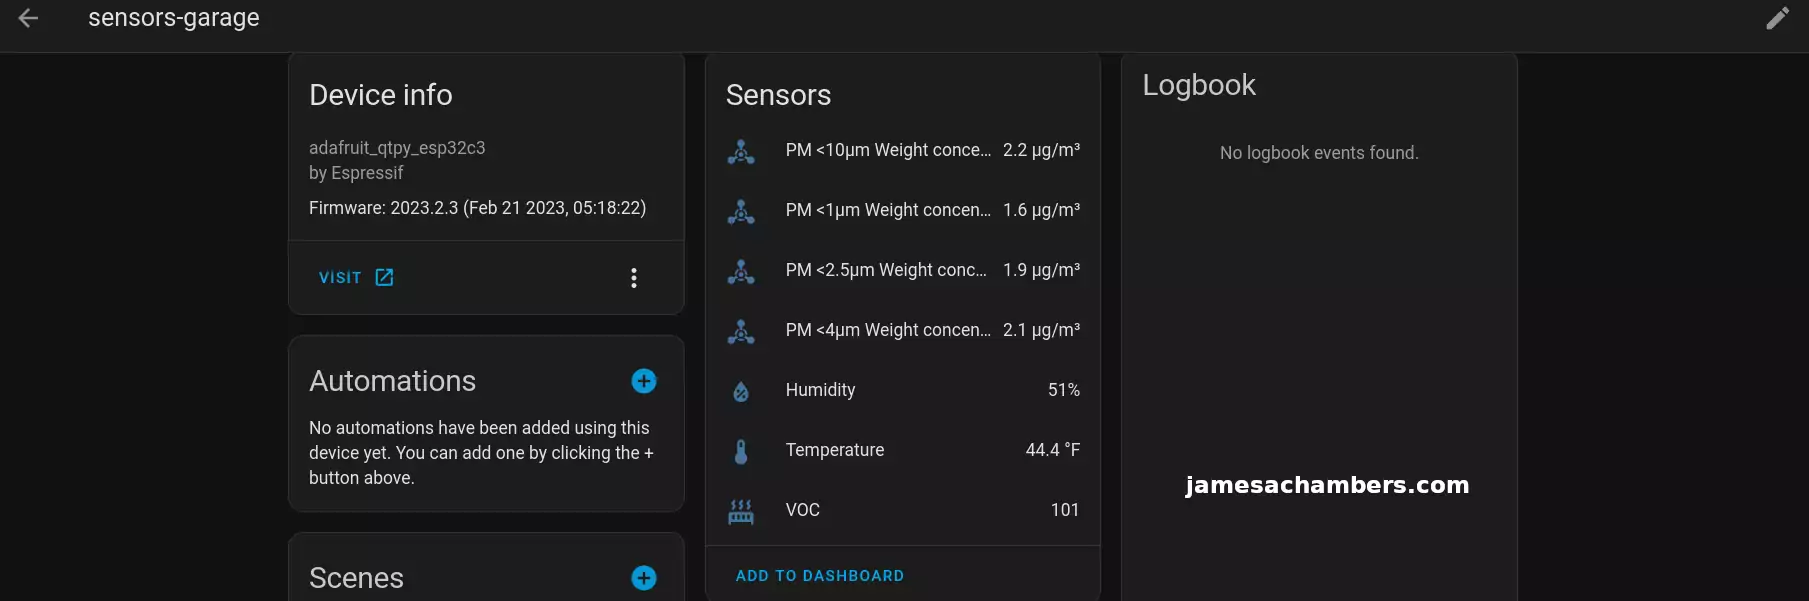
Configured Result
Now you should have a new entity within Home Assistant that looks like this:
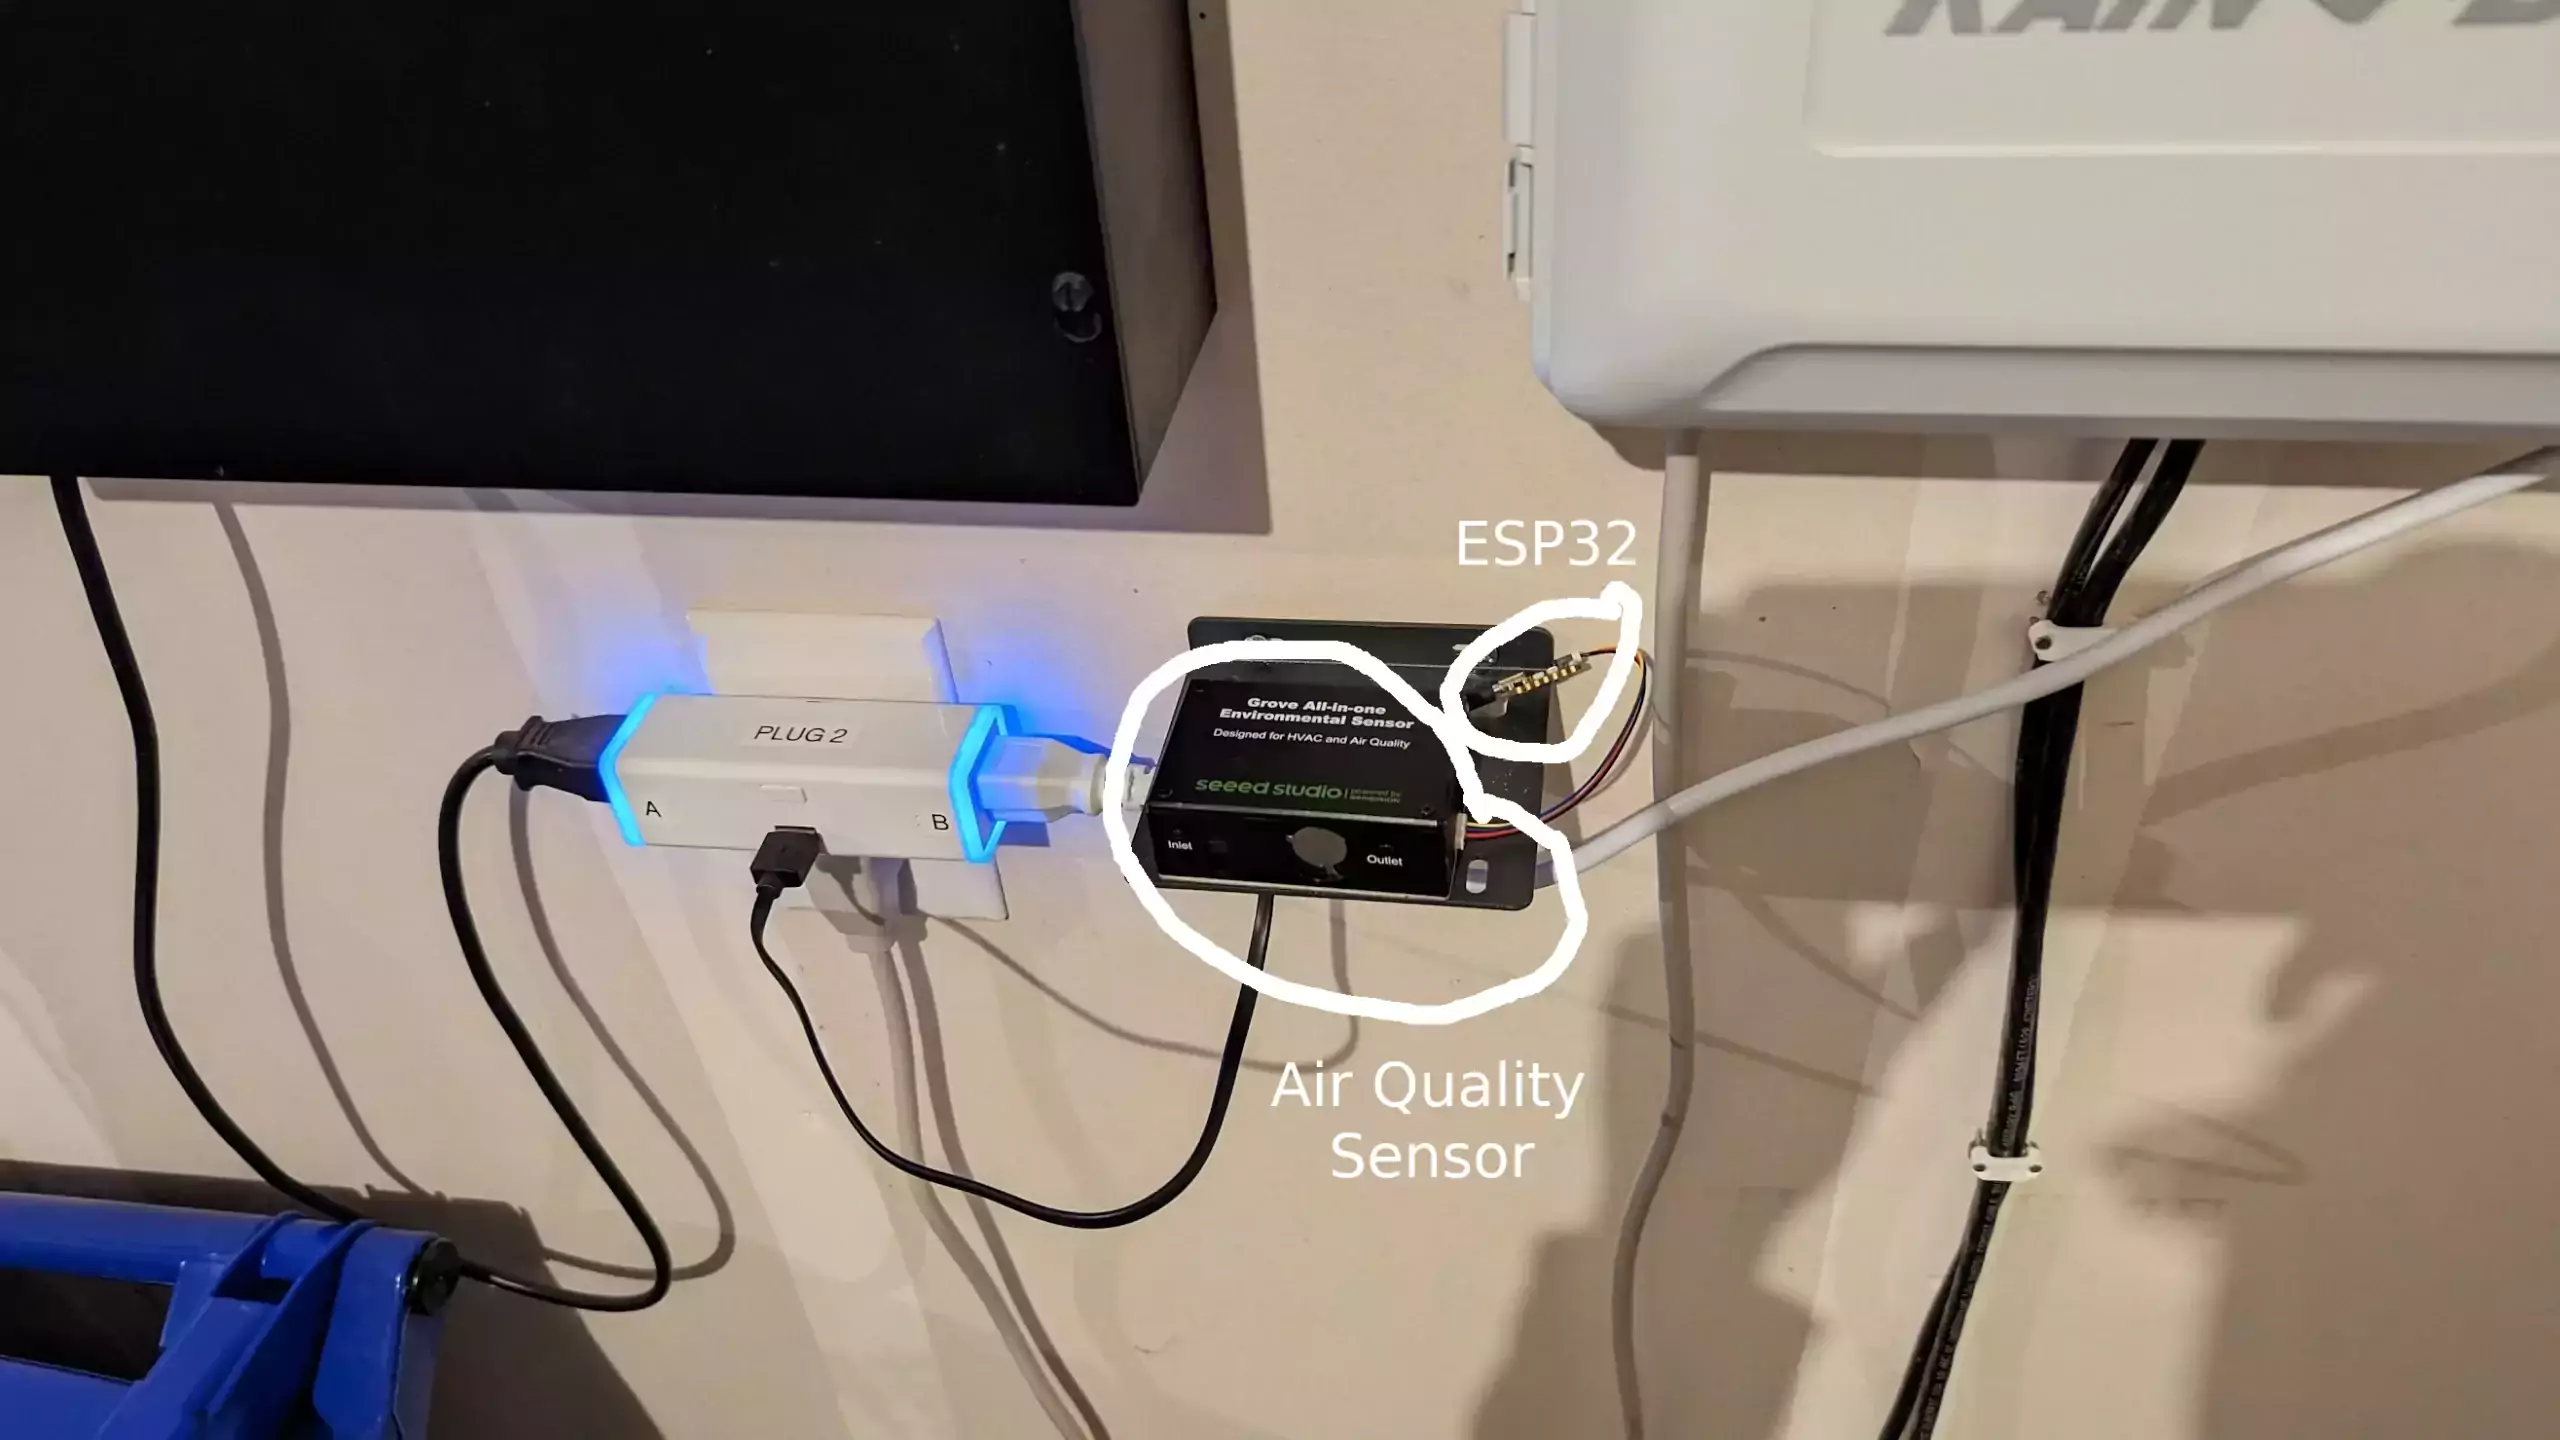
I put them in my garage here:
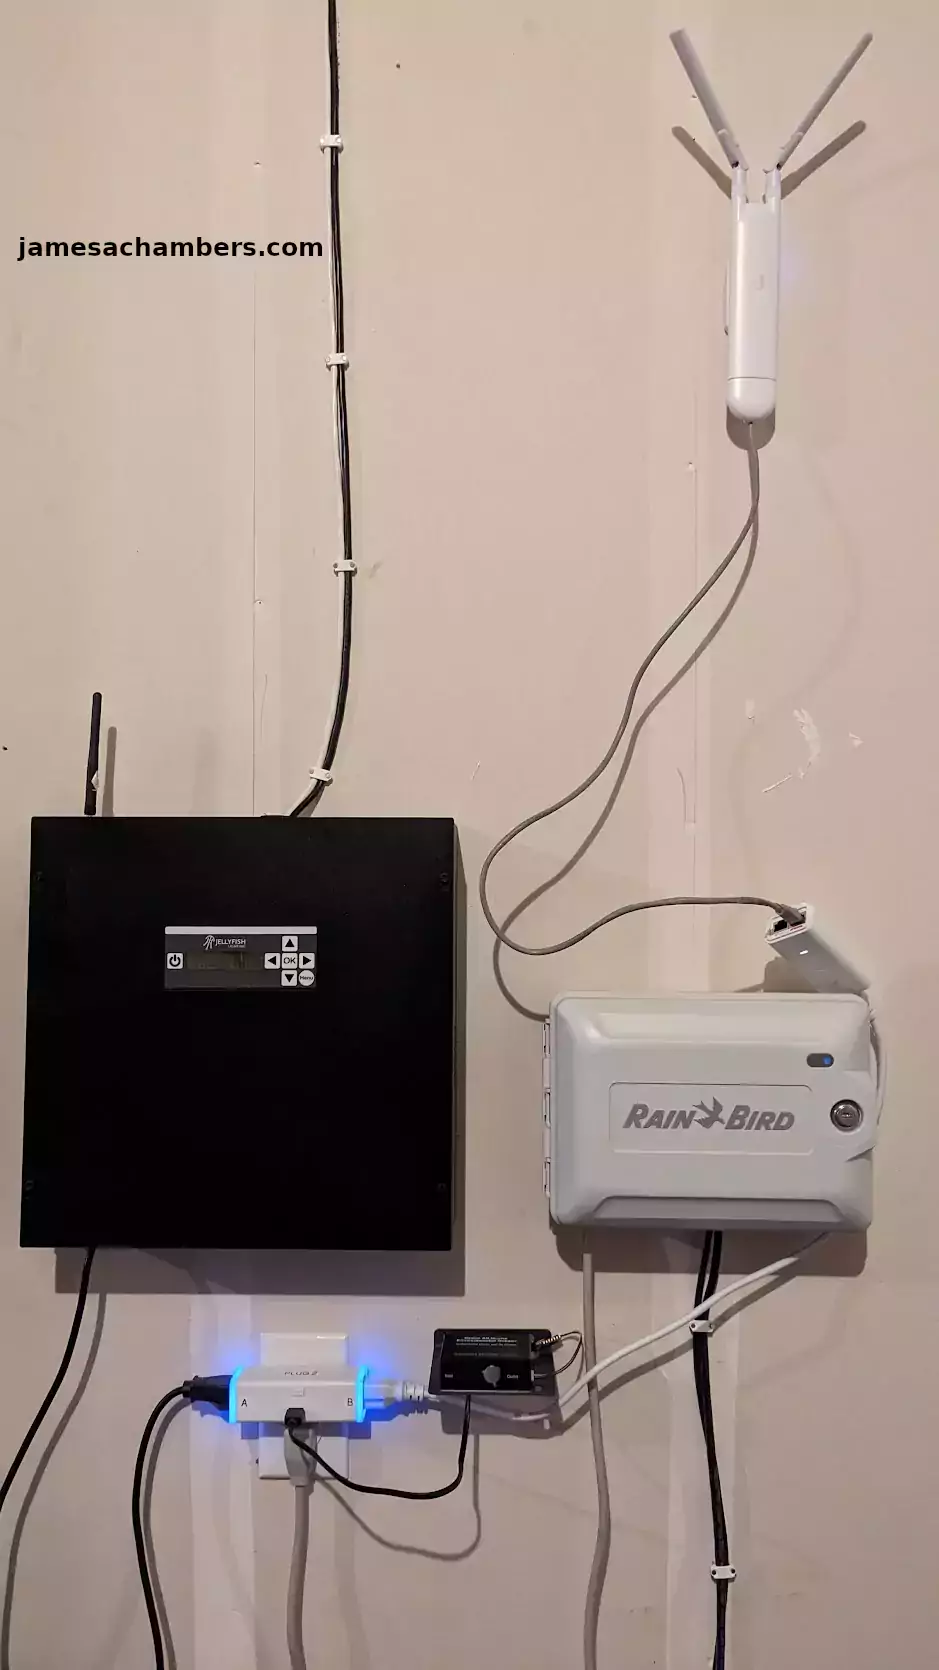
You can see I put a little mount for the sensor unit to sit on and faced the inlet and outlets away from the wall. This is so I’m getting good airflow and accurate readings.
The other equipment in the picture is my whole house outdoor RGB lighting as well as my sprinkler box. The plug is a Z-Wave enabled smart plug with power monitoring features.
Conclusion
This is the design I will be using for all of my environmental sensors from now on. Although the soldering isn’t a big deal for me now that I have the Pinecil there’s no question that plug-and-play is a much nicer way to work with these. You also save money by not having to buy the expansion board.
This will be a much easier way to get started with these as a beginner. If you already have Home Assistant (and bonus points for already having ESPHome) everything will be configured within there. Even the flashing is done by ESPHome within Home Assistant. It really is as easy as I’ve made it look here.
I highly recommend the open source hardware and software solution for sensors. You don’t need proprietary units for these to have to avoid soldering. There are good ways to do this using a cheap <$10 ESP32 module without making any compromises!
Other Resources
You can see my old guide using a Seeed XAIO chip + expansion board to accomplish the same thing here
I’ve also covered using Z-Wave door and window sensors within Home Assistant here


What exactly is the seeedstudio enclosure adding to the SEN55 sensor? Have you had a chance to crack it open and see what’s inside? Looks like seeedstudio is selling their enclosed version for $55 but the sensor itself can be bought for significantly less at ~$21 and it already has a 5 pin output that can probably be connected to an ESP32 easily.
Hey Brandon,
Most of these units (not just the Seeed version) are enclosed with a built-in fan. It periodically runs a self clean as well. The reason they’re usually enclosed is that these are meant to be used in things like HVAC and other places where it won’t be easy to clean the unit and sensors. The self-clean function along with the enclosure helps install these for long periods of time.
Depending on how you’re going to use it an open version with just the sensors would probably be just fine. The enclosed version is actually a system though (including the self-cleaning and fan unit). Without that system you’ll have to keep it clean but depending on how you’re using it that may be easy or hard.
Hopefully that helps!
Thank you for sharing this! i keep running into issue:
[23:06:10][W][wifi_esp32:504]: Event: Disconnected ssid='chowchow' bssid=[redacted] reason='Auth Expired'[23:06:10][W][wifi:588]: Error while connecting to network.
[23:06:10][W][wifi:624]: Restarting WiFi adapter...
is there a way to fix it?
Thank you!
Hey John,
The most common cause of this is that the WiFi signal is too low. Can you try moving it right by your WiFi router as a test? I’m guessing the error will go away if it’s closer to the WiFi access point. They don’t have a very strong range compared to like your phone or a laptop I’ve found generally.
Hopefully that helps!
That works! thank you so much!! now after i clicked configure, nothing shows up in my devices tab. only ESPHome shows up with one device (adafruit_qtpy_esp32c3) even with my sensor connected. it did not ask me to put encryption key at all. where should i add it?
Thank you so much! got everything to work!! please ignore my previous question. I got the wifi to work and had all the sensors show up when it is connected to my Raspberry pi, but after i disconnect it from the pie and plug it into a wall plug, it won’t connect to the wifi anymore. What should I do?
Hey John,
Excellent, I’m glad you got it working, enjoy and take care!
Hi James, sorry actually for some reason during installation, it stucks at a point: INFO Starting log output from /dev/ttyACM0 with baud rate 115200
[22:43:52]I (147) esp_image: segment 1: paddr=0002ffd0 vaddr=3fc90400 size=00048h ( 72) load[22:43:52]I (147) esp_image: segment 2: paddr=00030020 vaddr=42000020 size=8f658h (587352) map
[22:43:52]I (246) esp_image: segment 3: paddr=000bf680 vaddr=3fc90448 size=02b04h ( 11012) load
[22:43:52]I (249) esp_image: segment 4: paddr=000c218c vaddr=40380000 size=10260h ( 66144) load
[22:43:52]I (269) boot: Loaded app from partition at offset 0x10000
[22:43:52]I (307) boot: Set actual ota_seq=1 in otadata[0]
[22:43:52]I (307) boot: Disabling RNG early entropy source...
[22:43:52]I (318) cpu_start: Pro cpu up.
[22:43:52]I (327) cpu_start: Pro cpu start user code
[22:43:52]I (327) cpu_start: cpu freq: 160000000
[22:43:52]I (327) cpu_start: Application information:
[22:43:52]I (329) cpu_start: Project name: sensors-garage
[22:43:52]I (335) cpu_start: App version: 2023.7.0
[22:43:52]I (340) cpu_start: Compile time: Jul 27 2023 22:33:48
[22:43:52]I (346) cpu_start: ELF file SHA256: ade1211c73b9313b...
[22:43:52]I (352) cpu_start: ESP-IDF: 4.4.4
[22:43:52]I (357) heap_init: Initializing. RAM available for dynamic allocation:
[22:43:52]I (364) heap_init: At 3FC96EC0 len 00045850 (278 KiB): DRAM
[22:43:52]I (370) heap_init: At 3FCDC710 len 00002950 (10 KiB): STACK/DRAM
[22:43:52]I (377) heap_init: At 50000020 len 00001FE0 (7 KiB): RTCRAM
[22:43:52]I (384) spi_flash: detected chip: generic
[22:43:52]I (388) spi_flash: flash io: dio
[22:43:52]I (392) sleep: Configure to isolate all GPIO pins in sleep state
[22:43:52]I (399) sleep: Enable automatic switching of GPIO sleep configuration
[22:43:52]I (406) cpu_start: Starting scheduler.
nothing goes after starting scheduler
Hey John,
Which ESP board are you using? That would definitely be where the issue is. It may require some special parameters for this board to work with it. I could probably even find them if you tell me what the board is as I would just google that board and problems with ESPHome and I bet it wouldn’t take long to find!
Hi James,
i’m using Adafruit QT Py ESP32-C3. it seems to work when i replace the framework from type: esp-idf to type: arduino. However, I’m stuck connecting to the wifi again, even though the board is right next to the router. it will not connect.
Hey John,
Great experimenting. I’ve switched between the two before as well depending on what was working best with my board.
I seem to vaguely remember having this problem with Arduino. Can you try opening the debug console on it and see if it connects after that? You can try this connected via the PC or wirelessly. I think I had to use esp-idf to get past that bug but when I would open the serial console it would suddenly wake up and connect to the WiFi.
Thank you, James! Would you mind advising on opening debug console? is this the right code? logger:
baud_rate: 115200
much appreciate it!
Hey John,
No problem! If you go into ESPHome there’s a “LOGS” button for each device. If you click that it will give you a few ways to connect to it. Try it both with USB (plug into your computer) and wirelessly and see what output you’re getting.
Hopefully that helps!
the wifi won’t connect. so it just still stuck at starting scheduler…Hard resetting via RTS pin…
INFO Successfully uploaded program.INFO Starting log output from /dev/ttyACM0 with baud rate 115200
[22:47:41]I (110) boot_comm: chip revision: 4, min. application chiI (147) esp_image: segment 1: paddr=0003002c vaddr=3fc90400 size=02b4ch ( 11084) load
[22:47:41]I (149) esp_image: segment 2: paddr=00032b80 vaddr=40380000 size=0d498h ( 54424) load
[22:47:41]I (163) esp_image: segment 3: paddr=00040020 vaddr=42000020 size=8f684h (587396) map
[22:47:41]I (257) esp_image: segment 4: paddr=000cf6ac vaddr=4038d498 size=02dc8h ( 11720) load
[22:47:41]I (264) boot: Loaded app from partition at offset 0x10000
[22:47:41]I (302) boot: Set actual ota_seq=1 in otadata[0]
[22:47:41]I (302) boot: Disabling RNG early entropy source...
[22:47:41]I (313) cpu_start: Pro cpu up.
[22:47:41]I (321) cpu_start: Pro cpu start user code
[22:47:41]I (322) cpu_start: cpu freq: 160000000
[22:47:41]I (322) cpu_start: Application information:
[22:47:41]I (324) cpu_start: Project name: sensors-garage
[22:47:41]I (330) cpu_start: App version: 2023.7.1
[22:47:41]I (335) cpu_start: Compile time: Aug 2 2023 22:44:06
[22:47:41]I (341) cpu_start: ELF file SHA256: ef21c703395bf60c...
[22:47:41]I (347) cpu_start: ESP-IDF: 4.4.4
[22:47:41]I (352) heap_init: Initializing. RAM available for dynamic allocation:
[22:47:41]I (359) heap_init: At 3FC96EC0 len 00045850 (278 KiB): DRAM
[22:47:41]I (365) heap_init: At 3FCDC710 len 00002950 (10 KiB): STACK/DRAM
[22:47:41]I (372) heap_init: At 50000020 len 00001FE0 (7 KiB): RTCRAM
[22:47:41]I (379) spi_flash: detected chip: generic
[22:47:41]I (383) spi_flash: flash io: dio
[22:47:41]I (387) sleep: Configure to isolate all GPIO pins in sleep state
[22:47:41]I (394) sleep: Enable automatic switching of GPIO sleep configuration
[22:47:41]I (401) cpu_start: Starting scheduler.
Update: i’m able to get it online by adding output_power: 8.5
however, it seems like the code does not run automatically.– i have to plug it into a computer or my pi, and manually choose “log” to trigger the start. is there a command like “run” that i can add to the end of the code to make it run automatically when i just connect it to a wall plug?
Hey John,
It’s because you are using arduino instead of esp-idf. Mine does the exact same thing if I use arduino. The “log” just gets it to start in arduino mode. It’s a bug that sounds like it still exists. Can you get it working with esp-idf using the output power?
it wont process using esp-idf unfortunately. it stuck at ” cpu_start: Starting scheduler.” what would cause this problem?
Hey John,
That’s a great question! Here’s my exact config that is live right now:
esphome:name: sensors-garage
platformio_options:
board_build.flash_mode: dio
friendly_name: sensors-garage
esp32:
board: adafruit_qtpy_esp32c3
variant: esp32c3
framework:
type: esp-idf
# Enable logging
logger:
# Enable Home Assistant API
api:
encryption:
key: "xxx"
ota:
password: "xxx"
wifi:
ssid: !secret wifi_ssid
password: !secret wifi_password
domain: .jamesachambers.net
power_save_mode: none
manual_ip:
static_ip: 192.168.4.61
gateway: 192.168.1.1
subnet: 255.255.0.0
dns1: 192.168.1.1
dns2: 8.8.8.8
i2c:
sda: 5
scl: 6
sensor:
- platform: sen5x
id: sen54
pm_1_0:
name: " PM <1µm Weight concentration"
id: pm_1_0
accuracy_decimals: 1
pm_2_5:
name: " PM <2.5µm Weight concentration"
id: pm_2_5
accuracy_decimals: 1
pm_4_0:
name: " PM <4µm Weight concentration"
id: pm_4_0
accuracy_decimals: 1
pm_10_0:
name: " PM <10µm Weight concentration"
id: pm_10_0
accuracy_decimals: 1
temperature:
name: "Temperature"
accuracy_decimals: 1
humidity:
name: "Humidity"
accuracy_decimals: 0
voc:
name: "VOC"
algorithm_tuning:
index_offset: 100
learning_time_offset_hours: 12
learning_time_gain_hours: 12
gating_max_duration_minutes: 180
std_initial: 50
gain_factor: 230
temperature_compensation:
offset: 0
normalized_offset_slope: 0
time_constant: 0
acceleration_mode: low
store_baseline: true
address: 0x69
update_interval: 10s
This is on my XAIO C3 (the one showing in the picture) and has been working since I wrote the article without issue. For my one using the Adafruit ESP32-C3:
esphome:name: sensors-office
platformio_options:
board_build.flash_mode: dio
friendly_name: sensors-office
esp32:
board: seeed_xiao_esp32c3
variant: esp32c3
framework:
type: esp-idf
# Enable logging
logger:
# Enable Home Assistant API
api:
encryption:
key: "XXX"
ota:
password: "XXX"
wifi:
ssid: !secret wifi_ssid
password: !secret wifi_password
domain: .jamesachambers.net
power_save_mode: none
manual_ip:
static_ip: 192.168.4.58
gateway: 192.168.1.1
subnet: 255.255.0.0
dns1: 192.168.1.1
dns2: 8.8.8.8
i2c:
sda: 6
scl: 7
sensor:
- platform: sen5x
id: sen54
pm_1_0:
name: " PM <1µm Weight concentration"
id: pm_1_0
accuracy_decimals: 1
pm_2_5:
name: " PM <2.5µm Weight concentration"
id: pm_2_5
accuracy_decimals: 1
pm_4_0:
name: " PM <4µm Weight concentration"
id: pm_4_0
accuracy_decimals: 1
pm_10_0:
name: " PM <10µm Weight concentration"
id: pm_10_0
accuracy_decimals: 1
temperature:
name: "Temperature"
accuracy_decimals: 1
humidity:
name: "Humidity"
accuracy_decimals: 0
voc:
name: "VOC"
algorithm_tuning:
index_offset: 100
learning_time_offset_hours: 12
learning_time_gain_hours: 12
gating_max_duration_minutes: 180
std_initial: 50
gain_factor: 230
temperature_compensation:
offset: 0
normalized_offset_slope: 0
time_constant: 0
acceleration_mode: low
store_baseline: true
address: 0x69
update_interval: 10s
I guess I should ask if you are using the XAIO, the Adafruit ESP32-C3, or a different one entirely. If it's neither of those then there might be a different line we can use in board such as "board: seeed_xiao_esp32c3". That would probably get it if that is the case.
Hopefully that helps!
Thank you so much for the details. I do have one from adafruit and used the one board name. i do see this message:
esphome 2023.7.1 requires click==8.1.3, but you have click 8.1.6 which is incompatible.esphome 2023.7.1 requires pyparsing>=3.0, but you have pyparsing 2.3.1 which is incompatible.
how should i address these issues? maybe this is what causing the scheduler problem?
Hey John,
Beautiful, thanks for sharing those, I think we’re much closer now. It looks like this is a bug impacting a ton of people. Check out this megathread here on GitHub about it.
According to the last post it’s fixed in 2023.8.0b1. They’re forcing it on their command line and are able to fix it now but it sounds like this will be fixed really soon as this beta release makes its way through the channels.
It may be worth trying some of the things in that post though if you wanted to get it going right away!
I am on a later Version and still have the bug. Do you have an Idea how I could it get to work?
I just got the new IKEA
that includes the SEN54 sensor combined with a nice display and Zigbee, over Zigbee it only reports PM 2.5 temp and humidity but it’s really easy to add a ESP32 or ESP8266 inside and use ESPHome + the display keeps working 🙂
The Ikea vindstyrka is €40,- here in The Netherlands
Hey maarten,
That unit actually looks really nice! It looks like eInk with the backlight on but it’s also right on the edge of being a fake LCD that is meant to look like it’s eInk but totally isn’t. It looks like those 3 colors (for the air quality of red, yellow and green) are printed on there and not eInk so it’s definitely not a color eInk. A lot of the DIY builds that look similar to this do use eInk and it’s a great technology for this. Uses very little power!
My guess is this unit isn’t real eInk though. If it was they would say so and I can’t find the words eInk anywhere on the IKEA site (in English either). It probably also wouldn’t be this price but someone as big as IKEA might be able to do it with a real eInk display if they wanted to. Undoubtedly they’d mention/brag about it if they pulled this off though instead of not mention the screen type anywhere. There’s also a lot of whitespace on the screen that isn’t used which would be a very expensive way to use a eInk screen. Typically they’d be more compact and more information dense as eInk is not cheap (still).
They really tried to make it look like the DIY ones people have done but an eInk screen that big for DIY would cost a ton. Those are like $20-30 for one not even as big as this unit seems to be using. They designed it to look just like DIY e-ink models though (the very ones that no doubt inspired this product and there’s similar ones done with Raspberry Pis years ago but that hasn’t made sense to do for a long time due to availability).
I love the idea of putting your own ESP32 inside of it. That was going to be my main issue with it is that there’s a million devices like this that are super cheap that are meant purely to lock you into an ecosystem / their cloud services and apps.
In other words most of the companies give these away at cost if it locks you into some kind of subscription or cloud service where they can harvest all of your data. There’s definitely no shortage of sensor solutions meant to lock you into cloud ecosystems or hardware ecosystems and they’ll usually be cheaper than DIY because they make their money later off subscription services / selling your data. Your data (especially over a long period of time) is way more valuable than them marking up these sensor units $10-$20. They’ll sell them to you for pretty much what they cost to make I would say most of the time. This is a well understood and successful business model (and very bad for the consumer).
This IKEA one is definitely one meant to harvest your data / lock you into an ecosystem:
By connecting this product to DIRIGERA hub, you can see the air quality in the IKEA Home smart app. We make continuous updates so that the sensor and the app only get better and better over time.Yep, that’s exactly how this works. The app data collection and building their ecosystem is why they’re packaging Sensirion sensors like this that cheap and selling them. They can buy the sensor units in bulk so they get cheaper prices than any DIY build can and then they undercut it and sell the hardware for virtually no profit as the way they make money off these is always cloud services / other ecosystem packaged products / data collection via apps.
I know there are better/more data protection laws over there in Europe but if they were strong enough to prevent them from making money from this kind of arrangement somehow (or if the companies are really even following all the laws which I’m sure a lot of them don’t especially depending on what part of the world they are operating in) this product simply wouldn’t be offered there for that price. It’s about $50 US from the US version of the web site so it’s pretty similarly priced here for sure.
Maybe for this company it’s all about locking you into their hardware rather than data collection but whichever it is (or both to what degree) they simply are not making money selling you the product for this price directly. We know how much the sensors cost and they aren’t too much cheaper than this product is being sold for even when purchased in bulk (although that certainly helps a lot). When you add the screen (even though it’s not eInk) and all of the other components to make this work there’s simply no profit there. The money they are making / want to be making is coming from the app / services / ecosystem for sure.
Modifying that unit with your own ESP32 + ESPHome is an incredible idea. That will make it really cheap overall while giving you control over the source code instead of becoming *their* product (in the form of the data collected about you or you having to buy other products in their ecosystem with much fatter profit margins like hubs). I’m sure the company that makes this *hates* the idea of people doing this as they would not be selling it for this price if they weren’t making the calculation they’re going to harvest your data via the app and device and sell it for years to come or charge you a whole lot more for other devices to make everything work that won’t work with any other ecosystem’s devices.
You’re basically cheating the system here. You’re taking their hardware they are giving away for no profit and then skipping out on participating in their app / ecosystem (which is how they make their money) by using a ESP32 module to power it instead using open-source software such as ESPHome. I do not feel sorry for them at all though because I despise the business practices surrounding hardware lock-in ecosystems and data harvesting. Very awesome option, thanks for sharing!
Thanks for sharing another informative guide and I swear each time you do one of these guides I’m left googling for new products to research and seeing your lighting and sprinkler setup has me super envious so great work!
You’ve done a wonderful job show casing different ways to run environmental sensors using Home Assistant and it still amazes me to see such advanced sensors being run by a tiny ESP32-C3 microcontroller that uses very little power and packs onboard wireless/bluetooth.
Its encouraging to see Espressif deciding to use RISC-V technology moving forward and the newly announced C6 and P4 chips look highly promising with hopes of seeing them used in these tiny sized boards for more tasking projects in the future but in the interim the XIAO and Adafruit offerings do perfectly fine and for the price you can’t go wrong adding them to your projects.
Thanks again for the detailed and inspiring guides as I’m sure to dedicate some spare time over the coming weekend to make a start on my HA setup and you’ve convinced me to try this example for my garage as its really easy and that way I can use the expansion boards for other projects around the home… Take care!
Hey Razor Burn,
Thanks so much, I definitely need to cover all of these things on the site! I definitely need to cover the whole-house lighting and the sprinkler system as well. That’s probably stuff I should cover this year when the weather warms up!
The C3 has been great, I can’t wait to get my hands on some of the newer versions coming out! I actually snagged two of the Adafruit ESP32-S3 Reverse TFT Feathers. I subscribed to restock notifications and I got the email yesterday. I ordered 2. When I went back an hour or two later they were completely gone again. I’ll definitely cover these when I get them. I wish it was the RISC-V version but it’s still a really cool board!
It looks like XAIO is launching some new products as well. I just got an email this morning that they dropped the price of the XAIO-ESP32-C5 down to $4.99. Yes, it’s only $5 now. That is a drop of 50% so I wonder what is behind that. It could be either that they aren’t selling as well as they’d like *or* they have a whole bunch of these and they know the newer models are going to start coming out. It’s probably the latter.
Thanks so much for your comments as always, I can’t wait to hear how it goes when you start getting it going! If you run into any trouble don’t hesitate to come leave me a comment on the most relevant article and I’d definitely help the best I can!
One interesting thing
I was too slow to jump on the Adafruit ESP32-S3 Reverse TFT Feather as the email notification said 97 available boards so I left it a few hours, had a check and saw they all sold out so I’ll need to be quicker next time. I may wait for stock to arrive with local vendors as its quite expensive shipping to Australia from the US and I’m still waiting on my earlier order to arrive after a few weeks stuck in transit.
It pays to do a bulk order yet I’ve noticed the popular items sellout quickly and have been caught out myself rushing an order only to see something I wanted restock but thankfully they do a fabulous job keeping inventory regular and they’re transparent if an item won’t be available due to component shortages or replaced with a newer version which is great to see.
Adafruit do sell a mid sized ESP32-C3 Dev board however I much prefer the microcontrollers for projects and have amassed a nice collection of XIAO and Adafruit QT PY boards using different chips and will certainly grab any new versions as they’re fairly cheap with the conversion rate and such a joy to use. Hopefully the discounted pricing flows its way to Australia as I’d happily grab a few more C3 boards for sensors and hope you’re correct about a possible upgrade with a newer chip yet my understanding is the C6 and P4 are still under going development so far off consumer use unless there’s another chip they’re targeting as the S2 and S3 feel old for todays standards…?
I look forward to seeing your review of the Reverse TFT Feather as judging by the feedback from users/testers they did a great job having the display on the back as its cleaner and makes for better mounting in projects. Until then take care good sir!
Hey Razor Burn,
Yes the restocking is really nice. That’s one of the great things about Adafruit since they make the PCB and do all of the assembly there. As long as they have the necessary components on hand they can literally just make more of them (like on-site). Here’s a fairly recent video of their manufacturing line that I thought was pretty cool. They’re definitely the real deal.
So as far as the C6 goes Adafruit does have some C6 RISC-V modules already but they give the exact same warning about it still being in development:
Please note: There is minimal support for this dev board. For example, as of the time of this writing, there is no Arduino or CircuitPython support - only ESP IDF! Please purchase if you're doing development with the C6, and OK with stuff not working 100% out of the box.I’m also too spoiled from QT Pys and XAIO modules to accept a nasty looking module like that although I believe that is the pretty standard development board form factor. One of the exciting things about the C6 is the Zigbee support making it a lot more viable for things I’ve been using Z-Wave accessories for. If these had been widely available and stable I may have had some other options for some of my more recent builds that WiFi wasn’t suitable for. They also bump the flash up to 8MB and the WiFi version to 6.
They are definitely still in development but you can buy them now. It just sounds like the libraries are still in development so you’d need to use bleeding edge Arduino versions and all the libraries which definitely can be a pain. The good news though is that technically you can already buy them so it’s mostly just libraries and getting all of the support in place (which means hopefully not too much longer). Once they’re ready I’m sure Adafruit and Seeed will start putting them in modules that are much smaller and more pleasant to use such as the QT Py and XAIO series.
I’ll definitely cover the S3 Reverse Feather when it comes for sure!
Yeah Adafruit have a professional setup and its great seeing the staff proudly showcasing all the neat tech with “Ladyada” being an expert at finding cool components on Digikey for use in their newest devices so normally popular items get restocked fairly quickly which is great for consumers.
I should receive my ESP32-C6 Dev board any day now with the understanding that I won’t be able to do anything with it currently as I have no experience using ESP IDF but Adafruit seem to be the only place selling them and I’m confident we’ll see Arduino IDE and CircuitPython supported soon and when that happens I hope to integrate it into my Home Assistant project as from what I’ve read Zigbee seems to be lower energy and more stable than Z-Wave but that’s a subject I know very little about and why your recent reviews/guides have been so informative and helpful for me.
I see you posted another colourful guide showing off the Adafruit WiFi Action Key and the BFF plug in PCBs are awesome as they transform the tiny MCUs into a functioning button with flashing lights or you can add the microSD Card BFF Add-On for added storage or programming. Really cool stuff that I’d never had thought to try for myself if I hadn’t seen them being used on this blog so thank you for enlightening me with something so simple yet practical!
Hey Razor Burn,
Wow, that’s super exciting! Definitely let me know how this performs when you get it and how hard it is to get it working. It might not be hard at all depending on how close it is to be ready to be their new flagship (at least for the RISC-V versions). It’s definitely a very exciting chip because the 8MB flash brings the storage on par with the other versions and adding Zigbee like I was saying earlier would have given me a whole lot of options for some of my recent non-WiFi sensor builds that I didn’t consider available to me today.
My guess is that judging by Seeed Studios dropping the price of the XAIO-ESP32-C3 down to $4.99 on their web site that this new version is coming very soon to the rest of the boards.
I have used ESP-IDF with some of these. If you look at my YAML on some (like the air quality sensor here) I use ESP-IDF. I’ll explain why too. There’s no NeoPixelBus library for ESP-IDF so on the Home Assistant projects where I need to access and set the NeoPixels I’m still using Arduino at the moment. ESP-IDF works a lot better though on the C3 from my experience. Arduino I have to add a whole bunch of things to try to prevent serial output or they tend to boot loop. I still have to use Arduino on the ones that use the NeoPixel lights though and you’ll notice I have to add a bunch of code (like setting the serial baud rate to 0) for it to work reliably.
I actually prefer it for that reason. As long as I don’t have some kind of dependency on a library only available in Arduino I will use esp-idf like this article does here (even within ESPHome). You’ll definitely find that some things aren’t present in one or the other though as it sounds like you’ve seen some of!
The Adafruit WiFi action key one was a ton of fun! That one also uses arduino instead of esp-idf to use the NeoPixel lights. I added a couple of fixes to it though (and my IoT button code) to make it work more reliably with Arduino. The only issue I notice with Arduino is sometimes if I plug the device directly into a PC I need to hit the “Reset” button before it comes online. This isn’t necessary with esp-idf so if I could figure out a way to use NeoPixelBus in esp-idf (or another library to control the lights) I would actually move *all* of them to esp-idf if I could.
Great thoughts, definitely let me know how the C6 goes when it arrives!