
Recently I’ve been trying to learn more about options to set up my own sensors within the house. What kind of sensors? All of them. I want gas sensors to tell me the indoor/outdoor air quality. I want moisture sensors to tell me the moisture level in my garden. I want to know if all the doors and windows are shut and locked. I’m sure there are dozens of sensors out there I don’t even know about that once I do I will want. I basically want to be able to see a status / reading of everything going on in and around my home easily from a monitoring panel.
I knew I wanted all of these types of sensors but I wasn’t sure how to get started. How will I control them all? How will they connect together? I don’t want apps for every single different sensor. I’ve been doing everything I can around the home to eliminate having so many different systems. I am looking for a system that is cleaner than that to tie everything together. An ecosystem.
That was why when I was going through old Twitter direct messages from Seeed Studio offering to send me a prototyping kit to evaluate sensors from the “Grove” line of sensors I decided to contact them again and see if they were still interested in sending me this. They offered to send me the K1100 sensor prototyping kit and it was exactly what I needed as it contains a full kit including a screen (the Wio terminal). In under 10 minutes you can literally be up and running with either WiFi or LoRa to transmit the sensor data.
Having a sensor prototyping kit was the tool I needed to start seriously breaking into the sensor world and starting to actually build instead of plan. In this guide we’ll cover the Seeed Studios K1100 sensor prototyping kit which gives you everything you need to easily buy and test inexpensive sensors (usually <$10) from the Grove ecosystem.
Let’s get started!
Hardware Used
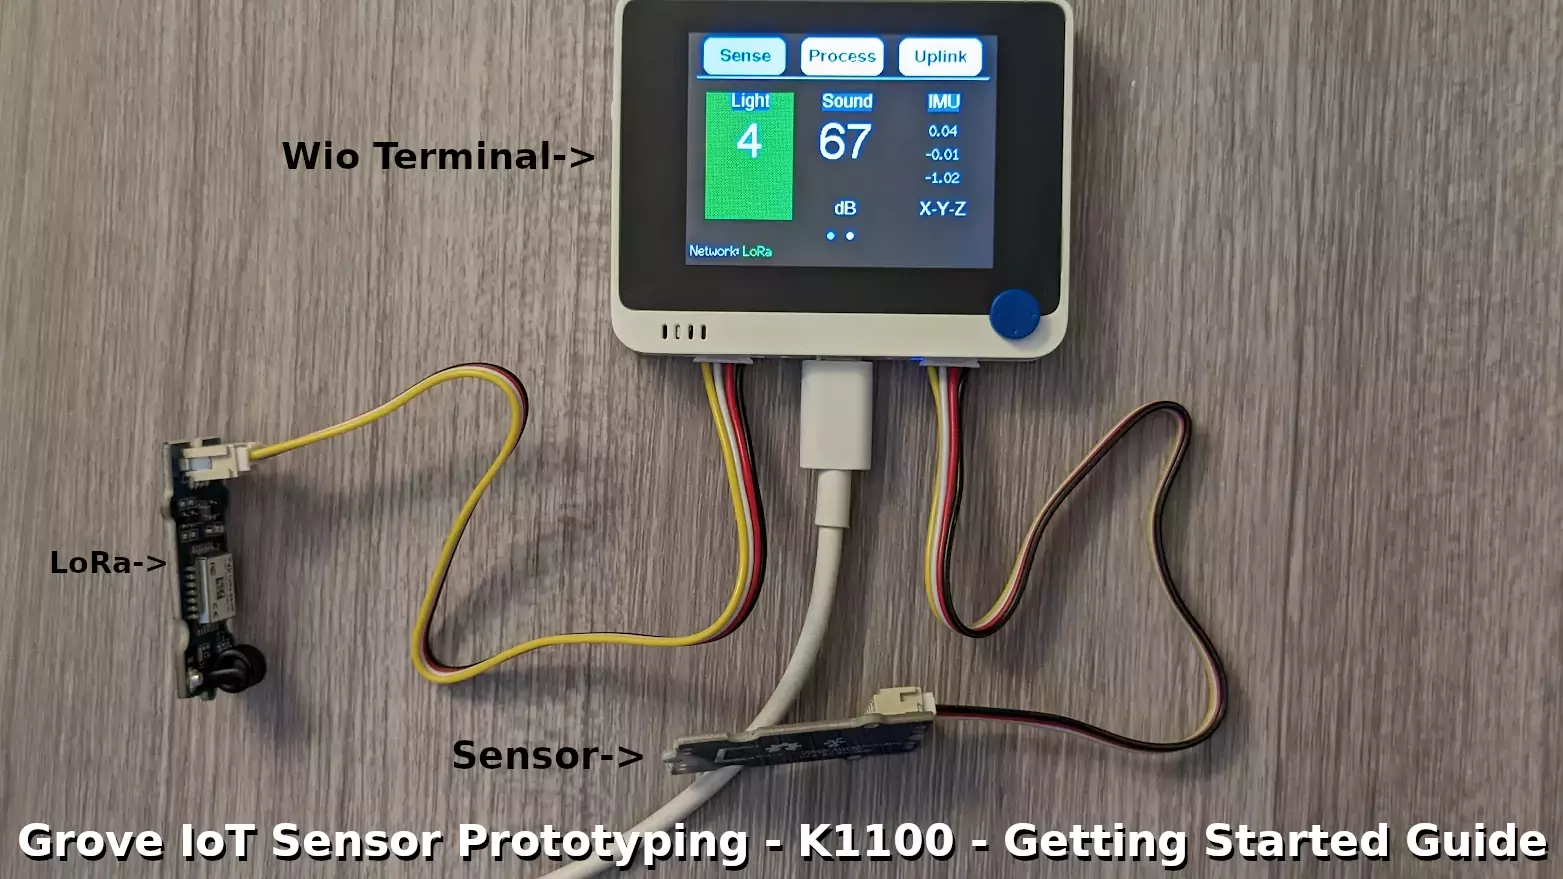
The Seeed Studio SenseCap K1100 kit is a sensor prototyping kit meant for testing and development for over 300 different types of Grove IoT sensors
Links: Amazon.com*, seeedstudio.com (official), Amazon.com.au*, Amazon.co.uk*, Amazon.de*, Amazon.es*, Amazon.fr*, Amazon.it*, Amazon.nl*, Amazon.pl*, Amazon.sg*
Defining Sensor Prototyping
So what is it exactly that makes up a full sensor prototyping kit? Generally you’ll need a display, some sensors and a communication module. The important thing to understand is that basically you are getting a testing kit that you can plug any Grove sensor in immediately start using them (including in the cloud and with LoRa as there is 1 year of data credits included for free with the kit).
This is extremely useful for testing if certain sensors are going to work for the use cases / applications you have in mind. The sensors are for the most part incredibly cheap (and the expensive ones have understandable reasons such as the thermal imaging camera module being $70 due to the cost of thermal imaging sensors). There are literally more than 300 sensor boards out there in the Grove ecosystem with varying capabilities.
This kit makes it easy to plug in any of these sensors and start testing to see if they will be a good fit for the project / use case. I’d consider it an essential development tool for anyone working with sensors. This is essentially a <$100 Grove sensor development kit that will have everything you need to prototype and develop your sensor project.
What’s Included
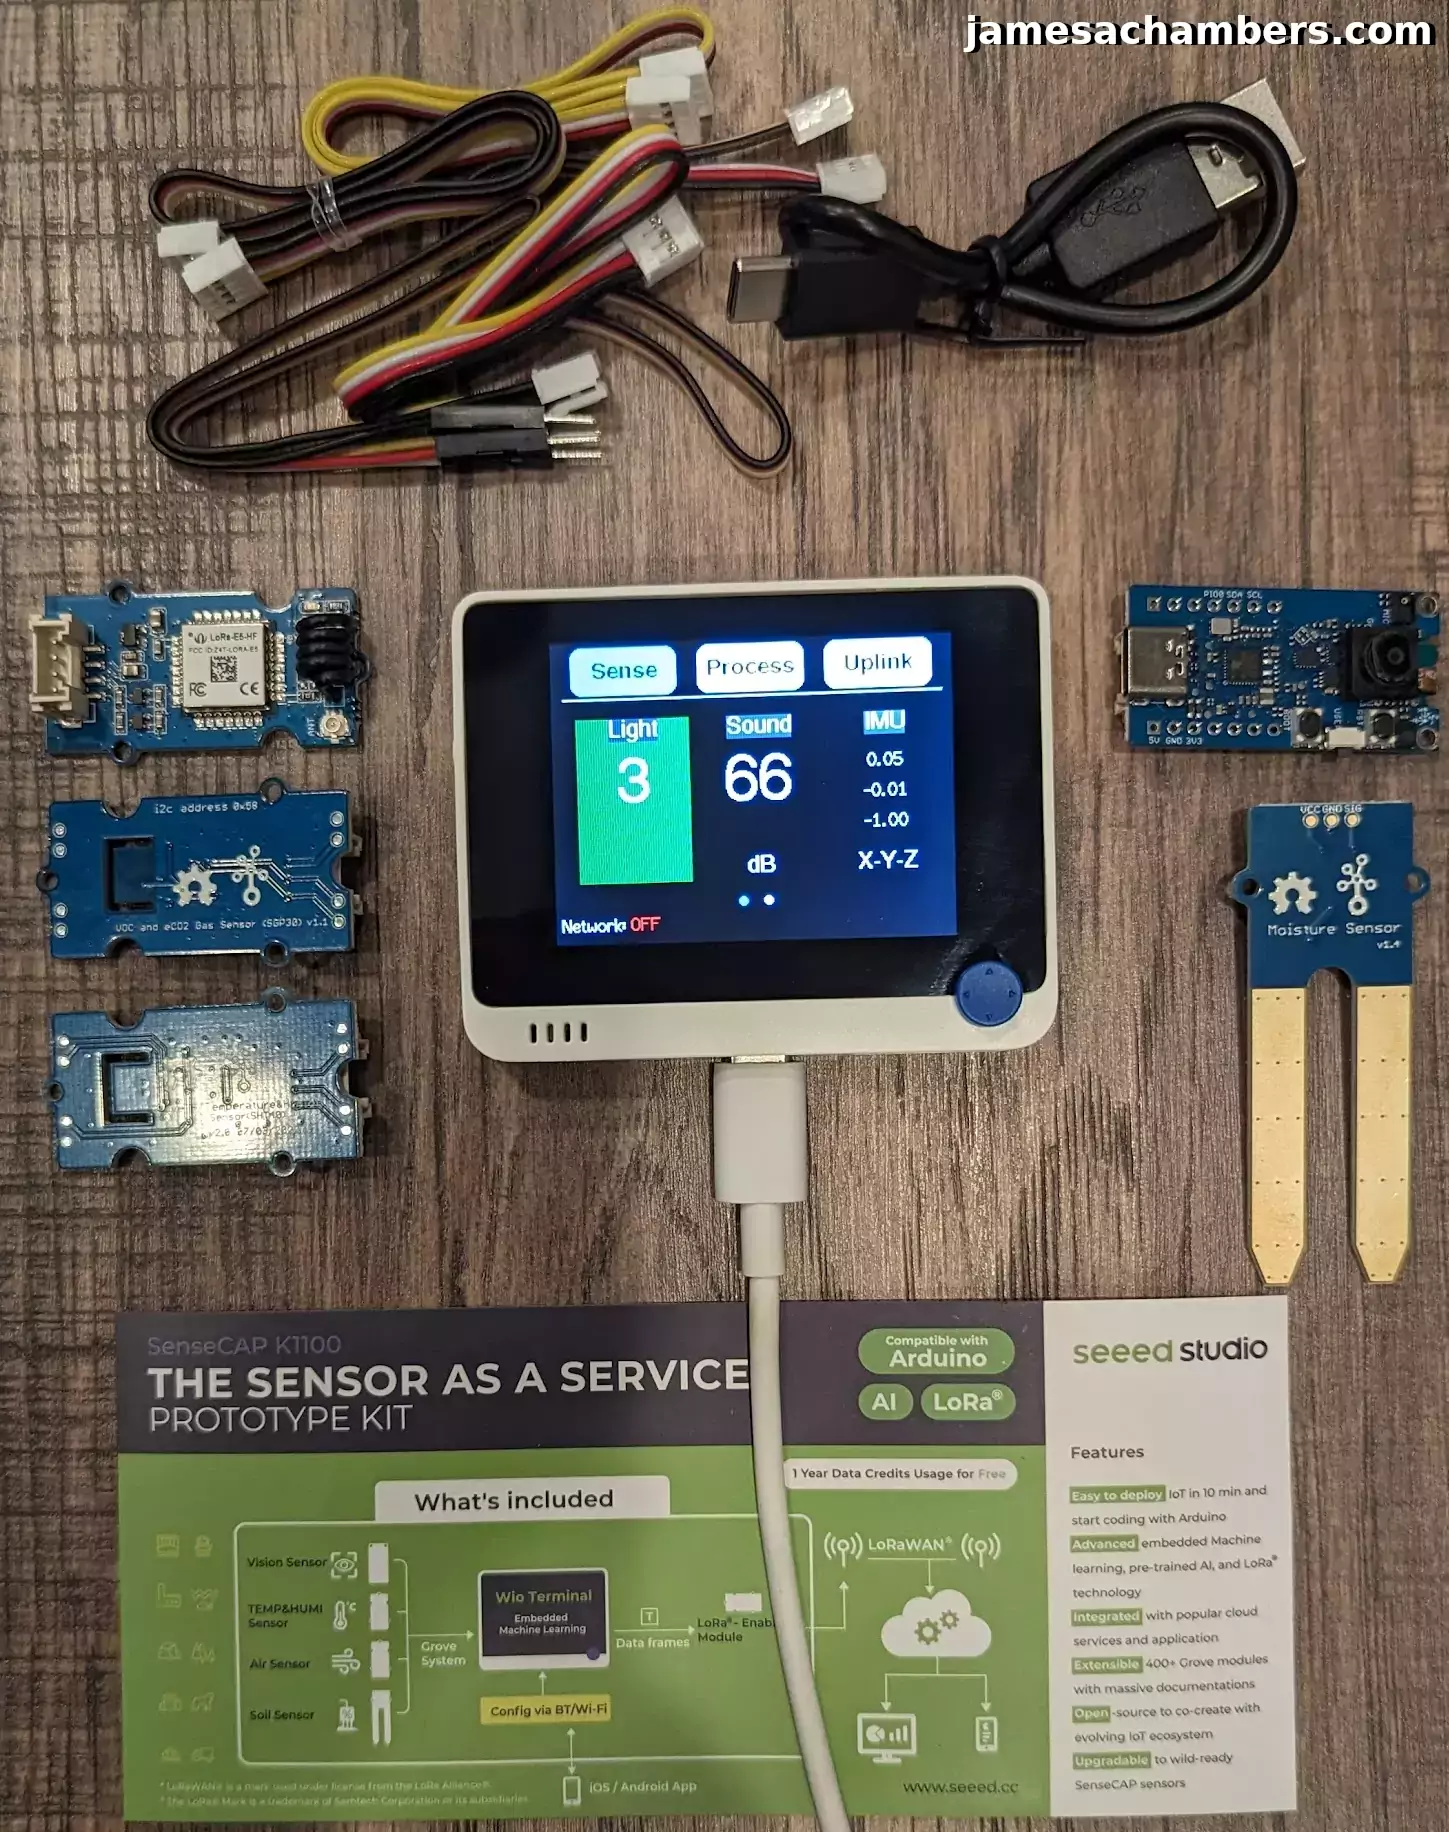
- Wio Terminal
- Grove – Wio-E5
- Grove – VOC and eCO2 Gas Sensor SGP30
- Grove – Soil Moisture Sensor
- Grove – Temp & Humidity Sensor(SHT40)
- Grove – Vision AI Module
- 4x Grove – Cable
- 4x Grove – 4 pin Male Jumper to Grove 4 pin Conversion Cable
- USB Cable – Type C
First Step – Update SenseCraft
The first thing you should do is install the latest version of the SenseCraft application on the device as the Seeed Studio wiki instructions recommend.
First go to the project’s GitHub page here. Make sure you read the download description and get the version that is for the K1100 (0.4.0 at time of writing). There is another version (0.4.1) that is for the K1101 so unless you have the K1101 get the version for the K1100.
Once you’ve downloaded the .uf2 file from the GitHub page it’s time to connect the Wio terminal to your PC with either the provided or your own USB-C cable. Once it’s connected the terminal should power on.
Now we just need to put the Wio terminal into bootloader mode. Once we do this it will show up as just a regular drive on your computer just like any USB flash drive would. To do this we will slide the power button down twice fairly quickly using the side button:
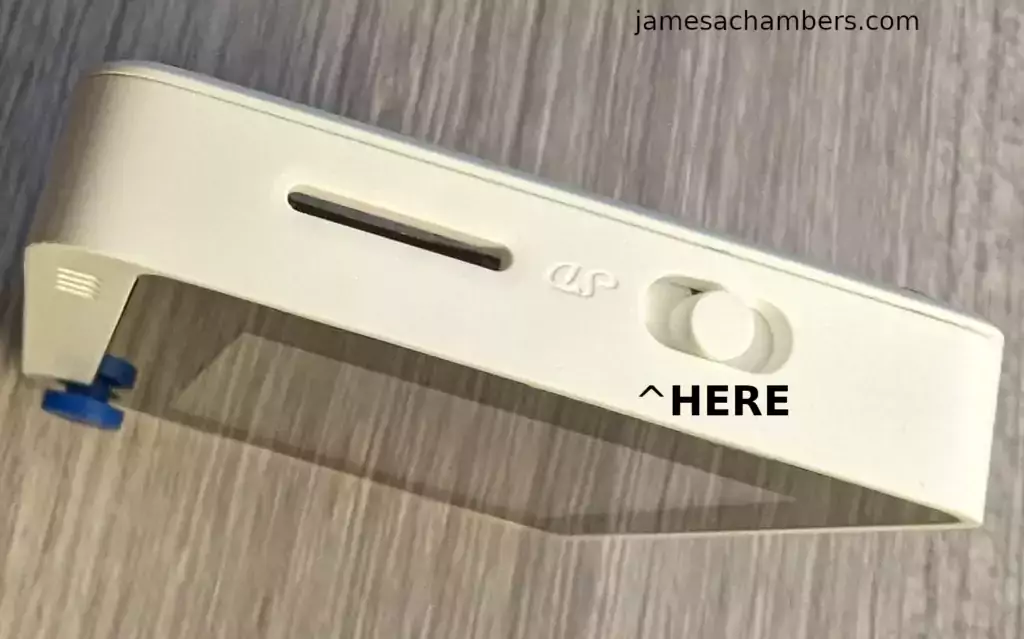
In the above picture the device is actually in the “on” position. You want to slide it toward the SD card port. It will not stay in that position and will slide back the moment you release it.
Simply slide it this way twice really quickly and it will show up as a removable drive in your PC. Now drag and drop the .uf2 file you downloaded earlier into the device’s folder.
Once it’s finished the device will restart running the updated application. Easy!
Networking
You have a couple of choices for networking. The K1100 comes with a year of free data credits for LoRa usage. You may also use WiFi.
The first thing you should do is register for a SenseCap account at Seeed Studio’s official SenseCap page here.
Next get the app. On Android the instructions from Seeed are:
Android: Please click http://sensecap-app-download.seeed.cn and scan QR code.
iOS: Search “SenseCAP” in App Store.
Despite the Android page taking you directly to an apk to download they do appear to have an official app by Seeed in the Android app store (just make sure it says it’s by Seeed). I used the Android store version (has less than 100 downloads so it looks quite new).
Configure LoRa
Configuring the LoRa module is extremely easy. Open up your SenseCap app and choose the “Device” tab from the bottom of the screen. Now click the “+” in the top right of the screen to add a new device.
Your LoRa module has a QR code that you will scan on the back:
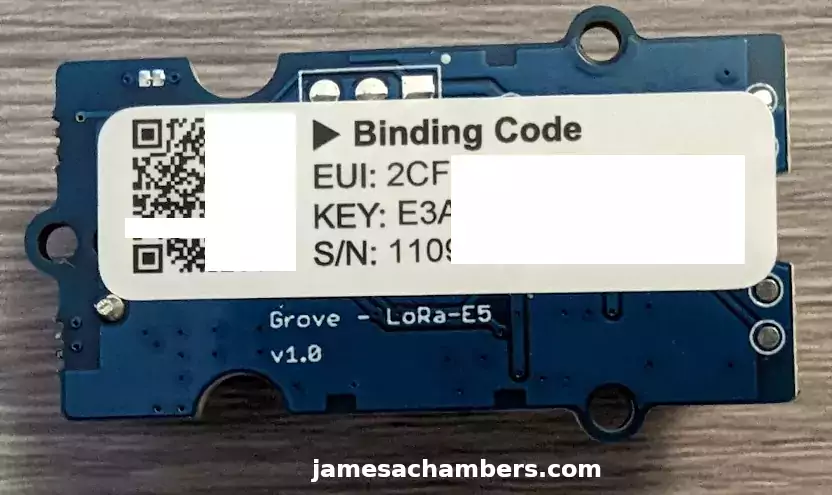
Once you’ve scanned this in it will ask you for a device name and then allow you to save it. That’s it for the LoRa configuration!
You can connect the LoRa module to the left-hand connector on the Wio terminal once this is completed.
If it isn’t connecting automatically use the blue buttons on the top of the device to go to the “Uplink” menu and choose LoRa with the blue directional pad. It should then ask which frequency to use for the country you are in and once you select that it should start blinking and attempt to connect.
Configure WiFi
To configure the WiFi we are going to use a file on the device called config.txt.
Connect your Wio terminal to your PC but this time we are not going to boot it into bootloader mode using the slider. Instead just plug in the device to the computer normally. You should see a small drive pop up that contains config.txt.
It looks like this:
SSID=WiFi_Name
PASSWORD=WiFi_Password
MQTT_CLIENT_NAME=Topic
TOKEN=Default_Token
DEVICE_LABEL=Device_Name
ID_SCOPE=Default_ID_Scope
DEVICE_ID=Default_Device_ID
PRIMARY_KEY=Default_Primay_Key
Edit the file and change your SSID and PASSWORD fields to match the network you’d like to use for WiFi. Now save the file.
Next go to the “Uplink” tab on the Wio terminal (use the blue buttons on the top of the device, the rightmost button will go to Uplink). Change the selection to WiFi using the right button of the blue directional input button. Now restart the device by flicking the side button down once.
Conclusion
This is a very important tool for anyone wanting to work with IoT sensors as a service and the Grove sensor ecosystem. It comes with everything you need even including the LoRa module and a year of data credits! It’s meant to be able to prototype their industrial line of IoT sensors as well. I don’t know how anyone could expect to step in and work with an ecosystem that has over 300 sensors without having a prototyping kit like this for you to test and work with them on.
I really like how inexpensive most of the Grove sensors are. The vast majority of them are under $10. The ones that are more expensive will always be due to the components that are on the sensor but the pricing is incredibly reasonable and competitive. They are cheap enough that I can basically just try buying a bunch of different sensor modules and see if they will work well enough for me to deploy in my home or projects.
If you are looking for industrial grade sensors they have all of them including ones meant to be deployed outdoors with a permanent battery that lasts for many years / the lifetime of the sensor without any battery changes or external power. The kit is meant to prototype these as well. You are not walled off from industrial grade sensors and put into a lesser “consumer” category. In fact quite the contrary. The industrial-grade sensors are meant to be tested with this exact same kit.
I’m really enjoying the Grove ecosystem so far and plan on doing a lot more content related to sensor technology. I’ve finally found an ecosystem that gives me access to enough different sensor technologies to fulfill my wildest sensor dreams and see which ones of these are realistic/useful for the use cases I have in mind. If you know of any really interesting/useful sensors in the Grove ecosystem you’re using let me know in the comment and I will check them out!
Other Resources
If you are more interested in using an open source system to manage your sensors check out my guide on ESPHome with Home Assistant here
I’ve also covered using the Arduino IDE with the XAIO ESP32-C3 RISC-V and XAIO expansion shield here


")