

Official support from Canonical for the Raspberry Pi has come a long way. We can now install officially supported Ubuntu on the Pi! In my previous guide for Ubuntu 18.04 on the Pi the Raspberry Pi was not officially supported yet and to be honest the experience was pretty janky.
The previous LTS “unofficial” release had so many problems I actually rolled my own image with dozens of fixes to common ailments before I quickly realized that maintaining a Linux distro, even in such a limited capacity as patching in and distributing fixed binaries, was a monumental undertaking.
Fortunately the current Ubuntu 20.04 LTS release is officially certified for the Raspberry Pi. This combined with Ubuntu’s full 64 bit userland/system environment allows you to take full advantage of the 8 GB Pi’s memory without per-process 3GB memory limits (very useful if you are doing something like running a Minecraft server and want to allocate almost all of the 8 GB to it) means there has never been a better time to give Ubuntu a try on the Pi.
This guide takes it a step further and shows you how to get Ubuntu 20.04 / 20.10 / 21.04 / etc. working with a SSD. Let’s get started!
Equipment Used

The Kingston A400 has been a great drive to use with the Pi for years. It’s reliable, widely available around the world, has low power requirements and performs very well. It’s also very affordable. This drive has been benchmarked over 1000 times at pibenchmarks.com and is the #1 most popular SSD among the Pi community!
Links: AliExpress*, Amazon.com*, Amazon.ca*, Amazon.com.au*, Amazon.co.jp*, Amazon.co.uk*, Amazon.de*, Amazon.es*, Amazon.fr*, Amazon.it*, Amazon.nl*, Amazon.pl*, Amazon.se*, Amazon.sg*
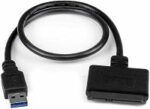
The USB 3.1 variant of the StarTech 2.5″ SATA adapter works well with the Pi 4. The USB 3.0 variant doesn’t have firmware updates available and is not recommended.
Links: Amazon.com*, Amazon.ca*, Amazon.com.au*, Amazon.co.jp*, Amazon.co.uk*, Amazon.de*, Amazon.es*, Amazon.fr*, Amazon.it*, Amazon.nl*, Amazon.pl*, Amazon.se*, Amazon.sg*
NVME Option (powered USB hub required, see “Power Requirements” section in my more generalized Raspberry Pi 4 USB booting guide):
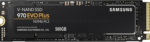
The Samsung 970 EVO Plus is a fantastic drive and has fallen in price substantially. It’s widely available around the world. The smaller capacities (such as the 250GB version) of this drive are perfect for the Pi! This is the top performance option without going into the “Pro” series of the lineup which are much more expensive.
Links: AliExpress*, Amazon.com*, Amazon.ca*, Amazon.com.au*, Amazon.co.jp*, Amazon.co.uk*, Amazon.de*, Amazon.es*, Amazon.fr*, Amazon.it*, Amazon.nl*, Amazon.pl*, Amazon.se*, Amazon.sg*
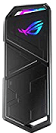
If you really want to take things over the top the ASUS Rog Strix M.2 NVMe enclosure uses the latest USB 3.2 Gen2 specification, is RGB capable and works with the Pi! Unsurprisingly, adding the extra lighting does take extra power! A powered USB hub is also required for this enclosure. More widely available than the ICY BOX but tends to be on the expensive side.
Links: AliExpress*, Amazon.com*, Amazon.ca*, Amazon.com.au*, *Amazon.co.jp*, Amazon.co.uk*, Amazon.de*, Amazon.es*, Amazon.fr*, Amazon.it*, Amazon.nl*, Amazon.pl*, Amazon.se*, Amazon.sg*
Prerequisites
Verify Power Supply Size (3.5A strongly recommended)
Check your Raspberry Pi’s power supply size and make sure it is delivering at least 3.5A. There are a lot of USB C adapters for the Raspberry Pi that are only 3.0A. These will typically work fine, until you plug in something like a SSD which draws power from the Pi and there is nothing left to give.
Most SSDs are quite power efficient but HDDs draw significantly more. Older generations of SSDs used quite a bit more power than newer ones as well. If you are using an older drive or a drive that you know is power hungry you need to pay extra attention to having a quality power source with plenty of capacity.
A good alternative option to relying on the Pi to power the drive is using a powered USB hub* so your drive doesn’t need to draw power from the Pi’s limited power budget. Make sure you get one that is compatible with the Pi as some powered USB hubs won’t work properly with it so check the reviews and do your research to make sure people are using it successfully with the Pi.
Using a 3.5A power supply* or powered USB hub* will ensure your drive is getting enough power without impacting the Pi’s stability.
Recommended Power Solutions
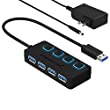
The Sabrent powered USB hub delivers a whopping 2.5A of dedicated power for your USB attached devices. This is almost as much as the Pi adapter itself is rated for (3.0A). It will easily power the most thirsty of setups such as NVMe enclosures.
Links: Amazon.com*, Amazon.ca*, Amazon.com.au*, Amazon.co.uk*, Amazon.es*, Amazon.it*, Amazon.nl*, Amazon.pl*, Amazon.se*
Note: Make sure Amazon doesn’t try to take you to the non-powered version and that it’s the one with the AC adapter that plugs in to provide extra power
The CanaKit 3.5A adapter has an extra half an amp (500 mA) of capacity to give some breathing room to your accessories. This is bigger than the official Pi power supply which provides 3.0A.
Links: Amazon.com*, Amazon.ca*, Amazon.com.au*, Amazon.sg*
Verify Storage Adapter Compatibility
You will need a USB 3.0 storage adapter. See my other article on USB booting not specific to Ubuntu for a lot more details on the storage adapters!
Get Latest Raspbian & Updates
To update your bootloader / firmware you should use Raspbian on a SD card. Right now support in third party operating systems to do anything with the new Raspberry Pi 4’s firmware or bootloader is very limited / nonexistent. You can use a third party operating system later once you set the boot mode, but to actually make these changes we will use official Raspbian.
First make sure that you have the absolute latest updates and firmware for the Pi. To upgrade all your packages and firmware to the latest version use the following command:
sudo apt update && sudo apt full-upgrade -y
Once the update has completed restart your Pi with a sudo reboot command to apply the latest firmware / kernel updates.
Verify EEPROM Bootloader is up to date
We can check if your Pi’s bootloader firmware is up to date with the following command:
sudo rpi-eeprom-updateIf your Raspbian is *very* out of date you may not have this utility and can install it using:
sudo apt install rpi-eepromThe output from rpi-eeprom-update will look like this if you are not up to date:
BCM2711 detected
VL805 firmware in bootloader EEPROM
*** UPDATE AVAILABLE ***
BOOTLOADER: update available
CURRENT: Thu 3 Sep 12:11:43 UTC 2020 (1599135103)
LATEST: Tue 24 Nov 15:08:04 UTC 2020 (1606230484)
FW DIR: /lib/firmware/raspberrypi/bootloader/beta
VL805: up-to-date
CURRENT: 000138a1
LATEST: 000138a1
If it says any updates are available they be installed manually by adding ‘-a’ to the end of our previous command like this:
sudo rpi-eeprom-update -aAfter the updates finish installing restart your Pi as firmware updates will not be applied until after a reboot. Now if you run rpi-eeprom-update to check for updates again it should say you are on the latest and up to date!
Changing rpi-eeprom’s Release Channel
Note: As of February 16th the firmware available in the “critical” branch is new enough to USB boot so I no longer recommend changing this. One reader even let me know in the comments that on the “stable” channel his storage was getting corrupted prompting a full reinstall!
By default you will only receive updates from Raspbian’s “critical” channel. This is a very conservative firmware update channel that will only give you very well tested firmware updates that are considered critical fixes for the device. Another channel that is available is “stable”.
Carlos and other commenters have reported that the current “critical” firmware didn’t work for them and they had to upgrade to the “stable” channel.
To switch to the stable channel we are going to edit the file /etc/default/rpi-eeprom-update:
sudo nano /etc/default/rpi-eeprom-updateChange the line FIRMWARE_RELEASE_STATUS=”critical” to:
FIRMWARE_RELEASE_STATUS="stable"
Now you can run sudo rpi-eeprom-update and you should see a new update available.
Install Ubuntu on USB Storage Device
The new official Raspberry Pi imaging tool is really good. It’s available on Windows, Linux and MacOS and is a small and fast download. It also works fine on most USB mass storage devices like SSDs. Since Ubuntu is now officially supported the image itself is also available in this tool which saves you the trouble of having to find and download the right image files.
64 bit images are recommended for the Pi 4 for better performance but the 32 bit images work as well.
If you want to do things the traditional way you can download the image from the main Ubuntu site and write it yourself using Etcher / dd / Win32diskimager / your preferred tool and skip to the next section. It’s recommended to create the media with the Raspberry Pi Imager unless you are having problems with that utility or are using this as a troubleshooting step.
Once you’ve downloaded the tool run it as administrator/sudo to avoid permission errors. To run the utility from the command line is usually sudo rpi-imager. You’ll be greeted with this screen:
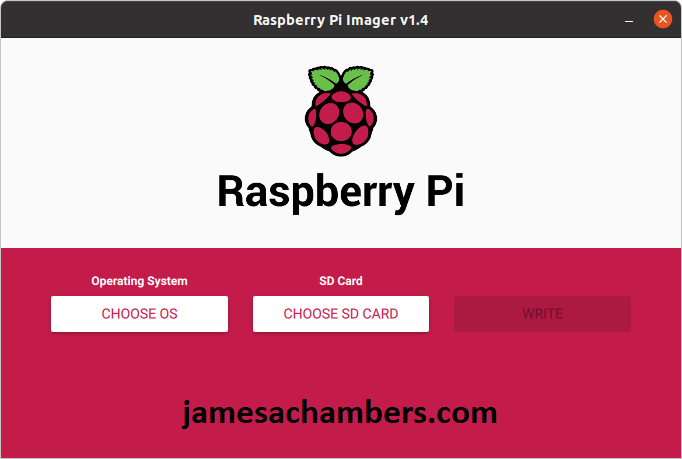
Next click the “Choose OS” button:
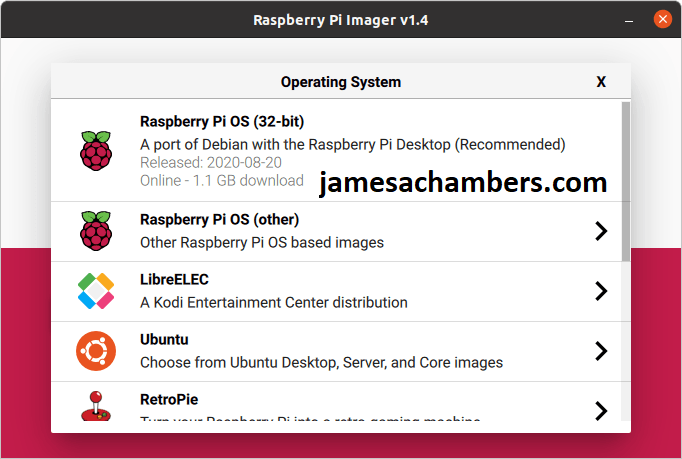
Ahh, the benefits of being officially supported! Ubuntu is right there on the list waiting for us. Select the Ubuntu option and you will get the different choices of flavors/architectures. There’s Ubuntu Desktop, Ubuntu Server, and Ubuntu Core in various forms of 64-bit (arm64) and 32-bit (armhf).
If you want to use the out-of-the-box Ubuntu Desktop edition you need to use the 64 bit Ubuntu 20.10 image as they never made a 20.04 desktop version for some reason. This really isn’t usually a big deal though because you can always choose the “Server” version and install Ubuntu’s desktop environment later with:
sudo apt install ubuntu-desktopOnce you’ve selected the edition you want go ahead and pick the “Choose SD Card” option and write the image. Despite not being a SD card my USB mass storage devices showed up anyway (writing the guide I used a StarTech adapter and a Kingston A400 SSD).
I’m sure some of you will manage to find unusual devices and configurations that may not show up in this tool. It doesn’t appear to show “fixed drives” that are physically installed in your machine. Regardless if it is causing a headache you may need to do it the old fashioned way and download the image from the main Ubuntu site and write the image using your favorite imaging tool instead.
Modifying Ubuntu for USB Booting
We need to make some changes to the Ubuntu drive we just created before we boot from it. Make sure your Pi is powered on and booted into Raspbian then plug in your newly imaged Ubuntu drive. We are going to make the changes using the Pi.
Find and Mount Storage Device
First let’s find your storage device using the command:
lsblk
This will show you all the storage devices attached to your system:
NAME        MAJ:MIN RM   SIZE RO TYPE MOUNTPOINT
sda           8:0    0 119.2G  0 disk
├─sda1        8:1    0   256M  0 part
└─sda2        8:2    0   2.8G  0 part
mmcblk0     179:0    0  59.5G  0 disk
├─mmcblk0p1 179:1    0   256M  0 part /boot
└─mmcblk0p2 179:2    0  59.2G  0 part /
Your SD card will always start with mmcblk so you can rule that one out. That leaves sda as the only other disk device on the system. This will be the same for most of you but depending on what type of drive and storage adapter you use this can vary. You can substitute whatever yours is in place of /dev/sda in these instructions going forward. If yours is sdb use /dev/sdb. If it’s nvme0 use /dev/nvme0, etc.
In my output under the “MOUNTPOINT” column you can see it is blank. This means the drive isn’t mounted on my system. My mmcblk0p1 mountpoint though is not blank and is “/boot” as an example of a non-blank mountpoint. If you are using the full “Desktop” version of Raspbian it may have automatically mounted your drive and created 2 shortcuts on your desktop that will take you to the files. If your mountpoint is not blank and has something like /media/pi/writable go ahead and unmount them now using the following commands substituting the mountpoint listed for your drive:
sudo umount /media/pi/writable
sudo umount /media/pi/system-boot
Now we are going to create two mountpoints and mount the Ubuntu drive. Use these commands substituting your own drive it is not /dev/sda:
sudo mkdir /mnt/boot
sudo mkdir /mnt/writable
sudo mount /dev/sda1 /mnt/boot
sudo mount /dev/sda2 /mnt/writable
Once you have mounted everything correctly your lsblk command’s output should look like this with the mountpoint field now populated:
NAME        MAJ:MIN RM   SIZE RO TYPE MOUNTPOINT
sda           8:0    0 119.2G  0 disk
├─sda1        8:1    0   256M  0 part /mnt/boot
└─sda2        8:2    0   2.8G  0 part /mnt/writable
mmcblk0     179:0    0  59.5G  0 disk
├─mmcblk0p1 179:1    0   256M  0 part /boot
└─mmcblk0p2 179:2    0  59.2G  0 part /
Modify Mounted Partitions – Option A – Automated Script
If you just want to get your Ubuntu partition bootable I have made an automated script to do this. As long as you have mounted the partitions as /mnt/boot and /mnt/writable the script will make the necessary changes for Ubuntu 20.04 / 20.10 to boot! The source code for the script is available at https://github.com/TheRemote/Ubuntu-Server-raspi4-unofficial/blob/master/BootFix.sh
Here is a one liner to run the script:
sudo curl https://raw.githubusercontent.com/TheRemote/Ubuntu-Server-raspi4-unofficial/master/BootFix.sh | sudo bash
You may also download it for inspection (such as nano BootFix.sh or opening it in the Text Editor if you are using Desktop Raspbian) with:
curl https://raw.githubusercontent.com/TheRemote/Ubuntu-Server-raspi4-unofficial/master/BootFix.sh -O BootFix.sh
chmod +x BootFix.sh
nano BootFix.sh
To execute the script use:
sudo ./BootFix.sh
As long as you mounted your partitions correctly it will modify the partition and tell you that it was successful. Now unmount your partitions with the following commands:
sudo umount /mnt/boot
sudo umount /mnt/writable
You may now shut down your Pi and remove the SD card from the Pi leaving just the USB mass storage device plugged in. Reconnect the power.
Modify Mounted Partitions – Option B – Manual Instructions
See bottom of the article for the manual instructions section
First Boot
If all went well the system should boot up into Ubuntu’s logon screen! The default credentials are:
Username: ubuntu
Password: ubuntu
Before logging in for the first time you will be forced to select a new password. Once you have done that you will be fully logged in!
Important Note: Upon logging in for the first time if the Pi is connected to the internet Ubuntu will immediately/soon start a lengthy update process via snapd and apt.  This can be annoying since you'll be ready to start configuring the system and if you do an apt install it will halt and wait for the updates to finish.

It may seem like they're stuck, but if you use the 'top' command you will see all sorts of apt/package/update/extraction related activity happening.  Even on my 8 GB Pi and a gigabit fiber connection these took a good 20 minutes or so before my CPU activity went back to 0 and the apt lock released.

I highly recommend letting these finish and not yanking the power on the Pi / forcing a reboot / trying to kill the processes.  It will often cause a ton of very nasty apt and dpkg problems to the point where it's easier to start over from a fresh image than try to fsck and apt install --fix-broken your way out of it  Try to do other necessary configuration that doesn't involve apt in the mean time and let these finish in the background.
Once the patching is finished your shiny new Ubuntu 20.04 system is fully ready to use!
Manual Instructions
These are the manual instructions to recreate what the automated script does. If you used the automated script you don’t need to do anything further in this section unless you want to understand more about how it works or you want to do the process manually.
Decompress the kernel
We need to decompress the kernel as we will be changing the way the Pi is booting. Ubuntu uses u-boot by default and we will be switching away from that. We can do this with the following command:
zcat -qf "/mnt/boot/vmlinuz" > "/mnt/boot/vmlinux"
Update config.txt with correct parameters
Now let’s update /mnt/boot/config.txt with the parameters we need to load the decompressed kernel. Open up config.txt with nano with:
sudo nano /mnt/boot/config.txt
Change the [pi4] section to the following contents:
[pi4]
max_framebuffers=2
dtoverlay=vc4-fkms-v3d
boot_delay
kernel=vmlinux
initramfs initrd.img followkernel
Create script to automatically decompress kernel
We are going to create a script to automatically decompress the kernel. If we don’t do this we have to decompress it every time Ubuntu updates. This particular part of the script was not written by me and was found at the post on the Raspberry Pi forums by egrechko.
First let’s create the decompression script. Open up a new file with nano using:
sudo nano /mnt/boot/auto_decompress_kernel
Paste the following contents:
#!/bin/bash -e
# auto_decompress_kernel script
BTPATH=/boot/firmware
CKPATH=$BTPATH/vmlinuz
DKPATH=$BTPATH/vmlinux
# Check if compression needs to be done.
if [ -e $BTPATH/check.md5 ]; then
   if md5sum --status --ignore-missing -c $BTPATH/check.md5; then
      echo -e "\e[32mFiles have not changed, Decompression not needed\e[0m"
      exit 0
   else
      echo -e "\e[31mHash failed, kernel will be compressed\e[0m"
   fi
fi
# Backup the old decompressed kernel
mv $DKPATH $DKPATH.bak
if [ ! $? == 0 ]; then
   echo -e "\e[31mDECOMPRESSED KERNEL BACKUP FAILED!\e[0m"
   exit 1
else
   echo -e "\e[32mDecompressed kernel backup was successful\e[0m"
fi
# Decompress the new kernel
echo "Decompressing kernel: "$CKPATH".............."
zcat -qf $CKPATH > $DKPATH
if [ ! $? == 0 ]; then
   echo -e "\e[31mKERNEL FAILED TO DECOMPRESS!\e[0m"
   exit 1
else
   echo -e "\e[32mKernel Decompressed Succesfully\e[0m"
fi
# Hash the new kernel for checking
md5sum $CKPATH $DKPATH > $BTPATH/check.md5
if [ ! $? == 0 ]; then
   echo -e "\e[31mMD5 GENERATION FAILED!\e[0m"
else
   echo -e "\e[32mMD5 generated Succesfully\e[0m"
fi
exit 0
Create apt script to call kernel decompression script automatically
This is a one liner to create a script to call the auto_decompress_kernel script:
echo 'DPkg::Post-Invoke {"/bin/bash /boot/firmware/auto_decompress_kernel"; };' | sudo tee /mnt/writable/etc/apt/apt.conf.d/999_decompress_rpi_kernel
Verify Drive Performance
You can make sure everything is running correctly (and as fast as it should be) by running my quick storage benchmark. You can run the benchmark with the following one-liner:
sudo curl https://raw.githubusercontent.com/TheRemote/PiBenchmarks/master/Storage.sh | sudo bash
This will give you a score you can compare to the other Raspberry Pi Storage Benchmark results and make sure that you are getting an equivalent speed to your peers with the same device!
Fix (some) USB Adapter Problems Using Quirks
Some storage adapters don’t work very well with the Raspberry Pi 4. There is an option that can get a lot of them working using quirks. If your Ubuntu is booting to emergency mode but not in normal mode it’s worth giving quirks a try. This lowers performance, but it’s still much faster than a SD card and your adapter won’t go to waste.
To find out the quirks mode string to use we need to find the device ID string for your adapter and then add an entry to cmdline.txt telling the kernel to apply them on boot.
Find Your Adapter
To apply the quirks we first need to get the adapter id. We will use the sudo lsusb command:
$ sudo lsusb
 Bus 003 Device 001: ID 1d6b:0002 Linux Foundation 2.0 root hub
 Bus 002 Device 002: ID 174c:55aa ASMedia Technology Inc. Name: ASM1051E SATA 6Gb/s bridge, ASM1053E SATA 6Gb/s bridge, ASM1153 SATA 3Gb/s bridge, ASM1153E SATA 6Gb/s bridge
 Bus 002 Device 001: ID 1d6b:0003 Linux Foundation 3.0 root hub
 Bus 001 Device 002: ID 2109:3431 VIA Labs, Inc. Hub
 Bus 001 Device 001: ID 1d6b:0002 Linux Foundation 2.0 root hub
On line 2 we can see my ASM1051E SATA 6Gb/s bridge adapter (it’s the known working StarTech.com 2.5″ SATA to USB 3.1* adapter). You will see something very similar to mine when you run the command and it shouldn’t be too hard to figure out which device it is. If you need more information add a -v switch to make the command sudo lsusb -v. This can sometimes add some additional details to make it easier to figure out which one is your adapter.
If you’re still not sure, we have another command that between the two that can narrow things down. Type / paste the following:
sudo dmesg | grep usb

 [0.828535] usb usb3: New USB device found, idVendor=1d6b, idProduct=0002, bcdDevice= 4.19
 [0.828568] usb usb3: New USB device strings: Mfr=3, Product=2, SerialNumber=1
 [0.828597] usb usb3: Product: DWC OTG Controller
 [0.828620] usb usb3: Manufacturer: Linux 4.19.75-v7l+ dwc_otg_hcd
 [0.828644] usb usb3: SerialNumber: fe980000.usb
 [0.830051] usbcore: registered new interface driver uas
 [0.830182] usbcore: registered new interface driver usb-storage
 [0.836488] usbcore: registered new interface driver usbhid
 [0.836511] usbhid: USB HID core driver
 [0.971598] usb 1-1: new high-speed USB device number 2 using xhci_hcd
 [1.154217] usb 1-1: New USB device found, idVendor=2109, idProduct=3431, bcdDevice= 4.20
 [1.154254] usb 1-1: New USB device strings: Mfr=0, Product=1, SerialNumber=0
 [1.154281] usb 1-1: Product: USB2.0 Hub
 [1.301989] usb 2-1: new SuperSpeed Gen 1 USB device number 2 using xhci_hcd
 [1.332965] usb 2-1: New USB device found, idVendor=174c, idProduct=55aa, bcdDevice= 1.00
 [1.332999] usb 2-1: New USB device strings: Mfr=2, Product=3, SerialNumber=1
 [1.333026] usb 2-1: Product: ASM105x
 [1.333048] usb 2-1: Manufacturer: ASMT
 [1.333071] usb 2-1: SerialNumber: 123456789B79F
This is the dmesg log showing the hardware detection as hardware is activated on the Pi. If your log is really long you can generate fresh entries by just unplugging a device and plugging it back in and running the command again. Here we can clearly see that the ASM105x is what our StarTech adapter is being detected as.
Now we can go back to our first lsusb command and we want the 8 characters from the ID field that comes right after the Device:
Bus 002 Device 002: ID 174c:55aa ASMedia Technology Inc. Name: ASM1051E SATA 6Gb/s bridge
Our adapter’s ID is: 174c:55aa
Applying Quirks
To apply the quirks to our USB adapter we are going to edit /boot/firmware/cmdline.txt. Type:
sudo nano /boot/firmware/cmdline.txt
We are going to add the following entry into the very front of cmdline.txt:
usb-storage.quirks=XXXX:XXXX:u
In place of the X’s above you will put in your adapter’s ID that we got before. With the example commands I gave above mine would look like this: usb-storage.quirks=174c:55aa:u. After this my cmdline.txt looks like this (everything should be one continuous line, no line breaks!):
usb-storage.quirks=174c:55aa:u dwg_otg.lpm_enable=0 console=serial0,115200 console=tty1 root=LABEL=writable rootfstype=ext4 elevator=deadline rootwait fixrtc
Now reboot the Pi. If the Pi fails to boot you can plug the SD card into the computer and go to /boot/cmdline.txt and undo the change we did so you can boot back in with your SD card.
Verifying Quirks
Once you have rebooted after changing cmdline.txt we can verify the quirks have been applied by doing another dmesg | grep usb command:
sudo dmesg | grep usb
 [1.332924] usb 2-1: New USB device found, idVendor=174c, idProduct=55aa, bcdDevice= 1.00
 [1.332957] usb 2-1: New USB device strings: Mfr=2, Product=3, SerialNumber=1
 [1.332983] usb 2-1: Product: ASM105x
 [1.333006] usb 2-1: Manufacturer: ASMT
 [1.333028] usb 2-1: SerialNumber: 123456789B79F
 [1.335967] usb 2-1: UAS is blacklisted for this device, using usb-storage instead
 [1.336071] usb 2-1: UAS is blacklisted for this device, using usb-storage instead
 [1.336103] usb-storage 2-1:1.0: USB Mass Storage device detected
 [1.336479] usb-storage 2-1:1.0: Quirks match for vid 174c pid 55aa: c00000
 [1.336611] scsi host0: usb-storage 2-1:1.0
This time we can see in dmesg that UAS was blacklisted for the device and it has loaded with the usb-storage driver instead. This driver tends to be more compatible with the “problematic adapters” but the performance is usually significantly lower. It’s definitely worth a try though as some adapters do better with the quirks performance-wise. The only way to know for sure is to run a benchmark (see “Verify Drive Performance” section).
Other Resources
I compiled the 2022 Raspberry Pi Storage benchmarks which shows the fastest storage devices for the Pi
For easy headless imaging (does support Ubuntu) check out my Headless Raspberry Pi configuration guide
To find out where to get the 64 bit version of Raspberry Pi OS: where to get the 64 bit Raspberry Pi OS image
To find out how to add a UPS backup battery to your Pi check out my UPS for Raspberry Pi guide


Any thoughts on getting this to work with kali? They recently released the 2021.1 version for the Pi but USB boot doesn’t seem to work.
I guess this procedure is now outdated (for the Pi4 8GB at least) with the release of Ubuntu 20.04.2 LTS… I was just able to boot from my USB3 NVME drive by just setting the usercfg.txt file to the contents below:
# Place "config.txt" changes (dtparam, dtoverlay, disable_overscan, etc.) in# this file. Please refer to the README file for a description of the various
# configuration files on the boot partition.
[pi4]
max_framebuffers=2
kernel=vmlinuz
initramfs initrd.img followkernel
[all]
arm_64bit=1
cmdline=cmdline.txt
dtoverlay=vc4-fkms-v3d
dtparam=sd_poll_once
disable_overscan=1
enable_uart=1
Hey Daniel,
That’s good news! Some of them are slowly becoming bootable on their own. 20.10 can boot on it’s own without even having to do this much. The LTS release has been the most problematic. 32 bit vs 64 bit can make a difference as well.
If 20.04.2 can do it natively then that is a positive recent change with this release!
I had to apply this fix (thanks btw!!!) to get 20.04.2 to boot of my SSD. I always thought it weird that 20.10 could, but this 20.04 server couldn’t. Then again 20.04 desktop booted…so, it’s beyond me.
Hey Dazza,
That’s fantastic! It’s very weird which variants will and won’t boot. It also seems to have changed over time!
I’ll definitely leave this here and maintain it until we’re positive that all images are fixed but thanks for your feedback as it lets me know that this is still helping people. Take care!
Hi
Wanted to say thanks for the clear well written information and script. Also taking the trouble to update when things change, as they always do! As a reasonably experienced Linux user I’d been messing about trying to get a working install on an Intel M.2 SSD in the Argon One case. Cue several rounds of reformatting SD cards and USB flash drives, first with Debian 11 (couldn’t get the network working), before moving to Ubuntu Server 20.04 LTS 64bit. Worked like a dream with the lengthy updates as you noted upon reboot. I’m now going to put the Raspberry Pi 4 to good use running PiHole. Cheers!
I to have the Argon M.2 case with a Kingston 240 gig Sata SSD. The Argon M.2 will not do NVMe. I installed 20.10 desktop using your instructions and script with no problem. Then I chickened out and felt I wanted LTS. So I did server then installed the desktop so far so good. Now I just need to figure out turning overscan turned oh on my 4K monitor and I should be good. I plan to make this my developers workstation per DroneBot Workshops guide 🙂
I’ll let you know if anything goes nutty 🙂
Thanks again really appreciate it.
Hey Simon,
Thanks a ton for the positive feedback! I’m glad that the updates have finally got the LTS 20.04.2 release working after some fixes as we were having a lot of problems with that one a couple of weeks ago.
It sounds like you’re right on track! There should be some options in the file /boot/firmware/config.txt file for enabling overscan. If you’ve already tried the basics in here there is an issue with some 4K displays where sometimes you need to do a manual override. Here’s a link to a good thread on how to do that if the regular overscan options aren’t effective. This is an alternative method where you actually set the overscan pixels yourself for very stubborn setups!
I am trying to get this to work with an nvme drive that I had laying around, but it does not want to work past the first boot. Every time I install ubuntu server, i get it to boot up once. The second time it will freeze or fail to boot. I have tried a number of installs with slight variations of the config, but no luck. Currently when I reboot, I just get a blinking cursor. My best guess is that it is related to when the drive expands to the full ssd. I think I am also gonna try leaving it on for a while before the first reboot to see if that fixes anything. Any general thoughts?
Hey Brendan,
It sounds like it could be power related as well. Do you have a powered USB hub you could try using the drive with? NVMe ones have been particularly power hungry and the Pi has difficulty passing through enough current (especially for “enclosure” styles).
I just uploaded a new version of BootFix.sh to GitHub that may help. Can you give that a try?
So I figured out my issue. The ssd was previously used on a system with zfs for the filesystem. Apparently, the raspberry pi filesystem expander didn’t like that. Every time it expanded the filesystem, something would get messed up such that the drive looked to just be one zfs partition again. By first rewritting the partition table and then flashing, everything worked.
Hey Brendan,
Oh wow, that is definitely really interesting! I don’t know why the imaging software does not redo these partitions to the correct types every time it writes an image. It seems like they are all guilty of it. I think issues like this are the cause a lot of the time for mysterious boot/resizing problems. Just writing a new image often does not change the partition tables/types even using the most popular imaging software!
I sincerely hope that the rpi-imager tool redoes the partitions. It’s why I’ve been recommending to use that instead of anything else but I’m not 100% sure if it will catch this issue yet or not (it does catch a lot of other similar “gotcha” issues). I no longer recommend Etcher or any of those because they all do this.
Thanks a ton for posting your resolution, I think in the future I’m going to recommend deleting/rewriting the partition table to people who are having similar problems!
Hi James,
Thank you for this great tutorial.
Also, the suggested config parameter dtparam=sd_poll_once brought the load level from 0.9 to almost 0 on a new installation.
I have an issue with the ethernet port eth0 not being detected by this installation, wifi works fine though.
Thanks
Hey Alex,
That’s fantastic that the dtparam change got the load level back under control!
The ethernet issue was due to a change in the Ubuntu 20.04.2 images. I’ve just uploaded a fixed version that takes care of this if you want to give it a try!
Hi James,
Can confirm everything is working now with the image Ubuntu Server 20.04.2 LTS.
Thank you so much.
No problem Alex, thank you for confirming!
hi James,
Thank you for the great guides. I have successfully boot up from SSD and benchmark it.
Just a note, I didn’t follow your step exactly, especially using automated script.
My step:
1. Update rpi-eeprom using raspberry pi os
2. Flash the SSD with Ubuntu Server 20.04 using BalenaEtcher
3. Decompress vmlinuz kernel with “dd if=vmlinuz bs=1 | zcat > vmlinux”
4. Edit boot/config.txt
I noticed that in the automated script, it still copies .dat .elf & .bin to the /boot partition whereas in manual method is not required.
If I’m using the automated script, I’m able to boot, but my ethernet eth0 won’t show up.
Anyway, thanks again for the guides. Cheers
Hey Azmi,
You are absolutely right. I have removed these from the latest version as it’s no longer necessary!
First off, thanks so much for the wonderful scripts! I have been able to get Ubuntu Server 20.04.2 LTS up and running exactly as described in your guide. However, upon booting for the first time I get something like this –
Err:1 http://ports.ubuntu.com/ubuntu-ports eoan InReleaseTemporary failure resolving 'ports.ubuntu.com'
Err:2 http://ports.ubuntu.com/ubuntu-ports eoan-updates InRelease
Temporary failure resolving 'ports.ubuntu.com'
Err:3 http://ports.ubuntu.com/ubuntu-ports eoan-backports InRelease
Temporary failure resolving 'ports.ubuntu.com'
Err:4 http://ports.ubuntu.com/ubuntu-ports eoan-security InRelease
Temporary failure resolving 'ports.ubuntu.com'
Reading package list ... Done
Building dependency tree
Reading state information... Done
All packages are upto date.
W: failed to fetch http://Ports.ubuntu.com/ .................
W: failed to fetch http://Ports.ubuntu.com/ .................
W: failed to fetch http://Ports.ubuntu.com/ .................
W: failed to fetch http://Ports.ubuntu.com/ .................
W: Some index files failed to download. they have been ignored, ............
I have been unable to figure out exactly why this is happening or what I can do to fix it. Various searches across forums have not yielded a solution so far and you seem to be very up to date on Raspberry Pi compatibility issues so any help is very much appreciated.
Hey Miles,
Thanks for the kind words! I think I can help. It looks like it’s having trouble resolving DNS queries so it’s unable to reach the apt mirror.
Is this the 32 or 64 bit version? We were having this problem with 32 bit and I had to make a change to BootFix.sh to get it to work. I notice this is 20.04.2 so there may have been a change in the base images. If you have a fast internet connection you may want to try the other one from the one you tried just as a test to see if 64 bit vs 32 bit has networking or not.
I’m guessing that this is wired using the ethernet connection. Depending on your familiarity with Ubuntu you could probably add your wireless network to netplan and connect on the wifi and do an apt dist-upgrade. This will likely fix your DNS/networking over wired and is a trick I’ve used before!
Let’s see which architecture you’re running and then I can go and test it out and make sure nothing has changed with 20.04.2 that might need a tweak to BootFix.sh!
James,
I was running the 64 version which was written using the Raspberry Pi Imager. The current configuration is ATT Fiber Modem –> NetGear unmanaged switch –> Pi 4 all wired as you presumed. I had the same Pi running PiOS (32 bit) and ran your tutorial through that same Pi which had the SATA III USB with Ubuntu Server 20.04.2 on it. Then I shut it down and unplugged the power, removed the SD card and fired it up. The boot came through just fine, but it stops at the update part and halts there.
Thanks again as this seems to be the most comprehensive and easy to implement fix. Lots of people seem to be just giving up and running with 20.10 but I plan to use these for a home production server so I do want to try to stick to 64 bit Ubuntu Server LTS for that reason.
Hey Miles,
Thanks a ton for the additional information. Between your reply and Guilano’s reply it’s clear I need to make a change to the script for 20.04.2.
Guiliano posted the fix but I will update the script today to get this out there. Sorry that you got caught in between the version changes! 20.04.1 and 20.04 were working but it looks like they are cleaning up some of the boot proocess in 20.04.2 so I need to make a tweak to BootFix.sh to account for this.
Thanks again for following up!
Just as a follow up, I just barely uploaded the new version of BootFix.sh to GitHub. This should fix your eth issue!
I had the same error. My network was turned off and the command
sudo dhclient -4 -v
managed to enable my ethernet eth0 connection.
Thanks Maximilian, that’s an awesome command! I am used to using ifconfig which is not included with Ubuntu (until you install it with apt).