
For many years configuring a headless Raspberry Pi usually involved creating a bunch of text files on the SD card. Some of these were more commonly known (such as creating the “ssh” file to enable SSH) but there are many lesser known methods to configure many different options headlessly.
These days we have a much better option available. We can use the Raspberry Pi imager’s headless configuration options to create a preconfigured SD card for headless use without touching any obscure text files!
Today in this guide we’ll cover the more well known options as well as the options that you may have not heard of (but are quite useful) that are available in the Raspberry Pi Imager. Let’s get started!
Supported Pis
The Raspberry Pi 4 is available in different memory configurations all the way up to 8 GB. It’s about the size of a credit card and uses an extremely low amount of power making it ideal for all sorts of projects and ideas!
Links: Amazon.com*, AliExpress*, Amazon.ca*, Amazon.com.au*, Amazon*.co.jp*, Amazon.co.uk*, Amazon.de*, Amazon.es*, Amazon.fr*, Amazon.it*, Amazon.nl*, Amazon.pl*, Amazon.se*, Amazon.sg*

The Raspberry Pi 400 kit includes everything you need for a full Pi 400 desktop build. The Pi 400 is the fastest Raspberry Pi ever released and comes in the form factor of a keyboard!
Links: Amazon.com*, AliExpress*, Amazon.ca*, Amazon.com.au*, Amazon.co.jp*, Amazon.co.uk*, Amazon.de*, Amazon.es*, Amazon.fr*, Amazon.it*, Amazon.nl*, Amazon.pl*, Amazon.se*, Amazon.sg*

The Compute Module 4 by the Raspberry Pi Foundation is a single-board computer (SBC) that is meant to be used in embedded devices. It has many new capabilities that have not been seen on other Pis before such as a built in eMMC module (optional) and has PCI express capabilities when used with the IO board.
Links: Amazon.com*, AliExpress*, Amazon.ca*, Amazon.com.au*, Amazon.co.uk*, Amazon.de*, Amazon.es*, Amazon.fr*, Amazon.it*, Amazon.nl*, Amazon.pl*, Amazon.se*, Amazon.sg*
Headless Options Menu
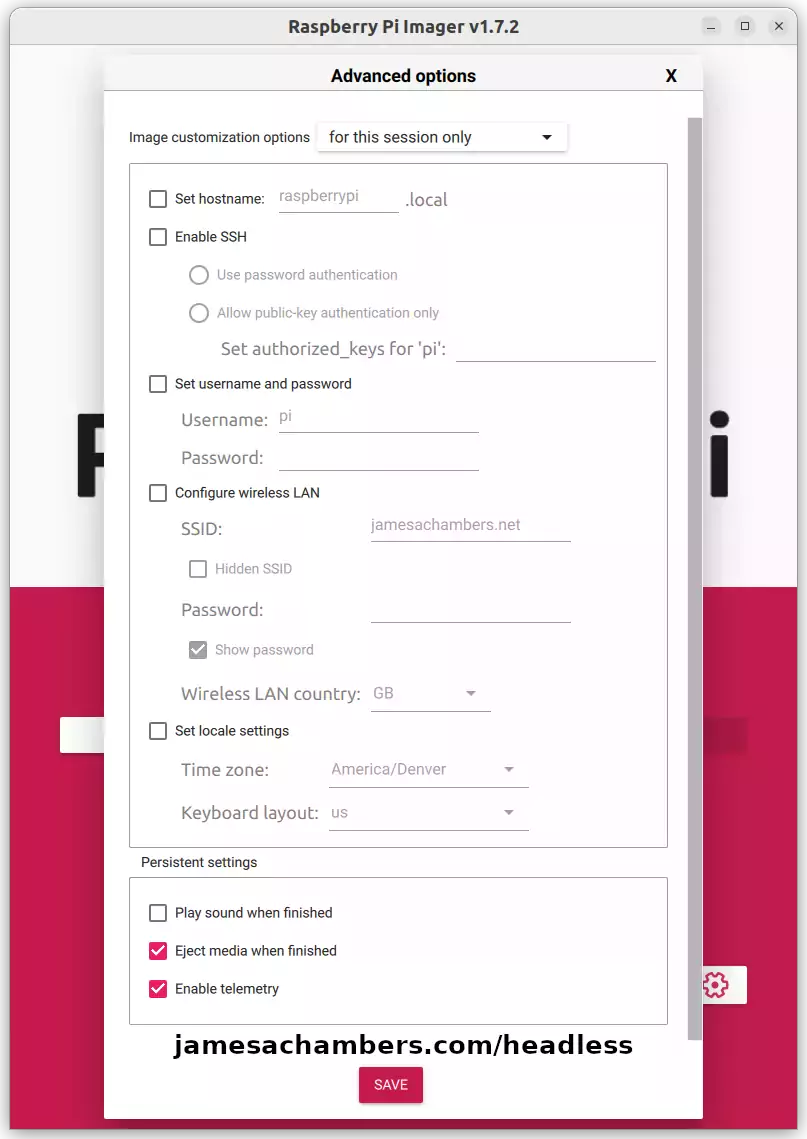
If you’ve ever done headless configuration of a Raspberry Pi using the old text file method you can immediately appreciate this options menu and how difficult it would be to recreate some of these options via text files. Let’s cover the different options briefly.
Set hostname
This will set the hostname of the Raspberry Pi. This is what your network equipment / router will see your Raspberry Pi as typically. It’s extremely useful to set this if you are configuring multiple headless Pis on the same network.
Enable SSH
This is the classic option that most people will be familiar with creating text configuration files for. The nice thing about the Pi Imager menu is that instead of just creating a blank “ssh” file and enabling password login you can actually use an authorized key file for key-based SSH authentication (more secure).
Set username and password
This is a very useful option that lets you preconfigure the Pi’s default account username and password. You definitely want to do this to get ssh working without fighting with the default passwords (which have been removed in modern versions of Raspberry Pi OS).
Configure Wireless LAN
This is probably the next most popular headless configuration option after enabling SSH. You can still do this with text files but it’s much easier to configure this in the Pi Imager. You can see in the screenshot that it already prepopulated my SSID for me based on the network I was connected to.
This also has the wireless LAN country option. This is very important to choose especially for 5G WiFi as if you have the wrong country selected your 5G radio will not work and this is a very common misconfiguration on the Pi!
Set Locale Settings
This is a great quality of life option. If you’ve been using a Raspberry Pi for an extended period of time you are probably used to it always being set to en-GB as the default language. It’s very nice to be able to preconfigure the right locale right in the image!
Persistent Settings
The first two settings here are pretty unremarkable and only relate to the Pi Imager playing a sound when the image is done writing and whether to eject the media automatically when finished.
The second setting is a bit more interesting. This enables telemetry. To explain what this is it’s basically only telemetry of how you use the Raspberry Pi Imager utility. It will send anonymous info about what image you tried to burn and whether it was successful.
This will send the name and category of the image written as well as information about the host computer running the Pi Imager to the Raspberry Pi Foundation to improve the imaging experience. You may disable this option if you do not want to share this data.
How to access headless settings
In previous versions of the Raspberry Pi imager you had to hit Ctrl+Shift+Enter to bring up the “Advanced options” menu. This still works but there’s an easier way to access the menu now without remembering hidden key combinations.
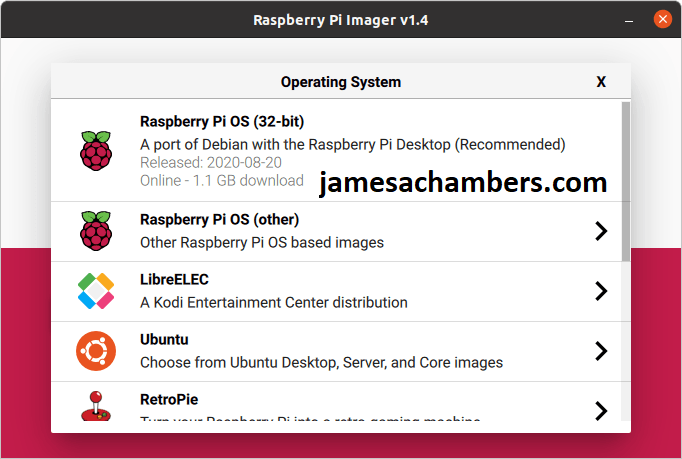
First select an operating system from the “Operating System” menu.
Now once you’ve selected an OS provided you picked one that supports headless configuration (Raspberry Pi OS and Ubuntu Server gave me the Advanced options menu) it will appear in the bottom right of the screen like this:

Not all of them will work with the headless options at time of writing but Ubuntu and Raspberry Pi OS both show the advanced options gear/menu.
If you are having any trouble finding the options I describe make sure you’re running the latest version of the Pi Imager as many of these features are new.
Changing Boot Mode
The Pi Imager can also create an image that will change your Pi’s primary boot mode. This is useful if you have multiple storage devices and want to specify which one to boot from. It can also speed up the boot process if the Pi doesn’t have to check other devices that aren’t present and fail and instead goes right to the correct one.
To do this you actually select a special image from the “Operating System” menu (this is the first step on the main menu with the button “Choose OS”). Scroll down to “Misc Utility Images” on the Operating Systems menu and choose “Bootloader”.
This will take you to this screen where you can select the boot mode you want the image to apply:
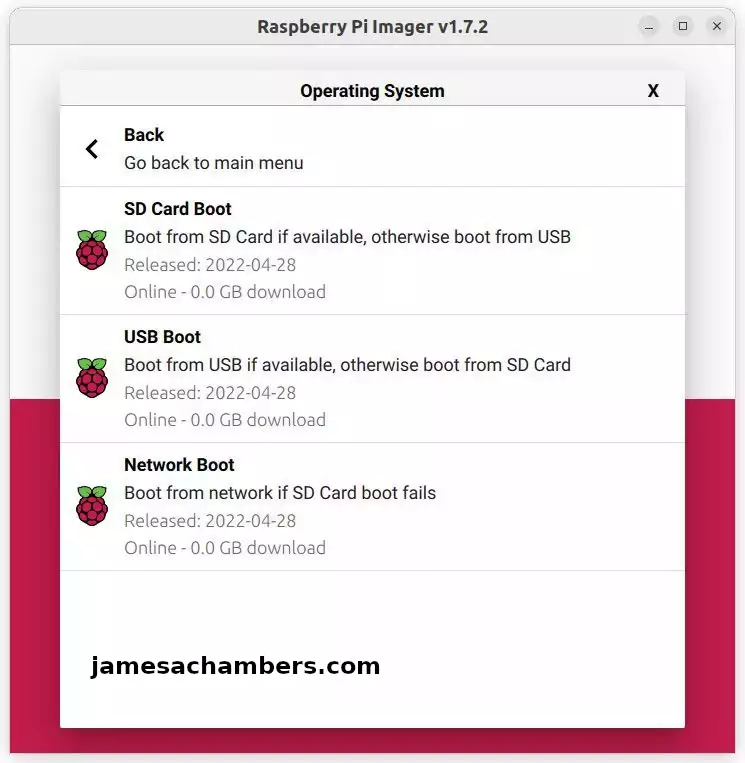
This will basically create a special SD card or image that will change the boot mode of the Pi. That’s basically all it does. You can simply reimage it again with something else when you’re done or if you have a lot of spare SD cards or other Pis to do it’s definitely handy to keep one around!
Writing Image
Once you’ve configured the options you’d like you simply write the image. All of your settings will be included in the image automatically!
If you would like to include these settings on multiple images change the option at the top of the screen from “for this session only” to “always use”.
Conclusion
I never really use the “old way” to headlessly configure Raspberry Pis anymore because it’s so much faster and more convenient to use the new Raspberry Pi imager features.
I also find myself using features that while I technically knew how to do via text were such a pain that I would just set up SSH and do them later. I’ve improved my workflows quite a bit switching to the Pi Imager and saving these additional steps.
Some of you may be on operating systems that don’t support this yet and have to fall back to text but for Ubuntu and Raspberry Pi OS (both the 32 and 64 bit flavors) this is already supported and available!
Other Resources
For the best SSDs to use on the Pi check out my 2022 Raspberry Pi storage benchmarks
For tips on where to get Raspberry Pis during the shortage check out my Raspberry Pi Shortage Survival Guide
If you are looking to update / restore your bootloader or firmware check out my Raspberry Pi Firmware Update / Recovery Guide
I’ve also compiled a list of the best SSDs and storage adapters to use with the Raspberry Pi
To learn how to set up the Pi for SSD booting check out my new Raspberry Pi bootloader SSD boot guide


