
I recently had a need to interact with a Google Sheets spreadsheet and it turned out to be pretty easy and worked very well! I wanted to write this post to share what I learned and hopefully it can help some others out there.
In this guide we’ll explore how to create a Google API key then and use PowerShell to create a new spreadsheets and upload a CSV file into Google Sheets.
Acquiring Google Sheets API
First head to the official Google Developers Console. If you have never used the Google API before go ahead and create a new project. I called mine Scripts-jamesachambers.
After creating a project it should take you to the main dashboard. From here we are going to click “ENABLE APIS AND SERVICES” at the top of the page. It looks like this:

This will bring up a page showing all the different Google APIs available. From here we are going to scroll down to the G-Suite section and click on “Google Sheets” and then choose the “Enable” button.
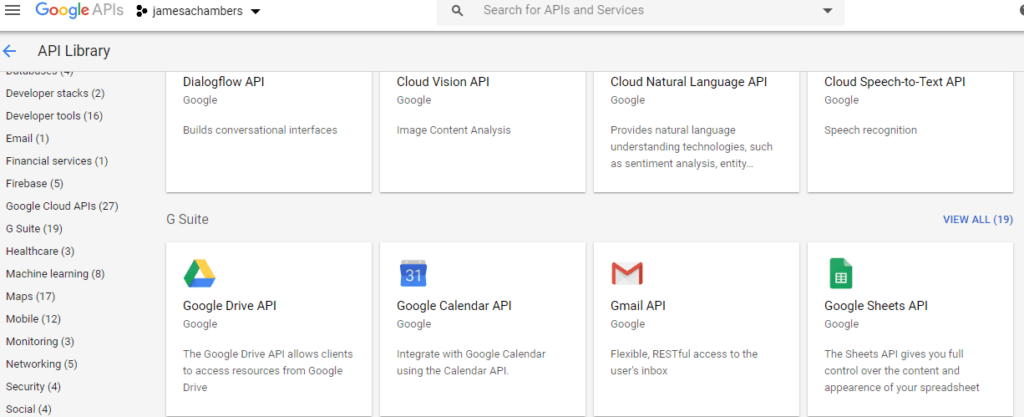

Enable Google Drive API
Now enable the Google Drive API using the exact same steps. This will be needed for some access/permission controls later.
To enable the Google Drive API follow the same steps we did in the “Acquiring Google Sheets API” but choose “Google Drive” from the G-Suite options instead.
Creating a Service Account
There is a lot of security built into Google’s APIs. Some types of them require user consent but can access private user data. The kind of account we want to create to work with Google Sheets using scripts is a service account.
This type of account uses a certificate to validate your identity instead of a username/password. It is able to create new spreadsheets and give permissions for others to view them without requiring user consent since the service account will own the spreadsheet sidestepping the private user data issue. It is also able to update these sheets right from PowerShell!
When you clicked the “Enable” button it should have taken you into the “Google Sheets API Console” but sometimes I’ve noticed the button just turns into “Manage”. Click Manage of you aren’t already in the Google Sheets developer console. You should be at a screen that looks like this:

Choose the “Credentials” tab on the left hand of the screen as shown above and click “Create Credentials” and choose the “Service Account” option.
Choose a name for your account. You can set an optional description here as well if you would like. Click the “Create” button and it will take you to the next screen.
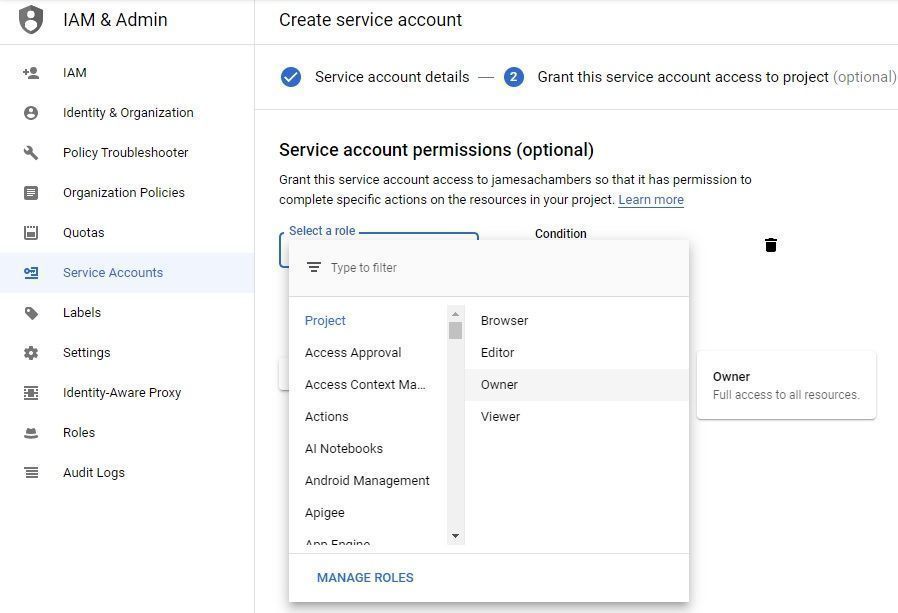
Give your service account the “Project” – “Owner” role. This will give your service account full access to all resources in the project you created. You can create finer grained permissions if desired but the service account is only going to have access to the project you created so it should be safe unless you have other resources in the project.
Press the button again and leave the final screen on the defaults. Your service account is now created!
Create Service Account Access Key/Certificate
Now that we have created our service account we need to create an access key and download the certificate for it.
At the official Google Developers Console dashboard choose the “Service Accounts” tab from the left side of the screen and then click on the new service account you created:
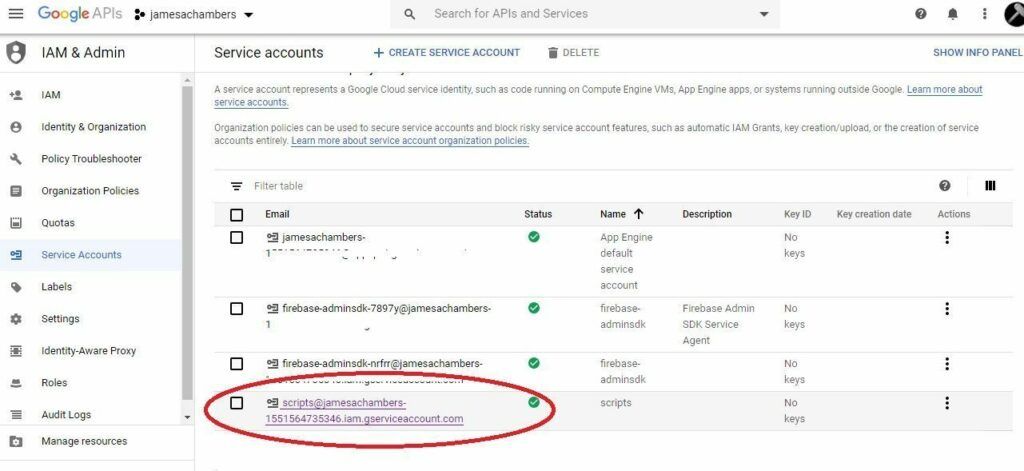
Make a note or copy of your service account’s email address listed here. This will be the $iss credential we’ll be using in PowerShell to authenticate with Google very shortly.
At the bottom of your “Service account details” page will be an option to add keys. Click the “Add Key” button and choose “Create new key” as shown here:
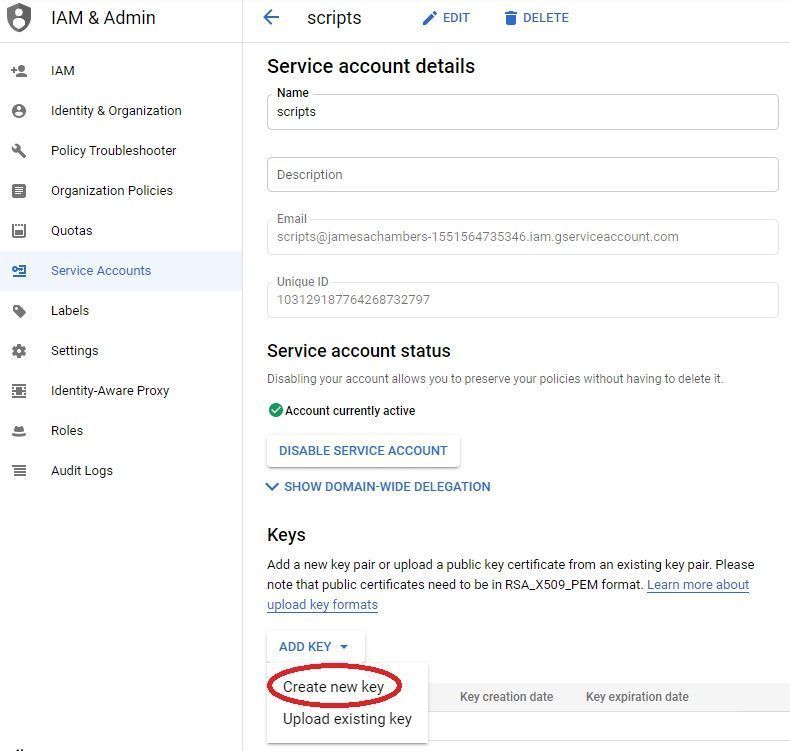
Choose the “P12” format:
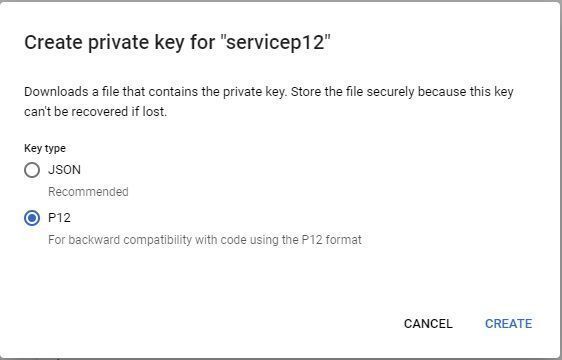
Press “Create”:

A download dialog will pop up and the screen above will be displayed. This is your certificate file your scripts will use to access Google Sheets.
Warning: This is the only time Google will give you this key. If you lose it you cannot recover it or redownload it and have to create a new key and update all your scripts that use that key accordingly. Make sure you have this key backed up!
Once you have safely backed up this key we are all done with configuration and it’s time to head to PowerShell!
Install UMN-Google PowerShell Module
We are going to use the UMN-Google PowerShell module to be able to communicate with Google Sheet’s API. You will want to install this module on any machine you will be running scripts. Open PowerShell and type:
Install-Module UMN-GoogleThis PowerShell module is developed and maintained by the University of Minnesota. You can see more information at the PowerShell Gallery here: The UMN-Google PowerShellGallery Repository
Getting Authorization Token
This block will appear at the top of your scripts. It will use our service account certificate to get an authorization code from Google.
Create a new PowerShell .ps1 file with the editor of your choice. Copy and paste the code block below:
Import-Module UMN-Google

# Set security protocol to TLS 1.2 to avoid TLS errors
[Net.ServicePointManager]::SecurityProtocol = [Net.SecurityProtocolType]::Tls12

# Google API Authozation
$scope = "https://www.googleapis.com/auth/spreadsheets https://www.googleapis.com/auth/drive https://www.googleapis.com/auth/drive.file"
$certPath = "C:/Users/james/Desktop/PowerShell/jamesachambers-1551564735346.p12"
$iss = 'scripts@jamesachambers-1551564735346.iam.gserviceaccount.com'
$certPswd = 'notasecret'
try {
    $accessToken = Get-GOAuthTokenService -scope $scope -certPath $certPath -certPswd $certPswd -iss $iss
} catch {
    $err = $_.Exception
    $err | Select-Object -Property *
    "Response: "
    $err.Response
}

$accessToken
Modify the values below to match your certificate file you downloaded in the previous step and your $iss (service account email address) information that we made a note of/copied earlier. The 2 lines you need to change to your own values are listed in bold.
I recommend fully qualifying the path to your certificate file to avoid working path problems (especially when doing background/automation scheduled tasks). Make sure you remember to copy the certificate from your downloads folder to the location where you created your PowerShell .ps1 file and that you change the path to yours.
After you have modified the values run the script to make sure you don’t receive any errors. If everything ran successfully you will see a valid Google API authorization token! It should look like this:

If your screen shows a long string of numbers/letters/symbols and does not give an error then congratulations, you’ve completed your API key setup successfully! If you received an error double check that you copied the certificate and gave the right path and run through the earlier steps quickly and verify everything looks correct.
Create New Google Sheet
Now that you have working authentication it’s time for the fun part! Now we get to start creating/modifying Google Sheet documents. Let’s create a new sheet and display the spreadsheet ID.
Add the following commands to the end of your .ps1 file with the title of your choice:
# Create new spreadsheet
$Title = 'Patching Spreadsheet'
$SpreadsheetID = (New-GSheetSpreadSheet -accessToken $accessToken -title $Title).spreadsheetId
$SpreadsheetID

# Create new sheet
$Sheet = 'Computers'
Add-GSheetSheet -accessToken $accessToken -sheetName $Sheet -spreadSheetID $SpreadsheetID
Now run your .ps1 file again:

The first line is your access token again, but the second line is the new spreadsheet ID! To access this spreadsheet you append the spreadsheet ID on the end of the following base URL:
https://docs.google.com/spreadsheets/d/
So for example, to access the spreadsheet I just created in this example go to https://docs.google.com/spreadsheets/d/1anI7Bdr0ZjkSDwMbGpCb0KZc1SpSC-3JdQiycvoM5CM/
However, when you go to the URL you will see:
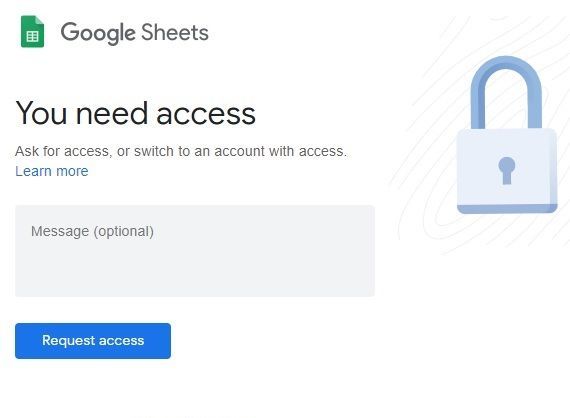
This is because by default these sheets are private. We need to set the permissions for other people to be able to access our new sheet!
Setting Google Sheet Permissions
Let’s start by adding individual users. Comment out the lines that create a new spreadsheet and sheet and add the following lines to the end of the file:
$SpreadsheetID = '1anI7Bdr0ZjkSDwMbGpCb0KZc1SpSC-3JdQiycvoM5CM'
Set-GFilePermissions -accessToken $accessToken -fileID $SpreadsheetID -role writer -type user -emailAddress 'youremail@yourdomain.com'
Change the $SpreadsheetID to the ID you received in the last step and the email to match your own personal email address. This will add “writer” permissions to your account to the spreadsheet. The bolded lines are things you need to adjust. The final result should look like this:
Import-Module UMN-Google

# Set security protocol to TLS 1.2 to avoid TLS errors
[Net.ServicePointManager]::SecurityProtocol = [Net.SecurityProtocolType]::Tls12

# Google API Authozation
$scope = "https://www.googleapis.com/auth/spreadsheets https://www.googleapis.com/auth/drive https://www.googleapis.com/auth/drive.file"
$certPath = "C:/Users/james/Desktop/PowerShell/yourcertificate.p12"
$iss = 'scripts@jamesachambers-1551564735346.iam.gserviceaccount.com'
$certPswd = 'notasecret'
try {
    $accessToken = Get-GOAuthTokenService -scope $scope -certPath $certPath -certPswd $certPswd -iss $iss
} catch {
    $err = $_.Exception
    $err | Select-Object -Property *
    "Response: "
    $err.Response
}

$SpreadsheetID = '1anI7Bdr0ZjkSDwMbGpCb0KZc1SpSC-3JdQiycvoM5CM'

Set-GFilePermissions -accessToken $accessToken -fileID $SpreadsheetID -role writer -type user -emailAddress 'youremail@yourdomain.com'
Now run the script.
If you received the following error:
Invoke-RestMethod : The remote server returned an error: (403) Forbidden.
It means you very likely did not enable the “Google Drive” API. Go back to the “Enable Google Drive API” step from earlier and double check that the Google Drive API got enabled!
Now go back to your browser and refresh the “Access Denied” page. You should now see the blank spreadsheet!
Uploading a CSV File to Google Sheets
Now that you’ve set up your Google Sheets API keys and environment we are ready to modify new Google Sheets! If you already have a CSV file to upload you can use that, otherwise let’s create a quick testing CSV. Open Notepad or your favorite editor up to a new document and paste the following text:
Computer,"Operating System",RAM
"iMac 27""",OSX,"16 GB"
"HP ZBook 15""",Windows 10,"16 GB"
Now save the document as test.csv in the same directory you have our “Setting Google Sheets Permissions” PowerShell script from the last step. Remove or comment out the very last Set-GFilePermissions line of the script.
Google Sheets expects an ArrayList of values to upload to Google Sheets. We are going to load our test CSV and convert it to an ArrayList and submit the data to Google Sheets with the following code:
# Import CSV
$import = New-Object System.Collections.ArrayList($null)

# Build sheet header as it isn't included automatically
$import.Add( @("Computer", "Operating System", "RAM")) | Out-Null

# Build ArrayList
$inputCsv = Import-Csv "test.csv"
$inputCsv | ForEach-Object {
    $import.Add( @($_.Computer, $_."Operating System", $_.RAM)) | Out-Null
}

# Upload CSV data to Google Sheets with Set-GSheetData
try {
    Set-GSheetData -accessToken $accessToken -rangeA1 "A1:C$($import.Count)" -sheetName "Computers" -spreadSheetID $SpreadsheetID -values $import -Debug -Verbose
} catch {
    $err = $_.Exception
    $err | Select-Object -Property *
    "Response: "
    $err.Response
}
This code loads the CSV into a variable called $inputCsv and then iterates through each object and adds it to the ArrayList we are going to send to Google Sheets. If you wanted to modify the data before sending it you absolutely can.
Once the CSV is imported you will have an object array and the names of the variables will be the name of the header of that column. You have to be careful if it has a quote in it. You can still access them by quoting the variable. For example:
$_."Operating System"
This will allow you to access the variables even if there are spaces in the column’s header. The actual first line of the CSV with the headers in it is consumed by PowerShell when you import it so we also create our own header line for our spreadsheet.
Your final code should look like this:
Import-Module UMN-Google

# Set security protocol to TLS 1.2 to avoid TLS errors
[Net.ServicePointManager]::SecurityProtocol = [Net.SecurityProtocolType]::Tls12

# Google API Authozation
$scope = "https://www.googleapis.com/auth/spreadsheets https://www.googleapis.com/auth/drive https://www.googleapis.com/auth/drive.file"
$certPath = "C:/Users/james/Desktop/PowerShell/yourcertificate.p12"
$iss = 'scripts@jamesachambers-1551564735346.iam.gserviceaccount.com'
$certPswd = 'notasecret'
try {
    $accessToken = Get-GOAuthTokenService -scope $scope -certPath $certPath -certPswd $certPswd -iss $iss
} catch {
    $err = $_.Exception
    $err | Select-Object -Property *
    "Response: "
    $err.Response
}

# Spreadsheet ID # of the Google Sheet
$SpreadsheetID = '1anI7Bdr0ZjkSDwMbGpCb0KZc1SpSC-3JdQiycvoM5CM'

# Import CSV and build ArrayList
$import = New-Object System.Collections.ArrayList($null)
$inputCsv = Import-Csv "test.csv"
$inputCsv | ForEach-Object {
    $import.Add( @($_.Computer, $_.'Operating System', $_.RAM)) | Out-Null
}

# Build sheet header as it isn't included automatically
$import.Add( @("Computer", "Operating System", "RAM")) | Out-Null

# Build ArrayList

# Upload CSV data to Google Sheets with Set-GSheetData
try {
    Set-GSheetData -accessToken $accessToken -rangeA1 "A1:C$($import.Count)" -sheetName "Computers" -spreadSheetID $SpreadsheetID -values $import -Debug -Verbose
} catch {
    $err = $_.Exception
    $err | Select-Object -Property *
    "Response: "
    $err.Response
}
Now we’re ready to run the code. Execute your script in PowerShell:

If everything was set up you should immediately see the changes in your browser window and it should look like this:

Wrapping Up
That’s it! You’ve now set up your Google API console access and can now modify Google Sheets through the power of PowerShell automation.
Make sure you check out the University of Minnesota’s GitHub repository to see any new changes or announcements related to the PowerShell extension. It is open source!
International Language Fix (Required for computers not set to “English” as the default language)
Once this post started gaining some traction I learned that international users (specifically ones that didn’t have “English” set as their default language) were having trouble with authentication. I suspected this was due to language differences because I’ve encountered it before on some of my other scripts (like my Minecraft Bedrock dedicated server setup script) that gained international traction as well and once we tested for it sure enough that was the issue.
Yoan graciously shared the solution in the comments:
Function Using-Culture (
[System.Globalization.CultureInfo]$culture = (throw "USAGE: Using-Culture -Culture culture -Script {scriptblock}"),
[ScriptBlock]$script= (throw "USAGE: Using-Culture -Culture culture -Script {scriptblock}"))
{
    $OldCulture = [System.Threading.Thread]::CurrentThread.CurrentCulture
    trap
    {
        [System.Threading.Thread]::CurrentThread.CurrentCulture = $OldCulture
    }
    [System.Threading.Thread]::CurrentThread.CurrentCulture = $culture
    Invoke-Command $script
    [System.Threading.Thread]::CurrentThread.CurrentCulture = $OldCulture
}
This was found at Microsoft Developer Blogs – Using Culture Culture ScriptBlock and the blog post contains a ton of information about how to use it and what it’s doing!
In a nutshell it lets you wrap your calls to UMN-Google (or your entire script if you wanted) like this:
Using-Culture en-US {$accessToken = Get-GOAuthTokenService -scope $scope -certPath $certPath -certPswd $certPswd -iss $iss}
This is a really easy way to wrap your functions if you are getting errors related to language differences / default headers / etc. and is definitely worth a try if your PC’s default language is not set to English!




Hey guys… question.. is there a command in this UMN-Google module that allows you to “Find” a value in a sheet? how about Find/Replace? I already look at the list of commands in the module… but I don’t see anything that resembles a “Find” “Search” “Find/Replace” function… Thanks!!!!!
Hey Joe,
The underlying nature of the API is tricky with multiple batch methods to find/replace. If you pull the sheet data, search your array… compute which column/row, you can then post a set-GSheetData with the rangeA1 flag to set new data to a specific range. See here on A1 notation.