
I’ve covered the benefits of taking your Raspberry Pi to a solid state drive (SSD) before extensively in this article but in a nutshell you get around a 280% increase in raw throughput and a 1000% increase in 4k random read/writes over a MicroSD card.
That’s fantastic but SSDs have traditionally been very expensive costing you as much as 4+ Raspberry Pis so it seemed silly to use a drive like that as Pi storage. Until now.

That’s right. Thanks to technologies such as 3D NAND flash solid state drives for consumers have now become cheaper than mid-high range MicroSD cards. With 10x the performance of MicroSD cards they are now a no-brainer upgrade for servers or IO intensive Raspberry Pi projects.
Why Choose SSD?
MicroSD cards were not designed to serve as living storage for operating systems. They are designed for devices such as cameras and smart phones that need to write and reliably store data. They’re very good at this and some cards have excellent throughput fast enough to even record 4K video.
But one thing they are not good at is 4k random writes and rewrites. These are small writes throughout a disk and consist of about 25% of all hard drive activity on a computer. Almost every action you take and even routine log file updates trigger these updates so they are very important for performance.
To show you the difference in performance I have developed a benchmark that anyone can run and uploads the results to the site. Click here to see benchmark results.
As you can see all of the top spots in the results are held by solid state drives. Further, solid state drives beat the fastest MicroSD cards by about 300%.
MicroSD performance varied wildly based on quality of the card. But even the very best and most expensive MicroSD cards got absolutely destroyed by even the cheapest solid state drives. This is because SSDs are so fast that they are limited by the speed of the Raspberry Pi’s USB 2.0 ports.
Solid state drives also have very large write caches. This lets your Raspberry Pi push data to the drive and start doing other things and let the drive itself figure out how to organize the data. Much of the throughput and other performance differences in the above chart are because of much better and faster read/write caching.
Which SSD to Buy?
Since all models and types of solid state drives hit the Raspberry Pi’s USB 2.0 transfer speed limit you should buy the cheapest one that fits your needs!
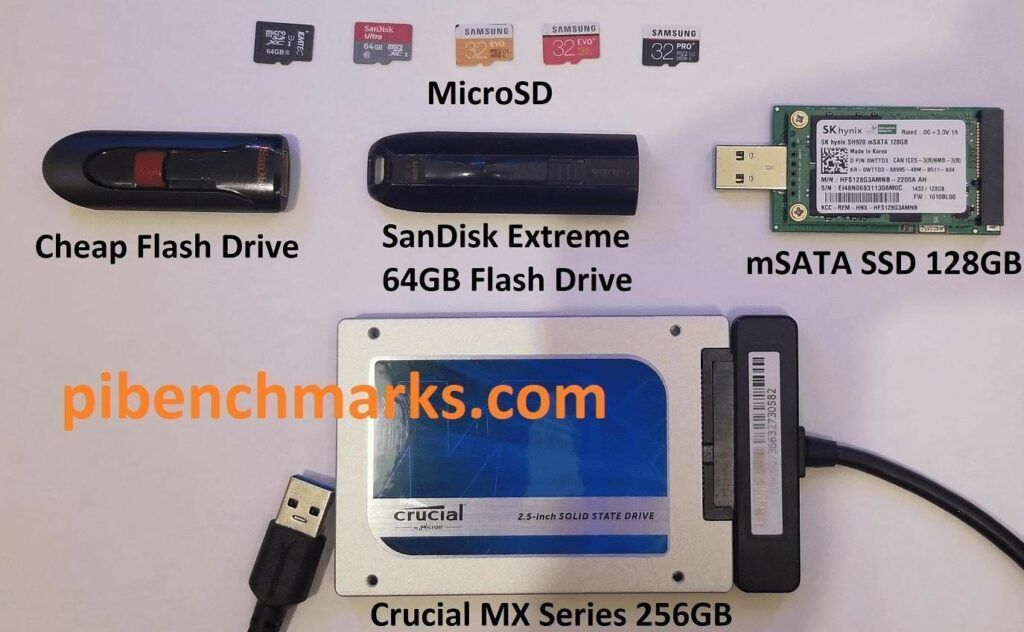
If your Raspberry Pi is mostly stationary it’s easiest and cheapest to just use a normal 2.5″ SATA SSD with a USB adapter. Here’s my recommendation:

The Kingston A400 has been a great drive to use with the Pi for years. It’s reliable, widely available around the world, has low power requirements and performs very well. It’s also very affordable. This drive has been benchmarked over 1000 times at pibenchmarks.com and is the #1 most popular SSD among the Pi community!
Links: AliExpress*, Amazon.com*, Amazon.ca*, Amazon.com.au*, Amazon.co.jp*, Amazon.co.uk*, Amazon.de*, Amazon.es*, Amazon.fr*, Amazon.it*, Amazon.nl*, Amazon.pl*, Amazon.se*, Amazon.sg*
The Kingston A400 drive performs really well in the Raspberry Pi Storage Benchmarks. It’s a great drive and is cheaper than many mid-range MicroSD cards. Another popular choice is the Crucial BX500 which you can sometimes find in a very cheap 120GB version:
The USB 3.1 variant of the StarTech 2.5″ SATA adapter works well with the Pi 4. The USB 3.0 variant doesn’t have firmware updates available and is not recommended.
Links: Amazon.com*, Amazon.ca*, Amazon.com.au*, Amazon.co.jp*, Amazon.co.uk*, Amazon.de*, Amazon.es*, Amazon.fr*, Amazon.it*, Amazon.nl*, Amazon.pl*, Amazon.se*, Amazon.sg*
The 2.5″ SATA to USB adapter above allows us to connect a drive like this to our Pi using USB. There is no power adapter needed as 2.5″ SSDs using adapters are low power and are powered by the Pi through USB. Be careful with enclosures as they tend to take a bit more power (especially for NVMe, see “Power Requirements” section below).
Compact SSD Options
If you move your Pi around a lot or need something more compact there are a couple of options. These eliminate having any extra cables as they plug directly into the USB slot.

The SanDisk Extreme Pro USB SSD is a true solid state drive. This is different than a typical “flash drive” which uses extremely cheap memory and has very low random I/O performance/throughput compared to a real solid state drive. I’ve used both the USB 3.1 and USB 3.2 variants with the Pi successfully and they benchmark very well!
Links: AliExpress*, Amazon.com*, Amazon.ca*, Amazon.com.au*, Amazon.co.jp*, Amazon.co.uk*, Amazon.de*, Amazon.es*, Amazon.fr*, Amazon.it*, Amazon.nl*, Amazon.pl*, Amazon.se*, Amazon.sg*
There are some flash drives (a very small number) that are actually real solid state drives. The SanDisk Extreme Pro is the most popular one on Pi Benchmarks.
You have to be extremely careful when looking for these as 99.9% of flash drives are NOT solid states. The SanDisk Extreme Pro is a true solid state. The cheaper SanDisk Extreme and Extreme Gos are not (needs to be the pro). If you are looking at a USB style drive and they don’t explicitly state it’s a solid state drive then it definitely isn’t!
Other SSD Options
There are many other types of SSDs and storage adapters you can use. For example, there is an older type of drive technology called mini-SATA or mSATA that can be found in a lot of old laptops or bought for very very cheap. I wrote an article on mSATA to USB 3.0 storage adapters here covering these.
There are also extensive M.2 NVME to USB 3.0 and M.2 SATA to USB 3.0 options available as well. You can build a M.2 SATA or M.2 NVME SSD but you need to be careful with which type of M.2 drive you have/buy. They can be B-key, M-key, or M+B keyed. By far the most common and cheap ones are SATA with a B or B+M key. The adapter I have is this one.* For a full overview of different available options check out my Raspberry Pi 4 USB Mass Storage Device Booting Guide where collectively as a community we’ve compiled the best list we can of working and nonworking adapters.
Power Requirements
Most types of adapters can be powered by the Pi itself. One notable exception is NVMe enclosures. Throughout the years we have had hundreds of comments from people who had no trouble powering 2.5″ SATA enclosures but couldn’t get a NVMe one to work at all without a powered USB hub.
Very large older 3.5″ SATA drives are known to require more power than the Pi can provide as well as some types of very high performance models that were designed to burn more power to get extra performance gains.
For solid state storage older models of solid state drives (SSDs) are also known to draw more power than their newer counterparts. If you have a drive that you think may fall into this category then definitely be on the lookout for power related issues and extra cautious about your power setup. High end “extreme” performance models also tend to draw more power (Samsung 970 NVMe drives* are some of the fastest in the world but also pretty power hungry for the Pi).
Insufficient Power Symptoms
Symptoms of a lack of power to the drive can include the system only booting sometimes (or not at all) or working for a while and then locking up. Just because the drive boots does not mean it is getting enough power.
Some commenters on previous articles have described this as working fine until there was a sudden spike in CPU usage while they tried to do several things at once (high CPU, accessing storage, activating various hardware all at once) and then they would get a lockup/crash.
This is because the Pi is teetering on the edge of not having enough power and that spike caused it to drop enough where the drive actually lost power (likely only for tiny fractions of a second). This is enough instability to easily cause a crash and worse if it happened to be in the middle of writing something important! Usually nothing will happen other than you’ll have to restart the Pi but because of the risk of data loss and eventually corrupting files. That being said, if you’re particularly unlucky you will have to fsck the drive or potentially even reimage it if fsck is unable to repair the damage!
The best answer is to test for stability. Do this by stressing out the Pi and make sure you are doing activities that stress the CPU and storage at the same time like browsing the web, etc. and if you can do that for a few hours/days without a lockup/crash then you have a stable power setup!
Powered USB Hub Solution
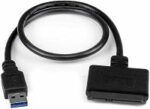
For NVMe enclosures and power hungry drives I personally use this Sabrent powered USB hub and have been recommending it here on the blog for a long time:
The Sabrent powered USB hub delivers a whopping 2.5A of dedicated power for your USB attached devices. This is almost as much as the Pi adapter itself is rated for (3.0A). It will easily power the most thirsty of setups such as NVMe enclosures.
Links: Amazon.com*, Amazon.ca*, Amazon.com.au*, Amazon.co.uk*, Amazon.es*, Amazon.it*, Amazon.nl*, Amazon.pl*, Amazon.se*
Note: Make sure Amazon doesn’t try to take you to the non-powered version and that it’s the one with the AC adapter that plugs in to provide extra power
If this hub isn’t an option for you and you don’t have one already you can try with it then look in the reviews for people saying that it is working with Raspberry Pi. Some powered USB hubs will not play nice with the Pi so before buying one definitely check reviews and do some careful research about what to expect with the Raspberry Pi!
Oversized Power Adapter Solution
This solution will work for setups that are right on the border of having enough and not having enough power. An example would be if you can get a stable boot but are getting occasional lockups/freezes when the power dips just below the threshold it needs.
If you are using a powerful NVMe drive/enclosure combo like the ICY BOX with a high performance Samsung NVMe drive even with the extra 500 mA it will still not even boot. I have had these oversized adapters and they are great but for a very powerful drive/adapter combination you are going to need more than 500 mA.
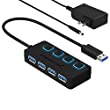
The CanaKit 3.5A adapter has an extra half an amp (500 mA) of capacity to give some breathing room to your accessories. This is bigger than the official Pi power supply which provides 3.0A.
Links: Amazon.com*, Amazon.ca*, Amazon.com.au*, Amazon.sg*
It’s a lot less extra wires and one less AC plug though if you are right on the border and just need a little bit more. It will depend on your individual drive/adapter combo whether it’s enough or you will have to go full powered USB hub!
In previous articles readers have told me that this specific adapter can be hard to find outside of North America. I tried to link to as many regions as I could find it in but there should be something equivalent in your region (it just likely won’t be specifically designed for the Pi but will be a more generic USB-C charger).
Look for a USB-C power supply rated to supply around 3.5A. 3.0A or lower won’t do much good as that is almost certainly what you already are using. You can use a higher one (at your own risk). The largest one I’ve ever used is my Dell laptop’s 30W USB-C power adapter. It’s probably not a good idea to go too much bigger than this or to even use one this big over the long term (I didn’t, just for occasional testing and as a emergency backup) but USB-C does have some specification improvements related to power management that seem to provide some flexibility here.
Power Limits
The Pi can only pass through a limited amount of extra power. On the Pi 4 this is up to 1.2A of extra power for peripherals (combined) on top of the board’s 3.0A power rating. This is much more than the Pi 2 and some other previous models could do which was only around 0.5A. This also means that getting a power adapter bigger than about 4.2A of rated current is pointless because the Pi won’t allow any more power to flow through to the board to the peripherals through USB anyway even if it’s available.
I’m oversimplifying a little bit to illustrate the point but if you want the full technical details they are available here in the Raspberry Pi USB documentation. The important takeaway is that going much above 3.5-4.0A or so will not actually provide any more power to the Pi because of these limits. If you’ve hit this ceiling and it still isn’t enough you need to go powered USB hub.
I’ve also used ones that charge cell phones to power Pis before and these ones are the most likely to fall into a range close to what the Pi uses. Most of the ones I had around the house for phones were 2.5A (just barely not enough) or 3.0A so it was enough for a backup spare but not enough to provide extra power. Nevertheless, it’s definitely worth it to check what you already have around and see if there are USB-C chargers around to test with!
Note that a powered USB hub essentially bypasses these limits because the power for your peripherals such as your USB storage will come from the AC adapter connection to the powered USB hub instead of the Pi having to provide that power.
Powered USB Hub Troubleshooting
Most hubs including the Sabrent one above can feed back power into the Pi which can cause it to not boot when the power is connected. The reason for this is that the Pi is detecting power and is trying to power on using that source but the current provided isn’t enough for the Pi to actually boot.
The solution to this is to remove the USB hub’s connection from your Pi momentarily and then connect the power. Plug your USB hub back in quickly after reconnecting the Pi’s power (if you have native USB booting set up) and unless you really fumble with reconnecting it you will have it plugged in well before it tries to boot from the SSD!
If this trick doesn’t work then unfortunately you may have a powered USB hub that is not going to work with the Pi. It’s worth checking to see if there are any firmware updates available for your USB hub before you give up on it as some readers have let me know in the comments of previous articles that they were able to get some hubs working after a firmware upgrade!
Benchmarking / Testing Storage
If you’re getting poor performance or just want to verify everything is working correctly you may want to run my storage benchmark with:
sudo curl https://raw.githubusercontent.com/TheRemote/PiBenchmarks/master/Storage.sh | sudo bash
If you search for the model of your drive on Pi Benchmarks you can compare your score with others and make sure the drive is performing correctly!
Create Bootable Drive
Creating your bootable drive is also very easy. You simply image it the same way you would image a blank MicroSD.
I use Win32DiskImager and simply select the USB attached drive just like you would with a MicroSD card and write the image. It’s very easy!
Don’t forget to place an empty “ssh” file in the /boot directory if you want to connect via SSH.
Prevent High CPU Usage
There is an issue where using a solid state drive will cause kworker to consume around 1-10% of your CPU all of the time. This is due to the Pi polling constantly for a Micro SD card to be inserted.
There are two ways to fix this. One is to insert a blank Micro SD card in the Micro SD slot and leave it there all the time. The other is to add a line to your /boot/config.txt. Open up config.txt and add the following:
dtparam=sd_poll_onceThis option will tell the Pi to only check for a Micro SD card once at bootup. This means if you want to access the card it needs to be in the Pi before it boots up.
I also wrote a complete guide on this very issue that is available here: Fix ~% CPU Usage When SSD Booting with Raspberry Pi
SSD With Raspberry Pi 4
The Raspberry Pi 4 did not originally support USB booting at launch unlike the previous Pi 3 models did. This is because they actually added a physical EEPROM firmware storage chip into the board. Due to this I previously published a workaround for how to set up USB booting using a SD card as a bootloader.
Fortunately the native support has finally been released for USB booting on the Pi 4. I cover how to upgrade to the new firmware and enable native USB booting extensively in my new Raspberry Pi 4 USB Booting Guide (recommended).
If you aren’t sure which SSD / storage adapter to get I have an extensive guide available here: Raspberry Pi 4 / 400 Storage Adapter Guide
SSD With Raspberry Pi 3
Once you have chosen your SSD it is time to configure the Raspberry Pi to boot off USB storage. Fortunately this is extremely simple. To enable booting from USB storage simply boot up your Raspberry Pi and run this command:
echo program_usb_boot_mode=1 | sudo tee -a /boot/config.txtAlternatively you can put your MicroSD into your computer and open /boot/config.txt and add the line:
program_usb_boot_mode=1Now reboot your Pi and USB boot support will be permanently enabled. This only needs to be done once per Raspberry Pi as the change is permanent.
You may now remove the Micro SD card altogether and plug in your external storage you prepared in the previous section. Power up the Pi and it will boot directly from the USB storage!
SSD with Raspberry Pi 1 / 2 / Zero W
The older Pi family and the Zero / Zero W also support USB booting with a small catch. You still need to have a Micro SD card inserted in the Pi with only one file on (bootcode.bin). This is because these Pis use the older
BCM2835 which is a Micro SD only bootloader.
The good news is that if we put a otherwise blank Micro SD card in there with this file the Pi can boot from USB storage just fine and take full advantage of the increased speed and storage size. Bootcode.bin basically provides the instructions to the Pi telling it how to boot from USB.
First you will format your Micro SD card as FAT32 . FAT32 is the partition type that the Pi bootloader can read and is the same format as the /boot/ partition on a fully imaged Pi card.
Next grab the latest bootcode.bin from the official Raspberry Pi repository at bootcode.bin in official Raspberry Pi GitHub Repository
Copy the bootcode.bin file onto your newly created and otherwise blank FAT32 imaged Micro SD card and then insert the Micro SD card back into the Raspberry Pi.
Now connect your USB storage back to the Pi and power it on. The Pi will boot directly from your USB storage device!
Conclusion
A solid state drive is the biggest upgrade you can give your Pi. When I am configuring my Minecraft Raspberry Pi servers the performance difference is night and day. They boot faster, respond faster and write/read much faster. It’s very difficult to go back to MicroSD after using one of these with your Pi.
I highly recommend running the benchmark for yourself to get an idea of how much performance you can gain!
Other Resources
If you’re looking for a guide on setting up SSD booting with your Pi check out my Pi 4 Native USB Mass Storage Device Booting Guide
If you want to find out the best storage adapters and SSDs for the Pi check out the Best Storage Adapters for the Raspberry Pi 4 / 400
For fixing storage adapters / improving performance with firmware updates: Fixing Storage Adapters for Raspberry Pi with Firmware Updates
If you have one of the new Raspberry Pi 400 kits *then don’t miss my Pi 400 Overclocking and SSD Setup Guide


Thanks for providing these guides. I replaced my SD Cards with SSD drives, and they work really well. How do you backup your SSD drives? there are various tools out there, but I wondered what you used? ideally I’d want an image of the drive, but not a simple image that dd would make (so ideally a compressed image or one that only stores what is actually used on the SSD). thanks!
Hey Scrumpy,
Typically you will want a full image with dd. We would just typically compress it like this:
dd if=/dev/nvme0n1p3 | xz -z9eT16 > nvme0n1p3.img.xzThere are definitely lots of other utilities that do this if you search for open source Linux imaging utilities but none of them come to mind as a must-use. You may still find one that makes things easier for you though.
Hopefully that helps!
No question. Just observation. Stock Raspberry PI 5 (8GB version) + heat sink and fan + 5V-5A power supply. Finally got my hands on one!!! That said for an empirical test, I fired it up booting PI OS Bookworm from a USB Samsung T7 2TB SSD with HDMI-Keyboard-mouse combination. Has been running great. No hick-ups! Good News! Then plugged in a Seagate 4TB HDD into remaining port. RPI-5 stayed alive (An RPI-4 would have rebooted, hung at this point)! All 4 USB ports in use (mouse, keyboard, SSD, HDD). Then kicked off a 1.6TB backup on the RPI-5 getting data from my home server to the attached HDD (over hardwired ethernet) which takes a few hours to transfer. Finished with NO reboots/errors/slowdowns/etc when I checked it this morning. What I am excited about is it looks the USB power problems experienced with the RPI-4, do not exist on the RPI-5! At least that is my experience so far. Just thought I’d put my observation out there. Also being that each USB board has it’s own controller there is no speed bottleneck either. Cool Beans.
When I can get my hands on a PCI SSD adapter I want to see if the little board will run with ‘three’ drives connected. Not that I need it, but want to find out if the little board can handle it:) .
So far I am really happy with the RPI-5. This iteration I think got everything right!
That’s “Each USB 3.0 port has it’s own controller in the RPI1 chip …”
Hey rclark,
Great report, thanks for testing! So with the RPI4 we had 5V 3A which was just short of what it takes to run a single NVMe drive (above 512GB or so) over USB typically. The 5V 5A gives us more headroom to work with.
I’d imagine it could power 3 2.5″ SATA SSDs. I doubt it would power 3 NVMe drives unless they were low power drives or 128GB/256GB modules which tend to use a lot less power than their denser counterparts of 512GB-1TB+.
I’m really not a fan of having to use a proprietary adapter to use a SSD to be honest with you. If I were to criticize things about the Raspberry Pi 5 it would be that they went even *more* proprietary on this version. Most of their competitors just gave us a standard M.2 slot such as the Orange Pi 5, Radxa Rock 5B, etc. I was really hoping for a real M.2 slot on this Pi but they went the proprietary route which is kind of their MO at this point.
Definitely let us know when you get the proprietary hat how many drives you’re able to power!
I am hoping that it will handle all three drive options at the same time. Note I wouldn’t expect it handle more than that though. More than that a powered hub should be used. But the point being that you can plug [b]ANY[/b] USB 3.0 ‘spec compliant’ device into the USB ports and the board will easily handle it is a big win IMHO.
Did you see the https://pineberrypi.com/ boards (a top and a bottom M.2)? I like the idea of a ‘bottom’ board instead of on top for some applications.
Instead of just a M.2 Slot, I think they did the special connector so that makers and companies can creatively do more things using the ribbon PCIe interface…. That said I could easily do away with the SD card slot, and have a M.2 connector on the bottom side of the RPI-5 🙂 . That I agree with!
Hey rclark,
Oh yes, I really like the Pineberry design as well! I think the partners of Raspberry Pi (and themselves) have a lot to do with why they went with a proprietary connector for sure.
It does have some upsides but to be honest you can have a M.2 connector ribbon cable as well. Like this. Nothing would be stopping their partners from making any design they wanted to if it had a real M.2 slot instead of this proprietary connector.
Add that to their proprietary screen ribbon connector cables and other connectors on the board and it’s pretty clear it’s a conscious design decision/philosophy. Almost everything on the board is proprietary at this point other than the USB ports and the HDMI connectors. It looks like storage will go in the same direction on the Pi but I can’t say I’m surprised!
FYI, actually this is what RPI person said about the M.2 slot:
”
Why didn’t we add an M.2 connector to the Raspberry Pi 5? The M.2 connector is large, relatively expensive, and would require us to provide a 3.3V, 3A power supply. Together these preclude us offering it in the standard Raspberry Pi form factor.
Using a small, low-cost FFC connector allowed us to provide a PCIe interface without growing the board, or imposing the cost of an M.2 connector and its supporting power-supply circuitry on every Raspberry Pi user.
”
Full Article here: https://www.raspberrypi.com/news/double-standards/
Hey rclark,
Thanks for sharing the link, that’s a great read! So I’m actually somewhat encouraged by them attempting to standardize. The devil is in the details but if competing boards are also allowed to implement the HAT+ standard into their own boards then it would certainly be better than what we’ve had in the past (no standards at all).
I honestly feel like that whole article was written for people who have my point of view on how they implemented this. The title is even “Double Standards”! Well there’s no question in my mind that standardizing is the right way to go about it. If those are open specifications/standards that can be used by everyone then that’s a major improvement!
I got a geekworm PCIe NVME adapther. Tried a 1TB WD Blue and the RPI5 would not boot with it installed. Tried a 250GB Samsung and RPI5 booted. Then found out I had to enable the PCIe interface which was another reboot before I could access the drive. I then researched the PCIe interface and found it is limited to 1A (or 5 Watts) . So that was reason the board would not boot with the 1TB drive. Note the boot drive is a USB 3.0 T7 with this setup I have for testing. So don’t plan on big drives for NVME! Anyway, thought I’d share.
Update. Actually the problem was the EEPROM needed to be updated to latest. The WD SN550 SSD controller wasn’t supported until recently. My 1TB drive appears to work now. Sorry for the mis-information above the WD Blue not working (other info is correct). Now I’ll have to see about ‘booting’ from it at some point! Oh and the geekworm board does have a 5V connector if needed to power externally instead of the pcie cable, so higher power boards ‘may’ work if powered by board instead of cable.
Hello rclark,
Thanks for the update, that’s great that the 1TB module is working after a firmware update! It’s pretty common to run into power issues on the 1TB+ versions. I have the same issue with my 256GB Samsung 960 vs my 1TB Samsung 960. The 256GB will work in basically any enclosure while the 1TB always requires a powered USB hub or it won’t power on.
Enjoy and take care!
A couple days ago, I did remove the 1TB drive, imaged latest PI OS on it, and then re-inserted in the socket, and booted from the drive. So far all is working fine running off the m.2 1TB drive.
Hi James,
Hopefully a quick question……..can you run *two* SSDs (via USB-2-SSD adapters) on a RPi-4b? I’m wondering whether the 1.2A for peripherals is enough to power two SSDs (one connected to each USB3 port).
Thanks in advance
Hey Justin,
Possibly. It will help if one of them is just being used as a general storage drive instead of the OS drive. They shouldn’t be fighting for power nearly as much. This will also depend on the SSDs you’re using specifically but I’d say generally yes it should be possible but if you run into trouble you may need a powered hub!