
I recently covered all the pieces you need for a complete setup to work with the Raspberry Pi Compute Module 4. Today I want to cover the whole reason I wanted to investigate the Compute Module 4: The PCI express capabilities!
In this guide I’ll cover a couple of 1x PCIe to NVMe adapters I picked up to try doing this with as well as full configuration and setup instructions. Let us begin!
Prerequisites

The Compute Module 4 by the Raspberry Pi Foundation is a single-board computer (SBC) that is meant to be used in embedded devices. It has many new capabilities that have not been seen on other Pis before such as a built in eMMC module (optional) and has PCI express capabilities when used with the IO board.
Links: Amazon.com*, AliExpress*, Amazon.ca*, Amazon.com.au*, Amazon.co.uk*, Amazon.de*, Amazon.es*, Amazon.fr*, Amazon.it*, Amazon.nl*, Amazon.pl*, Amazon.se*, Amazon.sg*
Make sure you’ve imaged your NVMe drive with an operating system of your choice such as Raspberry Pi OS, Ubuntu or your preferred distro. You may have to actually put the drive into a PC temporarily (you can use the 1x adapter in one) or if you have a USB to NVMe adapter (lots of Pi users should have one of these already) you’re good to go.
This guide will assume you’ve done this and the drive is prepped. The official Raspberry Pi Imager tool is a great choice to take care of imaging needs for you and is available for Windows / Mac OS X / Linux. Here’s a suggested drive if you don’t have one yet:
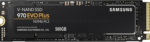
The Samsung 970 EVO Plus is a fantastic drive and has fallen in price substantially. It’s widely available around the world. The smaller capacities (such as the 250GB version) of this drive are perfect for the Pi! This is the top performance option without going into the “Pro” series of the lineup which are much more expensive.
Links: AliExpress*, Amazon.com*, Amazon.ca*, Amazon.com.au*, Amazon.co.jp*, Amazon.co.uk*, Amazon.de*, Amazon.es*, Amazon.fr*, Amazon.it*, Amazon.nl*, Amazon.pl*, Amazon.se*, Amazon.sg*
You will also need a IO board that has a PCI express slot:
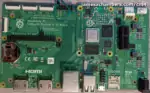
This is essentially the “motherboard” of the compute module. This IO breakout board lets us work with the compute module and get the ports we need to interface with it. This includes a SD card slot for models that don’t have eMMC, a PCI express slot (very exciting), 2 USB ports and more.
Links: AliExpress*, Amazon.com*, Amazon.ca*, Amazon.com.au*, Amazon.co.jp*, Amazon.co.uk*, Amazon.de*, Amazon.es*, Amazon.fr*, Amazon.it*, Amazon.nl*, Amazon.pl*, Amazon.se*, Amazon.sg*
Power requirements are also an issue. If you are using a powerful (or power hungry) NVMe drive you will for sure need something like this:

Delivers a full 12V DC to the IO board so that there’s enough power to run very powerful NVMe drives / accessories
Links: AliExpress*, Amazon.com*, Amazon.ca*, Amazon.com.au*, Amazon.co.jp*, Amazon.co.uk*, Amazon.de*, Amazon.es*, Amazon.fr*, Amazon.it*, Amazon.nl*, Amazon.pl*, Amazon.se*, Amazon.sg*
If your NVMe drive is performing extremely slowly / booting into emergency mode / things like that it’s very likely that it’s not receiving enough power!
PCIe to NVMe 1x Adapters
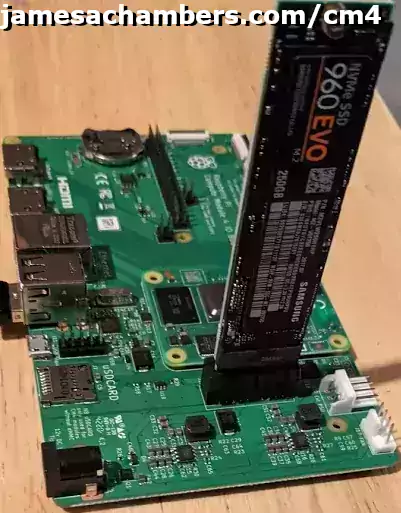
I picked up two different style adapters from Amazon to test. The first one is a very simple vertical standing adapter. My full benchmark for this adapter is available here: Pi Benchmarks – #48606

The Cablecc 1x PCIe M.2 NVMe adapter sticks straight up out of the board. It doesn’t take up a lot of space and ends up being pretty compact (as long as you have vertical space!)
Links: Amazon.com*, Amazon.ca*, Amazon.com.au*, Amazon.co.jp*, Amazon.co.uk*, Amazon.de*, Amazon.es*, Amazon.fr*, Amazon.it*, Amazon.nl*, Amazon.pl*, Amazon.se*, Amazon.sg*
Next up we have an adapter that sits horizontally and comes with some optional mounting brackets. This adapter scored about 400 points higher (may be a slightly better chipset) and has a green LED indicator light (the cablecc has no light of any kind). Benchmark available here: Pi Benchmarks – #48607

The Xiwai PCI-E 3.0 x1 Lane to M.2 NGFF M-Key SSD NVMe AHCI adapter card sits horizontally and comes with a couple of different size shrouds meant for mounting (not required). This takes up less vertical space but more horizontal space.
Links: AliExpress*, Amazon.com*, Amazon.ca*, Amazon.com.au*, Amazon.co.jp*, Amazon.co.uk*, Amazon.de*, Amazon.es*, Amazon.fr*, Amazon.it*, Amazon.nl*, Amazon.pl*, Amazon.se*, Amazon.sg*
Changing Boot Order
While the PCIe to NVMe adapters are pretty much plug and play in this setup switching the boot order of the Compute Module 4 is a little bit more in depth. It requires using the rpiboot tool on a different computer / Pi with the CM4’s “disable eMMC boot” jumper (j2) bridged with the pin directly below it so the Pi is able to boot into USB mass storage mode and be flashed with bootloader/firmware updates.
To do this we need to get a copy of the rpiboot/usbboot utility’s source tree. If you followed my CM4 setup guide you will already have the ‘usbboot’ folder and can skip cloning. If you are using Windows you will need to do this on your Pi and we will copy the final resulting folder over to Windows (for now just do the instructions on your Pi).
git clone --depth=1 https://github.com/raspberrypi/usbboot
cd usbboot
make
Now we’re going to enter the ‘recovery’ subdirectory and edit the bootloader configuration like this to change the boot priority:
cd recovery
sed -i -e '/^BOOT_ORDER=/ s/=.*$/=0xf25416/' boot.conf
./update-pieeprom.sh
You can also change boot.conf manually using nano followed by running ./update-pieeprom.sh. The boot type for PCI express is 6, so that should be your first type (which means it should be the number at the end of the string like I have in the above example) if you want to boot from PCI express.
(Optional) Choose / Update Firmware Version
The CM4 will have the exact firmware that is in your git source tree as the file “pieeprom.original.bin” inside the “recovery” folder at the end of this process.
We need to use the rpiboot utility to update the firmware. I will use the latest firmware at time of writing but check for the latest firmware at: the official rpi-eeprom Raspberry Pi GitHub Repository (if there is a newer one replace the pieeprom-2022-07-26.bin in the curl command below with the newer version file name).
Use these commands (from inside the usbboot/recovery directory):
rm -f pieeprom.original.bin
curl -L -o pieeprom.original.bin https://github.com/raspberrypi/rpi-eeprom/raw/master/firmware/stable/pieeprom-2022-07-26.bin
./update-pieeprom.sh
Mine looked like this when updating from my Pi 400:
pi@pi400:~/usbboot/recovery $ ./update-pieeprom.sh
+ /home/pi/usbboot/tools/rpi-eeprom-config --config boot.conf --out pieeprom.bin pieeprom.original.bin
+ set +x
new-image: pieeprom.bin
source-image: pieeprom.original.bin
config: boot.conf
pi@pi400:~/usbboot/recovery $
(Optional) Further Bootloader Configuration Changes
If there are any other bootloader parameters you would like to change you can do so using the file boot.conf like this (from inside the usbboot/recovery directory):
nano boot.conf
Make changes and press Ctrl+X then type 'y' to save
./update-pieeprom.sh
Flashing New Boot Order / Firmware / Configuration
We are now ready to run the rpiboot utility and use it to flash the new bootloader configuration and firmware to our Pi. You should still be in the “recovery” directory from the previous steps. Go to the base of the “usbboot” directory with:
$ cd ..
$ ls
bin2c    debian      imager   main.c    msd   Readme.md  rpiboot
bin2c.c  fmemopen.c  LICENSE  Makefile  recovery   win32
You should see the “rpiboot” utility like the above example if you’re in the base of the usbboot directory. If your host PC you will be plugging the USB cable into for flashing runs Linux use the command:
sudo ./rpiboot -d recovery
Make sure your Compute Module 4 IO board’s “disable MMC boot” jumper J2 is bridged with the lower pin to disable eMMC boot. Now connect the power:
api@pi:~/usbboot $ sudo ./rpiboot -d recovery
Loading: recovery/bootcode4.bin
Waiting for BCM2835/6/7/2711...
Loading: recovery/bootcode4.bin
Sending bootcode.bin
Successful read 4 bytes
Waiting for BCM2835/6/7/2711...
Loading: recovery/bootcode4.bin
Second stage boot server
Loading: recovery/config.txt
File read: config.txt
Loading: recovery/pieeprom.bin
Loading: recovery/pieeprom.bin
Loading: recovery/pieeprom.sig
File read: pieeprom.sig
Loading: recovery/pieeprom.bin
File read: pieeprom.bin
Second stage boot server done
pi@pi:~/usbboot $
(Optional) Windows Specific Instructions
If you are using Windows transfer the “recovery” folder you generated using the Pi over to Windows and run it in “Command Prompt” like this (make sure you’ve installed the rpiboot utility for Windows first, see my CM4 setup guide for links/instructions):
"C:\Program Files (x86)\Raspberry Pi\rpiboot.exe" -d recovery
or you can fully qualify your paths with:
"C:\Program Files (x86)\Raspberry Pi\rpiboot.exe" -d "C:\YourPathTo\recovery"
and connect the IO board (with the disable eMMC boot jumper set). You will see the same output as the Linux example above and the CM4 will be updated!
Preconfigure NVMe Device for CM4
If you attempt to boot now you will not have working USB ports, ssh, or any wireless configuration. We can preconfigure your NVMe device by plugging the device into a computer / Pi. You should see the “boot” volume where we can preconfigure our CM4 to be working right from the start.
Enable USB Ports
When mounted in the IO board the USB ports will not function without making a change to config.txt and adding an overlay.
Add the following line to config.txt:
dtoverlay=dwc2,dr_mode=host
After adding this line the two USB ports (as well as the “External USB” header) will function the next time the CM4 boots.
Enable SSH
It’s very useful to have SSH enabled when working with the Compute Module 4. It is enabled simply by creating an empty file named:
sshin the root folder of the “boot” volume (the top-most folder of the drive where start4x.elf, fixup.dat and those files are located)
Now when the Pi starts up SSH will automatically be enabled!
Preconfigure WiFi / Wireless
You can also preconfigure the Compute Module 4 (and any Pi) by creating wpa-supplicant.conf at the base of the “boot” volume like we did with “ssh” file.
Create a new file named wpa-supplicant.conf that contains the following:
ctrl_interface=DIR=/var/run/wpa_supplicant GROUP=netdev
country=US
update_config=1

network={
 ssid="YourNetwork"
 psk="YourPassword"
}
When this file is created in the base of the “boot” volume it will automatically be applied to the Pi upon the next startup. Make sure to adjust your country=US line to your own country as this can impact what channels and functionality are available from your WiFi card!
First Boot
You are now ready to boot your Compute Module 4. Go ahead and remove the jumper now from J2 and the pin below it and connect your prepped NVMe drive. If you’re using a monitor connect it to the IO board first before turning on the power.
Now connect power to the IO board and the PCIe/NVMe boot process will start. Your OS should boot with your preconfigured settings! My first boot was a little sluggish (most likely first boot operations on your drive) so give it a little bit of extra time here before assuming it failed.
You should verify your boot device by running:
sudo mount | grep "/dev/"
Make sure that the first line (usually your root) is something like /dev/nvme0n1p2 (the NVMe drive) and not /dev/mmcblk0p2 (that would be the eMMC or a SD card)!
Benchmarking / Testing Storage
Once you’ve booted up you can verify your drive’s performance using my storage benchmark with:
sudo curl https://raw.githubusercontent.com/TheRemote/PiBenchmarks/master/Storage.sh | sudo bash
If you search for the model of your drive / eMMC / etc. on Pi Benchmarks you can compare your score with others and make sure the drive is performing correctly!
Verify Bootloader / Firmware
You can verify your firmware version once you boot the Compute Module 4 by running rpi-eeprom-update which should look like this:
sudo CM4_ENABLE_RPI_EEPROM_UPDATE=1 rpi-eeprom-update

BOOTLOADER: up to date
   CURRENT: Tue 06 Jul 2021 10:44:53 AM UTC (1625568293)
    LATEST: Tue 06 Jul 2021 10:44:53 AM UTC (1625568293)
   RELEASE: stable (/lib/firmware/raspberrypi/bootloader/stable)
            Use raspi-config to change the release.

  VL805_FW: Using bootloader EEPROM
     VL805: up to date
   CURRENT:
    LATEST:
The firmware version for “CURRENT” should match the exact version you used for pieeprom.original.bin in our curl command we used when we were preparing the “nvme” folder earlier regardless of what is available in the repository.
Conclusion
These are by far the highest benchmarking scores I’ve ever got and at a score of nearly 20,000 it put me on the top scores page and was definitely well worth the setup and configuration!
I’m excited to experiment more with the PCI express capabilities and see what more the Compute Module 4 is capable of. I also have ordered a 8 GB CM4 that has eMMC as well as the built in WiFi (missing on my current model and it’s only a 2GB) which should let me experiment with some of the other smaller IO boards available and some of the other compute module specific capabilities that look really exciting as well.
I have 1x PCI risers that I use for cryptocurrency mining with GPUs that would theoretically allow me to connect some interesting things like a GPU, a Intel Optane 900p PCI express drive, and a few other wild ideas! This is just scratching the surface of what the PCIe capabilities could enable on the Pi.
Other Resources
Definitely don’t miss my Shapes, Sizes and Features of Compute Module 4 IO Boards guide to see which IO boards may work best for your project
For an explanation of the Pico W (a microcontroller) check out my Pico W Explained article or if you want to jump right into the action and see what it’s like to work with a Pico check out my Pico W Getting Started guide


Greetings,
Is this doable on a CM4 with 0GB eMMC (Lite version)?
That’s the cheapest I can find on Amazon ($175) with 8GB ram. Not sure why they got so expensive. There must be shortages.
Does the CM4 boot right from ee to the NVMe or is the SD card required to boot to NVMe?
Russ
Hey Russel,
Absolutely! You don’t need the eMMC to do it. It’s possible to boot the CM4 from NVMe with current firmware. As long as the firmware is up to date you should be good to go without a SD card.
Hopefully that helps!
How’d you get the Xawai adapter to even work. This is what lspci nets me. (CM4 on Pi IO board)
pi@CM4PI:~ $ dmesg | grep pci[ 1.213069] brcm-pcie fd500000.pcie: host bridge /scb/pcie@7d500000 ranges:
[ 1.213107] brcm-pcie fd500000.pcie: No bus range found for /scb/pcie@7d500000, using [bus 00-ff]
[ 1.213191] brcm-pcie fd500000.pcie: MEM 0x0600000000..0x063fffffff -> 0x00c0000000
[ 1.213272] brcm-pcie fd500000.pcie: IB MEM 0x0000000000..0x007fffffff -> 0x0400000000
[ 1.531038] brcm-pcie fd500000.pcie: link down
pi@CM4PI:~ $
Hey John,
For me the device was plug and play. I’ve never seen your issue before which intrigued me. I think I was able to find out why this is happening:
Now that sounds like we’re more on the right track. In the comments of this gist though was your exact error and a discussion about it. That was in reference to a firewire card and seems to have to be due to the Pi not supporting IO space directly allocated in the PCI bus (or something like that). I don’t think it’s the same case as the firewire cards that they didn’t successfully get working in that thread because we know it worked on mine a few months ago so it’s definitely not impossible. This has to be some kind of weird configuration / firmware issue.
If you have the identical one I linked to / have in the picture that definitely tells us that some kind of tweak could get it working. What version of the CM4 firmware are you running? Have you updated it to the latest firmware with the usbboot tool? I also used the 64 bit version of Raspberry Pi OS for all of these tests (this could have an impact potentially if the 64 bit address space is opening up what the Pi is expecting to be in that “bus range” or maybe only the 64-bit dtb maps this correctly). It may be worth trying the 64 bit flavor to see if it makes any difference. The firmware version and the OS (64 vs 32 bit) are the most likely things to be different from my setup.
I get the sense from Jeff’s posts that this issue is mostly resolved in later firmware versions. Updating the firmware on the CM4 is very weird compared to a regular Pi. You cannot do it through software. You have to switch the jumper and plug it into another computer running the usbboot/rpiboot software to update it. Raspberry Pi OS cannot update it by itself (like it can on a regular Pi).
If you haven’t done this it’s almost certain that it’s running a ~2020 version of the firmware from around the time Jeff originally made that gist and that doing the CM4 usbboot firmware update will fix it. If this ends up being the case it was already fixed when I wrote this post (which may explain why I never saw it) and the firmware had just never actually been updated since Pi OS can’t autoupdate it on a CM4.
If you continue to have trouble I can test it again with my Xawai using the latest Raspberry Pi OS flavor to see if I can reproduce this. What drive do you have in the adapter? I did tests with the Samsung 960 250GB module and the Samsung 960 1TB module. I don’t think the capacity / size of the SSD should be influencing this but I figured I’d ask in case it’s something like a 4TB or an unusual size.
I should also mention the 1TB module would not boot on a standard size power supply. I had to connect a 12V power supply (instead of the normal 5V Pi one) to the IO board to have enough power to boot the 1TB module. When this is the case you’ll get all kinds of strange errors depending on when the drive is losing power / dipping too low during the boot process. This doesn’t strike me as this issue from your initial description but I wanted to mention it because it’s a possibility.
Definitely let me know what you find and I am sure we can narrow it down further / solve it and I am willing to test again with the latest to see if I can reproduce it if you’re still having trouble!