
Recently I reviewed the Orange Pi Zero 2 and thought it was a fantastic board. I really like the amount of polish that the Orange Pi line of products have as it is the closest I have seen to anything approaching a Raspberry Pi experience. We also benchmarked the Orange Pi Zero 2 and determined it’s a very capable board.
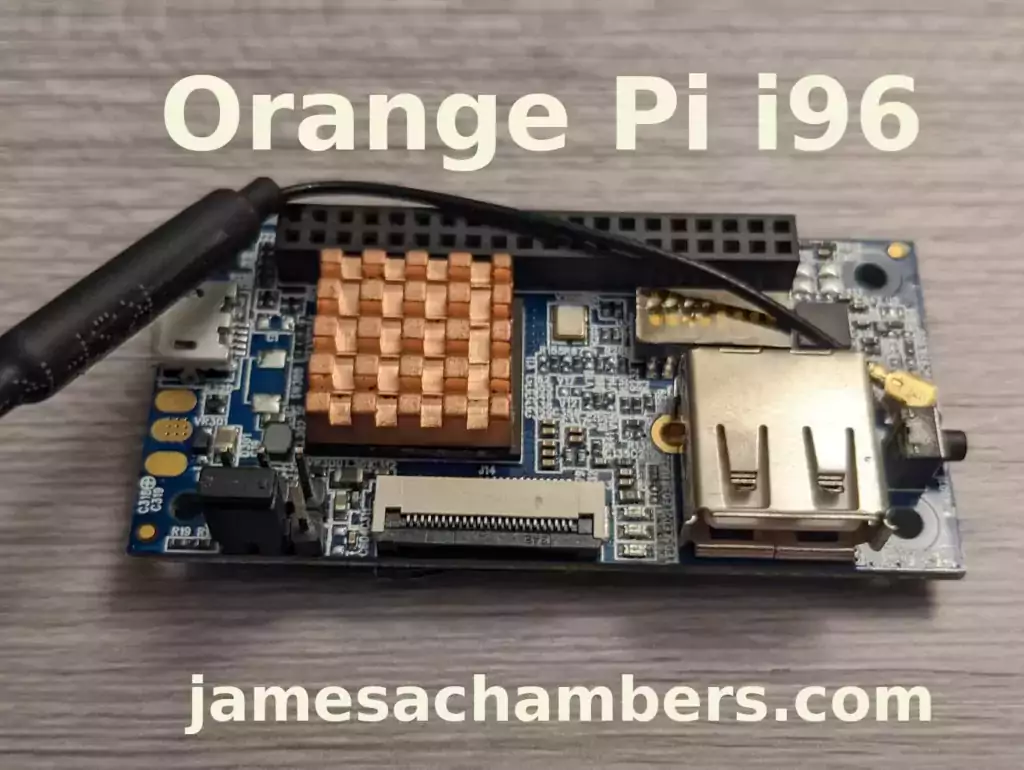
I recently got a Orange Pi i96 (thanks munecito!) and this board is very exciting because it was purchased on sale for ~$10! That is insanely cheap. The reason it’s so cheap is because it’s a headless board that doesn’t contain any display-out ports.
If you are going to be using the board headless anyway (I use most of my SBCs headlessly) you may be able to save a fortune with this board. Let’s get started!
Hardware Used

The Orange Pi i96 is a low-cost board from the Orange Pi line of SBCs. It uses the RDA8810 SoC and has 256MB LPDDR2 SDRAM. It’s well suited for headless tasks and is astonishingly cheap.
Links: Amazon.com*, AliExpress.com*, Amazon.ca*, Amazon.co.uk*, Amazon.de*, Amazon.es*, Amazon.fr*, Amazon.it*, Amazon.sg*

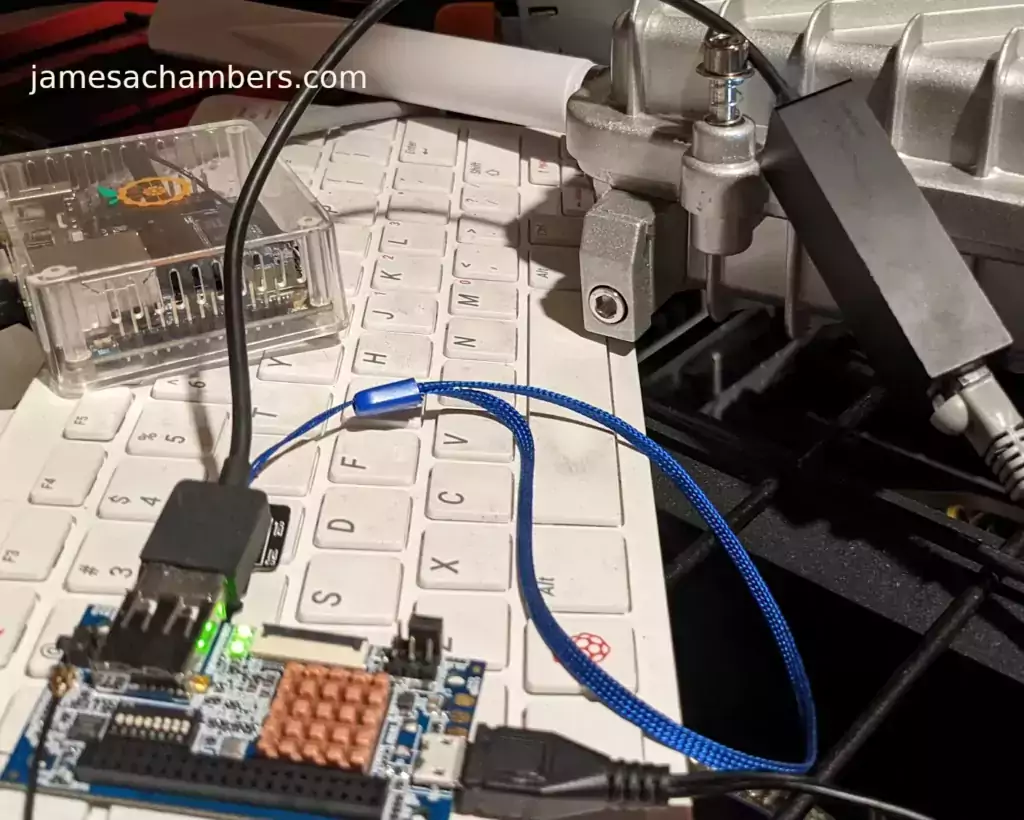
The Geekworm copper heatsink set is designed to fit many different single board computers. It uses thermal conductive adhesive which many “cheap” heatsink kits for SBCs don’t have. Eliminates hotspots and reduces throttling. Can be further enhanced by powered cooling over the heatsinks.
Links: Amazon.com*, Amazon.ca*, Amazon.co.jp*, Amazon.co.uk*, Amazon.de*, Amazon.es*, Amazon.fr*, Amazon.it*

The Orange Pi official mouse uses 2.4GHz wireless to give you a wireless mouse experience with the Orange Pi
Links: Amazon.com*, AliExpress*

The Orange Pi monitor is meant to be a portable monitor you can take anywhere. It has a resolution of 1080P and features a hinge in the back that folds out to support the monitor.
Links: Amazon.com*, AliExpress*
Getting Started
EDIT: I now recommend using my fixed Orange Pi i96 image as it will fix your USB port to be able to operate at full speed and give you a much newer OS of Debian Bullseye.
Alternatively you may use the official images (not recommended for this board). If you’d like to use the official images instead head to the official Orange Pi downloads page:
Now select the Orange Pi i96 from the list. I will be using Ubuntu Linux for this guide but you may use Armbian as well.
If you are wanting to try Android I highly recommend seeing my Orange Pi Android Installation Guide as the installation process is different than Linux.
Writing the Image
The images are typically distributed as a .tar.gz file. The name of the Ubuntu image tar.gz file at time of writing was OrangePi_i96_ubuntu_xenial_server_linux3.10.62_v0.0.4.tar.gz.
We will need to extract this file. If you are using Windows then grab 7-zip to be able to extract a .tar.gz file.
Inside this file will be a .img file. Since I downloaded the Ubuntu image the name of my file was OrangePi_i96_ubuntu_xenial_server_linux3.10.62_v0.0.4.img. This is the image that we are going to write to our SD card.
There are several choices to write the image to your SD card. If you are on Windows I recommend Win32DiskImager. Etcher is also available for Windows/Linux/Mac OS X.
Write the image to the SD card using your preferred software.
First Startup
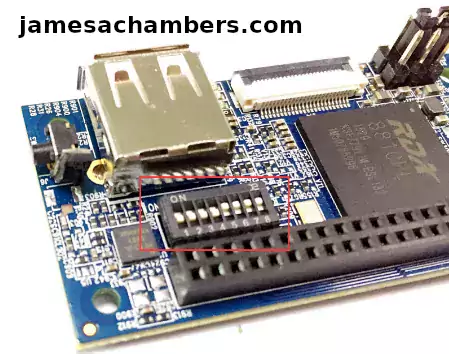
Before starting up you should make sure that the Orange Pi’s switches are in these positions (indicating to boot from SD card):
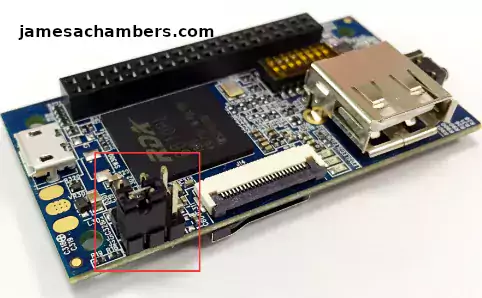
We’re ready to put the SD card into the Orange Pi i96. But how are we going to connect to the device? There’s no network port and the device isn’t configured to connect to our WiFi yet.
Connection Option #1
If you happen to have a USB to Ethernet adapter that is the easiest way to connect to the device for initial configuration:
Connection Option #2
If you have a TTL to USB serial debug adapter* you can use that as well. See the OrangePi instructions for that method.
Initial Configuration
orangepi-config Utility
Once you’ve connected it’s time to do some basic configuration. We will use the tool orangepi-config:
sudo orangepi-config
You may now set the WiFi settings, etc. The orangepi-config is just like raspi-config if you’ve ever used that on a Raspberry Pi.
Don’t reboot before doing the next section.
Fix Second Startup (Debian / Ubuntu)
You will notice if you reboot the device it will often not come up the second startup. This is especially likely if you performed a sudo apt dist-upgrade.
To prevent this I recommend removing the alsautils package. This will impact sound functionality on the board but as I was not using it and intended to use this more as a headless board this was fine for me.
sudo apt purge alsa-utils
If you need to have the sound working on the board there is an alternate solution available here.
This is not necessary in my Legendary image as it has kernel fixes for these issues (highly recommended)
Set Timezone
Replace my timezone with yours in the following commands:
rm /etc/localtime
ln -s /usr/share/zoneinfo/America/Denver /etc/localtime
Setup Locales
Setting the locales isn’t in orangepi-config (such as it is in raspi-config) but here’s a quick way to set them:
sudo apt install locales -y
sudo dpkg-reconfigure locales
Setup Wireless CRDA Regulatory Domain
For the wireless to function very well at all you need to set the wireless regulatory domain.
If you are not using my image then you will first need to install the crda package with:
sudo apt install crda -y
Now we can set the regulatory domain by editing the following file:
sudo nano /etc/default/crda
At the bottom of the file there is this line:
REGDOMAIN=
Put the 2 letter country code for your country. Mine is “US”. Once finished press Ctrl+X then Y to save the file.
Optional – Upgrade Debian OS to Buster/Bullseye
Note that this will not upgrade the kernel. You can upgrade everything else though including all the way up to Bullseye. You should do this one release at a time and start with “Stretch” and then do “Bullseye” afterward.
If you are using the Debian installation you can upgrade to Buster by editing your /etc/apt/sources.list file.
Change all instances of “stretch” in the file to “buster” and then do the following:
sudo apt update && sudo apt dist-upgrade -y
Once this has completed reboot the system (make sure you’ve done my fix second reboot section first by purging alsa-utils). Verify you are on Buster with
cat /etc/os-releasefor example:
root@orangepii96:/# cat /etc/os-release
PRETTY_NAME="Debian GNU/Linux 10 (buster)"
NAME="Debian GNU/Linux"
VERSION_ID="10"
VERSION="10 (buster)"
VERSION_CODENAME=buster
ID=debian
HOME_URL="https://www.debian.org/"
SUPPORT_URL="https://www.debian.org/support"
BUG_REPORT_URL="https://bugs.debian.org/"
Now you can upgrade to Bullseye. It’s almost the same as upgrading from Stretch to Buster but there has been a change in the security updates server format. Here is a working “Bullseye” apt sources file for the Debian Orange Pi i96 image:
root@orangepii96:/# cat /etc/apt/sources.list
deb http://ftp.debian.org/debian bullseye main contrib non-free
#deb-src http://ftp2.cn.debian.org/debian bullseye main contrib non-free
deb http://ftp.debian.org/debian bullseye-updates main contrib non-free
#deb-src http://ftp2.cn.debian.org/debian bullseye-updates main contrib non-free

deb http://security.debian.org/ bullseye-security main contrib non-free
#deb-src http://security.debian.org/ bullseye-security main contrib non-free
Once you’ve changed the files do a sudo apt update and make sure you don’t see any errors. If everything looks okay start the Bullseye upgrade with:
sudo apt full-upgrade -yAfter a reboot you should be on Bullseye! We can verify this with cat /etc/os-release:
orangepi@orangepii96:~$ cat /etc/os-release
PRETTY_NAME="Debian GNU/Linux 11 (bullseye)"
NAME="Debian GNU/Linux"
VERSION_ID="11"
VERSION="11 (bullseye)"
VERSION_CODENAME=bullseye
ID=debian
HOME_URL="https://www.debian.org/"
SUPPORT_URL="https://www.debian.org/support"
BUG_REPORT_URL="https://bugs.debian.org/"
orangepi@orangepii96:~$ uname -a
Linux orangepii96 3.10.62-rel5.0.2+ #4 PREEMPT Wed Mar 18 18:49:25 CST 2020 armv7l GNU/Linux
Notice that the kernel has not changed at all (as cautioned at the beginning of the section) but everything else on the system will be Bullseye!
Performance Benchmarking
I benchmarked the board using a SanDisk Extreme SD card on my Pi Benchmarks web site. This gives us comparable results between boards and there are over 30,000 benchmarks submitted for various boards / storage devices.
I had a total score of 497. This was below average or off from an average Raspberry Pi setup by about 47%.
To be clear the storage performance on the board is relatively low compared to the Orange Pi Zero 2 or a Raspberry Pi (Zero or 4). That is to be expected for a price of around ~$7-$10.
I’m not sure I would say this is a disappointing result though. We are talking about a board that is a single digit number of dollars. For the price point that is fantastic performance! In fact for the price point it’s a wonder that it works at all.
Conclusion
It’s a great board. At a price point of $7-$10 it reminds me of the really, really old Raspberry Pi Zero days where you could actually get a Raspberry Pi for around that price point.
The Zero 2 is a significantly more powerful board. It benchmarked much higher than the i96 but it also costs significantly more. If you need more power that board will be a better choice. If you’ve never had an Orange Pi before I would recommend the Zero 2 first as this board is quite a bit trickier and has more outdated software available for it.
The version of Ubuntu on this board is also quite old (Ubuntu 16.04 / Xenial) compared to the Orange Pi Zero 2 which is actually running a modern 5.X kernel whereas this one is a 3.X kernel. Make sure that is not going to be a problem or you will want to step up to a higher Orange Pi. The i96 is definitely meant for simple services / projects that don’t need a lot of power. It’s perfect for those.
If you need a headless board then the Orange Pi i96 may very well fit the bill for you, the price is certainly right! Don’t skip the heatsinks though. It got very warm during testing (warm enough to freeze once during consecutive benchmarks) and Orange Pis are known to get quite hot!
Other Resources
I highly recommend using the Legendary i96 Debian Bullseye image available here
I’ve also reviewed the Orange Pi portable monitor here
Don’t miss my Orange Pi Zero 2 Review / Tips / Guide for another great board (with display connections)
I’ve also reviewed the Orange Pi 3 LTS which is roughly equivalent in power to a 2GB Pi 4
If you’re trying to set up Android definitely see my Orange Pi Android Installation Guide
For the fastest storage options check out my Linux storage benchmarking script


I have been using/testing 1.8 . This works well – wifi very stable for me ( i ran without antenna by mistake and it looked good 😉
Here are some things I have found:
> if you run dmesg you may see the ‘ALC on the journald not supported’ it is a warning – did we want that as part of kernel config.
> is the rda_backlight service needed? (maybe sets voltages) using $systemd-analyze critical-chain it looks like that service takes a while to come up
> also in dmesg: unrecognized mount option “hidepid=invisable” or missing value
> in the e2scrap_reap.service the Ambient_Capabilities field is empty/unknown
> There is no modprobe? modules? I need the USB CH341 driver and USB serial enabled to talk to 3D printer vi ttyUSB. I can lsusb and see the device I need to talk to, but no driver is loaded
I have not built kernel yet – still something missing on my LinuxMint install – i get an image of something but it is not right – otherwise I would clone your repo and submit some PR as I test.
Thanks again for your attention – I will continue to test/use and try to get working build environment.
I found modprobe – need to invoke with $sudo modprobe 😉
I found the problem with build env – I was missing bsdtar found in libarchive-tools
the .xz file is a different size than the one on your repo, but the img is exact byte size
Hey Steve,
That makes sense. The original build tool produces .tar.gz files. The xz files are completely of my own creation. Each one will be different because the time is sync’d (you can actually see it do this during the build, the image will basically ship with the exact time it was built at stored in the clock) and it actually downloads and builds a brand new image each time so these will never have matching signatures or anything like that.
I don’t think matching signatures would be possible with a debootstrap style image (what it uses for Debian, the Ubuntu one downloads a base file so that one it may be possible). It is actually a unique system set up each time that will have different timestamps for the apt updates / installs / a bunch of other things if that makes sense. This should never produce the same MD5 or SHA hashes even if you built it over and over a hundred times because the apt timestamps should not be the same since you updated at a different time than the last time.
You can verify this simply by building the same image over and over again making no changes at all. It will not match my signature or any of yours basically (nor should it, that would be very strange). It’s a fresh and totally new image each time you do it basically and will have timestamps matching when it was ran. It does cache the root filesystem though so it might be possible with a cached kernel or cached rootfs but even then your cached versions would not match mine (or your own previous builds). The best they would match is your own if you built them with the same cached kernel/rootfs if that makes sense but never will they match mine since I would have to generate my own rootfs.
It looks like bsdtar is used in some other places though, I got this using the same package you did I think. I’m glad you were able to build it yourself, I don’t think very many others have actually built it yet! Basically you need to be able to build the Orange Pi one to be able to build mine (for the most part, I took some of their obsolete dependencies out).
The image generator does complete apt full-upgrade updates (not the original one, that one doesn’t do them at all, just this one). If there has been any apt updates since I built the image your size will be different. It might not even take that for the size to be different. Just the apt dates changing and how well those compress would change the image size from mine. The size generated will probably change from build to build. If you build it over and over it probably shouldn’t change much. If you build it and then build it a week later it will definitely change since there will have definitely been updated apt packages in that time.
In other words the image produced will always have the latest apt updates available at the time you ran it. There will always be 0 apt updates available if you run the image right after you produced it. If there’s apt updates available those are ones that have only become available since the last time I generated a release image. It’s also a good way to understand why the images will never match and if they do it won’t be for long.
This is very useful for anyone else who is trying to build it. It would be nice to add these to the dependencies to automatically install but honestly the truth is the Orange Pi build environment is probably going to be a little bit different to get working on other people’s systems. The libarchive-tools would be a good one to add though since I ran into that one as well. Thanks for sharing this Steve!
Hey Steve,
I think the rda_backlight service is probably not needed but it’s used if someone actually connected the display. It does look like it times out during startup though when it’s not connected.
If we can add the ACL on journald in the kernel config I think that would be fine. I already fixed some services related to this but it would be better to fix it if the kernel is not too old to use that functionality.
It sounds like you figured out the modprobe
The e2scrap_reap service was a fix by me. I may have done the wrong syntax to produce a warning instead of an error. Either that or it doesn’t recognize that syntax at all but it used to fail with the old syntax. It needs to be set to empty or the service will fail (old kernel related, not sure if it can be fixed)
If you are able to do PRs for any of them that would be fantastic as it sounds like you were able to get it to build! Remember, we are using a 3.X.X kernel with an OS that actually isn’t really compatible with a kernel this old. To give you an idea of why there are so many warnings:
The kernel version for Buster was supposed to be 4.19. It’s supposed to be 5.10 for Bullseye. I am not so sure that fixing all of these warnings will be as simple as flipping a switch. Most of the fixes I’ve done to keep the services from crashing/failing are just workarounds disabling new functionality that won’t work with such an old kernel. We are running a totally unsupported kernel for Bullseye basically. It’s not even within years of being new enough to run Bullseye normally and to get a clean startup (as in no systemd failed units, not no warnings in the log as not even my Ubuntu 22.04 desktop or any Linux desktop I’ve ever owned has completely clean dmesg logs with no warnings and my laptop is even worse) took manually editing services which you can see in all of my changes submitted to this basically.
This is also almost certainly why a newer Ubuntu image won’t boot it all. That one just straight up won’t work without an updated kernel for anything 20.04 or newer. It’s just too old of a kernel it seems like. It might be possible by enabling as many build options as possible and doing workarounds like I’ve done for Debian but that one won’t even boot without much more work on that image (and probably a UART serial debugger to figure out why it’s not booting to begin with and then see if it’s possible to fix from there without upgrading to a newer kernel).
A kernel porting project is definitely not what I wanted to go for here and I fear that fixing some of those warnings will lead you right to that. They do not seem to be causing any problems other than annoying warnings. I think you will find that it is impossible to fix some of these but definitely not all of them. If you’re able to find any that are easily fixed I would absolutely accept any PRs related to fixing these. It’s hard to want to focus on those issues though because I know they are related to the old kernel and most of them aren’t causing any problems (with the exception of the backlight slowing down booting).
Many of these services automatically fall back when kernel features aren’t supported. If you google the
hidepid=invisibleerror for example you will find that is related to old kernels and it is actually harmless. The services already know to fall back when it’s an unsupported kernel in that case. Is there a kernel option present to enable that? Maybe. I saw that was added in Linux 3.3 so it’s possible there is an option for this one. Some of the other service related warnings/failures are related to options that didn’t exist until 4.X and 5.X kernels though depending on the issue. If you are able to narrow any of these down into a more concrete idea of which ones can be fixed and which ones can’t that would be amazing!I think the backlight one you mentioned here is by far the most fixable issue and that it would have a benefit. It seems like it is timing out after something like 10 or 20 seconds twice. I think this may literally be delaying the boot by that long which your systemd-analyze results seem to agree with that conclusion that this is significantly slowing down booting. Maybe we can just disable the service and it won’t time out like that? I haven’t tried that yet but I think that’s worth investigating. If someone is actually using the RDA screen connector they can re-enable the service potentially.
I’m curious what you will find is easy to fix and what will require some kind of kernel upgrade. Hopefully that helps explain some of it at least with what I’ve seen and learned so far working on it!
What is your workflow for i96_linux_defconfig updating?
I have something like this (in kernal dir):
$make ARCH=arm i96_linux_defconfig$make ARCH=arm menuconfig
now? copy .config over i96_linux_defconfig ?
thanks
Hey Steve,
I actually put any files I’m going to modify in my project and copy them over the build every time.
I have a window open with
cp -r Legendary-OrangePi-i96/OrangePiRDA* OrangePiRDAThat means I make the changes in my copy of the file and copy over. Your .config will just get replaced by the default config files basically.
I actually delete the entire output folder every single build.
rm -rf OrangePiRDA/output. This will prevent a cached kernel and rootfs from being used (which can block any of your changes from showing up in the image).Then I run ./build.sh from scratch. Having a powerful machine helps. It only takes me a few minutes to build on Threadripper. A normal PC will probably be 20-30 minutes or higher without more additional cores to build it as you will be building the kernel, the image, the modules, everything from scratch.
Essentially you would edit kernel/arch/arm/configs/i96_linux_defconfig from my project and then follow the instructions to copy it over. The .config file will be replaced by this file every time no matter what you edit on your own within OrangePiRDA. The build system will simply replace it with the one it thinks it’s supposed to be building with (i96_linux_defconfig).
I never really work with the OrangePiRDA folder other than running ./build.sh in OrangePiRDA after I’ve copied my files over the top of them. Hopefully that helps!
Thanks for the help. I’ll use it.
I find using $ make ARCH=arm i96_linux_defconfig after making changes shows errors – such as using a =Y instead of a =y
Hey Steve,
Are you using the Orange Pi build system or building it on the command line? I do not build the kernel that way using make or menuconfig or anything like that. I do:
cd OrangePiRDA./build.sh
That’s all I do to build the whole thing (after copying my files over the top basically). I build it using Orange Pi’s menus at that point so I never use any commands like that on the CLI (unless you are saying that is where the automated build is failing). After running ./build.sh I simply choose Orange Pi i96, then Debian, then to build the whole server image.
You can use the “Build Kernel” and all of those options from the menu as well. I do not recommend using the CLI though and manually trying to build your changes. I have never done it that way and I’d guess it will be pretty miserable because Orange Pi is copying configs over the top of those files right and left all throughout the source code. That’s most of what I’m modifying (and knowing what to modify and where as you can see on a higher level what they are trying to do in the build scripts).
I’d recommend using the build menu though as that is how it is designed/intended for sure and it’s fully functional for all the steps they offer to use (and won’t have nearly as unpredictable outcomes as trying to build this on the CLI outside of the build scripts). I’ve even put my SD card in and let it update the kernel through the build menus and that works. You type in the path to your mounts after putting the SD card in and it can actually update the kernel without touching the rootfs for example through the build menus.
If you are simply trying kernel changes this will save a ton of time. In ./build.sh you can choose to build the kernel instead of the entire image and then you can use the “Update Kernel” option on your SD card to update it without having to rebuild all of Debian. Those are some tricks that may hopefully help with this!
I am using the build.sh – I will try the kernel build – that is great! thanks
I was using the make to show possible problems in the changes – see below – if the Y is used instead of y then that change is ignored (i believe)
steve@redDog:~/Projects$ cp -R Legendary-OrangePi-i96/OrangePiRDA/* OrangePiRDA/steve@redDog:~/Projects$ cd OrangePiRDA/kernel/
steve@redDog:~/Projects/OrangePiRDA/kernel$ make ARCH=arm i96_linux_defconfig
arch/arm/configs/i96_linux_defconfig:122:warning: symbol value 'Y' invalid for SYSFS_DEPRECATED
arch/arm/configs/i96_linux_defconfig:2505:warning: override: USB_G_ANDROID changes choice state
#
# configuration written to .config
#
Hey Steve,
Ugh, I’m guessing the capital Y was my fault in that. You could probably find where I did that in the commits (or already did). I guess I must have tried to fix this at some point not realizing that I used the wrong case letter.
Fantastic finds! I’ve merged your pull request #2 and am going to build a new release for it here (1.10). Thanks for your hard work and successful building / PR!
Look what i have found, we can use the NAND, would be nice to integrate it a little bit worthier
Hey Marco,
I actually hadn’t seen that one before! The NAND is only 512MB so I wonder what Linux they are booting on it. This image is almost 2.5x-3x times the size of the NAND chip. I’m not sure what people would have room to load on there (or would have used even at the time). I’ve only seen it ever used for Android.
I have thought about making the NAND storage more accessible within the image though. There are some tools out there used to do this now. They’re generally just scripts.
I guess I don’t understand what this is doing. Now that I’m reading the instructions it looks like it’s booting to /dev/mmcblk0p1. The NAND shouldn’t be a eMMC/SD card mmcblk0 object. So what is the SD card being used for here? Is it holding the root OS? Or is the SD card acting like a bootloader?
I guess the biggest issue for me is that there isn’t enough room for this to be what it appears to be unless the 2G version of the board has a larger NAND chip onboard. There simply isn’t enough space. The image is 1.4GB and the NAND is 512MB so I’m not sure what this is but it can’t be what they are saying it is!.
The official image from 5 years ago is also 1GB+ so I’m not sure what we are looking at here but it is not a 1GB image boot off a 512MB NAND and something else must be going on here, Where would the files be? Is this used in conjunction with a SD card somehow as like a dual boot? That would at least explain where all the files are but it’s also not actually a NAND boot if that’s the case.
I’m definitely open to adding more NAND support into this or making the partitions accessible within Linux for sure though. I don’t see how it’s possible to boot off a 512MB NAND with this image though or any image I’ve ever seen available for the i96 (that isn’t Android).
Just got done reading the article it says it’s using DietPi. It might be doing some smoke and mirrors where it’s bootstrapping off the SD, but loading off the NAND. Looks like you have to flash the bootloader on the device to see the NAND from Linux. I’m a bit of noob, so take all this with a grain of salt.
Hey Dustin,
Don’t sweat it at all, thanks for linking me to that. That makes sense. I knew it couldn’t have been the original image. I knew there were a couple others out there like the abandoned Armbian fork but that one would be too big too.
That would make sense if this method is bootstrapping off the SD. It was pointing to /dev/mmcblk0p1 which is usually the boot partition (the other possibility being that the SD card *only* contains a root partition which I’ve seen before on other boards but didn’t seem likely). That is something that I’m sure can be fixed. I just didn’t know of any reason to with the size of the images I knew about but this helps!
I will definitely investigate this and see what it looks like. As far as I know there is nothing on my NAND partition at the moment (or it’s the Android install that comes by default on it probably). If there’s still a <512MB DietPi I could definitely give it a try and see what it looks like!
The link for the build system is dead. I believe this is the updated one.
I haven’t got one of these yet, just researching. I’m looking for something I can power with a battery (18650), acts as webcam and a hotspot. I played with a Pi Zero W. It worked OK, but the internal antenna didn’t have the range. Hoping the external antenna might be better or maybe an upgrade?
Hey Dustin,
I completely understand! So the OrangePi_Build system is what this one is based off of. I haven’t read the article yet to see what they’re doing as I’m on vacation/traveling but it looks like you can “generate” a DietPi image by dragging in an existing image on their web site.
I assume this is what they did and that this would probably still work (as long as it boots, It would need to use the Orange Pi specific kernel as other kernels won’t have hardware support for it including mainline which lacks support for the SD card / storage.
So for the WiFi a lot of the problems with it are related to the regulatory settings on the device (/etc/default/crda). On a Raspberry Pi this setting is set in raspi-config (or can be) but orangepi-config does not have this option )and indeed their base image is missing the CRDA package meaning the regulatory part of the WiFi chip will not function / will be wrong).
I would not state that it makes the wireless fantastic yet but it is apparently pretty stable now from testing with the right regulatory settings. I’m sure it would still benefit from an antenna upgrade but the fixes in this image definitely improve the WiFi from what everyone says about the board (because they had to have been using an image with broken regulatory which is all of them including the official ones).
My plan when I get back from my trip is to basically put my image into DietPi and see what it shrinks it to. If this turns out to be relatively straight forward I might not even be opposed to distributing a DietPi image as one of the downloadable versions (if it worked well enough). Great questions, I would say it’s worth trying with this image on the stock antenna and then if that isn’t yielding results then yes an antenna upgrade may be in order for sure. Hopefully that helps!
Thanks for all the great info! I’ve done some work with WiFi and I’m familiar with the US/EU freq. differences.
Even if you can’t use the NAND for the OS, it might be useful as swap, /tmp or maybe user storage that can survive an OS update. I’m not sure if it would be more or less wear resistant than a microSD drive.
I’ll probably roll the dice and order up a few of these. Enjoy your vacation!
Hey Dustin,
I agree 100% with you! That’s very cool you’ve done WiFi work especially related to the frequencies and regulatory! The only reason I knew about this is from my experience on all the other boards I’ve covered on the site.
This used to be a thing on the Raspberry Pi as well and still can be. On earlier models of the Pi you had to worry about this more but it’s honestly an issue on any device with a wireless chip (and they’re supposed to be configured or at least configurable to deal with it).
I recently just ordered 3 off Amazon for the $6.99 price as well a few days ago (the shipping scales up with the amount of boards unfortunately so the shipping at least for NA is annoying but still dirt cheap compared to any other board basically at all even with the shipping).
The price is not too good to be true. It’s true to the reality that the people selling the board live in which is that the only thing available for it is their 5 year old broken image. If your eyes have been opened to the reality of using a fixed image this changes everything and it will take some time for the price to catch up with that (if it ever does, they may just be liquidating them and then when they’re gone they’ll be gone which is another argument in favor of picking up one or two of these now while this price/availability holds).
Andy, the person who helped inspire this image originally by asking the USB 2.0 high speed vs. full speed ports question also picked up a few anticipating that the price will rise as people realize there is a $6-7 board available that most people think is nonfunctional (thus they give it away) but that eventually more people will realize this (including Orange Pi themselves and that people are buying the board much more than before for some reason).
With the image it is a Bullseye headless board with an aging/aged kernel but hey, $6-$7! One check on eBay to see what people are paying for Pi Zeros should make a reasonable person consider this board for projects/ideas that do not need anything close to the power of a Pi Zero. It’s just a smart and financially savvy decision and gives a truly low-tier / entry level board option.
I think you will be happy with them given that you largely know what to expect given you found the place where everyone was coming together that wanted to use the board and discussed every issue that was going on that was preventing them from using them.
I’m sure there will be more fixes going forward as people find more but I can say from about version 1.8 and up that I’m comfortable recommending the board and saying that you will probably be happy enough with it as you’re aware of the possible caveats.
I’d love to hear if it actually turns out that way when you get the boards though! Maybe you’ll even discover more things that need fixed (or potentially the fixes themselves) as a few others who have gone down this path have done. Thanks for sharing / discussing!
So, I’m rolling the dice and ordering from AliExpress. I used the link off the Orange Pi site, so I AssUMe it’s a legit seller. I got 3 for $24.55 USD after shipping and tax. I’ve always wanted to try AliExpress and since these all seem to ship from China, it seemed like a reasonable time to try.
Thank you for all your help and work.
Hey Dustin,
Excellent, great choice! The listing on their site should be by: “Shenzhen Xunlong Software CO.,Limited”. That is literally Orange Pi themselves (just like on Amazon, the Amazon listing is also official).
In other words you are buying this directly from them via AliExpress instead of Amazon. AliExpress is unfamiliar to a lot of people in the west (or they’ve had a bad experience trying to buy something for $2 that would normally cost 10+ each). I think of AliExpress like eBay. There are good sellers and there are bad sellers. It’s almost as easy to tell as eBay. If they have 0-10 fulfilled transactions / stars on their account then yeah that is not smart to order from someone like that just like it isn’t smart to order a brand new PS5 from a brand new eBay account with 0 stars. You might honestly be more likely to be scammed by the eBay person in that situation (like sending the good old brick in the mail) but people know how to use eBay for the most part.
i know AliExpress is legit because they pay about 2-3X the commission for links as Amazon does. I’m able to wire this money right to my US bank account. They send me tax forms for me to report my income to the IRS on my taxes. It’s 100% legit. Just keep in mind that just like eBay just because AliExpress is legit doesn’t mean every seller on there has a stellar reputation. Think of it more like eBay than Amazon and you can literally save a fortune from this web site. There is no western equivalent of some of the prices you can get on there out of China. None.
I’m excited for you to get them!
Hey, thank you for your response, what i dont like is that you have to manually run ubi_attach to attach it. would be nice to implement it for automounting at kernel, not at userspace.
I am close to your thoughts, 512MB are way too less to let a proper system running on that space. I havent looked into the bootloader so i cant tell you how the NAND is internally beeing detected and used ( to boot from). This wont even be interesting for us, as you stated the main image is already over a gb.
I would add this space for idk, maybe /var/log? this way, we can bypass the most read/writes a system usually creates by using /var/log.
Or just add it as additional space.
There is this spanish manual attached where you can spot the details and see that its not mounted as mmcblk.
Another Topic: What about porting the kernel-drivers to a newer kernel version, a mainline 5.x kernel? this COULD lead to more stability
Hey Marco,
Great ideas! Yes, theoretically these could definitely be automounted. The biggest problem I’m not sure how to figure out is that people are using the flash partition differently. There isn’t really a “correct” partition set to mount on it as some people will have Android installed and some people may have wiped those partitions completely and been using it for /var/log and anything like that.
Most likely the vast, vast majority of people aren’t using the NAND at all but if they are it becomes a little bit difficult to handle. That is where your idea of the kernel automounting them appeals to me. That way the partitions will just get mounted no matter what they are and if people want to acesss/use them they can. I think this is better than me assuming a particular mounting format.
I’m not sure how hard this is going to be to do yet. It’s not that hard in other Linux distros. If you can uci_attach to them already then it sounds like all it’s missing is the automounting. It should definitely not be mounted as mmcblk0 as that is eMMC/SD only. These should be mtd partitions I’d imagine unless the driver is written in a very, very strange way (have seen it before on some other devices on the i96 where yes they are mapped and worked weirdly).
For example the i96 doesn’t support the TRIM function on eMMC/SD cards. Why? It thinks it’s a real hard drive with sectors so it won’t let you trim it even though it should (and this does have performance implications). This is purely because of the way they wrote the driver (incorrectly). It doesn’t even think it’s a SD card and has no TRIM support because of the boneheaded decision to code them like they’re HDDs in the driver instead of SD/eMMC which both support TRIM. I didn’t even know this was possible before examining the i96 but check for yourself and you will also see that you cannot TRIM and if you run disk info on the SD card it prints out it’s sectors and info like it’s a HDD (and is a fixed non-removable drive).
And what about the NAND, havent we been able to use it or boot from it already? i did it 2 years ago but i didnt wrote it down 🙁
Hello, thanks for your work, i had some spare i96 in my closet, never use them because of the unstable wifi, but the crda patch has aparrently been worked, no sudden timeouts or lost packages anymore.
has anyone information on how to use the sound on the board, especially if iam able to connect a speaker to it?
Hi James,
Digital IO/ V_PAD Voltage:
I’m surprised to find that the VPAD in on the 40 pin header was set to 1.8 V.
I fear that most of the cheap SPI and I2C devices we’re trying to use ( LCD, CAN, …) will not handle this voltage.
The RDA8810PL datasheet says Digital I/O can be set to 1.8 or 2.8. I’ve seen some people struggling to set it to 1.8 but I think that ( on the bullseye image 1.9) the gpio_fixup.py script had already set it to 1.8V ( to be compliant to IoT board standard)
Well, I’m stuck, there’s no 3.3 V pin on the board. Should I try with 2.8 V ?
Hey MZA,
That’s very interesting! My first thought when you said this is that you should try it on 2.8V. I wanted to find some results of people doing such a thing before suggesting it though and was able to find some examples:
It looks like in this case the engineers said it was possible but also suggested they could use a converter board. It sounded like the person was just going to develop the product using 2.8V on the development board and then use a dedicated shifter part in the final build / shipped product.
This person also contacted a hardware engineering team to see if their 3.3V part would function at 2.8V with “decreased accuracy”. That seems to be what I’m seeing. Most parts will work but there will be some kind of slight accuracy/resolution drop over full voltage. I’d imagine that you would have to have a oscilloscope to detect this in a lot of cases but undoubtedly it depends on what the part is question is.
People also make cool parts that do this supposedl. I’m not 100% sure what is exactly the right / ideal one but it definitely looks like there are cheap parts available that may be able to handle this for like 99 cents or whatever.
There’s also something like this which has a wider range of input voltage and a much wider choice of output ranges as well. You may very well know better than me if these parts can electrically work (electrical is not my specialty for sure). I tried looking for a logic level shifter with these inputs and outputs and didn’t find a part like that so I assume we actually are talking about voltage here. I wanted to mention this though in case I’m wrong. The TI engineers linked to a specific part meant for level shifting SPI signals in the first link I linked so it’s possible you may need a more specialized part to do this so keep that in mind / do some more research as these are just hairbrained ideas based on what other engineers were saying/doing and some initial research.
My thoughts are it’s worth trying as-is. Almost everything I read from engineers who were contacted by developers/engineers trying to do this said you can absolutely use 2.8V with some reduced accuracy. This is the first thing I would try. If there are problems you could investigate other electrical parts to deal with this as it doesn’t look like this issue is unique to to the Orange Pi i96 by any means. Hopefully that helps!
Yeah, using level shift should work, I’m attracted to avoid it ( less wiring) but it seems necessary.
MCP2515 for CAN bus does not handle lower voltage than 2.9V which will make it impossible to communicate properly without level shift. The pb is that the communication is bidirectional => two level shifts, and one LDO 5V->3.3, that’s too much extra for an simple SPI communication.
Cheap SPI screens would have the same issue, that’s, may be, the problem of the spi with the other users. First task is to find a 1.8V slave device.
I’ve returned to see the posts of the russian guy ( yoshee), he does not use the i96, all the photos he displayed with LCD screens are done with other orangepi boards.
Now for the 2.8V, I’m still searching how to have it back, I disabled the gpio_fixup script but voltage level did not return to 2.8. I may be wrong since I read only opio command output.
There should be a chance to have the SPI LCD work, the’re tolerant up to 2.7 V.
Down to 2.7 sorry.
Hey MZA,
Ugh, 2.9V! Yes, that is right outside the range we need. I understand. The Russian person was using the i96 2G at best which does not have the same wiring / pins as the i96. The reason the i96 pins are broken without the gpio fixup script is actually because it’s set to the 2G board’s values by default which are wrong. It also tries to initialize the 2G modem on the regular i96 version and I have not removed that yet (partly because I think I read somewhere that the 2G modem chip is used for other things internally but I’d have to do more research on this).
The problems with this image and this board are pure incompetence. All of this stuff works. It’s just not configured correctly. I’m comfortable saying that for a fact at this point. The WiFi? Misconfigured. The SPI? Misconfigured. The SPI pins? Misconfigured. Almost every problem the i96 has can be explained simply by their terrible image. They couldn’t even bother to apply the right pin settings to the regular i96 vs. the i96 2G. It’s not even smart enough to tell the difference and they never fixed it. It’s still broken in the base image and still would be if it weren’t for patb’s script.
I would check the voltage. The reason I say that is I’m looking at the opio source code:
("V_PAD", "", -1, "1.8v", ""),From what I can tell this doesn’t change. I don’t see where it would be setting that variable in the code (or reading it). It just looks hard coded to me. I don’t think this is actually measuring the real VPAD. I could be wrong. The Orange Pi 2G is set to 2.8V in this file. You could honestly probably just change it to 2.8V in this file potentially if it actually is applying these.
which gpioor
which opiowill tell you exactly where it is (they’re identical copies of the same program, I just put a gpio one in because that is what people will be used to) and you can just edit it with a text editor basically.
There are other weird info in the user manual, their display of the GPIO Header setting page 20 shows 3.3 V in multiple positions, bad display ?
I’m also looking for the usage of this 8 bit switch, it is not in the schematics, not in the manual. The only mention to it is to change it for Android ADB debugging….
You can’t trust any of it. Check this out. You definitely need to read that document for sure as there are some known mapping issues already.
Funny enough he says in there that modifying uboot to fix this is beyond his skill level. That’s not beyond my skill level. I could absolutely take care of that. It sounds like that’s a better way to actually fix this. It would basically be me changing more hardcoded driver parameters (what I’ve already been doing) instead of running a script at startup. He is saying here though that I could fix this in the driver. It’s really hard for sure but that is so much more comfortable to me than the electrical.
You know what is beyond my skill level? Everything else he’s doing. I’m amazed from his writeup that he was able to figure all of this out. The whole thing is worth a read (may need a translate, I think my Google Translate extension is translating this because one time I reloaded and it was in Russian). It really highlights how different people’s skillsets can be from one another that he can do all of that and he thinks modifying the uboot is too hard. He’d probably say the same thing about me. “You can rewrite Orange Pi’s entire build system and modify the hardcoded kernel drivers but you can’t figure out the GPIO pin assignments?!”
Check out this thread here. They actually talk about the 1.8V voltage issue in this thread. They also mention that a bunch of the spec sheets are wrong/incomplete and link to some ones that are supposed to be more accurate there! That 126 page spec sheet is supposed to be the best / most comprehensive and it’s on GitHub and not one that the official resources link to for sure. I’m not sure if this will help with this issue but I know there are known issues with the spec sheet and figured I better mention it in case you’re working off one of the official ones that are known to have issues.
I’ve already visited that thread from orangepi.org, the datasheet is the official and obviously the correct RDA8810 datasheet ( there are three variants, ours is RDA8810pl) and the other is the schematics of the i96 board.
In the schematics, I did not figure where is the 8 bit switch, but i’s not a major issue until we’ll need it.
The user manual is not good, as anywhere.
You don’t need to spend time changing the uboot drivers as users may need different functions from the 40 pin header, better invest in other issues.
I’ll work a little bit on testing the SPI, my issue is that I use a new ePaper screen MH-ET LIVE that I’m not used to, I need to port a test application for it.
Thank you for your help, I’ll update you with the news.
Hey MZA,
I agree with you. This script is doing the same thing as if I hard modified the kernel with the additional benefit that it allows everyone to control it. Unless it turns out this is necessary for me to fix something to get it working I think having it as-is makes the most sense. I’d basically just be changing the default boot mode when the kernel is loaded instead of changing it as soon as the system starts and the startup script is ran.
The downside of the script is that it adds the complexity of having to have a startup script (or the settings won’t survive a reboot). This was not a problem for me and it has the systemd service gpio_fixup to take care of that (which is easily disabled as it sounds like you already figured out how to do so this is mostly for other people who may be reading this later).
I look forward to your results!
U’re right about the opio command, the values are just strings, I don’t know now if the pin is 2.8 or 1.8. I’ll get a voltmeter.
It’s 2.8. The voltmeter says 2.9 but I don’t believe it.
I’ll check the links you provided, thank you.
Hey MZA,
Thanks for checking that out and confirming! I’m honestly learning more about GPIO / SPI / pin assignments / drivers in the past week than I had to in my past whole life. I like it though because it’s all starting to come together and make more sense!
I’ll await your findings. I mean even if it is hitting 2.9 it’s going to be 2.8-2.9 realistically and if the CAN module truly requires the 2.9 (and it doesn’t just say that on the spec sheet but really have a little bit of wiggle room) I feel like if you can get it to function that you would have periodic dips where the power falls too low and then weird things will start to happen. I’m sure you’re similarly concerned as that is very, very close.
I think you will run into speed issues at some point as well with a TFT type of display. The one person we’ve seen kind of doing something like this (that’s weird his pictures didn’t match, I actually didn’t look that close at the pictures as his code would definitely not work for anything but the i96 / i96 2G) said that the SPI was software-controlled meaning it was pretty slow. I don’t really understand why it would be software controlled. Is it because he wrote that driver for it basically in the kernel code? Does that make it software? Or is the spi-gpio piece that is software controlled but the other devices have a hardware controller? That’s not clear to me.
It probably won’t hurt it to try it and see if it will perform. It might do something like cut in and out or it could cause kernel panics / hangs depending on how exactly everything is working under the hood. Thank you for investigating this!
Running 1.8 – this is great for wifi!
The wifi connection seems solid even at my original 30ft from router and powering orangepi from USB 3 on my laptop (was using 2A wall wart)! The signal is weaker (according to wavemon) but ‘apt install’ works every time. No more CDRA messages hitting console.
Thanks for the quick fixes – I will be testing this further.
Hey Steve,
Great testing, you’ve helped me squash at least a half dozen issues in the image by now! That is fantastic. I also tend to power my Orange Pis from the USB from other devices (like my Pi 400s on the shelf).
Thank you so much for confirming the CRDA changes and helping me with this. Definitely let me know what other observations you make as I feel like the image is getting really good now!
correction under the “Setup Locals”
sudo dpkg –reconfigure locales should be: sudo dpkg-reconfigure locales
I see you have it correct on github…
Thanks, I’ve corrected this one as well! I do the same thing on the command line. Sometimes I’ll remember it’s dpkg-reconfigure and other times I’ll try to do dpkg –reconfigure. Thanks again!