
Today I’m very excited to review the ODROID M1 board. I bought this board for a couple of reasons. The first was that it is one of the top rated (and the top rated) boards on my Pi Benchmarks storage benchmarking website.
The second reason was a recommendation from you guys on one of my articles to check out and review the board! This will be my very first ODROID board. Definitely let me know if there’s more boards I need to check out that I haven’t covered as I’m actively investigating alternative SBCs to the Raspberry Pi due to the ongoing shortage.
Let’s begin!
Hardware Used
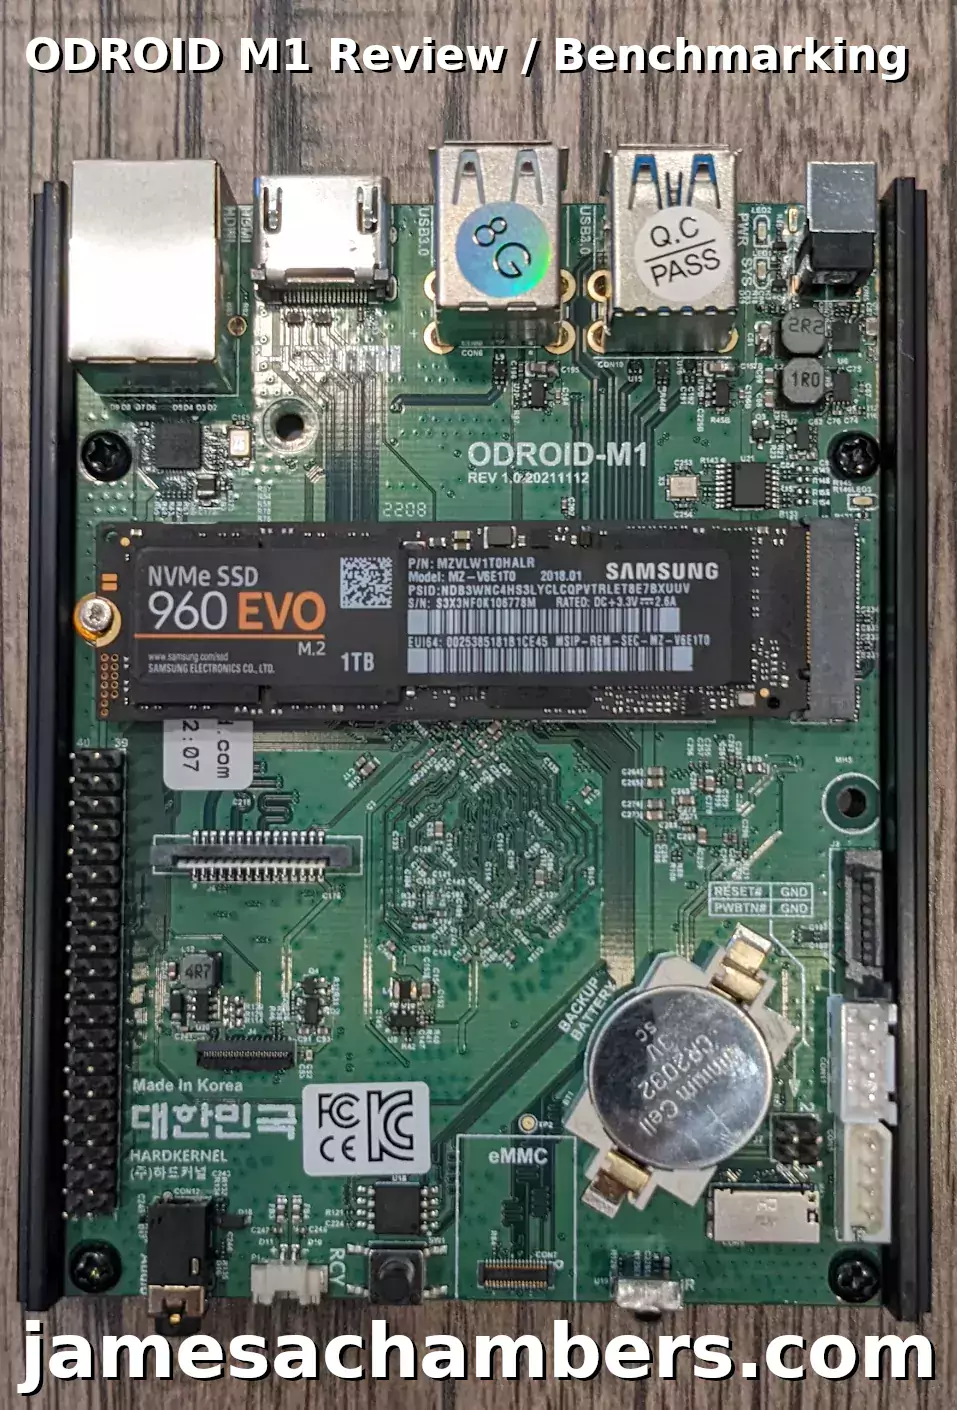
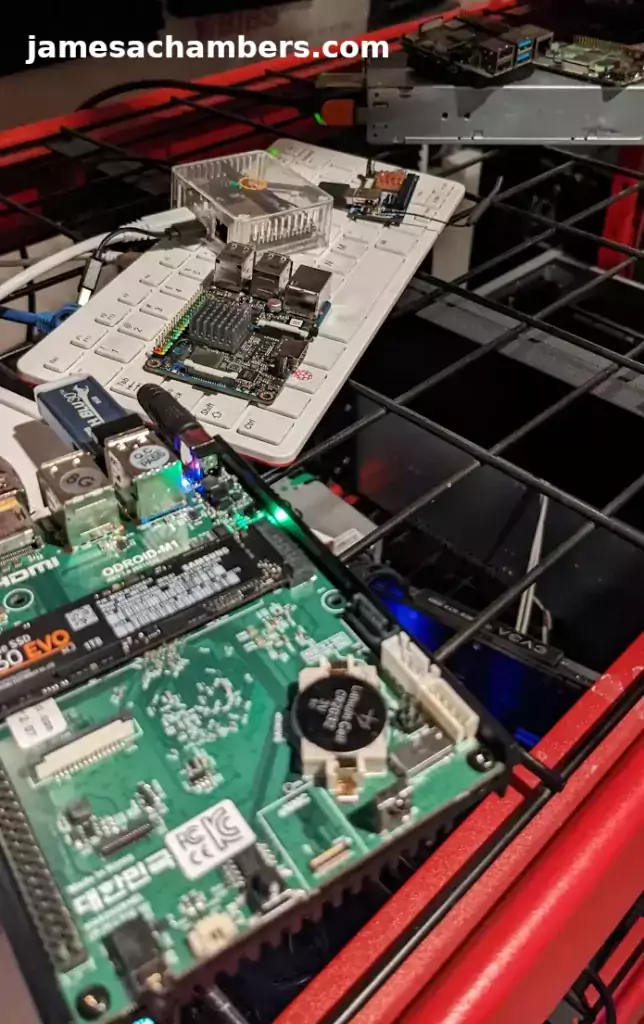
This is the 4 GB version of the ODROID M1. Includes a full size (2280) M.2 slot (PCIe 3.0 2 lanes), a Neural Processing Unit (NPU) and contains a RK3568B2 SOC. There is a slot for eMMC cards on the board as well and these perform very well.
Links: Amazon.com*, AliExpress.com*
This is the 8 GB version of the ODROID M1. Includes a full size (2280) M.2 slot (PCIe 3.0 2 lanes), a Neural Processing Unit (NPU) and contains a RK3568B2 SOC. There is a slot for eMMC cards on the board as well and these perform very well.
Links: Amazon.com*, AliExpress.com*

You will need a 12V 2A power adapter for the ODROID M1
Links: Amazon.com*

The ODROID takes a CR2032 LiCB battery for the backup / system clock battery slot (not included with board)
Links: Amazon.com*
Getting ODROID Images
One aspect of all these different SBCs I’ve been paying special attention to is the quality of the official images and how old the kernels in them are. Today will be no exception.
The official ODROID images are available here. For the M1 board it looked like this at time of writing:
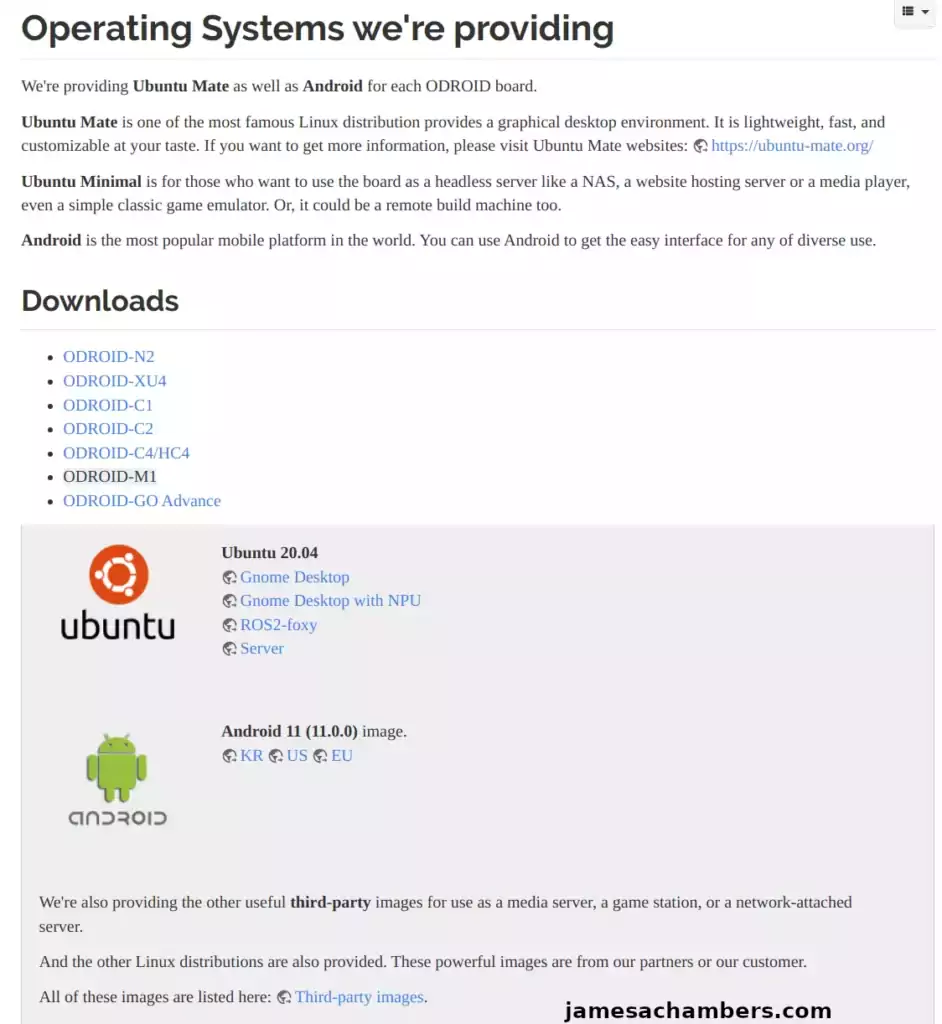
Here we see Gnome Desktop, Gnome Desktop with NPU, ROS2-foxy and Server. These are all Ubuntu images but are meant for different setups. The “Server” one is meant for headless setups and has a minimal installation. You may also choose Android 11.
In a perfect world I would recommend the Gnome Desktop with NPU. What is a NPU you may say? It is a “Neural Processing Unit” and the M1 board does have one. Here’s what ODROID says about the onboard NPU:
Since Machine Learning has been a trend in this industry, there is a neural network processing unit (NPU) which can deliver up to 0.8 TOPS on the M1 single board computer. We could run various TensorFlow Lite and ONNX models on Ubuntu Linux OS.
https://www.hardkernel.com/shop/odroid-m1-with-8gbyte-ram/
Unfortunately this image would not boot for me. It would just immediately cut to black when I chose to boot “Ubuntu 20.04”. Therefore I do not recommend the NPU image. This will presumably be fixed at some point but for now avoid the NPU image.
I then tried the regular desktop image without the NPU. This image worked. However it cannot upgrade to Ubuntu 22.04.1 successfully and will give crazy package errors (and ones that won’t be easily fixed by sudo apt install –fix-broken or dpkg –configure -a). Therefore I do not recommend the desktop image either even if you want a desktop.
I recommend you use the server image and upgrade it to 22.04.1 and then install the desktop with:
sudo apt install ubuntu-desktopOnly install the desktop after you’ve fully upgraded releases. That way you end up with both 22.04 and a desktop environment! Keep in mind that the NPU and desktop both can be enabled later. You will have a much easier time if you start with the “Server” image and upgrade it to 22.04.1 first and then install the desktop and configure the NPU.
Alternative Images
BEST IMAGE: I have an alternative Ubuntu 22.04.1 image available here.
ODROID has a list of alternative images available here. These include
Armbian Distribution
There was not a Armbian image available at time of writing but people are working on it. You can build the earlier versions yourself already but they have some issues that are being ironed out.
Imaging
Imaging these is a little different than many other boards. You actually have several options. You can plug the ODROID M1 in via USB cable directly to a PC. You can directly image the SSD before mounting it in the ODROID (with a NVMe to USB enclosure like my ASUS ROG Strix M.2 NVMe enclosure*).
The way I did it for this article was to put the image onto a USB drive and boot the ODROID and image it from the shell. For this review I’ll be using my 1 TB Samsung 960 EVO M.2 NVMe drive. This is the exact same drive that I used in my Compute Module 4 PCIE 1x NVMe testing article which should make for a good comparison.
First you need to extract the image from the xz format so we get the raw image which ends with .img. If you are in Linux you can do this with:
xz -d ubuntu-20.04-server-odroidm1-20220531.img.xzThis gave me ubuntu-20.04-server-odroidm1-20220531.img. This is the file you want to copy to your USB drive. The server image is only about 1GB but the desktop images are much larger so keep that in mind for the size of your USB drive.
Installing the M.2 is completely straightfoward. You simply remove one screw, mount the drive and then use the screw you unscrewed to mount it to the board. We are going to power up the M1 with the USB drive plugged in.
First Startup / Final Imaging
Connect the M1 to a display for this part as we are going to go into the shell to image the M.2 drive. When you connect the power you will see this menu:
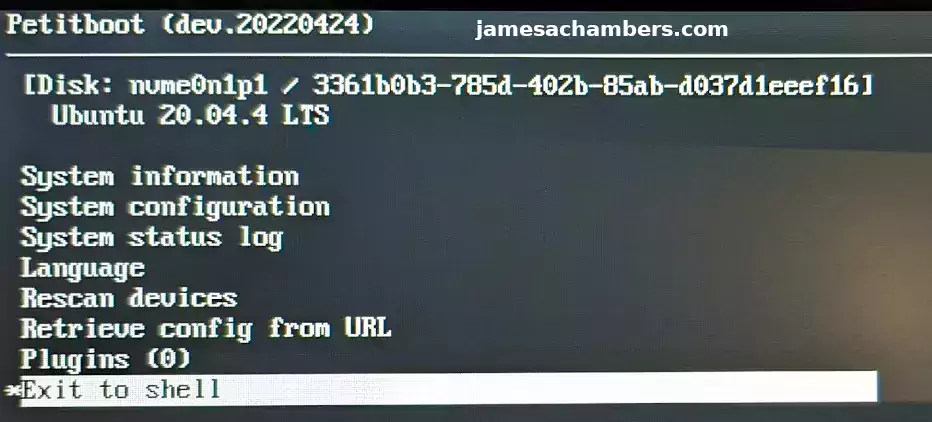
This is called the Petitloader bootloader. We are going to choose the very last option on the menu to enter the shell. Now we are going to image our SSD with the following command:
dd if=/usr/var/petitboot/mnt/dev/sda1/ubuntu-20.04-server-odroidm1-20220531.img of=/dev/nvme0n1 bs=4M
sync
If you are having any trouble finding the USB drive (or another drive you are using to hold the image) use the command:
dfto get a full listing of all attached drives and paths to them. You should find that it’s pointing to /usr/var/petitboot/mnt/dev/sda1 as the USB drive mount path (mine was and I definitely used a regular USB flash drive).
Now type “exit” to go back to the main menu. Choose the “Rescan Devices” option and it should find your NVMe boot partition. Select “Ubuntu 20.04” and press enter and with any luck you should see the Ubuntu logo!
First Login / Updates
The credentials to sign in to the image are:
Username: odroid
Password: odroid
There is also a root user that also has the password of odroid.
The first thing I recommend doing when signing in is updates:
sudo apt update && sudo apt upgrade -y
sudo apt install ubuntu-release-upgrader-core pciutils -y
sudo reboot
Now to upgrade releases open a terminal and use:
sudo do-release-upgrade
Provided you are using the “Server” image you should be able to successfully upgrade to 22.04.1!
Performance Testing / Benchmarking
After a couple of hours fighting with reimaging and getting a successful upgrade to 22.02.1 I was finally ready to benchmark the device!
The way to run the Pi Benchmarks storage benchmark is the following command:
sudo curl https://raw.githubusercontent.com/TheRemote/PiBenchmarks/master/Storage.sh | sudo bash
The result was a score of: 15,978. The full benchmark is available here: Pi Benchmarks – Benchmark #62071
Now this is a fantastic score (compared to any Pi 4 score and most other SBC scores) but it is disappointing. Why? Allow me to explain.
I have previously done NVMe testing using a PCIe 1x adapter on the Raspberry Pi Compute Module 4 (CM4). Using that setup (which is not nearly as nice as a PCIe 3.0 2-lane dedicated M.2 slot built directly into the board) I was able to achieve a score of 19,957. This is with the exact same 1 TB drive (literally the same module).
Something is bottlenecking it here. It could be firmware related, a bug, something with the kernel (which is why I updated to the latest 22.04.1 version to try to prevent something like this from happening) or many other possibilities.
Still not convinced it should be faster? I recently wrote an article detailing various Compute Module 4 boards and their capabilities. One of those boards is the Waveshare $38 Compute Module 4 board and it scored 15,925. Again, with the exact same drive. It beat the $38 Waveshare CM4 IO board* but only by a hair.
The Compute Module 4 setup remains the undisputed champion of performance in the SBC world for now.
Pros / Cons
Pros
- Onboard NVMe slot works as advertised
- Has Petitboot boot loader simplifying many boot operations and adding capabilities such as network booting
- Powerful CPU and GPU capable of excellent desktop performance
Cons
- Not overclockable
Conclusion
It should be performing faster than it is. I’m not sure what is holding it back. There’s likely improvements that can and will be made in software and firmware to improve this over time. I got this board pretty early in the lifecycle so maybe I didn’t do ODROID any favors by buying a board that hasn’t been out for years like some of their other popular boards. Nevertheless this was the experience and I’m honestly happy with the result and will keep using the board.
I would really like to see ODROID put a current Ubuntu 22.04.1 image on the “Downloads” page. I’m sure this is only a matter of time but I did not have a clean upgrade experience my first time and spent a couple of hours fighting with this. I strongly recommend following my recommended route of using the “Server” image and adding the desktop and other capabilities later.
I think the ODROID M1 is a good board for experienced SBC users given the current price of Pis. I would not recommend it for first timers because it’s not quite as polished of an experience as an Orange Pi or a Raspberry Pi yet. If you are generally comfortable with Linux and troubleshooting you will be just fine. For experienced users the power and performance you get with this board for the price is excellent.
I expect the M1 experience will improve over time and that many of the issues I encountered with the images in this article will likely disappear as soon as ODROID posts an updated image on their site. The M1 is not that old of a board compared to a lot of other boards in ODROID’s lineup. I definitely intend to try some of the other ones that are more established and expect I will not have as much trouble.
Using NVMe on the Pi 4 is kind of difficult and clunky without powered USB hubs and enclosures especially with higher capacities. Given that the ODROID M1 is literally cheaper than a 4 GB Pi 4 on Amazon there’s no question to me that it’s smarter to buy the ODROID M1 at the moment. It’s not as smooth of sailing as with the Pi though which is why I would choose another board for first timers (or wait until better and more stable images are available for the M1).
I’d like to try the eMMC slot. That’s one thing we didn’t cover today because I don’t have the right adapter board to connect a eMMC to it. I plan on getting this as the performance on eMMC with the M1 is supposed to be fantastic as well.
If any of you also have the M1 board and know any tricks to possibly optimize the performance that I can try let me know in the comments! This is literally my first ODROID experience and I just wanted to review the board and share what it was like using it and what the outcome was. I’m sure I will learn and share more tricks to get more out of these as I become more familiar with them!
Other Resources
I highly recommend my Ubuntu 22.04.1 Legendary ODROID M1 image for your M1!
Definitely check out my testing with a official Hardkernel eMMC using the M1
The ODROID XU4Q is definitely a more approachable board for beginners
Check out my Orange Pi Zero 2 review here for a board that’s more approachable for beginners
If you want to see a really cheap headless board for under $10 that is the Orange Pi i96 Getting Started Guide
ASUS Tinker Boards are quite cheap right now at time of writing as well at roughly half the cost of a Pi


Hi James,
More arguments exist for choosing ODROID M1 and Hardkernel as the hardware vendor. First, they publish schematics (https://wiki.odroid.com/odroid-m1/hardware/start#schematics_drawings_and_rk3568_datasheet), maybe it is not that surprising for ARM-based SBC, but for x86 it makes their offering very unique (I can recall only one other vendor who did that, and it was PC Engines from Switzerland).
Second, their hardware coming unprovisoned and in case of Rockchip RK3568B used on M1 you can provision, enabling secure boot and make sure only kernel that you signed boot on that hardware, if you connect that with self-decryption you gain security at rest as well as compilance in case you would look for building some professional deployments based on that hardware. The process is not that straightforward, as always with ARM SoC vendors.
We (3mdeb) wrote an article on how to approach secure boot on that hardware, which could be helpful for other readers of this review: https://blog.3mdeb.com/2025/2025-04-22-odroid-m1-secure-boot/
Hey Piotr,
Thanks for sharing, very interesting reads!
The ODROID M1 impresses with its compact design and powerful performance, making it a standout choice for enthusiasts and developers alike. With its impressive internet benchmarks, it offers a glimpse into the future of single-board computers. Its versatility and reliability make it a compelling option for a wide range of projects.
Hi James,
Unfortunately 22.04 image are available for N2/N2H, XU4, C4/HC4 , but M1 is still locked onto 20.04. (https://wiki.odroid.com/getting_started/os_installation_guide#tab__odroid-m1).
lmv2 with / encapsulation as well as tasksel package should be mandatory. may you ask them or help me to encapsulate slash into lvm2 vg/lv
Hey Frédéric,
To be honest I’m not sure why you’d ask me to update ODROID’s image or to lobby the team on your behalf to add these features. They obviously don’t care and are not going to release updates for this board. I think we’re far more likely to see an ODROID M2 than we are to see an update to Ubuntu 22.04 officially on the M1 at this point.
It has been a very, very long time since I made these images. I made the images assuming that within a few months ODROID would update their own. They never did. I’d strongly recommend running something that doesn’t come from them like Armbiam.
Armbian has been on 22.04 as well as kernel 6.4.X for a while and they have financial support. Have you considered asking them? I never made a dime off making these images and frankly I’ve stopped building things like this. I’m not interested in maintaining the images for a board for free that the company that produced them doesn’t care about or maintain.
There’s frankly too many other boards that are better choices now. The ODROID M1 is pretty overshadowed by the Orange Pi 5 or the Radxa Rock 5B. They’re far more powerful and enjoy much better support. They also benchmark much faster in basically every way including NVMe. I haven’t used my M1 in quite a long time since I got those boards.
I imagine ODROID is well aware they lost the arms race to the RK3588 boards. That’s probably why they aren’t putting any resources into their images for it. There was a small window when this board was first released that it was basically one of the fastest ways you could do NVMe on a single board computer. That window did not last long before boards came out like the Orange Pi 5 and Radxa Rock 5B that are RK3588 based that absolutely wipe the floor with the M1.
They’re probably just making an RK3588 board themselves because the way this board is priced it simply can’t compete with anything that has a RK3588/RK3588S in it. ODROID doesn’t have any answer to the RK3588 boards from their competitors that came out. If there was anyone worth asking though to update/enhance the images it would be ODROID first and then probably a team that has some resources/money like the Armbian team second.
Sorry about that!
Hello James,
Thank you for your honest and direct response. There was some confusion on my part, I thought you maintained image and board updates – I did not intend to bother you and certainly never wished for you to intervene on my behalf with Odroid. That was likely an artifact from the differences between French and English.
As much as I can hold my own with x86 or PowerPC servers, I am very much a novice++ when it comes to the world of SBCs/ARM. To give you an idea, I did not even know about ARMBIAN until your previous email, where I just discovered their distribution – I will take a closer look. You piqued my curiosity by mentioning other solutions that outperform the M1. If you have any advice for an investment in the next 3 months, I’m all ears. The configuration would need at least 2 Ethernet ports – ideally 4x 2.5Gb or 2x10Gb, either natively or through an extension – in addition to NVMe storage.
Unless you are not interested, I will give you feedback on my ARMBIANIZATION.
Thank you again for taking the time to respond to me. I sensed some annoyance, so please accept my sincere apologies.
Frédéric
Hey Frédéric,
No problem at all! I’d love to hear your feedback on how trying Armbian goes. It will get you on a much newer kernel and userspace and I think you’ll like it!
So for any perceived annoyance it’s mostly because I was working on the web site full time when I was doing a lot of those projects and I’ve since gone back to work. I’m annoyed in the sense of I wish I still had the time to work on and maintain images and projects like that. Don’t take it as annoyance toward yourself. I wish I had the time still to do those things.
Take care!
Hi James,
Please can you add tasksel and lvm2 packages into your distribution image and upgrade your image and configuration to get / “slash” to be managed natively by lvm2?
It should be a great improvement.
Thanks a lot
Hey Frederic,
The official Ubuntu 22.04 images are out now here. I made the image to basically bridge that gap as they were only releasing 20.04 for a long time. Do the official images support this? If not that is definitely something I would suggest to ODROID. Hopefully that helps!