
I’ve covered eMMC modules on the site before as being a fantastic performance option. Today I received some Hardkernel eMMC modules that I wanted to do some performance testing to see how they perform as well as a guide for how to get started with them.
These are promised to be ready to go out of the box. I will test that claim and then we will do some performance benchmarking. No matter what happens we will also do a fresh reimage of the module to show the complete process of getting them set up. Let’s begin!
Hardware Used
The Hardkernel eMMC modules are the officially recommended eMMC option for ODROID boards. They are available in a wide variety of sizes from 8 GB to 128 GB. Comes preinstalled with either Linux or Android but can be reimaged.
Links: Amazon.com*, Amazon.ca*, Amazon.com.au*, Amazon.co.jp*, Amazon.co.uk*, Amazon.de*, Amazon.es*, Amazon.fr*, Amazon.it*, Anazon.nl*, Amazon.sg*
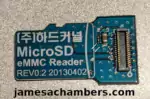
This MicroSD to eMMC reader is meant to read Hardkernel eMMC modules and will let you read and write to the eMMC module using a PC or other device.
Links: Amazon.com*, Amazon.ca*, Amazon.com.au*, Amazon.co.jp*, Amazon.co.uk*, Amazon.de*, Amazon.es*, Amazon.fr*, Amazon.it*, Amazon.sg*
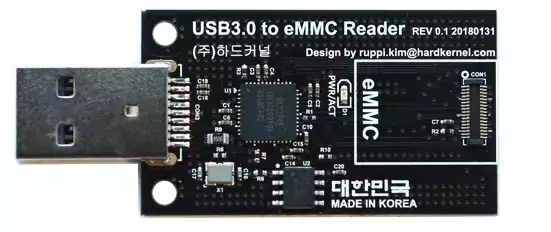
This is another way to read and write to Hardkernel eMMC modules using a USB to eMMC Adapter. Plug the eMMC right into the socket and then connect the USB port to access the module.
Links: Amazon.com*, AliExpress.com*, Amazon.ca*, Amazon.com.au*, Amazon.co.jp*, Amazon.co.uk*, Amazon.de*, Amazon.es*, Amazon.fr*, Amazon.it*, Amazon.nl*, Amazon.pl*, Amazon.se*, Amazon.sg*
Compatibility
Before we start we need to talk about compatibility. You need to be careful here when shopping for these modules.
First make sure you read the official compatibility chart from ODROID. I will cover the basics but things get weird and complicated especially with older modules so if in doubt make sure to read the official page.
The most important factor for the official Hardkernel eMMC modules is the color of the PCB. Here’s a rough list of compatibility:
- The Orange eMMC modules work with ODROID-C0/C1/C1+/C2/C4/XU4/H2/N2/M1.
- The Black eMMC modules work with ODROID-C0/C1/C1+/C2/C4/H2/N2.
- The Red eMMC modules work with ODROID-C0/C1/C1+/C2/C4/XU4/H2/N2.
Again, there are some weird exceptions to this so double check the compatibility link above. I ordered one of the “Orange” modules for the M1 so that is the one this article will be using going forward.
Using Modules With Different Boards
This is possible but the eMMC modules actually have a hidden bootloader partition that isn’t overwritten during normal imaging.
To do this you need to prepare the XU4 recovery image on a SD card and connect it to the board. Full instructions are available here.
Out of Box
First I wanted to examine Hardkernel’s claim that these modules would be ready to go out of the box. This is true provided you bought the eMMC imaged for your board. If not you will want to reimage it. For this section we will see if my M1 boots with the eMMC completely unmodified
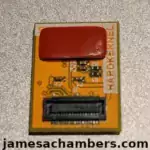
Here is what the “Orange” eMMC module looks like:

Notice that there is only one socket at the bottom of the eMMC module. The spot that would have a second socket has a red pad instead.
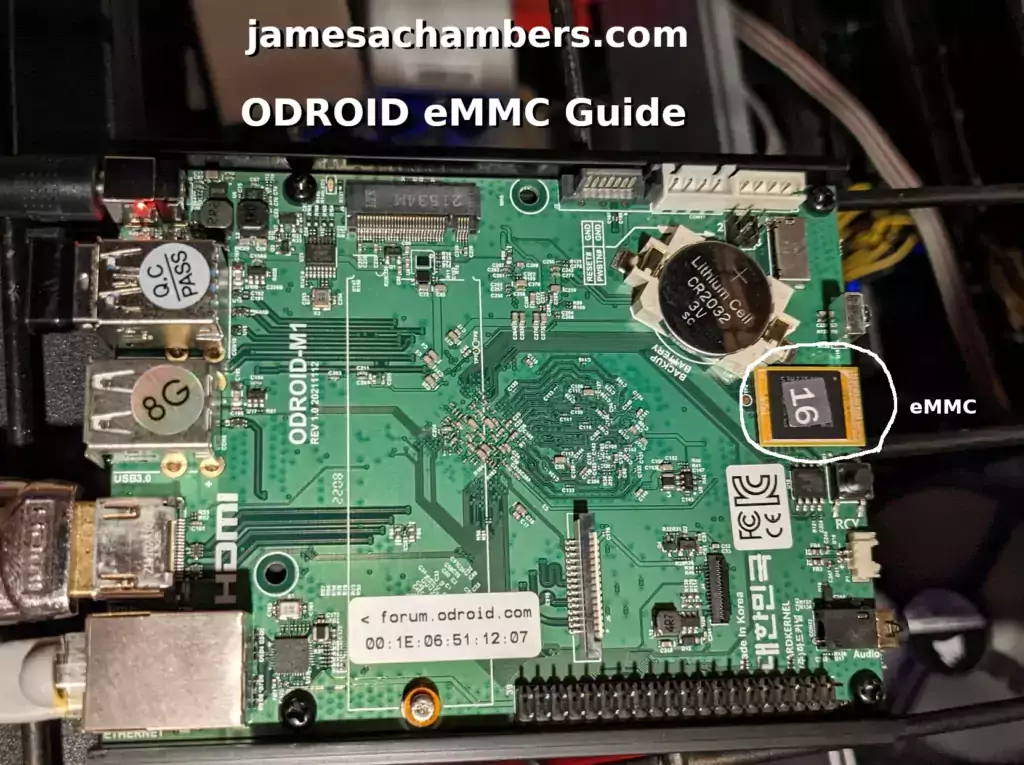
Here’s what the top of my 16 GB module looks like:
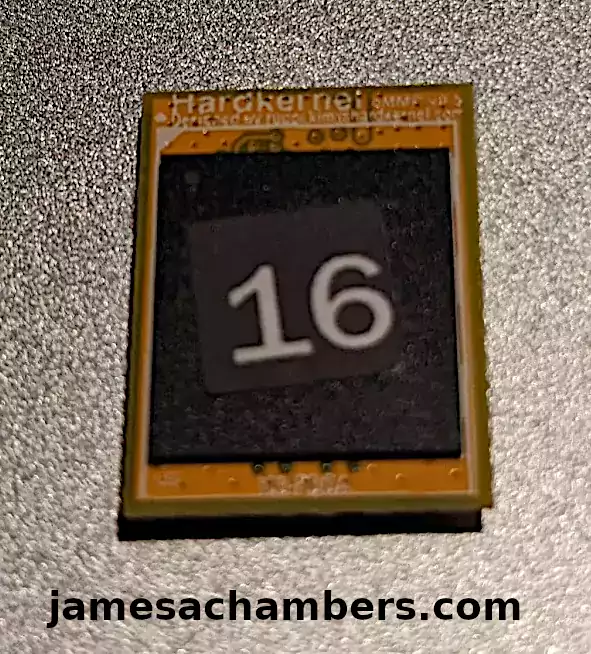
The color of the label will depend on which model the eMMC was meant for. This black square label means Linux for the M1. The N2 eMMCs for Linux have a “red dot” and the XU4 has a “blue dot”. These can all be reflashed for other models but there are additional steps beyond just writing a different image to them (more on that later).
Module Installation
The module snaps right into the board like so:
This location will vary by board but there is usually a white outline that shows where the eMMC is meant to fit. You can see the white outline above the bottom edge in the picture and that surrounds the entire module.
Performance Testing
To test the performance of the board I used as always my Pi Benchmarks storage benchmark. This can be ran on any board or device (at least that’s the goal) like so:
sudo curl https://raw.githubusercontent.com/TheRemote/PiBenchmarks/master/Storage.sh | sudo bash
This yielded the following result:
     Category                  Test                      Result
HDParm                    Disk Read                 153.36 MB/s
HDParm                    Cached Disk Read          141.84 MB/s
DD                        Disk Write                43.0 MB/s
FIO                       4k random read            8752 IOPS (35008 KB/s)
FIO                       4k random write           4703 IOPS (18814 KB/s)
IOZone                    4k read                   26072 KB/s
IOZone                    4k write                  12228 KB/s
IOZone                    4k random read            25920 KB/s
IOZone                    4k random write           14465 KB/s

                          Score: 4,127
The full eMMC benchmark is available on Pi Benchmarks here. That is a great benchmark! With a score of 4,127 that puts it slightly above the UUGear eMMC to SD adapter which as a comparison had a score of 3,899. That is about 5% faster.
This is exactly where I would expect it to be. I mentioned in my eMMC to SD Card Adapters Explained article that by going through the SD card port you are adding an additional interface/layer/bus and the rule of thumb is that for every layer of complexity you add you are going to lose some speed.
Since the ODROID boards have a dedicated eMMC socket we do not have to lose that speed by going through the SD card port. We can connect (more) directly with the board with less steps between the board and the eMMC and that performance gain shows in the benchmark exactly as it should here.
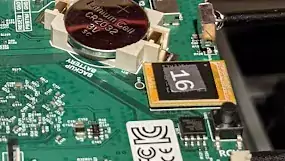
It’s also not quite as fast as the Compute Module 4’s eMMC that is soldered directly to the motherboard. This is also to be expected because that further removes additional layers of complexity such as the PCB board that connects with the socket. That is similarly another 5% or so faster from previous testing.
It’s probably worth the 5% to get the added functionality of actually being able to remove and swap the eMMC module without having to unsolder it from the board. You also get a nice performance boost over if you were to use a eMMC to SD adapter such as the UUGear.
Imaging
Fortunately when using one of the two adapters outlined in this guide imaging the eMMC modules is exactly the same as imaging a SD card.
Here’s what it looks like using the adapter with the eMMC:
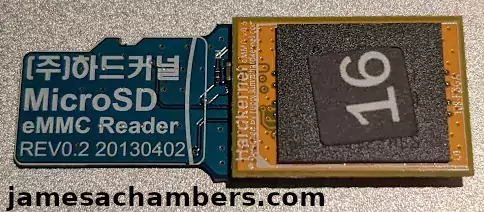
Now simply insert the adapter’s SD card half into a computer with a SD card slot or using a SD to USB adapter.
Once you’ve connected it to your machine you can use Etcher or your preferred disk imaging program to write the official image to your eMMC module. You will see the eMMC as a removable drive option that your downloaded image can be written to. It’s that easy!
Conclusion
Hardkernel did actually live up to their promise of having the eMMC work on my board out of the box with the correct image (Linux in my case). One nitpick I have is that SSH wasn’t enabled out of the box on my eMMC. I had to go back downstairs and use the keyboard/monitor and run the command:
sudo systemctl enable --now ssh
After that I was able to access it over SSH normally. This wasn’t really a serious problem though and the image fired right up without any trouble.
Reimaging the eMMC with the official images couldn’t be easier as long as you have one of the two compatible adapters listed in this article. It will show up right as a removal drive that you can write your image to using your preferred imaging software.
Ordering one or two modules at a time directly from Hardkernel is prohibitively expensive. The shipping to the United States is about $59. Their site is great if you are ordering multiple things at a time and they caution you all over the web site that you will save a *lot* of money if you group things together (including on bulk discounts and shipping). If you need more than a few of these it may be worth it to order directly. It does show up on Amazon sometimes and is also available from resellers like Ameridroid (not an affiliate but I bought one from there and it was fine and came quickly).
Overall I definitely recommend these if you can get your hands on them without paying anything outrageous for shipping. The performance is fantastic and the integration works really well (provided you have compatible modules)!
Other Resources
An alternative available on all boards with a SD card slot is eMMC to SD Card Adapters
I used the ODROID M1 for this article which I have reviewed and benchmarked here.
I highly recommend my Ubuntu 22.04.1 Legendary ODROID M1 image for your M1 if you already have one!


