
Recently on the site I’ve been covering my journey exploring the world of microcontrollers. This has been a fun journey but it has required me to work with technology a lot smaller than what I’m used to working with. The boards I’m routinely working with now are so small I can barely see them and read the features on them.
This has exposed some gaps in my tool set such as my former very poor quality soldering iron which I recently replaced with the Pinecil. That was only about a $40 upgrade from Amazon including shipping.
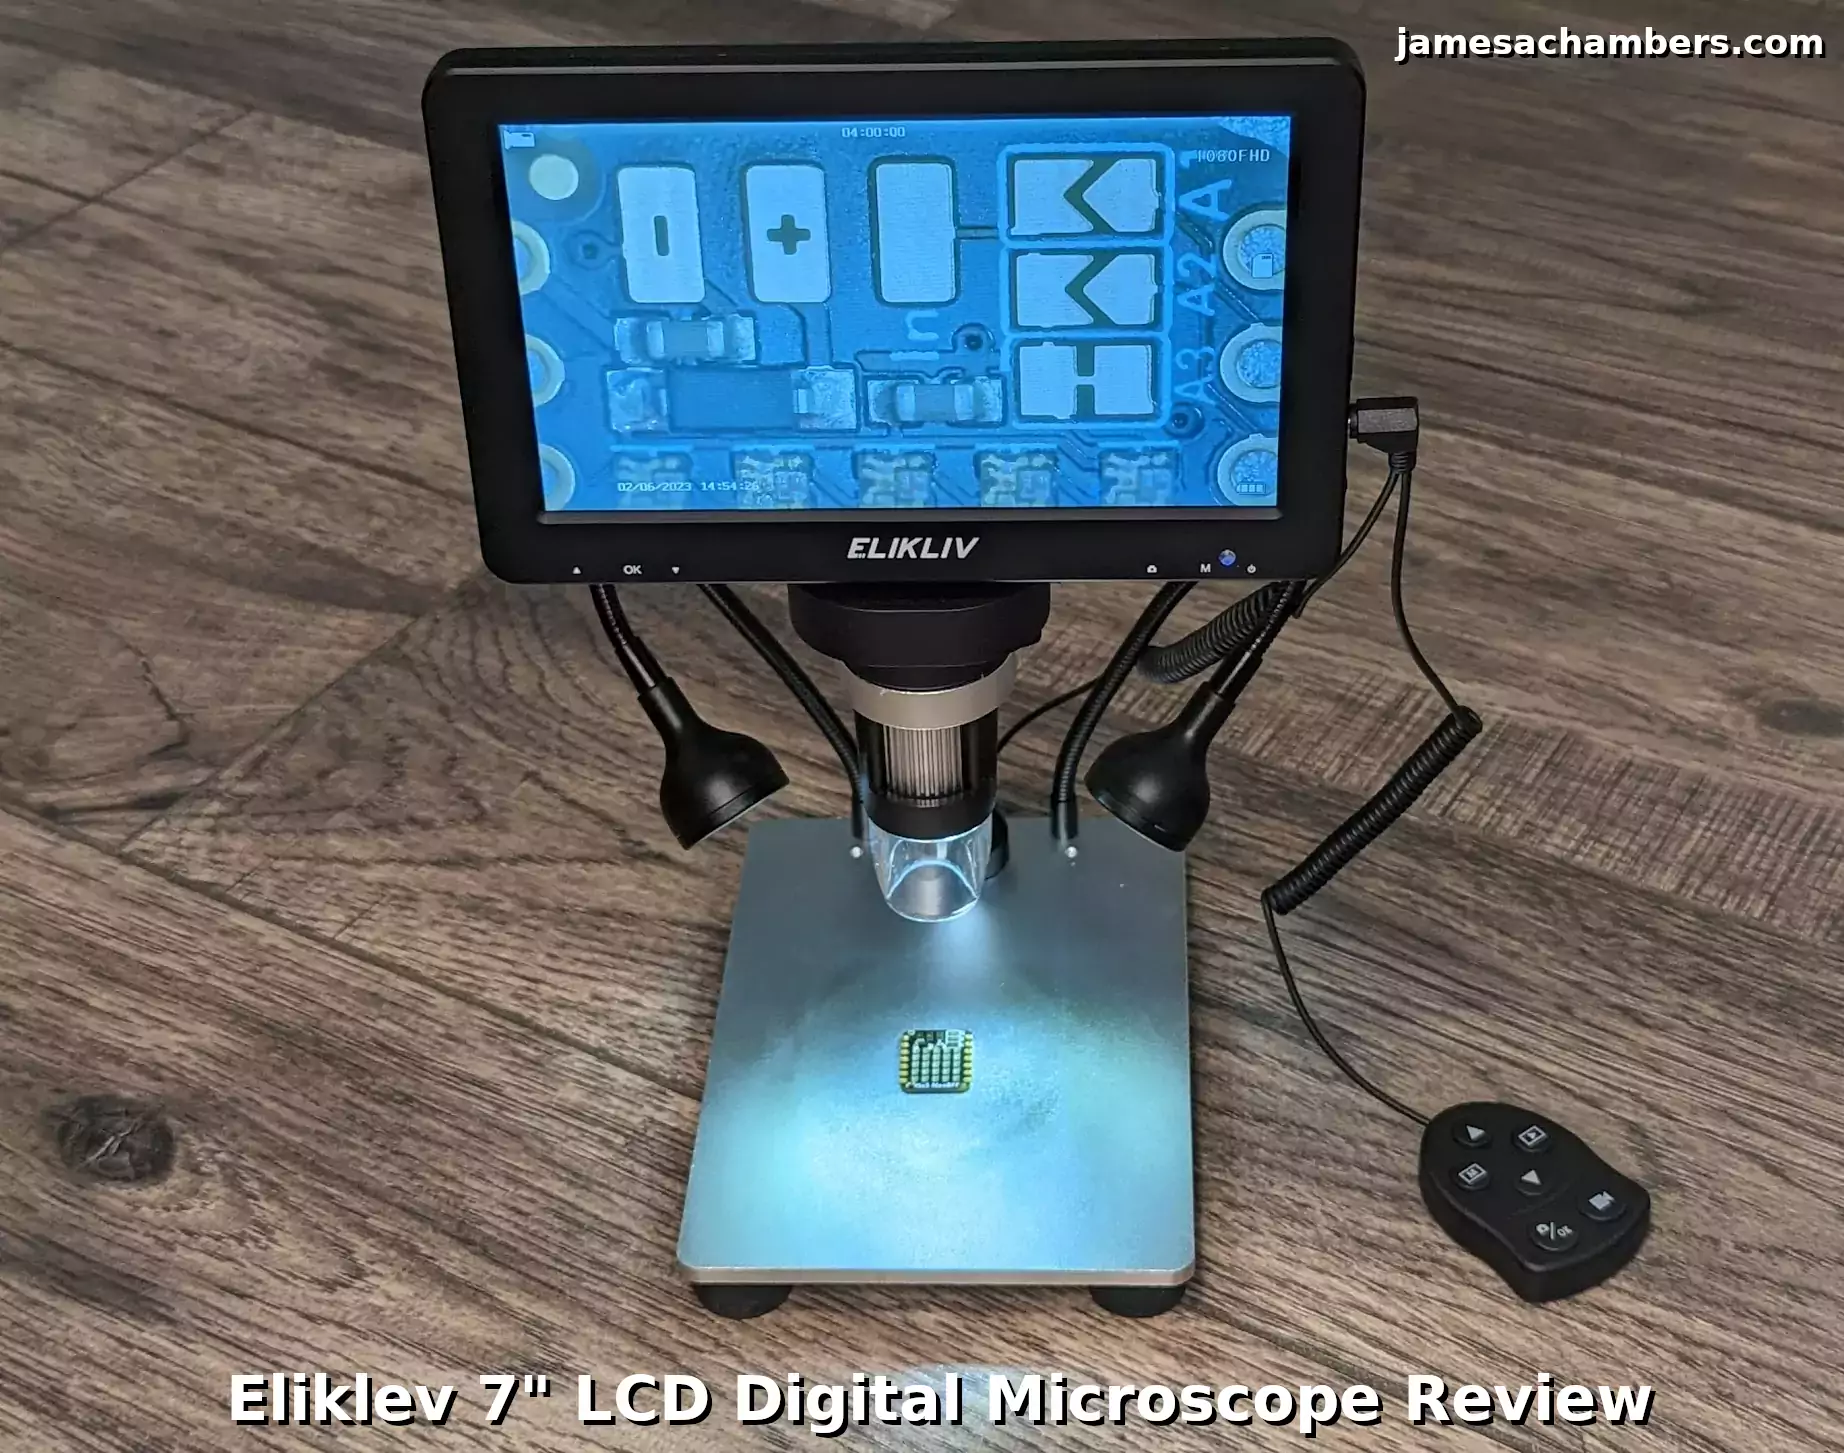
Just today I received the Elikliv 7″ Digital Microscope. It’s one of the most popular selling digital microscopes on Amazon and it cost me less than $100. This was not something I wanted to spend a ton of money on. I only had one requirement. I wanted it to be able to take pictures / video so I could use them here on the site to show my readers what I’m working with on a scale I haven’t been able to in the past. This microscope claims to do just that!
In this review I’ll cover the Elikliv 7″ digital microscope and tell you the pros / cons and whether it’s worth your money if you have a similar use case. Let’s get started!
Hardware Used
The Elikliv 7″ LCD digital microscope (model EDM9) has a 12 megapixel imaging sensor and can zoom from 10x-1200x. It can capture pictures and video on the included SD card. It is great for PCBs, coins, and other small things while not breaking the bank
Links: Amazon.com*, AliExpress*, *Amazon.ca*, Amazon.co.uk*, Amazon.com.au*, Amazon.de*, Amazon.es*, Amazon.fr*, Amazon.it*, Amazon.nl*, Amazon.pl*, Amazon.se*, Amazon.sg*

The CanaKit 2.5A micro USB power supply is meant for the Raspberry Pi but will provide plenty of power for the Elikliv digital microscope. Any power adapter that is 5V1A to 5V2A (recommended) will do though.
Links: Amazon.com*, Amazon.ca*
Specifications
- 7-inch Rotatable Full HD Screen: The digital microscope is equipped with a 7-inch high-definition display. Whether taking photos, videos, or image analysis and testing, it can observe more clearly, conveniently, and easily meet visual needs. The angle of the display screen can be adjusted to 90° front and rear. You can choose the most comfortable and suitable angle from the display. The adjustable angle of the large screen will provide you with a better visual experience.
- 10X – 1200X Magnification: Easy to zoom right in and out and focus by adjusting the knob to view the incredible details at a magnification range from 10X to 1200X. Raise or lower a microscope to adjust the distance between the camera and the objective. Larger view with the microscope on the top, and better details at the bottom.
- Support Real-time Viewing On PC: This 7-inch (about 17.8 cm) LCD digital microscope also supports real-time viewing. When connected to a computer via a USB cable, the object can be viewed on the computer monitor. The magnification effect is displayed on the large screen, which is convenient for many people to observe simultaneously. Only start the installed software when your microscope is connected to the computer and ready to observe.
- Height Adjustable Stand: The height-adjustable stand can adjust the distance between the camera and the object, making the object distance of this microscope longer than other microscopes. Because there is a certain amount of operating space when you use tweezers and electric iron under the microscope. The best object distance is 2 cm-10 cm. The distance to the object is 2 cm. As the distance increases, the magnification time will be shortened.
- 2 Additional Ancillary Lights: This digital USB microscope is equipped with 2 additional ancillary lights. When the light source is insufficient, the light source can be turned on to provide excellent details and the best sharpness and allows to capture of pictures or videos in the woods and some dark places.
- Save and Output Images and Videos: This LCD screen digital microscope is equipped with a Micro SD card slot. You can save the images and videos obtained during the observation process to the card and output. This microscope is equipped with a 32G Micro-SD card (maximum support 64G Micro SD card).
- Rechargeable Battery: Elikliv digital microscope is powered by a rechargeable battery (2.5 hours of working time) or directly via USB. On a sunny day, fully charge the micromirror, and then you can take your family or children to explore the magical and colorful miniature world. Truly portable and independent.
- Also Great for Adults: With the powerful camera sensor, practical functions, and metal construction, this microscope is also ideal for adults, repairing electronics, soldering PCBs, and doing experiments.
Included Accessories
The microscope comes with a 32GB micro SD card, a micro USB cable, a remote control and a anti-glare lens cover. It’s nice that they included the SD card with it.
The most important thing to cover is what is not included and that is a charger. It will charge very slowly plugging it into most USB ports. It’s much better to charge it into a dedicated micro USB charger.
Many people will have chargers for old cell phones or other devices that used to use micro USB laying around. Any of those power adapters will probably be worth checking to see if they output 5V 2A. You can still charge it from normal USB ports if you have to. It will just be very slow with most USB ports.
A surprisingly comprehensive user manual is included as well. This is nice to see in 2023 as so many things are coming with something like a QR code to scan (or nothing). This has a full 28 page manual (all in English in the one I received). Lots of pictures too. I actually did refer to it several times while writing this guide. I’d encourage looking through it to see all of the different functions especially for configuration if you end up getting one.
Assembly
The Elikliv 7″ LCD digital microscope is incredibly easy to assemble. It basically comes in only a few large parts that all fit together. These are the base plate, the arm, and the LCD/microscope assembly respectively.
Everything is tightened together using hand-tightened tension screws that hold everything in place. It’s extremely easy to assemble which is a plus. Very little actual assembly is required on your part. It’s more like fitting 3 large pieces together and then just tightening the knobs to hold them in place.
Usage
The first thing to know about using the microscope is that you need to do a long press on the power button to turn it on. A short press will light up the blue light for a moment and then it will turn red again. Once you long press it the microscope will turn on provided it has enough charge.
Now you should be getting an image on the screen as soon as the microscope finishes starting up (should only take a few seconds). From here we would simply adjust the adjustable height up and down and then finally there is a manual focus knob to help focus the microscope.
You can use the adjustable LED lights to light up the board however you’d like. You can adjust the two side lights from the base and the overhead lights from a control on the side of the LCD panel.
The best way to configure the device is to use the included remote. If you press the the menu button (labeled M) you can go and set the time and date and do other configuration with the microscope.
Testing
Here are some of the images taken by the microscope. I only took these in 10MP resolution. It could have gone higher but I didn’t bother because I have to compress it for the web site anyway otherwise none of you will see this article within Google because it will be too large.
In other words the microscope can take higher resolutions than I’m using here. For the first image I took a picture using the microscope looking at the same PCB I am in the picture at the beginning of the article:
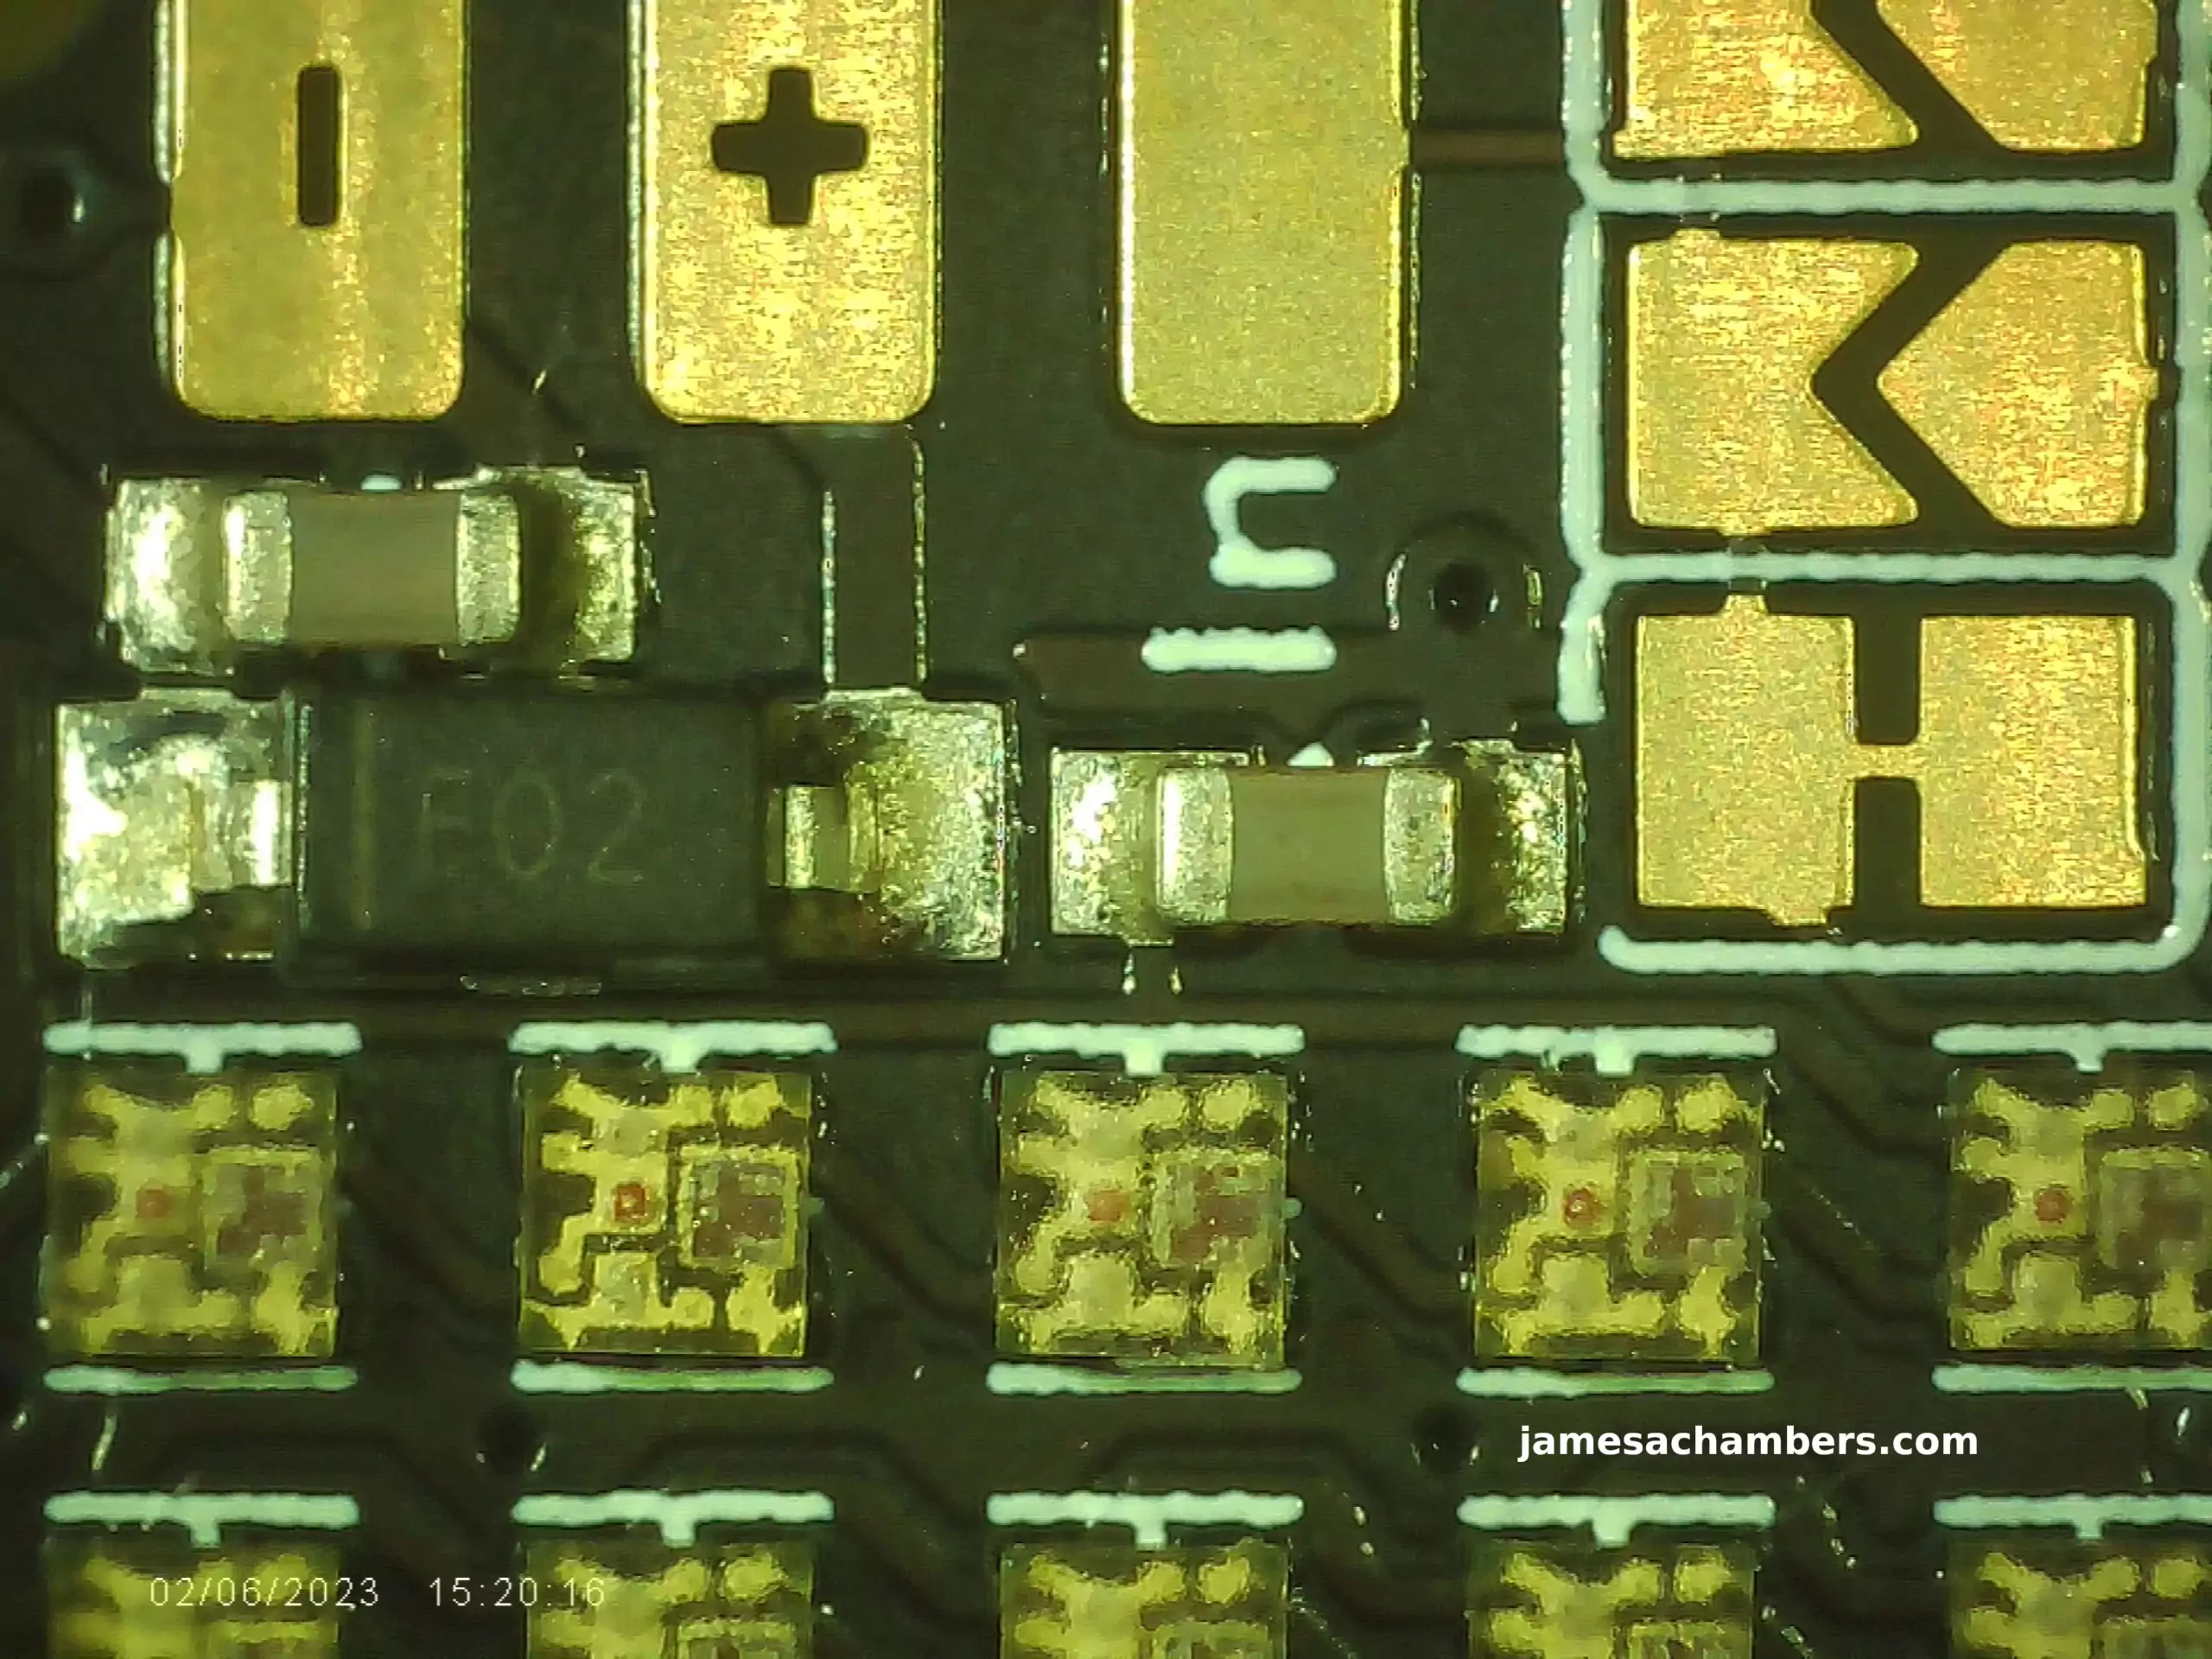
This is actually a Adafruit Neopixel 5×5 BFF board under the scope. At the bottom you can see the NeoPixels which you can tell are actually inside (or covered by) some kind of a wavy looking material. Notice that the timestamp is burned into the image. This is adjustable but I like it.
Next I wanted to test something like a coin. Here’s a 1944 mercury dime that I found metal detecting many years ago under the scope. This is as zoomed out as I can possibly make the shot:
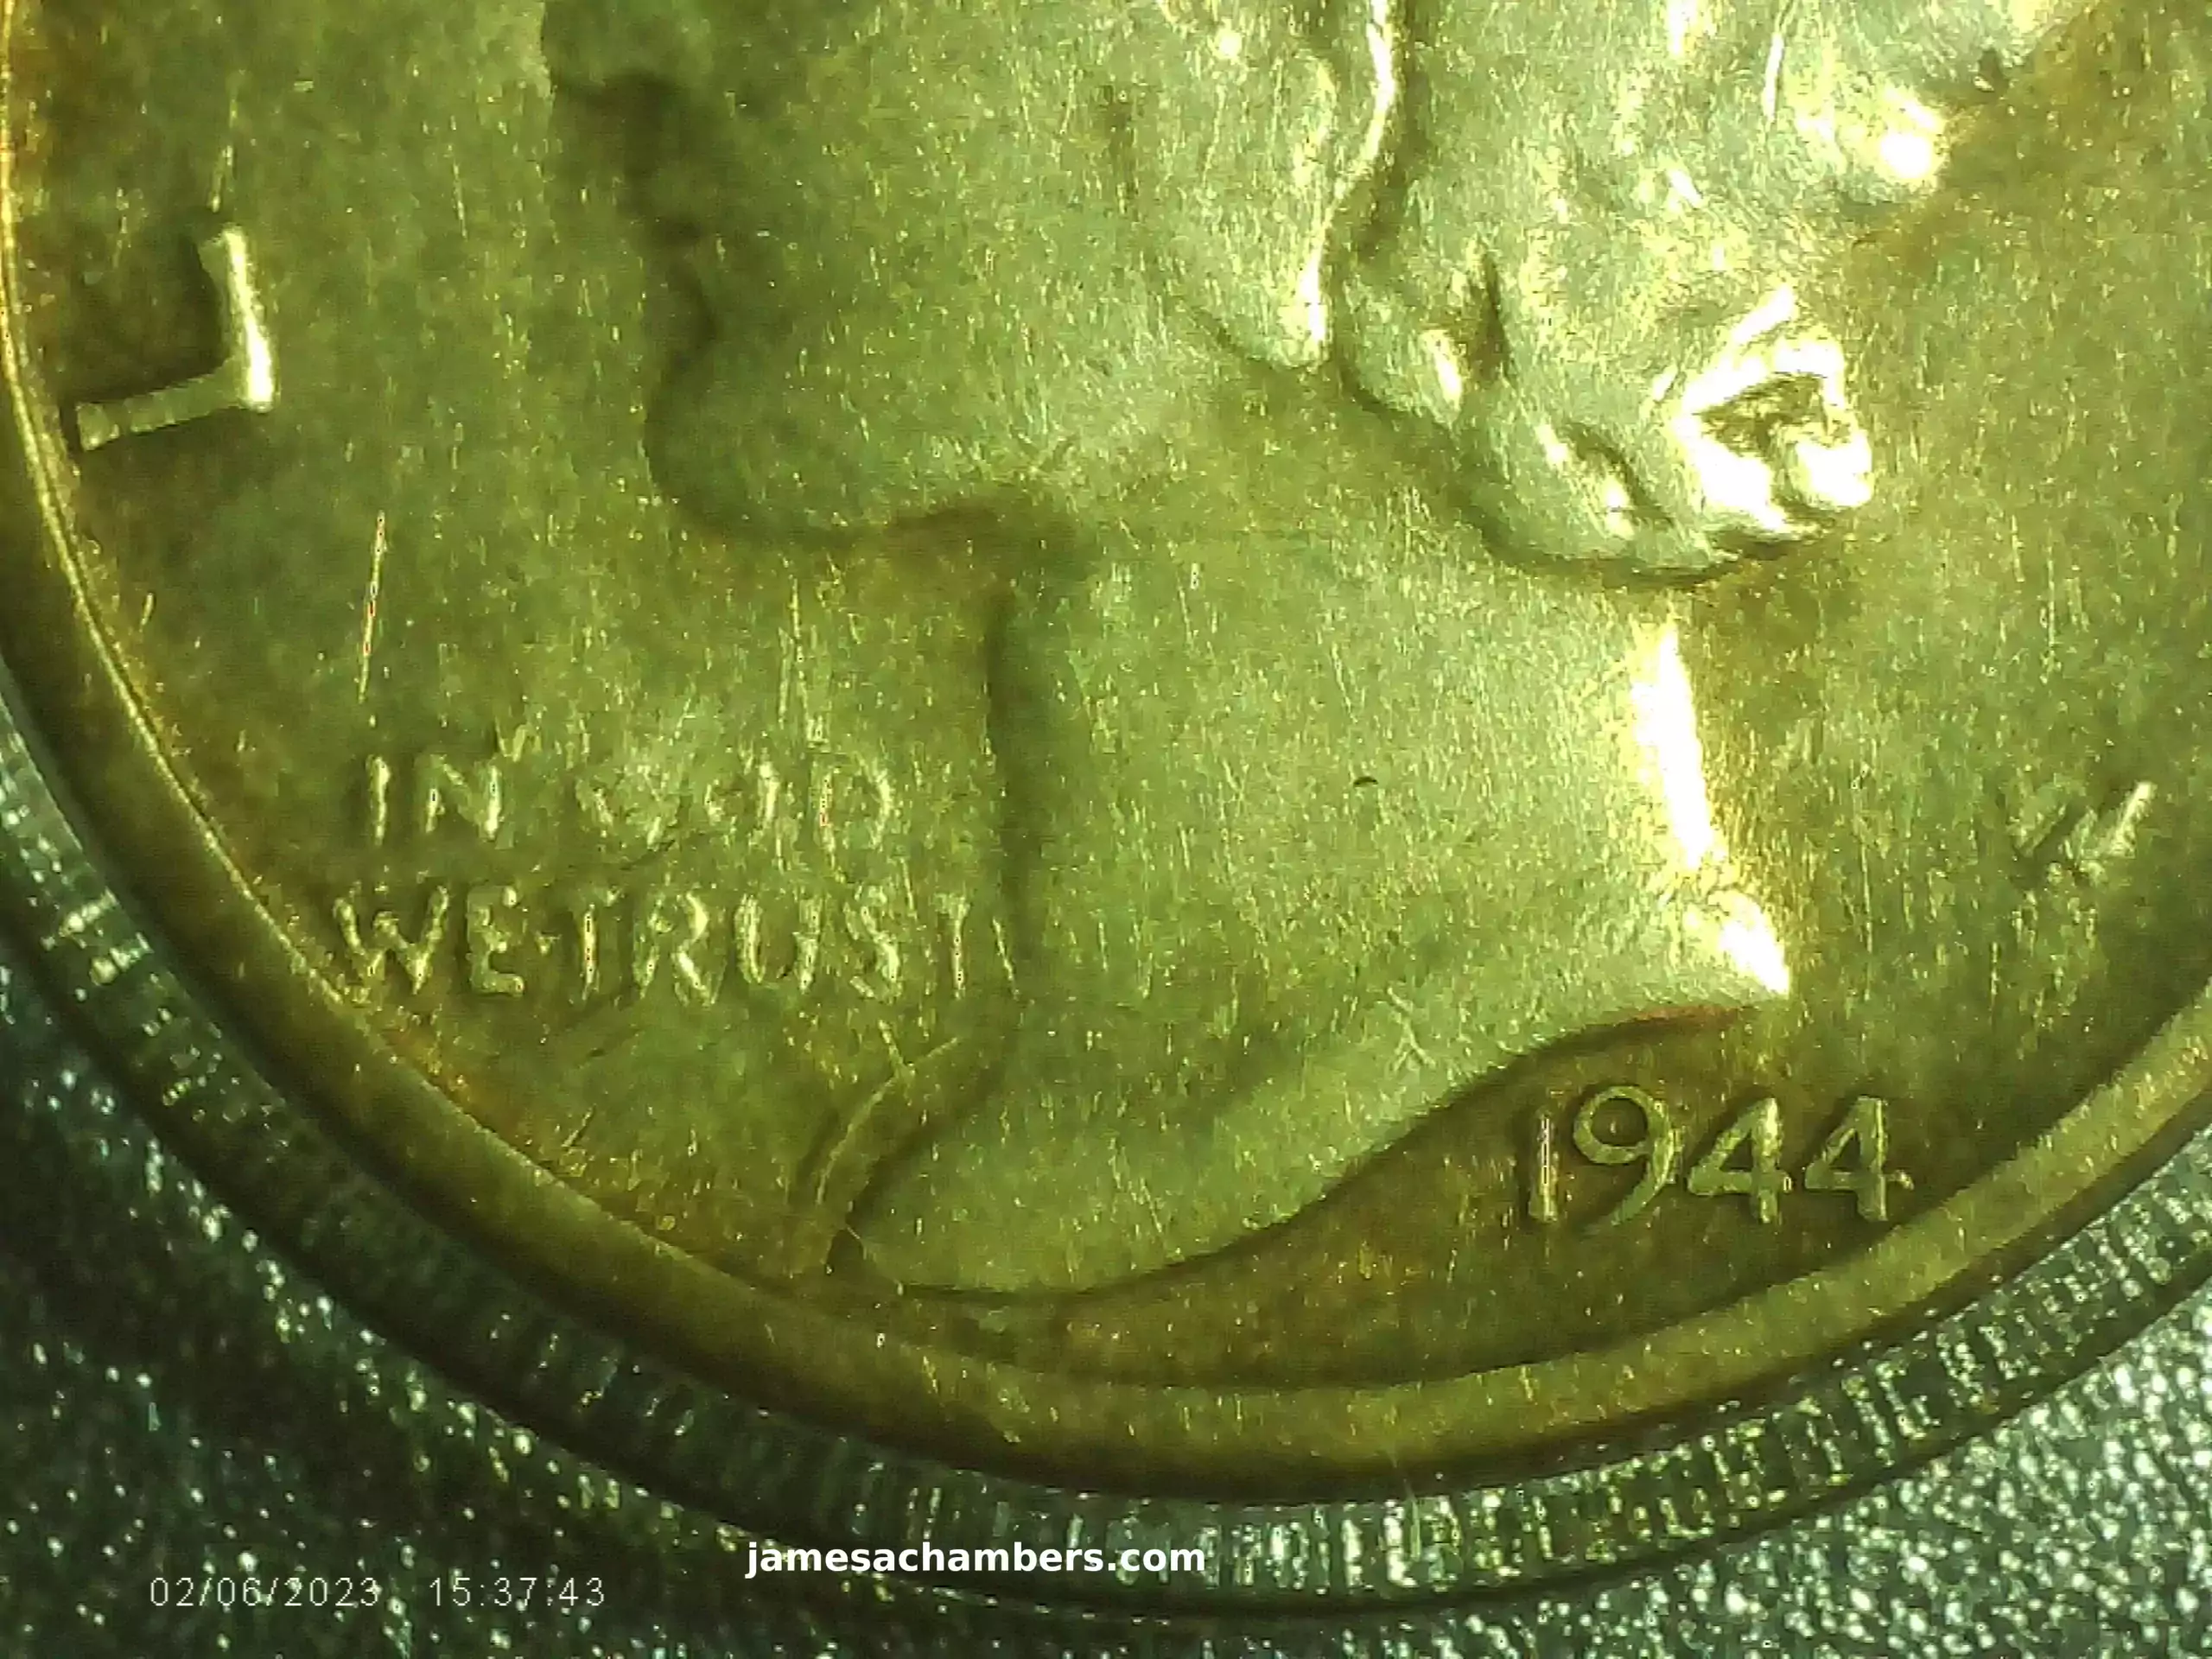
Okay, now I’ll adjust the scope and zoom in on the 1944 part of the coin:
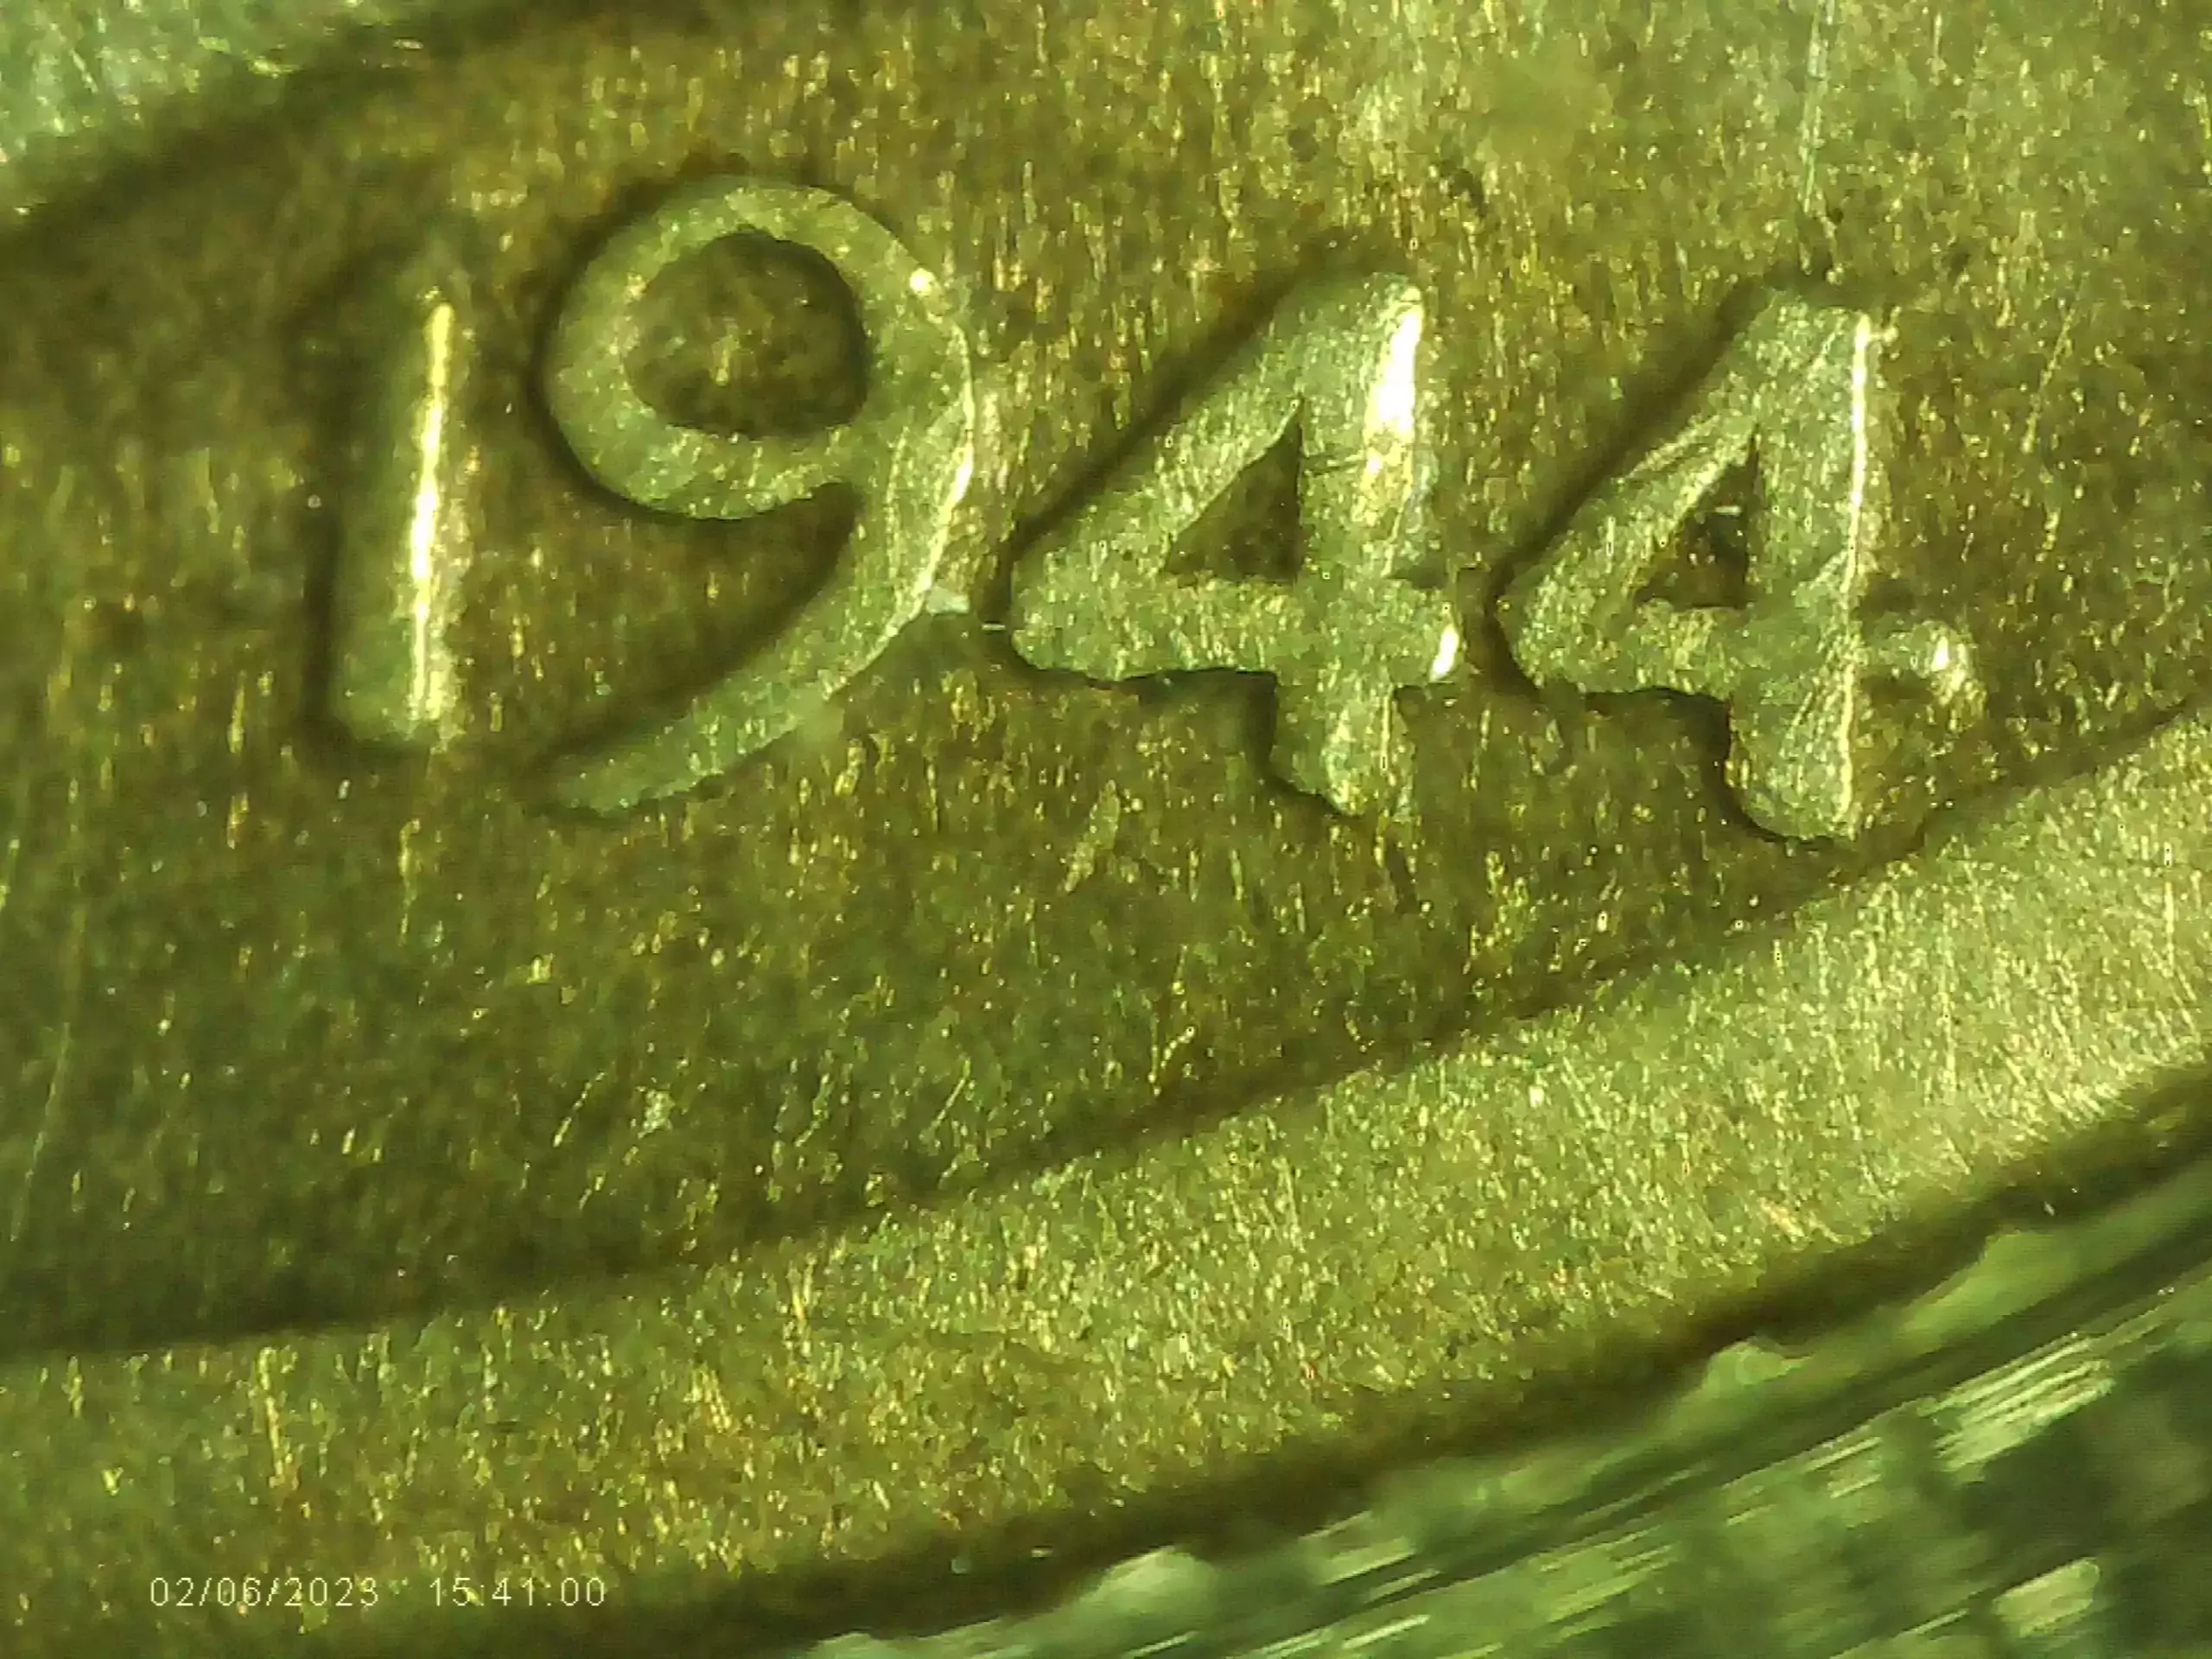
Again, this was not on the highest settings that the microscope can take pictures with. The quality and resolutions it’s capable of imaging with literally exceeds what I can really use on the web site at this time in 2023. Very impressive!
Pros / Cons
Pros
- Extremely affordable, can often be found for <$100
- Takes pictures and videos with included SD card
- Portable since it has a rechargeable battery and a very small footprint
Cons
- No charger included and charges pretty slowly off most regular USB connections
Conclusion
I’m very happy with this little microscope. It’s perfect for exactly what I wanted which is mostly to examine PCBs. I don’t need an extremely powerful microscope for that. This would also be a great microscope for coin collectors or anyone who needs to see small details on objects a lot.
The built in function to take photos and videos works surprisingly well. The SD card is included so it won’t cost you anything to take advantage of this feature. I was able to take satisfactory quality pictures which will help me a lot with my media/images on the site.
This microscope is surprisingly portable. Since it has a rechargeable battery and is physically very small it is very easy to move this microscope anywhere you need it / want to use it. I can hold the entire assembly easily with one hand and move it as it’s also quite light.
I would recommend this microscope for anyone that needs a cheap microscope around $100 or less. If you buy it from Amazon there is a $30 off coupon at time of writing that you need to select from the listing so make sure you clip that coupon before checking out. I only paid ~$80 for this thing with the coupon and I’m incredibly impressed for $80 as I have no doubt I’ll use it for years.
I wish I would have bought one sooner. The picture/video quality is surprisingly good for a device in this price range. It’s actually more than I need / can use on the site and I’m not even using max settings. Definitely watch out for more images on the site taken with the microscope going forward as I will be keeping / using it!
Other Resources
You may also be interested in the wowStick electronic screwdriver for electronics
I’ve also covered the Pinecil (a great and inexpensive soldering iron) here
Another handy tool for technicians is the DataVac ED500 dust removal tool


Why do images of coins show green or gold or silver, etc. Are screen image colors due to settings or different manufactures have their colors?
Hey Larry,
I think the imaging sensor has a bias toward green (and many other similar ones like it have the same green hue). That being said it is adjustable by settings. Mine are just stock.
Hopefully that helps!
Hi James,
Thanks for sharing this informative review as I was looking at getting a microscope and this one ticks plenty of boxes at a very affordable price using your link!
Hey Razor Burn,
Excellent, I’m so glad you saw it! I wasn’t necessarily planning on reviewing this but I was so happy with it for the price that I knew it had a place in my “Hidden Technican Gems” series of articles I’ve been doing which are basically just tools (like the Pinecil) I have got that were relatively inexpensive and made a *huge* difference for my work / productivity.
I can’t overstate how light the entire unit is. It’s completely portable. You can move it anywhere with one hand easily (just don’t forget to take the PCB off before trying it or it will slide off). My wife was also shocked how light it was.
I know you’ve said they let you order from Amazon.com in the past when it’s not on some of the other Amazon country-based sites and they have a $30 off coupon going right now for it that made the value pretty extraordinary. This will be perfect for letting me examine boards that aren’t working properly, my solder joints, all of that fun stuff.
I have some very interesting stuff coming that I can’t help but tell you about. That Adafruit board I mentioned in the review is 100% compatible with the XAIO series! They actually have their own ESP32C3 chip here called the QT Py. Check it out here.
These are so cool because they’ll work with all of the Grove sensors (and the QT Py even has a Grove I2C connector soldered on the board, wow!). All of the QT Py stuff is compatible with the XAIO series so all of the Adafruit gear can be used interchangeably with all of the XAIO series ESP32 chips/gear. They’re so compatible that Adafruit actually sells the XAIO expansion board here stating it’s for both the XAIO series and their QT Py series boards.
That’s very exciting especially if the relationship between my country and China keeps getting worse and there end up being some nasty export controls or some kind of trade war stuff. I hope this day never comes and I really hate trade wars but I’m not naive and I see what is happening and that it’s entirely possible things will get even more rocky (although I’m hoping not). Seeed has warehouses in the US as well too which should help. They have some kind of presence in the US which may help to keep these available even if we have a rocky trade relationship or things don’t improve.
It’s for sure one of the advantages of ESP32 chips is that anyone can make them. Adafruit (American company, New York) also makes them and they are 100% compatible with all our gear.
Thanks for your comment and stay tuned for more exciting stuff!
I’ll be sure to pick up a microscope as my eyesight isn’t what it used to be and all those small microcontrollers require attention when soldering on headers so thanks again for the review and I hope to see more “Hidden Technician Gems” reviews in the future.
I’m a big supporter of ‘home made’ so having retailers/makers such as Adafruit, DFRobot or Sparkfun is really important as the world enters a new “Cold War’ and in Australia we have Core Electronics who also make some really cool gear such as sensors, boards and stock a large range of electronics that ensure you don’t need to wait ages for something to arrive from overseas and at the same time you support the local economy. Conveniently they stock plenty of Adafruit gear so I’ll look to grab the QTY Py as its in stock and it seems its compatible with their range of PiicoDev sensors and can be programmed using Arduino IDE or MycroPhyton which is really handy so thanks for the tip!
By the way I’m curious to see if you’ll be trying out the Pine64 128Mb Ox64 SBC as I see its using the Bouffalo Lab BL808 RISC-V chip and has been touted an alternative to the RPi Pico and Zero range yet takes a bit of fiddling with to flash the necessary software. I feel its above my skill levels but for the price it looks interesting and runs ‘open source’ Linux and RTOS development plus some useful additions such as WiFi/BT, SD card and Zigbee…?
I plan on doing some tinkering in the coming weeks as my orders slowly trickle in and really appreciate the guides and reviews so keep them coming in… Take care!
Hey Razor Burn,
Very interesting! I just plugged a Zigbee and ZWave stick into my Home Assistant box with USB sticks and I’m going to be doing a little bit with those. I also have ESP32 lights coming that are smart RGB lights (like Philips Hue) that actually run ESP32s and can be configured within ESPHome!
I’m glad there are good options in Australia for Adafruit and some of the sensors. That definitely helps to have a more local or regional retailer with a stockpile of them for sure.
I’ll definitely investigate the Pine64 chip for sure. That definitely sounds interesting and the Zigbee could be really useful for smart home automation. I’ll definitely keep the guides/reviews coming as things come in and thanks!
I have this microscope but the charger port broke.and there is no battery so I’m trying to find out what battery I need . I’m going to have to keep buying batteries but it’s better than nothing. Can you please tell me what battery I need and where I can purchase one thank you
Hey Joshua,
That’s a tough one. The device has an internal battery that is charged through that port. It’s going to be some kind of Lithium Ion battery.
It would probably be cheaper to resolder the micro USB charging port. This will require some basic soldering though to pull off.
I’m not sure how the battery is connected inside the device. If it has one of those battery connector ports I suppose you could connect your own Lithium Ion battery (watch out for the polarity, it differs between devices whether the red and black wires are switched). I’d imagine fixing the charging port though is the more realistic option.
Hopefully that helps!