

Recently I reviewed the Orange Pi Zero 2 and thought it was a fantastic board. I really like the amount of polish that the Orange Pi line of products have as it is the closest I have seen to anything approaching a Raspberry Pi experience. We also benchmarked the Orange Pi Zero 2 and determined it’s a very capable board.
I recently got a Orange Pi i96 (thanks munecito!) and this board is very exciting because it was purchased on sale for ~$10! That is insanely cheap. The reason it’s so cheap is because it’s a headless board that doesn’t contain any display-out ports.
If you are going to be using the board headless anyway (I use most of my SBCs headlessly) you may be able to save a fortune with this board. Let’s get started!
Hardware Used

The Orange Pi i96 is a low-cost board from the Orange Pi line of SBCs. It uses the RDA8810 SoC and has 256MB LPDDR2 SDRAM. It’s well suited for headless tasks and is astonishingly cheap.
Links: Amazon.com*, AliExpress.com*, Amazon.ca*, Amazon.co.uk*, Amazon.de*, Amazon.es*, Amazon.fr*, Amazon.it*, Amazon.sg*

The Geekworm copper heatsink set is designed to fit many different single board computers. It uses thermal conductive adhesive which many “cheap” heatsink kits for SBCs don’t have. Eliminates hotspots and reduces throttling. Can be further enhanced by powered cooling over the heatsinks.
Links: Amazon.com*, Amazon.ca*, Amazon.co.jp*, Amazon.co.uk*, Amazon.de*, Amazon.es*, Amazon.fr*, Amazon.it*

The Orange Pi official mouse uses 2.4GHz wireless to give you a wireless mouse experience with the Orange Pi
Links: Amazon.com*, AliExpress*

The Orange Pi monitor is meant to be a portable monitor you can take anywhere. It has a resolution of 1080P and features a hinge in the back that folds out to support the monitor.
Links: Amazon.com*, AliExpress*
Getting Started
EDIT: I now recommend using my fixed Orange Pi i96 image as it will fix your USB port to be able to operate at full speed and give you a much newer OS of Debian Bullseye.
Alternatively you may use the official images (not recommended for this board). If you’d like to use the official images instead head to the official Orange Pi downloads page:

Now select the Orange Pi i96 from the list. I will be using Ubuntu Linux for this guide but you may use Armbian as well.
If you are wanting to try Android I highly recommend seeing my Orange Pi Android Installation Guide as the installation process is different than Linux.
Writing the Image
The images are typically distributed as a .tar.gz file. The name of the Ubuntu image tar.gz file at time of writing was OrangePi_i96_ubuntu_xenial_server_linux3.10.62_v0.0.4.tar.gz.
We will need to extract this file. If you are using Windows then grab 7-zip to be able to extract a .tar.gz file.
Inside this file will be a .img file. Since I downloaded the Ubuntu image the name of my file was OrangePi_i96_ubuntu_xenial_server_linux3.10.62_v0.0.4.img. This is the image that we are going to write to our SD card.
There are several choices to write the image to your SD card. If you are on Windows I recommend Win32DiskImager. Etcher is also available for Windows/Linux/Mac OS X.
Write the image to the SD card using your preferred software.
First Startup
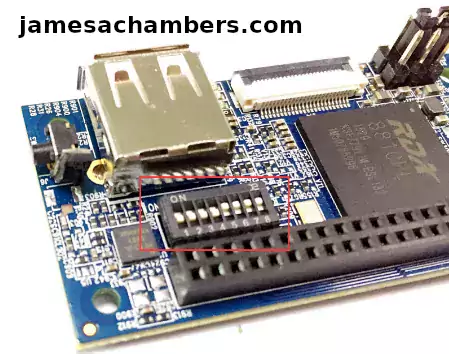
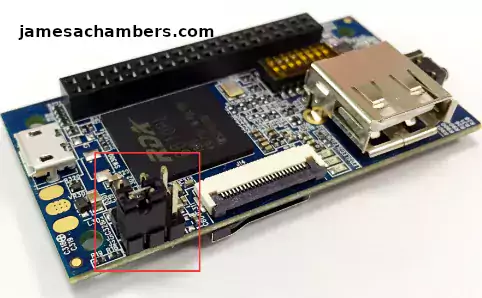
Before starting up you should make sure that the Orange Pi’s switches are in these positions (indicating to boot from SD card):
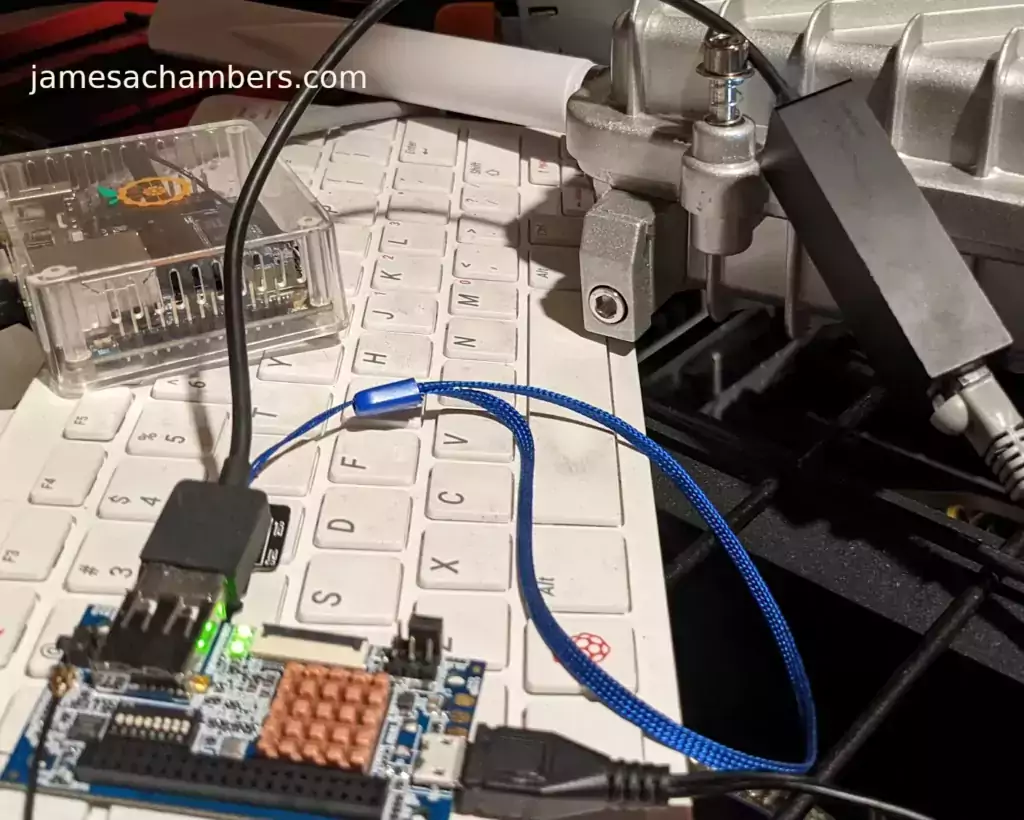
We’re ready to put the SD card into the Orange Pi i96. But how are we going to connect to the device? There’s no network port and the device isn’t configured to connect to our WiFi yet.
Connection Option #1
If you happen to have a USB to Ethernet adapter that is the easiest way to connect to the device for initial configuration:
Connection Option #2
If you have a TTL to USB serial debug adapter* you can use that as well. See the OrangePi instructions for that method.
Initial Configuration
orangepi-config Utility
Once you’ve connected it’s time to do some basic configuration. We will use the tool orangepi-config:
sudo orangepi-config
You may now set the WiFi settings, etc. The orangepi-config is just like raspi-config if you’ve ever used that on a Raspberry Pi.
Don’t reboot before doing the next section.
Fix Second Startup (Debian / Ubuntu)
You will notice if you reboot the device it will often not come up the second startup. This is especially likely if you performed a sudo apt dist-upgrade.
To prevent this I recommend removing the alsautils package. This will impact sound functionality on the board but as I was not using it and intended to use this more as a headless board this was fine for me.
sudo apt purge alsa-utils
If you need to have the sound working on the board there is an alternate solution available here.
This is not necessary in my Legendary image as it has kernel fixes for these issues (highly recommended)
Set Timezone
Replace my timezone with yours in the following commands:
rm /etc/localtime
ln -s /usr/share/zoneinfo/America/Denver /etc/localtime
Setup Locales
Setting the locales isn’t in orangepi-config (such as it is in raspi-config) but here’s a quick way to set them:
sudo apt install locales -y
sudo dpkg-reconfigure locales
Setup Wireless CRDA Regulatory Domain
For the wireless to function very well at all you need to set the wireless regulatory domain.
If you are not using my image then you will first need to install the crda package with:
sudo apt install crda -y
Now we can set the regulatory domain by editing the following file:
sudo nano /etc/default/crda
At the bottom of the file there is this line:
REGDOMAIN=
Put the 2 letter country code for your country. Mine is “US”. Once finished press Ctrl+X then Y to save the file.
Optional – Upgrade Debian OS to Buster/Bullseye
Note that this will not upgrade the kernel. You can upgrade everything else though including all the way up to Bullseye. You should do this one release at a time and start with “Stretch” and then do “Bullseye” afterward.
If you are using the Debian installation you can upgrade to Buster by editing your /etc/apt/sources.list file.
Change all instances of “stretch” in the file to “buster” and then do the following:
sudo apt update && sudo apt dist-upgrade -y
Once this has completed reboot the system (make sure you’ve done my fix second reboot section first by purging alsa-utils). Verify you are on Buster with
cat /etc/os-releasefor example:
root@orangepii96:/# cat /etc/os-release
PRETTY_NAME="Debian GNU/Linux 10 (buster)"
NAME="Debian GNU/Linux"
VERSION_ID="10"
VERSION="10 (buster)"
VERSION_CODENAME=buster
ID=debian
HOME_URL="https://www.debian.org/"
SUPPORT_URL="https://www.debian.org/support"
BUG_REPORT_URL="https://bugs.debian.org/"
Now you can upgrade to Bullseye. It’s almost the same as upgrading from Stretch to Buster but there has been a change in the security updates server format. Here is a working “Bullseye” apt sources file for the Debian Orange Pi i96 image:
root@orangepii96:/# cat /etc/apt/sources.list
deb http://ftp.debian.org/debian bullseye main contrib non-free
#deb-src http://ftp2.cn.debian.org/debian bullseye main contrib non-free
deb http://ftp.debian.org/debian bullseye-updates main contrib non-free
#deb-src http://ftp2.cn.debian.org/debian bullseye-updates main contrib non-free

deb http://security.debian.org/ bullseye-security main contrib non-free
#deb-src http://security.debian.org/ bullseye-security main contrib non-free
Once you’ve changed the files do a sudo apt update and make sure you don’t see any errors. If everything looks okay start the Bullseye upgrade with:
sudo apt full-upgrade -yAfter a reboot you should be on Bullseye! We can verify this with cat /etc/os-release:
orangepi@orangepii96:~$ cat /etc/os-release
PRETTY_NAME="Debian GNU/Linux 11 (bullseye)"
NAME="Debian GNU/Linux"
VERSION_ID="11"
VERSION="11 (bullseye)"
VERSION_CODENAME=bullseye
ID=debian
HOME_URL="https://www.debian.org/"
SUPPORT_URL="https://www.debian.org/support"
BUG_REPORT_URL="https://bugs.debian.org/"
orangepi@orangepii96:~$ uname -a
Linux orangepii96 3.10.62-rel5.0.2+ #4 PREEMPT Wed Mar 18 18:49:25 CST 2020 armv7l GNU/Linux
Notice that the kernel has not changed at all (as cautioned at the beginning of the section) but everything else on the system will be Bullseye!
Performance Benchmarking
I benchmarked the board using a SanDisk Extreme SD card on my Pi Benchmarks web site. This gives us comparable results between boards and there are over 30,000 benchmarks submitted for various boards / storage devices.
I had a total score of 497. This was below average or off from an average Raspberry Pi setup by about 47%.
To be clear the storage performance on the board is relatively low compared to the Orange Pi Zero 2 or a Raspberry Pi (Zero or 4). That is to be expected for a price of around ~$7-$10.
I’m not sure I would say this is a disappointing result though. We are talking about a board that is a single digit number of dollars. For the price point that is fantastic performance! In fact for the price point it’s a wonder that it works at all.
Conclusion
It’s a great board. At a price point of $7-$10 it reminds me of the really, really old Raspberry Pi Zero days where you could actually get a Raspberry Pi for around that price point.
The Zero 2 is a significantly more powerful board. It benchmarked much higher than the i96 but it also costs significantly more. If you need more power that board will be a better choice. If you’ve never had an Orange Pi before I would recommend the Zero 2 first as this board is quite a bit trickier and has more outdated software available for it.
The version of Ubuntu on this board is also quite old (Ubuntu 16.04 / Xenial) compared to the Orange Pi Zero 2 which is actually running a modern 5.X kernel whereas this one is a 3.X kernel. Make sure that is not going to be a problem or you will want to step up to a higher Orange Pi. The i96 is definitely meant for simple services / projects that don’t need a lot of power. It’s perfect for those.
If you need a headless board then the Orange Pi i96 may very well fit the bill for you, the price is certainly right! Don’t skip the heatsinks though. It got very warm during testing (warm enough to freeze once during consecutive benchmarks) and Orange Pis are known to get quite hot!
Other Resources
I highly recommend using the Legendary i96 Debian Bullseye image available here
I’ve also reviewed the Orange Pi portable monitor here
Don’t miss my Orange Pi Zero 2 Review / Tips / Guide for another great board (with display connections)
I’ve also reviewed the Orange Pi 3 LTS which is roughly equivalent in power to a 2GB Pi 4
If you’re trying to set up Android definitely see my Orange Pi Android Installation Guide
For the fastest storage options check out my Linux storage benchmarking script


Could you point me where to start to add the support of ov2640 camera.? module’s pinout seems to be reversed but it is not a problem.
Hey arforge,
I searched the code for OV2640 and there is a kernel flag you can enable for this (OrangePiRDA/kernel/arch/arm/configs/i96_linux_defconfig):
# CONFIG_SOC_CAMERA_OV2640 is not setIf you try setting that to:
CONFIG_SOC_CAMERA_OV2640=yYou should be able to rebuild the kernel with support for this module. Hopefully that helps!
Hello james, I have been trying to run docker on this card for a long time, but I am getting a thinpool error, I think there is a missing kernel in the image, one of the modules is missing. when querying i use this code: sudo modprobe dm_thin_pool
Hey Fatih,
Oh boy, that’s a good question whether it’s possible to get Docker working on this. I do see the parameter in question:
# CONFIG_DM_THIN_PROVISIONING is not setI feel like there’s going to be more than just this one though but I’ll try testing one to start with that and see what else it needs / if we run into a wall!
EDIT: I fixed two missing drivers by adding CONFIG_DM_THIN_PROVISIONING as well as the missing “bridge” driver with CONFIG_BRIDGE=m. Docker still isn’t starting but the errors are different. It should be closer than it was. I’m seeing some networking related warnings but maybe this is fixable with the 2 kernel drivers enabled. Can you check out V1.35?
I seem to have fixed it in V1.36 (at least as far as starting the service). I didn’t try running any containers yet but everything should be in place theoretically. Use the following:
sudo update-alternatives --set iptables /usr/bin/iptables-legacysudo apt install docker.io -y
This will fix the iptables startup error for Docker. If it isn’t wanting to start up (warning, only do this if there’s no containers and this is your first install) do a:
sudo rm -rf /var/lib/docker/*sudo systemctl restart docker
My results:
root@orangepii96:/home/orangepi# docker infoClient:
Context: default
Debug Mode: false
Server:
Containers: 0
Running: 0
Paused: 0
Stopped: 0
Images: 0
Server Version: 20.10.5+dfsg1
Storage Driver: devicemapper
Pool Name: docker-179:2-124703-pool
Pool Blocksize: 65.54kB
Base Device Size: 10.74GB
Backing Filesystem: ext4
Udev Sync Supported: true
Data file: /dev/loop0
Metadata file: /dev/loop1
Data loop file: /var/lib/docker/devicemapper/devicemapper/data
Metadata loop file: /var/lib/docker/devicemapper/devicemapper/metadata
Data Space Used: 240.1MB
Data Space Total: 107.4GB
Data Space Available: 30.02GB
Metadata Space Used: 696.3kB
Metadata Space Total: 2.147GB
Metadata Space Available: 2.147GB
Thin Pool Minimum Free Space: 10.74GB
Deferred Removal Enabled: false
Deferred Deletion Enabled: false
Deferred Deleted Device Count: 0
Library Version: 1.02.175 (2021-01-08)
Logging Driver: json-file
Cgroup Driver: cgroupfs
Cgroup Version: 1
Plugins:
Volume: local
Network: bridge host ipvlan macvlan null overlay
Log: awslogs fluentd gcplogs gelf journald json-file local logentries splunk syslog
Swarm: inactive
Runtimes: io.containerd.runc.v2 io.containerd.runtime.v1.linux runc
Default Runtime: runc
Init Binary: docker-init
containerd version: 1.4.13~ds1-1~deb11u2
runc version: 1.0.0~rc93+ds1-5+deb11u2
init version:
Kernel Version: 3.10.62-rel5.0.2-legendary-v1.36
Operating System: Debian GNU/Linux 11 (bullseye)
OSType: linux
Architecture: armv7l
CPUs: 1
Total Memory: 227.1MiB
Name: orangepii96
ID: A33D:L37D:WBOX:IUQU:IDSD:H47U:YWBG:BZZS:JRYJ:7E3V:GLE7:YGO4
Docker Root Dir: /var/lib/docker
Debug Mode: false
Registry: https://index.docker.io/v1/
Labels:
Experimental: false
Insecure Registries:
127.0.0.0/8
Live Restore Enabled: false
WARNING: No kernel memory TCP limit support
WARNING: the devicemapper storage-driver is deprecated, and will be removed in a future release.
WARNING: devicemapper: usage of loopback devices is strongly discouraged for production use.
Use `--storage-opt dm.thinpooldev` to specify a custom block storage device.
This absolutely will not work on versions less than 1.36 as I had to enable nearly a dozen kernel parameters for Docker but it seems to have ended up being worth it!
Thank you james i am trying now :).
Hey James
İ tried docker and its up running but the containers cant connected to network for example if i run portainer container its starts port 9000 but i cant connect the port its always times out. İ tried with other containers too but no luck. İ think there is a problem with ip tables. İ changed iptables,routing , bridge settings but nothing changed.
Hey Fatih,
I see some kind of weird IPv6 error:
[ 841.979858] docker0: port 1(veth548a9a9) entered disabled state[ 842.133605] docker0: port 1(veth548a9a9) entered disabled state
I then found this:
warning msg="seccomp is not enabled in your kernel, running container without default profile"I also half wonder if disabling IPV6 would fix it (for Docker) would fix it since it says specifically the IPV6 interface is what is having some kind of error.
Looks like there’s still some more for me to enable potentially here! If you see any specific errors though that would help as this seccomp one may be totally unrelated. There still may be several more to get!
Hey James,
I’ve seen you’re familiar with SDR ( HackRf post). I’ve made an antenna gimbal with servos and the orangepi, mounted a UHF antenna then started monitoring RF signal using an RTL-SDR focusing on the 401.5 Mhz band.
When I fire orangepi, I see immediate increase in the noise floor by at least 10 dB which is absolutely destructive to what I’m planning to do. Do you have any hint to lower this noise ? can you try to reproduce and will you have the same result ? Do the other boards you’re testing generate the same noise ?
Thank you.
Hey MZA,
Oh wow, that’s pretty interesting setup! RF can be incredibly tricky and I’ve seen interference come from USB 3.0 devices (yes, USB 3.0 devices give off significant RF interference and USB 2.0 doesn’t). Someone else figured out it was a nearby fountain interfering with it.
I typically use the HackRF which is about 10 times more expensive than the RTL-SDL (literally, about $290-$300 vs $29). I found someone here that said this:
As far as I know, it's impossible to completely disable all automatic gain mechanisms in the RTL chips.It sounds to me like this is automatic behavior when there’s a nearby strong transmitter and it can’t really be disabled. The HackRF has much finer controls available to deal with this.
Now as far as whether we can do anything about it I’m not sure. When you say you are firing the Orange Pi what type of signal exactly are you sending? What signal is raising the noise floor? It looks like to me that the RTL-SDL is doing this automatically due to being near a strong transmitting source and that they don’t let you control it very much on this radio!
The setup is pretty basic and is a complete DIY :
– two servos for Azimuth and Elevation,
– a lightweight antenna,
– a relay to switch on/off servos power ( from a USB power bank)
– a small I2C 16 channels PWM board provides position signal to the servos
and the pi powered ( fired) from my laptop with USB. The pi predicts a satellite position and orders the angles to the servos.
I use RTL-SDR on my laptop with SDRConsole to monitor the RF signal caught by the antenna.
Noise Floor raises by 10 immediately when I power the pi even before uboot starts, I don’t think its the laptop USB who does that, it’s probably the pi DCDC. That’s disappointing.
Then the servos make louder noise ( +20 dB) and this is more difficult to solve.
I’ll try wrapping all this ( except the antenna) with an aluminium foil.
Hey MZA,
Oh wow, that is interesting. Have you tried shutting off the Bluetooth and WiFi on the board with rfkill? No change in the floor with those shut off?
If you’re right that it’s the DCDC then insulating it might be the best thing to do. That’s similar to USB 3.0 RF interference. The solution is typically to use a shielded cable or you can wrap the whole thing in tinfoil just like this along the USB 3.0 cable. See here for a hilarious example of someone tinfoil wrapping their entire USB 3.0 adapter because it was interfering with RF.
Definitely let me know what you find, I’m curious if the foil will help!
I compared the noise floor when powering the orangepi fom my laptop USB or from the power bank. When powered from the powerbank, the noise floor increases by 20, its worse.
Bluetooth and Wi-fi are even not yet started, noise increases immediately with the very first lines on the console ( before setup ddr vtt to 1)
Hey MZA,
Wow, this keeps getting stranger but I honestly think we are getting closer. Take a look at this. This is for a different application than we are using obviously but it is for the RTL-SDR and the people commenting in that thread are a lot more educated than me about RF. They’re all engineers working on their thesis and stuff like that. They hooked these up to oscilloscopes and measured these signals. Look how big of a difference the power source made in these signal quality readings.
Now here is a thread on reducing this interference.
That definitely sounds promising. It sounds like there’s a design flaw. This has to be what is happening for it to go from 10 to 20. That’s a huge increase (it’s more than double because it’s a logarithmic scale)!
Also this:
That sounds easy. Do you have any of those or a cable that has them built in? I actually don’t have that many cables that have the chokes built in but they’re still widely available. He said he had a reduction of 10dB. That is almost exactly what you’re looking to get back.
Hi, James. How enable hardwire SPI for use WiringPi library?
Hey Tim,
Hmmm, I’m actually not completely sure. Are you trying to enable it with something like:
sudo gpio load spiIf so I tried that and it tried loading a wrong or non-present driver (/root/WiringPi/gpio/gpio.c):
       if(ORANGEPI ==  piBoardRev()) {

                if (strcasecmp(argv [2], "spi") == 0) {

                        module1 = "spidev";

                        module2 = "spi-sun8i";

                        file1  = "/dev/spidev0.0";

                        file2  = "/dev/spidev0.1";
I don’t think this has been set up for that yet as those values don’t look quite right here. Can you confirm that is what you are trying to do?
If you do a:
sudo gpio readallThis should use WiringPi to give you the current values of all the assignments. You may also change them with this tool as well. I think it may be set up to do it already right now but that you may need additional drivers depending on what you’re trying to do. If you are asking which pin assignments to use specifically I definitely am not sure on that one. My understanding is that the gpio/WiringPi tool should (combined with the startup script gpio_fixup.sh) set these correctly out of the box but maybe you’re trying to do something we haven’t exactly tried yet.
MZA has got the spidev interface itself working great. I don’t think you need to enable it this way and that it’s already loaded/enabled but he would be the person I’d trust the most to answer this question for sure (as all of the excellent WiringPi porting work has been done by him)! He stops by fairly often so I’d imagine he should be able to help shed some light on this as well.
I guess I’m not totally clear what you’re trying to do exactly. We have a working WiringPi implementation that is built into the image in /root/WiringPi (as the gpio tool) and it is enabled/installed out of the box basically when the image is built. Is this not working for what you are trying to do? Feel free to paste any output from what you are seeing as that should help as well!
Hi, I am trying to enable sound on the device but without success so far. A USB sound card is detected with lsusb but not with aplay as the modules are not enabled. I have also purchased a UDA1334A I2S DAC that I would like to connect possibly.
Has anyone been succesful in using a USB or I2S sound card with the device? Many thanks!
Hey Maus,
Can you try with V1.34? I just enabled a couple of kernel flags particularly CONFIG_USB_AUDIO that were missing before.
Let’s see if that takes care of it here!
Yes, sir. i tried V1.34. still , usb sound card not recogniced by aplay and arecord command. but listed in lsusb. i m using generic usb sound card. i m planning to use it as internet radio.
Hey saldzi,
Thanks for trying it! I’m not really sure which kernel flags are still missing. I would definitely be willing to change/add these if someone knows what they are. I don’t have one of these available to test with unfortunately!
UPDATE: Can you try again with 1.36? I found a problem with the USB audio kernel parameter and fixed it in this version. I think it may be worth another try!
Hi, thank you very much, i tried with very quick setup, my usb sound readed by lsusb command, unfortunately still not listed with aplay -l nor arecord -l. I have tried many way i found in googled but still no luck with v1.34.
I’m not trying yet with v1.36.
Thanks again, you lighted my day.
Hey saldzi,
No problem at all! I actually had made a mistake on one of the kernel parameters and put it to =m instead of =y. This was invalid for this option so I changed it to =y in 1.36.
This means that it essentially wasn’t turned on before. I’m definitely curious if you’ll be able to do anything with the card in 1.36 when you get a chance to try it!
How to switch to external usb Bluetooth?
Hey Kirillm,
You shouldn’t need to do anything but plug in the other Bluetooth adapter. You will then have two Bluetooth adapters basically and you would use the second one. Hopefully that helps!
lsusb | grep Bluetooth
Bus 001 Device 002: ID 0a12:0001 Cambridge Silicon Radio, Ltd Bluetooth Dongle (HCI mode)
hciconfig
hci0: Type: Primary Bus: UART
BD Address: 6C:DF:02:1F:9B:5D ACL MTU: 336:6 SCO MTU: 180:0
UP RUNNING PSCAN
RX bytes:2317 acl:0 sco:0 events:240 errors:0
TX bytes:4089 acl:0 sco:0 commands:240 errors:0
rfkill list0: rda_wlan_rk: Wireless WAN
Soft blocked: no
Hard blocked: no
1: rda_bt_rk: Bluetooth
Soft blocked: no
Hard blocked: no
2: phy0: Wireless LAN
Soft blocked: no
Hard blocked: no
3: hci0: Bluetooth
Soft blocked: no
Hard blocked: no
Bus: UART not Bus: USB
Hey Kirillm,
Yes those are all the default Bluetooth devices all working normally. There’s no USB one installed because there is no Bluetooth USB driver built into the kernel. It requires:
CONFIG_BT_HCIBTUSB=yAlthough it wouldn’t make sense to add these for every single type of device everyone wants to connect (they should rebuild the kernel for that) a USB Bluetooth device is generic enough that I’m fine with enabling support for this. My goal is to have it generally do what people want to do with it and only have to build it when they are working with something that they know they will have to build it for to accomplish. This is something I would expect to “just work”.
Can you try with V1.31 (which adds this driver) and let’s see what it looks like here!
Thanks, it is already visible but not scanning
hciconfig -ahci0: Type: Primary Bus: USB
BD Address: 00:1A:7D:DA:71:13 ACL MTU: 310:10 SCO MTU: 64:8
DOWN
RX bytes:547 acl:0 sco:0 events:27 errors:0
TX bytes:384 acl:0 sco:0 commands:27 errors:0
Features: 0xff 0xff 0x8f 0xfe 0xdb 0xff 0x5b 0x87
Packet type: DM1 DM3 DM5 DH1 DH3 DH5 HV1 HV2 HV3
Link policy: RSWITCH HOLD SNIFF PARK
Link mode: SLAVE ACCEPT
hci1: Type: Primary Bus: UART
BD Address: 30:B9:73:46:F2:29 ACL MTU: 336:6 SCO MTU: 180:0
UP RUNNING PSCAN
RX bytes:3516 acl:0 sco:0 events:102 errors:0
TX bytes:4424 acl:0 sco:0 commands:93 errors:0
Features: 0xff 0xff 0x8d 0xfa 0x98 0x39 0x79 0x83
Packet type: DM1 DM3 DM5 DH1 DH3 DH5 HV1 HV2 HV3
Link policy: RSWITCH HOLD SNIFF PARK
Link mode: SLAVE ACCEPT
Name: 'orangepii96'
Class: 0x000000
Service Classes: Unspecified
Device Class: Miscellaneous,
HCI Version: 2.1 (0x4) Revision: 0x12e9
LMP Version: 2.1 (0x4) Subversion: 0x12e9
Manufacturer: Cambridge Silicon Radio (10)
hcitool -i hci0 scanInvalid device: Network is down
hcitool devDevices:
hci1 30:B9:73:46:F2:29
Probably interferes with the built-in UART BT
?
hci1:
Manufacturer: Cambridge Silicon Radio (10)
It should be in hci0
Hey Kirillm,
Ahh yes that certainly is looking much better. There’s probably several ways you could fix it. The Bluetooth is initialized with /usr/sbin/bt_fixup.sh:
#!/bin/bashrfkill unblock bluetooth
bt_init
hciattach -s 921600 /dev/ttyS1 any 921600 flow
Since it uses a patchram to enable the Bluetooth and then uses hciattach I’m guessing one of those processes is making the ID not match. The device isn’t being mapped in the same way as your USB device. That one is actually mapping properly but the built-in Bluetooth never has and basically has to be initialized this way using the patchram (the init_bt part).
One way to fix it would probably be to plug in the USB Bluetooth radio after everything has start up (that way it will solidly be assigned hci1 as hci0 will be used and all settled theoretically). I assume it was plugged in at boot before and this may be why there’s a conflict. I think what is happening is that it is probably initializing your radio before the default one (since we do that in a startup service that runs relatively late in the boot process) but because we are using the patchram followed by hciattach directly it may be leading to this.
You could also try disabling the default Bluetooth radio altogether with
sudo systemctl disable bluetooth_fixup. Those are a few things to try to see if you can get it working here. As for how to fix the conflict I’m not sure yet as that will depend on what you find with those tests! It might just need for bluetooth_fixup.service to be ran earlier in the boot process or potentially before bluetooth.service or something like that.hciconfighci1: Type: Primary Bus: USB
BD Address: 00:1A:7D:DA:71:13 ACL MTU: 310:10 SCO MTU: 64:8
DOWN
RX bytes:547 acl:0 sco:0 events:27 errors:0
TX bytes:384 acl:0 sco:0 commands:27 errors:0
hci0: Type: Primary Bus: UART
BD Address: 30:B9:73:46:F2:29 ACL MTU: 336:6 SCO MTU: 180:0
UP RUNNING PSCAN
RX bytes:2532 acl:0 sco:0 events:52 errors:0
TX bytes:2671 acl:0 sco:0 commands:44 errors:0
hcitool dev
Devices:
hci0 30:B9:73:46:F2:29
hcitool -i hci1 scan
Invalid device: Network is down
systemctl disable bluetooth_fixup
Removed /etc/systemd/system/multi-user.target.wants/bluetooth_fixup.service.
Reboot..
/etc/init.d/bluetooth start
hciconfig -ahci0: Type: Primary Bus: USB
BD Address: 00:1A:7D:DA:71:13 ACL MTU: 310:10 SCO MTU: 64:8
DOWN
RX bytes:547 acl:0 sco:0 events:27 errors:0
TX bytes:384 acl:0 sco:0 commands:27 errors:0
Features: 0xff 0xff 0x8f 0xfe 0xdb 0xff 0x5b 0x87
Packet type: DM1 DM3 DM5 DH1 DH3 DH5 HV1 HV2 HV3
Link policy: RSWITCH HOLD SNIFF PARK
Link mode: SLAVE ACCEPT
hcitool dev
Devices:
hcitool scan
Device is not available: No such device
hciconfig hci0 piscan
Can’t set scan mode on hci0: Network is down (100)
bluetooth.service - Bluetooth serviceLoaded: loaded (/lib/systemd/system/bluetooth.service; enabled; vendor preset: enabled)
Active: active (running) since Wed 2022-10-12 19:58:37 UTC; 12s ago
Docs: man:bluetoothd(8)
Main PID: 496 (bluetoothd)
Status: "Running"
CGroup: /system.slice/bluetooth.service
└─496 /usr/libexec/bluetooth/bluetoothd
Oct 12 19:58:37 orangepii96 systemd[1]: Starting Bluetooth service...
Oct 12 19:58:37 orangepii96 bluetoothd[496]: Bluetooth daemon 5.55
Oct 12 19:58:37 orangepii96 systemd[1]: Started Bluetooth service.
Oct 12 19:58:37 orangepii96 bluetoothd[496]: Starting SDP server
Oct 12 19:58:37 orangepii96 bluetoothd[496]: Bluetooth management interface …zed
Oct 12 19:58:37 orangepii96 bluetoothd[496]: Failed to create GATT database …ter
Oct 12 19:58:37 orangepii96 bluetoothd[496]: Unable to register new adapter
Hint: Some lines were ellipsized, use -l to show in full.
Hey Kirillm,
That definitely means it has nothing to do with the stock adapter or our changes. It looks like it’s not initializing properly to me. Can you do a:
dmesg | grep -i bluetoothAlso what does rfkill say? It says the network is down. Is it blocked? How about
sudo hciconfig hci0 upCan you tell us which adapter it is as well?
lsusb | grep BluetoothBus 001 Device 002: ID 0a12:0001 Cambridge Silicon Radio, Ltd Bluetooth Dongle (HCI mode)
CSR8510 4.0
Yes!
sudo hciconfig hci0 up ))hcitool dev
Devices:
hci0 00:1A:7D:DA:71:13
Thank you very much it works!
Peace to the world!
ID 0bda:8771 Realtek Semiconductor Corp. Bluetooth RadioKembeteme 5.1
It doesn’t work, maybe there are no drivers, these ones worked on OpiPlus
rtl8761bu_fw
rtl8761bu_config
firmware-realtek
Hey Kirillm,
Excellent, I’m very glad that got that out of that stuck mode! Some of them will probably require some type of driver which there are hopefully packages available for or options to get those potentially. If there’s more kernel flags I can enable to fix some of these I would be glad to do it (but I’m not sure what they are or if there are more).
This is at least a great start that we got the USB Bluetooth support going. None of them could have worked without the work we did today. Thanks for testing this with me!
Hey James,
After a very long hours, I’ve succeeded to make the native spi work ( not with gpio ).
I’m testing it with my CAN shield and I’ll submit the corrections when concluded.
Cheers
Hey MZA,
That sounds fantastic, I will watch for them!
I’ve been experimenting with the USB hubs again lately which is why there hasn’t been any updates (because I don’t understand the low-level USB stuff and I’m trying to learn enough to understand what is even happening).
I got my USB to serial adapter set up with my i96 though and it’s going to be a game changer for me. You see all of the debug output printed out over the debug terminal all the time. I see some stuff failing really early in the boot process that cannot be seen otherwise. For example look how much output there is before dmesg even starts:
RDA8810 Boot_ROM V1.6HW_CFG: 0286
SW_CFG: 0000
Load EMMC
Open eMMC
EMMC OCR timeout
Open eMMC card Failed
Load EMMC Fail
Load SD
Open SD card
mcd_Open
Card is SDHC
Inserted Card is a SD card
mcd_Open Done
Loading image from SD card ................................................................................................Done
Check Image ... Done
Run ...
Init Clock ...
Clock config ver: 1.0
PMU vbuck1 = 9, vbuck3 = 10
setup ddr vtt to 1
setup ddr vtt to 1
setup ddr vtt to 1
setup ddr vtt to 1
setup ddr vtt to 1
setup ddr vtt to 1
setup ddr vtt to 1
setup ddr vtt to 1
setup ddr vtt to 1
rda2 stand for dqs_prsel_preset
rda2=0 rda2=1 rda2=2 rda2=3 rda2=4 rda2=5 rda2=6 rda2=7
R R R R * * R R
Please check the result and choose the best one
final rda2= 0, rda2_old = 2
setup ddr vtt to 1
pll freq CPU = 988
pll freq BUS = 800
pll freq MEM = 260
Init DDR, flag = 0x0002, para = 0x00001338
32bit dll-on Mode ...
ddr2 phy init done!
format ctrl value: 22000202
address ctrl value: 30301
decode ctrl value: 10
dram init done ...
Done
SETTING SECURITY CONTEXT
Board security: Not present
Init emmc ...
MMC: registered mmc interface 0
Spl init emmc first, use default zero mclk adj and inv.
MMC: registered mmc interface 1
raise: Signal # 8 caught
ERROR: v7_dcache_inval_range - stop address is not aligned - 0x0010fd48
-------------MMC information-----------
Manufacturer ID: 1b, Name: Unknown
OEM: 534d
Tran Speed: 25000000
Rd Block Len: 512
SD version 3.0
High Capacity: Yes
Capacity: Bus Width: 4-bit
-----------------------------------------
boot_mmc mfr id = 1b
EMMC boot ...
Check Image ...Verify image:
Done
U-Boot 2012.04.442-rel5.0.2 (Oct 06 2022 - 18:05:23)
RDA8810 SoC
Board: RDA8810
DRAM: 236 MiB
CPU: enable instruction caches
CPU: enable data caches
CPU: enable neon
CPU: p15-c1-c1 (NSACR): 0x00000000 -> 0x00000c00
CPU: p15-c1-c0 (CPACR): 0x00000000 -> 0x00f00000
NAND: metal 28 hwcfg 286, use eMMC, skip nand init
0 MiB
MMC: MMC: registered mmc interface 0
Cannot find the emmc corresponding mclk adj and inv.Now use default zero. Please add it
MMC: registered mmc interface 1
ERROR: v7_dcache_inval_range - stop address is not aligned - 0x8dae5e88
-------------MMC information-----------
Manufacturer ID: 1b, Name: Unknown
OEM: 534d
Tran Speed: 25000000
Rd Block Len: 512
SD version 3.0
High Capacity: Yes
Capacity: Bus Width: 4-bit
-----------------------------------------
MMC: 0, MMC: 1
Using default environment
In: serial
Out: serial
Err: serial
Hit any key to stop autoboot: 0
#-------Board Mux config found error-------#

Some used GPIO A are not available (0x8003)

--------------------------------------------
Board Mux : Error.
mmc0 is current device
Loading file "boot.scr" from mmc device 0:1 (xxa1)
884 bytes read
## Executing script at 81000000
** No boot file defined **
Loading file "uInitrd" from mmc device 0:1 (xxa1)
3091319 bytes read
Loading file "zImage" from mmc device 0:1 (xxa1)
3498360 bytes read
Loading file "modem.bin" from mmc device 0:1 (xxa1)
2097152 bytes read
## Checking Modem Code Image at 82000000 ...
Verifying Image Header ... OK
Image Name: Modem raminit codes
Image Type: MIPS Linux Kernel Image (uncompressed)
Data Size: 2064 Bytes = 2 KiB
Load Address: 01c16000
Entry Point: 81c16000
Verifying Data Checksum ... OK
## Raminit Image Detected
## Checking Modem Code Image at 82000850 ...
Verifying Image Header ... OK
Image Name: Modem work codes
Image Type: MIPS Linux Kernel Image (uncompressed)
Data Size: 2003744 Bytes = 1.9 MiB
Load Address: 02000800
Entry Point: 82000800
Verifying Data Checksum ... OK
## Work Image Detected
## Set modem logic base address 0x2000000
## Init mdcom ports ... Done
## Load Raminit Code to modem at 01c16000 (AP address 11c16000) ...
pc = 81c16000
param = 00000000
Done
## Start modem and waiting for response ... Done
## Load Work Code to modem at 02000800 (AP address 12000800) ...
pc = 82000800
param = 00000000
Done
## Load Calib Data to modem at Load factory from flash ...
lba size = 512
lba_start partition_size name
========= ====================== ==============
4096 52428800( 50M) xxa1
106496 31956402176( 30476M) xxa2
========= ====================== ==============
mmc partition table doesn't existLoad Failed
MOMEM EXT CALIB address 123f8000 ...
Factory already loaded
MOMEM CALIB address 123fc000 ...
Factory already loaded
MOMEM FACT address 123fe000 ...
Factory already loaded
AP FACT address 123ff000 ...
## Start modem ...
## Waiting for modem response ... Done
## Reset cause : 0x00000000
## Communication interface version : 0x00010001
## Power-on key is not pressed for normal boot.
## ****** Shutdown is needed later ******
## Init mdcom channels ... Done
## Loading init Ramdisk from Legacy Image at 85000000 ...
Image Name: uInitrd
Image Type: ARM Linux RAMDisk Image (gzip compressed)
Data Size: 3091255 Bytes = 2.9 MiB
Load Address: 00000000
Entry Point: 00000000
Starting kernel ...
Uncompressing Linux... done, booting the kernel.
Yikes. This part doesn’t look good:
#-------Board Mux config found error-------#
Some used GPIO A are not available (0x8003)
--------------------------------------------
Board Mux : Error.
mmc0 is current device
It will be refreshing to implement some other changes here!
Hey James,
I used the console since the beginning and was seeing these logs changing with the different updates we’ve done. It helps a lot to have them but for what you’ve posted, I only see errors due to the boot process alternatives ( no eMMC) and a bad assignment of GPIO from u-boot.
In fact, the gpio_fixup.sh is applied really late to make any spi device detected, that was one of the pbs I’ve identified and corrected. This specific correction ( assign proper functions to spi1) must be done in u-boot ( in TGT board something…). It’ll be posted.
Hey MZA,
Thanks, that’s actually a relief! I’d love to implement the fixes you’ve found. I’m definitely familiar with the file you speak of (it’s uboot/include/configs/tgt_ap_board_config.h).
I’ll implement it as soon as you’re ready / have it posted!
Hey James,
I pushed the modifications to my git, for kernel small modifs and uboot.
I think that we can remove the gpio_fixup script now. pins allocation should be done through tgt_board … but I did not follow all the modifs you’ve done to be absolutely sure of removing it.
If you keep it, gpio A mask and setting should be modified to have spi2 pins set to alternative function.
Other correction I’ve applied to WiringPi lib is the gpio binary, I found an error on the header pin 16, i’s an audio pin, not the SPI chip select. Second correction is the SPI2 ( as shown on the schematics) is in fact spidev1 in linux and not spidev2.
My best.
Hey MZA,
Fantastic work! I have a build out as 1.30 if you’d be willing to check that I implemented it all correctly.
Thanks a ton, it looks fantastic!
I think there’s an incomplete update from my part or from yours.
gpio setting is not correct, I see SPI2.DI set as GPIO, it should not. I fear this image breaks multiple functions. As a quick fix, please putback the gpio_fixup and I’ll try to figure out what went wrong ASAP.
Hey MZA,
Can you try with V1.31 first? I’m not sure that the root filesystem refreshed on that one so it is probably using an old version of your tool on 1.30.
If you look at the filesizes this one dropped a lot from the last version which tells me that the root filesystem definitely didn’t refresh (I have to remember to do a rm -rf output before building or it won’t refresh the root filesystem). It’s almost 8MB less despite me not removing anything and in fact adding another kernel parameter so I think that build may have been bad.
If it’s doing the same thing in 1.31 I can definitely turn gpio_fixup back on (I only commented it out just in case / for future reference)!
I’m sure it’s a new rootfs, I recompiled the kernel and uboot ( of 1.30) and got the same result as the image itself, let’s put back the gpio fixup then investigate later.
Now what I’m seeing is weird.
I enabled the mcp251x can driver, It got detected at bootup
[ 0.661987] CAN device driver interface
[ 0.662353] mcp251x spi1.1: max_speed_hz = 20000000, bus_speed_hz = 200000000, divider = 4
[ 0.673828] mcp251x spi1.1: probed
This means the gpio functions were OK.
I made it up and running and it was somehow working ( SPI bus properly configured) although the strange gpio readall display ( It shows SPI2.DI set to gpio function, where it is not, and D02 set to ALT while I get interrupts on this pin as gpio):
+-----+-----+----------+------+---+-Orange Pi I96+---+---+------+---------+-----+--+| RDA | wPi | Name | Mode | V | Physical | V | Mode | Name | wPi | RDA |
+-----+-----+-----------+------+---+----++----+---+------+-----------+-----+-----+
| | | GND | | | 1 || 2 | | | GND | | |
| 40 | 40 | UART2.CTS | OUT | 0 | 3 || 4 | | | PWR_BTN_N | | |
| 104 | 104 | UART2.TX | ALT | 1 | 5 || 6 | | | RST_BTN_N | | |
| 103 | 103 | UART2.RX | ALT | 1 | 7 || 8 | 0 | ALT | SPI2.CLK | 2 | 2 |
| 41 | 41 | UART2.RTS | OUT | 0 | 9 || 10 | 0 | IN | SPI2.DI | 4 | 4 |
| 14 | 14 | UART1.TX | ALT | 1 | 11 || 12 | 0 | ALT | SPI2.CS1 | 6 | 6 |
| 102 | 102 | UART1.RX | ALT | 1 | 13 || 14 | 0 | ALT | SPI2.DO | 3 | 3 |
| 0 | 0 | I2C2.SCL | ALT | 1 | 15 || 16 | 0 | ALT | I2S_LRCK | 10 | 10 |
| 1 | 1 | I2C2.SDA | ALT | 1 | 17 || 18 | 0 | ALT | I2S.BCK | 9 | 9 |
| 38 | 38 | I2C3.SCL | ALT | 1 | 19 || 20 | 0 | ALT | I2S.DO | 13 | 13 |
| 39 | 39 | I2C3.SDA | ALT | 1 | 21 || 22 | 0 | ALT | I2S.DI | 11 | 11 |
| 15 | 15 | G.A A15 | ALT | 0 | 23 || 24 | 1 | ALT | G.B A20 | 20 | 20 |
| 56 | 56 | G.C B24 | IN | 1 | 25 || 26 | 1 | ALT | G.D D02 | 66 | 66 |
| 67 | 67 | G.E D03 | ALT | 0 | 27 || 28 | 1 | ALT | G.F A22 | 22 | 22 |
| 30 | 30 | G.G A30 | ALT | 0 | 29 || 30 | 0 | ALT | G.H A29 | 29 | 29 |
| 28 | 28 | G.I A28 | ALT | 0 | 31 || 32 | 0 | ALT | G.J 27 | 27 | 27 |
| 26 | 26 | G.K A26 | ALT | 0 | 33 || 34 | 0 | ALT | G.L A25 | 25 | 25 |
| | | V_PAD | | | 35 || 36 | | | SYS_DCIN | | |
| | | VDD_IN | | | 37 || 38 | | | SYS_DCIN | | |
| | | GND | | | 39 || 40 | | | GND | | |
+-----+-----+-----------+------+---+----++----+---+------+-----------+-----+-----+
| RDA | wPi | Name | Mode | V | Physical | V | Mode | Name | wPi | RDA |
+-----+-----+----------+------+---+-Orange Pi I96+---+------+----------+-----+-----+
I really did not go thru all the gpio_fixup script, it must have other corrections that gpio binary uses.
Sorry for suggesting its removal.
Good news, spi is OK.
Hey MZA,
Fantastic work, that is amazing you were able to enable this to work this way! I’ve restored the gpio_fixup.sh script in there.
When we very first started I had read patb’s Wiki about some of his other changes and I would honestly have to read it again at this point to remember them but there were several things wrong for sure. That is just a tiny nitpick though to have it applied in the board config vs. the gpio_fixup script. It would be nice to have all the fixes in the config (and we’ll probably get there eventually) but I’m much more excited about what you’ve been able to accomplish than I am concerned about any residual configuration we may need to work into the main config files over time vs. the startup script.
This should be coming up as 1.32 shortly here!
Hey James,
Can bus is running better with the latest update to devices.c and mcp251x driver. ( Pushed to my git)
Hey MZA,
Thanks, I have them implemented here as 1.33!