

Minecraft Bedrock Edition is the version of Minecraft that powers the iPhone / Android versions (formerly Minecraft Pocket Edition), the Xbox / PlayStation / Nintendo Switch editions and the free Windows 10 Minecraft edition.
Mojang has released a dedicated server which is considered to be in alpha testing. I have found it to be very stable and able to run on a wide variety of hardware.
This script and guide are written to help you get a robust Minecraft Bedrock dedicated server up and running in only a few minutes!
This is the standalone version. The easiest and most problem-free way to run this is using Docker (installed as simply as sudo apt install docker.io): Legendary Minecraft Bedrock Container
I’ve also released a way for Java and Bedrock players to play on the same server using Geyser: Minecraft Java + Bedrock Server Together – Geyser + Floodgate
It’s now possible to convert your worlds between Bedrock and Java versions. Check out my guide on Chunker here for more information.
Features
- Sets up the official Minecraft Bedrock Server (currently in alpha testing)
- Fully operational Minecraft Bedrock edition server in a couple of minutes
- Ubuntu / Debian distributions supported
- Sets up Minecraft as a system service with option to autostart at boot
- Automatic backups when server restarts
- Supports multiple instances — you can run multiple Bedrock servers on the same system
- Updates automatically to the latest or user-defined version when server is started
- Easy control of server with start.sh, stop.sh and restart.sh scripts
- Adds logging with timestamps to “logs” directory
- Optional scheduled daily restart of server using cron
Requirements
- A computer with a 64 bit processor (if you are trying to use ARM read my article on the limitations). 32 bit binaries of the official server are not available so it needs to be 64 bit!
- 1 GB of RAM or higher
- The only officially supported platform by Microsoft is Ubuntu 22.04 / 20.04 (current LTS, recommended)
- Other Linux flavors supported by this script as well as long as they use systemd (for the service). The script assumes apt is installed but there are minimal dependencies so you could install these on another distro (that doesn’t have apt present) and use the script normally.
Recommended Gear
Game Editions
Minecraft: Bedrock Edition is the “Windows 10” version of Minecraft as well as the version of Minecraft on the Xbox / Playstation / Switch. The versions of Minecraft for Android and iOS are also the Bedrock edition.
All of these versions support cross-platform play with each other (but not with the Java edition).

This is the PC Minecraft for Windows 10 (Bedrock) edition of Minecraft. It is able to play cross-platform with other players on Android / iOS / Playstation / Xbox / Switch. Available as a code that is instantly activated to give you permanent access to the game!
Links: Amazon.com*, Amazon.co.jp*, Amazon.co.uk*, Amazon.de*, Amazon.es*, Amazon.fr*, Amazon.it*

The Sony PlayStation version of Minecraft: Bedrock edition.
Links: Amazon.com*, Amazon.ca*, Amazon.com.au*, Amazon.co.jp*, Amazon.co.uk*, Amazon.de*, Amazon.es*, Amazon.fr*, Amazon.it*, Amazon.nl*, Amazon.se*, Amazon.sg*

This is the Nintendo Switch version of Minecraft: Bedrock edition.
Links: Amazon.com*, Amazon.ca*, Amazon.com.au*, Amazon.co.jp*, Amazon.co.uk*, Amazon.de*, Amazon.es*, Amazon.fr*, Amazon.it*, Amazon.nl*, Amazon.pl*, Amazon.se*, Amazon.sg*

This is the Microsoft Xbox version of Minecraft: Bedrock edition.
Links: Amazon.com*, Amazon.ca*, Amazon.com.au*, Amazon.co.uk*, Amazon.de*, Amazon.es*, Amazon.fr*, Amazon.it*, Amazon.nl*, Amazon.sg*
Recommended Storage (Solid State Drive)
I strongly recommend a Solid State drive (SSD) for your server. This is because Minecraft is constantly reading/storing chunks to the disk which makes I/O performance very important.
These are much cheaper than they used to be. Here’s a decent 120 GB one (higher capacity options are available) at a very low price:

The Kingston A400 is reliable, widely available around the world, has low power requirements and performs very well. It’s also very affordable. This drive has been benchmarked over 1000 times at Pi Benchmarks and is the #1 most popular SSD among the community!
Links: AliExpress*, Amazon.com*, Amazon.ca*, Amazon.com.au*, Amazon.co.jp*, Amazon.co.uk*, Amazon.de*, Amazon.es*, Amazon.fr*, Amazon.it*, Amazon.nl*, Amazon.pl*, Amazon.se*, Amazon.sg*
If you have a M.2 NVME slot in your motherboard you can go with a high end drive. This will give your server maximum performance even if a large number of players are running around on the server changing blocks and triggering disk writes.
This is the one I have in my machine. These range from 250 GB to 2 TB depending on how big your server might grow:

The Samsung 980 Pro (NVMe) is a professional grade SSD and one of the fastest in the world. The Samsung NVMe drives have been at the top of this category for a long time and are well trusted for both their performance and reliability / long life.
Links: AliExpress*, Amazon.com*, Amazon.ca*, Amazon.com.au*, Amazon.co.jp*, Amazon.co.uk*, Amazon.de*, Amazon.es*, Amazon.fr*, Amazon.it*, Amazon.nl*, Amazon.pl*, Amazon.se*, Amazon.sg*
Computer / CPU / Memory
Almost any PC made in the last few years will be a x86_64 bit computer. If you have an older computer around that isn’t being used then it will most likely have the right CPU and amount of memory (as well as fast storage) to run a basic server.
Throwing a SSD in one of these older computers will provide an excellent server experience for small and larger player counts.
The speed of your storage will make the largest difference. Older HDDs are going to have significantly slower performance than any modern SSD even with all other hardware equal. This is because the Minecraft server is constantly reading/writing chunks of your world as well as updates to it to the disk so this tends to be the bottleneck.
Operating System
I highly recommend using Ubuntu Server to run the Minecraft dedicated server. It is available here.
At the time of writing the current version is Ubuntu Server 20.04. This is a secure and robust operating system and will leave plenty of resources available for the server to run.
The script should run on any Debian based flavor of Linux but since the Minecraft Bedrock server is compiled natively for Ubuntu I recommend sticking with it. If you have a GUI flavor of Ubuntu and a decent PC (>= 2 GB of RAM) the server will work just fine on it.
Note: People have reported in the comments that Ubuntu 16.x is no longer working with the latest official Mojang binaries. Ubuntu 18.04 is the minimum requirement for the latest versions, and 20.04 is recommended!
Installation
Log into your Linux server either using SSH or a mouse and keyboard and paste/type the following command:
curl https://raw.githubusercontent.com/TheRemote/MinecraftBedrockServer/master/SetupMinecraft.sh | bashThe script will setup the Minecraft sever and ask you some questions on how to configure it. I’ll explain here what they mean.
The first question will be the installation path. This is the root installation path for ALL servers you will have. If you add additional servers later you should select the exact same installation path. It should always be left as the default (~).
The only exception is if you have something like a completely dedicated disk for the Minecraft server. In that case you should always use the same root path of /mnt/yourdrive or wherever the path is for every new/additional server you install.
“Start Minecraft server at startup automatically (y/n)?” – This will set the Minecraft service to start automatically when your server boots. This is a great option to set up a Minecraft server that is always available.
“Automatically restart and backup server at 4am daily (y/n)?” – This will add a cron job to the server that reboots the server every day at 4am. This is great because every time the server restarts it backs up the server and updates to the latest version. See the “Scheduled Daily Reboots” section below for information on how to customize the time or remove the reboot.
That is it for the setup script. The server will finish configuring and start!
First Run
The server will start up and start displaying output to the console.
[2019-03-30 20:25:12 INFO] Starting Server
[2019-03-30 20:25:12 INFO] Version 1.10.0.7
[2019-03-30 20:25:12 INFO] Level Name: Bedrock level
[2019-03-30 20:25:12 INFO] Game mode: 0 Survival
[2019-03-30 20:25:12 INFO] Difficulty: 1 EASY
[2019-03-30 20:25:20 INFO] IPv4 supported, port: 19132
[2019-03-30 20:25:20 INFO] IPv6 supported, port: 19133
[2019-03-30 20:25:23 INFO] Server started.
Once you see the “Server started” line you will be able to connect from the client.
To add the server to the client open Minecraft and click “Play”. Then at the top of the screen select the “Servers” tab and click “Add Server”.
This will ask you for a Server Name and Server IP Address. For the name you can put anything and for the server IP address put the address of your Linux server. Leave the port as the default 19132. For more information on how to let people from outside your network on go to the “Port Forwarding” section below.
Now choose the server you just added in the list and connect!
Start, Stop and Restart Server
The server can be started, stopped and restarted two different ways. You can use the provided scripts in the Minecraft folder or you can use systemctl. Here are the commands:
cd ~/minecraftbe
./start.sh
./stop.sh
./restart.sh

-OR-

sudo systemctl start minecraftbe
sudo systemctl stop minecraftbe
sudo systemctl restart minecraftbe
Automatic Backups
The server backs up each time it starts. This helps you recover easily if something goes wrong. This system works best if you configured the server to restart daily since it means you will have a backup every day.
To access these backups type:
cd ~/minecraftbe/backups
ls
When a backup is made the filename will be the date and time the backup was taken. If you need to restore a backup it’s very easy. Substitute the timestamp in my example to the backup you want to roll back to. Type:
cd ~/minecraftbe
./stop.sh
rm -rf worlds
tar -xf backups/2019.02.15.22.06.30.tar.gz
./start.sh
Your world has now been restored! It’s a good idea to download these backups off the server periodically just in case the server’s storage fails.
Installing Resource Packs / RTX Support
For instructions on how to install resource packs (including optional RTX support) view my step by step Minecraft Bedrock Dedicated Server Resource Packs guide here.
Scheduled Daily Reboots
The daily reboots are scheduled using cron. It’s very easy to customize the time your server restarts.
To change the time that the server restarts type: crontab -e
This will open a window that will ask you to select a text editor (I find nano to be the easiest) and will show the cronjobs scheduled on the server. The Minecraft one will look like the following:
0 4 * * * /home/ubuntu/minecraftbe/restart.sh
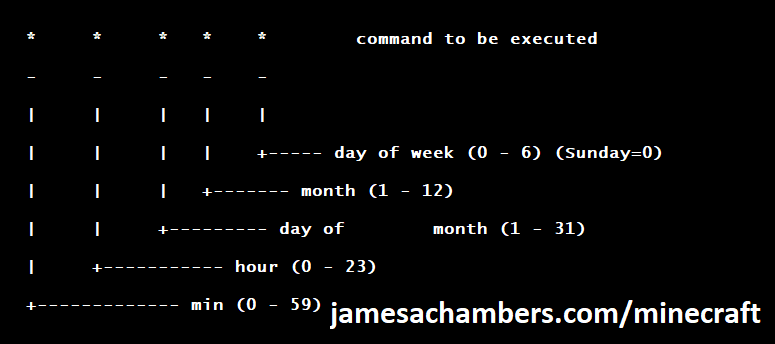
There are 5 fields here. The default restart time is set to reboot at 0 minutes of the 4th hour of the day (4 AM). The other 3 fields are left as * to represent every day of every month. Make any desired changes here and press Ctrl+X to exit nano and update the cronjob.
To remove the daily reboot simply delete the line and save.
Reconfigure / Update Scripts
The scripts can always be reconfigured and updated by downloading the latest SetupMinecraft.sh and running the installer again. It will update all of the scripts in the Minecraft directory and reinstall the startup service for you.
Running SetupMinecraft.sh again will also give you a chance to reconfigure options such as the memory dedicated to the server, daily reboots, starting the server on boot, etc.
This will not overwrite your world or any other data so it is safe to run!
Port Forwarding
If everyone on your server is on the same LAN or WiFi network as you then you don’t need to do this. If you want people to connect from outside your local network then you need to set up port forwarding on your router.
The process for this is different for every router so the best thing to do is just look at your router and find the model # and put that in google with port forwarding for easy instructions on how to do it for your specific router.
You want to forward port 19132. The type of connection is both TCP and UDP. On some routers you need to do both a TCP entry and then a second entry as UDP.
Once you do this people will be able to connect to your Minecraft server through your public IP address. This is different than your local IP which is usually a 192.x.x.x or 10.x.x.x. If you don’t know what that is just go to google and type “what’s my ip” and Google will kindly tell you!
Version Override
You can revert to a previous version with the revert.sh script included in your directory like this:
james@jamesgigabyte-linux:~/minecraftbe/james$ ./revert.sh
Set previous version in version_pin.txt: bedrock-server-1.19.10.20.zip
If you have a specific version you would like to run you can also create version_pin.txt yourself like this:
echo "bedrock-server-1.18.33.02.zip" > version_pin.txt
The version hold can be removed by deleting version_pin.txt. This will allow it to update to the latest version again!
Wired vs. Wireless
Going with an ethernet (wired) connection is going to be faster and more reliable. There’s so much wireless traffic and other interference in the air that running your server on WiFi is not recommended.
Even if it is working great 99% of the time it can ruin your experience very quickly if the WiFi drops for a couple of seconds and you get blown up by a creeper!
All that being said, the server works fine on wireless. The script will work fine as is with a wireless connection.
Benchmarking / Testing Storage
If you’re getting poor performance you may want to run my storage benchmark with:
sudo curl https://raw.githubusercontent.com/TheRemote/PiBenchmarks/master/Storage.sh | sudo bash
PC results won’t show up on the site yet (it’s meant for Raspberry Pi) but it will run on Linux just fine and give you a score. If you search for the model of your drive on Pi Benchmarks you can compare your score with others and make sure the drive is performing correctly!
Troubleshooting Note – Oracle Virtual Machines
A very common problem people have with the Oracle Virtual Machine tutorials out there that typically show you how to use a free VM is that the VM is much more difficult to configure than just about any other product / offering out there.
It is because there are several steps you need to take to open the ports on the Oracle VM. You need to both:
- Set the ingress ports (TCP/UDP) in the Virtual Cloud Network (VCN) security list
- *and* set the ingress ports in a Network Security Group assigned to your instance
Both of these settings are typically required before you will be able to connect to your VM instance. This is purely configuration related and has nothing to do with the script or the Minecraft server itself.
I do not recommend this platform due to the configuration difficulty but the people who have gone through the pain of configuring an Oracle VM have had good experiences with it after that point. Just keep in mind it’s going to be a rough ride through the configuration for most people.
Troubleshooting Note – Hyper-V
There is a weird bug in Hyper-V that breaks UDP connections on the Minecraft server. The fix for this is that you have to use a Generation 1 VM with the Legacy LAN network driver.
Conclusion
The Minecraft Bedrock Edition dedicated server runs much better than previous third party servers in the past that were missing critical features. The performance is very good even on low end hardware. It has never been easier to set up a Minecraft Bedrock server.
If you have any feedback or suggestions let me know in the comment section. A lot of the changes and developments in this script and guide are directly from readers.
Have fun!
Other Resources
For a guide on how to set up resource packs check out my Minecraft Bedrock Resource Pack guide
If you’re trying to run this on the Raspberry Pi check out the Raspberry Pi specific guide here


I just wanted to say thank you very much for taking the time to create these great scripts – very well documented and easy to read/modify as well. Super simple and easy to get a quick Bedrock server up and running on Ubuntu Server. And a great base of scripts for anyone to modify for themselves.
Hey Soren,
Welcome, thank you for leaving this comment! I’m glad you found them easy to extend/modify as I tried to keep them clean/organized and not full of bashisms and really obscure looking code. I definitely encourage anyone to try this that is interested. Enjoy and have fun!
Hey there, thanks for the awesome tools that make setting up and running a bedrock server so much easier!
My server has been running fine for the past 3 weeks, but 3 days ago and yesterday the minecraft bedrock server software crashed. As I was in bed both times I haven’t been able to reboot the server for my friends, which is quite unfortunate, but the server also hasn’t been rebooted at the daily reboot time at 4 am. Which is really not good if I think of being not at home or something like that.
My experience with Linux unfortunately is near zero, but is there a small script I can write that starts the server automatically if it’s not running? On a sidenote, the services you mentioned (systemctl start/stop/restart minecraftbe) seem to not work at all for me. Anything I missed?
Hey manuel19,
The only times I’ve seen this are when the server’s disk has got corrupted and the service is broken. I’ve diagnosed a few of them pretty recently in these comments. It would definitely be worth making sure that you are keeping some of the backups and storing them outside of the “backups” folder as it’s also possible the server is corrupted. Make sure you’re keeping a series of them just in case. Sometimes you have to go back a few backups to before the problem started so you want to keep some that are this old around just in case.
We would have to look at the log files to be sure. The files are in the “logs” folder (~/minecraftbe/yourserver/logs approximately). They will have a stack trace / dump each time it crashes unless it’s your system crashing altogether. The log files should help though if you want to look through them after a crash / post them here I can definitely help further and pinpoint what is going on. The most important thing though is to gather backups as when people try to fix these I’ve seen them prune all 10 good backups and just have junk for their backups. I’m sure we can get it going again.
The system probably needs an fsck at the very least but as of late everyone who has needed an fsck (meaning their disk/partition is corrupted) ended up reinstalling their OS with a fresh copy of the latest version and was infinitely better off afterward. We can definitely check the log file output before jumping to that conclusion though. Hopefully that helps!
Hey James,
thanks for your quick response! I’ve already checked the logs and found it was not such a rare bug, and added my logs here.
Doesn’t seem like a storage issue, it also hasn’t happened since, but nevertheless I backup the backup files like every other day to another harddrive + Google Drive.
I’ve once lost a mc world due to file corruption on ps4 and it was the worst. Like half the world was just reset and it was basically the most important stuff there.
My friends and I were shattered so we moved on and haven’t played mc because of that in a long time.
Because of that, I started paying for a Realm once that became an option. Quite nice to have your world backed up every 30 minutes.
But the performance sucks. Like 4 chunks sim distance and 10 chunk render distance on every platform? Makes exploring the world a weird experience since you never know where you’re going.
But pricely it was okay-ish, due to the Nintendo Switch Option where you could get a years subscription for basically like 35€ a year. Quite a steal in comparison to their monthly plan that sits at 8€/month.
But as they’ve removed that, I’ve set up a custom server and your script/tools made this so much easier. It’s like a realm that requires a little more work but at the same time is so much more enjoyable due to higher render and simulation distance!
Again, thank you so much. I will always keep my backups in multiple places to be safe from file corruption!
For the restarting problem, I have now set up a shell telegram bot on the server with some whitelist commands I gave myself and some friends permission to easily start/restart the server or ask for the ip address. Quite helpful
Cheers!
Hey manuel19,
Wow, that is quite the epidemic of that issue! I take it you’d already found my posts that in the past (way before it was as widespread as it apparently is from how many people commented in saying they very recently got the same thing) it was almost always that bedrock_server had lost it’s +x permissions. In rare cases it was actually losing permissions while running and this ended up being due to corrupt disk partitions (fsck unable to fix in pretty much every case, they reinstalled the latest fresh copy of their OS and it was fantastic afterward). This does indeed seem like something else here and I look forward to seeing how the bug report plays out.
One thing you may be able to try if you haven’t done this is to make sure you’ve installed your OS’s official curl libraries just to be sure. I’ve seen this be related to this before especially if you aren’t on the latest flavor of Ubuntu where the command for libcurl would be:
sudo apt install libcurl4and on an older flavor (recommend upgrading to the latest flavor of your OS if it even lets you install this version and doesn’t say it’s missing but this has worked before):
sudo apt install libcurl3Now the curl libraries are definitely statically linked within the binary. Nevertheless, probably due to bugs or something else, I’ve seen the system curl libraries make a difference and the error message itself references them as well even though it makes no sense why you’d ever use them with curl already statically linked inside the binary.
That is actually ideal because you know everyone has the exact same version of curl (the one inside bedrock_server) and so I’m not sure why Microsoft would ever want to trade that for whatever is/isn’t installed on the system instead which can introduce a million compatibility issues (which we arguably do kind of have honestly, the ports bug is another one that has weird inconsistent behavior across different setups).
I’m so glad you were able to use and extend the scripts to make this work! That was definitely my hope with these and this is definitely not a “my way or the highway” type of project. I’m always fascinated by what people are doing with them. I just found out it was possible to bridge Bedrock and Java versions using some Spigot plugins (running the Java version) yesterday from the community using the scripts as well!
That actually is pretty decent pricing from Nintendo on Realms especially considering the official/normal price as you pointed out. It’s arguably cheaper to just get a VPS (that you could run anything you wanted) than the full blown Realms server most likely but Nintendo’s price would push you into the lowest tier of VPS servers that have like 1 core and 1GB of RAM (specs worse than Pis, a lot worse actually these days). That is unfortunate that they are getting rid of that!
I think you’ll be much better off / probably are already. I love that you set up a shell telegram bot to it! I can only imagine what other kinds of customizations you and your community may come up with on the server. Cheers and thanks for sharing and the kind words!
Hey James,
first of all thanks for this amazing script.
I encored an error which prevents the server from starting and as a newbie I can’t really find a working solution to that. When I ran the ./start.sh I’ll get this error:
gawk application was not found -- timestamps will not be available in the logs. Please delete SetupMinecraft.sh and run the script the new recommended way!Use: screen [-opts] [cmd [args]]
or: screen -r [host.tty]
.
.
.
Error: Unknown option Logfile
--------------
and there’s a list of options displayed
ITs probably a minor problem, but im too stupid too fix it.
Kind regards Destinykid.
Hey Destinykid,
Welcome! I haven’t seen that one for a while for sure. I definitely know how to help!
It’s an easy fix by typing:
sudo apt install gawkThis is the GNU version of awk (which has the timestamping capabilities that the non GNU versions often don’t have) and some distros have both available. That should take care of it for you!
Hello again,
thanks for the fast response, now that I’ve installed gawk, it still gives me the error with the unknown option logfile.
Do you have any ideas why ?
Kind regards
Hey Destinykid,
That’s strange, it could be a really old version. Can you tell us what your distro is? Actually this might help more:
awk -W versiongawk -W version
which awk
I vaguely recall seeing this before once when someone was using Ubuntu 16.04 or one of the older versions still as well. It’s possible though this is just a distro that we don’t see very often and maybe it’s not automatically switching to gawk when gawk is installed like Ubuntu does.
Those commands should help. We can then use update-alternatives to tell it to use the right one if it’s still using the non-GNU gawk that doesn’t have the logfile option. It’s either that or it’s a really old version which is likely too old to run the bedrock server as well.
Fixing this with update-alternatives if it’s just selecting the wrong one would look something like this. If you post the output from the commands though I can give you the exact one you would use. Hopefully that helps!
Hey jamesachambers,
I’m sure this is a pretty simple question. How do I update the server from survival to creative? I updated the server properties, but it didn’t switch over. Do I need to wipe out the old world first and then restart the script?
Thank you!
Hey Andrew,
No worries at all, I think I can help! What is happening is that once someone signs in they are assigned the game mode from the options when they join. So basically when you change it in the options only new players will have that game mode and everyone else will have the same old game mode.
It’s an easy fix though for sure. The way to fix it is to change:
force-gamemode=falseto
force-gamemode=truein server.properties. That will force every player to have the game mode you have set in the options. That should take care of it here!
Hey jamesacchambers, just wanted to thank you for this simple and easy guide, we were given an old-ish NUC with an Intel atom cpu in it (from around 2010) and I didn’t know what to do with it as it had 32 bit windows 7 on it and you couldn’t do anything so, I installed linux lite on it and now I use it to run a LAN server for my brother and his friend/s, it makes it so much easyer for thier devices as they are sometimes laggy when hosting a world for someone else. This is such a good option for this device and will probably see use for years to come (only problem with it right now, which is on the hardware side, is that it takes a litle bit for new chunks to load in (This is no problem for them in survival because I ended up flying around to pre load in some chunks for them.))
Thank you again,
Firstdanjosh
Hey Firsdanjosh,
Welcome and thanks for your great feedback on the script, it’s much appreciated! The NUC family is a fantastic choice for running the server. I’m familiar with that era of NUCs and I actually have a somewhat similar one. It sounds like a huge improvement from before and that the server has come a long way!
I think I can explain the chunks issue. From the age of the NUC I’m going to guess it’s using a HDD (hard drive). It probably doesn’t look like this:
but probably looks more like this:
Notice now the older NUC has a 2.5″ tray for HDD/SSDs. You can get 2.5″ SSDs for super cheap now. You can get new ones for less than $20 on Amazon or AliExpress or if you want to deal hunt for a used one you could get it for even less on eBay!
The reason this will help is that Bedrock is in C/C++ and that’s why it’s so fast even on older devices that don’t have as much power. It’s as efficient as it could possibly be on memory/CPU basically (which is quite different from the Java version which is bloated in comparison). The reason the blocks are bottlenecking though is because it is hitting the storage. It’s more of a HDD issue and the NUC is actually just waiting for the HDD to catch up and could do more if it wasn’t. If it’s a circa 2010 then it’s not going to be a SSD. It will be one of the old “spinny disk” hard drives (HDD) that you can feel vibrating so it’s going to basically be the slowest part of the device for the Minecraft server.
Fortunately it’s also the easiest and cheapest thing to upgrade. That lower NUC had a HDD when I got it and I replaced it with a SSD (but there’s nothing in the slot right now shown on the right, it’s empty at the moment, normally you would see part of your HDD/SSD through the big hole in the middle). It’s a 1000% upgrade across the board as to be honest with you unless you go to something like a AMD Ryzen or Threadripper the CPU and memory in those really isn’t that different from what is in most things today! The storage is the dated piece. I have a feeling yours might be slightly older than mine possibly but even if it’s a DDR3 model it’s still good enough with a storage upgrade for this.
That’s fantastic you’re pregenerating some of the chunks for high performance gaming like during survival. I have done the same thing for many years on things like the Raspberry Pi that also don’t have a ton of power for sure. Your server sounds like it has come a long way and I think with a SSD upgrade you’d be good to go. You would basically just slide the old drive out of the tray (and remove the screws if it’s screwed in which it should be) and slide the SSD replacement in and then you will reinstall Linux the same as you did before to get rid of Windows. That would definitely eliminate the block issue!
Maybe you’re happy enough with it already but I wanted to give you an idea of where you could best utilize your resources next to get even more performance. Thanks again for the feedback and continue having fun with it!
Hello again,
I have actually opened it up, it was literally the first thing I did when we got it, (I love taking teck apart n putting it back together). Surprisingly it actually does have a sata ssd in there (it is a 32gb Kingston one).
The ram is ddr3 sodimm and it’s got 2gb at the moment, thinking of adding another as it’s so dirt cheep to do so.
For info the cpu is an Intel atom D2500 2 cores 2 threads @ 1.86ghz.
I’ve actually strapped a 12 v fan to the passive heat sink it to improve the cooling (I attached it to the cpu 12v pins and did a stress test for a couple of hours and found it functions fine/ safely)
I wiped windows off of it when I installed llinux lite (which felt like the best option at the time.) It took a while for me to get used to using the linux terminal.
I feel that the performance of the server will be ok for a little while especially because it probably won’t have more than 5 people on it, and most of the chunks close by have been pre-loaded anyway.
Thank you again for the help and support
Firstdanjosh
Hey Firsdanjosh,
Wow, that one was top of the line when it was brand new! It actually has a 1st/2nd gen 32GB SSD and those are pretty rare (even the 32GB capacity at all is pretty rare)! Just that SSD would have been $1000 back then and even if it isn’t the Samsung one it would only save you $100-$300 at that time for a vastly inferior experience, that’s why I’m shocked to actually see it. Not even the government was willing to pay those prices (with our tax dollars) which is why I’ve never seen one that has one in there. We see them very occasionally at my Pi storage benchmarking web site at Pi Benchmarks.
The ones I linked are 5th and 6th gen respectively. The 5th gen one I linked was from a state government job and it had been pulled and put in surplus for YEARS. I got permission to rescue it and threw in some upgraded DDR sticks and a modern SSD. For a quiet and low power server running Linux I don’t foresee these losing their use for a long, long time!
I agree with your reasoning. DDR3 is cheap now relatively speaking. I doubt you’d get much benefit of going very high above 8GB or so in that box but if you can get high capacity sticks for around the same price (not uncommon for older RAM like this where the value is mostly that it’s still working and not necessarily the size) you’ll notice that I threw 16GB sticks in all of mine (one is very old style DDR4, and one is more modern). DDR3 will have different options but I bet you could get it to 8-16GB pretty cheap if you could find cheap 8s. 2GB is too low for sure. Just going to 4GB would probably have a noticeable impact! Even 32bit can address up to 3GB of memory to a single process (in Linux).
It’s extremely expensive to buy DDR3 new but dirt cheap to buy it on eBay. I wouldn’t even recommend buying it new necessarily although Amazon has some decentish listings but a lot of them are still $40-$50 which is outrageous. When you search for this type of memory just search for DDR3 SODIMM. SODIMM just means it’s the laptop size and not the desktop size which is what the NUC takes. It’s probably PC 12800 but matching whatever is in there should be safe. If there’s any doubt look up your specific NuC model from the bottom on the Intel web site to see the specifications and buy the highest speed Intel says it can take.
On eBay you can find deals like a 4GB Samsung module for $10 and that kind of thing.
It wouldn’t surprise me if you found someone selling an entire NUC for parts (or maybe even working if you’re extra lucky) of that age for less than the RAM costs if you deal hunted enough. Think listings where they are being sold as lots. That one is for parts and doesn’t have the memory but a lot of them do. You might even find a more powerful NUC for cheap but that one seems good enough to slap a couple of modern parts in for sure to me!
It still may be worth it to upgrade the SSD. 1st/2nd gen SSDs consume a lot more power and are a lot slower than modern SSDs (definitely still better than *any* HDD though). That era of SSDs was very old technology that only did like 100MB/sec write and 150MB/sec read. That could lead to some bottlenecking for sure in Minecraft as you’ve been seeing. I imagine the 2GB of memory is also part of it though as once you get under 4GB then it definitely does have an impact even on these old machines. Something like a Kingston A400 which is an average consumer model drive does 500MB/s reads and 450MB/s writes so we’re talking almost a 5x gain to a modern SSD still.
The advances are due to memory technology like 3D NAND. They are just able to build them much more dense and power efficient (think smaller and closer together storage blocks). Storage technology has been advancing like it’s still the 90s while everything else seems to have slowed down quite a bit like CPUs and RAM.
Hopefully that helps some at least. What a great build project, definitely let us know how it turns out!
Hey jameschambers,
I’m a bit of a teck nerd myself n I was surprised to see that ssd in there too. I jumped at the opportunity to do this project as I’ve seen people run servers on raspberry pi’s and wanted to try myself. I guess it’s just a matter of eight time right place.
I did some research on the cpu and found that it is actually from 2011. Sadly it only supports 4gb of ram max. So I’ll try to find a 2gb stick of the same speed as the other one in the system. I’ve seen them listed for max £10 on eBay and equivalent stores.
Right now I have the server sat right next to the Wi-Fi router with an Ethernet cable connecting them together.
Right now I am fairly happy with the preformance and the ssd and think it will do ok for them right now.
I enabled zram and a couple other preformance enhancers in linux lite settings, it seems to have actually helped a little.
I will keep you updated on any changes I make in the future, thank you again,
Firstdanjosh.
Hey Firsdanjosh,
Excellent, that sounds like a great plan! I’m glad you checked on the maximum memory limit beforehand. I think this is the ticket for sure.
I agree completely with your plan. It’s entirely possible the RAM is bottlenecking it more than the SSD, or that it is contributing enough that without that you will be able to fly around without seeing the chunk generation/loading delays.
That is the right way to do it because we want to know how much each component helped, only upgrade if absolutely necessary and be able to tell which component is helping us with which part of the server’s performance and by how much. If we do multiple changes at once we won’t know any of that and you could end up wasting money.
Part of the fun with these type of projects is not spending a lot of money because if you just want to throw money at it then of course there’s better/faster choices. It’s fun and very satisfying to build and rescue these and save them from the bottom of the ocean or some dangerous mineral recovery operation where they try to get the gold out of the parts etc.
It also has a “cool” factor running an original 1st/2nd gen SSD like that (sounds like 2nd gen to me but it could still be 1st) just like a restored antique having as much of it’s original parts as possible. Unless it’s preventing you from meeting your goals and you’ve exhausted your other options (such as the memory which is only filling an empty slot with a used part of the same generation/time) I personally would try to keep it in there too.
It’s also very nice in this case that once it’s set up it will always basically be a 4GB Linux box (dual core CPU even) that is physically very small and uses less power than anything other than SBCs like a Raspberry Pi which is the ARM architecture creating some headaches (including for this project which does support running it very slowly, like an order of magnitude more slowly than we’re talking here, on the Pi due to QEMU emulation and no native ARM binary available). If you are renting a virtual private server (VPS) 4GB (which is a medium-size VPS even today) I’m seeing prices for $11-$12/mo. Dual core not even guaranteed either. Some of them only have one core.
It’s $20/mo from Amazon Lightsail for a 4GB one which is where my dedicated server is. If I didn’t need Amazon’s world-class network to distribute content effectively all over the world I would probably host it on one of these instead because it’s not for the power that I am renting one and I do host most of my stuff in-house. A lot of people pay that to be able to host applications like this. A 2GB server would drop that to $5-$6/mo (this is the budget option). The ultra budget option are still 1GB servers but many applications will struggle with 1GB and a modern OS especially will.
In the server world Linux is the King and most applications don’t require much power. If it’s a giant database or something like that then sure but most services these days are designed as “microservices”/containers like Docker and not to be so heavyweight. It will always be useful for hosting services you don’t want to put in the cloud or shouldn’t put in the cloud to protect your security/data/privacy/etc.
It’s normal to encounter a little bit of chunk generation even on a fast server with a ton of memory and dozens of cores but it’s really not much and they disappear almost as fast as you see the “hole” is there whereas when it’s bottlenecking it will try to keep up with various degrees of success but often fall behind where there’s several seconds (or more) before the “holes” start filling with chunks. When it’s really bad you will actually reach the barren edge of the world and see nothing until it catches up.
One thing to monitor when you’re doing this is something like the ‘top’ command. That just shows what resources the processes are using like CPU/memory/etc. You’d want to pay attention to the CPU % as well as the memory usage, but also the usage of everything else on your system to see if the server is getting “squeezed” by any other processes. You’d check this for both CPU or memory. There’s a program called “iotop” that can help to monitor disk/IO usage. It’s a bit trickier but possible with some tools (can also use
iostat -dxfor a reading in the util% column on how your disk is being utilized as well as some other stats and give you an idea).If you want a deep dive on tracking down the bottlenecks specifically to the source there’s an article from way back in the day and it hasn’t changed at all really and is from the time period of the NUC in question.
An effective upgrade would look something like you may see some chunk generation on the edges but the holes fill in quickly and it doesn’t “fall behind” to where it gets worse and worse compounding on itself (bottlenecking) until you slow down or stop. I look forward to hearing what you find out!
Hi James, after having run a server with multiple dedicated bedrocks on it for the last month-ish (thanks for the script, much appreciated!!), I’ve noticed that that I have a bunch of snap mount filesystems on my server:
/dev/loop0 56M 56M 0 100% /snap/core18/2253/dev/loop1 56M 56M 0 100% /snap/core18/2284
/dev/loop2 44M 44M 0 100% /snap/snapd/14295
/dev/loop3 68M 68M 0 100% /snap/lxd/21835
/dev/loop4 62M 62M 0 100% /snap/core20/1270
/dev/loop5 70M 70M 0 100% /snap/lxd/19188
/dev/sda2 976M 207M 703M 23% /boot
/dev/loop7 44M 44M 0 100% /snap/snapd/14549
/dev/loop6 62M 62M 0 100% /snap/core20/1328
Any insight onto what they are, should they be removing themselves, and/or can I clean them up safely?
regards,
Paul
Hey Paul,
Welcome back! I can definitely help. What has happened is that over time you have ended up with core 18, core 20 and a bunch of different snaps. It’s totally safe to clean these up.
There’s a really good guide on safe (and automated) snap cleanup here as well that may help.
Definitely let me know if you run into any trouble / have any questions doing this!
Thanks for this! I bought a Dell Optiplex for $75 at a local store that resells computers, put it in my son’s basement (since he has gigabit fibre), and now my grandkids have their own worlds. I like playing, too, but for me the satisfaction comes from seeing the kids have fun on a safe, private, cheap server.
Hey Rob,
That’s such a fantastic idea. I still have a bunch of those Dell OptiPlex machines in my basement from old jobs where as a tech my job was to get rid of the computers so I was allowed to take some of them instead of send them to the recyclers. I bet you they will still be working fine 10 years from now. They’re really tough. As tough as they come for computers these days since they’re Enterprise level gear (consumer ones usually have cheaper materials, thinner flimsier metals, etc).
Thank you for your kind words and leaving this, and I couldn’t recommend this more to anyone else who sees this and thinks it may be a good idea!