
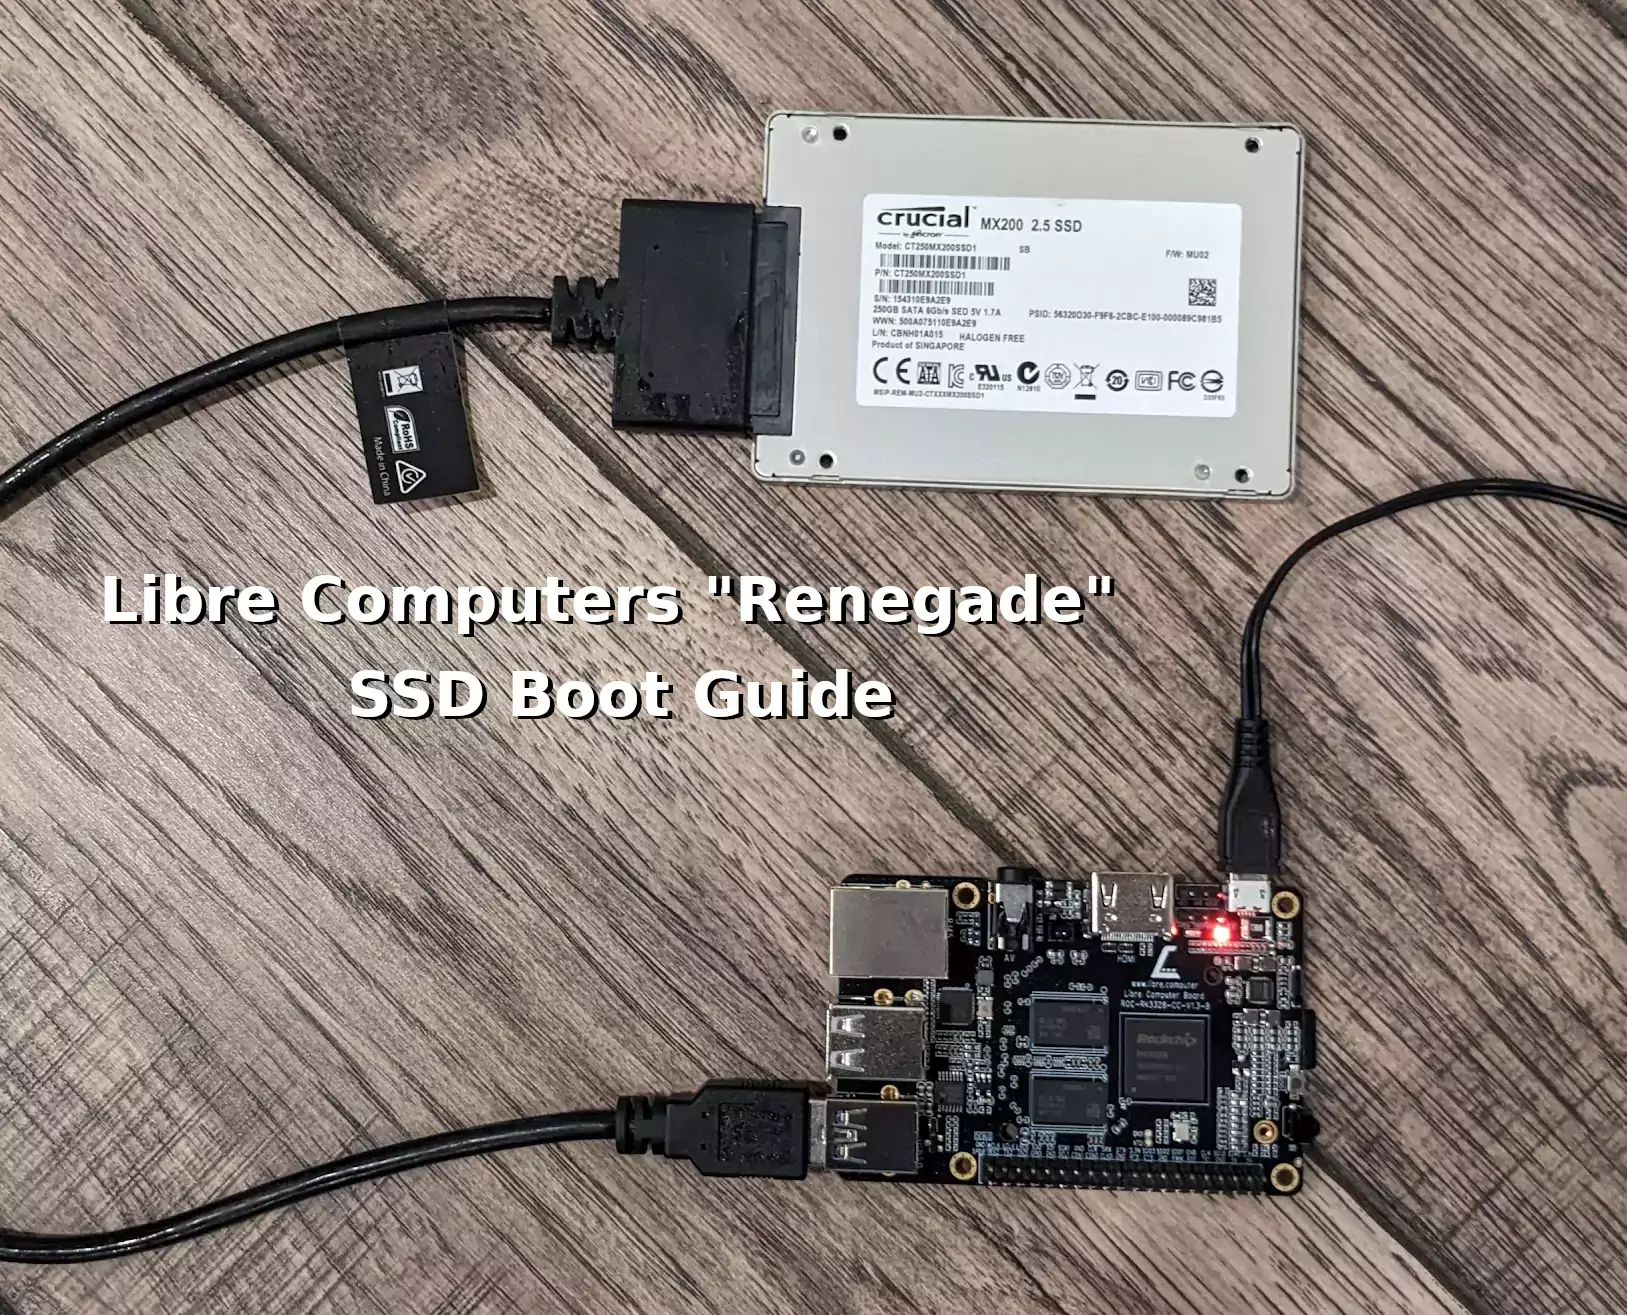
The ROC-RK3328-CC Firefly “Renegade” by Libre Computers is a $50 single board computer. You actually get USB 3.0 with the “Renegade” which is going to make it even more worth it to use a SSD with than the “Le Potato”.
This method requires a sacrificial SD card to serve as the bootloader. After booting though it will use your SSD for the system’s root filesystem. We will then benchmark it to measure the improvement/gains.
In this guide I’ll walk you through the process. Let’s get started!
Hardware Used
The ROC-RK3328-CC Firefly “Renegade” from Libre Computers is a very powerful RockChip based single board computer. The “Renegade” features 2G of DDR4 RAM, USB 3.0, a quad-core ARM Cortex-A53 CPU, a Mali-450 GPU and 1 USB 3.0 port!
Links: Amazon.com*, Amazon.ca*, Amazon.com.au*, Amazon.co.jp*, Amazon.co.uk*, Amazon.de*, Amazon.es*, Amazon.fr*, Amazon.it*, Amazon.sg*
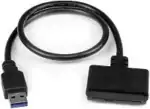
The StarTech USB 3.1 to 2.5″ SATA adapter is one I have recommended for many years for use with all kinds of devices including the Raspberry Pi, Orange Pi, ODROID, Libre “Renegade” and Tinker Board. It’s widely compatible and works with gaming consoles as well.
Links: Amazon.com*, Amazon.ca*, Amazon.com.au*, Amazon.co.jp*, Amazon.co.uk*, Amazon.de*, Amazon.es*, Amazon.fr*, Amazon.it*, Amazon.nl*, Amazon.pl*, Amazon.se*, Amazon.sg*
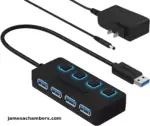
The Sabrent powered USB hub delivers a whopping 2.5A of dedicated power for your USB attached devices. It will easily power the most thirsty of setups such as NVMe enclosures.
Links: Amazon.com*, Amazon.ca*, Amazon.com.au*, Amazon.co.uk*, Amazon.es*, Amazon.it*, Amazon.nl*, Amazon.pl*, Amazon.se*
Note: Make sure Amazon doesn’t try to take you to the non-powered version and that it’s the one with the AC adapter that plugs in to provide extra power
Preparing SD Card
First you should have a completely working installation on a SD card of the OS that you would like to use. I used Armbian for this guide (recommended) so if your partitions are different it may be your flavor of Linux and need slightly altered instructions.
If you have an already working installation you want to move to your SSD you can use this as well most likely.
You should completely update first with:
sudo apt update && sudo apt full-upgrade
If you are using a different package manager then update the image however you need to for your distribution.
Preparing SSD
Now we are going to connect your SSD to the “Renegade”. First we are going to completely remove all partitions from the drive so it’s completely blank. If you only have one drive plugged into the “Renegade” (and nothing else) this should be /dev/sda.
sudo fdisk /dev/sda
Now remove all partitions from the device. If you press “p” it will print out the partitions. Here’s an example on mine:
root@renegade:~# sudo fdisk /dev/sda

Welcome to fdisk (util-linux 2.37.2).
Changes will remain in memory only, until you decide to write them.
Be careful before using the write command.


Command (m for help): p
Disk /dev/sda: 232.89 GiB, 250059350016 bytes, 488397168 sectors
Disk model: CT250MX200SSD1
Units: sectors of 1 * 512 = 512 bytes
Sector size (logical/physical): 512 bytes / 4096 bytes
I/O size (minimum/optimal): 4096 bytes / 4096 bytes
Disklabel type: dos
Disk identifier: 0x39524a4b

Device     Boot Start       End   Sectors  Size Id Type
/dev/sda1        8192 123469824 123461633 58.9G 83 Linux

Command (m for help): d
Selected partition 1
Partition 1 has been deleted.

Command (m for help): w
The partition table has been altered.
Calling ioctl() to re-read partition table.
Syncing disks.
If you get an error that the device was busy don’t worry. After unplugging and replugging the SSD the partition table will be clear.
Once the drive is all cleared off you’re ready for the next step.
Cloning Installation to SSD
We’re now ready to clone your installation to the SSD. If you don’t have the eMMC attached your current root filesystem should be /dev/mmcblk0p1 (or /dev/mmcblk1p1 on some operating systems, check ls /dev or blkid).
We can now copy your drive to the SSD with the following command:
cat /dev/mmcblk0 > /dev/sda
Wait for the operation to complete (there won’t be any output but you will have a cursor again and be able to type new commands). It may take several minutes or longer. You are copying an entire drive from one to another basically with that one command.
Mine took about 30-40 minutes (although I was using a 64GB SD card and the larger SD card you use the longer it will take to copy the whole drive).
If you are having any trouble with permissions try becoming “root” first with:
sudo su
Now try running the command again and as the superuser you should not encounter any permission errors.
Change SD card’s UUID
Now unplug the SSD and plug it back in. We need to change our SD card’s UUID so that it doesn’t try to boot from that partition. We can set it to a random one with the following command:
sudo tune2fs -U random /dev/mmcblk0p1
We can verify that it has changed with blkid like this:
root@renegade:~# sudo blkid
/dev/mmcblk0p1: LABEL="armbian_root" UUID="c2a8cffc-9d4a-4629-b408-6f56332e03f6" BLOCK_SIZE="4096" TYPE="ext4" PARTUUID="910ca03c-01"
/dev/sda1: LABEL="armbian_root" UUID="72f42008-24a6-466f-bc3b-1690902fd466" BLOCK_SIZE="4096" TYPE="ext4" PARTUUID="910ca03c-01"
/dev/zram0: UUID="12a7b136-4351-4fff-bc39-956516fb2ae1" TYPE="swap"
/dev/zram1: LABEL="log2ram" UUID="d5ec015b-2be5-4877-8d01-128563a2eb1e" BLOCK_SIZE="4096" TYPE="ext4"
Notice that /dev/sda1 and /dev/mmcblk0p1 no longer have matching UUIDs. This is exactly what we want.
Run fsck
Before we reboot run e2fsck on the drive like this:
sudo e2fsck -yf /dev/sda1
This will prevent you from having to run fsck on the CLI the first time you try to boot.
Reboot and Verify
Now reboot the “Renegade” with:
sudo reboot
With any luck you should be booted using your SSD! We can verify this with the mount command like this:
root@renegade:~# mount
/dev/sda1 on / type ext4 (rw,noatime,errors=remount-ro,commit=600)
/dev/sda1 on /var/log.hdd type ext4 (rw,noatime,errors=remount-ro,commit=600)
/dev/zram1 on /var/log type ext4 (rw,relatime,discard)
Here we can see that our root partition (/) is indeed on /dev/sda1 and not /dev/mmcblk0p1. Success!
Testing Performance
You can verify the performance of your SSD on Pi Benchmarks using the following command:
sudo curl https://raw.githubusercontent.com/TheRemote/PiBenchmarks/master/Storage.sh | sudo bash
SD Card Test
To show the improvement between having a SD card rootfs and having a SSD rootfs I did a before test here with the SD card:
     Category                  Test                      Result
HDParm                    Disk Read                 64.24 MB/s
HDParm                    Cached Disk Read          57.55 MB/s
DD                        Disk Write                22.3 MB/s
FIO                       4k random read            3574 IOPS (14299 KB/s)
FIO                       4k random write           261 IOPS (1047 KB/s)
IOZone                    4k read                   12437 KB/s
IOZone                    4k write                  2926 KB/s
IOZone                    4k random read            12402 KB/s
IOZone                    4k random write           3148 KB/s

                          Score: 1,361
SSD Test
     Category                  Test                      Result
HDParm                    Disk Read                 305.13 MB/s
HDParm                    Cached Disk Read          239.02 MB/s
DD                        Disk Write                115 MB/s
FIO                       4k random read            23432 IOPS (93729 KB/s)
FIO                       4k random write           12190 IOPS (48761 KB/s)
IOZone                    4k read                   20588 KB/s
IOZone                    4k write                  25046 KB/s
IOZone                    4k random read            16739 KB/s
IOZone                    4k random write           31967 KB/s

                          Score: 7,656
You may view the full “Renegade” benchmark on Pi Benchmarks for this guide here.
Wow, that’s quite a dramatic improvement. We went from 1,361 to 7,656. That’s nearly a 5x increase! You can also look at the raw IOPS and MB/s numbers on HDParm and the various test categories if you are more familiar with those to see the improvement.
Conclusion
Even though we are limited to USB 2.0 bus speeds we can still achieve about 3.5x the performance of the SD card using a SSD with a USB to 2.5″ SATA adapter. This is definitely worthwhile as it was on boards like the Raspberry Pi 3 that had USB 2.0 as well.
I haven’t tested the eMMC modules for the “Renegade” yet because they are currently out of stock on Amazon. I do plan on testing these when they become available.
Using a SSD is the best upgrade you can give your single board computer. With the USB 3.0 ports available on this board it’s extra worth it!
Other Resources
If you are moving from a Raspberry Pi to a “Renegade” see my Raspbian Portability Tool for Libre Boards Guide
Definitely don’t miss my full “Renegade” ROC-RK3328-CC Firefly SBC review here
You may also be interested to see my Libre Computers “Le Potato” Review
Make sure to check out my ODROID XU4Q review which includes eMMC tests and benchmarking


I followed your instructions and it worked perfectly. Except I had the bright idea to update/upgrade after I moved over.
It seemed to be OK. It reboots, I see the Armbian start up screen and then it gets stuck running a script:
Loading, please wait...Starting systemd-udcvd version 252.6-1
Begin: Loading essential drivers ... done.
Begin: Running /scripts/init-premount ... (initramfs)
It doesn’t act dead… There is network activity and the “red” light is blinking.
I’m using lates version of Armbian Bookworm.
My eventual goal is to try Plex.
It should be OK to update/upgrade the SSD after you move it right?
Hey Dan,
Great question! So it really depends to be honest. If I were to guess the problem is that updating is changing files in your /boot folder. I think you’ll be okay with most upgrades if you upgrade first.
The best way to avoid this is to fully upgrade before you move it to SSD. It’s likely that something related to booting was changed and once you have that change it should be fine for a while.
Hopefully that helps!
Hi! I’m getting an error when trying to assign a random number to my SD card’s UUID:
tune2fs: Bad magic number in super-block while trying to open /dev/mmcblk1p1/dev/mmcblk1p1 contains a vflat file system labeled ‘system-boot’
Is there any way around this? I tried to execute as a super user as well to no avail.
Hey Nicole,
It looks like you’re using an image that has a FAT32 boot partition. In other words it works different than the OS I used in this example.
Your operating system sounds more similar to one like this. The way we would do it on one that boots like this would be:
First make sure you have mtools with:sudo apt install mtools -y
Now we can change the UUID with:
sudo mlabel -N aaaa1111 -i /dev/sda1 ::
Hopefully that helps!
James, I’m running the libre Raspberry pi OS on my Renegade and followed the directions on this page. My drive was successfully cloned, and after running fsck (from the debian SSD directions you linked to in your reply to Nicole), everything ended up looking good. But, no joy on reboot. Do I need to use mlabel to change the SD card UUID as well as the SDA, similar to the debian instructions?
Thanks for the help!
Cheers,
Mike
Hey Mike,
Changing the SD card UUID won’t impact booting at all. All that will change is whether the /boot partition is mounted from the SD card or the SSD. You could skip that step entirely and the only thing it would impact is that updates from apt would go to the wrong boot partition (not good but won’t prevent it from working).
Which partitions did you try this on? Can you post a:
lsblkIf the partitions match then there is probably special stuff on the /boot partition. It’s not always easy to set this up with every operating system. You’d need to go in there and take a look at the boot files.
My guess is that if this one isn’t working normally then it’s going to be more complicated. It uses that portability script so it probably has some kind of custom boot sequence that is going to involve editing files in /boot. Hopefully that helps!
James,
Here’s the lsblk after rebooting without the SSD attached, then plugging it back in. I’ll probably try the Libre flash tool that they mentioned in your reddit post.
NAME MAJ:MIN RM SIZE RO TYPE MOUNTPOINTsda 8:0 0 223.6G 0 disk
├─sda1 8:1 0 256M 0 part
└─sda2 8:2 0 7G 0 part
mmcblk1 179:0 0 7.2G 0 disk
├─mmcblk1p1 179:1 0 256M 0 part /boot/efi
└─mmcblk1p2 179:2 0 7G 0 part /
Hey Mike,
I think that’s a fantastic idea! This is the tool you’re referencing.
Let me know how it goes if you try this. I haven’t investigated it much yet but I could definitely see it helping a lot here so if it’s good let me know so I can do some coverage on it for sure!
James,
I ran the tool but had the same problem mentioned in the reddit discussion– no wifi on reboot. I edited /etc/network/interfaces but still had no luck. I run my Renegade headless, so I’m not sure if it’s actually booting my SSD correctly or not. Next step is to boot it with a monitor and see what it does that way. The tool seems to work pretty well though- my wpa_supplicant.conf on the flashed SD card had my correct network settings at least. More to follow!
So, it would not boot at all with the SSD. But, after replacing the SSD with the original SD card (that was cloned to the SSD) in a USB stick adapter, the renegade booted right up from the Libre flash tool built SD card. SO… I’m going to start over with the SSD and build it from scratch with the Libre Raspbian lite, then see if that works (then reload the BirdNET-Pi software on it, which is the whole point anyway.)
Anyway, thanks for all the help, fingers crossed for the next try, haha!
Hey Mike,
Interesting results! I think you are on the right track here. I never used the eMMC at all in my setup and only used the SD card slot. The people who tried using the eMMC ended up causing problems on the device because the boot loader seems to be stored there on the Renegade (pretty common with RockChip boards).
Armbian should be able to set this up using armbian-config if you want to try an alternative to cloning. I think Raspberry Pi OS is probably worth a try as well.
Thanks for the updates and let me know what else you’re able to find!
James, What are your thoughts on using this as a standalone retro gaming system using an emulator?
Hey Doug,
Great question! So the Renegade has been used for a long time for this purpose. It’s definitely a good choice for doing it.
One thing that may impact this though is how retro of games we are talking about. When I think of retro gaming I think of the NES/SNES/that type of era. If you’re wanting to run a lot newer games than that then you may benefit from something like an Orange Pi 5 but that board was just released and you need to use Armbian to get good 3D support so honestly unless you need a lot more power I think the Renegade would be a better choice.
The Renegade has the benefit of it has been out for a while and that means that a lot of stuff on the board is supported in the mainline Linux kernel. It enjoys pretty good hardware support compared to some of the most recent releases so I think this would be a great choice. Hopefully that helps!
Have a Libre renegade. The usb ports aren’t putting out any power to my LCD display when the Libre is powered (red and green LEDs on).
Trying to determine if the problem is the boot os on my ssd card or a bad Libre.
Do the USB devices output power regardless of a proper bootable OS on the SSD? Or do the USBs only get powered when the OS successfully boots?
Hey John,
This depends mostly on your power supply. Micro USB is not good at passing a lot of power through it. This is a really common problem on Raspberry Pis like the Pi 3 before they moved to USB-C. Micro USB just really sucks for power delivery. It always has.
The best thing you can do is use a much bigger micro USB power supply than you’re using now for sure. What is the capacity of your current one? If it’s something like 5V 2.5A or something like that then it’s probably not enough.
People have had trouble with this before:
Firefly and Libre Computer recommend a 5V/2A power supply for ROC-RK3328-CC “Renegade” board, and it works well, as long as you don’t plug a USB 3.0 drive into the USB 3.0 drive, in that case a 5V/2.5A or greater is needed, at least that’s my experience in this review.I used a 2.5A CanaKit power supply meant for a Raspberry Pi 3B. It legitimately wouldn’t hurt to have a 3A one either but I was able to SSD boot with 2.5A using 2.5″ SATA with this one.
Any board with microUSB though is more prone to power issues for sure as was the Raspberry Pi 3. It doesn’t support all the new fancy USB-PD (power delivery) that USB-C does. It’s extra important to have a high quality power supply with it to avoid issues like this. It’s quite sensitive which is why it has been eliminated on most newer SBCs. I’m sure the next model of this will be USB-C as well.
Having an even bigger one wouldn’t hurt. Can you verify the size of yours? I used at least a 2.5A one for sure!
When using the cat command to clone to the SSD, do I cat the entire drive (like cat /dev/mmcblk1 > /dev/sda) , or just the partition with the root filesystem (like cat /dev/mmcblk1p2 > /dev/sda) ?
You use the former command in the codeblock, but your previous sentence makes it sound like I should use the latter command. Just wanted to clarify before attempting this.
Thanks a lot for the guide!
Hey Ian,
Great question. You will actually do the:
cat /dev/mmcblk0 > /dev/sdaThis will do the whole drive. It is possible to clone just the partitions but things get complicated. For one not all of them have a boot partition such as Armbian but outside of that there is more on your drive than just the partitions. There’s also the partition table and that part wouldn’t get copied if you just did /dev/mmcblk0p2 so you would have to partition the drive yourself within fdisk to do a partial clone.
The other reason is that while it’s possible to have just the root partition on your SSD (and no boot partition) it makes the configuration more complicated because a lot of operating systems will be hard-coded to look for the second partition. By matching the existing partition layout a lot of these “gotcha” issues are avoided when setting something like this up.
Hopefully that helps!
Hi James,
I was wondering how safe it is to perform the cat operation from a running system?
A cursory Google search suggests that it could be troublesome for running databases, such as the one supporting Pi-Hole and other common projects that run on these devices.
Do you stop any services before running this type of clone? Do you have any experience using rpi-clone or similar tools?
I was looking for an existing tool that facilitates rebooting into a ramdisk-based OS that would allow cloning using cat without fear of potential disk corruption, but sadly did not find anything.
Thanks,
Frederico
Hey Frederico,
Great question! So any time you are cloning a live system this is potentially an issue. You’d definitely want to stop any database related services before cloning as databases will keep some of their stuff in working memory. It’s not always written to disk.
Ideally most people will be trying to set this up with a clean install that isn’t running anything. If this is a configured system with a bunch of running services you’d definitely want to close them all first.
You don’t have to do a live clone to do this method. The method we are using is just copying one drive to another basically and then changing the UUIDs. If this is a concern just run my same steps offline. You can simply plug your SSD into a PC (or another SBC) and do a cat on the drive. Nothing will be running then so you completely sidestep this issue. None of the steps will change basically doing this offline from another computer.
As far as rpi-clone I see they do give you a few different options to do this:
Clone by initializationClone by syncing
I’m honestly not sure how these would help very much with the issues you’re talking about. Using common backup tools like rsync would suffer from the same issue. If the database is running then it will still have a lot of contents stored in memory that may or may not have been written to the disk. This is an issue with Minecraft servers as well which I’ve done a lot of work with.
In the case of Minecraft it’s just plain not safe to clone it while it’s running. You have to close it first. I’d imagine that’s the case with a lot of these other services as well. There’s no way for rpi-clone to force Minecraft to write all of it’s data out of disk and sync it to the disk without closing it. They provide no assurances that all of the data will be written to the disk all of the time and isn’t being used in cache and other places.
In other words it’s more a matter of a lot of these services are just not safe to live clone while they’re running no matter what you’re using. They operate with caches so you’re never guaranteed to get a copy of all of the data *unless* the service is completely shut down. There are basically no services like this on a clean install so the people that need to be careful are the ones with already configured systems for sure.
Hopefully that helps!
How would you go about expanding the partition? I tried the below steps, but just ended up at an initramfs prompt.
apt install cloud-utilsgrowpart /dev/sda 1
resize2fs /dev/sda1
Hey Mike,
Great question. This is a little bit different depending on which OS you are running but the method you are using looks fine. I think the problem is you are using partition 1 instead of partition 2. When I do lsblk with Ubuntu:
james@james-roc-rk3328-cc:~$ lsblkNAME MAJ:MIN RM SIZE RO TYPE MOUNTPOINTS
mmcblk1 179:0 0 29.7G 0 disk
├─mmcblk1p1 179:1 0 256M 0 part /boot/efi
└─mmcblk1p2 179:2 0 29.5G 0 part /
It says there are two partitions. Partition 1 is the boot partition so it looks like you’re resizing that one. I would try it again with the root partition (partition 2) with your exact same commands (and then use resizefs on /dev/sda2).\ I’m using a SD card in this example but since we’re cloning it everything should have both partitions.
There’s also another option if it’s fighting you too much within the OS. You can always connect it to another computer running Linux and run gparted on the SSD to resize the partition. This will let you resize it via GUI and it’s really easy / safe.
Hopefully that helps!
I’m using Armbian on the renegade. I got the ssd working and expanded, but I’m not 100% sure what that initial issue was. I “think” I was trying to power the device with an under-powered power supply. I tried swapping out the supply after a few other attempts and it worked. I’m going to be looking around on amzn for something better to power a cluster. If I run into issues again I’ll take a look at your suggestion.
Hey Mike,
No worries, Armbian is a better choice on the Renegade anyways since you can set up 3D driver support with it.
The power supply is definitely a strong possibility. The micro-USB ones can be pretty picky. I use an old CanaKit one that is meant to power Raspberry Pis which puts out 2.5A. It should be rated for at least 2A.
Enjoy and take care!
Hi James,
Can you tell me if this process can be run on a Renegade running Raspbian from an SD?
I am wanting to clone the running OS from SD to an eMMC. The Libre guides all seem to require a Linux environment and although there are mentions that it might work from MacOS, your guide here seems like it might be the more straight forward method (assuming it were possible!).
Thanks for your time.
Oscar
Hey Oscar,
Welcome! So yes, you can absolutely do a live clone from your SD card to your eMMC. Raspbian / Raspberry Pi OS should work by UUIDs so I think you should be totally fine.
I actually have a very old guide to do this on Raspberry Pi OS using this method. It’s moving it to SSD in the guide (like this one) but it works pretty much the same way.
The obvious changes you’d make is that you’d update the device names where I’m using things like /dev/sda to /dev/mmcblk0 or /dev/mmcblk1 depending on which one is the eMMC and which one is the SD. The process itself should work though.
Hopefully that helps!
Thanks James, that’s great.
Unfortunately I was copying from a 32GB Sd to a 16GB eMMC. I anticipated this might be a problem but thought I’d go through the motions and begin again from a 16GB Sd if things went awry. I stupidly neglected to erase the eMMC again when the clone failed and my Renegade now defaults to the eMMC which I am unable to SSH into.
Live and learn I guess. I think if I had a potato I could rectify the situation but from here it looks like the eMMC module is toast.
Thanks for your time.
Oscar
Hey Oscar,
You can rectify the situation with rkdeveloptool. This is the standard way to flash the Renegade with an image.
There are instructions here to do it for Gentoo:
To be able to flash to an eMMC installed on the Libre Computer Renegade the latter needs to be forced into the so called Maskrom Mode[5]:
Pull all the USB cables (including micro USB cable and male to male USB cable) out of the board to keep the board powered off and if applicable pull out the SD cardUse a male to male USB cable to connect the host system and the USB OTG port (lower one of double-decker, white) of the target device, for pictures see the ROC-RK3328-CC Manual
Connect the eMMC CLK and GND pads with metal tweezers while plugging in the micro USB cable to power on the board. Wait about 1 second before breaking the connection of the two pads
You might want to actually just try installing Gentoo on there so you can follow their instructions verbatim. Once you can get it to boot again you will have more options.
You’re right that it looks much more difficult than the “Le Potato” to fix this as you can get that one to show up as a drive within your OS but the Renegade doesn’t seem to support that.
It’s definitely not bricked or unfixable though. rkdeveloptool is the standard way to reflash these. It’s not easy to do though (at least nearly as easy as the “Le Potato”).
This same thing can happen cloning a SSD if the capacity is too small for the drive you are cloning. The technical explanation would be that not everything is in that first 16GB. The drive tends to be messy and a lot of data will be in that second 16GB that it couldn’t copy.
I think it’s even more complicated than that though with this one. If you read the Gentoo page you can see that the eMMC seems to contain some kind of boot loader as well. This really works a lot differently than the “Le Potato” one. Thanks for sharing this experience as I’ll make sure to advise people to be *very* careful trying this going forward. It’s not as easy to recover from as it should be (and is on most other boards which is why this is a bit surprising).
I’d imagine this is simply because the “Le Potato” is a newer model if I’m not mistaken. Libre Computers calls the “Le Potato” their flagship platform on their web site even though the Renegade has some capabilities (like a USB 3.0 port) that the “Le Potato” doesn’t. They seem to have added a much easier way to deal with the eMMC by letting it show up as a drive (at least within Linux).
Of course if that was available to you then you would have never had to try something like this in the first place. You’d simply have been able to plug it into a PC basically and image it with your favorite imaging tool. It’s really unfortunate that isn’t on the “Renegade” while that is actually available on the “Le Potato”.
I’m not sure if this would have completely succeeded if it weren’t for the free space issue or not. To be honest with you though I wouldn’t have recommended trying this if I knew how difficult the eMMC recovery would be on this vs. the “Le Potato”. Thanks for sharing this even though I know this is definitely not the outcome you wanted. Now it’s clear to me (and everyone reading this going forward) that you need to be extremely careful with the eMMC on this board due to how difficult it is to recover (and that it apparently will not want to try to boot from SD card in this state). This was a first and I hadn’t seen anyone try it yet.
Best of luck and take care!
Thanks James,
I was aware of this process I just don’t have the time nor mental capacity right now to apply myself to such a critical and delicate procedure (as evidenced by my neglecting to delete the failed clone before regrouping). Having said that, the eMMC shows as 14.6GB so a 16GB SD card would likely have presented with the same problem as the 32GB and I would probably have made the same mistake the second time so there’s no saving it really.
I reaslise the module isn’t bricked but it is effectively unusable until I can apply myself to nutting out the Firefly solution which is probably not until the end of the year at this point.
Thanks for your guides and for taking the time to reply!
Best regards,
Oscar
Hey Oscar,
No worries at all, I totally understand where you’re coming from. I have my limits too when it comes to dealing with things that are way harder than they need to be / should be. I recently disqualified the Radxa Rock Compute Module 3 (CM3) because it was making me miserable to work with it by making what should be the simplest tasks require all kinds of proprietary utilities (and even connecting the USB to TTY serial console) to try to image the eMMC on it at all. I went on a huge rant about it actually in that article. It’s exactly the same process / tools to do it on that board and I refused and disqualified it instead of slog through it so it would be hypocritical of me to judge you too harshly here.
I just wanted to make sure you knew it was fixable (although it’s admittedly a miserable slog of a process to fix it). I have not had to do it on this board before but like I said I’ve seen and had to do processes like this before on other boards. I’ve used rkdeveloptool before (and there’s also a Windows version which I believe they just call RkDevTool). I honestly don’t have a ton of patience / time either for really nasty firmware or eMMC flashing processes so I totally get it.
Thanks for all your kind words you’ve said as well. Take care!
Hi James.
Just to cap it all off (or attempt to) I’ve been in touch with the seller, LoverPi, who directed me to a Libre forum post on rebinding of the eMMC module.
Apparently you can attach the module after booting to the SD card and the rebind with the codes detailed in this post https://hub.libre.computer/t/emmc-re-detection-by-driver-re-binding/150
Just another option to the mix, it might be useful to someone. I’ll give it a try when I can find an 8GB micro Sd that might be fast to boot an OS.
Thanks again.
Best regards,
Oscar
Hey Oscar,
Oh thank goodness! To be honest with you I had assumed that booting it without the eMMC attached wouldn’t work. I’ve seen this before on other boards that have the bootloader completely stored on the eMMC.
This makes things much easier. It’s weird that you even have to remount it like this but that’s very useful. I’m surprised the eMMC doesn’t just show all of the time (which it does on a lot of other boards). It looks very easy to mount it though.
Once you are booted in and have this mounted you have a lot of options. You could still live clone or you could just image it with dd at that point (or Etcher or anything else). Thanks for sharing this!