
If you’ve just received a new StarFive VisionFive 2 you may be having trouble to get it to boot with the latest images. This is because your firmware needs to be updated before using the latest version.
In this guide we’ll cover how to update the firmware on the StarFive VisionFive 2. Let’s begin!
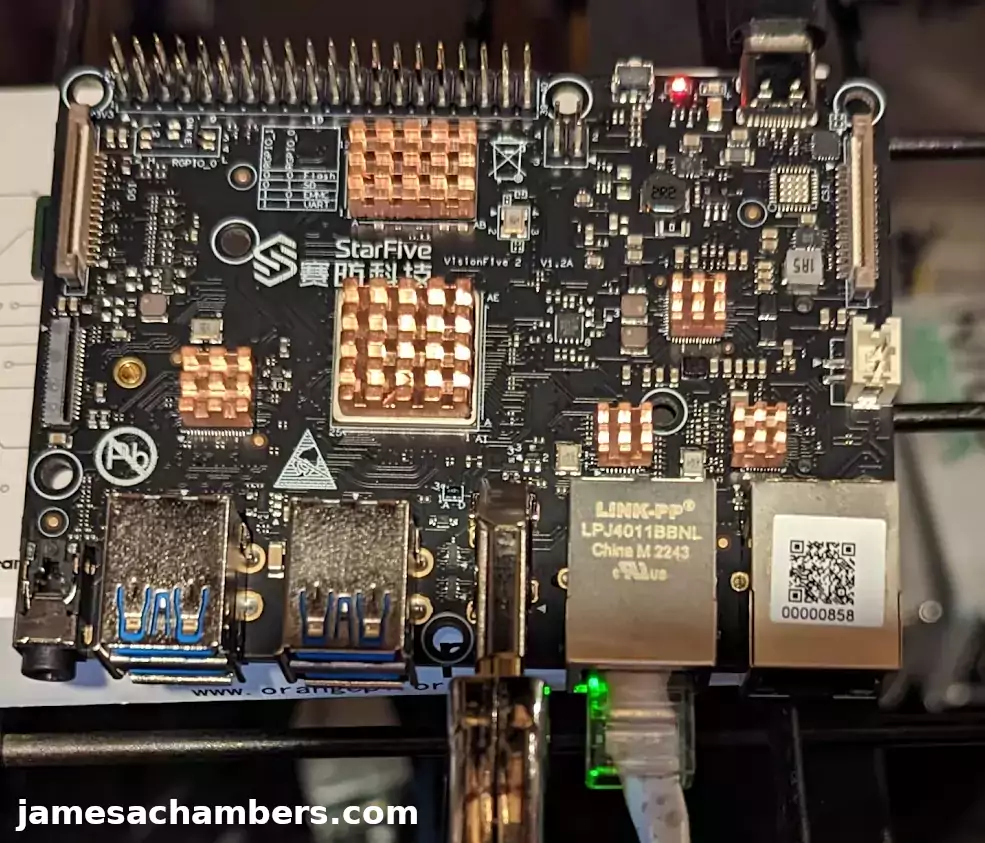
Hardware Used
The StarFive VisionFive 2 is a quad-core high performance single board computer that runs the RISC-V open-hardware architecture. It also has a dedicated GPU making it suitable for desktop use!
Links: Amazon.com*, AliExpress*

The Geekworm copper heat sink set is designed to fit many different single board computers. It uses thermal conductive adhesive which many “cheap” heat sink kits for SBCs don’t have. Eliminates hot spots and reduces throttling. Can be further enhanced by powered cooling over the heat sinks.
Links: Amazon.com*, Amazon.ca*, Amazon.co.jp*, Amazon.co.uk*, Amazon.de*, Amazon.es*, Amazon.fr*, Amazon.it*
Prepare SD Card with Older Image
At time of writing if you go to the official StarFive debian.starfivetech.com page you will see two versions:
- Image-55
- Image-69
You want to download image 55 (the oldest one) because the firmware on your VisionFive 2 will not run version 69 yet.
Download version 55 and extract the .bz2 file which will give you a .img file.
Once you have the .img file write it to a SD card.
Now boot the VisionFive 2 using the old image. It should boot correctly.
Getting Necessary Files
Log into the device with the default credentials of root / starfive. If you would like to do this over SSH then log into the device with user / starfive. You can then use the command “su” and the password starfive to use root.
Now we need to install mtd-utils with:
apt update && apt install mtd-utils -yNow head to the GitHub releases section for the VisionFive 2 firmware here.
Download the latest versions of the following files:
- u-boot-spl.bin.normal.out
- visionfive2_fw_payload.img
Easy Way vs. Hard Way
There is an easy way to update the firmware on the VisionFive 2 but you can’t use it unless you are using version 2.5.0 or later. If you are using V1.2A of board or got the board reasonably close to when I wrote this you do not have this yet and need to use the hard way first.
The hard way requires a Linux PC as you will need to set up a TFTP server for flashing. It also requires a USB to serial adapter as the boot loader cannot display on a monitor and we will be typing commands into the uboot prompt to flash it.
The full documentation for both methods from StarFive is here.
UPDATE 1/26/2023: LivingLinux has let me know on Twitter about an additional image available via the official StarFive GitHub repository that should be able to flash the VisionFive 2 without having to do it the “Hard Way” below. If you are struggling with the uboot-based network TFTP flash and want to try using this image the full instructions are available here. It’s essentially a barebones image that will let us update the firmware via SSH or the serial console.
Updating Firmware – The Hard Way
Setting up TFTP server
First you need to quickly set up a TFTP server on a Linux PC/SBC to host the files we downloaded earlier:
sudo apt install tftpd-hpaNow change directories to where you downloaded the files such as:
cd ~/DownloadsOn my Linux install the tftp server defaults to using the directory /srv/tftp. You can check this with:
systemctl status tftpd-hpaFor example:
systemctl status tftpd-hpa
● tftpd-hpa.service - LSB: HPA's tftp server
Loaded: loaded (/etc/init.d/tftpd-hpa; generated)
Active: active (running) since Tue 2023-01-24 14:28:20 MST; 2min 9s ago
Docs: man:systemd-sysv-generator(8)
Process: 627792 ExecStart=/etc/init.d/tftpd-hpa start (code=exited, status=0/SUCCESS)
Tasks: 1 (limit: 38184)
Memory: 840.0K
CPU: 15ms
CGroup: /system.slice/tftpd-hpa.service
└─627800 /usr/sbin/in.tftpd --listen --user tftp --address :69 --secure /srv/tftp
You can see on the bottom it’s set up to serve on /srv/tftp. Move the files you downloaded to that folder (use root/sudo).
Here’s an example of how I did it:
james@pop-os:/srv$ cd tftp
james@pop-os:/srv/tftp$ sudo curl -o u-boot-spl.bin.normal.out -k -L https://github.com/starfive-tech/VisionFive2/releases/download/VF2_v2.8.0/u-boot-spl.bin.normal.out
james@pop-os:/srv/tftp$ sudo curl -o visionfive2_fw_payload.img -k -L https://github.com/starfive-tech/VisionFive2/releases/download/VF2_v2.8.0/visionfive2_fw_payload.img
% Total % Received % Xferd Average Speed Time Time Time Current
Dload Upload Total Spent Left Speed
0 0 0 0 0 0 0 0 --:--:-- --:--:-- --:--:-- 0
james@pop-os:/srv/tftp$ ls
uboot-spl.bin.normal.out visionfive2_fw_payload.img
I strongly recommend using the latest versions though and not copy/pasting my exact command which will be release 2.8.0 at time of writing.
The TFTP server is now set up!
Booting into uboot console
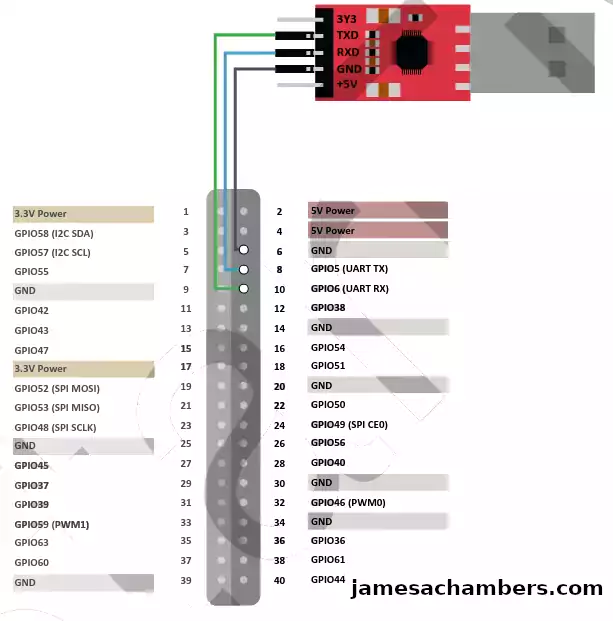
To use the uboot console we need to connect the USB to serial console. The wiring for that looks like this:
Once you have everything connected power on the VisionFive 2. You should see a screen that allows you to interrupt the boot process by pressing a key.
For what it’s worth I had to reverse the green and blue wires on my USB to serial adapter and then it worked perfectly. Mine didn’t work with the TX/RX indicated in the picture above but that is from the official documentation. If you are having trouble try switching the TX and RX (leave the GND where it is).
Quickly press a key (it’s okay if you missed it, just try again) and it should take you to a prompt that just says “StarFive”. This is the uboot prompt.
Completing the Updates
First we need to set up some IP addresses. Substitute the IPs with the IPs for your server (the PC running the SFTP server) and VisionFive2.
setenv ipaddr 192.168.120.222
setenv serverip 192.168.120.9
setenv gatewayip 192.168.1.1
sf probe
Now we’re going to update the files with:
tftpboot 0xa0000000 ${serverip}:u-boot-spl.bin.normal.out
sf update 0xa0000000 0x0 $filesize

tftpboot 0xa0000000 ${serverip}:visionfive2_fw_payload.img
sf update 0xa0000000 0x100000 $filesize
Before you reboot make sure none of the commands failed. None of them should have resulted in 0 bytes or any errors. If they did then you need to figure out what went wrong with the IPs / connections and make sure you get a successful flash before rebooting.
My commands did not all work the first time. I had problems with my gatewayip (which I added to the article because it’s not included in the official quick start guide) and other issues. You want to watch and make sure that things completed and that things aren’t 0 bytes or giving some kind of error.
If everything completed then you are all set and can reboot.
Updating Firmware – The Easy Way
The easy way is done on the VisionFive 2 itself.
Change directories to where you downloaded the files such as:
cd ~/Downloads
We can now flash the updated SPL with:
sudo flashcp -v u-boot-spl.bin.normal.out /dev/mtd0
sudo flashcp -v visionfive2_fw_payload.img /dev/mtd1
Before you reboot make sure none of the commands failed. None of them should have resulted in 0 bytes or any errors. If they did then you need to figure out what went wrong and make sure you get a successful flash before rebooting. You want to watch and make sure that things completed and that things aren’t 0 bytes or giving some kind of error.
Conclusion
Now that your firmware is up to date you should be able to boot all of the latest images! I tried my Debian build 69 after doing this process and it boots just fine now.
I can also use the easy way in the future for updates going forward (and so can you)!
Other Resources
I’ve written a review for the StarFive VisionFive 2 available here
I also have a SSD boot guide available for the StarFive VisionFive 2 here


Hi, I’m trying to update the SPL and U-boot firmware and all, for some reason when I try to use the 2 flashcp commands only the first one works, this is the output I get:
# flashcp -v u-boot-spl.bin.normal.out /dev/mtd0Erasing blocks: 36/36 (100%)
Writing data: 143k/143k (100%)
Verifying data: 143k/143k (100%)
# flashcp -v visionfive2_fw_payload.img /dev/mtd1
visionfive2_fw_payload.img won't fit into /dev/mtd1!
Does anyone know why this is and how to fix it?
Thanks for the help!
probably /dev/mtd2
first read ‘cat /proc/mtd’ to list devices
The firmware and dtb changed between versions
2.10.4
mtd0: 00020000 00001000 "spl"mtd1: 00300000 00001000 "uboot"
mtd2: 00100000 00001000 "data"
2.11.5
mtd0: 00040000 00001000 "spl"mtd1: 00300000 00001000 "uboot"
mtd2: 00100000 00001000 "data"
the spl partition is double the size, as defined by the dtb file
so you have to boot with switch selected SD boot with a newer version starfive-tech linux image to update the firmware
The u-boot is pretty flaky, hoping for better to come out of starfive-tech.
I have modified u-boot scripts for nvme booting which works with the Armbian images,
it’s a steep learning curve.
Hey Colin,
Great work, thanks for sharing!
Me presento soy alfredo saludos desde mexico recien compre un strafive con la idea de utilizar ffmeg o gstreamer el caso es que en la version minimal faltaba de compilar asi que me decidi usar la version full el problema viene cuando la intento instalar y arranco el strafiver y sorpresa no hace boot al fin me di cuenta de que habia que actualizar los firmwares como casi no hay informacion enconetre este pos y me ayudo a aclarar algunas dudas me tope con el problema de que si actualzo a la version 3.1.15 que es la mas actual cuando scribo el post la compilacion 9 no funciona y como hice la actualizacion desde el puerto serial usando el servidor tftp no me resulta coplicado hacer eso pero veo que a muchos usuarios se le hace muy dificil o no entienden bien el concepto asi que quiero aportar un poco a la comunidad me hice un scritp en bash para el que quiera usarlo y no tener tanto dolor de cabeza ya que hay que estar probando entre los diferentes firmwares
el scritp lo hice en español y en ingles bueno
1 descargar la sdcard imagen build root de sddejo el link de descarga (nota el usaurio es root el password es starfive)
2 usar la imagen descargada con la idea de tener una terminal con busybox
3 ya cuando esten dentro del sistema descargar el scritp
4 wget http://gamba.dynns.com:5000/apk/starfive/starfive_update.sh
5 darle permisos de ejecucion chmod +x starfive_update.sh
6 si quieres ejecutar el scritp en español solo corres el escrip o lo puedes mandar llamar ./starfive_update.sh es o ./starfive_update.sh
7 si quieres el scritp en ingles ejecutar ./starfive_update.sh en
Te dara algunas opciones
la primera opcion es saber que version de firmware tenemos actualmente
la segunda opcion descarga los firmwares
la tercera ver los firmwares que tenemos
y la cueta es para actualizar al firmware deseado
creo que este pequeño aporte le pude servir a muchos novatos para que no tengan tanto dolor de cabeza
les dejo el menu en español
====== MENÚ PRINCIPAL ======Seleccione una opción:
[1] Mostrar la versión del firmware actual
[2] Descargar firmwares
[3] Ver firmwares disponibles
[4] Actualizar firmware
[0] Salir
==========================
tambien se los dejo en ingles
====== MAIN MENU ======Select an option:
[1] Show current firmware version
[2] Download firmwares
[3] View available firmwares
[4] Update firmware
[0] Exit
=======================
Hey melcocha14,
Looks good, thanks for sharing, it should definitely help some newbies update easier!
Buenas, he intentado descargar este script. Pero parece que ya no está activo el servidor donde lo hosteabas. Hay alguien que lo tiene o alguna manera que se pudiera compartir otra vez?
Gracias y saludos!
lo siento me cambie de domicio y aqui donde estoy no me permiten abrir los puertos asi que deje en desuso ese dns voy a tratar de reactivarlo pero lo mejor sera que suba el proyecto a git ahora recien he tomado el starfive y veo que a avanzado mucho asi que le dare otra oportunidad mi interes principal es es en la codificacion de stream con la tarjeta grafica pero bueno probare denuevo
I want to share a bad experience to avoid that someone else makes the same mistakes…
I started my visionfive 2 last week, and it looked nice. I was running the 69 build I think.
I then tried to update the u-boot flash and spi flash on using the mtd-utils method …
The /dev/mtd0 and /dev/mtd1 devices was present, so I wanted to use flashcp to update them as I had read above. However there was no flashcp command available although I searched several possible locations. So I thought, maybe a normal cp would work ok…. I shouldn’t… I took copies of the contents of the mtd0 and mtd1 devices afterwards (before reboot) and realized the contents of those were not identical (although similar) to the files I had copied. There were bits differing here and there. Strange…
When I rebooted it did not start anymore… When connecting to a USB-serial connector it just tells me “Main section boot fail,use backup section” and then it goes quiet.
If I change the switches to the serial boot mode, it gives me CCC, then (C)StarFive) then CCCCCCCC…. for ever.
I tried to use minicom there and send the jh7110-recovery-20221205.bin file to it but it does not seem to understand that I try to use the xmodem protocol. The CCC:s just keep coming.
Finally I flashed the sdcard.img and to changed the switches to sd-disk boot mode, and was able to transfer the files from a USB-card to the device, and flash them using flashcp (it was present in that image). So now it finally boots again. 🙂
Hey Kenneth,
Wow, thanks for sharing this experience! I’ve actually made this mistake before on other boards and I made it for the same reason you did: I thought they were the same. Recently I told someone to try cloning a SD card to eMMC on a Libre board and it turns out just like this they were not identical. There was other stuff on the eMMC serving as the boot loader on that board and it got wiped out from the clone. They had to do a similar nasty RockChip recovery on it for exactly the same reason. On that board it also can’t boot from SD card once you’ve corrupted the boot loader forcing a recovery with RKDevTool. Lesson learned.
sdcard.img to the rescue! It’s amazing that image isn’t in the documentation anywhere. I’m so glad you were able to recover. That’s a great tip about using the SD disk boot mode.
Thanks again for sharing this, take care!
Thanks James,
I can add that currently the board boots nicely with the 69 build, but with the 202302 build it still does not boot.
It does the initial u-boot sequence, and waits for the keyboard interrupt for two seconds, but if it’s not interrupted it fails directly after.
Below is the end of the u-boot sequence before it stops.
It complains early about a CRC error before, but I have seen that in other examples of the boot as well, so that seems not uncommon.
Do you have any input on what is the problem now?
It says FDT_ERR_BADMAGIC, maybe that’s a clue?
===================================
U-Boot 2021.10 (Dec 25 2022 – 20:59:18 +0800), Build: jenkins-github_visionfive2-4
CPU: rv64imacu
Model: StarFive VisionFive V2
DRAM: 8 GiB
MMC: sdio0@16010000: 0, sdio1@16020000: 1
Loading Environment from SPIFlash… SF: Detected gd25lq128 with page size 256 Bytes, erase size 4 KiB, total 16 B
*** Warning – bad CRC, using default environment
StarFive EEPROM format v2
——–EEPROM INFO——–
Vendor : StarFive Technology Co., Ltd.Product full SN: VF7110B1-2253-D008E000-00001572
data version: 0x2
PCB revision: 0xb2
BOM revision: A
Ethernet MAC0 address: 6c:cf:39:00:2a:4d
Ethernet MAC1 address: 6c:cf:39:00:2a:4e
--------EEPROM INFO--------
In: serial@10000000
Out: serial@10000000
Err: serial@10000000
Model: StarFive VisionFive V2
Net: eth0: ethernet@16030000, eth1: ethernet@16040000
switch to partitions #0, OK
mmc1 is current device
found device 1
bootmode flash device 1
406 bytes read in 2 ms (198.2 KiB/s)
Importing environment from mmc1 ...
Can't set block device
Hit any key to stop autoboot: 0
Can't set block device
## Warning: defaulting to text format
Can't set block device
libfdt fdt_check_header(): FDT_ERR_BADMAGIC
Retrieving file: /boot/extlinux/extlinux.conf
Can't set block device
Error reading config file
StarFive #
Now I realized what my problem was!
I did not realize that the u-boot and fw_payload files were specific to each OS build! Now I flashed the u-boot and fw_payload files bundled with the newer release, and it boots with that.
I would suggest they start naming the released files so it’s easier to understand which version they are supposed to work with as long as they are not compatible with foreseeable future versions…
I can admit am not used to trying out boards that are in “the frontline” and not yet supported, but improved naming could help all I think.
Hey Kenneth,
Absolutely! I would suggest they have no clue what they’re doing as an alternative to be honest with you. I’ve never seen a board where this was necessary in my life. What a nightmare for beginners. What a nightmare for me and you!
This is not normal at all. It’s not normal for companies to release OS updates that are so incompatible with each other the entire board needs to be reflashed. Every time. I cannot BELIEVE they’ve done this again.
Doing this once made me pull my recommendation of the board for everyone but experts. Having to do it every time pulls my recommendation for everyone. Do not recommend. This is not necessary on *any* other board. It’s maximum cheesiness and shows they really are out of their league here. It’s a really, really bad sign of incompetence.
I’d honestly consider it an unusable device at this point. This is a mess. They really need to make up their mind about what they want the firmware to do. They also really need to figure out their imaging and firmware. This is absolutely unacceptable and the worst firmware and update experience of any SBC I’ve ever used across probably 30 different boards.
I cannot stress enough that there is not another board out there that is this difficult to use or update. Anywhere. It’s the worst I’ve ever seen in my life. I honestly thought we’d only have to deal with this one time because they shipped a bad firmware from the factory on the board.
It turns out that no. This is just how this board works. We can’t update even between the same OS without reflashing. Incredible. On most boards this stuff is in the image so simply reimaging it will take care of it. I cannot stand when they do boot sequences like this.
It’s honestly already bad enough that you have to download a new image every time you update instead of just update it through apt. That’s another thing you’d be able to do on most other boards. Update it through the package manager instead of have to reimage the board every time. The fact that you have to both reimage and reflash every time to install an update is maximum terribleness. It brings me no pleasure to say it. It is what it is.
I’m glad you were able to get this going, and thanks for sharing your resolution!
Yes, I agree, it has been a shaky experience, so lets hope they get up to a more stable firmware deliveries soon now.
To their defense, this is one of the first SBCs using RISC-V, so I guess we can’t expect the stability of ARM-based boards quite yet.
Maybe the Star64 board will help stabilize the platform if it is ever released…
Hey Kenneth,
For sure, I’m definitely going to be getting the Star64 to compare it with!
I don’t think this is something that can be fixed on this board. It seems fundamental. It has nothing to do with RISC-V though.
I alluded to in my earlier posts that the Libre Computers Renegade works this way when I mentioned the person that tried to clone their eMMC to SD card before I realized it was another crappy board that boots this way. That board has a very similar boot process to this board. For some reason they put the critical boot files on the eMMC that aren’t a part of the normal image. This is extremely difficult to deal with and it is not the norm. It’s a sign of bad engineering. Other companies put them in SPI flash sometimes but it’s the exact same problem if they make breaking changes to the kernel. It needs a total firmware flash to even install a new version and similarly to this board it also can’t update itself through apt.
Of course the Libre Computers one is way better of an implementation even though it was pretty disappointing it worked this way. You don’t have to reflash it every single update. They at least have that figured out. You just have to not damage it.
On this board you do have to update it every single update apparently. The kernels/dtbs are so incompatible it won’t even boot. How these keep changing I have no idea. Mapping your hardware is not something that should change this dramatically each update. This is not normal at all.
I also don’t see how this design gets fixed. This is a fundamental design problem. They can’t ship a universal image or kernel for this. It’s always going to be fiddling with firmware and flashing on this board.
I really hope the Star64 board takes a different approach. I can’t imagine they won’t though. I never tried the VisionFive 1 but maybe it was the exact same way. This is my first product from this company and frankly it’s even worse than RockChip based boards (which are the closest thing to requiring so much flashing I can really think of).
How are there ever going to be third party images for this board? They’re all going to need their own firmware flash? Nobody is going to make any third party images for this then would be my guess.
To be clear the problem is that StarFive is storing their critical boot files within firmware. That’s a stupid design. Most companies put their boot files within the base image and NOT the firmware. Not this board though. This board it’s flashed into the firmware. That’s the problem. That’s why it’s so miserable and you have to reflash the firmware to install a new OS version on this board and on other boards you don’t.
We definitely need a friendly consumer RISC-V board and I agree with you that it’s only a matter of time! It’s not this one though for sure and I don’t think it can be fixed. It just needs to boot differently and that’s going to require a new board (or at least a new hardware revision).
Hey Kenneth,
Best I can tell they’ve broke the firmware again. Check out this post here:
I suspect that this new image come with a new but incompatible version of uboot?You should really put both u-boot-spl.bin.normal.out and visionfive2_fw_payload.img along the image download with a big warning that these probably be needed to be updated before the image will work.
And updated OpenSBI & Uboot with the versions from Release VisionFive2 Software v2.10.4 · starfive-tech/VisionFive2 · GitHub 17
And it is now booting :slight_smile:
You’re going to have to completely reflash it to update. Again. What a nightmare honestly. It’s honestly unacceptable. I’ve never seen such an incompetent board to be honest with you.
Hopefully that helps!
Thank heavens you wrote that. I would have been completely lost without it. You don’t need need to download the 55 version and install mda-utils. You just need the latest release (starfive-jh7110-202302-SD-minimal-desktop.img). It’s only 700M rather than 5.6G! And you need to do the tftpd stuff which can you do without SD card. Must enter uboot prompt by responding to press any key – otherwise it complains bitterly about lack of media. Then you can boot your SD image. Easy when you know how. Many many thanks.
Hey Dick,
Thanks so much for your kind comment as well, I’m glad this helped! You can also skip uboot altogether with the 700M image and do it over SSH. None of this is in the documentation of course but it’s much easier than what the documentation says to do.
I’d definitely recommend the 700M image as well even if it’s not on the documentation. Thanks again for your comment!
Thanks James! I got it done!
Hey James,
Excellent, thank you so much for letting me know that worked. It should be smooth sailing form here on out. You can run the newer versions and do the easy updates from right inside the OS for the rest of the life of the board. I think you’ll enjoy it now that you get to use it with the latest OS / updates.
Enjoy and take care!
Hello James, Thanks for the excellent post, I’m currently trying to flash my VF2 board, which is a version 1.2, and using the 55 image. It boots fine, and I have the TTY/USB working perfectly. Problem for me is that cannot get the setenv or sf commands to work for me as per your directions, even after installing the u-boot-tools package and some other development packages, so I’m at a stop point now. I can pull up the man pages for them on my workstation, but when I try to use them on the CLI, I get setenv: command not found, or same thing for sf probe. I’m using Debian 11 Bullseye on my workstation (WS), and am wondering – Are you using Ubuntu on your WS? Maybe I am missing some tools? Also, I had one more Idea here – Can I just copy the updated flash files on my WS to the root my existing (working) 55 image sd-card, and just flash from there?
Hey James,
Welcome! So updating the firmware is really tricky on these. You won’t use the setenv or sf probe commands inside of an OS. You have to use those inside of uboot. The way you get into uboot is that when you power on the device I think you have 1 second to press a key to interrupt the boot process and boot into uboot. If you miss it you need to disconnect the power and try again. It will pop up a countdown with either 1 or 0 seconds (meaning you have to instantly hit a key when the power is connected just about or you’ll miss it).
There is a third option. I added it into the article afterward but basically there is a minimal image you can use to flash these. If you go to the GitHub releases page for the StarFive Vision 2 here there is a special image called sdcard.img. It’s a CLI only image but it will let you boot all the way into the operating system.
Basically what is happening is that version 55 cannot flash the updates to the device. The kernel in it is too old or not configured properly. You have to either do it from uboot (which is the thing you interrupt when connecting power to the device before the OS boots) or you can also use this minimal image. I’m sure they deeply regret everything that led up to this not being possible but it’s basically not with the 55 image.
If you use the minimal image you don’t have to mess with uboot at all or use the serial console. You can use a keyboard/monitor and just flash it the “easy way” if you flash sdcard.img to a SD card and boot it from that. This is the “third way” basically. You can also connect to the minimal image with SSH so you don’t even have to use a keyboard/monitor. If you use sdcard.img burned to a SD card you’ll be able to do this the “easy way” over SSH.
They didn’t include the minimal image in the documentation at all as a possible way to update the firmware. That image basically *can* update the firmware though unlike 55. It will also boot on your existing firmware which will let you take care of flashing it the easy way.
Hopefully that clarifies and gives you some ideas, let me know if I can help further!