
Extremely powerful hardware tends to be very loud. Enterprise servers, networking equipment, cryptocurrency miners are three major offenders. This type of equipment tends to have very small fans that rotate extremely fast and emit a high pitched “whine”. This is fine if you are stuffing all of your equipment in a closet somewhere but for some deployments and situations this isn’t always possible.
There are extremely expensive racks that have sound dampening foam and other materials preinstalled for situations like this but they are extremely expensive (thousands vs . what we will be doing which only costs hundreds). In this article I’ll show you how I modified some (relatively) cheap racks available from Amazon with acoustic foam to reduce noise from ASIC cryptocurrency miners as well as other loud equipment!
Hardware Used
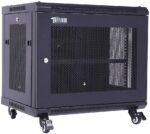
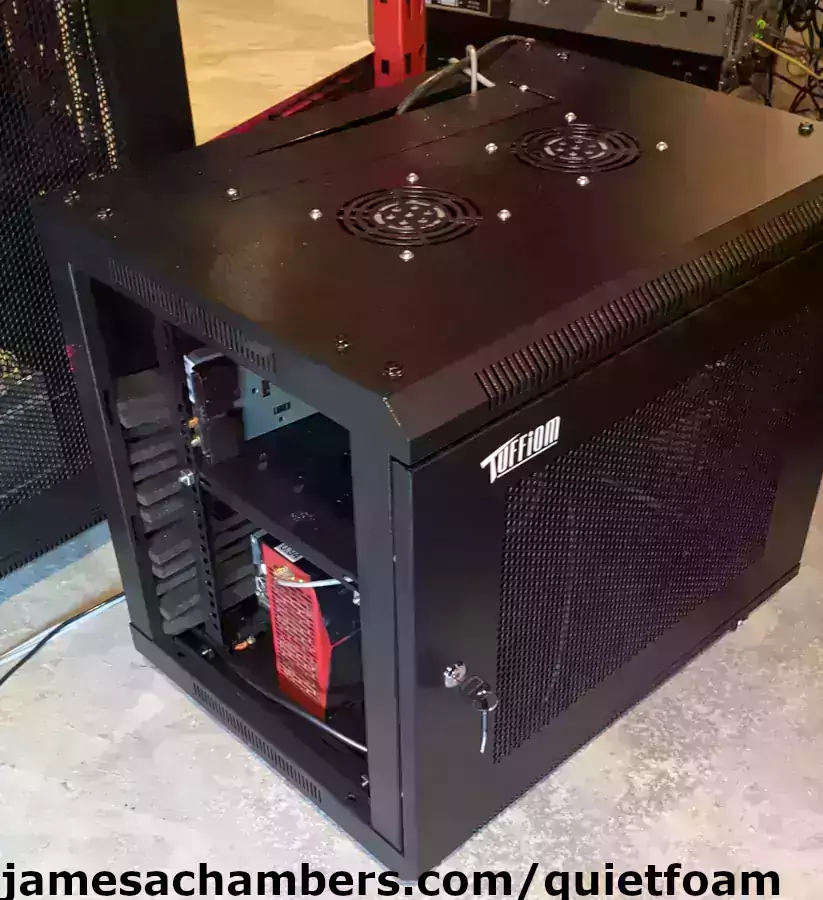
I have built two of these modded racks so far. One is a medium size rack and one is a baby mini rack. They are both on casters and are easy to move around. I went with the TUFFIOM racks because they come with the shelves and a bunch of extras they call “gifts”. These “gifts” are what somebody who hasn’t bought racks before might expect to just come with the rack, like a shelf for example, but they hardly ever do and it usually adds at least hundreds of dollars of expense just to buy the shelves and extras you need. This on top of the independently powered built-in powered air exchange at the top of the units made them the clear choice for this project of reducing noise without breaking the bank or cooking expensive equipment via overheating.
Here’s the two racks I modified in this article:

The TUFFIUM 15U rack is meant for smaller equipment and won’t accommodate most servers but is very accommodating for smaller equipment. Comes with a shelf so there are two solid “levels” you can place things without putting them on rails. Lots of airflow while still allowing plenty of surface to safely place acoustic foam. Great for ASIC miners, loud network switches, and other small but loud/hot IT equipment. Reasonable enough size to use at home as well.
Links: Amazon.com*, Amazon.ca*
The TUFFIUM 9U is what I affectionately refer to as a “baby rack”. It’s very small but has the same powered ventilation at the top and generous airflow of the 15U rack. Very cheap and perfect for home use. Still lots of solid surface area to place acoustic foam despite the small size.
Links: Amazon.com*, Amazon.ca*
I used two types of acoustic foam. One is a thicker fancier pad that is good for the deeper parts of the rack and absorbs the most sound. The other is a thinner foam that is cheaper in bulk and better for things like cutting into smaller pieces and lining the edges of the rack doors. It absorbs less sound but is more versatile and can go places that putting the thicker pad would cause problems or obstruct airflow. Here’s the two types I used:

The TroyStudio Acoustic Studio Absorption Foam Panel – Broadband Sound Absorber panels are a very thick foam (2″ depth) tile with a “periodic groove structure” that helps to absorb and dampen sound waves. This is the tile we will use in the deeper parts of the rack that can fit a full size foam tile like this.
Links: AliExpress*, Amazon.com*, Amazon.ca*, Amazon.com.au*, Amazon.co.jp*, Amazon.co.uk*, Amazon.de*, Amazon.es*, Amazon.fr*, Amazon.it*, Amazon.nl*, Amazon.pl*, Amazon.se*, Amazon.sg*
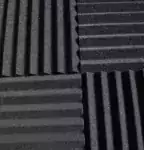
The Acoustic Grid Studio Foam Sound Absorption Wall Panels (1″ depth) are much cheaper than the thicker foam above and are great for cutting up into smaller pieces to use inside our rack on things like the outer doors and other places where a full foam “tile” won’t fit.
Links: AliExpress*, Amazon.com*, Amazon.ca*, Amazon.com.au*, Amazon.co.jp*, Amazon.co.uk*, Amazon.de*, Amazon.es*, Amazon.fr*, Amazon.it*, Amazon.nl*, Amazon.pl*, Amazon.se*, Amazon.sg*
I used 3M double sided stickies to secure the foam to the case.

3M double sided stickies to secure acoustic foam to another surface
Links: AliExpress*, Amazon.com*, Amazon.ca*, Amazon.com.au*, Amazon.co.uk*, Amazon.de*, Amazon.es*, Amazon.fr*, Amazon.it*, Amazon.nl*, Amazon.pl*, Amazon.se*, Amazon.sg*
Here are some classroom dividers I used to make a few extra sound barriers to further reduce noise:
Self standing classroom dividers. These already help dampen the sound but I added additional acoustic foam to one of the sides to maximize sound dampening
Links: Amazon.com*, Amazon.ca*, Amazon.com.au*, Amazon.co.jp*, Amazon.co.uk*, Amazon.de*, Amazon.es*, Amazon.it*, Amazon.nl*, Amazon.pl*, Amazon.se*, Amazon.sg*
Requirements / Recommendations
You don’t have to use the racks I got to do this as long as the racks you choose meet a few basic requirements. The most important requirement when picking a rack to mod is to make sure it’s actually a rack that is meant for hot IT equipment. I highly recommend getting one with powered ventilation / air exchange. Both of the ones I modded came with a separate AC cord that powers both an intake and exhaust fan (included and pre-installed) on the top of the unit.
The other thing you need to be conscious of is the rack depth. These ones are very narrow racks for IT equipment because I’m putting mostly ASIC miners and other “loose” small devices. One of my big HP ML350p Gen8 servers for example would have zero hope of fitting in a 19″ depth rack so make sure you choose one that has enough depth to hold your equipment.
There are tons of cabinets/racks out there that are not suitable for equipment that requires a lot of power and puts out a lot of heat. That is why you want to seek out one that has powered ventilation at a minimum and preferably lots of other airflow like the two cases we will be featuring today. We will be leaving all the rack’s airflow open and functioning as designed as well as carefully monitoring your temperatures (more on that later). This does let some noise through but I’ll be covering some ways I dealt with this as well without compromising the airflow and inadvertently creating an oven instead of an IT rack.
I generally don’t recommend a fully enclosed/sealed rack unless you really know what you’re doing and are just trying to quiet down something like a network switch/small device with extra whiny fans. Even a couple powered ventilation fans on the top like these racks we’re featuring today aren’t going to be able to exchange enough air for most serious IT equipment. In those situations you’re going to need to get one with a much fancier ventilation system to fully enclose it without risking overheating (think multiple air exchanges with 6-8 total fans in the case minimum instead of 2). The upside is that setup would be quieter in the end than what we’re doing but then you’re right back in the thousands of dollars price range again when you start looking at fully enclosed racks with proper ventilation for any serious equipment and they also tend to make a lot of noise for their own fans (which is what we’re trying to get away from).
Modding the Racks
A very nice thing about these racks is that they come fully assembled. Even my “gift” shelf came already preinstalled in both racks. All I had to put on was the caster wheels since they’re optional. That means once you receive the rack and the acoustic foam you are ready to proceed, so let’s get started!
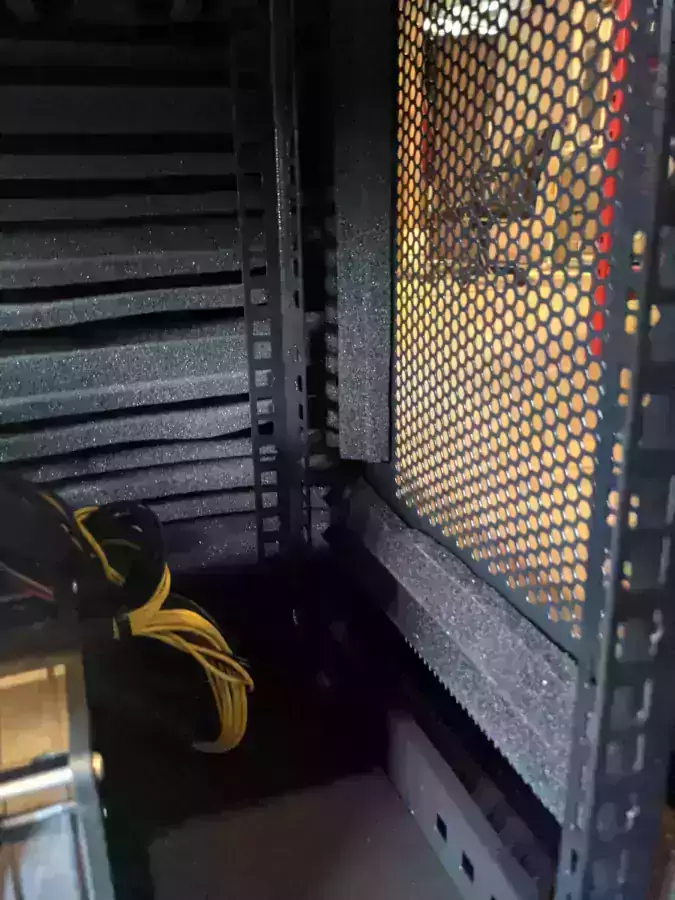
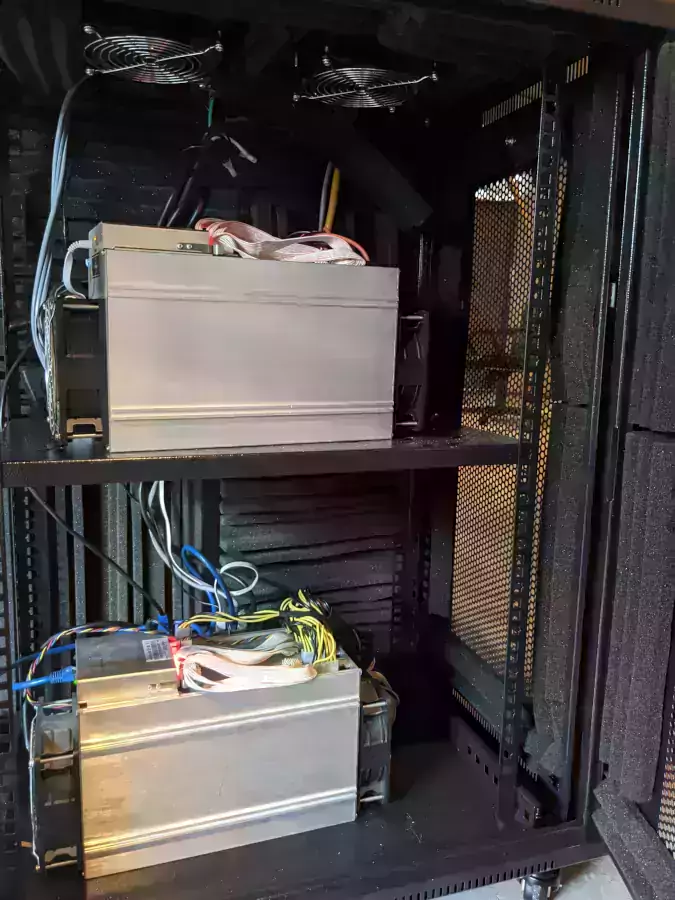
I started with the “easy” parts of placing the full 12″x12″ foam tiles along the back of the racks. Both the mini and medium racks have one side that is solid with no ventilation the larger premium tiles can be placed. Depth is also important as these are 2″ depth foam squares and both racks have plenty of clearance along this solid side.
I just have a power strip inside but I plan to upgrade to a rack mount power strip to clean it up. The networking is also coming in the top of the unit so you can actually move the rack around on the casters around the entire room. This definitely comes in handy!
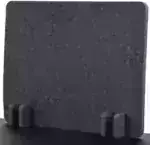
I used the 3M double sided stickies on the back of the acoustic foam to secure it to the case. This doesn’t give as “clean” of a result as glue would but is also a lot easier to work with and make changes to. You also should check to make sure pieces don’t fall off over time from heat and gravity working together. Mine have stayed mostly secured in a few weeks of testing so far but I have had to reattach some here and there. Here’s an example of one that started hanging:
This has only happened a couple of times but my guess is that it is due to heat. If it continues to happen I may have to upgrade to something like a heat resistant glue and just glue the pieces in place. I will definitely update this article if that happens!
Observe that the case’s natural airflow vents are left unobstructed. Don’t place foam over any of these as it will cause the airflow of the rack to not flow as designed. Here’s the top section of the case inside:
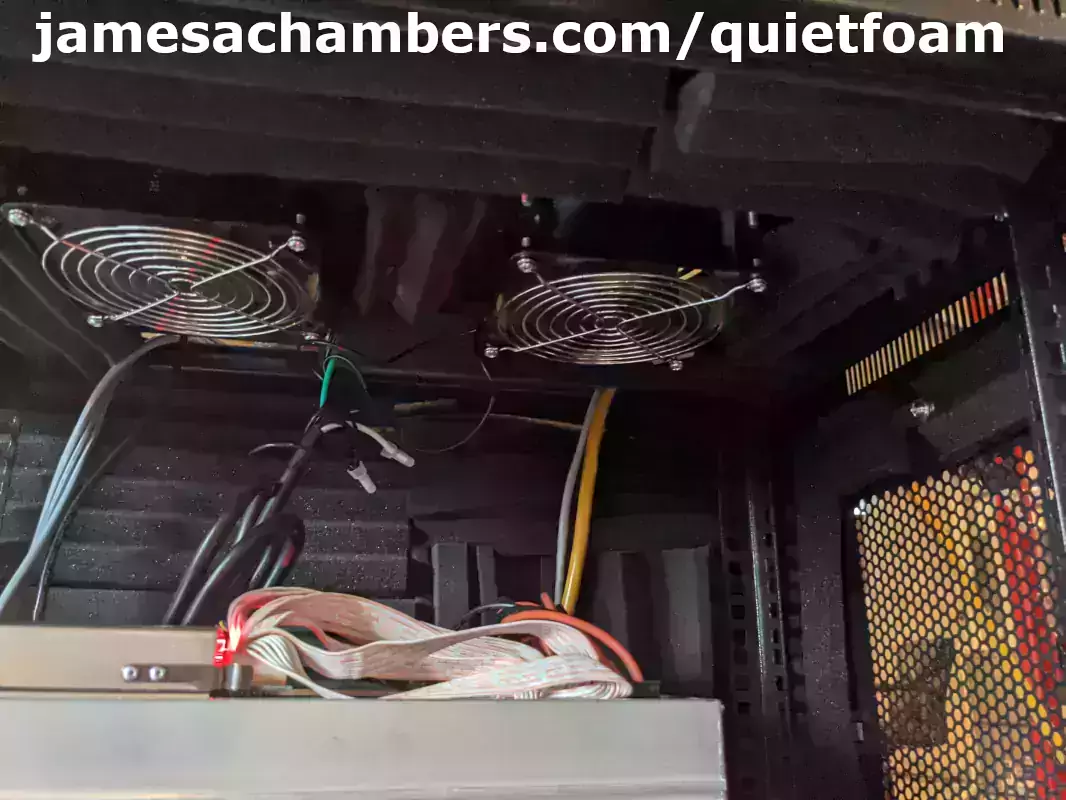
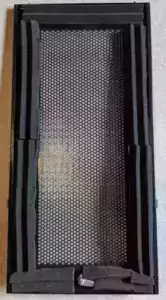
I lined around the fans but left them some space. Next I started lining all of the doors with the 1″ depth pads. I cut the squares into thirds or quarters depending on the size of pieces I need to fit each door.
Now it’s time to put everything together and take some measurements!
Measuring the Impact
So how much does it help? I took some measurements with a decibel meter to show how much of an impact acoustic foam and a decent enclosed rack can have. Here is a measurement from inside the mini 9U rack:

Ouch. 81.3dB inside the rack. That is loud enough to give you a splitting headache after a long enough exposure. I can tell you from personal experience and it is why I built the rack since I have a workstation down there and sometimes work for hours at a time near the equipment. Now let’s take a look at the measurement if I close the front panel again and stand only a few feet away:
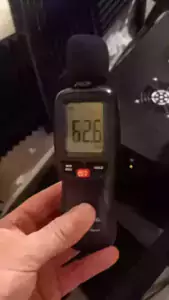
Standing directly above where I took the first 81.3dB measurement with the front panel closed we are already seeing a reduction of 18.7 dB. That is a huge improvement already! A quick note about decibels is that they are logarithmic. If you calculated this on a normal scale that would be a 23% drop but that is not the case in decibels. Let’s use a chart to help illustrate this:
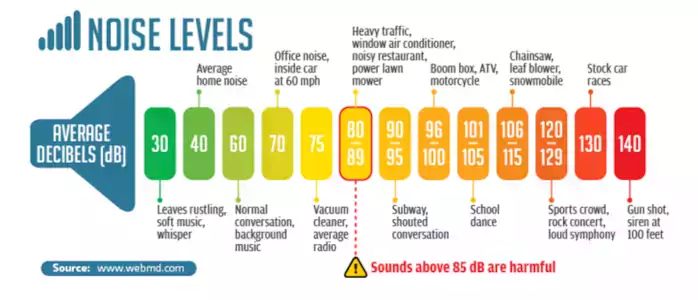
The difference between 81.3 dB and 62.6 dB is the difference between standing next to a running powered lawnmower for the former and “normal conversation / background music” for the latter. It’s a night and day difference already. Note that I do have some additional foam placed on the concrete below as well as some on the wall. I’ll cover that more in the next section here.
For our last measurement how about if I stand about 10-15 feet away? Let’s take a look:
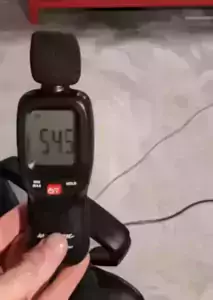
The two racks are in the top right corner of the shot. I am next to my chair that is visible in the very first shot from inside the 15U case. Only 15 feet away from that 81.3 dB equipment it is only 54.5 dB which puts us well into the green somewhere between “average home noise” and “background music”.
I can now comfortably work in this chair next to the equipment for hours whereas before I would get a headache from the high pitched fan whine in less than an hour of exposure. You also can’t hear the fans through some of the vents when the rest of the house is really quiet anymore.
Additional Sound Reduction
Since we leave the airflow open in the case there is some noise that will “escape” through the airflow holes. Think of the sound like light. If you were shining a bright light in there what would happen? The sound waves act much in the same way. Obstructing the airflow is not an option, but there are a couple easy additional things you can do.
If we continue with our analogy of our sound source being similar to shining a light where is the light “leaking” to? We can place additional foam at these places to dampen more sound. The easiest one is right on the concrete/floor outside of the rack on both sides. With concrete or tile especially the sound waves will bounce right off the surface very effectively and scatter all over the room. Once the acoustic foam is placed the sound waves impact the foam and are absorbed/scattered instead of reflected everywhere by the floor. You can see a foam tile below my hand placed directly on the concrete floor from the 62.6 dB measurement in the previous section.
I got some visual/noise partitions meant for dividing students in classrooms and added additional foam to it. You could consider these combined with one on the floor as our second line of defense. It looks like this:

These are very effective as they add a blocking sound barrier right at the “source” of the sound. We’re basically absorbing another set of waves that made it past our first line of defense. I also used some leftover foam and padded my unfinished basement wall here and there like this:
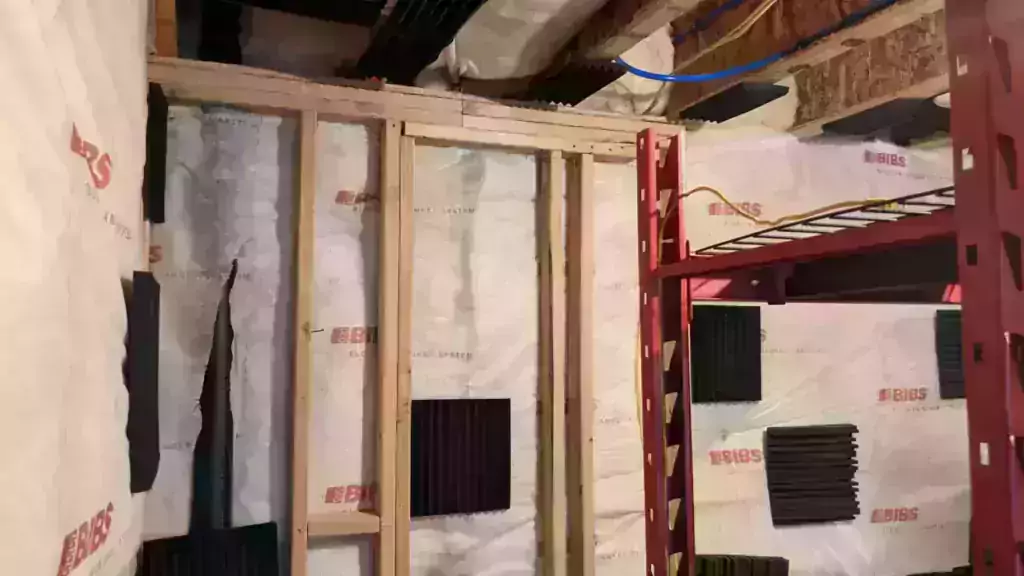
This would be the third line of defense. If sound waves still made it past the inside rack foam and the divider partition (our second line of defense) you still have an additional chance to catch and neutralize the waves before they bounce again. It definitely helps the most with areas that the open ends of the rack are pointing. In the above picture a lot of these are tiled right at the rack’s airflow level since that is the source of the sound. In this case the wall is getting a “direct hit” of sound waves right from the source and that’s why it’s so effective to place a tile there. The ones I placed on the ceiling are probably doing very little other than catching ones that bounce off the floor.
This is a very common basement setup and you may have seen these exact foam squares tiled on your favorite YouTuber’s wall. They do it because they are recording and acoustic foam absorbs noise from the furnace and other equipment in their basement that could be heard on their audio without using something to absorb it like this. They definitely work, but you need a LOT of them to do a whole room, and frankly I didn’t get anywhere near the reduction I got with the metal enclosure + foam method. I would have to spend several hundred more dollars to finish tiling this wall and I’m already satisfied with the results.
I do expect that if I do finish the rest of the wall though that it would yield further gains. From what I’ve measured it works almost proportionally to how much you do as the sound is hitting all the surfaces in the room and bouncing all over just like light does. The more you do the less places the sound can “bounce” without losing a bunch of intensity or being absorbed by the acoustic foam. Do the direct “line of sight” to the sound source areas first but then additional tiles do yield small additional gains.
Conclusion
This was a major quality of life improvement for my home lab. I definitely recommend it but you need to monitor your temperatures when you put hot equipment inside an enclosure.
I had to make some adjustments to how my units were placed. They had the best temperatures when the intake was right against the “grill” of the rack, and the exhaust was exhausting in the middle of the case. I thought it would be the opposite, but the case is pretty good at getting rid of hot air, but it is not good at giving it the coolest intake air vs. putting it right against the edge of the case.
As long as you monitor your temperatures if you are near something loud a lot this is definitely a good project to consider!


 - Pictures / History")

")