
I won’t lie. When I opened the Nebra Outdoor hotspot I was annoyed. Like many, many Helium hotspot owners I paid hundreds of dollars and waited many, many months past expected delivery for a Helium point.
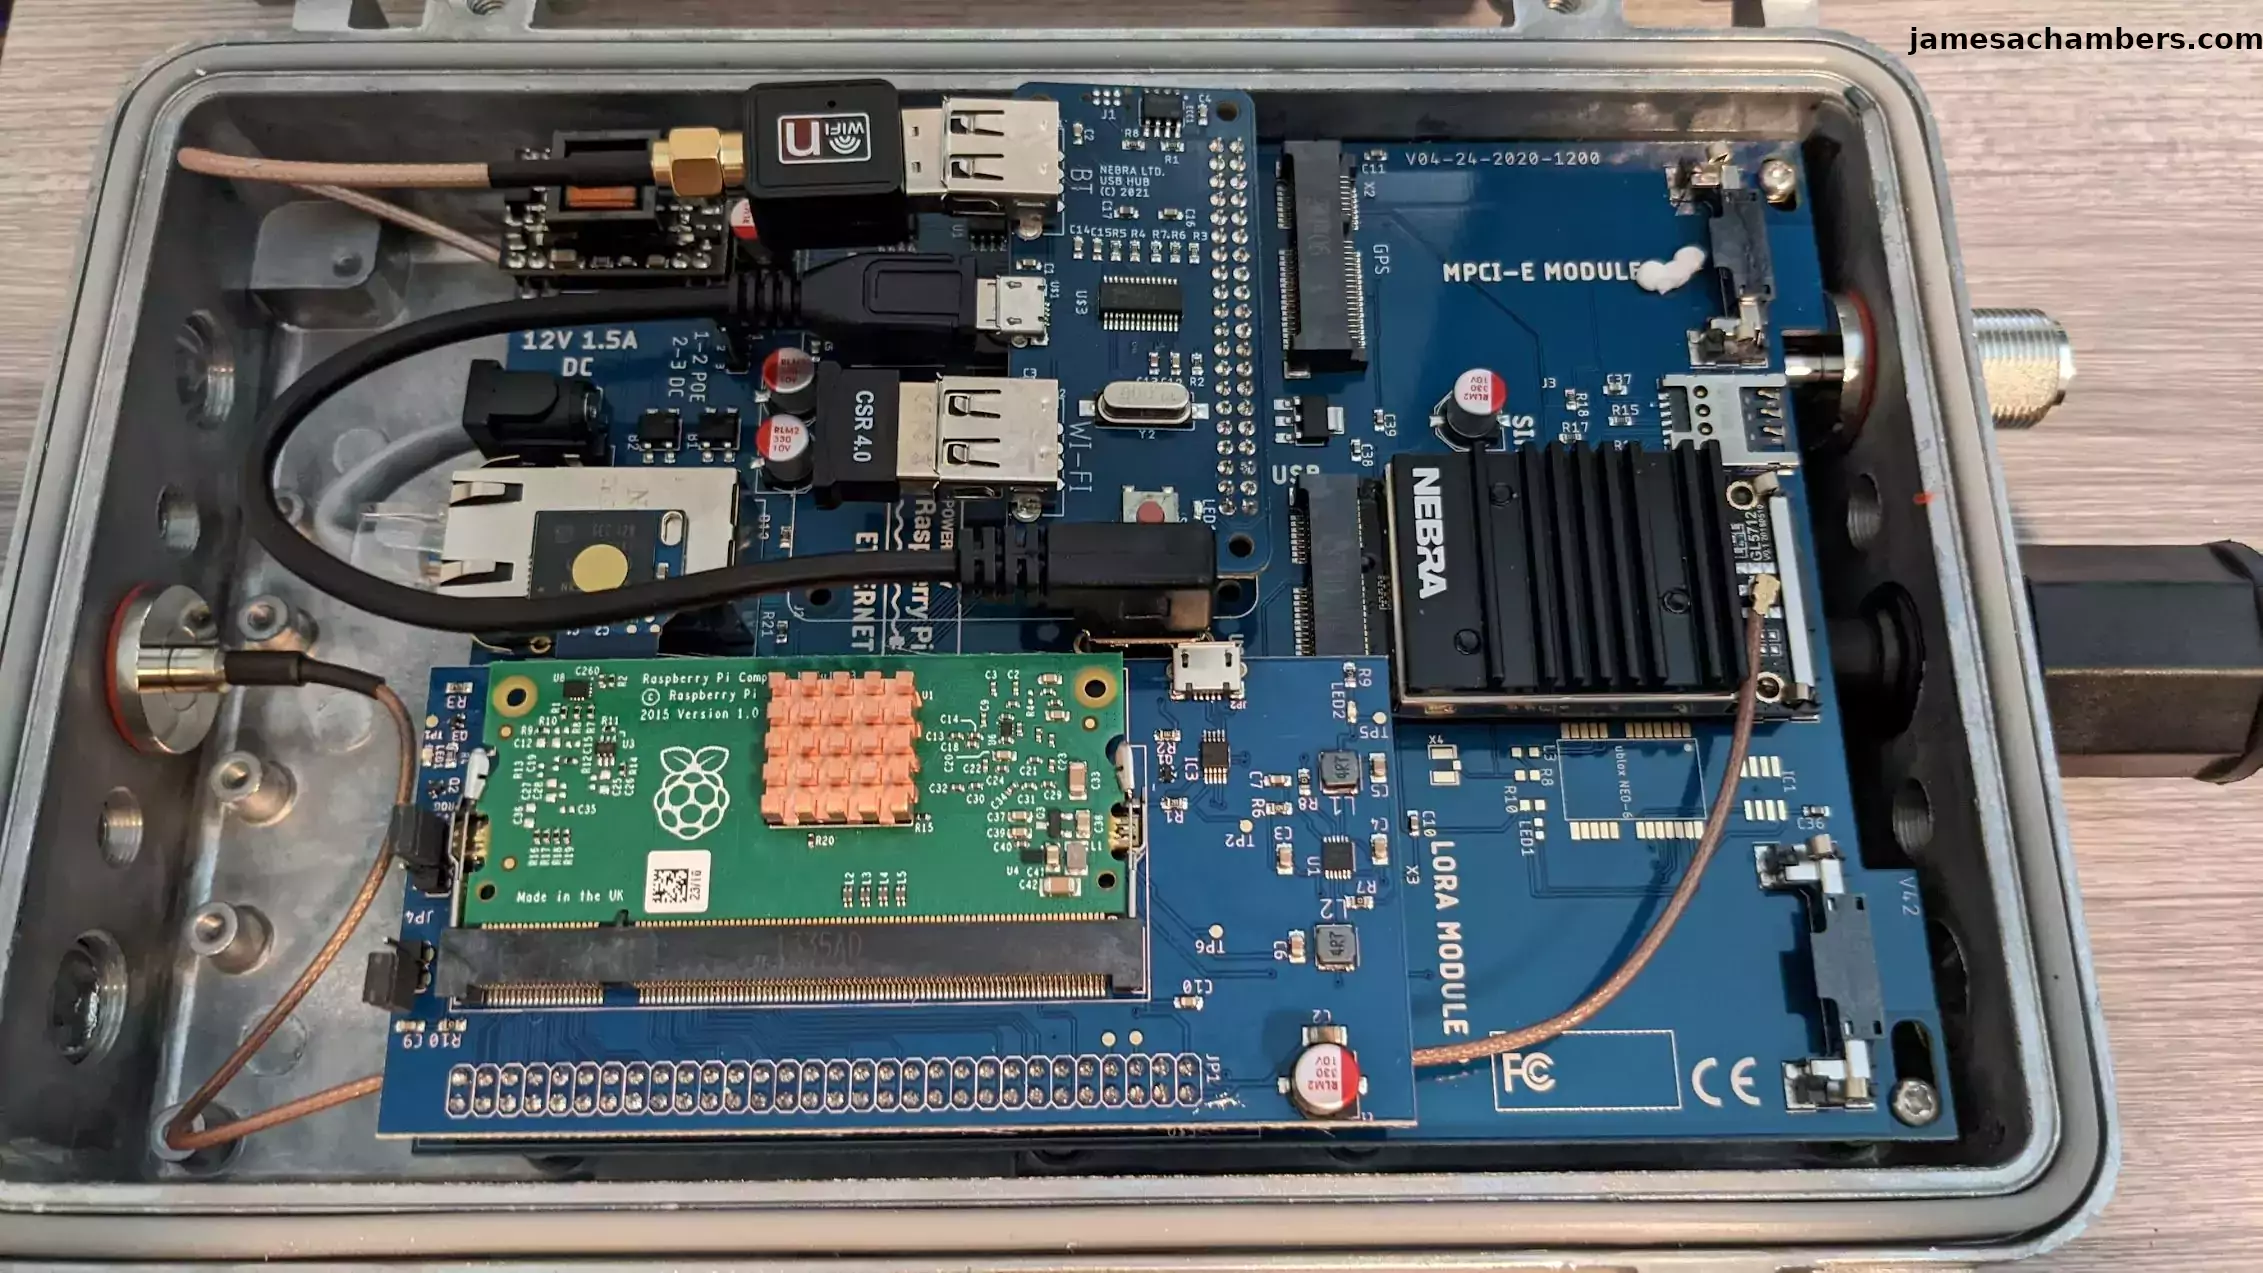
What did I get for my money and patience? I got a several generation outdated Raspberry Pi Compute Module 3 from 2015 that they no doubt paid literally a single digit number of dollars for, some connector boards and wireless chips. And of course it came too late to make any money in this last bull market.
To be fair to Nebra that is a beautiful Pi setup. If only they had used a Compute Module 4 or even a 3+ but still, that is clean except for maybe the wireless-N dongle (wouldn’t have needed it if you used a better Pi). However, it really isn’t going to make me any money at this point and is more interesting as an outdoor enclosed Pi setup to me now.
That means I needed to access it by rooting the device and getting SSH access and in this article I’ll show you exactly how I did it. Let’s begin now!
Hardware Used
The Nebra outdoor miner is a Helium miner designed to be installed permanently outdoors. It is powered by a Raspberry Pi Compute Module 3 and uses a eMMC chip for storage via a SD to eMMC adapter
Links: Amazon.com*
Opening the Hotspot
It’s easy. It’s not meant to keep you out of it frankly as there is a add-on slot in the board for a 4G/5G accessory that Nebra will sell you and they expect and have no problem with you getting into it.
I had to search through my drill bits for a while but I found one that fit the outdoor socket. It took very little force from the factory to move it and if I had known that I may have been able to get it with just my fingers as I assumed they’d be very tight and they were not at all.
You can’t actually take the screws out by continuing to loosen them past a certain point. Once you’ve reached this point you’ll see some exposed springs where loosening it any more won’t do anything and it’s ready to open.
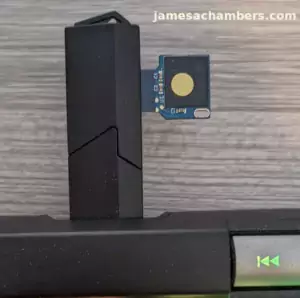
Locating the eMMC / SD card Adapter
The eMMC / SD card adapter is marked with a gold colored dot. It’s right here:
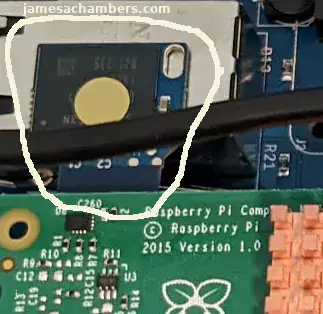
What is it exactly? It’s a eMMC storage chip on a board that actually connects to a SD card port. That means all you need to edit the files on it is a SD card reader (and an operating system that can read the partitions i.e. Linux). If you’re still not following it will make more sense if I show you the reverse of the card:
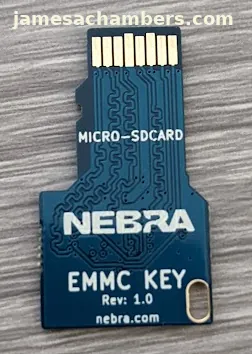
That should be looking a little bit more familiar. Yes, we can absolutely just use that in most SD card adapters and readers. My SanDisk reader will not read these eMMC adapters for some reason but my laptop’s built in one will and this generic adapter will for me to use with my PC:
We now have access to the Nebra files!
Accessing Partitions
The first thing to mention is that if you are on Windows you will not be able to see all the partitions. That is going to be a problem because the ones you won’t see are the ones we need to edit. Use Linux or something like a Raspberry Pi that runs Linux and you will be able to read all of the partitions.
I have 5 total partitions on my Nebra that were automatically mounted by Ubuntu when I plugged the SD card adapter in. Those were
- resin-boot
- resin-data
- resin-rootA
- resin-rootB
- resin-state
SSH Hostkeys
Let’s head to the “resin-state” partition and navigate to
/home/root/.ssh
This contains the authorized SSH keys that are allowed to connect to the Nebra as root. Presumably only engineers and potentially support personnel have access to this key.
I tried changing this at first but it is overwritten every time it starts up. I had better luck by adding an additional keys file to the sshd_config file of authorized_keys2 which did not get overwritten.
This part is a little tricky because the location of this file will change. On mine it looked like:
resin-rootA/balena/aufs/diff/06c7e97079a1876b64aeadf7130626e81da7ecce08f865d0ec3e3c0d3383de28/etc/ssh/sshd_config_readonly
The problem is that for you the long string in the middle will change from mine. The easiest way to find this is to use the “find” command on the resin-rootA partition like this:
cd /media/james/resin-rootA
find . -name sshd_config*
Mine looked like this:
james@jamesgigabyte-linux:/media/james/resin-rootA$ find . -name sshd_config*
./balena/aufs/diff/06c7e97079a1876b64aeadf7130626e81da7ecce08f865d0ec3e3c0d3383de28/etc/ssh/sshd_config_readonly
./balena/aufs/diff/06c7e97079a1876b64aeadf7130626e81da7ecce08f865d0ec3e3c0d3383de28/etc/ssh/sshd_config
Once you have these two files we are going to edit them. We are looking for the following line to change:
AuthorizedKeysFile .ssh/authorized_keys
Change this line to:
AuthorizedKeysFile .ssh/authorized_keys .ssh/authorized_keys2
Once you’ve made this change to both files we’re ready to generate our SSH key and put it on the device.
Generating Key
If you already have a SSH key to change it to then great, so did I but for those who don’t here is how to make one really quick.
ssh-keygen -t rsa -f new
Press enter twice when it asks for the password to leave it blank. The utility will generate the files new and new.pub. The contents of new.pub are what we will put into the authorized_keys2 file:
└─$ cat new.pub
ssh-rsa AAAAB3NzaC1yc2EAAAADAQABAAABgQDW5FRpHHeQgtEVgqitb8iv0SQjtK5mZA65I7FTY31QQcS8cSGYaBPESsYdMgRnM02bNQCSmVbmK0yXGMwbykD7k5MVC6RHhuPzrZneglK1077u97r2D9zGy91m9MpoZpnxVDrHgQOAjgiTPgi/R4zjXYBU99kWzSlzlb0fPqMJKgk2hzSNQGn4wY2CPEwRmtTeY1tO8r/YRBaqnxFqmbcZIDdgS22y7Hdi5HrnR4MENJOnLqKvD76VEzfAdc65wCwEnRC4rjIrym9OSvjf2ByqS9GkYDEO68RGy8QBVyMmOGkWsYIyuiY8LizENGeqBaRej0ooO3RJSGWDkAxf9DO10oQY7taAL3wlmU+8qgp0L3fdVKXnFAIQsALcoJJoWS0QTTCwn0s4+W6vB9tZi0bWfyhfKenJca9JFQ+rpXgMLlHtr7n+Sx38opJ3/uoScpzsQYGO1ICfgJFV+DEVRcV3jLwYECxnUk0iNS3H7AgNH4mOf8BtVqkLW4r1rMNvtBE=
I had a james@hostname at the end of mine that I left out of this example. Basically the only parts I kept were the ssh-rsa at the beginning and then the very long string after that. I also left this out of authorized_keys2 (the next step).
Create authorized_keys2
Now create the authorized_keys2 file. All this file will contain is the contents of new.pub.
Now remove the SD card from your computer and put it back in the Nebra and power it back on.
Connecting with authorized key
Once the Nebra has started up we can connect with SSH using our authorized key like this:
ssh -i new.pub -p 22222 root@192.168.X.X
If everything went well you’ll be taken right into the miner like this:
└─$ ssh -i new -p 22222 root@192.168.7.62
The authenticity of host '[192.168.7.62]:22222 ([192.168.7.62]:22222)' can't be established.
ED25519 key fingerprint is SHA256:UP7m/4ZADqJi/re353CB1KEzDXb1xnH53kLc0ki5r4c.
This host key is known by the following other names/addresses:
~/.ssh/known_hosts:45: [192.168.52.52]:22222
Are you sure you want to continue connecting (yes/no/[fingerprint])? yes
Warning: Permanently added '[192.168.7.62]:22222' (ED25519) to the list of known hosts.
root@b9e6def:~# uname -a
Linux b9e6def 5.10.31-v8 #1 SMP PREEMPT Fri Apr 23 15:16:49 UTC 2021 aarch64 aarch64 aarch64 GNU/Linux
root@b9e6def:~# ps -a
PID TTY TIME CMD
2389 pts/0 00:00:00 dbus-daemon
2506 pts/0 00:00:05 gunicorn
2716 pts/0 00:00:02 lora_pkt_fwd_sp
2773 pts/0 00:00:04 python
2797 pts/0 00:00:43 beam.smp
4110 pts/1 00:00:00 ps
You can see we’re running an aarch64 (64 bit ARM) distro on the Pi and we are logged in as root! You can now do whatever you want basically.
If you want to maintain persistent access you’ll definitely want to keep in mind that as the container / image receives updates it will likely replace the sshd_config files we modified but now that you’re in with root access you can essentially change anything you want / set up additional ways to maintain access.
Conclusion
This was actually harder than I thought it would be. That’s probably mostly thanks to the Balena cloud platform which seems to be replacing changes I try to make locally with a copy of the cloud configuration so I had to get a little bit more creative to get into this device.
I’m certain you could also just install Raspberry Pi OS on this SD to eMMC adapter as well if you wanted to completely wipe all of the Nebra software and use this box for something else completely. Be careful if you try reimaging the SD/eMMC as I have heard horror stories that your SD/eMMC card is configured with your Nebra’s keys and if they are lost you are basically screwed.
I backed up my SD/eMMC card’s original image completely so I still have them anyways but you should also do the same thing and back up the entire thing (all partitions, preferably a raw whole image of the card). Don’t think that you can just reimage it and go back (without taking precautions) as it seems to be a one way street.
Might I also suggest if you want to try running a different OS on the Nebra to just use a different SD card altogether and put that in the slot instead of the eMMC and leave the eMMC as-is for Nebra hotspot/Helium usage.
This is what I suspect I will end up doing unless it starts looking like it may be worth using as a Helium miner (I already have my Bobcat running at this location) and then I can simply swap back to the Nebra eMMC and take my own SD card back out.
Other Resources
Definitely check out my cryptocurrency ASIC miner security and hacking audit article here


")

 - Pictures / History")
Hello, do you have any idea if the Raspberry Pi CM 3+ module has internal built-in memory (EMMC) or is everything on this external EMMC card? Thanks!
Hello Tsvetomir,
I just opened it up and checked and indeed it’s just the “Lite” version of the module. You can see where the internal storage eMMC would be soldered on the board is empty.
Hopefully that helps!
I know this is old but for anyone else searching, the ssh key is changing because it’s loaded from the config.json file in the resin-boot folder. So open that on another PC, put it back in and you can ssh easily.
Hey Paul,
Thanks for the update! I’m not surprised they’ve tried to secure it slightly more. They definitely *don’t* want us doing this. I’m actually surprised it’s still that easy. Thanks for sharing this!