
P4wnP1 A.L.O.A. is a tool for the Raspberry Pi Zero W that allows you to plug a Pi into a host computer and send remote commands and share networking with a host computer all without any user interaction. A.L.O.A. stands for “A Little Offensive Appliance”.
The device is connected as a HID keyboard/mouse as well as a network interface to accomplish this. The device is automatically configured and does not require any special driver installation. It supports Windows / Linux / OS X. There’s practically no defense to this type of attack other than physically securing your USB ports.
The ALOA version is a successor to the original P4wnP1 which is still a very popular tool to use with a Raspberry Pi Zero W. The old version was very simple and could only deliver a payload and was basically a Pi version of the old “Rubber Ducky”. This is the alpha 1.0 release so there’s still some work to do to make things smoother and easier but this version is functional enough to start playing with.
ALOA aims to do much more than its predecessors by having trigger actions and multiple scripts ran based on those triggers. This allows you to adapt to changing environments and execute much more sophisticated actions.
On top of this, it is also a full Kali Linux distribution giving you all the power of Kali. This guide will help you get it installed and start experimenting with it. Let’s jump right into it!
Hardware

The Raspberry Pi Zero W is the wireless-capable version of the Pi Zero. It has a much smaller form factor than a full size Pi making it ideal for use in projects that benefit from a very small form factor while having a fully capable Linux PC.
Links: Amazon.com*, AliExpress.com*, Amazon.ca*, Amazon.com.au*, Amazon.co.jp*, Amazon.co.uk*, Amazon.de*, Amazon.es*, Amazon.fr*, Amazon.it*, Amazon.nl*, Amazon.pl*, Amazon.se*, Amazon.sg*

The SanDisk Extreme A1-A2 SD card has the best scoring SD card on Pi Benchmarks for years and is second in popularity only to the SanDisk Ultra (often included in combo kits). The application class (A1) means random I/O speeds (very important when running an OS) have to meet a higher standard. There’s no benefit on the Pi for A2 right now so get whichever is cheaper/available.
Links: AliExpress*, Amazon.com*, Amazon.ca*, Amazon.com.au*, Amazon.co.jp*, Amazon.co.uk*, Amazon.de*, Amazon.es*, Amazon.fr*, Amazon.it*, Amazon.nl*, Amazon.pl*, Amazon.se*, Amazon.sg*
Kali Image Getting the Image
UPDATE 3/18/2021: The Kali specific P4wnP1 image is no longer available and doesn’t appear to be distributed anymore but an updated version is available. Details below.
The good news is after a couple of years of very little activity on the project’s GitHub page the original developer mame82 released an updated version of the image
Grab the latest image for Raspberry Pi at the project’s GitHub releases page (the developer is now using the handle “RoganDawes” so if you see this don’t worry you are still in the right place):
Official P4wnP1 Releases GitHub Page
Download the img.xz file for the latest release (v0.1.1-beta at time of writing released 2/6/2020).
Write the image to your MicroSD card using your preferred method! The best way is to write a custom image using the official Raspberry Pi Imager utility but Etcher or even writing the image with dd will work.
Getting Started
There are several ways to connect to the Pi. My preferred way is to plug it into my computer and use the web interface / SSH to connect to it. I can then have the Pi connect to my home wireless and have an internet connection on Kali.
Plug the Pi into your computer. If you are on Windows you will see a interesting notification that Windows is installing and configuring drivers for a “P4wnP1 by MaMe82”. We can change this later to whatever we want but it’s a good sign for now that everything is working the way it should be.
Once initial configuration has finished we can now connect. Open a new tab in your browser and connect to:
http://172.16.0.1:8000
This is the P4wnP1 ALOA web configuration interface. From here we can easily start configuring the device and begin to play around.
Network Configuration
Let’s start by configuring your wireless interface so the Pi gets an internet connection. Go to the “WiFi Settings” tab. This is what you will see:
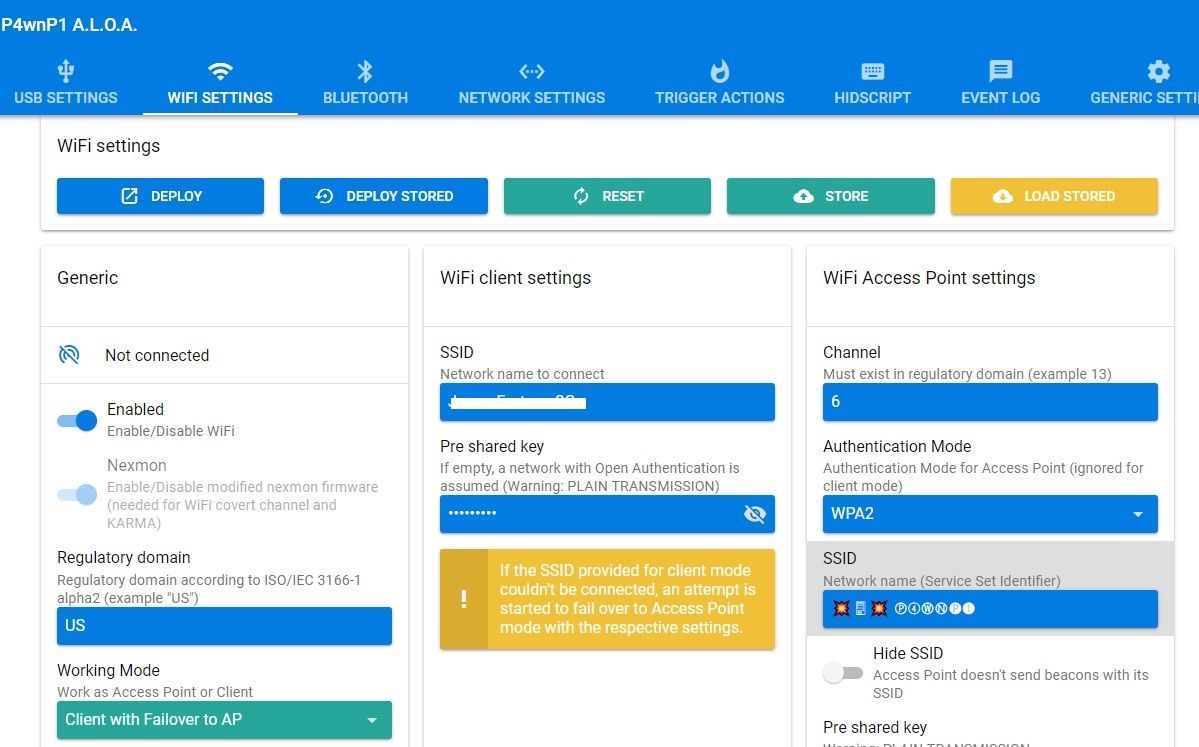
In the bottom left of your screen click the “Working Mode” dropdown and change it to “Client with Failover to AP” like I have in the screenshot. The WiFi client settings will appear in the middle of the page and you can enter your home network information. Now hit the “Deploy” button in the top left and the Pi will apply your settings.
Failover mode means that if the Pi can’t find or connect to your network it will start listening as an access point again. This makes it very easy to connect to the web interface when you take the device outside your home as it will fail to connect and start listening.
The SSID and pre-shared key to connect to the Pi wirelessly are along the right side of the screen. It comes prepopulated with a SSID of: 💥🖥💥 Ⓟ➃ⓌⓃ🅟❶ and a password of “MaMe82-P4wnP1”. You can actually completely configure the Pi without connecting it to the computer by just connecting to the SSID wirelessly. It is possible to get internet through the host computer the device is plugged in to but it requires additional configuration on the host PC (we’ll cover that later).
In addition to the wireless tab you have the network settings and bluetooth settings tab. You can click around these on your own as they are pretty self explanatory, but I will mention that it is also possible to configure the device through the bluetooth connection. Depending on the type of scripts you want to run it may serve you better later to connect over WiFi or Bluetooth so it’s good to know it’s there.
USB Settings
Go to the USB settings tab next. This is where we can configure the behavior and identity of our device for when it is plugged into a host.
On the left hand side of the screen you can configure all of the settings that control how the device identifies itself to the computer. You will want to change these because “P4wnP1 by MaMe82” is hilariously suspicious and likely already being detected by AV software. Pick some custom settings and make the device your own!
On the right hand side of the screen we have the gadget mode configuration options. The top two options (CDC ECM and RNDIS) are network interfaces that the Pi uses to communicate to Windows/Linux/Mac.
The middle options are related to HID. HID stands for Human Interface Device and appears to the computer as basically a mouse or keyboard. This is how P4wnP1 is able to send keystrokes and mouse movements to your computer. The computer thinks it is actually talking to a keyboard instead of our Pi.
At the very bottom you have a “USB Mass Storage” option which can mount a CD-ROM iso or a emulate a small flash drive.
HIDScript
Now that we understand that the Pi is impersonating a mouse and keyboard let’s go to the HIDScript tab and start having some fun. This is where we can write and load scripts that tell the Pi what to make the host computer do.
Press the “Run” button. A script will run that will open Notepad and tell you Hello from P4wnP1 and move the mouse around. Notice on the right side of the screen you can see the job running with a red X next to it. You can cancel jobs here by clicking the X. This also has a log of jobs that have been ran and whether they succeeded or failed.
Now try running some of the other examples included with the alpha release. There’s a lot of different programs including a “game” that opens mspaint and has movement keys to move around with. There’s a lot in these examples to help you build a HIDScript to accomplish what youa re looking to ultimately do with the tool.
Trigger Actions
Trigger actions one of the key features of the reboot of this tool. HID scripts stem from the original Rubber Ducky tool that simply ran a script to deliver a payload when inserted into the computer. Although the payloads have got far more sophisticated over the years the way they work (and the limitations of it) really haven’t. They deliver a weaponized payload and that is it.
With trigger actions you have a chance to respond to specific triggers with specific actions making it more like an application or framework. Let’s look at some of them below:
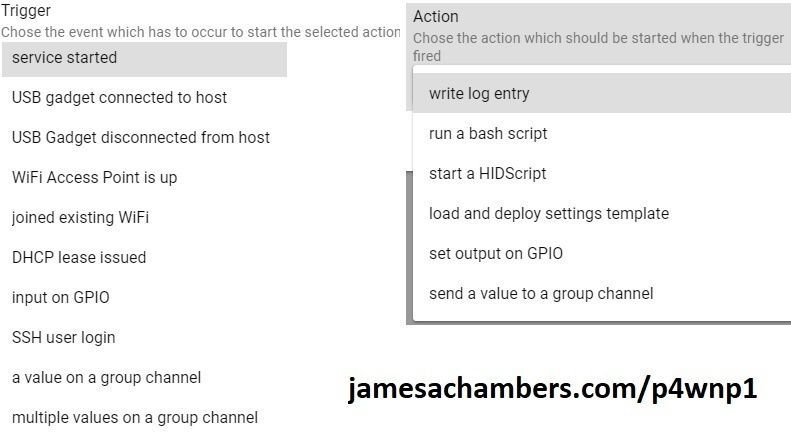
We can see a lot of very useful triggers such as “service started”, “USB gadget connected to host”, “SSH user login”, etc. The actions are very powerful. You can trigger a bash script, run a HID script to send a second/third/etc set of inputs, and even setting output on GPIO.
With this model your Pi can actually have a conversation with the host. You have the chance to react differently to different situations that may arise during execution on different hosts. This is more like a dance than the previous payload delivery model.
Accessing Kali
Of course you still have all of Kali Linux available to you from the Pi Zero. The easiest way to access them is to SSH in.
To connect with SSH simply connect to the same address that we used to access the web interface on port 22.
ssh 172.16.0.1
Log in with the default credentials of root / toor and you will be on the command line of Kali. If you connected to the internet by connecting to your WiFi via the web interface you will also have internet access from the Pi and be able to update.
I recommend doing a apt-get update && apt-get upgrade to get all the latest packages and fixes. The author says in the README that apt-get upgrade should not break anything related to P4wnP1 and I was able to do it successfully.
You may also install the full Kali Linux suite by typing
apt-get install kali-linux-full
This will download all available packages for Kali Linux giving you a complete full installation on your Pi Zero!
Templates
P4wnP1 has a feature that wraps all necessary HIDScripts and settings together called templates. This makes it easy to switch between different configurations without having to go change all the options one by one.
The example that ships with P4wnP1 ALOA alpha is the WiFi covert channel attack. This is basically a port from the original P4wnP1 script of the same name and function.
The attack launches a PowerShell window on the host and transfers/launches a script payload that allows you to control the host by connecting to the P4wnP1’s WiFi. This very powerful attack actually allows you to remotely control “airgapped” computers that aren’t connected to a network since the Pi itself becomes a wireless access point.
Deploying this attack is as easy as loading the template and pressing “Deploy”. Note that you cannot connect through ssh on USB while running this attack since the USB interface is busy communicating with the host. You need to connect to the WiFi specified in the P4wnP1 wireless settings tab and then you can reestablish your SSH session.
Before you hit “Deploy” make sure that the HIDScript for this attack has the right language for your country. The default for this one is US but if you have a different keyboard layout change it to your country in the HIDScripts tab.
After plugging in the “Deployed” state USB connect to the P4wnP1 WiFi access point and type the following to open the screen session that allows you to inject your keystrokes:
screen -d -r wifi_c2
Make sure to check out the following folders for more goodies:
P4wnP1 Bash scripts:
/usr/local/P4wnP1/script
P4wnP1 Legacy tools:
/usr/local/P4wnP1/legacy
Benchmarking / Testing Storage (Optional)
If you want to verify your drive’s performance you may want to run my storage benchmark with:
sudo curl https://raw.githubusercontent.com/TheRemote/PiBenchmarks/master/Storage.sh | sudo bash
If you search for the model of your drive on Pi Benchmarks you can compare your score with others and make sure the drive is performing correctly!
Conclusion
P4wnP1 ALOA is looking to evolve the tool’s capabilities past the previous version with trigger actions. It also aims to streamline the way these scripts are written in by moving code into pure Javascript rather than Ducky code. ALOA is much more similar to an application framework than a one-and-done payload. Indeed, the developer MaMe82 has this to say in his readme:
P4wnP1 A.L.O.A. is not meant to:
-be a “weaponized” tool
-provide RTR payloads, which could be carried out by everybody, without understanding what’s going on or which risks are involved
P4wnP1 A.L.O.A. is meant to:
-be a flexible, low-cost, pocket sized platform
-serve as enabler for tasks like the one described here
-support prototyping, testing and carrying out all kinds of USB related tasks, commonly used during pentest or redteam engagements, without providing a finalized static solution
-Mr. MaMe82
Some of these statements he makes here are a bit much. It’s not meant to be “weaponized” but it’s still called “P4wnP1″ and has the hilarious SSID title of”💥🖥💥 Ⓟ➃ⓌⓃ🅟❶ ” featuring emojis of a device exploding. Give us a break MaMe82!
But I really like his final point he makes in the quote. This framework can be used to carry out all sorts of USB tasks in a way we haven’t seen before. It may not be too long before we start seeing USB drives capable of running many different actions based on triggers that are unique to each environment.
There’s a lot more to know about P4wnP1 ALOA so make sure to visit the tool’s documentation located at: Official P4wnP1 Documentation Page
The documentation is very lengthy but with this overview it shouldn’t be as overwhelming as the first time I went through it. Have fun!
Other Resources
If you have a Raspberry Pi Zero you may want to check out my Kali P4wnP1 Linux guide here
If you have the 7″ official Raspberry Pi Touch Screen TFT display then check out my 7″ TFT for Kali guide



Hey mate, great article! One thing you forgot, HIDScript doesn’t quite work with other keyboards / languages other than those defined on the keymaps folder. Keyboards with extra keys are quite difficult to map (almost impossible!). Any ideas on how to create a custom keyboard layout on the .json with extra keys? Already tried modding some .json files on the folder but for some reason, the Y and Z keep appearing switched (despite being correctly set). So the problem must be on some extra key(s) that i have on my layout. Any help would be appreciated!
I have it set up as an access point so I can connect to it and control it from a phone. I try to go to the 172.16.0.1 address after connecting to the Pi’s network but it says connection refused. How can I open up that menu you showed in the tutorial from the access point?
Hey Tim,
To use the client via the WiFi interface use this IP address in your browser:
httx://172.24.0.1:8000How can one update the aloha?
Hey,
im looking for a P4wn1 img, that works on a pi 3b+ . The one for the pi 0w doesnt work
Thanks
Hey Colofdurty,
Unfortunately the 3B+ doesn’t support gadget mode. The only ones that currently do are the RPI Zero, Zero W and 3A+. It has to do with the way USB is laid out on the board.
James,
I’ve tried Raspbian (Lite) & Kali (ALOA), both images were replaced and redownloaded from the official sites. Meaning they were up to date.
When using P4wnP1 on Raspbian (Lite), I performed a full update and upgrade, which resulted in a call-back, stating I was up to date.
I’m out of all options but two.
1) Considering Kali is needed for several cross-application processes, with ALOA, I have decided to download Kali Lite (Or the equivalent) and attempt to install P4wnP1 on it. Perhaps with this, I can at least perform keystroke injection and exfiltration. The GUI is secondary to me, and all the dependencies should be met.
2) Replacing the SD card to the exact one you have used, or from a different company. Not sure, but something tells me the actual mounting or detection might have a problem with the SD card I have. (Sandisk 16GB Ultra, Class: A1). I’ll upgrade to (Sandisk 32GB Extreme, Class: A2)
Regardless. For the sake of the project, and my sanity, I have decided to return and replace the board. I will retry all options on the new device, and if the problem persists then I’ll make sure to make the issue more apparent to a dev. At this moment, I can’t logically rule out the possibility that I am an isolated incident. I shall keep you posted, this project is too good to give up on. As an aspiring pentester, this really ticks most boxes. Shame I can’t get it to work.
I think that’s smart. I’ll be honest and say that you will be both annoyed and glad when you get the new Pi Zero and it fires up and works immediately!
The distro should do what you are looking for (if that is writing CLI style HIDScripts). I hadn’t messed with the CLI tool much until I went to try it during our investigation but it basically just worked and worked immediately without any fuss. I also just updated to Windows 10 1903 and the gadget mode is still working nicely which is not the case for a lot of my older style gadgets that are not as easy to change IDs on.
Definitely drop me a line when you get your replacement!
UPDATE:
I have new erroneous outcomes. Joy.
After setting up, exactly, like you have (only diff being ip was 172.24.0.1), plugged in my pi via the data port, and saw nothing happen. No driver installation, nothing. Checking device manager, I see no new devices under HID, Keyboard, Mouse or even Universal Serial Bus. Can connect via SSH and web-GUI.
Command:
sudo P4wnP1_cli hid run -c'type("For everything, nay, anything holy on this planet. Just Work ffs.")'Terminal Output:
TempFile created: /tmp/HIDscript835671526Start appending to 'HIDscript835671526' in folder 'TMP'
The command just waited to be executed, but never did. The command does not timeout either. Using Mobaxterm instead of putty, inconsequential I know. But at this point I’m desperate.
Turned off bluetooth array using “sudo bluetoothctl” followed by “power off” . Ran the (HID) command again, no such luck. Do not think power supply/under-volting is the issue.
Even more information:
MaMe82’s previous projects fail to work on my pi0w as well, namely his P4wnP1 project (which ALOA stems from). Literally, having tried any and all duck/HIDemulationd projects on GitHub for the pi0w, I can safely say most methods and projects did not work.
Could this be due to a processor/hardware change? Could the new gen of boards be built to purposely fail as HID-emulation devices? As far as I can tell, the processor model number is the same as other pi’s which seem to work.
What could cause such an isolated incident on a standardized SBC, flashed with endorsed software & images?
Hey Malthe,
At this point a hardware fault even on a super mass produced board like this seems likely. Trying the old projects was a really good way to narrow things down. I have owned about 8 Pi’s from several of the first generation Model B all the way through the end and funny enough the only one I ever had fail on me was a Raspberry Pi 3B+. Granted I beat the crud out of them doing all my different projects and constantly reimaging/benchmarking/etc on it but they have been incredibly tough up until that one. Maybe quality control is starting to slip on newer devices?
My symptoms were extremely strange just like yours. Basically it started losing its connection to the Micro SD card in the slot and I’d have to power it off and power it back on again but it got worse and worse until finally it wouldn’t power on anymore at all.
As a last resort it might be good to download Raspbian Lite / Raspbian and do a full sudo apt-get update && sudo apt-get dist-upgrade -y on it and see if the USB starts cooperating or if they have quietly have released any firmware updates that might kick it back to life. Generally the vast majority of the firmware for the Pi is right on your SD card (although there are definitely some proprietary secrets/bits in there like the permanently burning USB boot switch etc.). If you go into Raspbian and it is working you may be able to copy the newer firmware right onto Kali’s firmware folder. There are all kinds of different overlays in there that control the different hardware and maybe your newer Zero W is giving it a hard time. I’ve found that the firmware used on these distros is sometimes the partially complete open source variant or a very old version and that copying the newer firmware can help with problems like this.
Worst case scenario is you could do a warranty return on the Pi. Whether this is easy or hard depends on who you bought it from (element14 and Canakit are easy to deal with, some of the other ones not so much). Let me know what happens!
I experienced similar problems to what you experienced and could not get the device to emulate a memory device, HID keyboard or mouse … untill I replaced my USB cable. So it was clear that one USB cable simply supplied power (charging cable) while the other one was a prroper USB data cable.
I know this is an old thread, and you probably fixed this, but when you run it, you need to have a text editor or something open. If you’re just doing “sudo P4wnP1_cli hid run -c’type(“For everything, nay, anything holy on this planet. Just Work ffs.”)’” directly to the hosts desktop, then obviously nothing is gonna happen. I’ve been playing around with it for a couple of hours now, and maybe late to the party, but I currently have it opening an image, downloading it, and closing the browser.
So I was facing a similar issue, but I believe I have it figured out. I believe you can only have 6 usb devices turned on if I remember the error correctly that flashed on my phone very quickly. It said I had 7 of 6 every time I tired to turn on mass storage. I’m not sure what change because a few months ago it was working just fine. So I was experimenting and turned off RNDIS, but if your on a windows machine you will loose connection. Same results with CDC ECM if your on a *nix system. If you turned one of those you will have enough slots to turn on mass storage and custom HID if needed. I was able to run scripts and write to mass storage. Hope this helps.
All steps followed, identically. Even the flashing software (Win 32 Disk Imager).
I am connected via the “data+power” port, i.e the second one. When connected I see no devices (That could be the pi) in device manager, the problem persists with all windows machine’s I have tested on. Cannot create USB partition for exfiltration either. No errors on boot (when connected via mini HDMI).
Probably my 7oth flash in 2 days. The suite seems to be fighting me if only I knew how to manually turn on hid-“Keyboard & mouse” services.
Could the problem be under-volting? Perhaps the hotspot is consuming excessive amounts of power to the point that the necessary voltage for data transfer over USB-type B is faulted? Not sure, can’t think of anything else.
Image used. Kali Nexmon, same one you have linked. Thank you for your continued help, a shame the dev didn’t see the similar post.
*USB-type A. My Bad.