
A “pwnagotchi” is a device used for wireless security auditing / hacking that captures the handshakes of any WiFi access points in range of the device. These handshakes can later be cracked. How difficult these are to crack depends on how secure the wireless network is. If the network is set up with the latest encryption standards and an extremely secure password (or is using WPA encryption) it can be nearly/essentially impossible. If the password is a common dictionary word it may crack within seconds.
It’s common and smart security practice for both enterprises and home users to check what kind of networks are operating within range. It’s common to find devices that are “broadcasting” a wireless access point used to share internet but this is often not intended / authorized. It’s also very common to find devices using extremely insecure passwords that will crack in seconds that are authorized to be on the network but need a more secure password. These are basically backdoors into your home / company and they can go for a long time without being caught when this is never checked for.
The “Pwnagotchi” tool automates this process. It will capture anything in range to be easily checked later for extremely insecure hashes (typically using hashcat or there are even online tools to find common hashes which we will cover). This saves a ton of time and can greatly improve your security. Today I’ll cover how to build a pwnagotchi setup as well as the steps to use it. Let’s begin!
Disclaimer
How you configure your pwnagotchi is extremely important and could even get you in legal trouble if you don’t know what you’re doing.
Understand that this is a serious tool and you must observe your local laws and regulations and be extremely careful with it. Only use it on your own networks or networks you are authorized to access/audit. Make sure to double and triple check you configure the tool for the correct mode that you intend to operate it.
Make sure you whitelist any networks in range that should not be audited. I will cover this in our initial configuration where we will create a whitelist.
Hardware Used

The Raspberry Pi Zero W is the wireless-capable version of the Pi Zero. It has a much smaller form factor than a full size Pi making it ideal for use in projects that benefit from a very small form factor while having a fully capable Linux PC.
Links: Amazon.com*, AliExpress.com*, Amazon.ca*, Amazon.com.au*, Amazon.co.jp*, Amazon.co.uk*, Amazon.de*, Amazon.es*, Amazon.fr*, Amazon.it*, Amazon.nl*, Amazon.pl*, Amazon.se*, Amazon.sg*

The Pimoroni Inky pHAT is a e-ink display for the Raspberry Pi. I’ve owned one for several years now and it still works perfectly! There are several color variations available (some of them have a third color, for example my third color it can do is red along with black and white) but availability may vary by country (I couldn’t even find some versions to link to for some countries).
These types of displays do not lose their screen contents when the Pi is turned off (even with no power at all). They’re an excellent choice for the Pi!
Links: Amazon.com*, AliExpress.com*, Amazon.ca*, Amazon.com.au*, Amazon.co.jp*, Amazon.co.uk*, Amazon.de*, Amazon.es*, Amazon.fr*, Amazon.it*, Amazon.nl*, Amazon.pl*, Amazon.se*, Amazon.sg*
Backup Battery
You will notice that my Pi Zero W has a battery. This is called a PiSugar device and I’ve covered it here. This essentially gives me a battery that lasts several hours easily without recharging which is more than enough time to cover a significant amount of distance.
Note: All Pis work
The Pi Zero W specifically is not a requirement (it is recommended and what the original project was developed on/for) but you can alternatively use a Pi 4* or a Pi Zero 2 W* (the prebuilt images work best with the Pi Zero W* but you can use pwnagotchi on any Pi according to the developers).
We are in an absolutely terrible Raspberry Pi shortage at time of writing so you may have to take whatever you can get and that will be totally fine. The Pi 4 even has an advantage that it can audit 5 GHz networks (the Pi Zero W doesn’t do 5 GHz). That may be a consideration for some people. If you need 5 GHz capabilities you should use a Pi 4. The Pi Zero 2 W also does *not* do 5 GHz surprisingly (definitely a missed opportunity in my opinion) so you will want a Pi 4 for that.
I ended up using the Pi 4 in the back of my car where it didn’t matter that it was a little bigger and I use the Pi Zero for on-foot network audits. Different tools for different jobs but they definitely have their place and all work!
The e-ink screen is also optional but it’s *really* cool and it gives you an actual display so you know what it is doing (definitely a much funner experience than seeing nothing or trying to access it remotely).
Alternative Screen Option (official screen of the project):
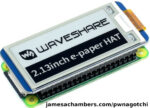
The Waveshare e-ink display is the officially recommended screen for the Pwnagotchi project. This is the newer generation that doesn’t suffer from the same “ghosting” effect the first versions of this screen had. These newer versions of the screen with all the glitches fixed are excellent!
Make sure you get the V2 version as the V3 version of the screen is not compatible yet. If you already bought the V3 version there is an imperfect fix here (but probably better than nothing).
Links: Amazon.com*, Amazon.ca*, Amazon.com.au*, Amazon.co.jp*, Amazon.co.uk*, Amazon.de*
Overview
To get an idea of the idea and spirit behind the Pwnagotchi project make sure you read their official intro. It’s worth it.
In a nutshell this device will capture WiFi handshakes from any device in range. There are different operating modes where it can be configured to passively collect this information or a more aggressive mode where it will try to communicate with the access points and initiate the handshakes. You can then take these handshakes and use them with a tool like hashcat to attempt to crack them and audit their strength manually or you can utilize Pwnagotchi’s plugins.
The plugins available for Pwnagotchi are extremely powerful. For example one of my favorite ones is the “wpa-sec.py” plugin. It will upload all handshakes to a well-known service called the “Distributed WPA PSK auditor“.
This means that weak handshakes you’ve detected will automatically have their passwords cracked online by this tool and be presented to you in a list. Here is some several year old data that this plugin collected during some audits:
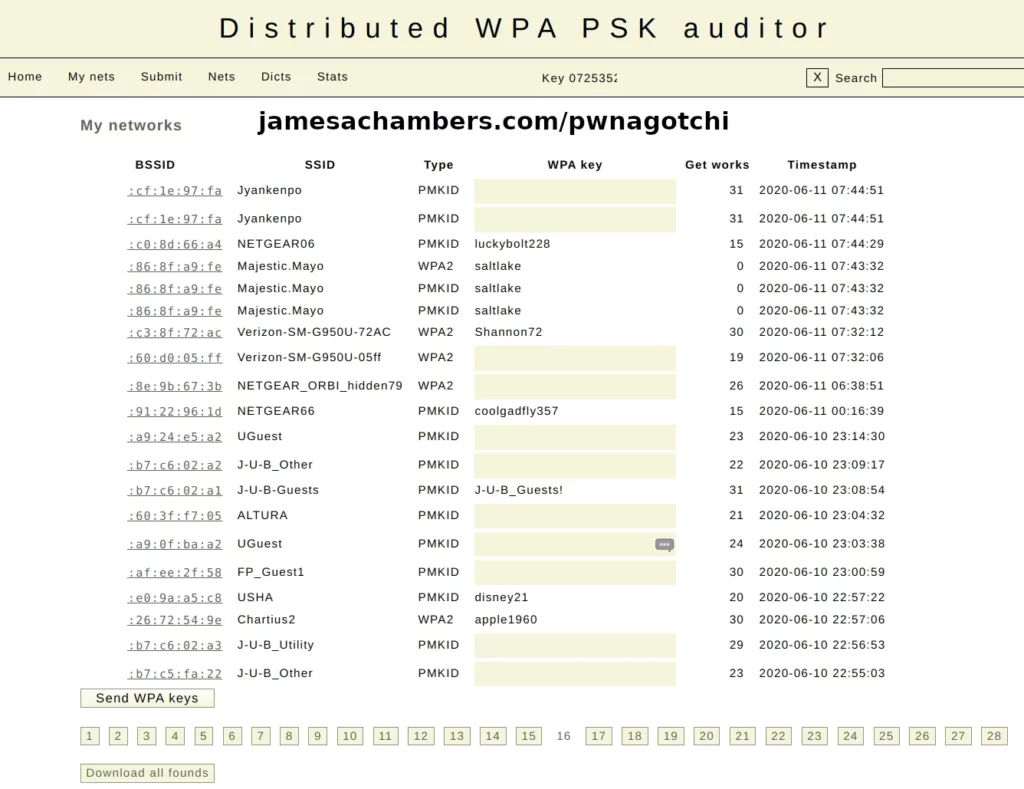
Here you can see exactly why this is useful as a security audit tool. Devices with weak passwords that are commonly used will immediately be revealed by a Pwnagotchi with this plugin running.
The success rate is not incredibly high (this page had more than some of my other pages which would only have 2-3 revealed passwords per page) but as you can see it’s more than high enough (alarmingly high for residential points especially) to be worth configuring this plugin and checking your network with it for weak links that an attacker will find just as easily if this automated tool is able to collect and crack them that easily with no human intervention.
If networks are following appropriate password length and complexity requirements and not using common dictionary words this tool will *not* be able to crack them. That is normal and what you should see. It’s incredibly useful though for revealing devices setup with inappropriate / default credentials in the environment (usually unauthorized or misconfigured, or more commonly these days the device is setting up access points by default without explicitly being turned on).
There are many more plugins available. The official Pwnagotchi plugins list and documentation is available here.
Build Instructions
Download Location
The precompiled image can be downloaded here from the official Pwnagotchi GitHub releases page.
Write Image
Write this image to your SD card (or SSD) you are going to use with the Pi as you would normally.
Once the image has finished writing eject it from your SD card writer and then plug it back in. We need to create some configuration files before we boot up the pwnagotchi.
Creating config.toml
If you followed the instructions in the previous section you should have ejected your SD card after writing the image and then plugged it back in. You should now see the “boot” volume. This is where we are going to create a new file right in the root / base of the “boot” volume named:
config.toml
This is the main configuration file that controls the pwnagotchi. Let’s start with the basics (from the official documentation):
main.name = "pwnagotchi"
main.lang = "en"
main.whitelist = [
  "YourHomeNetworkMaybe"
]

ui.web.enabled = true
ui.web.address = "0.0.0.0"
ui.web.username = "changeme"
ui.web.password = "changeme"
ui.web.port = 8080

main.plugins.webcfg.enabled = true

main.plugins.grid.enabled = true
main.plugins.grid.report = true
main.plugins.grid.exclude = [
  "YourHomeNetworkMaybe"
]

ui.display.enabled = true
ui.display.type = "inky"
ui.display.color = "black"
Here we are giving the device a name and we can whitelist any networks we don’t want the Pwnagotchi to test. We are also going to select our screen type here. The example uses the type of “inky” and the display color of “black”. If you don’t have a display you can leave the last 2 lines out. Use ‘waveshare_2’ for the alternative Wavescreen recommendation. Additional options are here.
The middle section enables the ‘pwngrid’ plugin (enabled by default unless we explicitly disable it even if you don’t include the section in the file, you need to set enabled and report to false) which helps map access points you’ve discovered. Obviously this is not appropriate data to share sometimes so you can disable this here by setting both enabled and report to false if you do not want this functionality.
We can change the language if your native language is not English. This is done with the “main.lang” parameter on the second line of my example.
Watch out for settings not sticking when using the preconfigured config.toml method (especially the display). More on this in the next section.
Important config.toml Note
I and others have found that the Pwnagotchi does not always seem to pick up all these settings (particularly when trying to configure the screen).
If you find that your screen isn’t functioning then it’s likely that your config.toml settings aren’t being picked up. If you are experiencing this then the best way to solve it is to manually edit your /etc/pwnagotchi/config.toml file.
There are two ways to do this. The easiest way is using a Linux-based PC. If you can put the SD card into that PC it will be able to see the “root” partition. Other operating systems will not be able to see it. On Linux you can simply navigate to /etc/pwnagotchi/config.toml and edit it with a normal text editor.
The second method is to log into the Pi using the default credentials (pi/raspberry) either via SSH or using a monitor and keyboard. Once you are in you will again simply edit the file /etc/pwnagotchi/config.toml. Make sure that your display type is correct and that the display is enabled in /etc/pwnagotchi/config.toml.
Enabling WPA-SEC
If you want to enable WPA-SEC like I am using in the guide first register for a free account at wpa-sec.stanev.org.
Once you’ve registered and signed in you will see an API key in the top right of your screen. Add this section to config.toml (be very careful with spacing):
main.plugins.wpa-sec.enabled = true
main.plugins.wpa-sec.api_key = "XXXXXXXXXXXXX"
main.plugins.wpa-sec.api_url = "https://wpa-sec.stanev.org"
main.plugins.wpa-sec.download_results = true
main.plugins.wpa-sec.whitelist = [
 "YourNetworkMaybe"
]
Additional Configuration
You should absolutely read the official “Configuration” documentation from pwnagotchi.ai. It’s very comprehensive and gets into the gritty details of everything you can do!
Usage
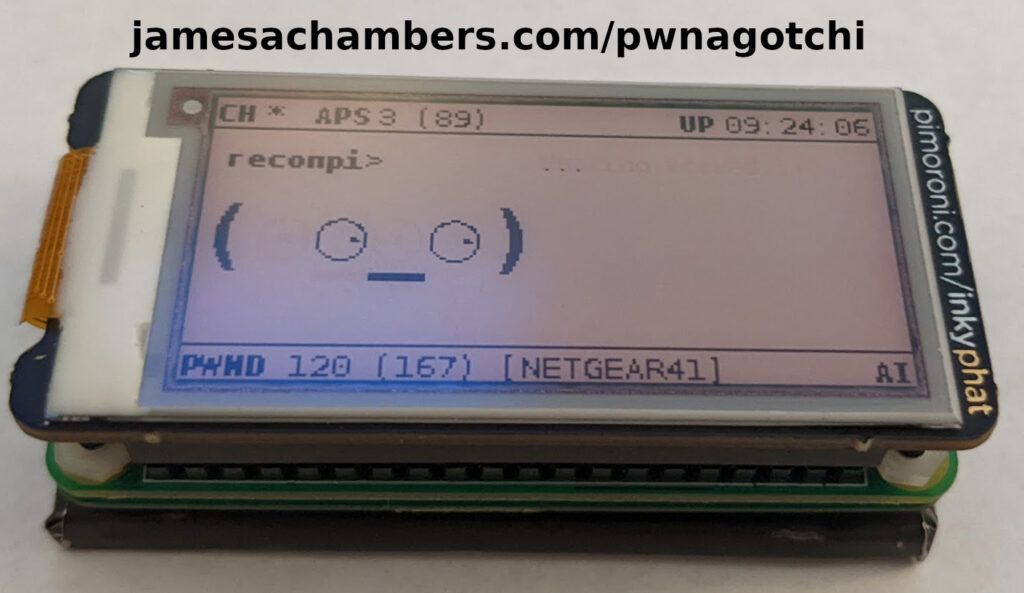
Once the Pwnagotchi boots up you will start seeing activity from both the Pi Zero W’s activity indicator lights as well as the attached display (if you have one).
The device is automated. If you did all of your initial configuration in the previous section then you’re ready to start gathering handshakes! The top right of the screen will have your uptime, the bottom left shows how many networks it has seen vs. how many it was able to successfully capture handshakes for (those are considered “pwned” in the display’s stats.
Simply move around the area you are auditing until you’ve collected all of the data you need.
There is so much more that the Pwnagotchi can do. It has a built in bettercap interface for example which is extremely powerful. My goal isn’t to cover every single thing it can do but to show you how to get started with it / the main capabilities. Definitely make sure you read the official Pwnagotchi usage guide here!
Retrieving Captured Handshakes
This is the most tricky part of using the pwnagotchi. There are several ways to connect to your pwnagotchi to download the handshakes. These are located in the folder:
/root/handshakes
You can use gadget mode. This requires you to connect your Pi Zero to your PC with a data cable. This will put it in a special mode where you can connect and download files from the device. You can also share your internet connection with the device in this mode. To use this mode make sure to see the official “Connect to your Pwnagotchi” documentation where they cover how to configure this on Mac, Windows, and Linux individually (too long to repeat here).
If you connect an Ethernet adapter you can simply SSH into the device normally.
My personal favorite mode since I use Linux on my main desktop PC is I can simply just take the SD card out of the Pi and put it in my PC. If you are on a Linux based PC you will be able to see the “root” partition and simply browse to /root/handshakes in your file explorer window. This won’t work on Windows as Windows will only see the “boot” partition.
Conclusion
I’ve been using this tool for years and have been kind of surprised more people haven’t caught onto how useful this is. Combined with the plugins I outlined this device will immediately detect devices on your property / networks / wherever that are broadcasting wireless networks with extremely weak credentials. You can then investigate the source and take the appropriate measures to secure them.
This is completely automated and portable. While it’s possible to do these kind of audits on a laptop or other device you’d be hard pressed to find setups that make it as easy as a Raspberry Pi Zero running this software makes it. Add the plugin capabilities and it rivals (and often outperforms) even expensive commercially available setups designed to do exactly this same thing.
I suspect it’s never got the recognition it deserves partially because it’s presented to be fun with the different faces and moods of the Pwnagotchi and seems more like a toy to people (probably because the faces and some of the other fun parts in the project are inspired by the Tomagotchi digital pets from the 90’s, and yes I had one as did almost every kid on the street I grew up on when that fad hit).
The faces more represent whether the AI is getting enough “mental stimulation”. If it’s showing sad and angry faces it’s just letting you know there’s nothing more for it to really do here and it’s time to move on. There’s a bit more to it than that and if you want more details then the official “How does Pwnagotchi work?” is a good resource and explains every face and some of the algorithms driving them.
It’s definitely not a toy. It’s an extremely powerful tool and I encourage anyone responsible for securing networks to try running a tool like this at your location and see what comes up. It’s not going to be the things you are thinking about (or probably even realize are there) and that is the point.
I bet you will be surprised what it finds and it’s better to be surprised by your own audit than by a breach!
Additional Resources
Another very awesome wireless tool is the HackRF + PortaPack Upgrade: Upgrading HackRF One to PortaPack H2
For strategies on how to get reasonably priced Pis check out my Raspberry Pi Shortage Survival Guide
If you want to learn how to use a SSD with your Pi check out my Best Storage Adapters and SSDs to use with the Pi article


Hello great tool
Do you know any compartible usb dongles/chipsets as many are not working correct in arm sbc’s
Thanks
Hey Jim,
The exact one I have is this Edimax one. It says the exact version I bought (this is from my order history so I’m 100% sure the one I have is this one) is unavailable but there’s a bunch of similar variations that are available.
I’ve used the Alfa adapters with it but those aren’t dongles and are kind of ugly. It’s an option though.
One important thing to get these working: you need to set your wireless country. To do this SSH in and run
sudo raspi-config. Choose “Regulatory Options” and then “WLAN Country”. You can set the wireless regulatory country in here. This will make some adapters that won’t work at all function perfectly as the regulatory stuff can be quite nasty (especially depending on what country you are in).If you mean Ethernet to USB adapters then I have these HP ones and I’ve also used the Microsoft Surface ones. Yes, ironically the Microsoft Surface ones for older ones (like the Surface or Surface Pro 1-3ish probably) work perfectly on all Linux distros and architectures I’ve tried (including ODROID and Orange Pi on arm and aarch64). I use these every day and they’re in all of my articles too so these are the exact ones I use for pretty much everything!
I think the key reason these specific Ethernet to USB adapters work is that they support gadget mode. I suspect this is why previous older ones like USB 2.0 adapters that previously were rock stars in Linux are less likely to work (they lack gadget mode support). The gadget mode support in most newer adapters seems to give a compatible standard that Linux likes even on ARM architectures. I suspect if you find other ones that also support gadget mode they have an excellent chance of working for the same reason.
Even on the older Orange Pi here’s what the Surface one looks like:
orangepi@orangepii96:~$ sudo lsusb[sudo] password for orangepi:
Bus 001 Device 002: ID 045e:07c6 Microsoft Corp. RTL8153 GigE [Surface Ethernet Adapter]
Bus 001 Device 001: ID 1d6b:0002 Linux Foundation 2.0 root hub
orangepi@orangepii96:~$ sudo lsmod
Module Size Used by
cdc_ether 3660 0
usbnet 17806 1 cdc_ether
mii 3565 1 usbnet
rdawfmac 208792 0
fuse 58945 1
autofs4 18232 2
Hopefully that helps!
Hello thanks for the response i ussually take tplinks wifi dongles but the newer ones they all have realtek 8188 or 8192 that the arns don’t like,i have a couple rtl8187 that have long range
Also they dont work correct,and some old ralinks,the atheros are good but who can find them now,all brands put the cheap realtek
Anyway i build dietpi on my orange pi one with armbian bullseye to upgrade the hotspot coz the cpu in the zero1 gets at 50% if one is connected and downloading,and used the only atheros i had.
I managed to activate the usb otg port to have a second usb without using a hub and maybe boot it from a flash drive if its possible
Orange pi one gets really hot without a fan it can reach 80 celsius even with the large heatsink i have put
The cpufreq scaling is set on schedutil by default should i set it to ondemand ? Or powersaver?
Thanks
Hey Jim,
ondemand and powersaver will probably reduce the temperatures on there if it’s still running really hot even with the heatsink!
hey nice job, I was curious if you had any clue on how to get it to work in a vm setting without the hardware?!
Hey rjd,
Thank you! So that should be possible theoretically. I assume by without the hardware you primarily mean without the Raspberry Pi Zero (understandable with current market conditions). You’d need to be using a VM that supports hardware passthrough and then you could typically pass through a WiFi card. You can similarly do this with Kali Linux on a VM (although it’s a bit easier without ARM images, more on that in a bit).
The good thing about the Pwnagotchi image is that it’s actually just Raspbian/Raspberry Pi OS underneath. It just has a certain set of services installed which you can actually manually do like this.
I think it will be easier for you than doing a manual installation as long as you have a virtual machine that can run ARM images. Any of the virtual machines designed to let you run a Pi image on your computer would work for running the image itself and you’d just want one that lets you pass through a WiFi card. You may have to adjust some of the config files if the hardware interface name ends up different than wlan0 but it’s definitely possible to configure this way since you can do a manual install like I linked to above.
It looks like people have even done this with Raspberry Pi OS x86_64 before using the manual install method. That would probably open up your prospects for having good hardware passthrough substantially since most virtualization software packages can easily run x86_64 images and not many can reliably run ARM images (especially with good passthrough). You can technically use any Linux according to the creators although the closer you are to the Pi / Raspberry Pi OS the more familiar the documentation (and people’s articles/comments) will feel to reality.
Hopefully that helps!