

I’ve had the original 900 mAh PiSugar UPS backup battery for the Raspberry Pi Zero for several years now and it’s an absolute game changer. With the wireless capabilities of the Raspberry Pi you have a completely portable and networked computer available that is extremely tiny. It’s much more capable than hooking it up to a power brick and is actually designed for the Raspberry Pi!
In this article I’ll cover how to set up a full UPS battery backup with several hours of available power using the the PiSugar as well as the PiSugar 2 and some of the shortcomings in the first version the 2nd revision fixes. Let’s get started!
Hardware Overview
The PiSugar 2 Portable is a full UPS system for the Raspberry Pi Zero W/WH. When power is lost the battery takes over seamlessly. A web interface and access to the UPS board is available to read the battery % and other stats from the device.
Links: Amazon.com*, Amazon.ca*, Amazon.com.au*, Amazon.co.jp*, Amazon.co.uk*, Amazon.de*, Amazon.fr*
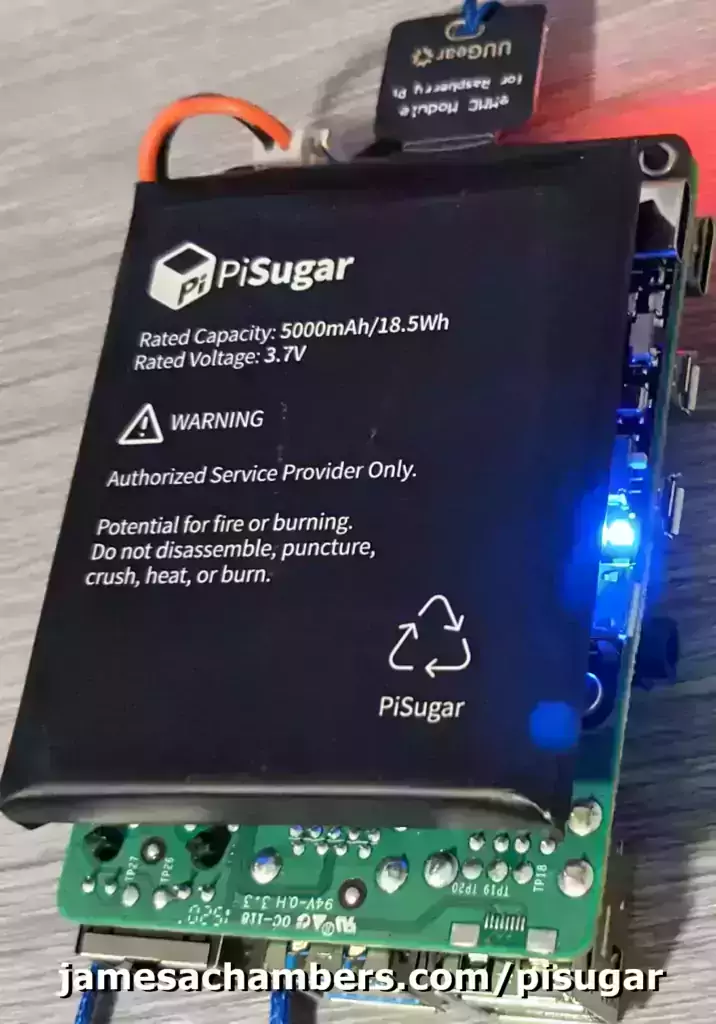
The PiSugar 2 Pro is for the Raspberry Pi 3B/3B+/4B. It has a whopping 5000mAh battery!
Links: Amazon.com*, Amazon.ca*, Amazon.com.au*, Amazon.co.jp*, Amazon.co.uk*, Amazon.de*, Amazon.fr*, Amazon.sg*
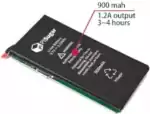
The thinnest version of the PiSugar (900 mAh) for Raspberry Pi Zero W/WH but has several critical limitations (read limitations section). Listings are combined with the 1200 mAh PiSugar 1 battery so be careful and don’t get the 1200 mAh PiSugar 1 since there is already a 1200 mAh PiSugar 2! May be available in some countries the PiSugar 2 isn’t available.
Links: Amazon.com*, Amazon.ca*, Amazon.com.au*, Amazon.co.uk*, Amazon.de*, Amazon.es*, Amazon.fr*, Amazon.it*, Amazon.nl*, Amazon.sg*
Installation / Usage (Pi Zero W/WH)
The PiSugar powers your Pi through two small pins on the back of the board. This is excellent because it leaves all of your USB ports completely open. This lets you fit the Pi into much tinier places than you would be if you had to attach it to a power brick.
Installing the board is as simple as attaching the PiSugar’s control board to the bottom of your Pi with 4 nylon screws.


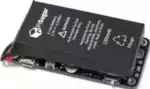
Here you can see the Pi on the bottom, the PiSugar control board with the power port as well as the power switch to the left of the power port. One press turns on and two presses turns off. There are four nylon screws attaching the control board to the Pi with 4 nuts securing the end of the screws. Here’s what the other side of the board looks like with the battery detached (Pi is now underneath in this shot):

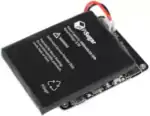
You can see the large silver rectangle on the PiSugar’s control board. That is a very powerful magnet that strongly holds the battery to the PiSugar. This is useful if you need to slightly adjust the battery as you can “slide” it on the magnet with a little bit of force. You can also detach the battery from the magnet altogether like the picture above and have a small bit of slack to work with if you wanted to place the battery in a different part of a case or enclosure. The magnet is powerful enough that you can use it to attach the Pi to other metal surfaces as well!
No soldering is required despite how the wires may look. Everything will come already soldiered together from the factory and is exactly how it came. Once you attach the slim PiSugar board with the 4 screws you’re finished with the build and are now ready to connect the power!
The PiSugar has it’s own USB power port and to start charging the battery you will plug your power source into this port.
The Pi will power on and you will see indicators light up. The PiSugar 900 mAh has 4 LED indicators for 25%, 50%, 75% and 100%. This is a really useful touch as you have a visual indicator at any moment if you are running your Pi off the UPS of how much power is remaining.

One cool touch of the board is that your green activity light will light up your screw and nut like the picture above. It’s really easy to see your Pi’s activity indicator which can be difficult otherwise when you start attaching cases and accessories.
PiSugar 1 Limitations vs PiSugar 2 (Important!)
I purchased my original 900 mAh PiSugar before the PiSugar 2 existed. It has several serious limitations you should be aware of that were fixed in the PiSugar 2 devices.
The first limitation with the PiSugar 1 is when you connect or disconnect the power cable your Pi reboots. When the power is cut you reboot and then when the power is restored you reboot again! That is obviously a devastating and almost laughably pathetic limitation for a device that is supposed to act as a UPS and it was not long before a new board was designed and announced to address this. This is a deal breaker if you are actually wanting the UPS functionality to protect your data or running processes. If you are just trying to use it as a mobile battery to run your Pi for hours wherever you want (I’ll be honest, for me it’s 90% this) then it’s not as big of a deal but is still annoying when you plug it in to recharge and it still reboots on you despite no actual loss in power (just a switch in the circuitry so the battery begins to charge).
The second limitation is that the PiSugar 1 has no way to interface with the Pi at all. That means you can’t get the battery level % through any applications or scripts because it doesn’t “talk” to the Pi. Sure it has the visual indicators, but what if you are using it remotely? This is also clearly not good and was also fixed in the PiSugar 2 which not only provides a way to interact with the control board through scripts to do things like safely shut down when the battery is low but even includes a fancy built in web interface!
So why on earth would anyone ever want a PiSugar1? There’s only one reason. To get the ultra-thin 900mAh battery you must get the PiSugar 1 as it was never made with the PiSugar 2 board. The 900mAh is getting difficult to find so make absolutely sure to triple check all listings if you absolutely have to have that particular one. Here’s a side by side:

I’ll try my best to link to 900mAh versions but the listings are often combined or “dual listings” between 900mAh/1200mAh so actually quadruple check as the links change constantly when different sellers list stock of each available. There is also a 1200 mAh PiSugar 1 but nobody should ever buy it (it’s not cheaper either) because there’s already a 1200mAh PiSugar 2 that doesn’t have any of the problems I just mentioned.
The PiSugar 2 1200 mAh is my recommendation for the Pi Zero W/WH unless you absolutely need to have the thinner battery to fit in the space you want or you just have to have the thin one and don’t care about the above limitations!
Installation / Usage (Raspberry Pi 3B/3B+/4B)
There’s only one size of PiSugar that fits the larger Raspberry Pis and that is the PiSugar 2 Pro with a whopping 5000mAh battery! That is more capacity than most cell phone batteries contain with the Samsung Galaxy S20 having a 4000 mAh capacity battery in comparison.
Installation is pretty much as easy as with the Pi Zero model. Screw the four screws and attach the PiSugar board to your device and connect the power to the PiSugar control board’s USB port.
Here’s what it looks like:

PiSugar2 Configuration
To install the PiSugar2 power management scripts/dependencies:
curl http://cdn.pisugar.com/release/Pisugar-power-manager.sh | sudo bash
The script will ask you to select which model of PiSugar2 you have and then finish. After that you can start accessing the PiSugar2’s web interface. It will tell you the address at the end of the script like this:
Clean up
Now navigate to http://192.168.0.3:8421 on your browser to see PiSugar power management
If you have any question,please feel free to contact us.
The PiSugar Team https://www.pisugar.com
Next we need to enable I2C so that we can communicate with the PiSugar2 board. Type/paste:
sudo raspi-config
Navigate to the ‘Interfacing Options’ -> ‘I2C’ -> ‘Yes’ and then exit raspi-config.
The nice thing about this web interface is you can access it from any device on your network. You don’t have to only access it from the Pi!
Conclusion
The PiSugar is more than just a UPS backup. It can be used to make the Pi more akin to a cellular phone where you can take it anywhere and have hours of stable power. I could see combining this with a solar setup and so many other uses where power might be available sometimes but not all of the time. It’s also great for critical systems where you may be writing critical data and can’t afford to risk a power loss interrupting that.
One word of caution: most of the negative reviews I see for the PiSugar devices are that the battery didn’t last as long as they thought it would. It depends on what the device is doing, whether you’ve overclocked etc. but don’t expect much more to 2.5-4 hours even highly tuned just to keep expectations in line. If you’re expecting 6+ hours that is very unlikely without taking extreme measures but it’s still an incredibly useful device and can be easily supplemented with an additional larger power brick plugged into the charge port or even potentially a solar kit.
The best part of this type of a setup is that it gives you the freedom to not worry about power fluctuations or taking the Pi somewhere that power isn’t easily accessible. That is it’s true value!
I would consider it an essential for every Pi owner because it really expands where and how you can use the device. It unlocks a whole new class of project possibilities and many of the most exciting projects require some sort of mobile power and this is a great way to get going with projects like that!


29.9.2022
Hi,
I bought the PiSugar2 some time ago but due to various delays only now do I want to implement it.
When the PiSugar arrived the screws were not included or lost in the opening.
What size screws are they M2 Nylon does not fit so I must assume that non-metric screws are used.
I must ask this rather banal question….
Can someone please inform me of the size of the screws and perhaps where in the EU I can buy them?
Thank you.
BD
Hey Bonzadog,
Welcome! So the screws should be M2.5. This should be pretty standard for the Pi as I tried accessories from my other PiSugars and other cases altogether and they fit:
The M.2 mounting screws are only M2.0. They’re too small. You should be able to get the screws for any Pi kit though. Check this out. There’s one from .de that costs €9 and has 500pcs (not all M2.5, various other sizes are included as well). You typically save buying it in bulk and will find the smaller listings to often be more expensive so getting a general kit (that is worth someones time to ship) that you can use for the rest of your life is a valid/smart strategy here while still only costing a single digit amount of euro.
I picked this one because it was the cheapest one I saw and it has the most screws. You’ll never run out of any of these sizes again and they do include the elusive M2.5 size. Hopefully that helps!
Hi! Next complaint is your page is infinitely better basic documentation than the github. That said, I bought both a pisugar2 and a pisugar pro. The pisugar2 was just screw on and go. I thought it was magic when I turned my pizerow on an off at the cord and nothing blinked, everything ran perfectly.
But I bought these for a car open auto installation, and I’ve not yet gotten that to play nice with the little zero. But I have a pi 4 so no issues, bought the pro.
The pro lights up and charges fine, but it is not doing anything to the pi board. What is the difference between green and blue led? Which way does the toggle go? With my installation I can’t see the label. Help?
Hey Eric,
Welcome and thanks for the compliment! I think I know what is going on. The PiSugar 2 “Pro” model for the Pi 4 has an “Activate” button on it. This button is not present on any other models.
When you connect the PiSugar 2 Pro it will start charging but the Pi won’t activate. If you just press this “activate” button once the Pi will immediately turn on and be powered by the PiSugar and turn on. I’m not sure why the “Pro” has this activate button but I saw the same thing with it.
This is a little cheesy but to be honest with you I turn the switch and then press the “Activate” button and if it doesn’t activate I flip the switch and then press it. Lame, I know, but I agree with your criticism for sure that this should be labeled better / easier to access. Hopefully that helps!
A problem not mentioned with the PiSugar 2 is that when power is applied to the PiSugar, you must toggle the switch to get the Pi to boot up. This is not how a UPS should operate, IMO. When the battery capacity goes below a preset level, it will shut down the Pi gracefully, but when power is restored the Pi will not come back up unless the switch is toggled, which means that it won’t work as an unattended UPS.
Hey Jesse,
Thanks for bringing this up! What you say is true about the out of the box stock behavior, and I agree with your conclusion as well, a true UPS should do that automatically with zero configuration or even having to think about it.
This doesn’t necessarily mean you can’t do it, but the configuration is a lot more complicated and there are some differences even among PiSugar 2 1200mAh devices we should cover briefly first here. First there are a couple of different versions of the PiSugar 2. There is the 4 LED model (the LEDs you count to figure out which version you have are the number of LEDs that indicate power, I have the 2 LED version and the old version is the 4 LED version). There is also the PiSugar 2 Pro for the Raspberry Pi 4/3/etc. which also has slightly different capabilities / firmware commands and an “Activation” button that is separate from the power switch.
There is a table that shows some of the capability differences here: pisugar-power-manager-rs. For example on the 4 LED version of the PiSugar 2 it doesn’t actually know the % the battery has. It doesn’t have any way to get it and it’s just an “estimate”. On the 2 LED version you don’t have any way to visually see what the charge is but the 2 LED version can actually talk to the battery and get the real % of battery you have left so it’s an actual reading from the control board/battery instead of just an estimate. There are other differences too and unfortunately they aren’t all written down in one place together.
My point with that previous section is the capabilities actually vary slightly even among PiSugar 2’s own revisions (and a PiSugar 3 is in development) so I want to be very specific here. I assume you are not talking about the PiSugar 2 Pro since that one has an “Activation” switch and you mentioned just the power switch. That narrows it down to the 4 LED or 2 LED 1200mAh model here.
There’s a couple of different ways to deal with this. The most common way is to set a “wake” timer and have it repeat all 7 days of the week. If you know the times you are going to have power (like with a solar setup for example) this works extremely well. For disaster recovery though you don’t want to potentially have to wait 23 hours 59 minutes in the worst case scenario if your wake up timer is just slightly too soon for there to be enough power to turn on.
Even this limitation is pretty easy to manage because in your auto shutdown script you can set the wake timer. Depending on the circumstances you may know a more ideal shorter time to wait. I 100% agree this is annoying though and it should do it automatically. It also works much better on the 2 LED model of the PiSugar 2 because the battery % reading is accurate and not a guess so this is important to point out as well.
The way I would deal with this is set my auto shutdown to something like 15-20%. I would then set the wake timer to 15-20 minutes (or whatever suites your needs, the lower the interval the less recovery time you will have as booting is unfortunately a power intensive process so keep it reasonable intervals or raise the % for shutdown to compensate) and have it boot up and check for charging status. If it’s not charging I would have it set the wake timer for another 15 minutes and shut down again if power still hasn’t been connected. You could keep this up for days / weeks / months depending on how big of a power reserve you leave yourself without ever losing “control” of the Pi even when it’s sleeping (since it’s sleeping on your behalf and is going to wake up and run your checks/instructions).
It’s an easy problem to manage through scripting (easy relative to how difficult this problem is to solve on the Pi and compared to some of the alternatives) but it definitely takes time and effort that shouldn’t be necessary. For an easy guide to get into the scripting for PiSugar (and by “scripting” I mean executing very basic commands like “get battery” with a one-liner) check out this from the PiSugar Wiki: PiSugar-Power-Manager-(Software). This is how simple it is to get the battery status for example (syntax may vary slightly based on your configuration / board revision):
echo "get battery" | nc -q 0 /tmp/pisugar-server.sockecho "get battery" | nc -U -q 0 127.0.0.1 8423
If you combine that with the command
get battery_chargingand then based on whether it’s charging or not use thertc_alarm_setto set the wakeup timer for 20 minutes. After that you can shut down and the wake timer will wake it up in 20 minutes and you can probe to see the battery charging status / % charged and decide whether it’s time to operate again or go back to sleep and conserve power.I agree with your caveat and conclusion though and am not defending the PiSugar or their design choices / limitations. It’s dumb that it works this way and a legitimate criticism. An “uninterruptable power supply” would do this automatically and let us all hope this is fixed on the PiSugar 3 (not released yet but there’s a GitHub repository for it so they must be working on it) or even better through firmware updates for the PiSugar 2 as well.
You shouldn’t have to implement all these tricks like you’re some sort of NASA engineer trying to get a rover to operate on 10W of power or something like that to get this level of reliability/functionality but it is still available/possible. I just wanted to say that it would not be correct to say that the PiSugar 2 can’t function with this level of reliability or these capabilities.
It would definitely be correct to say though that configuring the PiSugar 2 to behave this way without having to flip the power switch is an extraordinary pain in the butt and even these solutions are nowhere near as good as if PiSugar implements features that do this automatically at a certain charge % level etc. at the firmware level without having to boot the Pi up to check the levels / charging status. There is definitely room for improvement here from the PiSugar team!
Hopefully that helps you (if you already have one) or anyone trying to do this to know that no it won’t do it for you automatically without flipping the power switch but with some *very* basic scripting (like 5-10 line shutdown script for that checks these conditions and then responds based on your desired behavior) you can absolutely have this functionality by basically managing the critical power state yourself (where it’s below 10% or so). This way you know you’ll always be able to recover unless the power is gone for x amount of days/weeks/etc. You just have to kind of implement it yourself but with the RTC wake timer it’s totally doable! Maybe how to configure the PiSugar like this is a good idea for a future article since this comment got super long!