
This year I’ve been doing more with technology than ever and I wanted to build a workstation. As most of you probably know building a computer is an absolute nightmare right now. After navigating the process I figured I would share what I ended up building as it may give some people some ideas on how to complete their build. I also think the open frame builds turn out really cool and have some benefits I wanted to talk about as well.
This is a workstation grade build so it is not going to be cheap nor will it be limited to just gaming. I wanted to give fair warning though because if you’re trying to build a gaming PC you can do it for way cheaper than this. This is a PC that can handle 100 browser tabs, multiple VSCode instances and two dozen other heavily resource consuming running applications and also mine cryptocurrency while doing it and ask for seconds. You don’t want to pay for the ability to do that for a gaming PC. Since I am a gamer though as well this *is* a PC that plays games extremely well so that should spice things up a bit and throw in some odd choices that someone building a pure workstation might scratch their head at as well.
Everything in the build is generally attainable at reasonable prices (except for the GPU, but more on that later). Here’s what I ended up going with!
Hardware Used
CPU
The AMD Ryzen Threadripper 3960X has a whopping 24 cores and 48 threads! It’s much easier to get your hands on at a reasonable price in this crazy silicon market than a 3970X or higher so it’s still possible to build a system at a reasonable-ish price with this part.
Links: Amazon.com*, Amazon.ca*, Amazon.com.au*, Amazon.co.jp*, Amazon.co.uk*, Amazon.de*, Amazon.es*, Amazon.fr*, Amazon.it*, Amazon.nl*, Amazon.pl*, Amazon.se*, Amazon.sg*
RAM

The G.Skill Trident Z 3800 MHz CL14 is an insanely fast memory kit. The CL14 is extremely impressive and difficult to find because low CAS latency memory is highly desirable for specific ultra high performance situations like cryptocurrency mining as well as other tasks that require very fast memory access speeds.
Links: Amazon.com*, Amazon.ca*, Amazon.com.au*, Amazon.co.jp*, Amazon.co.uk*, Amazon.de*, Amazon.es*, Amazon.fr*, Amazon.it*, Amazon.nl*, Amazon.pl*, Amazon.se*, Amazon.sg*
GPU
The NVIDIA RTX 3090 looks like a gaming GPU but it is actually meant to be a workstation GPU replacing the old “Titan” series cards, and a fantastic workstation GPU it is at that! The RTX 3090 is the most powerful consumer-focused GPU NVIDIA currently offers and is the king. Not cheap, difficult to find in stock and usually is being scalped.
Links: Amazon.com*, Amazon.ca*, Amazon.com.au*, Amazon.co.jp*, Amazon.co.uk*, Amazon.de*, Amazon.es*, Amazon.fr*, Amazon.it*, Amazon.nl*, Amazon.pl*, Amazon.se*, Amazon.sg*
SSD
The Samsung 980 Pro 2TB (NVMe) is a professional grade SSD and one of the fastest in the world. The Samsung NVMe drives have been at the top of this category for a long time and are well trusted for both their performance and reliability / long life.
Links: Amazon.com*, AliExpress*, Amazon.ca*, Amazon.com.au*, Amazon.co.jp*, Amazon.co.uk*, Amazon.de*, Amazon.es*, Amazon.fr*, Amazon.it*, Amazon.nl*, Amazon.pl*, Amazon.se*, Amazon.sg*
Motherboard
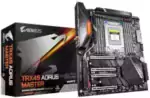
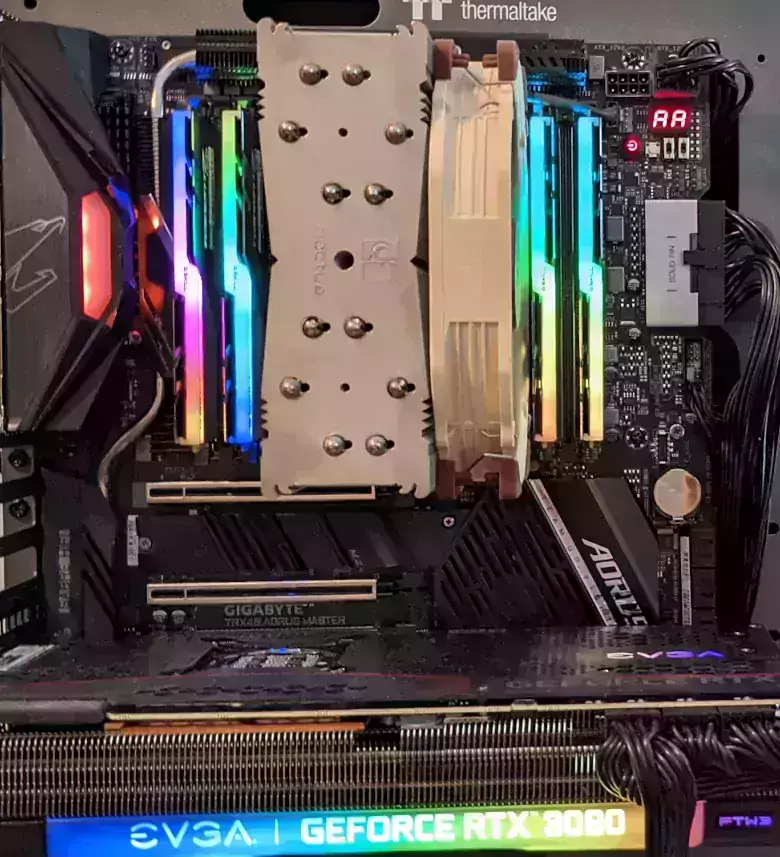
The GIGABYTE TRX40 AORUS Master is a widely available midrange board that includes WiFi 6, 5G LAN port + an additional 1G LAN port, and 4 PCI Express 4.0 ports as well as NVMe SSD and Quad Channel Memory support.
Links: Amazon.com*, Amazon.ca*, Amazon.com.au*, Amazon.co.jp*, Amazon.co.uk*, Amazon.de*, Amazon.es*, Amazon.fr*, Amazon.it*, Amazon.nl*, Amazon.pl*, Amazon.se*, Amazon.sg*
Case
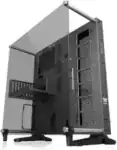
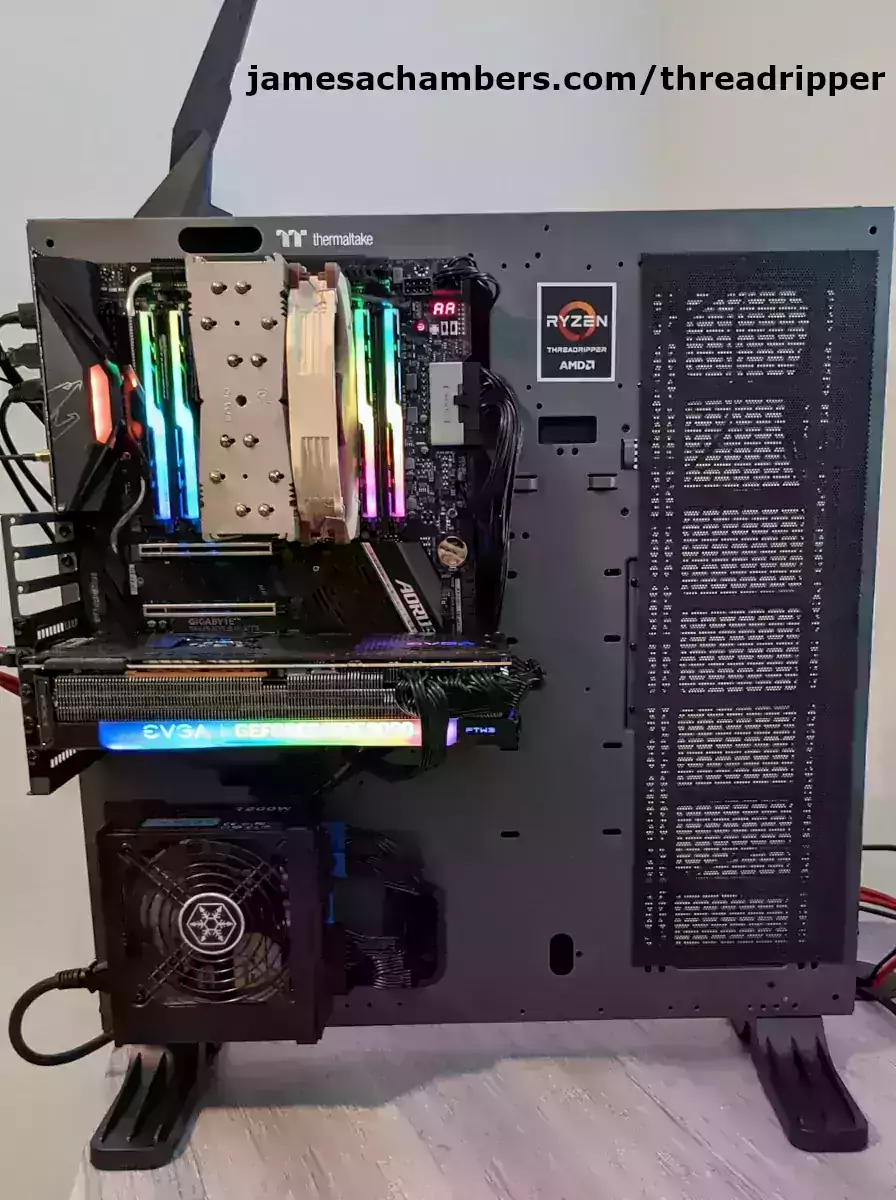
The Thermaltake Core P5 Tempered Glass Titanium Edition ATX Vertical GPU Modular Gaming Open Frame Computer Case (that’s a mouthful) is the big brother of a series of two open frame cases, the other one being the very popular P3 case. It supports several different mounting configurations and includes a PCI riser to even support different GPU mounts!
Links: Amazon.com*, Amazon.ca*, Amazon.com.au*, Amazon.co.jp*, Amazon.co.uk*, Amazon.de*, Amazon.es*, Amazon.fr*, Amazon.it*, Amazon.nl*, Amazon.pl*, Amazon.se*, Amazon.sg*
Or for the mid-size P3 alternative that is more easily available:
The Thermaltake Core P3 Tempered Glass Titanium Edition ATX Vertical GPU Modular Gaming Open Frame Computer Case (that’s a mouthful) is the smaller brother of the two open frame cases. It’s much easier to find than the P5 version.
Links: Amazon.com*, Amazon.ca*, Amazon.com.au*, Amazon.co.jp*, Amazon.co.uk*, Amazon.de*, Amazon.es*, Amazon.fr*, Amazon.it*, Amazon.nl*, Amazon.pl*, Amazon.se*, Amazon.sg*
CPU Cooler
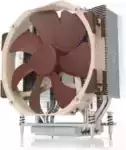
The Noctua NH-U14S TR4-SP3 CPU cooler is a full plate contact cooler for the TRX40 socket. It provides fantastic air cooling very quietly as Noctua is well known for. Few brands are really trusted to air cool a Threadripper CPU but Noctua is one of them you’ll find highly recommended everywhere.
Links: AliExpress*, Amazon.com*, Amazon.ca*, Amazon.com.au*, Amazon.co.jp*, Amazon.co.uk*, Amazon.de*, Amazon.es*, Amazon.fr*, Amazon.it*, Amazon.nl*, Amazon.pl*, Amazon.se*, Amazon.sg*
PSU

The SilverStone Strider is a 1200W 80 Plus platinum rated power supply. It’s fully modular and has a whopping 4x PCIe power connector slots which is why I have been using these in my builds.
Links: Amazon.com*, Amazon.ca*, Amazon.com.au*, Amazon.co.jp*, Amazon.co.uk*, Amazon.de*, Amazon.es*, Amazon.fr*, Amazon.it*, Amazon.nl*, Amazon.pl*, Amazon.se*, Amazon.sg*
Monitor (x2)
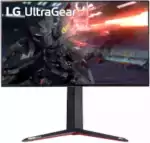
The LG UltraGear 4K 144Hz monitors are one of few monitors up to the task of fully utilizing a 3090. Stock can be hard to find but if you are going to get a 3090 it’s one of very few GPUs ever made that can actually consistently push out anywhere near 144 FPS to hit the 144Hz refresh rate these monitors can do. Absolutely stunning low profile height adjustable monitor with very narrow bezels.
Links: Amazon.com*, Amazon.ca*, Amazon.com.au*, Amazon.co.jp*, Amazon.co.uk*, Amazon.de*, Amazon.es*, Amazon.fr*, Amazon.it*, Amazon.nl*, Amazon.pl*, Amazon.se*, Amazon.sg*
Closer Motherboard Shot
Parts Availability Choices and Tips/Strategies
Many of the part choices were because of availability. I would have liked to have built with the 3970X theoretically but it was being scalped for 2X MSRP. The prices are really starting to come down though recently on all AMD CPUs as they are one of the companies that has been shipping and shipping and shipping and CPUs are quickly becoming one of the easier parts to get again (even high end threadripper parts)!
My RAM choice may be difficult to find but I chose a particularly low CAS latency one since it’s helpful for some of my applications. You can still get a 3800MHz kit (even the same brand) that will have wider availability and a slightly lower price. It’s definitely worth it to buy a high MHz memory like this for the Ryzen platform since they can actually take advantage of these speeds whereas Intel hits bottlenecks that make sticks of memory a complete waste of money instead of just mostly a waste of money but still having some measurable performance gains. Mine ran at 3800MHz out of the box without any overclocking or tinkering on the stock motherboard settings (it even automatically applied the X.M.P. enhanced memory profile these fast sticks come with).
Now let’s talk about GPUs. They’re an absolute nightmare to buy still and there’s really no “different” GPU you can buy that will alleviate this unlike *everything* else on my parts list. I got this 3090 RTX in November and paid a ridiculous scalped $2399 price for it. It pains me to say it but that was a bargain in retrospect as they are now 3K+ on Amazon minimum and that is down from 4K a month or two ago! The best GPU to get is the GPU you have the opportunity to buy or already have.
If you are getting a build together you should start looking for GPUs *immediately* as you will want to subscribe to the stock checking lists, get on the EVGA waiting list, check NewEgg and all of those sites 50x a day, etc. The GPU market is particularly dicey because it has all the silicon problems compounded with a cryptocurrency mining boom as well as a work from home renaissance that is demanding desktop grade equipment at home. I wish I had better GPU news but I’m guessing most of you know how bad the GPU situation is right now and there’s just no easy way around it.
TRX40 motherboards in the mid range are definitely obtainable. Some of the ultra high end boards are still hard to find such as the “Creator” series boards that are typically over $1000. I originally tried to get a MSI motherboard but had a *lot* of trouble getting that and went with the Gigabyte which has actually been great. You shouldn’t have much trouble here unless you’re looking for a very specific ultra high end.
PSUs big enough to run a Threadripper setup + a 3090X reliably are expensive but they are much easier to find than a few months ago when they were almost impossible for a while there. Stock seems to be returning to normal. SSDs you won’t have any trouble with right now either. When Chia cryptocurrency mining was booming the high capacities were expensive for a while but that has really fizzled out and prices seem to be back to normal and stock is widely available. CPU coolers are also easy to find right now and prices are normal.
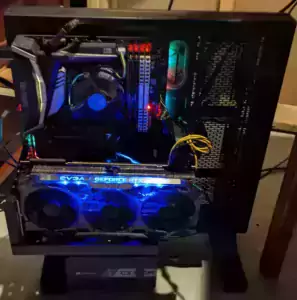
The P5 case availability depends on your region. The P3 case is typically more widely available if you are having trouble finding the larger P5 variant. The P3 case is also a great open bench build meant more for mid-size boards but I have had my 3090 mounted on that chassis as well so check for a P3 if you are wanting to do an open frame build and can’t find the P5. Here’s my old Intel build on a P3 frame for comparison:
Last but not least the monitors. 4K 144hz monitors are still pretty expensive. The good news is the availability has been much better than it was a few months ago. All of these choices are available. Prices are still a little high on them but that’s because stock has been so low that it’s taking some time for the prices to gradually return to normal. Tariffs may also be at play in some countries for these and a few other parts.
Open Frame Benefits
The primary benefit of an open frame setup is cooling. You don’t have to fight with the case to exhaust the hot air coming off your heatsinks. In our office we also have a ceiling fan which keeps the air circulating and is an ideal setup. You can also mount an open frame computer to the wall. The P5/P3 cases even have mounting support to do this!
It’s a lot easier to work with if you make a lot of changes to your technology around the house all the time like I do. I really like that the open frame setup feels just like having everything on a workbench!
Another huge benefit is cleaning. It’s so much easier to clean an open frame. I use my handy handheld duster tool and can clean the entire computer in about 20 seconds. No opening cases or dust collecting inside them or the screen traps. It has been great!
Build Challenges / Tips
CPU / Socket
The new TRX40 socket for the Gen 3 Ryzen Threadripper series is quite a bit different from other sockets if you’ve built other AMD or Intel computers before. The first big thing that’s different is the socket is a giant rectangle with 2 sides longer than the other instead of a perfect square. The second thing that’s different is the processor comes with a plastic “tab”. The only other place I’ve seen tabs like this is with server grade CPUs such as the Intel Xeon family. There are typically two protective covers you take off a new motherboard. One will be in the CPU slot and will slide out (this is where you will slide the “tabs” of your processor in) and the other one will be covering the CPU socket itself. Do not ever touch the CPU socket itself as it has the very sensitive pins that will bend and mess up your board (they’re extremely difficult to bend back) and is why they include a second protective cover specifically for that.
They give you a special tool with your CPU that you use to tighten the CPU and you have to both tighten the screws in the right order as well as open the socket back up in the right order. There will be big printed numbers on your socket showing which screws are which. It’s 1-2-3 to close and 3-2-1 to open. One tip with the tool is you should tighten the screw until the tool “clicks”. No more, and no less. Don’t start trying to tighten it again once it clicks, once it clicks it’s done.
It may take you several attempts to seat the Threadripper processor correctly as it is infamously sensitive. If one screw is too tight or too loose the board won’t even post. It can be very difficult to diagnose some of these issues as well when you’ve never built one of these systems before. Why? Because you probably don’t have any of the parts that go in this grade of a system just laying around. I have a whole PC graveyard of parts but nothing worthy to even be slotted into these PCI Express 4.0 systems running at 3800MHz RAM speed etc. This made my normal strategy of swapping things to narrow them down ineffective.
I recommend watching a YouTube video of someone doing this or having someone who has done it before with you when you attempt it the first time. It’s not very difficult, but it’s different enough and there’s enough pitfalls that you’ll really have a better experience if you prepare and if you’re really careless/unlucky you may damage the socket if you don’t understand how it is supposed to go in the socket (not directly, you use the tray with the blue tabs and slide it in there, and then that tray gently puts the CPU into the socket and you do the 3 screws with the CPU tool.
Motherboard Clearance – Watch your standoffs!
Another critical tip about the TRX40 motherboards (especially if you use a P5 or P3 Thermaltake case): there is extremely low clearance for the motherboard and pretty much anything there that doesn’t belong will short it. I had to actually take the rubber mounts for the cable channels off because the Gigabyte motherboard has a protective plate underneath your main motherboard. It has two layers basically! Without taking the rubber mounts off the Gigabyte would not mount flush to the standoffs.
Be extremely careful that your motherboard is not making contact with any metal on the case. TRX40 motherboards have this really weird thing I haven’t seen much before which is that they have a ton of places that can be shorted against your case than any other board I’ve ever seen. Some motherboards even have “no standoff warning zones” for TRX40 motherboards.
Do not place standoffs where your motherboard doesn’t have a hole. This is all it takes to short a TRX40 board is one standoff that doesn’t belong (you can do this with other types of motherboards too if you put standoffs on the holes that are meant for smaller motherboards instead of just the ones for your size motherboard) but I guarantee if you if you place even a single wrong one your system won’t even post (or if it does you’ll wish it didn’t).
Be advised on TRX40 boards that not all ATX standoff spots may be used. It’s normal (and required) to leave them empty if there isn’t a hole on your motherboard for that standoff even if on your case it’s labeled “ATX”.
I am not sure why these motherboards are running power that can be so easily shorted out by just placing what would normally be a correct standoff on one that they don’t want you to use. The MSI TRX40 Pro board has a ton of standoff warnings and “no standoff zones” that you will want to observe. The Gigabyte board doesn’t even trust us that much and made the board have a bottom protective plate to prevent shorting (as mentioned earlier I had to remove the rubber mounts from the case) but that is how big of a problem it is on these boards and you should definitely watch out for it!
Thermaltake P5 / P3 Case Tips
You can mount your GPU and motherboard several different ways. On my P3 build I mounted my GPU vertically and used the riser but on this build I used my standard PCI socket layout. I may switch it later as it is pretty easy to do and both the P3 and P5 come with a decent quality riser included. You can even mount your motherboard inside the case if you use the included tray but that really seems like it’s meant for much lower power systems and I strongly advise against that.
I leave the protective glass the cases come with off the top and stay with the open frame case. I doubt it would have enough clearance with the Noctua cooler but if you went with a shorter cooler or water cooling / an AIO then you could absolutely use the tempered glass that comes with the case.
It’s definitely easier during your build to not install the “feet” on the case yet. Leave it flat to do all of your installation and do the feet very last otherwise they just get in the way!
Monitor Tips
One critical thing to understand about 4K at 144Hz is that you actually need 8K cables to run it. Why? Because the cables that are rated for 4K are rated for 60Hz and not 144. They can’t handle it.
You will actually need to get 8K display cables. Fortunately LG does give you one of the proper DisplayPort cables with the monitor but it’s quite short. I ended up buying longer 8K monitor cables and it has worked fine. If you ignore this problem your screens will turn black and flicker so it’s definitely something you want to make sure you pay attention to!
Performance
I’ve just completed the build so I haven’t tried any overclocking yet. Let’s verify all of the settings/components:
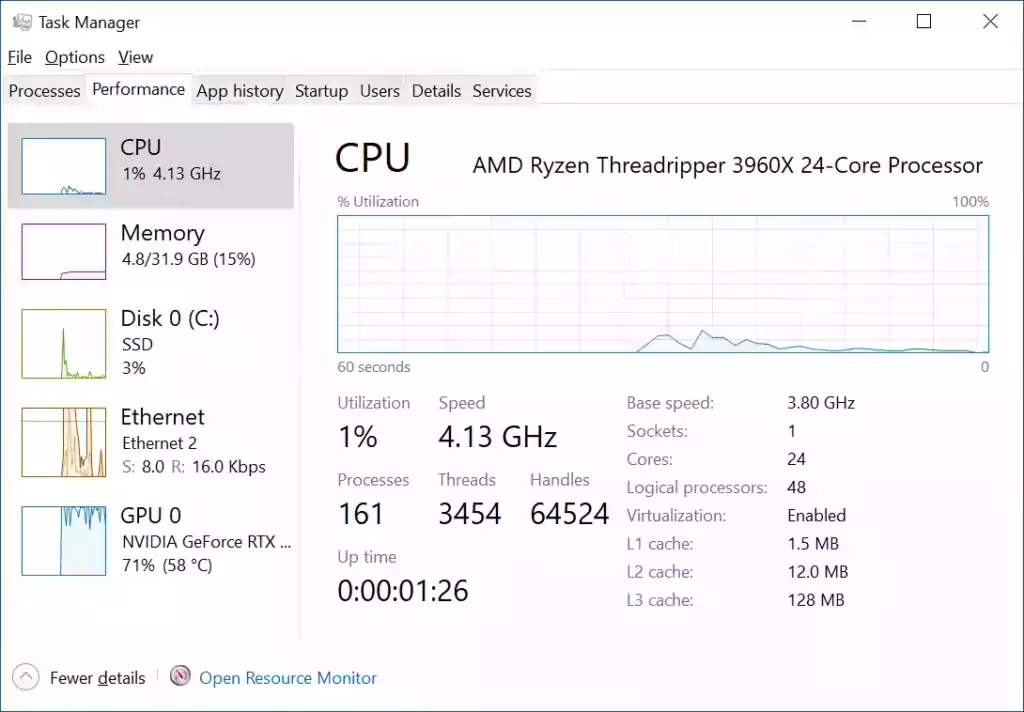
Perfect. We have all 24 cores and 48 logical processors activated. Now let’s check the memory tab:
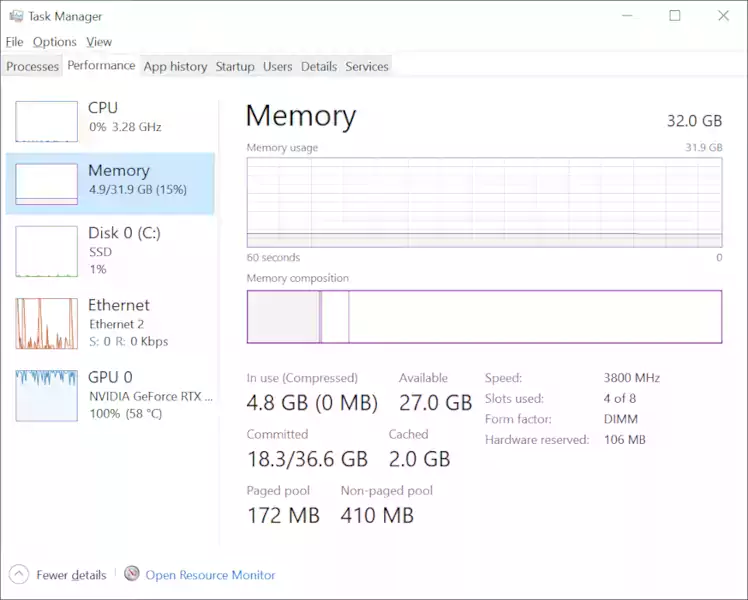
3800MHz speed matches what it should be. Let’s run a quick CPU-Z benchmark:
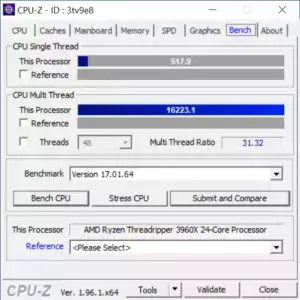
You can also view my full CPU-Z validation for the whole system here.
Conclusion
It’s definitely still possible to build a gaming and even workstation grade PC in 2021! There are definitely challenges, especially with GPUs, but I’m very glad I navigated the market and built it. I don’t expect anyone to pick the exact same set parts of me as the beauty of building your own computer is you can get exactly what you need / want but I figured I’d share what worked for me.
The Threadripper PC is just a different class of performance than anything I’ve ever experienced before. Combined with the quad channel 3800MHz memory and the PCIe 4.0 980 Pro NVMe SSD / 3090 GPU (also PCIe 4.0) and things are just absolutely wild. I can have as many VSCode instances / cryptocurrency miners / browser tabs / multimedia / compression / video encoding all going literally at the same time. That is exactly what I needed to continue to push the envelope on learning about new technologies and writing content!
Hopefully it helps some of you out there who may be trying to build a powerful machine think of some different paths/choices they could take to still end up with an extremely powerful machine without paying scalper prices or having to wait until 2023 to complete their build!
Other Resources
For the ultimate canned air / duster replacement to clean your electronics check out: A Good Alternative to Canned Air / Duster for Electronics


Thanks for the great write-up. Looks like quite the beast of a workstation and I hope it serves you well for many years!
Hey Jeff,
Thank you very much for the kind words!
A few months later here the build is still as-is/unchanged and has been great. Several VSCode instances along with other IDEs and 50 browser tabs is no problem. Even when compiling/building things there’s so many cores / such fast memory that nearly everything is instantaneous! Even on a great 6/8 core Intel CPU this was never the case and using my old Intel 9900K feels like using a Fisher Price toy computer in comparison!
If you are like me and have worked with high grade Intel systems/computers for a long time you can feel the difference for sure. This is a different performance class. Normal stutters/hitches on Windows clear the fastest I’ve ever seen on this combo.
I also hope it will serve me well for years to come but I wanted to take the opportunity from your comment to give a quick update that I haven’t had to change anything / make any changes since I wrote this, it’s perfect!