

Official support from Canonical for the Raspberry Pi has come a long way. We can now install officially supported Ubuntu on the Pi! In my previous guide for Ubuntu 18.04 on the Pi the Raspberry Pi was not officially supported yet and to be honest the experience was pretty janky.
The previous LTS “unofficial” release had so many problems I actually rolled my own image with dozens of fixes to common ailments before I quickly realized that maintaining a Linux distro, even in such a limited capacity as patching in and distributing fixed binaries, was a monumental undertaking.
Fortunately the current Ubuntu 20.04 LTS release is officially certified for the Raspberry Pi. This combined with Ubuntu’s full 64 bit userland/system environment allows you to take full advantage of the 8 GB Pi’s memory without per-process 3GB memory limits (very useful if you are doing something like running a Minecraft server and want to allocate almost all of the 8 GB to it) means there has never been a better time to give Ubuntu a try on the Pi.
This guide takes it a step further and shows you how to get Ubuntu 20.04 / 20.10 / 21.04 / etc. working with a SSD. Let’s get started!
Equipment Used

The Kingston A400 has been a great drive to use with the Pi for years. It’s reliable, widely available around the world, has low power requirements and performs very well. It’s also very affordable. This drive has been benchmarked over 1000 times at pibenchmarks.com and is the #1 most popular SSD among the Pi community!
Links: AliExpress*, Amazon.com*, Amazon.ca*, Amazon.com.au*, Amazon.co.jp*, Amazon.co.uk*, Amazon.de*, Amazon.es*, Amazon.fr*, Amazon.it*, Amazon.nl*, Amazon.pl*, Amazon.se*, Amazon.sg*
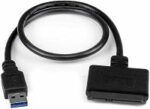
The USB 3.1 variant of the StarTech 2.5″ SATA adapter works well with the Pi 4. The USB 3.0 variant doesn’t have firmware updates available and is not recommended.
Links: Amazon.com*, Amazon.ca*, Amazon.com.au*, Amazon.co.jp*, Amazon.co.uk*, Amazon.de*, Amazon.es*, Amazon.fr*, Amazon.it*, Amazon.nl*, Amazon.pl*, Amazon.se*, Amazon.sg*
NVME Option (powered USB hub required, see “Power Requirements” section in my more generalized Raspberry Pi 4 USB booting guide):
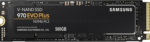
The Samsung 970 EVO Plus is a fantastic drive and has fallen in price substantially. It’s widely available around the world. The smaller capacities (such as the 250GB version) of this drive are perfect for the Pi! This is the top performance option without going into the “Pro” series of the lineup which are much more expensive.
Links: AliExpress*, Amazon.com*, Amazon.ca*, Amazon.com.au*, Amazon.co.jp*, Amazon.co.uk*, Amazon.de*, Amazon.es*, Amazon.fr*, Amazon.it*, Amazon.nl*, Amazon.pl*, Amazon.se*, Amazon.sg*
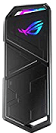
If you really want to take things over the top the ASUS Rog Strix M.2 NVMe enclosure uses the latest USB 3.2 Gen2 specification, is RGB capable and works with the Pi! Unsurprisingly, adding the extra lighting does take extra power! A powered USB hub is also required for this enclosure. More widely available than the ICY BOX but tends to be on the expensive side.
Links: AliExpress*, Amazon.com*, Amazon.ca*, Amazon.com.au*, *Amazon.co.jp*, Amazon.co.uk*, Amazon.de*, Amazon.es*, Amazon.fr*, Amazon.it*, Amazon.nl*, Amazon.pl*, Amazon.se*, Amazon.sg*
Prerequisites
Verify Power Supply Size (3.5A strongly recommended)
Check your Raspberry Pi’s power supply size and make sure it is delivering at least 3.5A. There are a lot of USB C adapters for the Raspberry Pi that are only 3.0A. These will typically work fine, until you plug in something like a SSD which draws power from the Pi and there is nothing left to give.
Most SSDs are quite power efficient but HDDs draw significantly more. Older generations of SSDs used quite a bit more power than newer ones as well. If you are using an older drive or a drive that you know is power hungry you need to pay extra attention to having a quality power source with plenty of capacity.
A good alternative option to relying on the Pi to power the drive is using a powered USB hub* so your drive doesn’t need to draw power from the Pi’s limited power budget. Make sure you get one that is compatible with the Pi as some powered USB hubs won’t work properly with it so check the reviews and do your research to make sure people are using it successfully with the Pi.
Using a 3.5A power supply* or powered USB hub* will ensure your drive is getting enough power without impacting the Pi’s stability.
Recommended Power Solutions
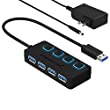
The Sabrent powered USB hub delivers a whopping 2.5A of dedicated power for your USB attached devices. This is almost as much as the Pi adapter itself is rated for (3.0A). It will easily power the most thirsty of setups such as NVMe enclosures.
Links: Amazon.com*, Amazon.ca*, Amazon.com.au*, Amazon.co.uk*, Amazon.es*, Amazon.it*, Amazon.nl*, Amazon.pl*, Amazon.se*
Note: Make sure Amazon doesn’t try to take you to the non-powered version and that it’s the one with the AC adapter that plugs in to provide extra power
The CanaKit 3.5A adapter has an extra half an amp (500 mA) of capacity to give some breathing room to your accessories. This is bigger than the official Pi power supply which provides 3.0A.
Links: Amazon.com*, Amazon.ca*, Amazon.com.au*, Amazon.sg*
Verify Storage Adapter Compatibility
You will need a USB 3.0 storage adapter. See my other article on USB booting not specific to Ubuntu for a lot more details on the storage adapters!
Get Latest Raspbian & Updates
To update your bootloader / firmware you should use Raspbian on a SD card. Right now support in third party operating systems to do anything with the new Raspberry Pi 4’s firmware or bootloader is very limited / nonexistent. You can use a third party operating system later once you set the boot mode, but to actually make these changes we will use official Raspbian.
First make sure that you have the absolute latest updates and firmware for the Pi. To upgrade all your packages and firmware to the latest version use the following command:
sudo apt update && sudo apt full-upgrade -y
Once the update has completed restart your Pi with a sudo reboot command to apply the latest firmware / kernel updates.
Verify EEPROM Bootloader is up to date
We can check if your Pi’s bootloader firmware is up to date with the following command:
sudo rpi-eeprom-updateIf your Raspbian is *very* out of date you may not have this utility and can install it using:
sudo apt install rpi-eepromThe output from rpi-eeprom-update will look like this if you are not up to date:
BCM2711 detected
VL805 firmware in bootloader EEPROM
*** UPDATE AVAILABLE ***
BOOTLOADER: update available
CURRENT: Thu 3 Sep 12:11:43 UTC 2020 (1599135103)
LATEST: Tue 24 Nov 15:08:04 UTC 2020 (1606230484)
FW DIR: /lib/firmware/raspberrypi/bootloader/beta
VL805: up-to-date
CURRENT: 000138a1
LATEST: 000138a1
If it says any updates are available they be installed manually by adding ‘-a’ to the end of our previous command like this:
sudo rpi-eeprom-update -aAfter the updates finish installing restart your Pi as firmware updates will not be applied until after a reboot. Now if you run rpi-eeprom-update to check for updates again it should say you are on the latest and up to date!
Changing rpi-eeprom’s Release Channel
Note: As of February 16th the firmware available in the “critical” branch is new enough to USB boot so I no longer recommend changing this. One reader even let me know in the comments that on the “stable” channel his storage was getting corrupted prompting a full reinstall!
By default you will only receive updates from Raspbian’s “critical” channel. This is a very conservative firmware update channel that will only give you very well tested firmware updates that are considered critical fixes for the device. Another channel that is available is “stable”.
Carlos and other commenters have reported that the current “critical” firmware didn’t work for them and they had to upgrade to the “stable” channel.
To switch to the stable channel we are going to edit the file /etc/default/rpi-eeprom-update:
sudo nano /etc/default/rpi-eeprom-updateChange the line FIRMWARE_RELEASE_STATUS=”critical” to:
FIRMWARE_RELEASE_STATUS="stable"
Now you can run sudo rpi-eeprom-update and you should see a new update available.
Install Ubuntu on USB Storage Device
The new official Raspberry Pi imaging tool is really good. It’s available on Windows, Linux and MacOS and is a small and fast download. It also works fine on most USB mass storage devices like SSDs. Since Ubuntu is now officially supported the image itself is also available in this tool which saves you the trouble of having to find and download the right image files.
64 bit images are recommended for the Pi 4 for better performance but the 32 bit images work as well.
If you want to do things the traditional way you can download the image from the main Ubuntu site and write it yourself using Etcher / dd / Win32diskimager / your preferred tool and skip to the next section. It’s recommended to create the media with the Raspberry Pi Imager unless you are having problems with that utility or are using this as a troubleshooting step.
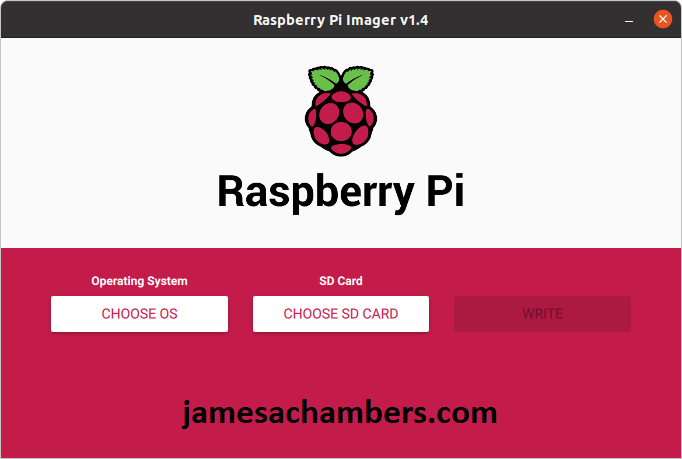
Once you’ve downloaded the tool run it as administrator/sudo to avoid permission errors. To run the utility from the command line is usually sudo rpi-imager. You’ll be greeted with this screen:
Next click the “Choose OS” button:
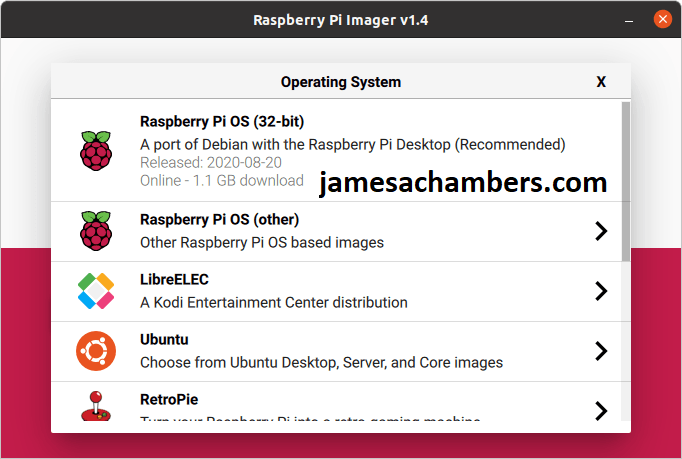
Ahh, the benefits of being officially supported! Ubuntu is right there on the list waiting for us. Select the Ubuntu option and you will get the different choices of flavors/architectures. There’s Ubuntu Desktop, Ubuntu Server, and Ubuntu Core in various forms of 64-bit (arm64) and 32-bit (armhf).
If you want to use the out-of-the-box Ubuntu Desktop edition you need to use the 64 bit Ubuntu 20.10 image as they never made a 20.04 desktop version for some reason. This really isn’t usually a big deal though because you can always choose the “Server” version and install Ubuntu’s desktop environment later with:
sudo apt install ubuntu-desktopOnce you’ve selected the edition you want go ahead and pick the “Choose SD Card” option and write the image. Despite not being a SD card my USB mass storage devices showed up anyway (writing the guide I used a StarTech adapter and a Kingston A400 SSD).
I’m sure some of you will manage to find unusual devices and configurations that may not show up in this tool. It doesn’t appear to show “fixed drives” that are physically installed in your machine. Regardless if it is causing a headache you may need to do it the old fashioned way and download the image from the main Ubuntu site and write the image using your favorite imaging tool instead.
Modifying Ubuntu for USB Booting
We need to make some changes to the Ubuntu drive we just created before we boot from it. Make sure your Pi is powered on and booted into Raspbian then plug in your newly imaged Ubuntu drive. We are going to make the changes using the Pi.
Find and Mount Storage Device
First let’s find your storage device using the command:
lsblk
This will show you all the storage devices attached to your system:
NAME        MAJ:MIN RM   SIZE RO TYPE MOUNTPOINT
sda           8:0    0 119.2G  0 disk
├─sda1        8:1    0   256M  0 part
└─sda2        8:2    0   2.8G  0 part
mmcblk0     179:0    0  59.5G  0 disk
├─mmcblk0p1 179:1    0   256M  0 part /boot
└─mmcblk0p2 179:2    0  59.2G  0 part /
Your SD card will always start with mmcblk so you can rule that one out. That leaves sda as the only other disk device on the system. This will be the same for most of you but depending on what type of drive and storage adapter you use this can vary. You can substitute whatever yours is in place of /dev/sda in these instructions going forward. If yours is sdb use /dev/sdb. If it’s nvme0 use /dev/nvme0, etc.
In my output under the “MOUNTPOINT” column you can see it is blank. This means the drive isn’t mounted on my system. My mmcblk0p1 mountpoint though is not blank and is “/boot” as an example of a non-blank mountpoint. If you are using the full “Desktop” version of Raspbian it may have automatically mounted your drive and created 2 shortcuts on your desktop that will take you to the files. If your mountpoint is not blank and has something like /media/pi/writable go ahead and unmount them now using the following commands substituting the mountpoint listed for your drive:
sudo umount /media/pi/writable
sudo umount /media/pi/system-boot
Now we are going to create two mountpoints and mount the Ubuntu drive. Use these commands substituting your own drive it is not /dev/sda:
sudo mkdir /mnt/boot
sudo mkdir /mnt/writable
sudo mount /dev/sda1 /mnt/boot
sudo mount /dev/sda2 /mnt/writable
Once you have mounted everything correctly your lsblk command’s output should look like this with the mountpoint field now populated:
NAME        MAJ:MIN RM   SIZE RO TYPE MOUNTPOINT
sda           8:0    0 119.2G  0 disk
├─sda1        8:1    0   256M  0 part /mnt/boot
└─sda2        8:2    0   2.8G  0 part /mnt/writable
mmcblk0     179:0    0  59.5G  0 disk
├─mmcblk0p1 179:1    0   256M  0 part /boot
└─mmcblk0p2 179:2    0  59.2G  0 part /
Modify Mounted Partitions – Option A – Automated Script
If you just want to get your Ubuntu partition bootable I have made an automated script to do this. As long as you have mounted the partitions as /mnt/boot and /mnt/writable the script will make the necessary changes for Ubuntu 20.04 / 20.10 to boot! The source code for the script is available at https://github.com/TheRemote/Ubuntu-Server-raspi4-unofficial/blob/master/BootFix.sh
Here is a one liner to run the script:
sudo curl https://raw.githubusercontent.com/TheRemote/Ubuntu-Server-raspi4-unofficial/master/BootFix.sh | sudo bash
You may also download it for inspection (such as nano BootFix.sh or opening it in the Text Editor if you are using Desktop Raspbian) with:
curl https://raw.githubusercontent.com/TheRemote/Ubuntu-Server-raspi4-unofficial/master/BootFix.sh -O BootFix.sh
chmod +x BootFix.sh
nano BootFix.sh
To execute the script use:
sudo ./BootFix.sh
As long as you mounted your partitions correctly it will modify the partition and tell you that it was successful. Now unmount your partitions with the following commands:
sudo umount /mnt/boot
sudo umount /mnt/writable
You may now shut down your Pi and remove the SD card from the Pi leaving just the USB mass storage device plugged in. Reconnect the power.
Modify Mounted Partitions – Option B – Manual Instructions
See bottom of the article for the manual instructions section
First Boot
If all went well the system should boot up into Ubuntu’s logon screen! The default credentials are:
Username: ubuntu
Password: ubuntu
Before logging in for the first time you will be forced to select a new password. Once you have done that you will be fully logged in!
Important Note: Upon logging in for the first time if the Pi is connected to the internet Ubuntu will immediately/soon start a lengthy update process via snapd and apt.  This can be annoying since you'll be ready to start configuring the system and if you do an apt install it will halt and wait for the updates to finish.

It may seem like they're stuck, but if you use the 'top' command you will see all sorts of apt/package/update/extraction related activity happening.  Even on my 8 GB Pi and a gigabit fiber connection these took a good 20 minutes or so before my CPU activity went back to 0 and the apt lock released.

I highly recommend letting these finish and not yanking the power on the Pi / forcing a reboot / trying to kill the processes.  It will often cause a ton of very nasty apt and dpkg problems to the point where it's easier to start over from a fresh image than try to fsck and apt install --fix-broken your way out of it  Try to do other necessary configuration that doesn't involve apt in the mean time and let these finish in the background.
Once the patching is finished your shiny new Ubuntu 20.04 system is fully ready to use!
Manual Instructions
These are the manual instructions to recreate what the automated script does. If you used the automated script you don’t need to do anything further in this section unless you want to understand more about how it works or you want to do the process manually.
Decompress the kernel
We need to decompress the kernel as we will be changing the way the Pi is booting. Ubuntu uses u-boot by default and we will be switching away from that. We can do this with the following command:
zcat -qf "/mnt/boot/vmlinuz" > "/mnt/boot/vmlinux"
Update config.txt with correct parameters
Now let’s update /mnt/boot/config.txt with the parameters we need to load the decompressed kernel. Open up config.txt with nano with:
sudo nano /mnt/boot/config.txt
Change the [pi4] section to the following contents:
[pi4]
max_framebuffers=2
dtoverlay=vc4-fkms-v3d
boot_delay
kernel=vmlinux
initramfs initrd.img followkernel
Create script to automatically decompress kernel
We are going to create a script to automatically decompress the kernel. If we don’t do this we have to decompress it every time Ubuntu updates. This particular part of the script was not written by me and was found at the post on the Raspberry Pi forums by egrechko.
First let’s create the decompression script. Open up a new file with nano using:
sudo nano /mnt/boot/auto_decompress_kernel
Paste the following contents:
#!/bin/bash -e
# auto_decompress_kernel script
BTPATH=/boot/firmware
CKPATH=$BTPATH/vmlinuz
DKPATH=$BTPATH/vmlinux
# Check if compression needs to be done.
if [ -e $BTPATH/check.md5 ]; then
   if md5sum --status --ignore-missing -c $BTPATH/check.md5; then
      echo -e "\e[32mFiles have not changed, Decompression not needed\e[0m"
      exit 0
   else
      echo -e "\e[31mHash failed, kernel will be compressed\e[0m"
   fi
fi
# Backup the old decompressed kernel
mv $DKPATH $DKPATH.bak
if [ ! $? == 0 ]; then
   echo -e "\e[31mDECOMPRESSED KERNEL BACKUP FAILED!\e[0m"
   exit 1
else
   echo -e "\e[32mDecompressed kernel backup was successful\e[0m"
fi
# Decompress the new kernel
echo "Decompressing kernel: "$CKPATH".............."
zcat -qf $CKPATH > $DKPATH
if [ ! $? == 0 ]; then
   echo -e "\e[31mKERNEL FAILED TO DECOMPRESS!\e[0m"
   exit 1
else
   echo -e "\e[32mKernel Decompressed Succesfully\e[0m"
fi
# Hash the new kernel for checking
md5sum $CKPATH $DKPATH > $BTPATH/check.md5
if [ ! $? == 0 ]; then
   echo -e "\e[31mMD5 GENERATION FAILED!\e[0m"
else
   echo -e "\e[32mMD5 generated Succesfully\e[0m"
fi
exit 0
Create apt script to call kernel decompression script automatically
This is a one liner to create a script to call the auto_decompress_kernel script:
echo 'DPkg::Post-Invoke {"/bin/bash /boot/firmware/auto_decompress_kernel"; };' | sudo tee /mnt/writable/etc/apt/apt.conf.d/999_decompress_rpi_kernel
Verify Drive Performance
You can make sure everything is running correctly (and as fast as it should be) by running my quick storage benchmark. You can run the benchmark with the following one-liner:
sudo curl https://raw.githubusercontent.com/TheRemote/PiBenchmarks/master/Storage.sh | sudo bash
This will give you a score you can compare to the other Raspberry Pi Storage Benchmark results and make sure that you are getting an equivalent speed to your peers with the same device!
Fix (some) USB Adapter Problems Using Quirks
Some storage adapters don’t work very well with the Raspberry Pi 4. There is an option that can get a lot of them working using quirks. If your Ubuntu is booting to emergency mode but not in normal mode it’s worth giving quirks a try. This lowers performance, but it’s still much faster than a SD card and your adapter won’t go to waste.
To find out the quirks mode string to use we need to find the device ID string for your adapter and then add an entry to cmdline.txt telling the kernel to apply them on boot.
Find Your Adapter
To apply the quirks we first need to get the adapter id. We will use the sudo lsusb command:
$ sudo lsusb
 Bus 003 Device 001: ID 1d6b:0002 Linux Foundation 2.0 root hub
 Bus 002 Device 002: ID 174c:55aa ASMedia Technology Inc. Name: ASM1051E SATA 6Gb/s bridge, ASM1053E SATA 6Gb/s bridge, ASM1153 SATA 3Gb/s bridge, ASM1153E SATA 6Gb/s bridge
 Bus 002 Device 001: ID 1d6b:0003 Linux Foundation 3.0 root hub
 Bus 001 Device 002: ID 2109:3431 VIA Labs, Inc. Hub
 Bus 001 Device 001: ID 1d6b:0002 Linux Foundation 2.0 root hub
On line 2 we can see my ASM1051E SATA 6Gb/s bridge adapter (it’s the known working StarTech.com 2.5″ SATA to USB 3.1* adapter). You will see something very similar to mine when you run the command and it shouldn’t be too hard to figure out which device it is. If you need more information add a -v switch to make the command sudo lsusb -v. This can sometimes add some additional details to make it easier to figure out which one is your adapter.
If you’re still not sure, we have another command that between the two that can narrow things down. Type / paste the following:
sudo dmesg | grep usb

 [0.828535] usb usb3: New USB device found, idVendor=1d6b, idProduct=0002, bcdDevice= 4.19
 [0.828568] usb usb3: New USB device strings: Mfr=3, Product=2, SerialNumber=1
 [0.828597] usb usb3: Product: DWC OTG Controller
 [0.828620] usb usb3: Manufacturer: Linux 4.19.75-v7l+ dwc_otg_hcd
 [0.828644] usb usb3: SerialNumber: fe980000.usb
 [0.830051] usbcore: registered new interface driver uas
 [0.830182] usbcore: registered new interface driver usb-storage
 [0.836488] usbcore: registered new interface driver usbhid
 [0.836511] usbhid: USB HID core driver
 [0.971598] usb 1-1: new high-speed USB device number 2 using xhci_hcd
 [1.154217] usb 1-1: New USB device found, idVendor=2109, idProduct=3431, bcdDevice= 4.20
 [1.154254] usb 1-1: New USB device strings: Mfr=0, Product=1, SerialNumber=0
 [1.154281] usb 1-1: Product: USB2.0 Hub
 [1.301989] usb 2-1: new SuperSpeed Gen 1 USB device number 2 using xhci_hcd
 [1.332965] usb 2-1: New USB device found, idVendor=174c, idProduct=55aa, bcdDevice= 1.00
 [1.332999] usb 2-1: New USB device strings: Mfr=2, Product=3, SerialNumber=1
 [1.333026] usb 2-1: Product: ASM105x
 [1.333048] usb 2-1: Manufacturer: ASMT
 [1.333071] usb 2-1: SerialNumber: 123456789B79F
This is the dmesg log showing the hardware detection as hardware is activated on the Pi. If your log is really long you can generate fresh entries by just unplugging a device and plugging it back in and running the command again. Here we can clearly see that the ASM105x is what our StarTech adapter is being detected as.
Now we can go back to our first lsusb command and we want the 8 characters from the ID field that comes right after the Device:
Bus 002 Device 002: ID 174c:55aa ASMedia Technology Inc. Name: ASM1051E SATA 6Gb/s bridge
Our adapter’s ID is: 174c:55aa
Applying Quirks
To apply the quirks to our USB adapter we are going to edit /boot/firmware/cmdline.txt. Type:
sudo nano /boot/firmware/cmdline.txt
We are going to add the following entry into the very front of cmdline.txt:
usb-storage.quirks=XXXX:XXXX:u
In place of the X’s above you will put in your adapter’s ID that we got before. With the example commands I gave above mine would look like this: usb-storage.quirks=174c:55aa:u. After this my cmdline.txt looks like this (everything should be one continuous line, no line breaks!):
usb-storage.quirks=174c:55aa:u dwg_otg.lpm_enable=0 console=serial0,115200 console=tty1 root=LABEL=writable rootfstype=ext4 elevator=deadline rootwait fixrtc
Now reboot the Pi. If the Pi fails to boot you can plug the SD card into the computer and go to /boot/cmdline.txt and undo the change we did so you can boot back in with your SD card.
Verifying Quirks
Once you have rebooted after changing cmdline.txt we can verify the quirks have been applied by doing another dmesg | grep usb command:
sudo dmesg | grep usb
 [1.332924] usb 2-1: New USB device found, idVendor=174c, idProduct=55aa, bcdDevice= 1.00
 [1.332957] usb 2-1: New USB device strings: Mfr=2, Product=3, SerialNumber=1
 [1.332983] usb 2-1: Product: ASM105x
 [1.333006] usb 2-1: Manufacturer: ASMT
 [1.333028] usb 2-1: SerialNumber: 123456789B79F
 [1.335967] usb 2-1: UAS is blacklisted for this device, using usb-storage instead
 [1.336071] usb 2-1: UAS is blacklisted for this device, using usb-storage instead
 [1.336103] usb-storage 2-1:1.0: USB Mass Storage device detected
 [1.336479] usb-storage 2-1:1.0: Quirks match for vid 174c pid 55aa: c00000
 [1.336611] scsi host0: usb-storage 2-1:1.0
This time we can see in dmesg that UAS was blacklisted for the device and it has loaded with the usb-storage driver instead. This driver tends to be more compatible with the “problematic adapters” but the performance is usually significantly lower. It’s definitely worth a try though as some adapters do better with the quirks performance-wise. The only way to know for sure is to run a benchmark (see “Verify Drive Performance” section).
Other Resources
I compiled the 2022 Raspberry Pi Storage benchmarks which shows the fastest storage devices for the Pi
For easy headless imaging (does support Ubuntu) check out my Headless Raspberry Pi configuration guide
To find out where to get the 64 bit version of Raspberry Pi OS: where to get the 64 bit Raspberry Pi OS image
To find out how to add a UPS backup battery to your Pi check out my UPS for Raspberry Pi guide


I was seriously at a loss wondering what I was doing wrong – I had backed up my SD card with Ubuntu 20.04 LSR and restored to other SD cards multiple times in the last few weeks wile configuring and tweaking my new server setup to replace a very pricey VPS I was using…
Anyway I’ve done the take an image, shrink it / restore to another card countless times without issues. So when it was time to move the server to “production” I wanted to run it off an SSD – repeated my process and got the PI bootloader running only to run smack into the “it doesn’t boot” I swear I thought I had made a bad image / all sorts of things
Happened upon your site and your tutorial.. and BINGO!
THANK YOU, THANK YOU! THANK YOU for exactly what I needed. You saved me a lot of cursing and hair pulling…
Hey Tananda,
Hooray! That is always the news I like to hear. Back in the day when I was trying to figure this out several years ago there was hardly anything on this out there so that’s the kind of topics I try to cover on here other than what everyone else is doing.
It’s super tough to troubleshoot the images / cloning / migrating. It definitely happens where you can get a bad image but anymore I feel like it’s 9 times out of 10 going to be one of the myriad of (annoying but important) configuration issues that we cover in the guide. Thanks truly for the kind words, take care!
two days of testing in deep depression before knowing you. thank you for your work
Hey Edouard,
Glad to hear it helped, thanks for taking the time to leave this nice comment, take care!
Hello and thanks a lot for this tutorial.
I’m having an issue and I can’t figure out why : I strictly followed the different steps successfully including the SSD mounting, boot script and umounting the SSD. I can browse the SSD from the Pi and see the SSD files, but I can’t boot from SSD. As soon as I remove the SDCard and try to boot I will have the Pi start screen saying “Failed to open device ‘sdcard’
Any idea what is wrong ? thank you
Hey Victor,
Welcome! Yours actually sounds a bit different than a lot of the other ones posted recently. I think yours is a firmware issue. The Raspberry Pi bootloader used to come with SD card (only) as the default boot setting. This has not been the case for at least a couple of years or so but a ton of Pis still have the original bootloader on them and are often “stuck” and won’t update on their own through apt / rpi-eeprom-update.
The best way to fix this is to create the “Recovery Image” using the Raspberry Pi Imager. It will create a SD card with a file on it that will update the bootloader. This should take it to a version that will have the default BOOT_ORDER set to try booting from USB mass storage and then fall back to SD card booting (this is supposed to be the default now like I said so when you don’t have it it’s time to run the recovery image). It sounds like your BOOT_ORDER is probably set to the old 0x1 or SD card boot only.
It could be power related but yours is so specific (and consistent) that I think it may actually be telling the truth here and just needs a firmware update. If you’ve seen me diagnose power issues before in the other comments they usually will experience a bunch of different symptoms that are changing (it will get stuck booting at different places). Yours sounds like it’s probably just not looking for USB mass storage devices to boot from without a firmware upgrade.
I did want to caution that while plugging your SSD into the Pi and reading the files from the SSD is a great test (it rules a bunch of things in/out) it does not rule out power. Most drives can function in a low power state if you plug them in. They will perform very slowly in this mode (you’ll feel that things are slower than they should be). Basically there’s a reduced functionality mode available on low power (up to a certain point, below a certain level of power not even this will work). They will *not* boot in a low power state though. Something always goes wrong during the process and it often changes from boot to boot since it varies when exactly the drive will fail with too little power.
I don’t think this is what is happening with yours, but I wanted to mention that we’ve seen a bunch of cases where there was enough power to plug in the drive and read files but not enough power to boot (but power was still the problem, and fixing the power levels was the solution). Power is also unpredictable and difficult to diagnose sometimes and we can’t rule it out yet.
It’s not presenting like any power ones I’ve done recently for what it’s worth and seems to be presenting as the old bootloader firmware to me (not included on the SD card or SSD, it’s part of the Pi, on an EEPROM chip separate from everything else). Despite this issue not coming up as often anymore it’s definitely still out there (once they get stuck they don’t seem to get unstuck until you do the recovery image, and a lot / most people will never notice until it causes a problem like this).
The biggest hint is it isn’t even trying to boot from mass storage or anything else. It’s just saying SD boot failed. This is not the correct behavior for a Pi with the latest bootloader firmware. What will happen with the newest firmware is you will see it try to boot multiple times and try from different sources. Those are the default settings so when we see behavior like this it’s a really strong hint that the bootloader is the original version that did not have fallback booting / attempt to boot from multiple sources by default.
We used to see this issue all the time but it has been at least months (maybe even a year) since the last time it came up so I am guessing that as time goes on more and more people are receiving Pis that already have these updates. An up to date Raspberry Pi OS or even Ubuntu should update these for you but in practice we’ve seen a lot of old stuck ones that will *not* update no matter what until they run the recovery image (after which normal updates through apt / rpi-eeprom-update start working again, it seems to get it unstuck and fix whatever is going wrong). I bet yours falls into this category.
Can you try running the recovery image and see if it gets it for you? Hopefully that helps!
Hello ! thanks a lot for your answer; I fixed the problem but in a very strange way. I noticed that while I was plugging BOTH SDcard and SSD (fresh image from Raspberry pi imager) the Pi would boot from the SSD and not on the SDCard. Like I said, If I was removing the SDCard, then I would get that “sd card not found” error. So what I did is while booting from SSD I ran all “apt update” and eeprom install and that worked. Maybe I did something previously that caused the problem, I don’t know. I’m quite new to it but anyway, problem solved 🙂 thanks a lot for your appreciated answer.
Hey Victor,
Excellent work, congratulations! That makes perfect sense. It sounds like apt / rpi-eeprom-update successfully updated your firmware. I don’t think it was anything you caused, I think this just gave it an update to the version that supports USB booting.
Thanks a ton for leaving your solution, I’m sure it will help others as well!
Thank you for these instructions.
I followed them but as soon as I boot from my SSD I get the following error:
[1.734458] mmc1: Controller never released inhibit bit(s).ext4
Then it just stays like that
Hey James,
That looks like it may be a compatibility issue. It also could be power related but I feel like the inhibit bit one is a compatibility related.
Can you tell us which adapter you’re using? Does putting it in USB 2.0 vs 3.0 ports make a difference?
Actually, not sure what I did but got past this.
Now, the pi is flashing 7 green lights which indicate it can’t find the kernel image on the SSD. Any ideas?
Hey James,
That sounds even more like power. The inconsistent behavior is from different levels of power as it’s trying to start up but none of them are enough here for a successful boot (it’s just getting stuck at different places along the way as the power dips too low for the drive to continue to function).
Do you have anything else plugged into your USB ports? They all draw from the same power limit so unplugging some of them can sometimes get it to get further if it’s right on the edge (over_voltage=6 in config.txt can also give it a slight jolt) but it sounds like you may need a powered USB hub.
Do you have one around to test with by chance? Any powered USB hub would work!
lol… looks like my eeprom was set to “critical”, moved it to stable and started over and now it’s booting.
However, the default username and password “ubuntu : ubuntu” aren’t letting me in.
What the heck!?
When it boots up for the first time it runs cloud-init. During this process it expands your drive to use the full storage. One of the last steps it will do is set up the ubuntu/ubuntu login. If it’s not taking it then it’s still doing cloud-init (or has crashed out again). If you have a slower internet connection it can take a while for the process to finish sometimes as it does an update I believe as well.
Are you seeing errors across the screen during this process? You can usually see the output it’s doing even though it’s letting you get to the login screen. It’s actually not fully booted yet / hasn’t finish first startup tasks.
Oh interesting! Nope, no errors to report. It just says
Ubuntu 20.04.3 LTS ubuntu tty1
ubuntu login:
Every so often it clears all the text for like 3 seconds and then refreshes it back to what’s above.
Odd though, I set my network configuration using the network config file in the system-boot partition (to use wifi).
I mean, what is the max you’ve seen it take? I’ve had it on for like an hour so far and it won’t let me get past that login screen. :/
How did you image the drive? This sounds like one downloaded from the Ubuntu web site and not prepared with the Raspberry Pi imager. Either that or things still don’t sound like they are working correctly to me.
None of it sounds right. I’ve heard of the networking issue before.
Basically what is supposed to happen is it is supposed to boot up and work. Every issue you’ve had so far is not typical. I still think you’re probably having some kind of power or firmware issues, or your adapter has compatibility issues (you never said what it was I don’t believe). I’m guessing the adapter will answer the question.
Hey James!
I imaged the drive using the Pi imager you mentioned in the post. I just got the 3.5A adapter for the Pi and I’m using this Sabrent adapter
I did have to quirk it in order for the pi to read it at first.
Hey James,
Excellent work, I’m glad you were able to get it! I’m not sure what was happening with the other image, but I recognized some of the symptoms (including the network ones and the ubuntu/ubuntu login not appearing correctly after cloud-init’s first run is supposed to complete but maybe never does when this happens) and I’d personally encountered them myself using the image from the web site but *not* when using the Pi Imager so I had a hunch that it may be worth giving it a try.
The “Pi Imager” seems to add some magic ingredients or is maybe using a different source image altogether with newer firmware. It could also have just gone wrong the first time and trying to image it again would have got it (happens occasionally).
Sorry about your other message being held for moderation and not appearing. That just happens if there’s a link in there because of the spam bots that roam the internet so if the comment has a link in it it will get held until the next time I check in to make sure it’s not spam. I would like to loosen it up a little bit for recognized users though so that’s on the to-do list!
I do have some additional good news for that Sabrent adapter. There should be a firmware update that will let you not have to use quirks mode with it. It will also improve the performance slightly because quirks mode disables UAS. Having UAS enabled is faster but the adapter’s onboard firmware has an incompatibility with the Pi but there is an update for it available. I have an article on how to do this here: Fixing Storage Adapters for Raspberry Pi via Firmware Updates.
You can find the firmware update tool for this adapter (EC-SSHD) here. Or if you’re happy with it how it is you don’t have to rock the boat if you don’t want to!
Actually – it didn’t work UNTIL I updated the firmware of that cable! Now it’s all up and running!
Thank you so much! I’ve lost a lot of sleep over this haha.
Hey James,
No problem at all, it sounds like you got it working all the way, congratulations and enjoy, and get some sleep!
Will the automated script also work with Ubuntu MATE 20.04?
Hey Tjob,
Great question! I believe someone did try it on MATE a long time ago and it did work. One thing I would double check though is that if this is 20.04.1 or newer (it should be if you just downloaded it off the web site) you shouldn’t need to do anything at all (at least with the modification / script, you’d still want to follow the rest of the instructions).
Official support for USB booting the Raspberry Pi was added into all stock Ubuntu images so unless you are using an original 20.04 image and not 20.04.1 I don’t believe running the Ubuntu boot fix script will be necessary for you! If for some reason MATE does still need the modification this should take care of it for you!
Just wanna state my appreciation for the work you have done and publicly shared here! Tried many different tutorials without much luck. This one was the most orderly and easy one so far, and it worked like a charm. Thank you! I can confirm that it worked well with the Mate (I ran the script just to be sure).
Hey Tjob,
Thanks so much for giving me a fresh and solid confirmation. I’m very glad that it helped and thank you for the kind words!
Unusual System Load when starting without SD Card
Dear Noah,
i followed your instructions and could very easily install Ubuntu on my USB disk. Great work!
I only now found out whenever the system is booted without a SD card inserted the system load is always at about 1.0 even if there is no CPU or disk activity. When booted with a SD card inserted this doesn’t happen.
Hey Sebastian,
I definitely know what is wrong with this one. I have an article written just for this here: Raspberry Pi: Reclaim ~1% CPU Usage when SSD/USB Booting
It’s basically due to SD card polling when the card is out. There’s a setting you can add to config.txt to take care of this. Hopefully that helps!
Hopefully that helps!
Dear James,
I am having quite the time following the instructions. I’m wondering what on Earth I must be doing incorrectly, as the errors I get don’t seem to be of the ‘usual’ sort.
Let me tell you what I have done troubleshooting, and that I have been following the directions as I understand them.
– Using Rpi4 with the Canakit 5.1VDC 3.5A power supply
– Fresh download from ‘Raspberry Pi Imager v1.6.2’
– Used imager and installed Raspberry Pi OS (32-bit) – the default choice onto an SD card
– Used imager and installed ‘Other general purpose OS’ –> ‘Ubuntu’ –> ‘Ubuntu Server 20.4.2 LTS (RPi 2/3/4/400) 64 bit’ onto my SSK Aluminum M.2 nVME SSD enclosure with a Crucial P2 500GB NAND nVME
– Both of these installs seemed to work perfectly
– Booted onto the card, works well
– Performed the apt update and full-upgrade, moved updates to ‘stable’ – received & installed eeprom update
– Attached SSD, automounts
– Dismounted and remounted onto the /mnt directories suggested (i.e. ./boot and ./writable)
– Downloaded script from github, set permissions, and ran it
– The script ran correctly – said it worked, and to remove sd card and reboot.
– Unmounted drives, powered off, removed card, rebooted
– Waited patiently to move to your ‘First Boot’ instructions – and it did not work…
– Hmmmm…
– When booting, it gets rather far, many [OK] boot messages – what was that error? Screen went off, grrrr
– OK, it was alive enough to have mounted the SSD – I bet there is a log
– Rebooted to SD card, and went spelunking to figure out how to read the dmesg type error log from the SSD
– Found a command called journalctl – it is the journal reader (I am proud of myself)
– journal is in /media/pi/writable/var/log/journal/{long hex number} (you know, from the automount location now)
– journalctl -D {directory} (which is a long hex number) will display the journal in a human readable format
– Read this file (long, like a dmesg with absolutely everything listed) and got to here:
Apr 01 12:23:47 ubuntu systemd[1]: Starting Command from Kernel Command Line...Apr 01 12:23:47 ubuntu systemd[1590]: kernel-command-line.service: Failed to execute command: No such file or directory
Apr 01 12:23:47 ubuntu systemd[1590]: kernel-command-line.service: Failed at step EXEC spawning /boot/firstrun.sh: No such file or directory
Apr 01 12:23:47 ubuntu systemd[1]: kernel-command-line.service: Main process exited, code=exited, status=203/EXEC
Apr 01 12:23:47 ubuntu systemd[1]: kernel-command-line.service: Failed with result 'exit-code'.
Apr 01 12:23:47 ubuntu systemd[1]: Failed to start Command from Kernel Command Line.
Apr 01 12:23:47 ubuntu systemd[1]: Dependency failed for Command from Kernel Command Line.
Apr 01 12:23:47 ubuntu systemd[1]: kernel-command-line.target: Job kernel-command-line.target/start failed with result 'dependency'.
Apr 01 12:23:47 ubuntu systemd[1]: Doing "poweroff" action instead of an "exit" emergency action.
- And the rest of the nice messages doing proper shutdown activity until EOF
- Well, that is strange - where might firstrun.sh be?
- Oh, there is a copy on /mnt/boot - let's copy that over
- Whoops, no worky - oh, it's not executable. Let's just chmod it to 777 and try it again
- Wow! A whole lot of stuff appears to be updating. That's PROGRESS, right?
- Oh my, it has now rebooted and it has died again - let's see what it did
-- Reboot --
Apr 01 12:23:48 ubuntu systemd[1]: Reloading.
Apr 01 12:23:49 ubuntu systemd[1]: /lib/systemd/system/dbus.socket:5: ListenStream= references a path below legacy directory /var/ru
n/, updating /var/run/dbus/system_bus_socket → /run/dbus/system_bus_socket; please update the unit file accordingly.
Apr 01 12:23:49 ubuntu firstrun.sh[1692]: /boot/firstrun.sh: line 22: rfkill: command not found
Apr 01 12:23:50 ubuntu systemd[1]: systemd-rfkill.service: Succeeded.
Apr 01 12:23:50 ubuntu firstrun.sh[1703]: Current default time zone: 'America/Chicago'
Apr 01 12:23:50 ubuntu firstrun.sh[1703]: Local time is now: Wed Apr 1 12:23:50 CDT 2020.
Apr 01 12:23:50 ubuntu firstrun.sh[1703]: Universal Time is now: Wed Apr 1 17:23:50 UTC 2020.
Apr 01 12:23:51 ubuntu firstrun.sh[2106]: Your console font configuration will be updated the next time your system
Apr 01 12:23:51 ubuntu firstrun.sh[2106]: boots. If you want to update it now, run 'setupcon' from a virtual console.
Apr 01 12:23:51 ubuntu firstrun.sh[2115]: update-initramfs: deferring update (trigger activated)
Apr 01 12:23:52 ubuntu firstrun.sh[2118]: Processing triggers for initramfs-tools (0.136ubuntu6.3) ...
Apr 01 12:23:52 ubuntu firstrun.sh[2120]: update-initramfs: Generating /boot/initrd.img-5.4.0-1028-raspi
Apr 01 12:24:00 ubuntu kernel: random: crng init done
Apr 01 12:24:00 ubuntu kernel: random: 7 urandom warning(s) missed due to ratelimiting
Apr 01 12:24:16 ubuntu systemd[1]: systemd-fsckd.service: Succeeded.
Apr 01 12:24:31 ubuntu firstrun.sh[8793]: Using DTB: bcm2711-rpi-4-b.dtb
Apr 01 12:24:31 ubuntu firstrun.sh[8793]: Installing /lib/firmware/5.4.0-1028-raspi/device-tree/broadcom/bcm2711-rpi-4-b.dtb into /b
oot/dtbs/5.4.0-1028-raspi/./bcm2711-rpi-4-b.dtb
Apr 01 12:24:31 ubuntu firstrun.sh[8793]: Installing new bcm2711-rpi-4-b.dtb.
Apr 01 12:24:31 ubuntu firstrun.sh[8793]: Installing /lib/firmware/5.4.0-1028-raspi/device-tree/broadcom/bcm2711-rpi-4-b.dtb into /b
oot/dtbs/5.4.0-1028-raspi/./bcm2711-rpi-4-b.dtb
Apr 01 12:24:31 ubuntu firstrun.sh[8793]: Taking backup of bcm2711-rpi-4-b.dtb.
Apr 01 12:24:31 ubuntu firstrun.sh[8793]: Installing new bcm2711-rpi-4-b.dtb.
Apr 01 12:24:32 ubuntu firstrun.sh[8793]: flash-kernel: installing version 5.4.0-1028-raspi
Apr 01 12:24:37 ubuntu firstrun.sh[8793]: Taking backup of vmlinuz.
Apr 01 12:24:37 ubuntu firstrun.sh[8793]: Installing new vmlinuz.
Apr 01 12:24:38 ubuntu firstrun.sh[8793]: Taking backup of initrd.img.
Apr 01 12:24:38 ubuntu firstrun.sh[8793]: Installing new initrd.img.
Apr 01 12:24:38 ubuntu firstrun.sh[8793]: Generating boot script u-boot image... done.
Apr 01 12:24:38 ubuntu firstrun.sh[8793]: Taking backup of boot.scr.
Apr 01 12:24:38 ubuntu firstrun.sh[8793]: Installing new boot.scr.
Apr 01 12:24:39 ubuntu firstrun.sh[8997]: Taking backup of start4.elf.
Apr 01 12:24:39 ubuntu firstrun.sh[8997]: Installing new start4.elf.
... (other .dat and .elf files installed)
Apr 01 12:24:40 ubuntu firstrun.sh[8997]: Installing new start4db.elf.
Apr 01 12:24:40 ubuntu firstrun.sh[8997]: Taking backup of fixup4cd.dat.
- And many other such things it installed
- Then we get to:
Apr 01 12:25:42 ubuntu firstrun.sh[12326]: sed: can't read /boot/cmdline.txt: No such file or directory
Apr 01 12:25:42 ubuntu systemd[1]: kernel-command-line.service: Succeeded.
Apr 01 12:25:42 ubuntu systemd[1]: Finished Command from Kernel Command Line.
Apr 01 12:25:42 ubuntu systemd[1]: Stopped target Network is Online.
- And the rest of the messages informing me of nicely shutting down.
– OK, fine – it *IS* late, and cmdline.txt is not there
– I should stop, no one else seems to do an official ‘Raspberry Pi Imager’ install and has missing firstrun.sh and cmdline.txt files
– Perhaps the nice man who wrote the instructions might help me?
– And I have now gotten to here – thanks for reading!
Any suggestions as to where I misunderstood the directions? I think I fundamentally missed or misunderstood something here. I would appreciate the assistance.
I’m looking to get the instructions down pat, so I can build a little LXD cluster and get to developing – but it’s senseless to keep going until I can get it booting correctly!
Thanks for any help you may provide.
– Noah
Hey Noah,
Can you try running the Raspberry Pi Imager and not using BootFix.sh on it (leaving the image as the Pi Imager leaves it)? I have seen it come up once or twice that 20.04.2 uses different configuration file names.
The current Ubuntu 20.04.2 image should be able to boot without BootFix.sh I believe. 20.04 needed it and 20.04.1 needed it in certain flavors. Can you try without it and see if it will boot?
Actually, I *DID* read that (it might just work now) and I tried Server 20.04.2 LTS and 21.04 Desktop both with and without BootFix.sh – no dice.
Interestingly enough, both had the same error, same place, same exit
(I have two identical SSD’s, for the cluster config, and I’m swapping back and forth to keep hammering at it – also makes this a lot faster to keep trying it over and over),
and thus I’ve tried this multiple times – a complete reimage with a fresh copy and following the instructions.
I’ve attempted to boot normal 32-bit Raspberry Pi OS (default) just by installing it to the SSD (nowhere near what I want – but hey, let’s see if ANYTHING will work, right?) and nope, that doesn’t work. I didn’t bother to go look at the logs (I’m getting discouraged – but NO FEAR!) but I can do it again and read the logs to see if 32-bit desktop dies in the same bizarre manner, it that helps.
I’m deeply confused, because I’m out of shape – but not a novice (my first cert was SUNOS, and I had to take the System V update to keep my cert – I just got demoted to Architecture and Management duties in later years), and I’m educated enough to follow the gist of the boot process, but cannot even find out where firstrun.sh and cmdline.txt are generated to be placed in the /boot folder on the / partition – so I can nicely try and ask whoever is responsible for these files why it is so very unhappy and refusing to tell the shiny new SSD anything about them.
These files are on the SD card – and in researching I cannot find anyone else who seems to have such an issue! And I also can’t seem to find where the documentation is for firstrun.sh, I might as well read the entertaining autoinstall and boot process for education while I ponder why I threw my life away on computers. I could have sold used cars or something more socially useful…
Thanks for the quick response! I’m on day 2 and grinding teeth – it really helps to have someone lending a hand!
– Noah
To clarify – the two versions (20.04.2 LTS Server & 21.04 Desktop) had the same error.
The others die in a way that seems more like a fail from not running BootFix.sh.
I can image a fresh 21.04 – not run BootFix, and grab the log (if it makes it that far) and take a look to be sure. I’ll do that now.
Hey Noah,
I doubt you’re actually missing any files. It just doesn’t look like it’s mounting the partitions correctly. In the past a couple of people with a similar situation have got it going by going into fdisk and completely deleting all the partitions from the drive so it’s completely blank and then imaging it.
In years past I would have said to check your Raspberry Pi’s firmware version but I really doubt that is the case here. The Pi Imager will not redo your partition table for you in my experience. Try completely wiping out the partition table and imaging it again. It just seems like it’s not mounting the /boot volume properly (at least when booted into the OS, it must be loading it at some point, maybe /etc/fstab is pointing to the wrong place). There’s a couple of things to check but this is pretty unusual.
Did you say this enclosure/drive combo does boot with Raspberry Pi OS correct? And SD card boot also works as well with this Ubuntu version?
I’ll answer your questions, then I’ll copypasta my notes from what I just tried (to provide more info).
– OK I can easily use fdisk and whack the partitions, just to be sure
– The volumes SEEM to be mounting, according to the log – I added some additional log info in my notes about this very issue (we are thinking along the same broad lines)
– Well, the SSK is listed on your site, and the Crucial P2 *SHOULD* work – I mean, it DOES create and expand the partitions, create the filesystems, and write logs to it. Also, they do mount cleanly when I boot from the SDXC and take a look
– I will burn a SDXC card with the Desktop version right after this message, and see if it boots!
More notes:
(Oh BTW, before I forget. I have a Satechi inline USB-C power meter, with the SSD attached running DD to create 100MB of file onto the SSD, while running stress with the parameters suggested on the man page, just upped the time to 90 seconds – and having turned off Wi-Fi and Bluetooth in case we had a power problem, it’s only drawing 1.86A at 5.00VDC. The meter is plugged directly into the USB port on the Pi, so we are getting all the voltage drop included from the wire, etc. This leads me to believe that there isn’t a power problem, as if the otherwise perfect functioning of the device didn’t put those fears to rest already.)
OK – New image burned onto the SSD, no SDXC card, not gonna run BootFix.sh, let’s rock and roll!
I do not have a serial port dumping this data (like I would in prehistory, I assume I CAN do this, I’ll need to build something – I can see the use for grabbing a serial dump of the bootloader messages) – so I’m literally taking pictures with my cell phone and typing it back in. When it is fast, or I sneeze, it can be blurry, so I’ll do my best here.
4 seconds after the beginning of time, January 1st 1970 – we see:
ext4Thu Jan 1 00:00:04 UTC 1970
GROWROOT: CHANGED partition=2 start=526336 old: size=17102704 end=17629040 new: size=976246799 end=976773135
[ 8.365405] brcmfmac: brcmf_fw_alloc_request: using brcm/brcmfmac43455-sdio for chip BCM4345/6
[ 8.577293] brcmfmac: brcmf_fw_alloc_request: using brcm/brcmfmac43455-sdio for chip BCM4345/6
[ 8.585192] brcmfmac: brcmf_c_preinit_dcmds: Firmware: BCM4345/6 w10: Jan 4 2021 19:56:29 version 7.45.229 (617f1f5 CY) FWID 01-2dbd92e
– And the system powers off
– Hit the power button
Annnnd – it’s the beginning of time again, except this time the timestamps are in the 7.335826 range.
– OK boot to SDXC. The SSD automounts. Let’s look at the logs:
This might be useful – it looks reasonable to me:
Apr 21 19:15:14 localhost.localdomain kernel: usb 2-1: new SuperSpeed Gen 1 USB device number 2 using xhci_hcdApr 21 19:15:14 localhost.localdomain kernel: usb 2-1: New USB device found, idVendor=152d, idProduct=0562, bcdDevice= 2.09
Apr 21 19:15:14 localhost.localdomain kernel: usb 2-1: New USB device strings: Mfr=1, Product=2, SerialNumber=3
Apr 21 19:15:14 localhost.localdomain kernel: usb 2-1: Product: SSK Storage
Apr 21 19:15:14 localhost.localdomain kernel: usb 2-1: Manufacturer: SSK
Apr 21 19:15:14 localhost.localdomain kernel: usb 2-1: SerialNumber: DD564198838B8
Apr 21 19:15:14 localhost.localdomain kernel: usbcore: registered new interface driver usb-storage
Apr 21 19:15:14 localhost.localdomain kernel: scsi host0: uas
Apr 21 19:15:14 localhost.localdomain kernel: usbcore: registered new interface driver uas
Apr 21 19:15:14 localhost.localdomain kernel: scsi 0:0:0:0: Direct-Access SSK 0209 PQ: 0 ANSI: 6
Apr 21 19:15:14 localhost.localdomain kernel: sd 0:0:0:0: Attached scsi generic sg0 type 0
Apr 21 19:15:14 localhost.localdomain kernel: sd 0:0:0:0: [sda] 976773168 512-byte logical blocks: (500 GB/466 GiB)
Apr 21 19:15:14 localhost.localdomain kernel: sd 0:0:0:0: [sda] 4096-byte physical blocks
Apr 21 19:15:14 localhost.localdomain kernel: sd 0:0:0:0: [sda] Write Protect is off
Apr 21 19:15:14 localhost.localdomain kernel: sd 0:0:0:0: [sda] Mode Sense: 5f 00 00 08
Apr 21 19:15:14 localhost.localdomain kernel: sd 0:0:0:0: [sda] Write cache: enabled, read cache: enabled, doesn't support DPO or FUA
Apr 21 19:15:14 localhost.localdomain kernel: sd 0:0:0:0: [sda] Optimal transfer size 33553920 bytes not a multiple of physical block size (4096 bytes)
Apr 21 19:15:14 localhost.localdomain kernel: sda: sda1 sda2
Apr 21 19:15:14 localhost.localdomain kernel: sd 0:0:0:0: [sda] Attached SCSI disk
– Looks like it is peachy with the SSK, saw it as usb-storage, then correctly ID’ed UASP, we can write to it, sees the raw device, sees the partitions (as we know, as I’m reading this log from the sda2 partition’s filesystem!)
– A bit further down the file:
— Reboot —
Apr 21 19:15:16 localhost.localdomain kernel: scsi 0:0:0:0: Direct-Access SSK 0209 PQ: 0 ANSI: 6Apr 21 19:15:16 localhost.localdomain kernel: sd 0:0:0:0: Attached scsi generic sg0 type 0
Apr 21 19:15:16 localhost.localdomain kernel: sd 0:0:0:0: [sda] 976773168 512-byte logical blocks: (500 GB/466 GiB)
Apr 21 19:15:16 localhost.localdomain kernel: sd 0:0:0:0: [sda] 4096-byte physical blocks
– Still peachy
– And here we are:
Apr 21 19:15:18 localhost.localdomain systemd[1]: Starting Command from Kernel Command Line...Apr 21 19:15:18 localhost.localdomain systemd[487]: kernel-command-line.service: Failed to locate executable /boot/firstrun.sh: No such file or directory
Apr 21 19:15:18 localhost.localdomain systemd[487]: kernel-command-line.service: Failed at step EXEC spawning /boot/firstrun.sh: No such file or directory
Apr 21 19:15:18 localhost.localdomain systemd[1]: kernel-command-line.service: Main process exited, code=exited, status=203/EXEC
Apr 21 19:15:18 localhost.localdomain systemd[1]: kernel-command-line.service: Failed with result 'exit-code'.
Apr 21 19:15:18 localhost.localdomain alsactl[488]: /usr/sbin/alsactl: load_state:1683: Cannot open /var/lib/alsa/asound.state for reading: No such file or d
Apr 21 19:15:18 localhost.localdomain systemd[1]: Failed to start Command from Kernel Command Line.
Apr 21 19:15:18 localhost.localdomain systemd[1]: Dependency failed for Command from Kernel Command Line.
Apr 21 19:15:18 localhost.localdomain systemd[1]: kernel-command-line.target: Job kernel-command-line.target/start failed with result 'dependency'.
Apr 21 19:15:18 localhost.localdomain systemd[1]: Doing "poweroff" action instead of an "exit" emergency action.
– A fresh install of Ubuntu Desktop 21.04 (RPi4/400) without Bootfix results in this missing file and calling it quits to go power off and sulk about it.
Why on Earth could this be happening? I’m using correct hardware, have enough power, it creates proper partitions, expands them, its a valid filesystem, it writes to it, I can mount and interact (read and write) with it, I’ve tried two different units, and I even saved a bit of power just in case because paranoid after reading your posts.
Have an idea about where to go in troubleshooting at this point? Hmmmm…..
Your mention of firmware reminded me of something I found in the log:
Apr 21 19:15:18 localhost.localdomain systemd-fsck[456]: fsck.fat 4.2 (2021-01-31)Apr 21 19:15:18 localhost.localdomain systemd-fsck[456]: /dev/sda1: 261 files, 110787/516190 clusters
Apr 21 19:15:18 localhost.localdomain systemd[1]: Finished File System Check on /dev/disk/by-label/system-boot.
Apr 21 19:15:18 localhost.localdomain systemd[1]: boot-firmware.mount: Directory /boot/firmware to mount over is not empty, mounting anyway.
Apr 21 19:15:18 localhost.localdomain systemd[1]: Mounting /boot/firmware...
Apr 21 19:15:18 localhost.localdomain systemd[1]: Mounted /boot/firmware.
Apr 21 19:15:18 localhost.localdomain systemd[1]: Reached target Local File Systems.
I honestly do not know if this is correct behavior or not. There are a few more similar, I can grab if useful.
I honestly still think it’s power even though you got your readings and they look okay. On the Compute Module 4 my 5V adapter will work with my 256 GB Samsung 960 EVO for example but it won’t boot with my 1TB 960 EVO (needs more power and I use the 12V adapter with that). I fought with this endlessly on my Compute Module 4 and it’s giving me flashbacks to that with the endless impossible disk/partition errors. Once I connected a larger power source it instantly booted up!
The errors are just too crazy/weird yet eerily consistent even through a reimage. There’s no way you’re getting that exact corruption on these disks especially starting with a clean partition table. Do you have a powered USB hub around?
The reason is that the Pi will only pass a maximum of 1.2A combined (COMBINED between all USB accessories plugged in including mice, keyboards, etc) to your USB accessories. It’s very possible that the higher capacity drive is pushing you ever-so-slightly over this limit. Even if more power is available from you shutting everything else on the board off it won’t make any difference above 1.2A to *all* plugged in USB devices combined. It’s an independently measured and throttled hard cap basically on power that can flow through the Pi to your USB devices.
Basically the measurements from the meter won’t matter and it only matters how much of that “hard cap” 1.2A power limit you’re using. If you have extra power hungry drives 1.2A won’t be enough to power them even with nothing else plugged in. Certain enclosures like the ASUS RGB enclosure will do this too because it pulls so much extra power to run the fancy/shiny lights. Smaller capacity drives / budget models are usually okay even on lower power but higher power ones will not boot successfully.
Source for this / more information is here. I’ve even seen a USB keyboard pull enough power for it to not boot and then it would with the keyboard removed!
Have you experienced the NVMe partitions acting really sluggish when working with them? That’s something I get when my power is low (and if it drops much lower it won’t show up at all even just plugging in as an external drive). The result of this is that you can plug a drive in a low power state in and it will function with reduced performance. You cannot however boot from one. It will get stuck somewhere along the process like it has been.
The only reason I could explain which OS you are using making much of a difference is that Ubuntu must not be managing it’s power quite as efficiently as Raspberry Pi OS. It even seems like from your log output firing up the sound card (would use power) finally seems to be making it gulp too much power for the drive to continue to function around this line (sound card has been initialized, state file should be available on disk but nowhere to be found):
/usr/sbin/alsactl: load_state:1683: Cannot open /var/lib/alsa/asound.state for reading: No such file or dEverything definitely seems to be pointing toward power. I see you already have the CanaKit power adapter which leaves a powered USB hub as the best choice here. The one I linked is cheap and the one I use but if you have *any* of them around they should be good enough to test with!
‘ I’ve even seen a USB keyboard pull enough power for it to not boot and then it would with the keyboard removed!’
I have had that EXACT same issue (granted, it was a Unicomp keyboard) – but yes, I agree this is a possibility.
I honestly kept having a cognitive miss with the ‘USB total available bus power is 1.2A’
*NOT*
‘You cannot use more than 3.5A total’
I did remove KB & mouse, as part of power drop reduction (and even tried turning off HDMI, but it’s too useful right now), for at least 4 of the tests (and they are still off, just running PuTTY and VNC) – but same issue.
Happily – I did read *MANY* of your posts here, and the day before yesterday I ordered the switched Sabrent 4-port with 5VDC 2.5A adapter. It will be here today, and I’ll let you know what I find out!
Thanks very much! This is more interesting a project than I thought it would be!
Hey Noah,
Thanks for bearing with me through that process! Yours has actually been a tougher one but some of the issues are so similar/identical to my NVMe power symptoms (although on the CM4) that I’m fairly confident this will take care of it for you.
In the past stuff like this used to happen more due to things like firmware but since Ubuntu received “official” support for the Pi in the 20.04 branch it has always shipped with new enough firmware on board these days. You’d have to have a launch Pi that you’ve gone out of your way to not update or has just been sitting for years with launch firmware.
Definitely let us know how it turns out when the hub arrives!
Well, the powered hub arrived.
NO DIFFERENCE!
Then, you know – it occurred to me, I haven’t even tried to install the default Raspberry Pi OS 32-bit directly onto the SSD and just boot it (no BootFix, nothing – disconnect it after imaging, plug it straight in and see).
IT WORKS PERFECTLY.
It works directly plugged in and found it works through the powered hub.
And by perfectly, I mean I ran the following (via the powered hub, because I just didn’t want to shutdown again):
stress --cpu 8 --io 4 --vm 2 --vm-bytes 128M --timeout 10mstress: info: [927] dispatching hogs: 8 cpu, 4 io, 2 vm, 0 hdd
stress: info: [927] successful run completed in 600s
While doing THIS, I ran:
dd if=/dev/zero of=./speedTestFile bs=25M count=500 oflag=directDid not break a sweat…
Feeling this was not enough, I tried stress with disc workers, as follows:
pi@red:~ $ stress --cpu 8 --io 4 --vm 2 --vm-bytes 128M --hdd 4 --timeout 10mstress: info: [1017] dispatching hogs: 8 cpu, 4 io, 2 vm, 4 hdd
stress: info: [1017] successful run completed in 601s
And absolutely everything is peachy. It’s been running now for 4 hours after those tests, and it hasn’t locked or anything. Seems quite solid so far.
OK – now, to be sure, I do not doubt anything you said about power. But I’m on a mission now.
First, I am running everything through an APC online UPS to ensure my power is clean and uninterrupted, no sags or swells to deal with. This is both the power supplies, the powered hub, and the ethernet switch. This also avoids any possible ground loops, etc.
Then to characterize the power draw, I connected my inline Satechi USB C power meter directly to the SSK enclosure (so we can see the draw of just the drive). I have kept the keyboard and mouse disconnected, Wi-Fi and Bluetooth disabled (not really relevant, but I’m not changing it back so we have some continuity in the config).
Regardless if the drive is directly connected, or through the powered Sabrent hub – it draws between .25 to .45 amps, and voltage of 5.01 to 4.99 (a slight voltage drop as current increases, as would be expected).
Now, I honestly did not believe it could consume so little power (given all the warnings about how much they draw), so I connected the meter to a 10000mAh fully-charged battery, and the meter to a USB DC load bank. I set the load bank to the following values – .25A .30A .38A .45A and 1.2A (the max bus current), and the Satechi meter was .01A different than the reported load from .25A to .45A, and .02 amps out at 1.2A load.
I believe the meter is correct, ~1/100th of an amp difference is well within testing tolerance that I would expect. However, the meter update speed isn’t incredibly fast (only several times a second), so I’m going to go full-bore crazy to characterize the power, just because I want to REALLY understand the root cause here. And, as a side effect – if it isn’t the SSK enclosure at the end of this, you will now have all the data on a low-power enclosure option. If it is, we will have a lot of work begun in characterizing why the chipset used in this device has issues with operating system versions that were previously unknown, and this may help more than just me.
So, because this is driving me more crazy than I obviously am – I’ve ordered a few items to assist in troubleshooting:
I’ve ordered a – ‘USB Power Meter USB 3.1 Tester USB load Digital Multimeter Current Tester Voltage Detector Lua Interpreter Integrated DC 26V 6A PD 2.0/3.0 QC 2.0/3.0/4.0 pps Trigge (CT-3(CNC Aluminum Alloy Casing))‘ – this will allow me to sample 1,000 times a second the voltage, current, and bus signalling – all captured to my PC, to check for voltage swells or sags, or unexpected extremely high momentary amperage spikes, and draw pretty graphs for me to put on my Mom’s fridge. This will confirm the power usage for certain.
I have also ordered a USB 3 inline breakout board that will allow me to connect a couple of Fluke 289 (with NIST trace) logging 4.5 digit multimeters and do the same thing to confirm the performance of the new USB power meter. I say a couple, as I want to get both voltage and current at the same time. This is because I need to confirm the performance of the new meter from above so we both trust it, right? And yes, I’m going WAY overboard – but I’m getting MEAN now, I don’t deserve this sort of flack from a computer I’ve been so nice to.
Well then, the next culprit might indeed be the enclosure – I do not know why, it shouldn’t be able to run RPiOS and not server (I say this as I tear more hair out, I’m down to Homer Simpson 3 hairs left, you know) due to the ENCLOSURE. It’s just crazy weird.
In case it is (for some reason) the SSK nVME enclosure causing the issue due to currently unknown bizarre reasons, I ordered your suggested ‘ORICO M.2 NVMe SSD Enclosure, USB 3.1 Gen 2 (10 Gbps) to NVMe PCI-E M.2 SSD‘
I will characterize it’s power draw (and post, if anyone is interested), and see if it magically works.
Do remember – I have 3, 8GB RPi4’s – and I have been swapping between them as I get a failure to quickly check if I have a bad board – and there is no difference.
In the meantime, as I wait…
Any suggestions to try other things? Any suggested reading to more deeply understand the initial boot process, so I can begin to try and be more useful to this undertaking?
I seriously appreciate your help – I am taking this as a personal affront now. I don’t know what I did to make these kids mad at me, but *I* have the opposable thumb here, and I plan to WIN!
And by enclosure – I guess I really mean the chipset and the implementation of such.
Oh – I almost forgot.
In a fit of additional paranoia – I deleted the Imager program, downloaded a fresh copy, and tried that.
THEN I downloaded the ‘preinstalled server’ image directly from Ubuntu, as well as desktop, core, and LXD (remember, that is the final endgame of all of this) – nope, they don’t work. I didn’t read the logs there, because at this point I’m unsure if I can lose more blood from my eyes parsing logs of suicidal Ubuntu ravings…
At this point it definitely seems like it has to be adapter specific. The differences in OS flavors would likely be impacting either the firmware or specific kernel version if this theory pans out.
Let’s see how the Orico one behaves!
Hey Noah,
Fascinating results! I agree with your conclusion. I don’t have a ton of experience with SSK adapters other than when people use them on the storage benchmark it doesn’t let any information from udev/lshw through so it wouldn’t shock me.
I really like the power meter you ordered and am excited to see how that does. This is a really curious case and I’m leaning toward this being something with the SSK adapter (or more specifically the storage chipset it uses internally) but it’s honestly really strange that the different flavors / 64 bit etc. seems to be making a difference here and points maybe toward a kernel or firmware fix that may not be present on some flavors.
As long as the Orico is the 10Gbps version you should be fine as people have had problems with some of the 6G versions. Let us know what you find!
I just double checked the Orico – and it is the 10Gbps version, so Saturday seems to be the day.
I am quite curious about that power meter as well – it’s kinda why I’m double-checking it with a pair of high-end Flukes. If it works to characterize the basics of USB communications (and also request higher voltage) and characterize instantaneous (to 1/1000th of a second) power draw requirements – it looks to be a very useful tool (and a lot smaller than a pair of 289’s) that anyone doing this for a living might want to get.
If it works out, I’ll get a few more – some of the stuff I run into I need to see how devices perform running multiple ports. It would be nice to see how a multiport adapter responds to 2.4A’s, (as they all advertise that they are PERFECTLY fine with) being pulled on all ports. In fact, I’ve seen a few that claim even higher amperage (several 3A units) that simply lie about it.
I’m finding that it seems that you have to do complete QA on everything nowadays.
I’ll let you know how it performs! Onward to victory (or at least a win for the home team)!