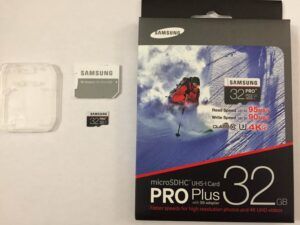
In my quest for maximum performing MicroSD cards in the Raspberry Pi* I decided to purchase the top performing card in most benchmarks which is the Samsung Pro Plus. However, the common overclock for the Raspberry PI SD port to 100MHz does not seem to work with these cards and they become unstable. However, through a little bit of tweaking and experimentation, I found that these cards can be clocked to 99MHz and work just fine and provide a substantial performance boost.
Equipment

The Raspberry Pi 4 is available in different memory configurations all the way up to 8 GB. It’s about the size of a credit card and uses an extremely low amount of power making it ideal for all sorts of projects and ideas!
Links: Amazon.com*, AliExpress*, Amazon.ca*, Amazon.com.au*, Amazon*.co.jp*, Amazon.co.uk*, Amazon.de*, Amazon.es*, Amazon.fr*, Amazon.it*, Amazon.nl*, Amazon.pl*, Amazon.se*, Amazon.sg*
Performance Difference: Before
Before you go through the trouble of doing this you might wonder if this actually makes a performance difference and if it’s worth it. The answer is definitely yes. Here are my benchmarks from 80MHz to 99MHz:
Raspberry Pi Dramble microSD benchmarks
microSD clock: 80.000 MHzRunning hdparm test…
/dev/mmcblk0:
Timing buffered disk reads: 82 MB in 3.06 seconds = 26.82 MB/secRunning dd test…
51200+0 records in
51200+0 records out
419430400 bytes (419 MB) copied, 17.9173 s, 23.4 MB/sRunning iozone test…
random random
kB reclen write rewrite read reread read write
102400 4 2322 2902 9067 8970 8864 1861
Performance Difference: After
And now for the 99MHz clock:
Raspberry Pi Dramble microSD benchmarks
microSD clock: 99.000 MHzRunning hdparm test…
/dev/mmcblk0:
Timing buffered disk reads: 106 MB in 3.04 seconds = 34.87 MB/secRunning dd test…
51200+0 records in
51200+0 records out
419430400 bytes (419 MB) copied, 16.5307 s, 25.4 MB/sRunning iozone test…
random random
kB reclen write rewrite read reread read write
102400 4 2400 2917 9759 9695 9620 1952iozone test complete.
microSD card benchmark complete!
As you can see there are some pretty big gains here. Our hdparm read tests went from 26MB/sec to 34MB/sec and our dd write and random 4k I/O tests also went up. This means whether you are running your Pi as a media server or just using it as an operating system you will see performance gains from increasing the clock to 99MHz. I have performed extensive testing at 99MHz such as upgrading a Kali distribution to kali-full (very disk intensive operation) and ran a Minecraft server with these settings and they are rock solid stable. I have no idea why at 100MHz these Samsung Pro cards suddenly stop working on the Raspberry Pi but 99MHz works just fine.
How do I do it?
The secret to getting the 99MHz clock has to do with your Raspberry Pi’s core speed. You want your core speed to be a divisor of 99. You do this using the Raspberry Pi’s config.txt located in the /boot/ folder. These benchmarks were taken with a pretty aggressive core overclock.
Please remember overclocking your Pi is at your own risk and I am not responsible for anything that happens!
Here are the settings I used on a Raspberry Pi 3:
# Overclock the SD carddtparam=sd_overclock=99
# Configure overvoltage (needed for core and CPU overclocks)over_voltage=4
# Overclock the corecore_freq=495
This is a pretty aggressive overclock. A more moderate one would be:
# Overclock the SD carddtparam=sd_overclock=99
# Configure overvoltage (needed for core and CPU overclocks)over_voltage=2
# Overclock the corecore_freq=396
A very conservative clock speed with no overvoltage at all would be
# Overclock the SD carddtparam=sd_overclock=99
# Overclock the corecore_freq=297
The important thing is that your core_freq / 99 comes out to an even number. You don’t HAVE to have an even number, but when you run the benchmarks you will see that the Pi adjusts it to frequencies that are not even divisors. One I saw was 81.75MHz or something similar. Either way, I highly recommend clocking your Samsung Pro cards to 99MHz because even as fast as it is it can go even faster!
Instructions to Benchmark
For the latest analysis of the results and recommended choices of what storage to use check out the Pi Storage Benchmarks Analysis Page.
To run the benchmark yourself type/paste:
curl https://raw.githubusercontent.com/TheRemote/PiBenchmarks/master/Storage.sh | sudo bash


Hey, I know this is more for the Pi 3, but I’m wondering if this would apply to the Pi 4 as well?
I ran the benchmark on my system (new install, up to date) and was surprised to see it seems to be running the SD Card at 50 Mhz. Does that sound right? Here’s the output I get to start with:
Clock speeds: CPU: 1500 - Core: 500 - RAM: N/ASystem rootfs drive (/) has been detected as /dev/mmcblk0p2 (mmcblk0p2)
Card CSD status register: MID: 3 OID: SD PNM: SN64G PRV: 8.0 MDATE: 8/2019
Card SCR status register: SD Physical Version Specification: 6
MicroSD information: Clock Speed: 50.0 - Manufacturer: SanDisk - Model: SN64G - Vendor: SD - Product: SD - HW Version: 0x8 - FW Version: 0x0 - Date Manufactured: 08/2019
Class: A2 Class 10 V30 U3
Is that the Pi, and I can modify it up to have a decent gain from it all, or will that limit likely be there from the SD Card itself? This is all literally a brand new purchase of both the Pi and the SD Card, I’m just mucking around to see what I can do to get the most performance out of it that I can before putting it to work. If you want to check the rest of the benchmark results I’m getting, you’ll find them in the Analysis page with the username “FreelancerJ”
Hey Freelancer,
The Raspberry Pi has always used a low clock on their SD card even though you’d be hard pressed to find one to buy anymore that won’t do 100Hz anymore.
The original reason was that the Pi’s original vision was to be a very cheap and inexpensive computer they could send anywhere in the world and any SD card plugged into it would work even if it was a < 99 cent ultra cheap generic SD card. I was surprised this wasn't upgraded in the Pi 4 though as the SD card setup on the Pi also has other limitations like lacking full UHS-3 support. I have a Tinkerboard S that I got at least a year or two back that has a much faster SD card reader that implements full U3 support so the Pi is falling behind in this area (thank goodness it got USB 3.0 this generation!) It's definitely worth running a benchmark with it as it helps more on some cards than others. The Samsung Pro series ones that this article was written for actually gain quite a bit from it. The truth is the best way to get a fast SD card is to buy an application class SD card (A1)!
Unfortunately the speed gains from overclocking from 50 to 100 are definitely nowhere near a 50% gain or even a 25% gain. If you sort on the Raspberry Pi Benchmarks page at all the people running at 100Hz are only very slightly faster than their 50Hz counterparts.