
The Orange Pi 5 has a nice M.2 NVMe slot but unfortunately most of the official images will not boot if you try to directly image a NVMe drive. Fortunately there is an easy way to get this working that people who frequent the blog will almost certainly have seen before.
We are going to bootstrap the boot process using a SD card and then clone that SD card to our SSD to be used as the root partition. This essentially will let us have our system’s root partition on the SSD (much faster).
Let’s get started!
Hardware Used
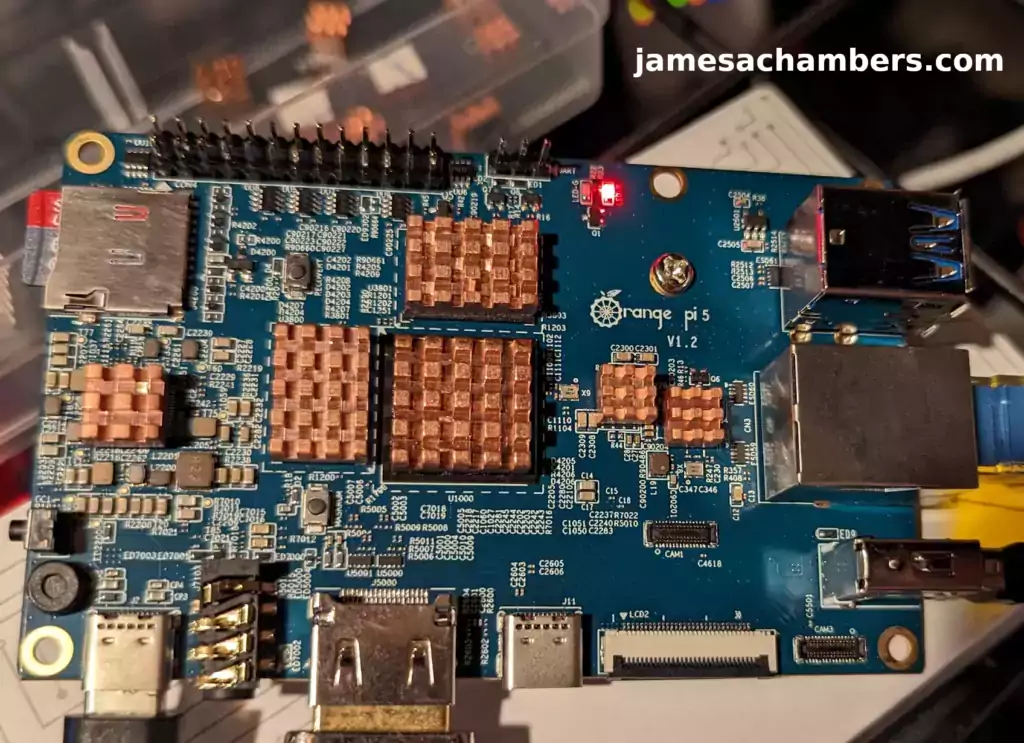
The Orange Pi 5 the latest release from Orange Pi and is the most powerful model yet. It has a 6 core CPU and options from 4GB of RAM all the way up to 32GB of RAM!
Links: Amazon.com*, AliExpress*, Amazon.ca*, Amazon.co.uk*, Amazon.de*, Amazon.es*, Amazon.fr*, Amazon.it*, Amazon.nl*, Amazon.pl*
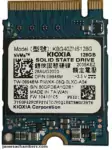
The Kioxia (Toshiba) 128GB M.2 2230 PCIe NVMe drive is much shorter than most NVMe drives (full size is 2280). It fits great with single board computers / tablets / other smaller form factors.
Links: Amazon.com*, Amazon.ca*, Amazon.co.uk*, Amazon.co.jp*, Amazon.com.au*, Amazon.de*, Amazon.es*, Amazon.fr*, Amazon.it*, Amazon.nl*, Amazon.pl*, Amazon.se*, Amazon.sg*

The Geekworm copper heat sink set is designed to fit many different single board computers. It uses thermal conductive adhesive which many “cheap” heat sink kits for SBCs don’t have. Eliminates hot spots and reduces throttling. Can be further enhanced by powered cooling over the heat sinks.
Links: Amazon.com*, Amazon.ca*, Amazon.co.jp*, Amazon.co.uk*, Amazon.de*, Amazon.es*, Amazon.fr*, Amazon.it*
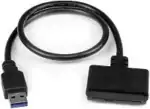
The StarTech USB 3.1 to 2.5″ SATA adapter is one I have recommended for many years for use with all kinds of devices including the Raspberry Pi, Orange Pi, ODROID, Libre “Renegade” and Tinker Board. It’s widely compatible and works with gaming consoles as well.
Links: Amazon.com*, Amazon.ca*, Amazon.com.au*, Amazon.co.jp*, Amazon.co.uk*, Amazon.de*, Amazon.es*, Amazon.fr*, Amazon.it*, Amazon.nl*, Amazon.pl*, Amazon.se*, Amazon.sg*

The Orange Pi official mouse uses 2.4GHz wireless to give you a wireless mouse experience with the Orange Pi
Links: Amazon.com*, AliExpress*

The Orange Pi monitor is meant to be a portable monitor you can take anywhere. It has a resolution of 1080P and features a hinge in the back that folds out to support the monitor.
Links: Amazon.com*, AliExpress*
Note for USB Booting
Important: Only the top blue port of the Orange Pi 5 is fast for using USB storage. You can use a USB-connected SSD.
The bottom port, despite being blue, is USB 2.1.
Keep in mind that if you are using a USB SSD then in the instructions anywhere it says /dev/nvme0n1 you will need to use /dev/sda or whatever drive was assigned when you plug in your drive via USB.
Note for Official Debian / Ubuntu Images (Updated 1/10/2023)
Orange Pi has updated their official images to support directly booting from NVMe. This means that if you are using the official Ubuntu or Debian from orangepi.org then you can actually write the image directly to the SSD. This is the easiest way to get it going.
You first need to write the image to a SD card and then run:
sudo orangepi-config
Then choose System->Install->Boot from SPI and install the new updated boot loader to the SPI flash.
This did not work at launch but is working now. It is now possible to simply write the official images directly to NVMe and boot with it after updating the boot loader! The following instructions will still be useful for other operating systems or operating systems that do not support booting directly from NVMe.
Note for Armbian (Added 1/20/2023)
Armbian has a similar install utility as orangepi-config. For Armbian you will use:
sudo armbian-config
Then choose System->Install->Boot from eMMC and install the new updated boot loader to the SPI flash.
You should also install the system to Armbian using this method. The instructions in the rest of the article are meant for operating systems that will not boot natively from NVMe. It uses a SD card as the boot loader to essentially let you boot anything (even ones not designed to boot directly from NVMe).
Supported SSD Sizes (Updated 1/26/2023)
Important: There is also a type of M.2 drive called a M.2 SATA drive. This is an older type of drive that most of you won’t have but some of you will. This type of drive is supported by the Orange Pi 5 but you have to add a special overlay (overlays=ssd-sata). If your NVMe drive shows up as /dev/sda instead of /dev/nvme0n1 then you have a M.2 SATA SSD. If you have a M.2 SATA drive follow this excellent guide by u/jng98908 on reddit.
You can use either a 2230 or a 2242 size NVMe drive.
There are actually holes for mounting hardware at both places.
Using a 2230 size NVMe drive looks like this:
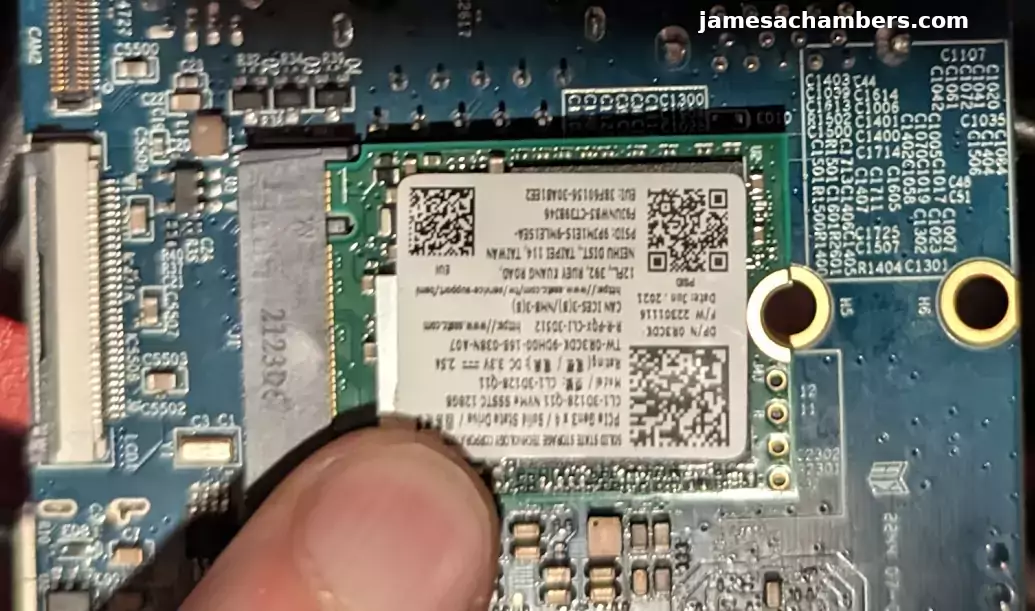
It’s totally fine to use a larger one but they will be hanging off the edge of the board. As you can see I do not have the mounts installed on my board. I just leave the 2230 drive in the port like this but it is on my to-do list to find some mounts for the M.2 drive for this board.
SD card boot loader – Preparing SD Card
First you should have a completely working installation on a SD card of the OS that you would like to use. I used the official Debian desktop image for this guide (recommended) so if your partitions are different it may be your flavor of Linux and need slightly altered instructions.
If you have an already working installation you want to move to your SSD you can use this as well most likely.
Note that some operating systems like Armbian will require you to manually go in and modify files on the “boot” partition. If you stick with the official images you should be able to follow the guide as-is but note that some operating systems may have text files (or even files that need to be recompiled with mkimage like for Armbian) for this method to work.
You should completely update first with:
sudo apt update && sudo apt full-upgrade
Preparing SSD
First we are going to completely remove all partitions from the drive so it’s completely blank. Your drive should typically be /dev/nvme0n1:
sudo gdisk /dev/nvme0n1
Now remove all partitions from the device. If you press “p” it will print out the partitions. You can then use “d” to delete them.
Here’s an example on mine:
root@orangepi5:~# sudo gdisk
GPT fdisk (gdisk) version 1.0.6

Partition table scan:
  MBR: protective
  BSD: not present
  APM: not present
  GPT: present

Found valid GPT with protective MBR; using GPT.

Command (? for help): p
Disk /dev/nvme0n1: 250069680 sectors, 119.2 GiB
Sector size (logical/physical): 512/512 bytes
Disk identifier (GUID): E3017ECA-4571-4F62-A39F-4BA2A4323BD8
Partition table holds up to 128 entries
Main partition table begins at sector 2 and ends at sector 33
First usable sector is 34, last usable sector is 250069646
Partitions will be aligned on 64-sector boundaries
Total free space is 8350 sectors (4.1 MiB)

Number  Start (sector)    End (sector)  Size       Code  Name
   1              64            8063   3.9 MiB     0700  loader1
   2           16384           24575   4.0 MiB     0700  loader2
   3           24576           32767   4.0 MiB     0700  trust
   4           32768         1081343   512.0 MiB   EF00  boot
   5         1081344       250069646   118.7 GiB   8300  rootfs

Command (? for help): d
Keep pressing d until all the partitions are deleted. Once they are gone use the ‘w’ command to write your changes.
Cloning Installation to SSD
We’re now ready to clone your installation to the SSD. We can now copy your drive to the SSD with the following command:
cat /dev/mmcblk1 > /dev/nvme0n1Wait for the operation to complete (there won’t be any output but you will have a cursor again and be able to type new commands). Remember that you are copying an entire drive from one to another basically with that one command.
Mine took about 30-45 minutes (although I was using a 64GB SD card and the larger SD card you use the longer it will take to copy the whole drive).
If you are having any trouble with permissions try becoming “root” first with:
sudo suNow try running the command again and as the superuser you should not encounter any permission errors.
Change SD card’s rootfs UUID
We need to change our SD card’s UUID so that it doesn’t try to boot from that partition. We can set it to a random one with the following command:
sudo tune2fs -U random /dev/mmcblk1p2
If you get an error with the previous command regarding csums try the following command instead:
sudo tune2fs -O metadata_csum_seed -U random /dev/mmcblk1p2
We can verify that it has changed with blkid like this:
root@orangepi5:~# sudo blkid
/dev/nvme0n1p1: SEC_TYPE="msdos" LABEL_FATBOOT="opi_boot" LABEL="opi_boot" UUID="0257-2A31" BLOCK_SIZE="512" TYPE="vfat" PARTLABEL="bootfs" PARTUUID="0a65713b-d4b4-0642-a3a4-ebc357e507a1"
/dev/nvme0n1p2: LABEL="opi_root" UUID="ae948e48-3646-4f5c-be01-73168e079bc8" BLOCK_SIZE="4096" TYPE="ext4" PARTUUID="7490e84a-f585-944e-9ce6-f275f067a023"
/dev/mmcblk1p1: SEC_TYPE="msdos" LABEL_FATBOOT="opi_boot" LABEL="opi_boot" UUID="0257-2A31" BLOCK_SIZE="512" TYPE="vfat" PARTLABEL="bootfs" PARTUUID="0a65713b-d4b4-0642-a3a4-ebc357e507a1"
/dev/mmcblk1p2: LABEL="opi_root" UUID="37a6ee0a-e61d-470a-9e53-eaf51726942c" BLOCK_SIZE="4096" TYPE="ext4" PARTUUID="4f32d51c-0523-1248-9bc3-092d1f11c594"
Notice that /dev/nvme0n1p2 and /dev/mmcblk1p2 no longer have matching UUIDs. This is exactly what we want.
Change SSD’s boot UUID
Next we are going to change the boot partition’s UUID on the SSD. This will make it so that the mounted /boot folder inside your operating system actually mounts the SD card (which is your actual boot loader in this configuration).
First make sure you have mtools with:
sudo apt install mtools -y
Now we can change the UUID with:
sudo mlabel -N aaaa1111 -i /dev/nvme0n1p1 ::
You can verify these are different using the same sudo blkid command as the previous section.
Run fsck
Before we reboot run fsck on the drive like this:
sudo fsck -yf /dev/nvme0n1p2
This will prevent you from having to run fsck on the CLI the first time you try to boot.
Reboot and Verify
Now reboot the Orange Pi 5 with:
sudo reboot
With any luck you should be booted using your SSD! We can verify this with the mount command like this:
root@orangepi5:~# mount
/dev/nvme0n1p2 on / type ext4 (rw,noatime,errors=remount-ro,commit=600)
/dev/mmcblk1p1 on /boot type vfat (rw,relatime,fmask=0022,dmask=0022,codepage=936,iocharset=utf8,shortname=mixed,errors=remount-ro)
/dev/nvme0n1p2 on /var/log.hdd type ext4 (rw,noatime,errors=remount-ro,commit=600)
Here we can see that our root partition (/) is indeed on /dev/nvme0n1p2 and not /dev/mmcblk0p2. We can also see that my /boot folder is properly mounted is /dev/mmcblk0p1 (the SD card which is serving as our boot loader). Success!
Resize NVMe Partition (Added 1/24/2023)
You can use Orange Pi’s built in resize application if you are using one of the official operating systems:
sudo /usr/lib/orangepi/orangepi-resize-filesystem start
Testing Performance
For the guide I used a SSSTC 128GB 2230 M.2 NVMe drive. These are available on Amazon for around $10-12 (also see Kioxia 128GB M.2 2230 module*).
You can verify the performance of your drive on Pi Benchmarks using the following command:
sudo curl https://raw.githubusercontent.com/TheRemote/PiBenchmarks/master/Storage.sh | sudo bash
Here are the results:
     Category                  Test                      Result
HDParm                    Disk Read                 375.32 MB/s
HDParm                    Cached Disk Read          381.15 MB/s
DD                        Disk Write                234 MB/s
FIO                       4k random read            47080 IOPS (188321 KB/s)
FIO                       4k random write           35128 IOPS (140514 KB/s)
IOZone                    4k read                   75628 KB/s
IOZone                    4k write                  67285 KB/s
IOZone                    4k random read            35874 KB/s
IOZone                    4k random write           70620 KB/s

                          Score: 17,718
The full Orange Pi 5 benchmark can be viewed here on Pi Benchmarks.
That is an outstanding score. We are getting NVMe performance. This score actually even beats my ODROID M1 benchmark.
The Orange Pi 5 is without a doubt a very powerful board and is performing exactly where it should be.
Other Resources
I’ve also covered how to install Steam on the Orange Pi 5 here
I’ve also reviewed the Orange Pi portable monitor here (with the Orange Pi 5 connected)
If you are looking for alternative WiFi adapters for the Orange Pi 5 see my using E-keyed WiFi adapters with the Orange Pi 5 guide here!


I know it’s a lot to ask, but would you be interested in doing a small update about running Arch-based distro on NVMe drive?
Would it follow the same procedure of installing the RebornOS on SD card, then cloning it to the NVMe with remaining steps? (How would the resize work in this case?)
Thanks!
Hey Patryk,
Yes, I’ve started writing my SSD booting guides much, much more specifically after what I’ve learned from writing this one. Notice how I titled this one “StarFive VisionFive 2 Official Debian SSD Boot Guide“. There’s more operating system options every day and that will continue for a long time. There would be 100 different sets of instructions on this guide for every single one if I support them all.
They’re all different. Usually you need to go in and modify things on the “/boot” partition. I did a SSD boot guide earlier this week that has to modify a file called /boot/extlinux/extlinux.conf. It was hard-coded in that file.
It’s really a sign of quality of your OS how easy it is to set up SSD booting. If it’s really hard you probably are using a pretty obscure OS made by a pretty small team. If you are using the official operating systems orangepi-config will literally do the whole thing for you. I’d imagine yours is going to require manually editing the “boot” partition. Armbian also has armbian-config which does the whole thing for you as well. The big operating systems all have tools to do it for you (which work now but only with the absolute latest downloads, Armbian has to come from the GitHub and the Orange Pi releases have to be something like Jan 12th or later).
If we’re talking about Arch Linux you are looking at instructions like this. It looks like you need to straight up build your own bootloader to me:
. Create a file called `boot.txt` with the following contentpart uuid ${devtype} ${devnum}:${bootpart} uuid
setenv bootargs console=${console} root=PARTUUID=${uuid} rw rootwait
if load ${devtype} ${devnum}:${bootpart} ${kernel_addr_r} /boot/zImage; then
if load ${devtype} ${devnum}:${bootpart} ${fdt_addr_r} /boot/dtbs/${fdtfile}; then
if load ${devtype} ${devnum}:${bootpart} ${ramdisk_addr_r} /boot/initramfs-linux.img; then
bootz ${kernel_addr_r} ${ramdisk_addr_r}:${filesize} ${fdt_addr_r};
else
bootz ${kernel_addr_r} - ${fdt_addr_r};
fi;
fi;
fi
if load ${devtype} ${devnum}:${bootpart} 0x48000000 /boot/uImage; then
if load ${devtype} ${devnum}:${bootpart} 0x43000000 /boot/script.bin; then
setenv bootm_boot_mode sec;
bootm 0x48000000;
fi;
fi
Oh boy. Yeah we’re not doing that in this guide.
It’s 8 total steps to do this vs. 1-2 for Armbian or the official Orange Pi operating systems (armbian-config/orangepi-config). I don’t think this is appropriate to add to the guide. That’s it’s own whole ordeal to install that one it looks like.
Someone probably needs to write a special guide for this one. It’s definitely not going to look anything like the other ones though. Someone has already shared one it looks like at least. Hopefully that helps!
Actually I followed your normal tutorial step for step and it worked perfectly!
– first I installed the RebornOS from the GitHub project for opi5 board on the SD card
– I cloned the system to SSD with cat
– followed all the standard instructions you described in the guide, one exception was changing UUID with random method which would not cooperate in my case, I had to manually specify random UUID.
– I have fully functional system with boot on SD card and system on the SSD, no major issues so far, everything works very responsively
Do you have any ideas how to attempt changing the contents of SPI to point to boot partition on the SSD to free the SD card slot, or maybe where to start the research? I’m planning to do some poking with spidev python library, not sure if it’s the right tool but I’ll post update in case I find a method that works.
Anyway, thanks for great tutorial!
w(ARM) regards 😀
Hey Patryk,
Oh wow, I’m a little surprised by that but that’s actually great news! It’s true that you can kind of adapt this method to work on anything but you’re the first one I’ve heard of doing it successfully for Arch, congratulations!
This is actually a really tricky question because as I was talking about in some of my earlier replies today the boot loaders between Armbian and Orange Pi aren’t compatible with each other. That leaves you with a tricky choice of having to choose between the official boot loader and the Armbian boot loader to see which one works. It wouldn’t hurt to try writing both and see if you can get it to boot off the NVMe with your existing image. It’s possible neither of them will work but one of them may be close enough. It’s worth a shot with how far you’ve got already.
What we are hoping for here using the armbian-config or orangepi-config boot loader menus is that they are smart enough to still make this process kind of work. That’s actually theoretically possible because the boot process is definitely a mix of SPI and what is on your “boot” partition. If Arch’s boot process is similar enough it may not really know the difference when you’re writing the boot loader and the menu/wizard still might find everything it needs to populate the fields with the right values (such as the UUIDs) not knowing that it’s actually for Arch instead of Armbian or Orange Pi Debian.
To be clear to attempt this you would take out your current SD card and set that aside, write Armbian or Orange Pi’s Debian to a different SD card, use orangepi-config or armbian-config and then choose System -> Install and finally write the boot loader to SPI flash. Don’t choose to copy the data to the SSD/root partition when trying this otherwise that will basically wipe out your existing Arch install on the SSD. Just write the boot loader only to SPI flash. If it doesn’t work you would just put your other SD card back in to go back to SD card boot strapping.
Hopefully that helps!
Hello. What is aaaa1111 in sudo mlabel -N aaaa1111 -i /dev/nvme0n1p1 :: ?
Hey Dmitry,
This is just random actually. You could use bbbb2222 as well. It just needs to not match the other one is the important part.
Hopefully that helps!
How to extend the nvme0n1p2 to the max size after reboot?
Hey cld,
Great question! Try using Orange Pi’s built in service to do this with:
sudo /usr/lib/orangepi/orangepi-resize-filesystem startIt might also be easier for some people to just put it into a PC running Linux and run gparted on it. That’s always a tried and true method if all others fail. Hopefully that helps!
Would be great to see how ssd fit board. As official documentation suggest 2242 and you are using 2230
Hey cono,
Yes, that is a great question! So the answer is you can use both sizes. There are actually mounting holes for both sizes. This is what a 2230 NVMe drive looks like mounted in it:
A 2230 drive will take you to H5. You can see here that if you use a 2242 there’s actually a second hole (H6). A 2242 will take you all the way to the edge of the board. You can use longer drives but they will hang over the edge.
This was such a great question that I’ve added this picture to the article as you’re right that I never showed the 2230 drive mounted (not in my review either it turns out). Technically it still isn’t mounted because I don’t have the little mounts for it (they’re not included). It’s on my to-do list to get some of these but I’ve been using it the whole time without one.
Probably the shorter of a drive you have the easier it will be to get away without doing a full mount. The longer drives tend to catch on things and get pulled out a lot easier when they’re sliding. The really short ones don’t want to pop out nearly as easily (unless it’s a worn drive that doesn’t have any tension at all when it’s in the port).
Thanks for asking this question!
Thanks. Appreciate your quick reaction 😀
No problem at all, take care!
ARBIAM NVME boot
I still cannot boot raspbian from NVME, I don’t think the section for Armbian NVME is correct
In any case I did follow those instructions, and also tried using the standard ( nand-sata-install, then option 7 ( Install/Update the bootloader on SPI flash) and was NOT able to boot from NVME
I even tried booting from one of the other Linuxes ( Ubuntu/Debian) and tried “nand-sata-install option 7”, and again it did NOT work
I will be very happy if somebody will confirm the EXACT steps to install RASMIAN into NVME
Thanks
Hey Javier Mitchell,
If you are using the public December 31st download of Armbian yes that one is broken. The one on the main site is broken. That’s the one from when they originally announced it was released and it has never been updated since. You can’t use that one.
You need to use the GitHub releases which are much newer. There’s a version from like 19 hours ago even on here. There’s at least a dozen versions newer than the one publicly posted on the site which is 100% broken. They release a new one every day or two it feels like so the one on the main site being 3 weeks outdated might as well be ancient. It’s a fossil. I have no idea why there’s such a release gap between the GitHub and the official site.
The same goes for the official images although you can use the ones off the main Orange Pi site for that now. If you aren’t using the newest versions of the official images those are also broken. If you are using an install (or downloaded image) from when you first got your Orange Pi 5 it’s broken and you’d want to download the updated version from the site.
Hopefully that helps!
Thanks, I will give it a try and let you know
James
I did try one of the newer releases and it works flawlessly
Thanks , I was starting to think I was useless!
Hey Javier,
Excellent, that is fantastic, I’m so glad these releases have all finally got updated.
That’s both you and Razor Edge today that have got all fixed up. Thanks for letting me know you got it, enjoy and take care!
Hi,
Thnaks, I finally booted from NVME. Could we remove the sd card and just boot from nvme? I could not do that and the SD card should be pluged.
Hey Mahdi,
Great question! So you can actually boot it without SD card if you write the new boot loader. However, it’s basically one or the other.
You can either use the SD-based boot like you’re using or you need to follow my “Note for Official Debian / Ubuntu Images (Updated 1/10/2023)” section and write the updated boot loader using orangepi-config. Once you do that you can image the NVMe drive directly and not use a SD card at all.
If you used the method in my guide and you want to switch you actually need to start over. The method in the guide is meant to be used to bypass native NVMe booting (because it didn’t used to work at all at launch and you had to do it the old school way). First write the updated boot loader to the device and then image the NVMe drive directly and do your first startup from that. Then it should just boot with the updated boot loader.
Hopefully that helps!
excellent write up, you and armbian folks have saved the day for the orange pi 5 community for those without the skills… shame on orange pi for their poor support, they could have worked with the community a little better. i even had to make my own case because there was nothing out, fortunately more free designs are showing up . regardless, nvme score is impressive for a sbc, its going to hard for next PI5 To catch up… at this price point.
Description: orange pi 5-armbian- 4 gb- 256 gb nvme active cooling
(Optional) Enter alias to use on benchmark results. Leave blank for completely anonymous.Alias (leave blank for Anonymous): jb
Result submitted successfully and will appear live on https://pibenchmarks.com within a couple of minutes.
Category Test Result
HDParm Disk Read 371.92 MB/s
HDParm Cached Disk Read 375.63 MB/s
DD Disk Write 289 MB/s
FIO 4k random read 49829 IOPS (199318 KB/s)
FIO 4k random write 43115 IOPS (172463 KB/s)
IOZone 4k read 79670 KB/s
IOZone 4k write 98346 KB/s
IOZone 4k random read 49865 KB/s
IOZone 4k random write 94361 KB/s
Score: 22474
Compare with previous benchmark results at:
https://pibenchmarks.com/
on a different point, anyone have issues with vertical usb port, wireless usb doesn’t work on it. thanks again
Hey jb1,
Fantastic results, you actually got the 2nd highest score ever recorded for the Orange Pi 5. DD write of 289MB/s. Wow, thanks for sharing!
So for the vertical USB port yes I can confirm this actually. Nobody else had mentioned it so far but when I did my testing with Armbian my USB keyboard dongle was plugged in the vertical USB 2.0 port and it didn’t work. I only experienced this problem on Armbian during all of my testing and nothing else so far. It seems specific to Armbian.
I had to move mine to one of the blue ports. I’m guessing that port isn’t working for anything if it won’t work for your USB WiFi adapter or my USB keyboard/mouse dongle. I don’t have a solution for it but I can absolutely confirm that I saw problems specifically with the vertical USB 2.0 port on Armbian.
I’m sure this will be fixed before too long. It sounds like it is fixed in Jammy maybe? You may want to try the build that person linked to though on the Armbian forums. That sounds like a more promising idea to me. It might be an even better idea to try this even newer version here released 16 hours ago.
Hopefully that helps!
still no vertical usb, usb c output, and video drivers didnt work. wondering if others have issue…. running a 1/10 nightly build jammy armbian with cinnamon. i ran armbians recommended video card repository, installed but still didnt work. no luck with dual monitor. thanks
Description: SSD SAMSUNG NVMe 2242(Optional) Enter alias to use on benchmark results. Leave blank for completely anonymous.
Alias (leave blank for Anonymous): Prokopa
Result submitted successfully and will appear live on https://pibenchmarks.com within a couple of minutes.
Category Test Result
HDParm Disk Read 372.79 MB/s
HDParm Cached Disk Read 368.23 MB/s
DD Disk Write 255 MB/s
FIO 4k random read 87896 IOPS (351587 KB/s)
FIO 4k random write 44618 IOPS (178474 KB/s)
IOZone 4k read 75550 KB/s
IOZone 4k write 108089 KB/s
IOZone 4k random read 39710 KB/s
IOZone 4k random write 71739 KB/s
Score: 21187
Compare with previous benchmark results at:
Чуток не дотянул)
Hey Алексей,
Outstanding, looking very good! Looks like this result here.
The Samsung PM991 should be a great drive for it!