
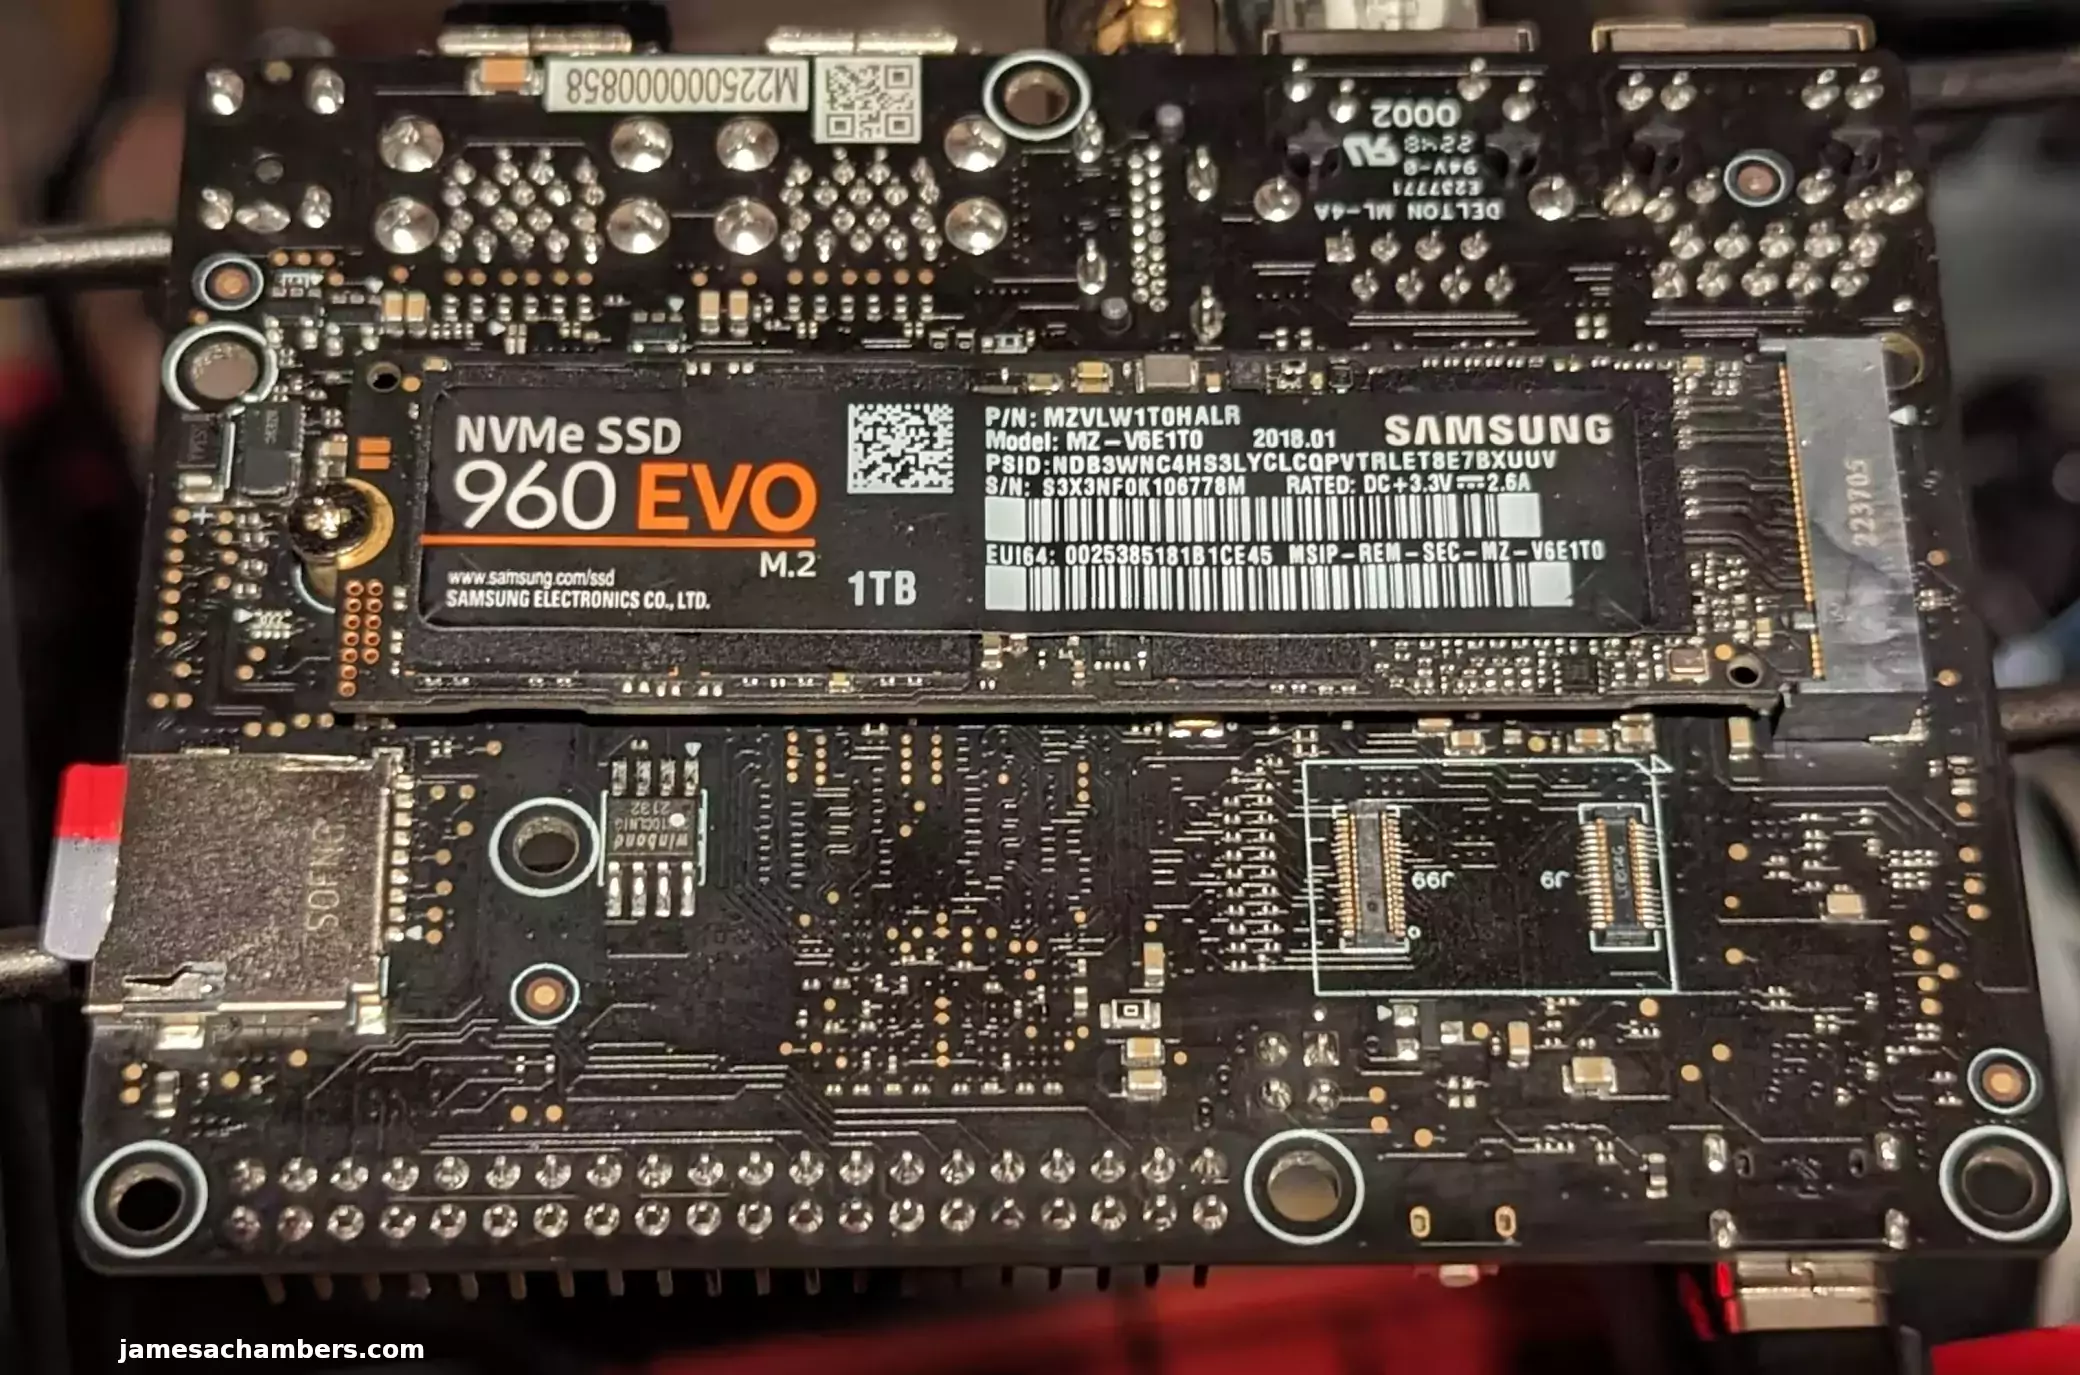
The StarFive VisionFive 2 comes with a M.2 M-key PCIe 2.0 slot that we can use with a 2280 NVMe drive. Unfortunately at release it’s not possible to boot from the NVMe drive but this is expected to be added to the device through some combination of SPI+NVMe booting.
In the meantime we are going to bootstrap the boot process using a SD card and then clone that SD card to our SSD to be used as the root partition. This essentially will let us have our system’s root partition on the SSD (much faster).
Let’s get started!
Hardware Used
The StarFive VisionFive 2 is a quad-core high performance single board computer that runs the RISC-V open-hardware architecture. It also has a dedicated GPU making it suitable for desktop use!
Links: Amazon.com*, AliExpress*

The Geekworm copper heat sink set is designed to fit many different single board computers. It uses thermal conductive adhesive which many “cheap” heat sink kits for SBCs don’t have. Eliminates hot spots and reduces throttling. Can be further enhanced by powered cooling over the heat sinks.
Links: Amazon.com*, Amazon.ca*, Amazon.co.jp*, Amazon.co.uk*, Amazon.de*, Amazon.es*, Amazon.fr*, Amazon.it*
Preparing SSD
First we are going to completely remove all partitions from the drive so it’s completely blank. Your drive should typically be /dev/nvme0n1:
sudo gdisk /dev/nvme0n1
Now remove all partitions from the device. If you press “p” it will print out the partitions. You can then use “d” to delete them.
Here’s an example on mine:
root@starfive:/# sudo gdisk /dev/nvme0n1
sudo: unable to resolve host starfive: Temporary failure in name resolution
GPT fdisk (gdisk) version 1.0.9

Partition table scan:
  MBR: MBR only
  BSD: not present
  APM: not present
  GPT: not present


***************************************************************
Found invalid GPT and valid MBR; converting MBR to GPT format
in memory. THIS OPERATION IS POTENTIALLY DESTRUCTIVE! Exit by
typing 'q' if you don't want to convert your MBR partitions
to GPT format!
***************************************************************


Command (? for help): p
Disk /dev/nvme0n1: 1953525168 sectors, 931.5 GiB
Model: Samsung SSD 960 EVO 1TB
Sector size (logical/physical): 512/512 bytes
Disk identifier (GUID): 8ACF6B0D-D7EC-48A0-955B-93AD7C6B53FE
Partition table holds up to 128 entries
Main partition table begins at sector 2 and ends at sector 33
First usable sector is 34, last usable sector is 1953525134
Partitions will be aligned on 2048-sector boundaries
Total free space is 1922993516 sectors (917.0 GiB)

Number  Start (sector)    End (sector)  Size       Code  Name
   1            2048          264191   128.0 MiB   0700  Microsoft basic data
   2          264192        30533632   14.4 GiB    8300  Linux filesystem

Command (? for help): d
Partition number (1-2): 1

Command (? for help): d
Using 2

Command (? for help): w

Final checks complete. About to write GPT data. THIS WILL OVERWRITE EXISTING
PARTITIONS!!

Do you want to proceed? (Y/N): y
OK; writing new GUID partition table (GPT) to /dev/nvme0n1.
The operation has completed successfully.
Keep pressing d until all the partitions are deleted. Once they are gone use the ‘w’ command to write your changes.
Cloning Installation to SSD
We’re now ready to clone your installation to the SSD. We can now copy your drive to the SSD with the following command:
cat /dev/mmcblk1 > /dev/nvme0n1
Wait for the operation to complete (there won’t be any output but you will have a cursor again and be able to type new commands). Remember that you are copying an entire drive from one to another basically with that one command.
Mine took about 30-45 minutes (although I was using a 64GB SD card and the larger SD card you use the longer it will take to copy the whole drive).
If you are having any trouble with permissions try becoming “root” first with:
su
Now try running the command again and as the superuser you should not encounter any permission errors.
Change SD card’s rootfs UUID
We need to change our SD card’s UUID so that it doesn’t try to boot from that partition. We can set it to a random one with the following command:
sudo tune2fs -U random /dev/mmcblk1p3
If you get an error with the previous command regarding csums try the following command instead:
sudo tune2fs -O metadata_csum_seed -U random /dev/mmcblk1p3
We can verify that it has changed with blkid like this:
root@starfive:/boot# sudo blkid
sudo: unable to resolve host starfive: Temporary failure in name resolution
/dev/nvme0n1p3: LABEL="root" UUID="8260c14e-8ec8-406a-ae74-4ae0465376cf" BLOCK_SIZE="4096" TYPE="ext4" PARTUUID="3d4c02eb-9c28-46a1-a86b-71666ef51cdb"
/dev/nvme0n1p2: SEC_TYPE="msdos" UUID="49C6-F38E" BLOCK_SIZE="512" TYPE="vfat" PARTUUID="bdc51e7d-66f3-4ba4-ac93-adf2e8850928"
/dev/mmcblk1p3: LABEL="root" UUID="2e441104-607f-4f13-ada2-09d2ef0e03fd" BLOCK_SIZE="4096" TYPE="ext4" PARTUUID="3d4c02eb-9c28-46a1-a86b-71666ef51cdb"
/dev/mmcblk1p2: SEC_TYPE="msdos" UUID="49C6-F38E" BLOCK_SIZE="512" TYPE="vfat" PARTUUID="bdc51e7d-66f3-4ba4-ac93-adf2e8850928"
/dev/nvme0n1p1: PARTUUID="5f7fd372-5546-44df-b018-a077758cee2f"
/dev/mmcblk1p1: PARTUUID="5f7fd372-5546-44df-b018-a077758cee2f"
Notice that /dev/nvme0n1p3 and /dev/mmcblk1p3 no longer have matching UUIDs. This is exactly what we want.
Fix extlinux.conf
Use this one-liner to update /boot/extlinux/extlinux.conf:
sudo sed -i 's/mmcblk1p3/nvme0n1p3/g' /boot/extlinux/extlinux.conf
EDIT 4/1/2023: Some builds use the path /boot/boot:
sudo sed -i 's/mmcblk1p3/nvme0n1p3/g' /boot/boot/extlinux/extlinux.conf
Run fsck
Before we reboot run fsck on the drive like this:
sudo fsck -yf /dev/nvme0n1p3
This will prevent you from having to run fsck on the CLI the first time you try to boot.
Reboot and Verify
Now reboot the VisionFive 2 with:
sudo reboot
With any luck you should be booted using your SSD! We can verify this with the mount command like this:
root@starfive:/home/user# sudo mount
/dev/nvme0n1p3 on / type ext4 (rw,relatime)
Here we can see that our root partition (/) is indeed on /dev/nvme0n1p3 and not /dev/mmcblk0p3. Success!
Benchmarking Performance
You can verify the performance of your drive on Pi Benchmarks using the following command:
sudo curl https://raw.githubusercontent.com/TheRemote/PiBenchmarks/master/Storage.sh | sudo bashHere are the results:
     Category                  Test                      Result
HDParm                    Disk Read                 181.92 MB/s
HDParm                    Cached Disk Read          181.63 MB/s
DD                        Disk Write                107 MB/s
FIO                       4k random read            44425 IOPS (177700 KB/s)
FIO                       4k random write           9006 IOPS (36024 KB/s)
IOZone                    4k read                   64462 KB/s
IOZone                    4k write                  43701 KB/s
IOZone                    4k random read            35419 KB/s
IOZone                    4k random write           75853 KB/s

                          Score: 13,856
The full StarFive VisionFive 2 benchmark can be viewed here on Pi Benchmarks.
This is actually a great performance score. It’s much higher than anything the Raspberry Pi 4 can do thanks to the PCIe interface (while the Raspberry Pi 4 has to use USB).
It’s also below competing ARM boards such as the Orange Pi 5, ODROID M1 and the Raspberry Pi CM4 that have PCIe 2.0 interfaces. The latest generation of alternative ARM boards are faster than this board but they also have a lot more CPU cores.
It’s pretty impressive performance considering this is RISC-V and not an ARM device. This is by far the highest score I’ve *ever* seen on any RISC-V device. It’s not even close. RISC-V is still a rapidly developing technology while ARM processors (while still having technological improvements) are unquestionably a much further developed technology. RISC-V is catching up very quickly though!
Other Resources
I’ve written a review for the StarFive VisionFive 2 available here
Don’t miss my guide on how to update the StarFive VisionFive 2’s firmware here


When I run the command
sudo tune2fs -U random /dev/mmcblk1p3
I get errors because the file system is vfat and this command only works on ext fs.
How could I make this work?
Hey Jackson,
If the partitioning is different than the guide it’s not going to work anyway if you are following it line for line. Your partitions are different than this guide and if that’s the case then none of the commands will be right.
To answer your question you would do it like this:
First make sure you have mtools with:sudo apt install mtools -y
Now we can change the UUID with:
sudo mlabel -N aaaa1111 -i /dev/mmcblk1p3 ::
However if you are using something with a different partition layout then you’re going to need to understand everything that is happening here because it sounds like on yours your boot partition is /dev/mmcblk1p3. Why do I say that? Because a root partition will *never* be a vfat in Linux.
That means that in the article anything referencing your root filesystem would need to be changed to whatever it actually is. You can’t use my standard partition layout with whatever OS you’re trying to do it with this unless you change the commands to match whatever you are using (something I warn about several times in the article).
Hopefully that helps!
Hey,
could you do update since firmware is supposedly allowing native booting on Starfive 2 board?
thx
james
Hey Jim,
I take it you are referring to the release notes for the past few versions:
For this release, we will releasing SD boot, eMMC boot and NVME boot version.SD boot: starfive-jh7110-202311-SD-minimal-desktop.img.bz2
eMMC boot: starfive-jh7110-202311-eMMC-minimal-desktop.img.bz2
NVME boot: starfive-jh7110-202311-nvme-minimal-desktop.img.bz2
Refer to this thread here for people trying to do this.
Unfortunately it doesn’t look like it’s as simple as writing the image to a NVMe drive and it will just boot off it. People are having to drop into uboot it looks like and do some commands.
That is provided you have already updated your firmware to one of these newer versions. In the newer ones it looks like it’s possible to specify NVMe in the boot order for direct booting. It does not sound like this is default behavior though. You will have to drop into uboot and configure it from what most people are saying.
Definitely check out the link though if you want to try the native booting support!
A few other notes I forgot to mention in my last comment.
I didn’t bother with changing the UUID, I just took out the sdcard once I was done. No more conflicting uuids.
In u-boot you will need to change the default bootcmd using:
editenv bootcmd
At the edit prompt type “run bootcmd_mmc0” (assuming you are using the emmc)
saveenv
You should then be able to continue booting by just typing “boot” or “reset”
Hey 0x80O0oOverfl0w,
Thanks for both comments, that should help a lot for people trying to do the eMMC instead!
If you’re cloning the sdcard to nvme or emmc you can greatly simplify this process by just using dd, no need to partition the nvme/emmc because dd is just going to overwrite it. Using your guide I was able to clone my sdcard to emmc by using the following steps:
sudo dd if=/dev/mmcblk1 of=/dev/mmcblk0 conv=fsync
sudo fsck -yf /dev/mmcblk0p3
sudo fsck -yf /dev/mmcblk0p4
modify extlinux.conf on /dev/mmcblk0p3 as required. i ended up just mounting it and using vim because that’s what i’m more comfortable with.
modify fstab on /dev/mmcblk0p4 and update root and boot to point to the emmc (or nvme)
expand /dev/mmcblk0p4 partition (steps in visionfive 2 getting started guide or google)
With my cheap Crucial P3 ssd 256 gb I have a bit higher results:
Category Test ResultHDParm Disk Read 201.50 MB/s
HDParm Cached Disk Read 195.87 MB/s
DD Disk Write 91.8 MB/s
FIO 4k random read 44618 IOPS (178474 KB/s)
FIO 4k random write 8939 IOPS (35757 KB/s)
IOZone 4k read 80756 KB/s
IOZone 4k write 47042 KB/s
IOZone 4k random read 36373 KB/s
IOZone 4k random write 87858 KB/s
Score: 15137
Looks good, thanks for sharing!
Thanks for sharing! But shouldn’t you also change the partition sizes after cloning the image of the SD card?
Hey Alexsander,
Certainly! Honestly with this board the easiest way is probably to use gparted from another PC. A lot of boards and operating systems have tools built in to do this like easy resize scripts. That’s usually what I put in the guides.
For this board you need to either do it by hand or use gparted from another PC. The instructions to do it by hand are in the StarFive VisionFive 2 Quick Start Guide. See the Appendix (4.1) titled “4.1. Extend Partition on SD Card or eMMC”.
I didn’t put this in the guide because it’s a pretty dangerous method of resizing. You need to go in using fdisk and delete the partition and then recreate it and if any mistakes are made you just wiped out the whole system. I would highly recommend just using gparted from another Linux PC if possible. If not then the official documentation covers how to do this.
Hopefully that helps!
@james, there have been a couple of releases since this guide was written, it might be worth a refresh. For instance the /boot/boot path is now just /boot again.
Hey owen,
Both of these are covered in that section. All I did was update it to say:
EDIT 4/1/2023: Some builds use the path /boot/boot:I mean who knows what they’ll do from build to build. It started out that way, changed, and now it’s back apparently? They break the firmware almost every update where a reflash is required if you want to boot from NVMe so it’s just a giant mess in my opinion. They can’t make up their minds and this is not the only thing they can’t make up their minds about.
It’s a difficult board to cover for this reason. It’s basically an alpha board. They don’t even know what they want the structure of the firmware and paths to be. If you’re looking for clean paths/instructions you couldn’t have bought a worse board for that. It changes faster than anyone can keep up with.
Might as well cover both methods! I’ve changed it back and forth so many times that it’s not even worth bothering. I just will put both in there and you’ll have to use whichever one they felt like using in that release. Don’t be surprised if it changes again for no reason. It wouldn’t be the first time and I doubt it will be the last.
I’ve basically paused publishing anything about this board for at least 6 months because it’s just so fluid. There’s no point in doing more guides like this (or some of my installing Steam guides I’ve been doing) and I probably wouldn’t have done this one either if I had realized how unstable the firmware would be. I assumed after one flash everyone would be good once they bought the board.
It feels pointless when anything you write about it will be outdated/invalid the next release. I’m basically focused on RK3588/RK3588S boards lately since those are really shining right now and writing stuff for those stays correct for a lot longer. Hopefully in 6 months they’ll know how they want this board to work so you can write a set of instructions and have them be good for more than a month or two. It’s too exhausting to support in the board’s current state.
It’s a disappointing state of affairs for sure as I like RISC-V a lot more. I’d just really like to see a stable board release from companies that know how to support them properly and not make breaking changes every single release. I know this board has a passionate following but I just don’t see it for this one. I think it will probably be the Lichee Pi 4A or something that ends up being the go-to RISC-V quad-core board but time will tell.
I’d never be able to convince Raspberry Pi users to switch to RISC-V with this board because it’s a *perfect* representation of everything Pi users hate about alternative boards. Unstable, breaking changes all of the time, nasty firmware flashing that is absurdly overcomplicated and has to be done way too often, inconsistent updates/paths, not being able to update itself properly through apt, the works. In other words the normally incorrect things Raspberry Pi fans say about alternative boards that are not actually true kind of are actually true on this board. That has to change or I won’t really be revisiting it and will just cover the other ones that come out later this year.
Hopefully that helps!
Thanks! Interestingly what the Quick Start Guide suggests seems to be as safe as doing the same from another Linux PC. The idea is that fdisk modifies only the partition table, not the partitions per se. So if you drop a partition and create a new one starting from the same block no data will be lost (fdisk doesn’t touch the filesystem on the partition, etc). On top of that ext4 supports on-line resizing, which is used by resize2fs.
Hey Alexsander,
Welcome back! So you’re absolutely right. It’s totally fine to do this entire process on another Linux PC. In fact some people have used another Linux PC to expand the partitions using gparted. It’s a lot easier.
The VisionFive 2 doesn’t have a resize service built in unfortunately (or if it does we haven’t figured out how to trigger it). Resize2fs can be done online but there’s more to it than that. The partition won’t be the right size so you need to recreate them using the full space of the drive using fdisk. It’s one of the more painful ones to do it as on many boards like the Orange Pi boards there’s a simple resize service we can trigger that will both recreate the partitions and then call resize2fs.
Doing it from another Linux PC will be easier for sure (especially on this board). Hopefully that helps!
I like the trick of just using ‘cat’ to clone the SD card : I used
dd if=/dev/mmcblk1 bs=8M status=progress of=/dev/nvme0n1which seemed to run somewhat faster, Not sure what the optimal blocksize is for the NVMe but 8M is usual for the SD card, the slower of the two.Hey owen,
That’s really interesting! Theoretically all this would do is have it do 8MB writes at a time instead of 4MB writes. I’m guessing the cache of the SSD can handle this but not for the SD card which is probably why it’s slower on the SD card.
Thanks for sharing this!
You can use
-ibsand-obsto specify them appropriately for each device. Thedddefault is512K.The big impact that I am aware of is that if the blocksize is lower than the device blocksize it will need to make multiple reads or writes for that physical block.. but writes are usually the bottleneck. 8M is the usual blocksize for SD cards afik, but trying to find the NVMe blocksize ended in google-hell so I assumed (as you point out) that I should increase it, but rely on it’s caching too.
Hey owen,
Absolutely! Generally the best block size to use is the one that is set by the SD card association’s tool. The block sizes used internally by SD cards can’t actually be changed. All we’re changing is how much data the OS is trying to force feed to it at once. If it’s too much it creates inefficiencies and makes things slower overall which sounds like what you were experiencing for sure.
You’re definitely on the right track here. You’re right that we can rely on the SSD’s caching a lot more to speed up this operation massively. This is just because the size and quality of the cache in a typical SSD is worlds above what is included in even the best/most expensive SD cards out there. Take care!