
The Orange Pi 5 has a nice M.2 NVMe slot but unfortunately most of the official images will not boot if you try to directly image a NVMe drive. Fortunately there is an easy way to get this working that people who frequent the blog will almost certainly have seen before.
We are going to bootstrap the boot process using a SD card and then clone that SD card to our SSD to be used as the root partition. This essentially will let us have our system’s root partition on the SSD (much faster).
Let’s get started!
Hardware Used
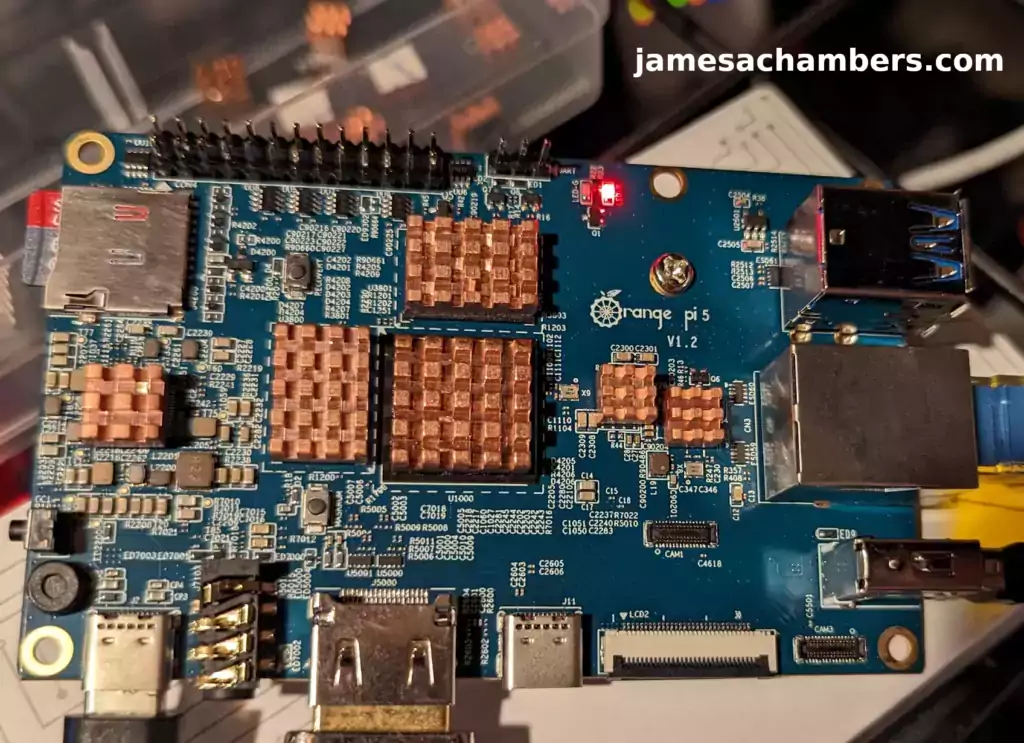
The Orange Pi 5 the latest release from Orange Pi and is the most powerful model yet. It has a 6 core CPU and options from 4GB of RAM all the way up to 32GB of RAM!
Links: Amazon.com*, AliExpress*, Amazon.ca*, Amazon.co.uk*, Amazon.de*, Amazon.es*, Amazon.fr*, Amazon.it*, Amazon.nl*, Amazon.pl*
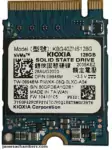
The Kioxia (Toshiba) 128GB M.2 2230 PCIe NVMe drive is much shorter than most NVMe drives (full size is 2280). It fits great with single board computers / tablets / other smaller form factors.
Links: Amazon.com*, Amazon.ca*, Amazon.co.uk*, Amazon.co.jp*, Amazon.com.au*, Amazon.de*, Amazon.es*, Amazon.fr*, Amazon.it*, Amazon.nl*, Amazon.pl*, Amazon.se*, Amazon.sg*

The Geekworm copper heat sink set is designed to fit many different single board computers. It uses thermal conductive adhesive which many “cheap” heat sink kits for SBCs don’t have. Eliminates hot spots and reduces throttling. Can be further enhanced by powered cooling over the heat sinks.
Links: Amazon.com*, Amazon.ca*, Amazon.co.jp*, Amazon.co.uk*, Amazon.de*, Amazon.es*, Amazon.fr*, Amazon.it*
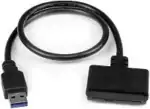
The StarTech USB 3.1 to 2.5″ SATA adapter is one I have recommended for many years for use with all kinds of devices including the Raspberry Pi, Orange Pi, ODROID, Libre “Renegade” and Tinker Board. It’s widely compatible and works with gaming consoles as well.
Links: Amazon.com*, Amazon.ca*, Amazon.com.au*, Amazon.co.jp*, Amazon.co.uk*, Amazon.de*, Amazon.es*, Amazon.fr*, Amazon.it*, Amazon.nl*, Amazon.pl*, Amazon.se*, Amazon.sg*

The Orange Pi official mouse uses 2.4GHz wireless to give you a wireless mouse experience with the Orange Pi
Links: Amazon.com*, AliExpress*

The Orange Pi monitor is meant to be a portable monitor you can take anywhere. It has a resolution of 1080P and features a hinge in the back that folds out to support the monitor.
Links: Amazon.com*, AliExpress*
Note for USB Booting
Important: Only the top blue port of the Orange Pi 5 is fast for using USB storage. You can use a USB-connected SSD.
The bottom port, despite being blue, is USB 2.1.
Keep in mind that if you are using a USB SSD then in the instructions anywhere it says /dev/nvme0n1 you will need to use /dev/sda or whatever drive was assigned when you plug in your drive via USB.
Note for Official Debian / Ubuntu Images (Updated 1/10/2023)
Orange Pi has updated their official images to support directly booting from NVMe. This means that if you are using the official Ubuntu or Debian from orangepi.org then you can actually write the image directly to the SSD. This is the easiest way to get it going.
You first need to write the image to a SD card and then run:
sudo orangepi-config
Then choose System->Install->Boot from SPI and install the new updated boot loader to the SPI flash.
This did not work at launch but is working now. It is now possible to simply write the official images directly to NVMe and boot with it after updating the boot loader! The following instructions will still be useful for other operating systems or operating systems that do not support booting directly from NVMe.
Note for Armbian (Added 1/20/2023)
Armbian has a similar install utility as orangepi-config. For Armbian you will use:
sudo armbian-config
Then choose System->Install->Boot from eMMC and install the new updated boot loader to the SPI flash.
You should also install the system to Armbian using this method. The instructions in the rest of the article are meant for operating systems that will not boot natively from NVMe. It uses a SD card as the boot loader to essentially let you boot anything (even ones not designed to boot directly from NVMe).
Supported SSD Sizes (Updated 1/26/2023)
Important: There is also a type of M.2 drive called a M.2 SATA drive. This is an older type of drive that most of you won’t have but some of you will. This type of drive is supported by the Orange Pi 5 but you have to add a special overlay (overlays=ssd-sata). If your NVMe drive shows up as /dev/sda instead of /dev/nvme0n1 then you have a M.2 SATA SSD. If you have a M.2 SATA drive follow this excellent guide by u/jng98908 on reddit.
You can use either a 2230 or a 2242 size NVMe drive.
There are actually holes for mounting hardware at both places.
Using a 2230 size NVMe drive looks like this:
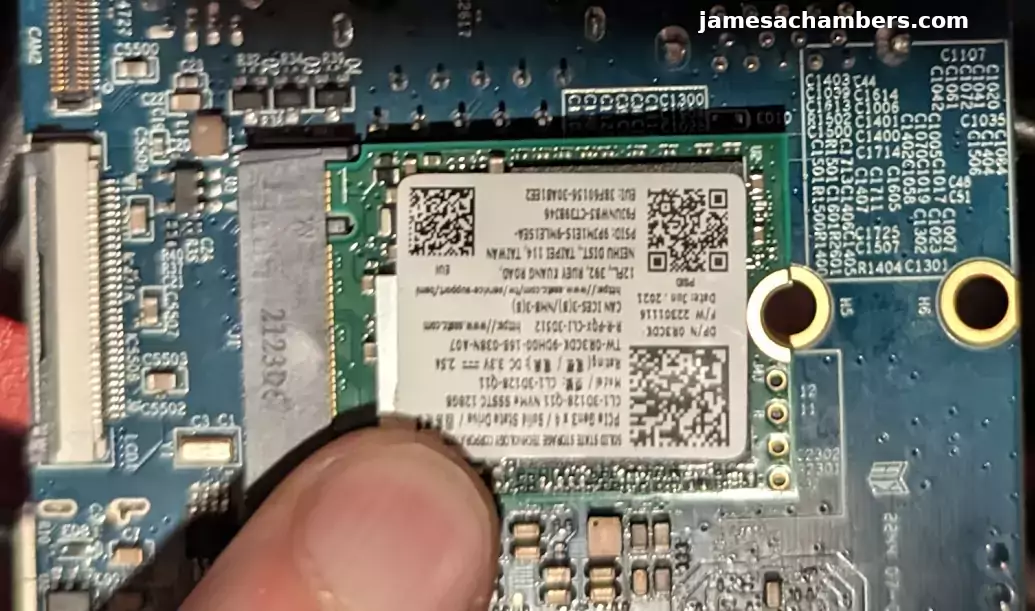
It’s totally fine to use a larger one but they will be hanging off the edge of the board. As you can see I do not have the mounts installed on my board. I just leave the 2230 drive in the port like this but it is on my to-do list to find some mounts for the M.2 drive for this board.
SD card boot loader – Preparing SD Card
First you should have a completely working installation on a SD card of the OS that you would like to use. I used the official Debian desktop image for this guide (recommended) so if your partitions are different it may be your flavor of Linux and need slightly altered instructions.
If you have an already working installation you want to move to your SSD you can use this as well most likely.
Note that some operating systems like Armbian will require you to manually go in and modify files on the “boot” partition. If you stick with the official images you should be able to follow the guide as-is but note that some operating systems may have text files (or even files that need to be recompiled with mkimage like for Armbian) for this method to work.
You should completely update first with:
sudo apt update && sudo apt full-upgrade
Preparing SSD
First we are going to completely remove all partitions from the drive so it’s completely blank. Your drive should typically be /dev/nvme0n1:
sudo gdisk /dev/nvme0n1
Now remove all partitions from the device. If you press “p” it will print out the partitions. You can then use “d” to delete them.
Here’s an example on mine:
root@orangepi5:~# sudo gdisk
GPT fdisk (gdisk) version 1.0.6

Partition table scan:
  MBR: protective
  BSD: not present
  APM: not present
  GPT: present

Found valid GPT with protective MBR; using GPT.

Command (? for help): p
Disk /dev/nvme0n1: 250069680 sectors, 119.2 GiB
Sector size (logical/physical): 512/512 bytes
Disk identifier (GUID): E3017ECA-4571-4F62-A39F-4BA2A4323BD8
Partition table holds up to 128 entries
Main partition table begins at sector 2 and ends at sector 33
First usable sector is 34, last usable sector is 250069646
Partitions will be aligned on 64-sector boundaries
Total free space is 8350 sectors (4.1 MiB)

Number  Start (sector)    End (sector)  Size       Code  Name
   1              64            8063   3.9 MiB     0700  loader1
   2           16384           24575   4.0 MiB     0700  loader2
   3           24576           32767   4.0 MiB     0700  trust
   4           32768         1081343   512.0 MiB   EF00  boot
   5         1081344       250069646   118.7 GiB   8300  rootfs

Command (? for help): d
Keep pressing d until all the partitions are deleted. Once they are gone use the ‘w’ command to write your changes.
Cloning Installation to SSD
We’re now ready to clone your installation to the SSD. We can now copy your drive to the SSD with the following command:
cat /dev/mmcblk1 > /dev/nvme0n1Wait for the operation to complete (there won’t be any output but you will have a cursor again and be able to type new commands). Remember that you are copying an entire drive from one to another basically with that one command.
Mine took about 30-45 minutes (although I was using a 64GB SD card and the larger SD card you use the longer it will take to copy the whole drive).
If you are having any trouble with permissions try becoming “root” first with:
sudo suNow try running the command again and as the superuser you should not encounter any permission errors.
Change SD card’s rootfs UUID
We need to change our SD card’s UUID so that it doesn’t try to boot from that partition. We can set it to a random one with the following command:
sudo tune2fs -U random /dev/mmcblk1p2
If you get an error with the previous command regarding csums try the following command instead:
sudo tune2fs -O metadata_csum_seed -U random /dev/mmcblk1p2
We can verify that it has changed with blkid like this:
root@orangepi5:~# sudo blkid
/dev/nvme0n1p1: SEC_TYPE="msdos" LABEL_FATBOOT="opi_boot" LABEL="opi_boot" UUID="0257-2A31" BLOCK_SIZE="512" TYPE="vfat" PARTLABEL="bootfs" PARTUUID="0a65713b-d4b4-0642-a3a4-ebc357e507a1"
/dev/nvme0n1p2: LABEL="opi_root" UUID="ae948e48-3646-4f5c-be01-73168e079bc8" BLOCK_SIZE="4096" TYPE="ext4" PARTUUID="7490e84a-f585-944e-9ce6-f275f067a023"
/dev/mmcblk1p1: SEC_TYPE="msdos" LABEL_FATBOOT="opi_boot" LABEL="opi_boot" UUID="0257-2A31" BLOCK_SIZE="512" TYPE="vfat" PARTLABEL="bootfs" PARTUUID="0a65713b-d4b4-0642-a3a4-ebc357e507a1"
/dev/mmcblk1p2: LABEL="opi_root" UUID="37a6ee0a-e61d-470a-9e53-eaf51726942c" BLOCK_SIZE="4096" TYPE="ext4" PARTUUID="4f32d51c-0523-1248-9bc3-092d1f11c594"
Notice that /dev/nvme0n1p2 and /dev/mmcblk1p2 no longer have matching UUIDs. This is exactly what we want.
Change SSD’s boot UUID
Next we are going to change the boot partition’s UUID on the SSD. This will make it so that the mounted /boot folder inside your operating system actually mounts the SD card (which is your actual boot loader in this configuration).
First make sure you have mtools with:
sudo apt install mtools -y
Now we can change the UUID with:
sudo mlabel -N aaaa1111 -i /dev/nvme0n1p1 ::
You can verify these are different using the same sudo blkid command as the previous section.
Run fsck
Before we reboot run fsck on the drive like this:
sudo fsck -yf /dev/nvme0n1p2
This will prevent you from having to run fsck on the CLI the first time you try to boot.
Reboot and Verify
Now reboot the Orange Pi 5 with:
sudo reboot
With any luck you should be booted using your SSD! We can verify this with the mount command like this:
root@orangepi5:~# mount
/dev/nvme0n1p2 on / type ext4 (rw,noatime,errors=remount-ro,commit=600)
/dev/mmcblk1p1 on /boot type vfat (rw,relatime,fmask=0022,dmask=0022,codepage=936,iocharset=utf8,shortname=mixed,errors=remount-ro)
/dev/nvme0n1p2 on /var/log.hdd type ext4 (rw,noatime,errors=remount-ro,commit=600)
Here we can see that our root partition (/) is indeed on /dev/nvme0n1p2 and not /dev/mmcblk0p2. We can also see that my /boot folder is properly mounted is /dev/mmcblk0p1 (the SD card which is serving as our boot loader). Success!
Resize NVMe Partition (Added 1/24/2023)
You can use Orange Pi’s built in resize application if you are using one of the official operating systems:
sudo /usr/lib/orangepi/orangepi-resize-filesystem start
Testing Performance
For the guide I used a SSSTC 128GB 2230 M.2 NVMe drive. These are available on Amazon for around $10-12 (also see Kioxia 128GB M.2 2230 module*).
You can verify the performance of your drive on Pi Benchmarks using the following command:
sudo curl https://raw.githubusercontent.com/TheRemote/PiBenchmarks/master/Storage.sh | sudo bash
Here are the results:
     Category                  Test                      Result
HDParm                    Disk Read                 375.32 MB/s
HDParm                    Cached Disk Read          381.15 MB/s
DD                        Disk Write                234 MB/s
FIO                       4k random read            47080 IOPS (188321 KB/s)
FIO                       4k random write           35128 IOPS (140514 KB/s)
IOZone                    4k read                   75628 KB/s
IOZone                    4k write                  67285 KB/s
IOZone                    4k random read            35874 KB/s
IOZone                    4k random write           70620 KB/s

                          Score: 17,718
The full Orange Pi 5 benchmark can be viewed here on Pi Benchmarks.
That is an outstanding score. We are getting NVMe performance. This score actually even beats my ODROID M1 benchmark.
The Orange Pi 5 is without a doubt a very powerful board and is performing exactly where it should be.
Other Resources
I’ve also covered how to install Steam on the Orange Pi 5 here
I’ve also reviewed the Orange Pi portable monitor here (with the Orange Pi 5 connected)
If you are looking for alternative WiFi adapters for the Orange Pi 5 see my using E-keyed WiFi adapters with the Orange Pi 5 guide here!


Many thanks for these guides. I used your OPiZero2 guide to get my OPiZero2 running from an external drive, and the used this one to get my OPi5 running from an USB HDD, with /boot running on the card.
Then I saw you, and others, talking about moving everything to the HDD, and thought it would be nice to take the SD card out completely.
But nothing has worked. I have followed the general process of copying a dist to the HDD, and flashing the SPI. But every time I try to boot without the SD I get the red light + no green light.
When I try it again with the SD card it boots up but I have noticed
– /boot is running off the HDD, but / is on the SD card
– the contents of the SPI have changed
orangepi@orangepi5:~$ sudo md5sum /dev/mtdblock0 /usr/lib/linux-u-boot-legacy-orangepi5_1.1.2_arm64/rkspi_loader.img6de777fb1bbd9a7c0a4207e4137452ce /dev/mtdblock0
1a62ad5f91789b7b422b23f9da5aee5c /usr/lib/linux-u-boot-legacy-orangepi5_1.1.2_arm64/rkspi_loader.img
orangepi@orangepi5:~$ lsblk -f
NAME FSTYPE FSVER LABEL UUID FSAVAIL FSUSE% MOUNTPOINT
sda
├─sda1 vfat FAT16 opi_boot 545D-A668 154.5M 40% /boot
└─sda2 ext4 1.0 opi_root 49c2697f-7f72-4fa4-ba25-b4820d09749a
mtdblock0
mmcblk1
├─mmcblk1p1 vfat FAT16 opi_boot 545D-A668
└─mmcblk1p2 ext4 1.0 opi_root 49c2697f-7f72-4fa4-ba25-b4820d09749a 26.1G 8% /
zram0 [SWAP]
zram1 153.6M 13% /var/log}}
I’ve tried the various Orange Pi distributions, and the Armbian ones, all with the same results.
I’m resigned to leaving the SD card in, as performance is still much improved, but it would be nice to free up the SD Card. I’m getting fed up having to buy an SD card every time I buy an SBC.
Hey jackduckworth,
Great question! So you definitely can’t use USB-based storage for this. That’s the issue here. The only way I know of to do this via USB storage is exactly the way that this article is written.
Would it be possible to do this via SPI flash? Theoretically but I don’t think the Orange Pi 5’s boot loader supports that. At the very least it would require a custom uboot I’d imagine to pull this off.
Sorry about the confusion. When I wrote this article you had to do it the way my article was written for *everything* including NVMe. It’s only NVMe that this has been fixed for. It doesn’t support doing this over USB storage as that still requires using a SD card and boot strapping (or doing some kind of custom boot loader / uboot).
Armbian might be able to do this theoretically but there would need to be an option for something like “Boot from SPI, root/data on USB storage” and I can’t remember if they have anything like that specifically or not. That is what you would want to pick though to try this.
Hopefully that helps!
I was confused, but it wasn’t caused by you.
The Orange Pi OS menu option is labelled “Boot from SPI – system on SATA, USB or NVME”, and the Armbian one is “Boot from MTD Flash – system on SATA, USB or NVMe”.
No worries – I can live with running the bootloader from the SD card. Performance is pretty good.
In the future I will maybe buy an NVMe drive, run the OS and bootloader from that, and use the USD HDD for storage. But NVMe drives aren’t looking particularly good value currently.
Hey jackduckworth,
Ahh yes, I’ve noticed those subtle differences in wording between Armbian and the official operating systems as well! That’s why I kind of try to paraphrase what it says as it literally does vary in the exact wording across the different flavors.
Great work. If you move to NVMe you will be able to do this as you’ve outlined here for sure. That’s the part that is *definitely* working right now for sure.
Wow, you are not wrong about NVMe prices. When I wrote this article that Kioxia one was $12.99 and I’d been recommending a SSSTC one for $9.99. Those are both more expensive now. The Kioxia one is $16 now. The SSSTC one is is now $12.
That may not seem like a lot but it’s actually about a 20% increase over only a couple of months for these 2230 SSDs. I’d still recommend checking out the SSSTC one for $12 potentially if 128GB is enough storage (but you might be using potentially a lot more). These definitely have gone up a little bit though since I wrote this originally.
I honestly think these small form factor SSDs (like 2230) are greatly rising in popularity. There was almost no use for them for consumers outside of laptops/tablets until single board computers started shipping with slots like this. Other small handheld devices are probably helping as well (the Steam Deck although I’d imagine people upgrading the Steam deck want big ones 1TB+). The Steam deck only takes 2230 drives so that has to be driving up the demand as well at least for the 2230 form factor.
Since the Orange Pi 5 can take both 2230 and 2242 it might actually be smarter to start looking at / buying 2242 drives. The Steam Deck can’t take a 2242 so any demand rise from the Steam deck won’t be happening on 2242 modules. Sure enough this UMIS (Union Memory Systems) 2242 is only $11. The 2230 budget options are now more expensive than 2242 budget options and when I wrote this that was not the case.
These were dirt cheap for years because almost nothing took them except OEM laptops/tablets but that is not the case anymore. I only expect the demand to continue to rise for these. Especially if the Raspberry Pi 5 comes with a NVMe slot like the Orange Pi 5 and many other current generation boards. Small sizes especially were cheap because nobody wanted to buy an upgrade for their laptop/tablet that was only 128GB/256GB but this new generation of single board computers is changing that. They’re perfect for them.
They’re actually more desirable and more cost effective than SD cards now. It’s a lot better value to have a 128GB NVMe drive for $12 than a 32-64GB SD card for a similar price. You get a lot more storage at a lot higher performance.
Of course that’s only true when evaluated from the perspective of somebody is starting with nothing and has to buy everything all at once to get started. If you already have existing SD cards/HDDs/SSDs/etc. that you can use that completely changes the math. In that equation the most cost effective thing to do is use what you already have and this is often the smartest thing to do as well (basically as long as what you already have will meet the performance requirements of your project / use case). Everyone should always evaluate and do the smartest thing for their situation and the answer won’t always be the same as to what that is for sure.
Thanks for letting us know how this turned out, take care!
$12 sounds sweet, that’s not much more than an SD card.
Both of those NVMes are over $40 on amazon.co.uk however. (Maybe that’s the Brexit dividend…)
Hey jackduckworth,
Ouch, that’s quite the premium! So the way I typically find these is try “nvme ssd 2230 128GB”. Then sort by price low to high.
I tried amazon.co.uk and these were the cheapest ones:
£18.99 – M.2 SSD 128GB 2242 PUSKILL NGFF Solid State Drive
£19.99 – KingSpec M.2 2242 128GB NGFF PCIe
Now both of the above options are M.2 SATA. These will work with the Orange Pi 5 but you need to enable the M.2 SATA overlay so it’s a bit annoying to use a M.2 SATA one since it requires some configuration changes and won’t work out of the box. The cheapest NVMe option I see would be this:
£23.16 – SK hynix BC711 128GB PCIe NVMe
Definitely not as cheap as you can get them here but a lot closer at least. The BC711 is actually a pretty well known and fast drive. It looks like for amazon.co.uk though it’s better to use my specific search query and then filter your results and see what is the cheapest in your local Amazon market there. That is probably true for other countries as well to be honest so this is a valuable thing to share, thank you!
The search queries are the tricky part. It’s trickier than it looks. I tried a dozen different search variations of this until I finally found one that Amazon would return somewhat relevant results before I shared this one. If you try my search query without the 128GB your result quality will go way, way down for example. People might read this and think “oh search Amazon and filter by price” but, just like Google, the results you actually get will depend on the quality and even the order of your terms so there’s an art to it for sure.
I should probably share the search queries I use more often for this exact reason. I’ll try to mention those more often in my articles!
Why don’ you try to change UUID in the /etc/fstab (located in the sda2) to pointing out the correct /boot (sda1), not that in the SD card? And you should able to boot without SD card
Good news, it seems Android 12 1.02 will detect RTL8821CU based WiFI/BT USB dongles even with ROM chips. You must make sure it is plugged in from a cold (power) boot and you may have to repeat the process. The one that like because of its built in stick antenna is this one on Amazon. Also EZcast makes a dongle with just the RT8821CU chip AND NO ROM that you do not need to use a ROM Switch function in Linux and is immediately seen by Android 1.02. Sadly this does not have a dipole antenna so you are limited in range but it does work. Just head out to this link.
Also BT does work while using WiFi (quite well). even with continuous stream BT audio, which I am using while watching a 4K video.
One more note: There is a new Android “Box” build on OrangePi which is for, you guessed it, for TV Box use or ‘Android TV’ I downloaded it and burned it to NVME and it booted right up and recognized my better RTL8821CU with dipole stick antenna, but like the previous Android build it is not Google Playstore certified so you will have to add GAPPs. Since my goal is to create the “Gaming Lens” with built in QLED 720P 7″ panel on DualShock 4 controller, I prefer the “tablet” build.
I have also added a very small 5VDC, 25mm square fan that is 7mm deep but running it at 3.3VDC. It is extremely quiet and more important consumes about 25ma (every little bit counts when you are trying run this from a 6000mAH Li-ION or 4A 5VDC wall unit PLUS QLED screen & game controller). I may add a negative coefficient thermistor to it vary the RPMs based on actual temp. For now it it runs well with my low profile heatsink and has kept the RK3388s from hitting its thermal ceiling early. My 3DMark score has gone up to 4400 points, which puts it top 25% of ARM64 based chips out there. With more work, I was able to get Armbian to produce similar results.
Final Note: Two more companies are going to be offering RK3388s board at the size. Pricing is bit more, but will offer onboard Wifi/BT.
It has taken awhile (thanks all of you for adding your own tips and tricks) but this is the new “Pi” in my book and hopefully the ARM64 dev community will support it over the “other”ARM64 chip from Apple. I can’t believe the performance that I am getting for less than $100 including a 256GB NVME. To put it in perspective. The Mac Mini M1 is $499 has only 8GB of RAM and 256GB NVM and take up about 8 times the space. Don’t get me wrong a LOVE my Mac Mini M1 and will probably get a M2, but OrangePi has hit it out of the park with the little ARM64/Mail GPU board.
Hey Owl Creek Tech,
Great work, fantastic job getting this going! I’m glad you found one that will do what you need it to do here and have shared it with everyone else. Thanks for the heads up about the new Android “Box” build too! That sounds like an awesome fan build. What a huge boost from having the proper cooling!
Thanks for the heads up about the upcoming RK3588S boards as well! I definitely think we’re going to keep seeing more of these. I’ll keep my eye out for them and pick some for review (let me know if you have any suggestions as well). Definitely don’t hesitate to stop by if you are doing any other wild stuff with the device. I know others have really enjoyed reading them as well. Take care!
Its been a pleasure reading all your helpful tips so thank you Owl Creek Tech and I hope you share a photo of your final setup once its ready!
None of my OrangePi5 pibenchmarks gets posted. I tried Ubuntu, Debian and Armbian.
I got a 22711 and one slightly higher (I think it was 22761) with a Kingston 256GB 2230-NVMe on Armbian.
But it works with my RaspberryPi3B.
Hey 032F,
Thanks for letting me know! Your model # was actually a slight variant of the others we’ve seen (but there have been similar ones, I’m guessing because it’s the 2230 version instead of the 2280 version). The model differences honestly make sense. The model I have some existing benchmarks for is OM8PDP3 (the 8 being for 2280) with yours being OM3PDP3 (for 2230).
It’s now recognized and your benchmarks should all show up on there now if you refresh the page. You are actually precisely right on both of your scores. The first one is here for 22711 and the second one is here for 22761.
Great setup by the way. Both of your scores are in the top 10 benchmarks ever recorded on there for the Orange Pi 5 so they’re pretty high up there.
Take care!
Awesome! That was quick. Thanks for that!
I had a coupon and bought a ‘Dell’-NVME directly from Dell which would have had a different appearance. They send me this Kingston instead.
You’re right, my drive is a 2230, not a 2280 like the one in the current image of my score.
It looks like this.
Hey 032F,
That makes perfect sense for sure. I looked at the model # more closely and noticed that yours had a 3 and the other ones had an 8. Since these are OEM model #s (and not meant for marketing like consumer model #s) everything in that nasty model # means something if you know how to decode them (which depending on the OEM/manufacturer how to read these model #’s is sometimes public knowledge and other times it’s a trade secret they only give to the OEM partner themselves).
We can be positive (since you told me it’s a 2230) that the 3 vs. the 8 means exactly that. You can see when you click on the “brand” link that all of the other variants I’d had benchmarks for are for 2280s so I’m sure that’s why yours didn’t get initially recognized.
I’m definitely torn between leaving it as is and moving it into a separate 2230 model. The main reason is I’m curious to see how it compares to the 2280 version as the way they did the model #s otherwise implies that these should be the exact same drive (more or less) other than the size of the drive. It would imply that the storage controller is the same though theoretically and other parts of the drive/PCB.
Almost all of the other ones also were clearly from Dells as well so these are very close cousins. There’s definitely an argument to be made for splitting them up and an argument to be made for grouping them but the most important thing is that it’s recognizing it and getting it relatively in the right family (even if the size recognition could potentially be split off from each other in the future especially as we get more 2230 results over time).
Thanks again for reporting it and take care!
Thanks to the brand category I can now also see my earlier score which I did anonymously. This one only had 20618 and was a Debian Desktop. My last score was Armbian CLI. My guess is CLI vs Desktop makes a lot of difference and I also changed the CPU governor to performance.
Hey 032F,
Great observations! I expect you’re right and that the CPU governor makes a difference as well. That’s definitely the kinds of things I try to find with the benchmark so we can measure and make meaningful comparisons.
Thanks for sharing your results. I’m betting others will find it helpful to know which configurations perform the highest as well. Take care!
I just gave Debian another try. This time CLI instead of Desktop and of course CPU performance governor.
I’m not expecting to win against WesternDigital. Top2 is good enough for me 😉
But I cannot recommend this specific distro at the moment. It seems to have some corrupted files. I hope this gets fixed with updated images.
Hey 032F,
Great findings! Top 2 is definitely good enough. These are all incredible scores for sure. You’ve proven how much of a difference these can make on the Orange Pi 5 for sure more than anyone else I can recall.
Yes, I agree with you about the Debian distro as well. The Orange Pi official distros are just not quite there yet. They are a lot better on their other boards like the Orange Pi Zero 2 that have been out for a while which is why I do have some confidence they’ll be cleaned up. You’re quite right about the current state of them though without a doubt.
Thanks again for sharing, take care!
Hi again…
Like in my first comment here my pibenchmark (which I did yesterday) doesn’t get posted. I got a 98488 score with my new pc hardware. Sadly, I once again missed #1 only quiet narrowly 😉
Hey 032F,
Excellent, very nice score! So it’s probably because the hardware is really new. I need to go through and add new drives and models again pretty soon here. I recently started a different job so I’m behind but it’s on my todo list. As always it will show up retroactively once I add the missing models into the site.
Take care!
I can live with a little bit more waiting 😉
I guess that your explanation would mean there could be other currently not-listed Top-Scores?! My hardware is not the best there is (e.g. the CPU isn’t even overclockable). It will be interesting to see other results with similar components.
Please excuse my obsessiveness, but I desperately wanted to hit the 100K score threshold. So I did some testing with different BIOS configurations. After a couple of underwhelming runs, I finally managed to hit my mark with a 104527 score. I don’t want to spam the highscore, feel free to delete the lowest scores if that’s possible.
I will enjoy my time of fame (if there aren’t other hidden better Top-Scores already, hehe).
Hey 032F,
I will definitely get through some of them this weekend and I’ll make sure yours make it through!
Two weekends have passed. Which one are we talking about?! 😉
By the way, the highest score I pulled off before installing windows on that drive was something 108XX 🙂
Hey 032F,
Sorry that it has been taking so long! So I actually have been working on the site both weekends but I haven’t got to the score correction issue yet. I fixed the search on the web site to allow you to search for multiple short terms and added like 50 new models of SSDs.
I need to still check for higher speeds in the upload and correct the scores. It’s still on the to-do list and I will update here once I’ve fixed it for sure!
Just a reminder that now a whole month has passed 😉
I guess by now there might be several higher scores with newer drives than mine (which is a PCIe 4.0 NVMe). PCIe 5.0 SSDs are already on the market.
Finally a sign of life! It’s been three additional months.
I see that the score corrections you mentioned have been applied.
I still keep waiting for my scores to appear as I check the site on a regular basis 😉
Hey O32F,
I’m glad you stopped by! I looked for your old comments to let you know it had been updated but I could not find them for the life of me. I wouldn’t have thought to look on an Orange Pi 5 post but yes this change has been made!
As for your ones that aren’t showing up yet I’ve added approximately 200+ new storage models and I’m surprised none of yours have came up yet. I still have some more to add though but the list is getting a lot smaller. If they still aren’t showing up it must mean I haven’t got to that drive yet but I expect they’ll be showing up soon as I’m running out of new drives to add pretty quickly.
Take care!
Nothing yet. I’ll keep waiting.
Strangely, all of a sudden, there seems to be something wrong with the NVMe. It’s a Samsung 990 Pro and the Samsung Magician software now always crashes when I try to start it. The S.M.A.R.T. readout seems to be the issue. But I’m not really sure. Otherwise the drive seems to be working just fine. I might have to do a warranty return.
In the coming days I’m also going to replace the CPU, the non-K i7-13700 with a i9-14900K. If I manage to overclock it as I like to, then it will be a full 1Ghz difference. This should be noticeable in every aspect.
If I then get a new NVMe I will try to achieve even higher scores. The new CPU should help.
Regarding the OPi5, we’re finally getting a mostly finished mainline kernel very soon it seems 🙂
https://www.reddit.com/r/OrangePI/comments/18939es/hdmi_out_now_working_on_orange_pi_5_with_mainline/
Just to follow up with my last rambling, I finally found the problem with the Samsung Magician SSD software!
The NVMe drive is perfectly fine. The reason the software always crashed, even with a clean Windows install, had nothing to do with the NVMe at all. After defaulting the BIOS settings the software worked again. And after some more testing I found the responsible setting: “CPU Flex Ratio” which I set to its minimum. It has the only relevant effect to list the CPU base clock in the windows task manager below the CPU’s normal base clock down to 0.8 GHz. It didn’t do/effect anything else, except this strangely programmed ‘cpu-unrelated’ software lol.
Hey 032F,
Great findings, thanks for sharing what it was!
Reminder: It’s now half a year of waiting for my scores.
Hey 032F,
I don’t see any other submissions from you that haven’t been approved if you submitted them with this user alias.
Did you submit them under a different name? Any hints on what to look for?
Good that I did a screenshot of at least score 😉
2023.07.25
https://i.imgur.com/go74iOW.jpeg
In case my post that I did couple of days ago didn’t come through, here’s the repost of it:
Good that I did a screenshot of at least one score that I did back then…
2023.07.25
I’ve found another screenshot on my USB drive…
2023.07.30
Beautiful! That helps me investigate. I will take a look!
hello everyone, my problem is not detected by the nvme drive, I connect the LED to the board, but the system does not determine what to do thanks in advance
Hey Harutyun,
The firmware needs to be updated before that will work by using a SD card and installing the updated boot loader. The instructions to do this are in the guide for sure but basically if you write your image to a SD card and use orangepi-config it will let you install the updated firmware.
Hopefully that helps!
I think m2 pcie 2.0 does not work on the pc ssd earned or separately install the driver?
Thanks James for this inciteful guide.
I have been playing around trying to get Armbian to boot from an external SSD plugged into the top USB 3.0 port and have partial (or rather temporary success).
My initial set-up was to have Orange Pi OS (droid) to my NVME drive.
I then installed Armbian to an SD card, which booted fine.
I then followed the above instructions and managed to clone the card installation to the SSD and get it to boot.
But, I have found a flaw that I am unable to fathom.
As long as the SD card is physically present, whether after a reboot or power off, booting from the external SSD is successful.
After powering off though, if I then remove the SD card, when booting, Orange Pi OS from the VVME drive boots and I am unable to boot from the SSD unless I plug the SD card in again.
Any ideas?
Hey Phil,
Great question! The problem is the Orange Pi boot loaders and the Armbian boot loaders aren’t compatible. You will have to wipe out the Orange Pi OS boot loader by writing the Armbian boot loader.
This is done in armbian-config. Then you go to install and choose to write the boot loader to SPI. This will delete the Orange Pi OS boot loader and install the Armbian boot loader.
Once you’ve done this you will immediately notice a difference. When booting you will see the spinning loading circle on an Armbian screen instead of a screen that says Orange Pi. That is actually the boot loader you are seeing during startup at that time.
The boot loader is stored in SPI flash (and not on the SSD or SD card). That’s why it’s not making a difference for the boot loader whether you take the SD card out or not. Once you replace it with the Armbian boot loader the only way to change it back will be to put in a SD card with Orange Pi Debian and write the boot loader again using orangepi-config instead of armbian-config. Since they’re not compatible you will have to replace them if you want to switch operating systems.
Hopefully that helps!
Thanks for the info James.
I did write the bootloader to the SPI flash with the Armbian tool.
I suspect that because the SPI flash can hold multiple things that perhaps without something to manage multiple boot options, like a petitboot that it will be rather fiddly.
I get the concept of what is required though and will swap about as necessary until Orange Pi come up with a better solution to using multiple OS’s.
But it was still good to se that USB boot is possible, so it bodes good things for the future.
Hey Phil,
No problem at all! So you’re exactly right about the boot loader situation. Petitboot is honestly worlds ahead of what everyone else has right now except for Raspberry Pi. ODROID has the most advanced boot loader I’ve ever seen other than Raspberry Pi.
The reason Petitboot is so good is because ODROID didn’t make it. Petitboot was actually made by IBM. That blew my mind when I learned that. ODROID went with a mature already developed system and as a result they hands down have the best one besides Raspberry Pi right now. The other manufacturers would do well to adopt a mature technology like this rather than try to roll their own (which is what they’re doing right now and they’re honestly terrible).
The only hopeful part is that the Raspberry Pi 4 shipped without a boot loader that could do this (or any boot loader at all that would be recognizable compared to what it has today). When you plug in the Raspberry Pi 4 you actually see a BIOS/UEFI-looking startup screen where you can see the boot process. That was completely absent at release. They had to patch it in via firmware updates. I’d like to see Orange Pi and Radxa and many of these other companies shipping inferior boot loaders do the same for sure.
On some other boards like the Radxa boards they provide a special image called zero.img that simply blanks the SPI flash. I haven’t seen anything like this for Orange Pi but this would be the answer if you ever had this situation. You would want to zero out the SPI flash with dd. This will wipe out all of the mixed fragments that are blended in there between the two operating systems. I haven’t seen this be necessary on the Orange Pi 5 yet but this situation definitely happens on other boards and some manufactures like Radxa have a special image that is purely meant to blank their SPI flash with zeroes to prevent this problem (meant to be used before you install updated firmware, I cover it in this review in the “Firmware Update” section and actually use their zero.img first).
In fact I’ll just go ahead and create that same zero.img that Radxa offers for their boards for the Orange Pi 5 right here right now. Here’s how you would create zero.img for the Orange Pi 5:
root@orangepi5:/# mtdinfo -aCount of MTD devices: 1
Present MTD devices: mtd0
Sysfs interface supported: yes
mtd0
Name: loader
Type: nor
Eraseblock size: 4096 bytes, 4.0 KiB
Amount of eraseblocks: 4096 (16777216 bytes, 16.0 MiB)
Minimum input/output unit size: 1 byte
Sub-page size: 1 byte
Character device major/minor: 90:0
Bad blocks are allowed: false
Device is writable: true
root@orangepi5:/# dd if=/dev/zero of=opi5zero.img bs=1M count=16
root@orangepi5:/# ls -al
total 128408
-rwxr-xr-x 1 root root 16777216 Jan 31 04:04 opi5zero.img
Perfect. The first command I used was mtdinfo (install with sudo apt install mtd-utils -y) to see how big the SPI flash was. It’s exactly 16MB. Okay. So then I did a dd write with if (input file) set to /dev/zero which will only give pure zeros. I did a block size of 1M repeated 16 times to create 16MB of zeroes (exactly). The resulting file size (16777216) precisely matches the Orange Pi 5’s SPI flash size down to the byte. It would completely fill it with zeroes.
Although I haven’t seen anyone have to zero their SPI flash to get it working I suspect that’s due to armbian-config/orangepi-config potentially already doing this for you. They might be writing 0’s to SPI flash before writing the boot loader or they may just be storing their data in relatively the same place and be overwriting each other. I’d have to look at their source code to say definitively but it’s only a matter of time before we start seeing boot loaders pop up for other operating systems that may not play so nice with each other as switching between Orange Pi OS and Armbian seem to be so far (which I mean they don’t play that nice with each other, they’re not compatible, but they don’t completely brick the board at least if they’re installed over the top of each other).
There’s how you would zero it if anyone runs into this situation. You’d write that updated opi5zero.img file we created to /dev/mtdblock0 first like I do in the Radxa Rock 5B review I linked earlier. I’d recommend after zeroing it though that you write the updated boot loader immediately before rebooting. I’ve yet to see anyone brick the Orange Pi 5 but on other boards you can brick it by wiping the boot loader or corrupting it and then you have to do a nasty recovery flashing process (the details of which I would have no idea how to do on the Orange Pi 5 as it hasn’t happened that I’ve heard of yet so far).
I won’t volunteer to be the first to try zeroing the SPI flash and then rebooting before installing a new boot loader but my guess is that if you zero’d the SPI flash on the Orange Pi 5 and tried to reboot it would still boot off SD. I and lots of others had some *very* broken boot loaders experimenting with this process but nobody has ever managed a brick that couldn’t even boot from SD anymore no matter how wrong things went. If not then we’d have to hope Orange Pi has some sort of similar flashing tool/process to what Radxa offers to recover it when things go *really* wrong. Either way be careful when trying this and write the updated boot loader immediately afterward.
Thanks so much for your comment, take care!
Hi James,
So I followed your suggestion and flashed Armbian to the NVMe and its now showing with the different partitions and an unallocated amount totaling 231.33GiBs
I then went to:
sudo armbian-config
Install to/update boot loader OK
5 Install /Update the boot loader on SD/eMMC
I then tried booting from:
4 Boot from MTD Flash – system on SATA, USB or nVME
I then get an error message saying: “There is not enough free capacity on /dev/. Please check your device”
A quick check of GParted shows :
unallocated 16.00MiB/dev/nvme0n1p1 (key symbol) bootfs
/dev/nvme0n1p2 rootfs
unallocated
/dev/nvme0n1 (238.47 GiB)
I assume this means that the boot loader has saved to the nvme so I tried starting up without the SD Card and all I get is flashing red light and a black screen with things booting back up when I reinsert the SD Card.
I’m not sure what I’m missing and will probably look to go with one of the official Orange Pi distros instead as your instructions seem clearer and I wasn’t really able to find any answers on the Armbian forum so I don’t want to trouble you by suggesting that you do a separate SSD booting guide just for Armbian as its still fairly new with weekly updates and I’ll give your suggestion trying Debian/Ubuntu a go over the weekend as the instructions look simpler… Thanks again for the support!
Hey Razor Burn,
I’m sorry to hear that! I definitely did the official Debian Bullseye desktop image today again and that one is working. I’m definitely seeing mixed results from people on the Armbian forum saying this is working and others saying it isn’t.
From what I can tell the people that did get it working made additional edits beyond what the menus did. It doesn’t sound like it’s working 100% for everyone to me still. I can guarantee the desktop Debian image will work though for sure.
I think you have a good plan trying with the official Debian one. That is what I am running on mine right now. I will probably try Armbian again in a few weeks or another month or so like it sounds like you are planning to do to let them continue to iron out the bugs!
Ok so I did some googling and saw a post on Reddit “Booting Orange Pi 5 from NVMe SSD”
Use etcher (or your preferred imaging tool) to write the OS image to an SD card
Use etcher again to write the same image to your NVMe SSD
Insert both the SD card and the NVMe SSD into the Orange Pi 5
Power on the Orange Pi (the first time around it will boot from the SD card)
SSH into the Orange Pi 5, and run: orangepi-config (or armbian-install if you’re using armbian)
Select boot options, then select: Install/Update the bootloader on SPI Flash (this might be Install/Update the bootloader on MTD Flash if using armbian)
Once this is complete, you can remove the SD card and the device will now be able to boot directly from NVMe (SD card is no longer needed — this is true even if you decide to re-image your NVMe SSD)
I followed those steps and got an error when selecting to boot from MTD Flash so shut down yet Armbian load screen popped up and I gathered I’d try restarting without the SD Card and eureka my Pi 5 now boots from NVMe so no need for the sd card!
I really appreciate your support James as it takes true dedication and passion to put in the many hours making these informative reviews and guides, not to mention answering the any questions and troubleshooting users problems so thank you!
Hey Razor Burn,
Excellent, I’m so glad you’ve got this up and running. It sounds like the good old pre-imaging trick worked for yours as well!
Yes, you’re exactly right that once you get this working it will keep working. This is what I meant by them shipping a broken boot loader. It sure would have been nice if they shipped it with the boot loader that would have done this out of the box. I struggled with it too the same way you did (for weeks as you watched early on) until they started getting images out that would finally write the proper boot loader.
I’ve had the same experience now that if I reimage it will just work. I don’t have to use the SD card a second time.
There’s one caveat though. If you try to switch to the official operating systems now it actually won’t work. The boot loaders between Armbian and Orange Pi aren’t compatible. This really isn’t too big of a deal though because if you want to switch it’s as simple as doing what you did the first time again. You would pre-image a SSD then use the SD card to go in and write the bootloader to SPI flash. After that the boot loader would be updated to work with the official operating systems instead of Armbian and you wouldn’t have to do it again unless you wanted to switch back to Armbian.
I fought with this a little bit last night trying to install the official Debian until I realized it still had the Armbian boot loader. After I put in an Orange Pi Debian SD card and wrote the boot loader again to fix it things started working correctly again without the SD card. It’s the same way going from Orange Pi official operating systems to Armbian. You will need to write the Armbian one over the top of the Orange Pi one in that case.
In other words you should never have to do it again as long as you stick with Armbian no matter how many times you reinstall/reimage. If you switch to a different OS you will want to update the boot loader again but it’s the exact same process you just did.
I should note that I actually wish the boot loaders were compatible. I don’t like that it doesn’t just work with any operating system. I hope they still fix that. I don’t like having a different boot loader for each OS. The Raspberry Pi doesn’t have to do that and I would like for the Orange Pi 5 to not have to do that either hopefully via a future firmware update.
Welcome to the Orange Pi 5 world! I’m so glad you have yours as you’ve been participating in the discussions for a long time while you were waiting for all of the pieces of your build to show up. You definitely deserve to have yours working with NVMe like this without a SD card if anyone ever did. Enjoy and take care!
Thanks for the kind words James and for hosting such an informative blog with ma wonderful support network!
Now my initial joy turned to dispair as I managed to corrupt something causing Armbian to not want to load so I a have spent the best part of the day flashing different versions finding issues with the lastest version from Github that wouldn’t load a web browser, then tried the Cinnamon version off their website and experienced problems with 3D accellaration crashing firefox so have settled on the Jammy Gnome desktop version dated 23 Jan 2023 which is so far snappy and hasn’t caused me any new issues booting from the NVMe.
I apologies as I’ve run a few benchmark tests so my results might muck up the averages but I did notice that I achieved a higher score on my first try running Armbian 22.11.4 Jammy where I managed to get a half decent score of 20,861 and 235MB/s DD yet subsequent tests have been mixed even after I did firware updates with last one 20,396 and 233MB/s DD. I’m not complaining as thats almost 4 x SD Card speeds and I’m intrigued to see how this will compare to the upcoming Rock 5A that I read is scheduled for April 2023 so still a little while off?
Its really a shame that the vendors are releasing operating systems without the latest kernels nor proper boot loaders as it then means developers are patching things yet as we see with the RK3588 their are legitimate security concerns using an outdated kernel not to mention bugs that take ages to fix (if even possible) and as my recent experience shows you can expect to see mixed results when using different versions of the same distro which makes for a steep learning curve which is why I’m greatful for websites such as yours as you take the time to explain things clearly so a newbie like myself can appreciate!
I’m hopeful that down the road we get the RK3588 mainline support as is seen with the RK3399/RK3568, with kernel “6.3” expected in a few months and I read they’re already hard at work on the Rock 5A which fills me with confidence but had you told me in late November 2022 that the Orange Pi 5 would be heavily supported with Armbian, RebornOS from the Rock 5B version let alone Batocera or JELOS I’d have remarked how it was optomistic yet here we are a few months on and the choices for operating systems is wonderful and we haven’t even seen proper Orange PiOS which might end up a real game changer if they can sort out the licencing and give it continued support?!
We often complain at Raspberry Pi for a host of issues but thanks in large part to the dedicated support its a much more user friendly experience as you can swapout operating systems with ease and I hope your wish becomes reality and we see the boot loader dilema fixed as its painful needing to constantly flash and reflash although setting up NVMe before hand makes the process simpler its still not ideal and if Orange Pi, Radxa, Banana Pi, XXX, want to be seen as true alternatives they need to get this resolved quick as the performance of the alternative SBCs have started to catch up however software support is still behind and Raspberry Pi knows this but I’m an optomist and look forward to what 2023 will bring as RPi decide to sit things out…
I can’t wait to see what you have planned for the next review or follow ups with the previous boards and apologies for taking up too much of the comments as I’m sure somebody else has something constructive to ask/share… Take care good sir!
Hey Razor Burn,
Ugh, it sounds like there’s still a lot of work for Armbian to do but I’m glad you found a stable version! Thanks for specifying the Jammy Gnome desktop was the most stable for you as well. That may give others a place to start if they’re having similar issues.
I saw that you were able to get it benchmarked, very nice! The Rock 5A should be exactly the same since that one will have the RK3588S so it will be limited to PCIe 2.0 speeds. This is pretty close to my scores as well. My score was 17,718 so you definitely beat my $8 SSSTC drive I used for the review/guide.
It will be interesting to see if the Rock 5A gets the boot loader right. Even if the PCIe speeds are the same I completely agree with you about the annoyance of all of these boot loaders being shipped broken. That’s definitely the #1 problem people have been having with the Orange Pi 5 so just smoothing that over could give it a smoother launch that is more user-friendly to people who may be trying a Radxa board for the first time.
I would *love* to see mainline support come to these boards as you talked about here for sure. Why? Because it always works so much better than all of these manufacturer based images. Once the support is mainlined then all Linux versions can essentially support the hardware after the version support was added in.
There’s so many companies that promise mainline support though and it never really materializes. The Pine64 SOQuartz comes to mind. These don’t even have official images available since they’re working on “mainline support”. Except the SOQuartz has been out for almost 2 years and there’s no mainline support in sight. It’s no good to go for mainline support if it’s going to happen 5 years after you buy the board since it’s basically obsolete at that point.
I think mainline support will happen with the RK3588 though for sure because so many manufacturers are shipping devices that have those. It isn’t just Orange Pi or Radxa or one company that has to shoulder the burden of trying to submit all of that to the Linux kernel and go through the process. It’s a whole group of manufacturers (and their users) that will be pushing for this and that helps. This is one I would expect to see it on. Hopefully it won’t take as long as other boards in the past because theoretically they should be getting better at going through this process over time. They should be learning how to navigate it which should reduce how long it takes for mainline support.
You’re 100% right about the Raspberry Pi user experience but it wasn’t always that way. I think I brought it up earlier but the Raspberry Pi 4 had a completely broken boot loader. Here’s my original article on how to do this same nightmare process for the Raspberry Pi 4. This article was actually based on that article. I knew how to do this because the Raspberry Pi 4 was the exact same way.
That was only 2019 we still had to SD card boot Raspberry Pi 4. It’s their *current model* even. They haven’t even had a new one since then which is pretty incredible. Believe it or not the Raspberry Pi 4 launch was just as bad as these boards with NVMe (and in fact it took more than a year before it got NVMe / USB mass storage booting, we had to SD card boot for a very long time). It only took weeks for Orange Pi and Radxa to fix this and have firmware updates out in comparison.
It’s still not good enough though. What we need to do is make sure that we hold Orange Pi / Radxa accountable for all of these things so we can help get them to where we got Raspberry Pi. That took almost a decade though to get Raspberry Pi to that point. I’m hoping we can get Orange Pi and Radxa just about there within a year or two. They’re so much better than they were 2 years ago when I really wouldn’t have recommended buying one of these boards to any of you. They’re that much better now than 2 years ago and I’m hoping 2 years from now (or even less) they are at least as good as or even better than the Raspberry Pi ever was (as far as support goes, if we’re talking hardware and performance they’re way ahead of the Raspberry Pi already)!
For the Orange Pi 6 I want you and I to have been able to take it out of the box, image the NVMe drive, pop it in and turn it on and have it work. That is what I want and I’m sure you want the same after having to fight with it like so many of us did.
I’m super excited for some of the upcoming review stuff! Probably most immediately I have the Orange Pi 800 and all of the official accessories that come with it as I want to dive into the official Orange Pi accessories and try testing them with the Orange Pi 5 for example. I also have some more Grove sensor stuff coming up as I just received my Grove expansion board (the B version) today so all of the parts I needed for that are starting to show up here. Thanks for your excellent reply as always and take care!
So many valid points made James as many critics love to cite how bad post support is for the alternative boards yet forget that it took years for RPi to reach the levels we see now due to the larger community work and what helps RPi is the fact they stick with same hardware whereas the competition chops and changes looking for the next best SOC yet little dedication is made fixing the previous models. More needs to be done by chip makers who won’t share source code leaving amateur developers to do all the leg work and in turn a frustrated user base questioning why they should make the switch when the RPi works out of the box…?
In my opinion we need more blogs such as yours to question the decisions of vendors who seem to follow the same bad trends and as a consumer I hope to see more being done to make things user friendly and agree 100% that future SBCs need to arrive with the ability to boot off SSD/USB on arrival as relying on SD cards in 2023 to run your device is a joke as they’re slow, prone to corrupting and expensive for technology that was primarily meant as storage for ones digital camera yet the appeal of having different operating systems on multiple cards is great but not sustainable as the cost for cards can equal more than the SBC price alone!
I often question the motivation of vendors such as Pine64 as they seem to try innovating things yet the lack of software is always brought up that I feel its a gamble purchasing one of their devices as you’re on your own dealing with an obsolete board that never worked properly to begin with and I see they’re now selling PineBuds Pro “Open Firmware Capable ANC Wireless Earbuds” for what looks to be interesting yet very little support is given and it almost seems as though they’ve gone with a concept and then its up to the user to find solutions and the mere fact it says multiple flashing can brick the device will scare potential buyers such as myself away out of fear of attempting to do anything constructive with these earbuds?! Not to mention the lack of any news on their RK3588 Dev Board the QuartzPro64 that looks suspiciously similar to one under development from Geniatech DB3588 that was due to launch back in August 2022…???
That’s not to take away from the great job they did with the Pinecil as its my go-to soldering iron and they’re doing great work with RISC-V as evident with the Ox64 and planned Star64 but I could say the same things for Banana Pi who seem to have many different devices released or in the works yet nobody seems to rate them due to lack of support or originality which is a real shame as successful author Nancy Pearcy summed it up best “Competition is always a good thing. It forces us to do our best. A monopoly renders people complacent and satisfied with mediocrity.” I appreciate limitations to supplies, small budgets, licensing, etc yet consumers want the best bang for their buck and what we’ve seen from Orange Pi and Radxa lately is a step in the right direction so I look forward to your Pi 800 review as hoping to see significant progress with software since its initial release and how the RK3399 stacks up against the overclocked Broadcom BCM2711 in the Pi 400. I’m holding out to see the accessories and any capability with the Pi 5 as the RK3399 seems to be better supported. Finally awaiting the XIAO and Grove reviews with hopes that my dev kit arrives next week so I can follow along and learn in the process. Take care!
Hey Razor Burn,
I completely agree about the Pine64 gear. When I told you that the open-source-style wearables (that I’ve seen and know about) weren’t really ready for prime time (or the phones) I was actually directly thinking of Pine64 when I said that but I don’t think I mentioned them by name. I had not seen the Pine earbuds before. That’s very interesting!
I definitely keep an eye on them though. If they really do start getting mainline support for this and as their wearables / phones continue to evolve I would absolutely be willing to try / review some of these for the site and start diving into them. I think they’re getting close to being something you could actually use.
I legitimately have no idea about the quality of the ear buds but everything I’ve tried from Pine64 is frustrating because I can see the potential and that the hardware is good but then yeah the software / image / support seems to be really lacking. The updates potentially bricking it sounds about right. It’s like 1-2 generations away from being ready it feels like with a lot of those which is where I come up with my hopeful these are 2-3 years away from being ready for the average consumer.
I definitely want Pine64 to keep trying though and keep making better ones because I legitimately see the potential in a lot of their gear and what they’re doing. I’d really love to see them get their much-coveted mainline kernel support for a lot of these devices and give them another look too for all of the ones I’ve done so far and even some I haven’t tried.
You inspired me to go and solder my XAIO series chip. I have a $20 Amazon soldering iron (with a bent tip) and it turned out like this:
I really should investigate getting something like a Pinecil. I’ve actually heard of that before and wondered if it was any good. The Pinecil looks fairly inexpensive as well. Not too much more than this entire Amazon kit was originally.
I could really use an upgrade because having a bent tip makes it pretty annoying to try to contact the pins/pad like I want. Most of my solder balls ended up looking like I dropped them on top of it and with the bent tip I didn’t even want to try to rework them since as I rotate the bent tip the angle was changing on it. I only had one bridge and I bet you can tell which two it was (it’s the most hideous looking two on the right hand side that are almost touching and they actually were touching before I dragged a line through the middle to separate them).
You can see the two expansion boards I’d been waiting for. One came quickly but the other one just arrived yesterday (the one with 8 ports, the Grove expansion shield).
Now that I’ve soldered it these are basically ready for me to start playing with. This module is the XAIO-ESP32-C3. It has the Bluetooth and WiFi on this module. You can see the little antenna connector for it between the two buttons at the bottom of the board. I have the antenna (included) downstairs. They also sent me a RP2040 (what is inside the Pico but it’s still a Seeed studio board that looks very similar to this one) so I have one of those as well but I’m really a lot more interested in the RISC-V ESP32C3.
This should be everything I need to start moving forward and prototyping more. I want to dive into these two expansion boards and that might be my first review related to these is covering these two different expansion boards and what capabilities they give you. Thanks so much for your kind words and stay tuned for those soon here!\
EDIT: I did actually order a Pinecil off Amazon that I’ll review on the site as well here! It was more expensive than it would have been from Pine’s web site but the main site is out of stock and the shipping was free from Amazon so it might not be too far off what it would have been from Pine64 as I’ve ordered from them directly before such as with the SOQuartz and they definitely charge shipping.
I hope you do try the open-source wearables from Pine64 or similar as the concept is very interesting and my comments were more a frustration than anything else as I truly wish them success and the fact they’re willing to expand into earbuds, phones, laptops is fantastic and I’m glad you managed to grab a Pinecil as they’re always out of stock and maybe going with Amazon will mean it ships earlier as they’re web shop states they’re shut for the holidays…?
You influenced me to place a few orders for the Seeed gear and I’m excited to see how you go with the initial testing and who knows you may want to expand into the other Seeed gear as I see the XIAO dev boards come with different chips and the Seeed XIAO BLE nRF52840 Sense version has me super interested as it uses a chip from Nordic Semiconductor who specialise in all things LE BLE, Wireless and IoT prototyping which is remarkable for such a small form factor and the specs are impressive as are the ESP32-C3 board! I promise I’ll stop bugging you as I’m a bad influence and the last thing you need is the wife quizzing you about the unplanned technology purchases LOL…
Hey Razor Burn,
That’s a great point about the Pine64 store being out of stock and the Amazon one being in stock. It says it is fulfilled by Pine but my guess is they actually shipped a giant crate of these to the Amazon warehouse. Mine is coming tomorrow by 10PM so Amazon definitely already had this. When I ordered directly from Pine64 it took weeks to come.
I couldn’t agree more about trying some of these wearables and I’m going to be watching a lot closer now that you pointed out the headphones which I’d definitely never seen. It’s hard to want to cover the ones that brick themselves from being flashed too much but I would absolutely try the very next successor to these (and probably to some of their other wearables, I’m on board for the next gen). I can’t imagine this problem won’t be fixed on the next version of them and that seems like the time to cover this for a more general audience and introduce them to them.
I’m definitely super excited for the ESP32. I definitely plan to do more with them outside of the sensor related projects I’m starting with. That was just a legitimate use case I knew I had for me that would help me power through the initial learning curve and start documenting how to get started with these.
The expansion boards could be used for anything really. I see more and more makers moving to a more microcontroller-based solution kind of across the board. People aren’t putting full blown Raspberry Pis into these maker builds and surprisingly the Raspberry Pi wasn’t replaced with a different SBC. It was basically replaced with microcontrollers at least on everything it possibly could be. This is a good thing for sure in my opinion. The microcontrollers getting a lot more powerful has certainly helped as well (especially getting WiFi and Bluetooth capabilities).
The sky is the limit with these ESP32 boards. You can direct wire these to make incredibly tiny builds. Here’s an example from the Seeed wiki:
You can see how easily you could 3d print something for a setup like this. You could put the ESP32 anywhere in a tiny 3d printed enclosure and with basically just soldered wires going right to any component off the headers/pads you really have a lot of flexibility in what kind of builds you could do.
The entire board is only a little bit larger than my thumbnail. The pictures don’t really do it justice for how tiny it is. Just keep in mind that the one port on the board is a USB-C port and that can help your mind put into perspective how tiny what you are looking at is. This picture above puts things into perspective a little better since you can see their hands. I feel like the hulk when I’m handling this thing. Fortunately the board is tough and rigid so you won’t actually break it but it’s so tiny.
I’m super excited to see what you’ll do with these as well. I’m sure I’ll think of more projects I want to do with them after I finish some of my initial coverage playing with these expansion boards. Take care!
Огромное тебе спасибо! Пол дня потратил на данное действие. Но стоило мне прочесть тебя, как всё встало на свои места. Я вытщил флэшку и вау ля! Всё работает!
Google Translate Translation added by James:Thank you very much! Spent half a day doing this. But as soon as I read you, everything fell into place. I pulled out the flash drive and wow la! Everything is working!
Ура!!! Mое удовольствие Алексей.
Hurray! My pleasure Aleksei.
Hi again,
I still cannot boot directly from ssd. The only difference between your tutorial and other tutorials that can boot from ssd any my case is that in my case the ssd drive is recognized as sda not as nvme. Is that a problem?
Here is the output of Debug/UART serial port:
DDR Version V1.08 20220617LPDDR4X, 2112MHz
channel[0] BW=16 Col=10 Bk=8 CS0 Row=16 CS=1 Die BW=16 Size=1024MB
channel[1] BW=16 Col=10 Bk=8 CS0 Row=16 CS=1 Die BW=16 Size=1024MB
channel[2] BW=16 Col=10 Bk=8 CS0 Row=16 CS=1 Die BW=16 Size=1024MB
channel[3] BW=16 Col=10 Bk=8 CS0 Row=16 CS=1 Die BW=16 Size=1024MB
Manufacturer ID:0x1 Samsung
CH0 RX Vref:34.7%, TX Vref:18.8%,0.0%
CH1 RX Vref:32.7%, TX Vref:18.8%,0.0%
CH2 RX Vref:32.7%, TX Vref:18.8%,0.0%
CH3 RX Vref:31.7%, TX Vref:17.8%,0.0%
change to F1: 528MHz
change to F2: 1068MHz
change to F3: 1560MHz
change to F0: 2112MHz
out
U-Boot SPL board init
U-Boot SPL 2017.09-orangepi (Jan 06 2023 - 14:00:02)
Trying to boot from MMC2
spl: mmc init failed with error: -123
Trying to boot from MMC1
Card did not respond to voltage select!
spl: mmc init failed with error: -95
Trying to boot from MTD2
Trying fit image at 0x4000 sector
## Verified-boot: 0
## Checking atf-1 0x00040000 ... sha256(806278dba1...) + OK
## Checking uboot 0x00200000 ... sha256(b1fc1e0a9d...) + OK
## Checking fdt 0x0034b500 ... sha256(feafd7cda6...) + OK
## Checking atf-2 0x000f0000 ... sha256(c00c7fd75b...) + OK
## Checking atf-3 0xff100000 ... sha256(71c3a5841b...) + OK
## Checking atf-4 0xff001000 ... sha256(2301cf73be...) + OK
Jumping to U-Boot(0x00200000) via ARM Trusted Firmware(0x00040000)
Total: 505.204 ms
INFO: Preloader serial: 2
NOTICE: BL31: v2.3():v2.3-405-gb52c2eadd:derrick.huang
NOTICE: BL31: Built : 11:23:47, Aug 15 2022
INFO: spec: 0x13
INFO: ext 32k is valid
INFO: GICv3 without legacy support detected.
INFO: ARM GICv3 driver initialized in EL3
INFO: system boots from cpu-hwid-0
INFO: idle_st=0x21fff, pd_st=0x11fff9, repair_st=0xfff70001
INFO: dfs DDR fsp_params[0].freq_mhz= 2112MHz
INFO: dfs DDR fsp_params[1].freq_mhz= 528MHz
INFO: dfs DDR fsp_params[2].freq_mhz= 1068MHz
INFO: dfs DDR fsp_params[3].freq_mhz= 1560MHz
INFO: BL31: Initialising Exception Handling Framework
INFO: BL31: Initializing runtime services
WARNING: No OPTEE provided by BL2 boot loader, Booting device without OPTEE init ialization. SMC`s destined for OPTEE will return SMC_UNK
ERROR: Error initializing runtime service opteed_fast
INFO: BL31: Preparing for EL3 exit to normal world
INFO: Entry point address = 0x200000
INFO: SPSR = 0x3c9
U-Boot 2017.09-orangepi (Jan 06 2023 - 14:00:02 +0800)
Model: Orange Pi 5
PreSerial: 2, raw, 0xfeb50000
DRAM: 3.7 GiB
Sysmem: init
Relocation Offset: eda2b000
Relocation fdt: eb9f91c8 - eb9fecc8
CR: M/C/I
Using default environment
SF: Detected sfc_nor with page size 256 Bytes, erase size 4 KiB, total 16 MiB
Bootdev(atags): mtd 2
PartType: EFI
DM: v1
boot mode: None
Model: Orange Pi 5
CLK: (sync kernel. arm: enter 1008000 KHz, init 1008000 KHz, kernel 0N/A)
b0pll 24000 KHz
b1pll 24000 KHz
lpll 24000 KHz
v0pll 24000 KHz
aupll 24000 KHz
cpll 1500000 KHz
gpll 1188000 KHz
npll 24000 KHz
ppll 1100000 KHz
aclk_center_root 702000 KHz
pclk_center_root 100000 KHz
hclk_center_root 396000 KHz
aclk_center_low_root 500000 KHz
aclk_top_root 750000 KHz
pclk_top_root 100000 KHz
aclk_low_top_root 396000 KHz
Net: No ethernet found.
Hit key to stop autoboot('CTRL+C'): 0
mmc@fe2c0000: 1
mmc@fe2e0000: 0
PCIe-0 Link Fail
Device 0: unknown device
scanning bus for devices...
Device 0: unknown device
Device 2: Vendor: 0x2207 Rev: V1.00 Prod: sfc_nor
Type: Hard Disk
Capacity: 16.0 MB = 0.0 GB (32768 x 512)
... is now current device
Failed to mount ext2 filesystem...
** Unrecognized filesystem type **
Device 1:
Device 0: unknown device
starting USB...
Bus usb@fc000000: usb maximum-speed not found
Register 2000140 NbrPorts 2
Starting the controller
USB XHCI 1.10
Bus usb@fc800000: USB EHCI 1.00
Bus usb@fc840000: failed to get usb phy
Port not available.
Bus usb@fc880000: USB EHCI 1.00
Bus usb@fc8c0000: USB OHCI 1.0
Bus usb@fcd00000: usb maximum-speed not found
Register 2000140 NbrPorts 2
Starting the controller
USB XHCI 1.10
scanning bus usb@fc000000 for devices... 1 USB Device(s) found
scanning bus usb@fc800000 for devices... 1 USB Device(s) found
scanning bus usb@fc880000 for devices... 1 USB Device(s) found
scanning bus usb@fc8c0000 for devices... 1 USB Device(s) found
scanning bus usb@fcd00000 for devices... 1 USB Device(s) found
scanning usb for storage devices... 0 Storage Device(s) found
Device 0: unknown device
failed to find reset-gpios property
No ethernet found.
missing environment variable: pxeuuid
missing environment variable: bootfile
Retrieving file: pxelinux.cfg/00000000
No ethernet found.
missing environment variable: bootfile
Retrieving file: pxelinux.cfg/0000000
No ethernet found.
missing environment variable: bootfile
Retrieving file: pxelinux.cfg/000000
No ethernet found.
missing environment variable: bootfile
Retrieving file: pxelinux.cfg/00000
No ethernet found.
missing environment variable: bootfile
Retrieving file: pxelinux.cfg/0000
No ethernet found.
missing environment variable: bootfile
Retrieving file: pxelinux.cfg/000
No ethernet found.
missing environment variable: bootfile
Retrieving file: pxelinux.cfg/00
No ethernet found.
missing environment variable: bootfile
Retrieving file: pxelinux.cfg/0
No ethernet found.
missing environment variable: bootfile
Retrieving file: pxelinux.cfg/default-arm-rockchip
No ethernet found.
missing environment variable: bootfile
Retrieving file: pxelinux.cfg/default-arm
No ethernet found.
missing environment variable: bootfile
Retrieving file: pxelinux.cfg/default
No ethernet found.
Config file not found
failed to find reset-gpios property
No ethernet found.
Could not get mtd 0
## Booting FIT Image FIT: No fit blob
FIT: No FIT image
Unknown command 'bootrkp' - try 'help'
opi# dir
Unknown command 'dir' - try 'help'
opi#
here is what I did:
1- Flashed a SD card with latest orange pi image version jammy 1.1.0.
2- Flashed a SSD with the same image
3- Plugged both SD and SSD
4- Logged in and Install/Update the bootloader on SPI flash
5- Unplugged the SD card.
Unfortunately it does not boot from SSD.
Hey Mahdi,
/dev/sda means you are using a M.2 SATA drive instead of an M.2 NVMe drive. You don’t have NVMe. That’s why everything isn’t matching. Try following this guide.
M.2 SATA drives require a special overlay to be enabled:
overlays=opi5-sataI don’t really recommend using a M.2 SATA drive when an NVMe drive costs less than $10 but if you’d like to use one anyway you will have some extra steps here.
Hopefully that helps!
I really thank you. I tried over 50 times with this M.2 SATA. I even did not know there are different M.2 drive. I really thank you again.
Hey Mahdi,
No problem at all, this was the first time it came up and I bet it will help a lot of others that you asked the question. I’ve added a note for M.2 SATA drives in the article and linked to that reddit post (and I gave the author a reddit gold award since I still have a bunch of reddit coins from years ago to burn and he earned it by writing it up).
Thanks for following up and letting me know this worked, enjoy and take care!
I tested today and it works. I can boot from SSD now. Thanks.
Hey Mahdi,
Excellent, thanks for following up and letting me know that works, enjoy and take care!