
The Orange Pi 5 has a nice M.2 NVMe slot but unfortunately most of the official images will not boot if you try to directly image a NVMe drive. Fortunately there is an easy way to get this working that people who frequent the blog will almost certainly have seen before.
We are going to bootstrap the boot process using a SD card and then clone that SD card to our SSD to be used as the root partition. This essentially will let us have our system’s root partition on the SSD (much faster).
Let’s get started!
Hardware Used
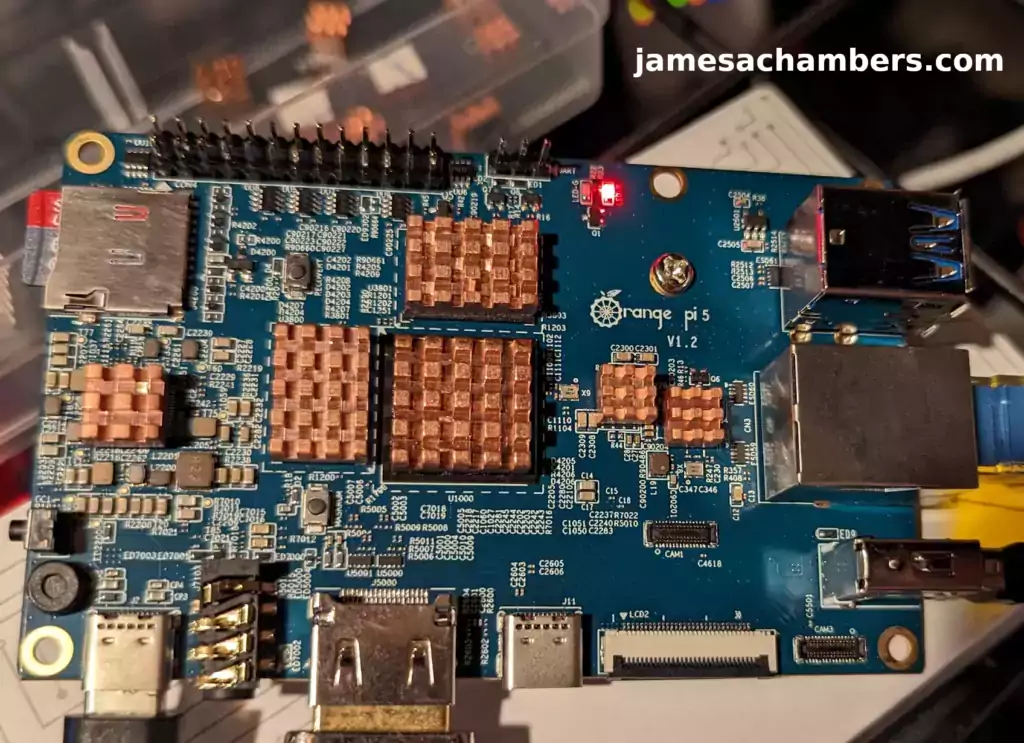
The Orange Pi 5 the latest release from Orange Pi and is the most powerful model yet. It has a 6 core CPU and options from 4GB of RAM all the way up to 32GB of RAM!
Links: Amazon.com*, AliExpress*, Amazon.ca*, Amazon.co.uk*, Amazon.de*, Amazon.es*, Amazon.fr*, Amazon.it*, Amazon.nl*, Amazon.pl*
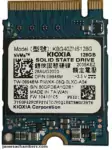
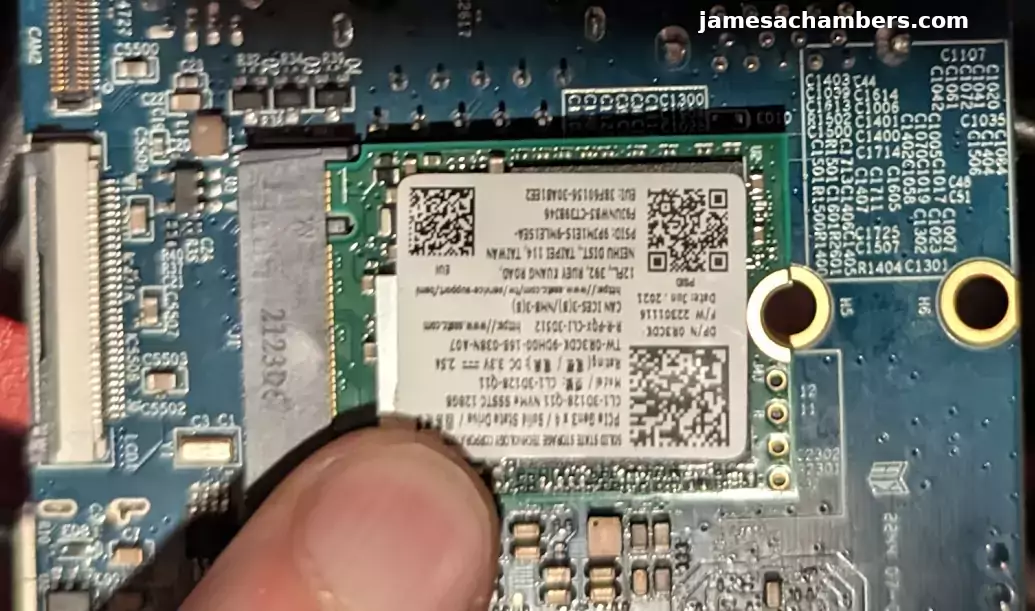
The Kioxia (Toshiba) 128GB M.2 2230 PCIe NVMe drive is much shorter than most NVMe drives (full size is 2280). It fits great with single board computers / tablets / other smaller form factors.
Links: Amazon.com*, Amazon.ca*, Amazon.co.uk*, Amazon.co.jp*, Amazon.com.au*, Amazon.de*, Amazon.es*, Amazon.fr*, Amazon.it*, Amazon.nl*, Amazon.pl*, Amazon.se*, Amazon.sg*

The Geekworm copper heat sink set is designed to fit many different single board computers. It uses thermal conductive adhesive which many “cheap” heat sink kits for SBCs don’t have. Eliminates hot spots and reduces throttling. Can be further enhanced by powered cooling over the heat sinks.
Links: Amazon.com*, Amazon.ca*, Amazon.co.jp*, Amazon.co.uk*, Amazon.de*, Amazon.es*, Amazon.fr*, Amazon.it*
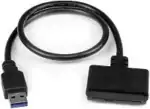
The StarTech USB 3.1 to 2.5″ SATA adapter is one I have recommended for many years for use with all kinds of devices including the Raspberry Pi, Orange Pi, ODROID, Libre “Renegade” and Tinker Board. It’s widely compatible and works with gaming consoles as well.
Links: Amazon.com*, Amazon.ca*, Amazon.com.au*, Amazon.co.jp*, Amazon.co.uk*, Amazon.de*, Amazon.es*, Amazon.fr*, Amazon.it*, Amazon.nl*, Amazon.pl*, Amazon.se*, Amazon.sg*

The Orange Pi official mouse uses 2.4GHz wireless to give you a wireless mouse experience with the Orange Pi
Links: Amazon.com*, AliExpress*

The Orange Pi monitor is meant to be a portable monitor you can take anywhere. It has a resolution of 1080P and features a hinge in the back that folds out to support the monitor.
Links: Amazon.com*, AliExpress*
Note for USB Booting
Important: Only the top blue port of the Orange Pi 5 is fast for using USB storage. You can use a USB-connected SSD.
The bottom port, despite being blue, is USB 2.1.
Keep in mind that if you are using a USB SSD then in the instructions anywhere it says /dev/nvme0n1 you will need to use /dev/sda or whatever drive was assigned when you plug in your drive via USB.
Note for Official Debian / Ubuntu Images (Updated 1/10/2023)
Orange Pi has updated their official images to support directly booting from NVMe. This means that if you are using the official Ubuntu or Debian from orangepi.org then you can actually write the image directly to the SSD. This is the easiest way to get it going.
You first need to write the image to a SD card and then run:
sudo orangepi-config
Then choose System->Install->Boot from SPI and install the new updated boot loader to the SPI flash.
This did not work at launch but is working now. It is now possible to simply write the official images directly to NVMe and boot with it after updating the boot loader! The following instructions will still be useful for other operating systems or operating systems that do not support booting directly from NVMe.
Note for Armbian (Added 1/20/2023)
Armbian has a similar install utility as orangepi-config. For Armbian you will use:
sudo armbian-config
Then choose System->Install->Boot from eMMC and install the new updated boot loader to the SPI flash.
You should also install the system to Armbian using this method. The instructions in the rest of the article are meant for operating systems that will not boot natively from NVMe. It uses a SD card as the boot loader to essentially let you boot anything (even ones not designed to boot directly from NVMe).
Supported SSD Sizes (Updated 1/26/2023)
Important: There is also a type of M.2 drive called a M.2 SATA drive. This is an older type of drive that most of you won’t have but some of you will. This type of drive is supported by the Orange Pi 5 but you have to add a special overlay (overlays=ssd-sata). If your NVMe drive shows up as /dev/sda instead of /dev/nvme0n1 then you have a M.2 SATA SSD. If you have a M.2 SATA drive follow this excellent guide by u/jng98908 on reddit.
You can use either a 2230 or a 2242 size NVMe drive.
There are actually holes for mounting hardware at both places.
Using a 2230 size NVMe drive looks like this:
It’s totally fine to use a larger one but they will be hanging off the edge of the board. As you can see I do not have the mounts installed on my board. I just leave the 2230 drive in the port like this but it is on my to-do list to find some mounts for the M.2 drive for this board.
SD card boot loader – Preparing SD Card
First you should have a completely working installation on a SD card of the OS that you would like to use. I used the official Debian desktop image for this guide (recommended) so if your partitions are different it may be your flavor of Linux and need slightly altered instructions.
If you have an already working installation you want to move to your SSD you can use this as well most likely.
Note that some operating systems like Armbian will require you to manually go in and modify files on the “boot” partition. If you stick with the official images you should be able to follow the guide as-is but note that some operating systems may have text files (or even files that need to be recompiled with mkimage like for Armbian) for this method to work.
You should completely update first with:
sudo apt update && sudo apt full-upgrade
Preparing SSD
First we are going to completely remove all partitions from the drive so it’s completely blank. Your drive should typically be /dev/nvme0n1:
sudo gdisk /dev/nvme0n1
Now remove all partitions from the device. If you press “p” it will print out the partitions. You can then use “d” to delete them.
Here’s an example on mine:
root@orangepi5:~# sudo gdisk
GPT fdisk (gdisk) version 1.0.6

Partition table scan:
  MBR: protective
  BSD: not present
  APM: not present
  GPT: present

Found valid GPT with protective MBR; using GPT.

Command (? for help): p
Disk /dev/nvme0n1: 250069680 sectors, 119.2 GiB
Sector size (logical/physical): 512/512 bytes
Disk identifier (GUID): E3017ECA-4571-4F62-A39F-4BA2A4323BD8
Partition table holds up to 128 entries
Main partition table begins at sector 2 and ends at sector 33
First usable sector is 34, last usable sector is 250069646
Partitions will be aligned on 64-sector boundaries
Total free space is 8350 sectors (4.1 MiB)

Number  Start (sector)    End (sector)  Size       Code  Name
   1              64            8063   3.9 MiB     0700  loader1
   2           16384           24575   4.0 MiB     0700  loader2
   3           24576           32767   4.0 MiB     0700  trust
   4           32768         1081343   512.0 MiB   EF00  boot
   5         1081344       250069646   118.7 GiB   8300  rootfs

Command (? for help): d
Keep pressing d until all the partitions are deleted. Once they are gone use the ‘w’ command to write your changes.
Cloning Installation to SSD
We’re now ready to clone your installation to the SSD. We can now copy your drive to the SSD with the following command:
cat /dev/mmcblk1 > /dev/nvme0n1Wait for the operation to complete (there won’t be any output but you will have a cursor again and be able to type new commands). Remember that you are copying an entire drive from one to another basically with that one command.
Mine took about 30-45 minutes (although I was using a 64GB SD card and the larger SD card you use the longer it will take to copy the whole drive).
If you are having any trouble with permissions try becoming “root” first with:
sudo suNow try running the command again and as the superuser you should not encounter any permission errors.
Change SD card’s rootfs UUID
We need to change our SD card’s UUID so that it doesn’t try to boot from that partition. We can set it to a random one with the following command:
sudo tune2fs -U random /dev/mmcblk1p2
If you get an error with the previous command regarding csums try the following command instead:
sudo tune2fs -O metadata_csum_seed -U random /dev/mmcblk1p2
We can verify that it has changed with blkid like this:
root@orangepi5:~# sudo blkid
/dev/nvme0n1p1: SEC_TYPE="msdos" LABEL_FATBOOT="opi_boot" LABEL="opi_boot" UUID="0257-2A31" BLOCK_SIZE="512" TYPE="vfat" PARTLABEL="bootfs" PARTUUID="0a65713b-d4b4-0642-a3a4-ebc357e507a1"
/dev/nvme0n1p2: LABEL="opi_root" UUID="ae948e48-3646-4f5c-be01-73168e079bc8" BLOCK_SIZE="4096" TYPE="ext4" PARTUUID="7490e84a-f585-944e-9ce6-f275f067a023"
/dev/mmcblk1p1: SEC_TYPE="msdos" LABEL_FATBOOT="opi_boot" LABEL="opi_boot" UUID="0257-2A31" BLOCK_SIZE="512" TYPE="vfat" PARTLABEL="bootfs" PARTUUID="0a65713b-d4b4-0642-a3a4-ebc357e507a1"
/dev/mmcblk1p2: LABEL="opi_root" UUID="37a6ee0a-e61d-470a-9e53-eaf51726942c" BLOCK_SIZE="4096" TYPE="ext4" PARTUUID="4f32d51c-0523-1248-9bc3-092d1f11c594"
Notice that /dev/nvme0n1p2 and /dev/mmcblk1p2 no longer have matching UUIDs. This is exactly what we want.
Change SSD’s boot UUID
Next we are going to change the boot partition’s UUID on the SSD. This will make it so that the mounted /boot folder inside your operating system actually mounts the SD card (which is your actual boot loader in this configuration).
First make sure you have mtools with:
sudo apt install mtools -y
Now we can change the UUID with:
sudo mlabel -N aaaa1111 -i /dev/nvme0n1p1 ::
You can verify these are different using the same sudo blkid command as the previous section.
Run fsck
Before we reboot run fsck on the drive like this:
sudo fsck -yf /dev/nvme0n1p2
This will prevent you from having to run fsck on the CLI the first time you try to boot.
Reboot and Verify
Now reboot the Orange Pi 5 with:
sudo reboot
With any luck you should be booted using your SSD! We can verify this with the mount command like this:
root@orangepi5:~# mount
/dev/nvme0n1p2 on / type ext4 (rw,noatime,errors=remount-ro,commit=600)
/dev/mmcblk1p1 on /boot type vfat (rw,relatime,fmask=0022,dmask=0022,codepage=936,iocharset=utf8,shortname=mixed,errors=remount-ro)
/dev/nvme0n1p2 on /var/log.hdd type ext4 (rw,noatime,errors=remount-ro,commit=600)
Here we can see that our root partition (/) is indeed on /dev/nvme0n1p2 and not /dev/mmcblk0p2. We can also see that my /boot folder is properly mounted is /dev/mmcblk0p1 (the SD card which is serving as our boot loader). Success!
Resize NVMe Partition (Added 1/24/2023)
You can use Orange Pi’s built in resize application if you are using one of the official operating systems:
sudo /usr/lib/orangepi/orangepi-resize-filesystem start
Testing Performance
For the guide I used a SSSTC 128GB 2230 M.2 NVMe drive. These are available on Amazon for around $10-12 (also see Kioxia 128GB M.2 2230 module*).
You can verify the performance of your drive on Pi Benchmarks using the following command:
sudo curl https://raw.githubusercontent.com/TheRemote/PiBenchmarks/master/Storage.sh | sudo bash
Here are the results:
     Category                  Test                      Result
HDParm                    Disk Read                 375.32 MB/s
HDParm                    Cached Disk Read          381.15 MB/s
DD                        Disk Write                234 MB/s
FIO                       4k random read            47080 IOPS (188321 KB/s)
FIO                       4k random write           35128 IOPS (140514 KB/s)
IOZone                    4k read                   75628 KB/s
IOZone                    4k write                  67285 KB/s
IOZone                    4k random read            35874 KB/s
IOZone                    4k random write           70620 KB/s

                          Score: 17,718
The full Orange Pi 5 benchmark can be viewed here on Pi Benchmarks.
That is an outstanding score. We are getting NVMe performance. This score actually even beats my ODROID M1 benchmark.
The Orange Pi 5 is without a doubt a very powerful board and is performing exactly where it should be.
Other Resources
I’ve also covered how to install Steam on the Orange Pi 5 here
I’ve also reviewed the Orange Pi portable monitor here (with the Orange Pi 5 connected)
If you are looking for alternative WiFi adapters for the Orange Pi 5 see my using E-keyed WiFi adapters with the Orange Pi 5 guide here!


Information on this site and in the comments are a bit misleading… Booting directly from NVMe SSD only works after installing the bootloader on SPI Flash. In order to do this, I had to first install the OS to my SD card, and boot from that. Here are the steps:
1. Use etcher (or your preferred imaging tool) to write the OS image to an SD card
2. Use etcher again to write the same image to your NVMe SSD
3. Insert both the SD card and the NVMe SSD into the Orange Pi 5
4. Power on the Orange Pi (the first time around it will boot from the SD card)
5. SSH into the Orange Pi 5, and run: orangepi-config (or armbian-install if you’re using armbian)
6. Select boot options, then select: “Install/Update the bootloader on SPI Flash” (This might be “Install/Update the bootloader on MTD Flash” if using armbian)
7. Once this is complete, you can remove the SD card and the device will now be able to boot directly from NVMe (SD card is no longer needed — this is true even if you decide to re-image your NVMe SSD)
These instructions are *not* for Armbian. They are for the official operating systems. My goodness, this has came up several times in the comments. It’s literally the first section of the article. Does it say Armbian? No. It actually says *NOT* Armbian. In several places.
From searching the comments for “Armbian”:
If it happens to be Armbian (it’s only a matter of time before Armbian comes up) then you would want to use Armbian specific methods like nand_sata_install or using armbian-config to install it to NVMe most likely. It’s a lot harder to make Armbian work using the method in this guide but it’s possible if you use mkimage to rebuild boot.scr on the “boot” partiton. Fortunately they provide scripts and armbian-config to help you do this within Armbian!Thank you for enlightening us on the simple sudo armbian-config Armbian installation process which has already been covered in the comments multiple times. You must be miserable to work with man. I literally made that comment to prevent someone from saying something stupid like this. It was only 5 days ago so it’s not particularly buried. You aren’t just the “it’s only a matter of time before Armbian comes up” guy, you are actually the guy who *still* said it after it had *already* came up.
You’re that guy who comes in telling everyone they’re wrong when everyone else already knows the deal and just rolls their eyes. That is literally not what the article is about and if we were at work the whole team would now proceed to make fun of you relentlessly (at least I would and they should). We’ve been working on this collectively as a community for weeks. People much smarter than you have worked on this problem and we were further along than you are weeks ago.
This article is about figuring out how to make the ones that *don’t want* to boot actually boot. Not Armbian. We’re way past your fiddling with the built in Armbian install scripts with what we’re doing in this article. Incredible that this never even crossed your mind and you assumed that myself and everyone in the comments were wrong and misleading.
I’m telling you straight up you’re an idiot and you missed it all and I’d trust the people you’re saying are wrong in the comments 1000x more with any of my equipment or any information than yourself. It’s one thing to tell me I’m wrong. Don’t tell your nicer and superior members of the community they’re wrong too or I won’t be nice about it when I point out how stupid what you’re saying is and that it has already been covered especially when it’s an uninformed opinion from someone just waltzing in who stumbled across the Armbian install script. These are people who did days of work trying multiple operating systems and figuring out which ones could be booted with this trick, which ones booted natively etc. and they did their homework / research.
I can’t imagine where some of these people are coming from or who would be willing to work with them. That’s insufferable. You didn’t even notice this article *is not about Armbian and is about the official operating systems* but you’re going to come here and preach to not only me but also the comments about what a genius you are finding the Armbian install script. Absolutely insufferable. It’s embarrassing too or it would be if you had the self-awareness to experience such a thing. It’s even sadder when one considers that Armbian was only released a few days ago for the Orange Pi 5 and didn’t even exist when this article was written.
EDIT: I’ve updated the article to add some sections to hopefully prevent some of these types of posts going forward. It’s stuff we’d already covered in the comments but now it’s in the actual article text. There’s now an Armbian section saying to use nand-sata-install/armbian-config and I updated the official image instructions on how to write the updated boot loader (must be using one of the latest images from the site for this to work otherwise it will write the same bad boot loader it shipped with). This is all stuff that has happened since publication (in the past few days actually) of course but hopefully it will spare the comments some further pain.
Your continued work covering the Orange Pi 5 hasn’t gone unnoticed James as many other reviewers have since moved on yet you continue to provide regular updates and troubleshooting advice so please don’t let the odd comment infuriate you as the written review and subsequent guides have been super helpful and shared across the community so keep up the great work!
Hey Razor Burn,
Thank you so much! I probably need to eat breakfast before I answer comments as I likely wouldn’t have been so hard on him. I think it was him going after others in the comments here in addition to me that flipped the switch in my head where I was like, “nope, this guy has it coming”. If he wanted to contribute to the discussion and work with everyone else I would have welcomed it for sure.
These types of interactions are pretty rare on the site although this thread has a couple of them at least already. One of them is suspicious (renaud) and that guy has shown up again in other threads asking strange stuff acting like nothing ever happened. They’ve taken benchmarks on pibenchmarks.com though so I really don’t know what to make of that one that keeps showing up (a troll or a smurfing account from some other creator maybe or a manufacturer?).
I feel bad if renaud is actually a fan of the site like he says but he’s saying blatantly wrong stuff and inconsistently across different threads and I cannot place his agenda in spreading this kind of stuff with no citations when it’s not true (such as the bottom blue USB port would be fixed to work at 3.0 speeds by Orange Pi despite all the specification sheets saying there is only 1 USB-A 3.0 port). Over 7500 comments I’ve never seen anyone behaving that way that wasn’t a bot or someone with some other agenda that isn’t who they are presenting themselves as.
This guy here I’ve seen a million of in IT. The reason I was talking about the team and people working with him hating him is that you know this guy goes to work with the same attitude that everyone is wrong and he has all the answers. I figured it would hit close to home. These types people can only rise to a certain level in IT (there’s a ceiling for them). They’re tolerated and nothing more.
At the highest levels you understand everyone has their specialties and doesn’t know everything and this type of attitude is much less tolerated. If you want to try to have the kind of attitude this guy has at the highest levels of IT you have to be legitimately *very good*. Like you really have to be able to do things nobody else can (or is easy to hire for) or nobody is going to put up with it (and even then everyone will just be waiting to put a proverbial knife in their back any chance they get).
It’s rarely an issue though because you have to be pretty dense to be able to work at that level and not understand the basic fact that even if you could know everything in IT most of that knowledge would be obsolete in 5 years. You have to keep up with it constantly and you can’t keep up with *everything*. No one can so we specialize and work together. Only by bringing all of our specialties together can we achieve the greatest result because there’s just too much to know and it’s changing too fast.
I see it as a community effort with all of us working together. You’ve taught me several things in your comments here on the site that have actually influenced important buying decisions I’ve made for future reviews. Those are the kind of interactions I look forward to every day and constitute a huge overwhelming % of comments on the site. Thank you for this post and all of your others as well!
I spent some time working at Data Centre’s and with IT so can appreciate its a specialized field with passionate people but at the end of the day we’re all just trying to get our Orange Pi 5’s working so there’s no need for rudeness and arrogance as it takes away from the valuable work being done considering the limited support from Rockchip and Orange Pi playing catch up.
As for renauld, I see him post regularly on Discord and he seems genuine with his testing and sharing his findings which has been helpful yet he did mention he met the Orange Pi team and owner prior to the pandemic so there may be some bias and the statements about the usb ports waiting for software upgrades is both puzzling and misleading as is the whole approach from Orange Pi misreporting the specs and that’s why we’re seeing reports of hdmi and usb-c not functioning correctly with certain monitors but that seems to vary depending on the distro you use adding to the already messy situation!?
I’ve held off doing any testing of my own as still waiting on some accessories to arrive and as soon as I flash an sd card with a distro it gets updated with some major fix so I’m happy to wait as judging by the consensus Android 12 offers the best experience with Armbian and the other Linux catching up and the Orange Pi Droid a mixed bag yet only Beta and Chinese version so it’ll be a while until things work as we hope and I’m happy to wait.
I hope to see some new reviews from you as surely your anticipated delivery of the Vision 2, Radxa Zero and Rock 5B are due any day now and each of those boards should make for some interesting testing and the comparisons between the real RK3588 and the watered down RK3588S are what most people will be waiting to see so keep us posted and thanks for taking the time to answer all the comments as it shows you care!
Hey Razor Burn,
Thanks, that definitely helps me solve a minor mystery that you’ve seen them in Discord. I’d definitely forgive him if he was just misinformed or misled or super passionate. I was more concerned that something stranger was going on so this legitimately helps and you may have saved him from being added to the spam filter (if he chooses to post here further). It’s not a crime to be wrong here or even have a bad opinion.
Spam/bots is another story and that was my concern with the strange behavior but it makes sense with some of the background you’ve given that he might feel a need to cover for them or may have misunderstood some insider information he heard (or the information he heard was right at the time but it changed later). Spam/bots are something that if I let run rampant would make the site usability pretty terrible as people actually do use the comments. It needs to be filled with comments from real people and not spam or nobody would use them for sure so that was my concern with the initially puzzling behavior.
I’m excited to hear about any testing you end up doing when the rest of the gear comes. I’ve been waiting for Orange Pi OS to drop too (outside of the beta) before I jump into Android too much. I do have the source code stashed aside that we talked about before downloaded but I have been doing a little bit of “wait and see” as I’d like to see what the final release of Orange Pi OS looks like and I’d imagine it can’t be too much longer.
I’m definitely highly anticipating those deliveries. I’m a little nervous though because I haven’t got any shipping notifications and we’re hitting the Lunar New Year in China period where not a lot of stuff will move. Apparently it’s a mess right now anyways due to COVID surges. I really hope at least one of them makes it through otherwise:
Mid-December 2022 Production begins to slow down at factoriesJanuary 1-6, 2023 Factories stop manufacturing; peak export rush at major Chinese ports to ship out goods
January 6-21, 2023 Workers start to leave for the holidays; ports have limited operational capacity
January 22-27, 2023 Lunar New Year holiday week
February 6, 2023 Workers start returning to factories and ports*
* It takes approximately 1-2 weeks for operations to return to normal levels.
You can probably see why I’m nervous from these timelines and the way things are going. It’s looking like I could be well into February if these boards have not already left China or they’re on some of the last limited shipments making their way out before the Lunar New Year!
Sadly the internet is a magnet for various bots and trolls who pollute the traffic of information but you’re doing a good job managing things and having that interaction with people is important plus you have some very helpful people posting working solutions which is fantastic to see and long may it continue!
I am constantly searching the forums, Discord, message boards for new updates and so far it appears we have most issues ironed out and a few distro’s that seem to work 90% yet I’m shocked that bluetooth still doesn’t seem to work especially with Linux as Android tends to have issues supporting bt usb dongles which sucks as Android seems to be the best performing so far which makes the decision to remove the onboard module even more confusing but once your factor in the decision to use the slimmed down RK3588S it makes sense as compromises needed to be made to squeeze in as much as possible but then again its begs questioning why manufacturers are using the RK3588S/J, etc if it means the powerful SOC is unable to utilize PCIe 3.0, not to mention dual HDMI, USB 3.1 and yes it the Pi 5 comes with 2 x camera mpi and lcd slot but what is actually supported is unknown meaning you then need to factor in using usb but that is hard as you’ve just wasted 2 x usb for wifi and bt unless you go with the M.2 but power becomes an issue so its all a real mess!?!
We’re in a dilemma as China starts to open up just in time for Lunar New Year and if last year is anything to go by we may seem a rapid increase in cases as people leave the cities and head back to the villages yet the authorities are pressured to keep manufacturing open so how they handle things will be interesting to see and I have already seen a rush to get orders out before the shut down so here’s hoping your orders at least reach the US as my understanding the products you ordered are ready for shipment with the Vision 2 dual Gigabit Ethernet schedule for shipping in February as the early bird orders have since sold out with is encouraging. Time will tell and I see you have a new Review out for a another H616 powered board so I look forward to reading what you find… Stay safe and take care!
Не могли бы Вы мне помочь по SSH перенести Armbian на SSD NVMe? Третий день вожусь и ничего не выходит 🙁
Hey Алексей,
Certainly! So for Armbian you want to use:
sudo armbian-configThen choose System->Install. Choose to install to SPI and NVMe. It should copy all of your files to the NVMe and then rewrite the SPI flash. Once it’s done it should tell you to power off. At that point you can remove the SD card and boot from NVMe.
Hopefully that helps!
Hi, thanks for sharing.
I have a two problems. I have an orange pi 5 and booted it from SD Card a few days ago with no problem. Today I tried to boot it from NVME and I used the new official Image but my orange pi did not boot from NVME. I changed it to SD Card, but now it does not boot from SD Card too. The power LED is red but green LED does not blink.
I put the SD Card to another new orange pi and it booted with no problem. But again this new orange pi did not boot from NVME.
1- Any idea to boot from SD Card in the first orange pi?
2- Any idea to boot from NVME in the second one? as you mentioned I used the new official image and used BalenaEtcher to format the SD Card.
Thanks alot.
Hey Mahdi,
Once you modify the SD card it will not boot from SD card before. I hope you are imaging a new one to test this and not trying to use the old SD card. That one is permanently set to try to boot from NVMe. You’ll need a fresh image to boot from SD card again unmodified. If it won’t boot from SD card if you reimage it with a fresh image then something is broken with that Orange Pi already. You changed the partition UUIDs on the card if you followed the guide so that SD card will never boot by itself again.
I’ve actually never got it to boot from NVMe directly using anything. Lots of people insist this is working (and Orange Pi says they’ve been updated) but it seems like there’s still problems with it. I’m not surprised it’s not working for you and images that people tell me should work don’t work for me either. People were telling me this worked *weeks* ago and I’m absolutely positive it still doesn’t really work properly for everyone today.
I would say that if you want to boot it from SD you will need a fresh SD card image. I’m not sure how to fix the native NVMe booting. That’s really up to Orange Pi for that! Lots of people insist it’s already working but it clearly doesn’t work for everyone.
To complete my question: This is the output of serial debug port of orange pi when booting from NVME:
DDR Version V1.08 20220617LPDDR4X, 2112MHz
channel[0] BW=16 Col=10 Bk=8 CS0 Row=16 CS=1 Die BW=16 Size=1024MB
channel[1] BW=16 Col=10 Bk=8 CS0 Row=16 CS=1 Die BW=16 Size=1024MB
channel[2] BW=16 Col=10 Bk=8 CS0 Row=16 CS=1 Die BW=16 Size=1024MB
channel[3] BW=16 Col=10 Bk=8 CS0 Row=16 CS=1 Die BW=16 Size=1024MB
Manufacturer ID:0x1 Samsung
CH0 RX Vref:33.7%, TX Vref:18.8%,0.0%
CH1 RX Vref:30.7%, TX Vref:20.8%,0.0%
CH2 RX Vref:29.7%, TX Vref:18.8%,0.0%
CH3 RX Vref:32.7%, TX Vref:18.8%,0.0%
change to F1: 528MHz
change to F2: 1068MHz
change to F3: 1560MHz
change to F0: 2112MHz
out
U-Boot SPL board init
U-Boot SPL 2017.09-orangepi (Dec 16 2022 - 15:38:30)
Trying to boot from MMC2
spl: mmc init failed with error: -123
Trying to boot from MMC1
Card did not respond to voltage select!
spl: mmc init failed with error: -95
Trying to boot from MTD2
Trying fit image at 0x4000 sector
## Verified-boot: 0
## Checking atf-1 0x00040000 ... sha256(806278dba1...) + OK
## Checking uboot 0x00200000 ... sha256(25f0b45730...) + OK
## Checking fdt 0x0034bb10 ... sha256(cae21b2b19...) + OK
## Checking atf-2 0x000f0000 ... sha256(c00c7fd75b...) + OK
## Checking atf-3 0xff100000 ... sha256(71c3a5841b...) + OK
## Checking atf-4 0xff001000 ... sha256(2301cf73be...) + OK
Jumping to U-Boot(0x00200000) via ARM Trusted Firmware(0x00040000)
Total: 505.28 ms
——————
And this is when booting from SD Card:
DDR Version V1.08 20220617LPDDR4X, 2112MHz
channel[0] BW=16 Col=10 Bk=8 CS0 Row=16 CS=1 Die BW=16 Size=1024MB
channel[1] BW=16 Col=10 Bk=8 CS0 Row=16 CS=1 Die BW=16 Size=1024MB
channel[2] BW=16 Col=10 Bk=8 CS0 Row=16 CS=1 Die BW=16 Size=1024MB
channel[3] BW=16 Col=10 Bk=8 CS0 Row=16 CS=1 Die BW=16 Size=1024MB
Manufacturer ID:0x1 Samsung
CH0 RX Vref:33.7%, TX Vref:18.8%,0.0%
CH1 RX Vref:30.7%, TX Vref:19.8%,0.0%
CH2 RX Vref:30.7%, TX Vref:17.8%,0.0%
CH3 RX Vref:31.7%, TX Vref:19.8%,0.0%
change to F1: 528MHz
change to F2: 1068MHz
change to F3: 1560MHz
change to F0: 2112MHz
out
U-Boot SPL board init
U-Boot SPL 2017.09-orangepi (Dec 16 2022 - 15:38:30)
Trying to boot from MMC2
Trying fit image at 0x4000 sector
## Verified-boot: 0
## Checking atf-1 0x00040000 ... sha256(806278dba1...) + OK
## Checking uboot 0x00200000 ... sha256(25f0b45730...) + OK
## Checking fdt 0x0034bb10 ... sha256(cae21b2b19...) + OK
## Checking atf-2 0x000f0000 ... sha256(c00c7fd75b...) + OK
## Checking atf-3 0xff100000 ... sha256(71c3a5841b...) + OK
## Checking atf-4 0xff001000 ... sha256(2301cf73be...) + OK
Jumping to U-Boot(0x00200000) via ARM Trusted Firmware(0x00040000)

Total: 640.640 ms
Hey Mahdi,
Those are identical. Nothing is going wrong there. Basically what this tells is is that the problem is the operating system. Both of these boots succeed:
Jumping to U-Boot(0x00200000) via ARM Trusted Firmware(0x00040000)Total: 640.640 ms
Jumping to U-Boot(0x00200000) via ARM Trusted Firmware(0x00040000)
Total: 505.28 ms
The problem is happening after this. It’s happening with your operating system. We’d really need to see the “mount” commands with each one booted.
Basically if you image a NVMe drive with the official Orange Pi 5 image and it won’t natively boot then yes, that has been the case for me since day one and you would just follow the guide normally. I can’t fix the native NVMe booting. It’s something with Orange Pi’s distributions.
Did you try with a different one than you used? If you tried with Debian did you try with Ubuntu? I have no idea what people are ever using because nobody ever tells me. You just said you were using the new “official image”. Which one? Debian? Ubuntu? Orange Pi OS like Ants Neo? This really doesn’t help as not only are there multiple official images but the version on the Chinese site is different than orangepi.org and there are no less than 3 different choices.
I could probably explain the differences if I knew what you guys were trying to do. Obviously you should try a different OS than you’re using for a test for a start. Try a different one from whichever one you may be using. See if it makes any difference.
The only two possibilities are that you did something wrong following the guide (in which case starting over from scratch is in order) or that some of the Orange Pi 5 images still can’t boot from NVMe (extremely likely). We need to know what you’re booting. Exactly.
Also if you haven’t reimaged your SD card since following the guide that SD card image is *burned*. It will always look for the wrong thing to boot because that’s what we told it to do in the guide. You need to reimage it if you want to boot from SD again.
Hopefully that helps!
And this is the output when in flashed a new SD Card:
DDR Version V1.08 20220617LPDDR4X, 2112MHz
channel[0] BW=16 Col=10 Bk=8 CS0 Row=16 CS=1 Die BW=16 Size=1024MB
channel[1] BW=16 Col=10 Bk=8 CS0 Row=16 CS=1 Die BW=16 Size=1024MB
channel[2] BW=16 Col=10 Bk=8 CS0 Row=16 CS=1 Die BW=16 Size=1024MB
channel[3] BW=16 Col=10 Bk=8 CS0 Row=16 CS=1 Die BW=16 Size=1024MB
Manufacturer ID:0x1 Samsung
CH0 RX Vref:32.7%, TX Vref:18.8%,0.0%
CH1 RX Vref:30.7%, TX Vref:20.8%,0.0%
CH2 RX Vref:30.7%, TX Vref:18.8%,0.0%
CH3 RX Vref:32.7%, TX Vref:19.8%,0.0%
change to F1: 528MHz
change to F2: 1068MHz
change to F3: 1560MHz
change to F0: 2112MHz
out
U-Boot SPL board init
U-Boot SPL 2017.09-orangepi (Dec 16 2022 - 15:38:30)
Hey Mahdi,
I doubt there is any fixing an Orange Pi that can’t read a fresh SD card image. That’s a failed boot.
Do you have a bad SD card port on your other Orange Pi? If native NVMe booting actually worked properly on that one you could probably bypass it but I would still return / exchange it.
This doesn’t look good. This is beyond anything in this article which is about SSD booting. You can’t boot from a freshly formatted SD card image. One that can boot on the other Orange Pi. This does not make sense and is not normal. I’d wager to guess that other Orange Pi 5 needs to be returned/exchanged!
Your SD card could also be so messed up it needs the SD card association’s formatting tool used on it. This seems unlikely though if it will work in the other Orange Pi 5. We’ve never seen anything like that and I would say it’s very, very clearly broken. If you can use a SD card image in one and it works and the exact same card/image won’t work in the other one (and you have done the fresh image which you stated in this one that you clearly did) then that doesn’t make a lot of sense does it? That’s definitely something like a bad SD card port or some sort of hardware issue most likely.
I’m open to alternative suggestions of what could be happening when you have one Orange Pi 5 that will boot from a SD card with the official image and then you have one right next to it that won’t. Do you really still want that other Orange Pi when it’s so clear it has a hardware issue and can’t achieve normal operation like the first one? I’ve never even heard of this happening to anyone. I’d have that thing sent back instantly. I’d never trust it when I’ve seen with my own eyes that the hardware is not functioning as well as the first one. Even if you can do some kind of workaround why would you? It’s brand new. Get them to send you a 100% working one!
Hopefully that helps!
Thanks for your guid. I’m almost there, but got stuck here:
orangepi@orangepi5:~$ sudo tune2fs -O metadata_csum_seed -U random /dev/mmcblk1p2tune2fs 1.46.5 (30-Dec-2021)
Setting feature 'metadata_csum_seed' is only supported
on filesystems with the metadata_csum feature enabled.
Hey Ants Neo,
It’s really hard to say without knowing which OS this is or what your sudo blkid looks like.
Initially I’d say to try dropping the “-O metadata_csum_seed” but I’m worried to even tell you to try this because I feel like this is not a standard partition layout and that you haven’t looked at your sudo blkid. Is /dev/mmcblk1p2 even the root partition for the OS you are trying to do?
Before we go further can you share your sudo blkid?
orangepi@orangepi5:~$ sudo blkid[sudo] password for orangepi:
/dev/nvme0n1p1: SEC_TYPE="msdos" UUID="AAAA-1111" BLOCK_SIZE="512" TYPE="vfat" PARTLABEL="bootfs" PARTUUID="048c42d4-6cf7-084d-b75a-620ce1556da2"
/dev/nvme0n1p2: LABEL="opi_root" UUID="5ead0754-b05b-4f29-8170-b0620e7ae6d2" BLOCK_SIZE="4096" TYPE="ext4" PARTUUID="fa1c0e08-a32a-8041-9d42-f4e654dab880"
/dev/zram0: UUID="be0edc2b-6782-4f0a-a1c1-6761358c5c8f" TYPE="swap"
/dev/zram1: LABEL="log2ram" UUID="6d9308ca-2411-461a-b0a5-42f319e7eaae" BLOCK_SIZE="4096" TYPE="ext4"
/dev/mtdblock0: PTUUID="311a2be6-c13a-4853-a08f-616708bfd0d3" PTTYPE="gpt"
/dev/mmcblk1p1: SEC_TYPE="msdos" LABEL_FATBOOT="opi_boot" LABEL="opi_boot" UUID="4CA7-1DD8" BLOCK_SIZE="512" TYPE="vfat" PARTLABEL="bootfs" PARTUUID="048c42d4-6cf7-084d-b75a-620ce1556da2"
/dev/mmcblk1p2: LABEL="opi_root" UUID="5ead0754-b05b-4f29-8170-b0620e7ae6d2" BLOCK_SIZE="4096" TYPE="ext4" PARTUUID="fa1c0e08-a32a-8041-9d42-f4e654dab880"
I have flashed the TF with Orangepi5_1.0.8_ubuntu_jammy_desktop_xfce_linux5.10.110.7z
/dev/mmcblk1p2 is labeled opi_root when I see it in GParted app.
Thanks a lot for helping me with this!
Hey Ants Neo,
Perfect, that helps a lot. It looks like the boot one changed correctly (that one is now AAAA-1111). Did you get a chance to try without metadata_csum_seed like this:
sudo tune2fs -U random /dev/mmcblk1p2After that do another sudo blkid and /dev/mmcblk1p2 and /dev/nvme0n1p2 shouldn’t match anymore.
If this works for you then let me know as it means I need to update the article and add a note that it might be one of those two commands. Let me know if this is the case and I can definitely update the article!
orangepi@orangepi5:~$ sudo tune2fs -U random /dev/mmcblk1p2[sudo] password for orangepi:
tune2fs 1.46.5 (30-Dec-2021)
orangepi@orangepi5:~$ sudo blkid
/dev/nvme0n1p1: SEC_TYPE="msdos" UUID="AAAA-1111" BLOCK_SIZE="512" TYPE="vfat" PARTLABEL="bootfs" PARTUUID="048c42d4-6cf7-084d-b75a-620ce1556da2"
/dev/nvme0n1p2: LABEL="opi_root" UUID="5ead0754-b05b-4f29-8170-b0620e7ae6d2" BLOCK_SIZE="4096" TYPE="ext4" PARTUUID="fa1c0e08-a32a-8041-9d42-f4e654dab880"
/dev/mmcblk1p1: SEC_TYPE="msdos" LABEL_FATBOOT="opi_boot" LABEL="opi_boot" UUID="4CA7-1DD8" BLOCK_SIZE="512" TYPE="vfat" PARTLABEL="bootfs" PARTUUID="048c42d4-6cf7-084d-b75a-620ce1556da2"
/dev/mmcblk1p2: LABEL="opi_root" UUID="8f0abe7e-6f62-41e5-b6ef-8babdd1c449e" BLOCK_SIZE="4096" TYPE="ext4" PARTUUID="fa1c0e08-a32a-8041-9d42-f4e654dab880"
/dev/zram0: UUID="8b36c1b6-ff39-4952-9e6b-115fba86cdca" TYPE="swap"
/dev/zram1: LABEL="log2ram" UUID="3e4b9bf4-b6c0-4bd2-8e0d-c524dd71d2d8" BLOCK_SIZE="4096" TYPE="ext4"
/dev/mtdblock0: PTUUID="311a2be6-c13a-4853-a08f-616708bfd0d3" PTTYPE="gpt"
Trying sudo reboot
Orange Pi OS still boots from TF. But this time icon of opi_root (SD) appears on Desktop. Address in file manager is /media/orangepi/opi_root/ and I can see the root folder is marked with X. The same in the File System folder, but no address here /
Do I need to press any key for boot on nvme01p1?
/dev/nvme0n1p1fat16
AAAA-1111
bootfs
bls_boot
/dev/nvme0n1p2
ext4
opi_root
5ead0754-b05b-4f29-8170-b0620e7ae6d2
I can see the TF is still bootfs and symbol of locked key /dev/mmcblk0n1p1
I’m still learning the linux command world. Decided to leave MacOS home office and not use Windows at work anymore. Enjoy my learning curve and have impressed colleagues even that they still ask why, ha ha…
Am I right, understanding the bootfs is locked on TF, so I need some command to unlock, or just go to the permissions to unlock. Checking…
Hey Ants Neo,
That just sounds like automounting. Use the “mount” command like I did in the guide at the end and check which ones are mounted. It doesn’t matter what the file explorer shows. It will mount everything it can a lot of the time.
Can you share us the results from following the guide? Mine in the guide were:
Reboot and VerifyNow reboot the Orange Pi 5 with:
sudo reboot
With any luck you should be booted using your SSD! We can verify this with the mount command like this:
root@orangepi5:~# mount
/dev/nvme0n1p2 on / type ext4 (rw,noatime,errors=remount-ro,commit=600)
/dev/mmcblk1p1 on /boot type vfat (rw,relatime,fmask=0022,dmask=0022,codepage=936,iocharset=utf8,shortname=mixed,errors=remount-ro)
/dev/nvme0n1p2 on /var/log.hdd type ext4 (rw,noatime,errors=remount-ro,commit=600)
Here we can see that our root partition (/) is indeed on /dev/nvme0n1p2 and not /dev/mmcblk0p2. We can also see that my /boot folder is properly mounted is /dev/mmcblk0p1 (the SD card which is serving as our boot loader). Success!
So what was actually mounted on yours as per the guide? Did it work? This is not checked via the file explorer.
Ok, Im doing the
sudo fsck -yf /dev/nvme0n1p2fsck from util-linux 2.37.2
e2fsck 1.46.5 (30-Dec-2021)
/dev/nvme0n1p2 is mounted.
e2fsck: Cannot continue, aborting.
Then mount
(cut some of the text here)
/dev/nvme0n1p2 on/dev/mmcblk1p1 on /boot type vfat (rw,relatime,fmask=0022,dmask=0022,codepage=936,iocharset=utf8,shortname=mixed,errors=remount-ro)
/dev/nvme0n1p2 on /var/log.hdd type ext4 (rw,noatime,errors=remount-ro,commit=600)
now doing sudo reboot
Hey Ants Neo,
It’s already booted from NVMe. You can see this here:
/dev/nvme0n1p2 on //dev/mmcblk1p1 on /boot type vfat (rw,relatime,fmask=0022,dmask=0022,codepage=936,iocharset=utf8,shortname=mixed,errors=remount-ro)
/dev/nvme0n1p2 on /var/log.hdd type ext4 (rw,noatime,errors=remount-ro,commit=600)
There’s nothing more to do. It’s finished (and it probably was a long time ago to be honest, I bet this was done a couple of replies ago)! /dev/nvme0n1p2 is your root partition (/). That means it’s booted off the SSD!
Straight from the article:
With any luck you should be booted using your SSD! We can verify this with the mount command like this:root@orangepi5:~# mount
/dev/nvme0n1p2 on / type ext4 (rw,noatime,errors=remount-ro,commit=600)
/dev/mmcblk1p1 on /boot type vfat (rw,relatime,fmask=0022,dmask=0022,codepage=936,iocharset=utf8,shortname=mixed,errors=remount-ro)
/dev/nvme0n1p2 on /var/log.hdd type ext4 (rw,noatime,errors=remount-ro,commit=600)
Here we can see that our root partition (/) is indeed on /dev/nvme0n1p2 and not /dev/mmcblk0p2. We can also see that my /boot folder is properly mounted is /dev/mmcblk0p1 (the SD card which is serving as our boot loader). Success!
The boot partition will always be /dev/mmcblk1p1. That is the right one. It would actually be wrong if it showed /dev/nvme0n1p1 on /boot (at least for this method, if you are using native NVMe booting it actually would be).
This method requires using the SD card so it’s finished. You can leave it as is! I guess I just need to insist on a sudo blkid and a mount command from anyone who wants help with this. Most of it seems to just be confusion about what we’re actually doing and how to check if you did it correctly (and it’s understandable honestly, it’s very confusing keeping all the UUIDs straight and all this stuff and I’m not saying it’s not). I could have saved you and myself a lot of time if I had just insisted you give me these and not said a word until I had them. I’m learning slowly but surely!
I was able to improve the article based on our conversation as well. Definitely enjoy the setup and take care!
Aha, then i totally miss the understanding of how to install an OS on this machine. I thought the downloaded Orangepi5_1.0.8_ubuntu_jammy_desktop_xfce_linux5.10.110.7z to TF, was enough when cloned to SSD to boot from? Have to find out how to start it then?
Hey Ants Neo,
What is it that you are trying to do exactly? You already succeeded in booting from NVMe. If you want to boot it without using the SD card I can’t really help with that. That’s up to Orange Pi and their images and a lot of people are saying that is already working. If that is working you would not even use a SD card. You would just image the NVMe SSD directly from your computer. That is not what this guide does and you can try it if you would like for sure.
I actually don’t recommend any of these things until you’ve decided what you want to do. What are you trying to do? You already accomplished everything in the guide, so what is missing still?
I’m honestly very confused because you literally already have booted it from SSD. You want to boot it from SSD more? Or are you saying you want to boot it natively? I have no idea. If you’re talking about native booting you need to talk to Orange Pi for sure.
I’m not sure why you’d bother continuing to fight with this though unless you really, really really needed your SD card back. I have not even bothered to fight anymore with directly NVMe imaging because I have tons of throwaway SD cards so it’s easier for me to just wait a month or two for Orange Pi to fix all the problems before even attempting it again and to just use a sacrificial SD card for now. I have no doubt that probably even a week from now several more of these images will have been updated to support native SSD booting.
I’d imagine the reason we are seeing some confusion is that people are trying different operating systems. So far people have been saying they’re trying Ubuntu, Debian XFCE, the other Debian one and several others. Has every single one of these been updated all at once to support this? I doubt it. Which ones have been updated exactly? Has the XFCE one specifically been updated yet? How about the CLI version? It sure doesn’t sound like all of them have because some people say it works and some don’t. Time will solve this (and probably not very much of it, weeks or at the most a few months).
Again, unless you really need your SD card back (and if you have this few SD cards I recommend having some spares on hand), why? It uses the SD card for all of 5 seconds during boot and then never touches it again. There is no speed or any other type of benefit to natively booting it vs. using the SD card as a boot loader. It’s exactly the same as using a eMMC as the boot loader.
Sure it’s nice to not have to waste SD cards but that is literally the only benefit. I want them to fix the native support. It’s not a serious problem for me though that this isn’t working 100% yet and I’m asking you if it’s really that serious of a problem for you (and why). The smart thing to do is ignore it and let them work it out over the next few weeks / months and just bypass it for now. Eventually you’ll very likely be able to natively boot *all* the Orange Pi 5 images and will get the SD card back before too long anyway. It does not seem like a good choice to lose a bunch of time fighting with the native support when it’s so easily bypassed. That time can go toward other things while you let Orange Pi do their thing and fix/update the images. That’s their job and they’re getting paid for it but you won’t be.
You have the NVMe root partition mounted as your OS drive. If that wasn’t what you were trying to do, then what was it? This may be worth posting about somewhere else. This article is about using your SD card to let you use your SSD as the main boot partition. I don’t think I even understand what you’re trying to do here and I’m sure my article is not about it.
If I’m misunderstanding I apologize but I can only assume you mean native booting of NVMe without having to use the SD card. Hopefully that helps!
Hi James, I thank you for your explanation and time your spent. I think I understand little more now but will read your replys again to get it even better. I thought I installed Ubuntu by doing this? Sorry my confusion, now I’m even more confused by what is what in the Linux world? But learning by my mistakes! I want to play around with this machine first and then land in having a stable computer setup for home and work. Leave Mac
Hey Ants Neo,
No problem at all, I definitely welcome you trying things out especially coming from the Mac world! I think I understand some of the confusion now and would definitely be happy to help clear some things up.
So you’re right, you did install Ubuntu. Orange Pi offers a few different flavors like Debian and Ubuntu. There is also Armbian which was recently released for the Orange Pi 5. These are all Linux operating systems but they are different “flavors” meaning they will look different / come with different desktops (or no desktop and all and be CLI only) / applications / etc.
One of the things you’ll learn in the journey you’re taking is you’ll find that you prefer a certain “flavor” of Linux. This could end up being Ubuntu, Debian, Armbian or something else entirely. There’s differences between each of them in how they look and feel.
They are all Linux under the hood though. When you go to the command line they’re generally the same commands to do things on each (although there’s some subtle differences the core or “kernel” for Linux is the same other than which options are selected when the kernel is built).
I’d keep doing exactly what you’re doing now. I would say to try the different flavors and see which one you like. See which one feels the best to you and is the easiest to use / configure. It will get easier over time.
One benefit you will have coming from the Mac world is that Mac OS X is Unix under the hood (which Linux is also derived from Unix at least long ago, they’re literally related through an ancestor). This means a lot of the CLI commands between the two will be recognizable and often even identical between the two.
Some of the switches may vary between the GNU versions and the Mac/POSIX versions that ship with Mac OS X but they will be similar enough that you will really have an advantage here vs. someone coming from the Windows world for example that has never touched Linux. The Windows CLI commands are their own thing. Obviously Mac tries to design it best where you don’t have to use the CLI ideally but as we all know we don’t live in an ideal world and sometimes you need to drop into CLI on Mac too to run some fix with these type of commands.
I apologize for not being more patient earlier. I understand where you’re coming from now and why this would be confusing especially the way I phrased some of it (which was very inside technical Linux lingo in some cases, bad James!). In the Apple / Mac world everything is uniform. There is only one Mac OS / iOS. In Linux there are hundreds of flavors (although don’t worry, you’ll only have to sample between a few for the Orange Pi).
I have no doubt you will be successful as knowing now that you’re coming from a Mac background and haven’t worked with these types of boards much I’m surprised you were able to follow what I was saying at all (and not only that, you actually accomplished what this guide was trying to do!). Sometimes I spend so much time in the technical weeds here that I forget that some people coming here are coming from places and backgrounds I am not expecting and this was one of those cases where I failed to keep that in mind.
You may even end up deciding you like Android better than Linux and Android is available as well for the Orange Pi 5. This will generally just come with some experimentation / learning exactly like you’ve set out to do here and your natural preferences will guide your selections as you become more comfortable. If you’re coming from Mac though I think you will really appreciate Linux when you get more familiar with it due to it having a common ancestor to Mac OS X (Unix) which will make the Linux CLI and commands a lot more familiar to you than they would be otherwise (giving you a huge advantage in what is normally a very difficult learning curve for beginners who have never worked with Unix-type commands or operating systems).
Hopefully that helps!
Just found out an easiest painless way to boot from m.2 NVMe storage without having a microSD plugged in. It only works with official OrangePi 5 images, I tried official Ubuntu and Debian only. I used official Radxa USB C 3.1 GEN2 TO M.2 NVME case from allnetchina.
This enclosure is based on jmicron JMS583 chipset.
This enclosure/case does accept 2280, 2260 and 2242 m.2 M-Key NVMe drives.
Just place your m.2 storage inside adapter, flash official OrangePi5 image directly with Etcher, unplug, plug it into OrangePi5 m.2 slot and Voila!.
I tried so far with 5 different NVMe 2280 m.2 drives such as Samsung 980Pro, Samsung 970Evo plus, WD Black SN750, WD SN550 and WD Black SN850X. They all worked every time without having to do anything else. Cheers!
Hey Gospa,
Is that working with the ones from Orange Pi’s main site or the ones from Chinese site only? The last I had heard the ones on orangepi.org would not work this way.
It says they were recently updated so maybe this has been fixed. If so I can update the article to add a note that the official Ubuntu and Debian images are now working by directly imaging the NVMe drive!
Those mentioned above are the ones I downloaded from Official OrangePi main site in english…I downloaded them yesterday and was playing with NVMe booting until I tried this method this morning…You can see I got the 2nd highest score on OrangePi5 booting from NVMe with Official OrangePi Ubuntu Jammy. Benchmark #65608 with a score of 22,244
Hey Gospa,
Thanks, I’ve added a node about this to the top of the article saying if you are using Debian or Ubuntu from the official web site that you can directly image the NVMe.
That’s an incredible pibenchmarks.com score. Looking very good. Thanks again for letting me know these have been updated!
More good news. Latest armbian jammy xfce trunk 0132 now boots directly from NVMe….I tried every single release from them and this is the 1st one booting directly from NVMe(previous 0130 and older weren’t). There a noticeable difference in performance when booting from NVMe vs booting from uSD(MicroSD).
For those who wants to try..so far seems very stable and can be installed Panfrost(Panfork) HW on it very easy:
File name:
Armbian_23.02.0-trunk.0132_Orangepi5_jammy_legacy_5.10.110_xfce_desktop.img.xz
File size:
829MB
Hey Gospa,
Yes, that is very good news. I was fighting with the Armbian release yesterday and actually gave up but it was the public release on the main page. I tried nand-sata-install several different ways and worked on it for quite a while to no avail. I do not recommend the posted release and definitely recommend anyone using Armbian (that wants NVMe) to use Gospa’s link to the official Armbian GitHub releases page (or newer if there’s newer releases).
I did see someone mentioning somewhere this release could do it. I assumed it was the one from their “Downloads” page but that one definitely is not it (yet) and is the one you linked. It’s so good to see these fixed.
Thanks for linking directly to it!
Fantastic work there Gospa!
im having a problem in this part
sudo tune2fs -O metadata_csum_seed -U random /dev/mmcblk1p2the answer is
This operation requires a freshly checked filesystem.Please run e2fsck -f on the filesystem.
i tried but doesnt work
Hey Cadu,
Welcome! So basically it looks like the filesystem on your SD card needs a fsck like it was saying. The reason it won’t let you fsck the filesystem is that it’s mounted. This can happen if power is cut to the device without shutting down or a few other ways.
There are a couple of ways you can fix this. The easiest way is probably to put the SD card into a PC and run fsck on it this way:
sudo fsck -yf /dev/mmcblk0p2You can usually also force a fsck (before the filesystem is mounted) in most Linux operating systems by doing:
sudo touch /forcefscksudo reboot
This is meant to be used to avoid having to use a second system for repairs but honestly it’s an automated repair and it’s not as good as the switches I gave to run it manually. My version will fix more issues than this but a touch /forcefsck might be enough to get yours to let you change the UUID.
There is another option though. The problem is your SD card’s OS partition needs an fsck because something got corrupted on it. You could simply image the SD card again with a fresh image and then try again if you don’t have a Linux PC or something you can plug the SD card into to run fsck that way. That’s basically the “nuclear option”. Reimage it so that there’s no disk errors and then try again.
I’m guessing power was cut sometime during your initial setup process without a safe shutdown or maybe you may have yanked the power to reboot it. I’m guilty of doing this all the time but I know that every time I do it I might have to do a fsck (and there’s a small chance the fsck will fail). I can get away with it 9 times out of 10 I would say without ever triggering the need to do a fsck. It depends on what is running and what the disk is doing when power is cut. You may also not have ejected the card before pulling it out after imaging and this can also corrupt them (and will also mark them dirty, Windows does that and Linux can as well).
Fsck will also fix the dirty bit issue from not ejecting properly before removing. In Windows when you plug in a drive and it says “There is a problem with this drive” and asks you to fix it it’s this exact same issue. The drive has been marked dirty and Windows is doing a disk check on it and removing those dirty bits. Both of these tools are doing identical things to solve the exact same problem which is that the disk was marked dirty either from getting shut off in the middle of a write or being removed without being ejected properly. Both tools scan the entire disk for errors and once it’s clean they will remove these dirty flags and mark the disk clean.
Rarely (probably 1 / 100 but it goes up if the system is busy or writing a lot to disk) fsck won’t be able to fix it and you will have to completely reimage and start over. On my other articles where people run Minecraft servers on SBCs if you cut the power to it when it’s running a Minecraft server it’s probably a >50% chance something will get corrupted. That’s an example of how what is running can make this much more likely (and much more serious). The Minecraft server is writing to the disk constantly so there’s a very high chance it will be writing when power is cut. This leaves corrupted half-written data on the disk because it didn’t have enough power to finish the write. If the device is completely idle then it’s a pretty low chance (but not zero, it’s constantly updating config files and logs and those will get corrupted occasionally).
This is exactly the same with Windows PCs and Macs when the power is cut. In Windows it will say “Windows is attempting repairs” or something and most of the time it will succeed but then 1 / 100 tries or whatever it is it will fail and then it needs a reinstall basically as it’s hilariously broken/corrupted at that point if it can’t even figure out how to repair it. This is the Linux version of that basically. If it were Windows it wouldn’t even let you boot as Windows pretty much will refuse to boot if it detects anything like this. In Linux it will let you boot if it can but often times the filesystem will be mounted as read-only (but not always). I don’t think yours is mounted as read-only or you would actually be able to fsck it. It must be some pretty minor damage that I bet putting it into another PC or SBC and running fsck would easily take care of.
If you’re positive it didn’t lose power then it might have just been a bad image from the start (it happens) and likely simply writing the image again will eliminate this. If it doesn’t it means your SD card has gone bad if this keeps happening (and that definitely happens with any board as that is actually a limitation of SD cards that they have limited total lifetime writes / a limited lifespan not to mention they can fail prematurely and the SD card market is *full* of fake cards that are extremely low quality).
Basically it’s telling you though that there’s a problem with the install on your SD card. You could repair that with another machine (so that it’s not mounted when you try to run fsck) or you could simply image it again and it should go away. Hopefully that helps!
I run this command “sudo mlabel -N aaaa1111 -i /dev/nvme0n1p1” and I get this response:
$ sudo mlabel -N aaaa1111 -i /dev/nvme0n1p1init :: non DOS media
Cannot initialize '::'
mlabel: Cannot initialize drive
Where do I go from here? Thank you. -Bob
Hey Bob,
It’s going to depend on your operating system. Not all of them are the same. Do a:
sudo blkidWhat do your partitions look like? Which operating system is this? I did mention the further you stray from the official offerings the more difficult it will be. I take it this is not Ubuntu so we’re going to need more information!
If it happens to be Armbian (it’s only a matter of time before Armbian comes up) then you would want to use Armbian specific methods like nand_sata_install or using armbian-config to install it to NVMe most likely. It’s a lot harder to make Armbian work using the method in this guide but it’s possible if you use mkimage to rebuild boot.scr on the “boot” partiton. Fortunately they provide scripts and armbian-config to help you do this within Armbian!
If you are straying from the official operating systems you need to be able to do a sudo blkid and look at your partitions and be able to tell which one is your boot partition and which is the root partition. You also further need to be able to know how to update the commands accordingly to take those into account. A lot of the people following the guide will be able to do that.
You can follow the guide conceptually and still change the UUIDs of the correct “root” and “boot” partitions substituting whichever methods you need to and really make this guide work for nearly any OS / device as it’s really the “method” that is the most important and not the line-for-line commands. I’ve wrote the same version of this article probably like 8-10 times on the site for different boards and they only vary from each other a few lines a lot of the time (frequent users of the site probably know what I mean).
Like it’s slightly different looking for the Orange Pi Zero 2 but it’s the exact same method as this. The lines just look different because the drives might be something like /dev/sda instead of /dev/nvme0n1. In fact if you check that article that one is for a OS that doesn’t have a boot partition at all (so we don’t change the boot partitions UUID since it doesn’t have one). It’s okay if it doesn’t have one. That guide might actually be a lot more accurate for the OS you’re using potentially if you aren’t using the official Orange Pi one.
It’s possible some operating systems may not use a MSDos partition at all. Some operating systems like Armbian don’t even have a boot partition a lot of the time. If it’s using a different partition type (like ext2 or ext4) for the boot partition then you may need to look up how to change the partition ID for that partition type (or a lot of the other SSD boot guides on the site have boot partition variations for different operating systems and you’d probably find one in one of those if you searched the site that would work for your boot partition type).
If you want to follow it line by line though (which is totally fine) you’ll want to use the official Orange Pi operating systems which have a partition layout like the guide shows. I am happy to take a look at it though and can probably help further for this specific OS if you’d like to share your blkid and let us know what it is!
Hello James, Thanks for your article. I want to point a point: the 2 blue USB port are the same, but there is a software error and for the moment only the top port is full speed. It just a question of time to have the 2 ports running at FULL Speed.
Hey renaud,
Thanks for sharing this, that’s actually a huge relief! But where did you hear it? The USB ports actually match the specifications sheet:
1 x USB 3.1 Type-C (with power delivery and DisplayPort 1.4 support)1 x USB 3.0 Type-A.
2 x USB 2.0 Type-A.
1 x HDMI 2.1.
1 x Gigabit Ethernet.
1 x 3.5mm audio.
1 x DC power jack (5V/4A power supplies supported)
This isn’t a one-off. ALL specification sheets I can find clearly state there is only one USB 3.0 port. USB 3.1 type C is not USB-A (nor can the USB-C port boot anyway for some reason but that is something I do expect to be fixed by Orange Pi over time or even by the end-users if we have to modify uboot ourselves).
If you are right then where is the second USB 2.0 port? There’s only one USB 2.0 port (if you go by color tabs) but all the spec sheets say there are two.
The reason I accepted this is actually the right number of USB ports is that the spec sheet says you only have one USB 3.0 port. It doesn’t say you have two and the bottom port registers as USB 2.1 (which is also funny because their spec sheets clearly say USB 2.0 but the benchmarks clearly register it as 2.1 for the bottom blue port, a better version than they’re giving themselves credit for).
Did they actually say this or are you assuming it? Because it actually matches the spec sheets that it only has one! The only thing that doesn’t match is the tab color of the port. Everything I can find says this board does only has one USB 3.0 USB-A port (exactly what we’ve found).
My conclusion is an assumption as well. I’m going off their specification sheets. No matter which one you check they all say 1 USB-A 3.0 port. I have never seen them state this is a bug or a mistake but if you have can you share where they said this? It seems like if this is actually a bug they knew about it before launch (to the extent they made sure none of their spec sheets mentioned 2 USB-A 3.0 ports). It’s only the fact that one of the USB 2.0 ports has a blue tab (not supposed to be a thing, the colors matter and blue is never USB 2.0) that raises any question as to what it’s supposed to be.
I’ve talked extensively in this thread about issues with Orange Pi and their specifications sheet “mistakes”. The fact that all of the spec sheets are actually *right* about the number of USB ports we’re seeing on the board makes me *extremely* suspicious that this is in fact by design/intentional.
Then again I’ve never seen someone ship a device with the wrong color tabs in their USB port. I suspect that would be grounds for having your certification revoked normally (or I’d like to think if these standards mean anything it would be).
Again, it’s just one of those things where it’s like, was this actually an accident? I don’t know and obviously I don’t have direct evidence that they maliciously set out to mislead people like this.
However, it certainly looks like more impressive I/O in pictures than if it was white on the bottom port and clearly it’s still misleading people to think that these are USB 3.0 or will be fixed to be USB 3.0. All that being said with the spec sheets all saying it does have 2X USB 2.0 and 1X USB 3.0 I really don’t think that seems likely which is why I’m hoping you have a citation.
How many times do they need to make small subtle mistakes like that which work out in their favor nearly 100% of the time making them look better and more desirable before one questions it? I reached that point long, long ago with Orange Pi (on previous boards even). I still like them but my experience with them leads me to the opposite conclusion of what you’re saying here.
They also make just enough mistakes that make them look worse (like labeling the ports as USB 2.0 instead of 2.1 or labeling the processor on the Wiki as only a 6 core CPU) to keep me guessing about whether it’s intentional or just pure incompetence. I honestly think the true answer must be it’s a little of both and it depends on which specific example we’re talking about.
If they do fix this then the spec sheets won’t match and it will only have 1 USB 2.0 port instead of having 2 (in addition to it also then becoming wrong about having only one USB-A 3.0 port). Will they get away with it? Almost certainly. Was it an accident? It might just be incompetence and not realizing that you’re not supposed to ship devices having USB ports with the wrong color tabs that don’t match their actual capabilities.
It’s a mistake that conveniently works in their favor though in pictures/media and one that they will almost certainly face no consequences for. When mistakes like that keep popping up over and over you have to ask if people are making cynical calculations behind the scenes here.
It was probably a lot cheaper to not change the tab (you’d have to get some kind of custom USB port stack with one blue and one white tab that while they certainly exist would be more specialty and cost more) and it also just happened to make them look better. Even if you technically shouldn’t ship it will you get punished? No? Then that isn’t a mistake to a business acting cynically. That’s actually smart business and in their part of the world that is what this would be considered (whereas in other parts it could be considered a crime or at least something they could face civil damages over). In a lot of cases even when businesses are fined for their illegal behavior they’ll often call it a “cost of doing business” internally and surely everyone has seen examples of that.
They may have even made the calculation that in the unlikely event that the backlash is enough that the EU or standards associations start making a fuss they’ll just quickly and quietly settle it and stop doing that practice. Who knows.
There are 2 pads on the bottom of the OPI5 they are close to the RTC chip. One pad is “RTC1” the other is GRD1. I’m 99% sure they are for RTC battery backup. I have looked at the circuit schematic but am unable to tell what kind of battery setup would work?
Hey berin,
Great find! So theoretically it may be something like this. I see the pads you are talking about in my screenshot of the bottom view of the board.
There’s no obvious circle where the battery pad would sit but theoretically you could solder a battery to these pads (or apply a voltage). Check out this post here on the Orange Pi forums:
there are no pins, but pad on the PCB, labeled rtc. However it is not a good idea to apply a battery voltage (3.3v) there - due to some schematic problems (guess) it powers not only rtc in SoC, so there are isuues with poweroff and battery drains quickly. That is, as I know, for H3 based OPI PC, OPI plus and OPI one.Okay, that doesn’t sound good. Keep in mind that the forum post is for the Orange Pi 2 though and is pretty old. At the end of that thread someone said they got it to work and the person asked “which pins they used” and there wasn’t ever any answer.
I’m honestly not sure about this. The backup battery connector is usually called something like BAT1. It seems like RTC1 would be for you to actually somehow interface with the RTC like read data from it.
The battery connector usually has a + on the board indicating the connector for the positive end of the battery (just like the laptop YouTube video I linked). You can see it on a SBC here though in this video. This one again has the positive marked and the Orange Pi 5 has no sign of it.
Then again I looked at the Orange Pi i96 here which does have a battery connector. And guess what? No + sign on the board and I am *positive* this one is meant to be a battery connector (you can also see it on the pictures too) so that kind of disproves what I was saying earlier that these are always marked. People also replied in my Orange Pi i96 post saying that the battery backup connection does in fact work on that board. Orange Pi didn’t mark an actual + on the i96 though so there is an example that raises further doubts and makes what you’re saying entirely possible.
Notice that the i96 put them in a whole lot more convenient (and safer) place to try and do this (right on the edge of the board with pretty big pads and no very closeby other circuits). It’s also right in their wiki and the marketing which I haven’t seen a backup battery capability advertised for the Orange Pi 5. You can see on the i96 it’s pointed out in all of the pictures and everything even though only give you pads (just like these would be theoretically).
There’s no mention of it on the wiki or the marketing though or the Orange Pi 5 product page. They point out the RTC in the pictures but they don’t point out the RTC1 pads as battery pads like they point out the battery pads on the i96 product page. That’s just for what it’s worth though. It’s just a little odd to me that they point them out in their other boards like the i96 that *definitely* can connect a battery but these pads are not pointed out or labeled for the Orange Pi 5 (and they don’t mention it in the product material). It could also just mean they didn’t think to label it when they made the pictures though.
I’m sure the intended setup would probably be something like a CR2032 battery. You can see the little spot welded connectors they use in the above YouTube videos. If it’s intended to be a backup battery it would be something like that (and every SBC I’ve seen that has the slot takes CR2032s). It’s also the same battery almost every PC that has the battery slot takes for this purpose. I have a drawer full of these that I put in all my SBCs that have the slots. You can see it in my ODROID M1 review. I have the slot populated with one of these CR2032 batteries.
You’ve probably seen other boards or laptops (that don’t have a dedicated slot like the ODROID M1 or some PCs/laptops) where it will be a little 2-pin connector with braided black/red wires. There will be a little CR2032 battery on the end (sometimes wrapped completely in tape and other times you can see the silver battery or parts of it). That will typically have a little 2 pin connector (that’s what the YouTube video of the SBC from earlier used).
If you try this can you let us know if it works? It’s a really great question and I definitely am not sure on this one!