
The OpenJDK 11 version that comes in Raspberry Pi OS’s apt repositories is ancient. It’s so old that recently people using my Minecraft Java Server for Raspberry Pi script have started getting a warning that Minecraft 1.17 will *not* support anything below OpenJDK 16.
In this article I’m going to share a sneaky trick to update your Java to a newer version than is available in apt using snapd. Let’s begin!
Hardware Involved

The Raspberry Pi 4 is available in different memory configurations all the way up to 8 GB. It’s about the size of a credit card and uses an extremely low amount of power making it ideal for all sorts of projects and ideas!
Links: AliExpress*, Amazon.com*, Amazon.ca*, Amazon.com.au*, Amazon*.co.jp*, Amazon.co.uk*, Amazon.de*, Amazon.es*, Amazon.fr*, Amazon.it*, Amazon.nl*, Amazon.pl*, Amazon.se*, Amazon.sg*

The Raspberry Pi 400 kit includes everything you need for a full Pi 400 desktop build. The Pi 400 is the fastest Raspberry Pi ever released and comes in the form factor of a keyboard!
Links: AliExpress*, Amazon.com*, Amazon.ca*, Amazon.com.au*, Amazon.co.jp*, Amazon.co.uk*, Amazon.de*, Amazon.es*, Amazon.fr*, Amazon.it*, Amazon.nl*, Amazon.pl*, Amazon.se*, Amazon.sg*
Overview
Raspberry Pi OS’s repositories have got quite dated for Java. This is happening for other applications as well because we are waiting for the Raspberry Pi OS team to jump to the next version of Debian (the underlying OS that Raspberry Pi OS is built on) which will bring a lot of these offerings more up to date.
To get around this we’re going to use the “snapd” utility to install a much newer version of OpenJDK. We will then use update-alternatives to point our /usr/bin/java to our new JDK installation.
A reboot is required after installing snapd for the first time and it takes a lot longer to install via snap than it would via apt but since the packages are not available this is a great workaround!
OpenJDK Update Instructions
First let’s install snapd and get our reboot out of the way:
sudo apt update
sudo apt install snapd -y
sudo reboot
Once your system comes back online let’s install snap core and OpenJDK:
sudo snap install core
sudo snap install openjdk
These steps can take a little while. It’s not unusual to have to wait 5-10 minutes for each step.
Now at this point our new OpenJDK installation is installed and we just need to tell our system to use that for Java using update-alternatives:
sudo update-alternatives --install /usr/bin/java java /snap/openjdk/current/jdk/bin/java 1
sudo update-alternatives --set java /snap/openjdk/current/jdk/bin/java
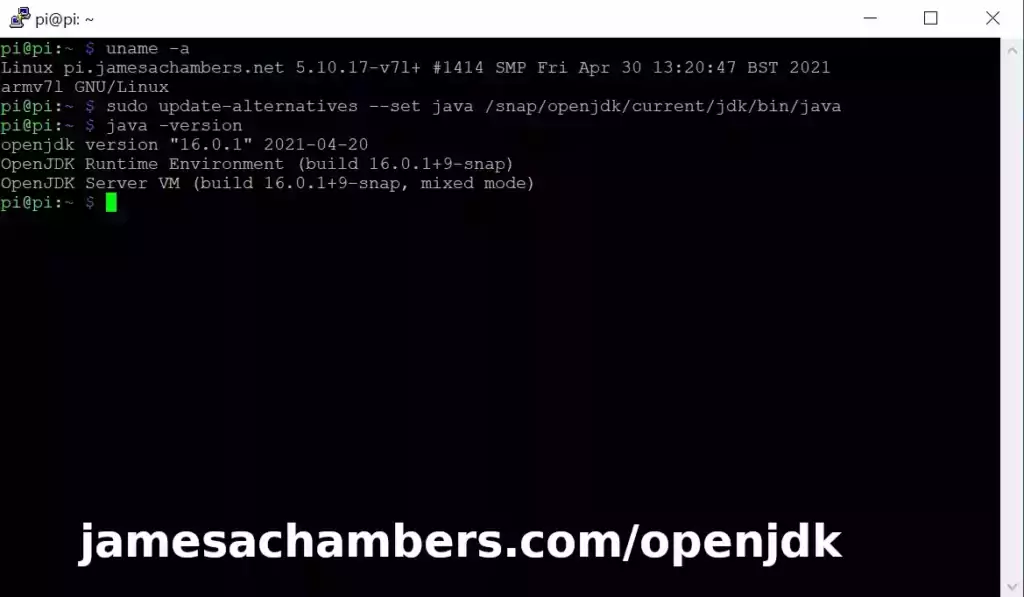
And that’s it! Go ahead and verify you are using the new Java version like this:
pi@pi:~ $ java -version
openjdk version "16.0.1" 2021-04-20
OpenJDK Runtime Environment (build 16.0.1+9-snap)
OpenJDK Server VM (build 16.0.1+9-snap, mixed mode)
Bonus Tip
If you need an even newer version of Java than you are getting from the default snap there are some flags to install even newer ones. There are 3 additional release channels. These are in ascending order so the further down the list you go the newer version of OpenJDK it will retrieve:
sudo snap install openjdk --candidate
sudo snap install openjdk --beta
sudo snap install openjdk --edge
You may have to slightly modify the update-alternatives commands when using one of these alternative builds. We used /snap/openjdk/current/ in our update-alternatives commands. Check if a different folder like “edge” is being used (just ls /snap/openjdk and see what’s in there)!
Other Resources
If you’re trying to set up SSD / USB storage booting check out my Raspberry Pi USB booting setup guide
To find out where to get the 64 bit version of Raspberry Pi OS view Where to get the 64 bit Raspberry Pi OS image
For benchmarks and recommendations on the fastest storage drives/adapters for the Raspberry Pi check out my 2021 Storage Roundup
If you’re having firmware issues and need to update/restore your firmware: Raspberry Pi firmware guide here
For my new overclocking and SSD setup guide for the Pi 400 check out my Pi 400 Overclocking and SSD setup guide


Hi, I’m having troubles with both of these solutions, “java -versions” now reports java 17.0.5 (latest temurin build) but when I try to run my startup script the server won’t boot up. How can I make it work?
Hey Sourbeans,
Welcome! So my script doesn’t use the system Java anymore and hasn’t for years. All you need to do to update it is run SetupMinecraft.sh again and it will set up the new version for you.
Hopefully that helps!
Hi, I already have a minecraft server configured and running on RPi 3b+ and I don’t want to mess up the files or overwrite anything.
I just want to update from the default repo java 11 to 17.
Following the steps you described in your comment to bane2000 just bellow, I installed the latest adoptium build but my server now doesnt boot up using the new java binary. I don’t know what to do
Hey Sourbeans,
It sounds like your Raspberry Pi OS version is really old. The current version of OpenJDK in the Raspberry Pi repositories is OpenJDK 18.
If you don’t see OpenJDK 18 in the Raspberry Pi repositories now it’s because you are running a very, very old version of Raspberry Pi OS. Probably Raspberry Pi OS Jessie.
Things are already quite messed up here. I’d back up the Minecraft server and honestly upgrade the Pi to Raspberry Pi OS Bullseye.
If you were on Bullseye the method of upgrading OpenJDK from this article would work (and so would sudo apt install openjdk-18) but it sounds like you’re running a really old outdated version of Raspberry Pi OS. OpenJDK 18 has been in the Raspberry Pi OS repositories for a while so if you’re still having this issue it’s because your OS needs an upgrade!
This is a common problem on Raspberry Pis. They do not have easy major OS upgrades built in. A sudo apt dist-upgrade will not upgrade you to Bullseye. I highly, highly recommend you do a clean install of the latest. If you want to do a manual upgrade you need to edit /etc/apt/sources.list manually and I don’t recommend it. You generally need to reimage every time there’s a major update released or risk the inevitable problems that pop up when you do a dirty upgrade by editing /etc/apt/sources.list and changing everything to Bullseye.
This is why nobody else has commented for a long time on this article. This problem is solved if you’re running the latest Raspberry Pi OS. When I wrote this there was nothing to upgrade to (and this was a workaround) but that has been fixed for some time now. I honestly recommend against what you’re trying to do right now. Your OS is only going to have more and more problems as time goes on and those will shift to security issues as you fall further and further behind the latest version. Upgrading to the latest will not only solve this but will keep the Pi safe/secure!
Hey, thanks, I didn’t realise I was running an outdated version.
I’m on Buster though, it’s not that old I think, “sudo apt install openjdk-18” gives me “Unable to locate package openjdk-18” that’s why I came here
Hey Sourbeans,
Got it, no worries, I figured that might be what is going on! Buster isn’t too bad. That’s amazing (and not in a good way) that the default in Buster is still OpenJDK 11. OpenJDK 11 is ancient and that’s why I guessed so much of an older version than Buster (and it looks like they’re never going to put the newer OpenJDKs in the backports or older repositories if that still hasn’t changed since I wrote this). I think the issue is that the newer OpenJDK versions seem to *only* be in the Bullseye apt repositories.
So there’s basically two things you can do. You can either update your /etc/apt/sources.list and change those to Bullseye and try upgrading through apt or just install a clean version of the latest. If it’s on Buster you may be able to get away with a dirty upgrade. I suppose you could always try it and if things aren’t working quite right you can do a clean install.
It should be pretty easy to install a clean version of the latest since you can just drag and drop the Minecraft server folder essentially onto a flash drive or some other backup drive. It’s pretty self contained which helps that there aren’t files scattered all over the Pi.
I’ve had mixed results doing the “dirty upgrades” before. Sometimes they work fine and other times you will have really strange issues that will completely go away if you do a clean install.
No matter what you try I would just make sure you have the entire server folder backed up safely before trying anything. As long as you have your server data files it should be pretty easy to recover so that’s by far the most important thing. You’ll want to completely close the server before backing up and even zip/tar the whole folder and have several backups if you can.
This is how my Minecraft script I was referring to earlier works (it creates an archived backup whenever the server starts) but it’s totally fine if you’re not using it. You would just want to make sure you manually make multiple copies of these first and it would even be good to test one of the backups and make sure it loads correctly before wiping anything out / upgrading.
I’ve always found doing the upgrades to take much, much longer than doing a clean install. You can reimage the Pi’s SD card using the Pi Imager with the latest Raspberry Pi OS in like 5-10 minutes. Doing a dirty upgrade will be at least a one to several hour process depending on your connection speed + all of the installation time as well as modifying the apt sources.
Some people may have so many services and so much configuration on their Pi that doing an upgrade is faster. If it’s only running the Minecraft server though or only one or two other things I can’t imagine an upgrade being faster than a clean install + reconfiguring.
Hopefully that helps!
Well you were right, I tried to do the dirty upgrade to not have to reinstall minecraft and Pihole, but now I can’t seem to set the static IP I want, something to do with dhcp and enxb827eb2f7b1c.
I like the idea of your backup script though, I’ll look furthur into that when I’ll have everything working again.
Hey Sourbeans,
Ahh yes, the dirty upgrades can be so hit or miss for sure. I think that this might actually be a Bullseye related issue. A lot of others have struggled with getting these set after upgrading to Bullseye.
There’s the “predictable network interface names” setting in raspi-config that can impact this. Some others were saying that it can be impacted by this other network setting as well:
sudo raspi-configselect 6.Advanced options
select AA Network config
select DHCPCD
reboot
Some others commented in that thread that something may have triggered network-manager to be used or something to change the default network manager. That sounds like it definitely could be upgrade related and is something that would probably not happen with a clean install (likely some upgrade chain path triggered a network-manager update and something flipped the default network manager, who knows). I’m guessing this may indeed be one of those negative artifacts from a dirty upgrade that “disappears” with a clean install.
If it’s not though and this is actually Bullseye related one or both of those two settings (“predictable interface names” or “DHCPCD”) should probably get it back to the previous behavior hopefully!
Is there a way to down grade or add an older version as my installation of minecraft only supports 17 and I am currently on 18?
Hey bane2000,
There absolutely is! I do it in my Raspberry Pi Minecraft Server Setup Script w/ Startup Service.
Unfortunately you can’t do it by snap anymore. That will take you past OpenJDK 17 as of March 23rd. I no longer use this method for Minecraft. I actually just download my own copy of the JDK and store it in the Minecraft folder as I was tired of dealing with this issue. Now I basically have my own JDK version that I can control.
It looks like this:
Install_Java() {

  # Install Java

  Print_Style "Installing OpenJDK..." "$YELLOW"
CPUArch=$(uname -m)
if [[ "$CPUArch" == *"armv7"* || "$CPUArch" == *"armhf"* ]]; then
curl https://github.com/adoptium/temurin17-binaries/releases/download/jdk-17.0.2%2B8/OpenJDK17U-jre_arm_linux_hotspot_17.0.2_8.tar.gz -o jre17.tar.gz -L
tar -xf jre17.tar.gz
rm -f jre17.tar.gz
mv jdk-* jre
elif [[ "$CPUArch" == *"aarch64"* || "$CPUArch" == *"arm64"* ]]; then
curl https://github.com/adoptium/temurin17-binaries/releases/download/jdk-17.0.2%2B8/OpenJDK17U-jre_aarch64_linux_hotspot_17.0.2_8.tar.gz -o jre17.tar.gz -L
tar -xf jre17.tar.gz
rm -f jre17.tar.gz
mv jdk-* jre
elif [[ "$CPUArch" == *"x86_64"* ]]; then
curl https://github.com/adoptium/temurin17-binaries/releases/download/jdk-17.0.2%2B8/OpenJDK17U-jre_x64_linux_hotspot_17.0.2_8.tar.gz -o jre17.tar.gz -L
tar -xf jre17.tar.gz
rm -f jre17.tar.gz
mv jdk-* jre
fi
CurrentJava=$($DirName/minecraft/jre/bin/java -version 2>&1 | head -1 | cut -d '"' -f 2 | cut -d '.' -f 1)
if [[ $CurrentJava -lt 16 || $CurrentJava -gt 17 ]]; then
Print_Style "Required OpenJDK version 16 or 17 could not be installed." "$YELLOW"
exit 1
else
Print_Style "OpenJDK installation completed." "$GREEN"
fi
}
This downloads the “Adoptium” OpenJDK version to my Minecraft folder basically and I start the server using that copy of the JDK. You could also download and install it and then use sudo update-alternatives to make it the system wide JDK but the nice thing is that isn’t actually necessary with this method. We are basically using our own self-contained JRE (the downside being you will need to update it manually as it won’t update with apt/snap but in this case that is exactly why we are doing it this way as those are the wrong versions).
Now I can just call the “java” binary from the OpenJDK we downloaded (if you go in the extracted folder you will see a “bin” folder that has “java” inside of it) like this:
screen -dmS minecraft $dirname/minecraft/jre/bin/java -jar -Xms400M -Xmx800M $dirname/minecraft/paperclip.jarNotice that I’m directly calling jre/bin/java from that OpenJDK distribution we downloaded instead of using the system’s Java (the one you get if you just type java instead of /path/to/your/java) which frankly cannot be trusted or controlled enough to reliably run a Minecraft server anymore (the JDK versions have definitely become an issue as very few distros will give you one old or new enough).
I definitely recommend just using my script to take care of it if you can but you can “manually” configure an OpenJDK version like I did above there. Hopefully that helps!
Thanks! Do I just copy the above for it solve my issue? Sorry for the questions, I’m a total noob with these things
Hey Bane,
This is a manual installation. Basically there’s no way to easily automate this because this method relies on you entering the manual path to the JDK you downloaded when you’re launching the server. This will be different for everyone. Assuming they are saving it to their “home” folder the correct path for me might end up being /home/james/minecraft/jre/bin/java but yours might be /home/bane/minecraft/jre/bin/java as an example.
When you have or are using a manual JDK instead of a system wide JDK you have to specify these paths directly. For sure if you want it to solve your issue for you by itself then you’d want to use my setup script! The script takes all of that into account (including asking you for the root folder path to save everything) and sets the PATH variable properly and calls the downloaded JDK runtime directly.
In other words, it’s not easy to automate this without knowing the exact path you are going to save your JDK and call it from. That’s why I made my automated Minecraft Setup script for those who want the automated option. Hopefully that helps!
On 64 bit ubuntu you could simply type
sudo apt install openjdk-16-jre-headlessHey CyberHare,
Which Ubuntu? 20.04/21.04 sure but not 18.04 (there’s still a lot of those out there). That is the only officially supported Raspberry Pi distribution I know of that has OpenJDK 16 available in the apt repositories.
OpenJDK 16 was released on Ubuntu 20.04 in March 2021 and I wrote this article in June which was about 3 months later. It has now been about an additional 4 months so it’s been an even longer time gap since release than it had been when I wrote the article and this is all still the case (keep in mind these newer OpenJDKs only have a lifecycle of 6 months although OpenJDK 17 is an exception to this and is a 5 year LTS release). Nothing has changed. Everything (except Ubuntu 20.04 +) still has significantly older than OpenJDK 16 available in the apt repositories. That’s essentially the problem we’re trying to solve here.
More importantly though than just the individual “OpenJDK 16” version is the concept / method from the article. The concept is using the snapd daemon (which is actually extensively used in Ubuntu, it’s not even installed by default on Raspberry Pi OS and we have to install it ourselves) which can always fetch a reasonably up to date build of Java (and some other utilities as well).
That is definitely what I want people to take away from this article because the “snapd trick” will be useful for OpenJDK 17, 18 and all throughout the future. It’s teaching a system to always be able to get to the latest version when OpenJDK 16 is long dead (which is tomorrow, OpenJDK 16 was a 6 month release) and not have to depend on apt repositories being maintained so the whole point is not to use apt. I’d expect most people getting here to have already tried to install it via apt and it was too old. Hopefully that helps!
Thank you! Worked the first time without any issues!
Excellent, thank you!
Thanks!
You’re welcome, and thank you for being my first comment on this one!