
All of the previous generations of Raspberry Pi contained all of their firmware on the SD card. Starting with the Raspberry Pi 4 the device actually has onboard upgradable firmware stored on an EEPROM chip separate from your storage. Updating this firmware is very important as one of the first released updates reduces power usage of the Pi by 30% which also reduces how hot it gets.
In this guide I’ll show you how to update the bootloader firmware (no, it’s not apt-get upgrade, it’s a new utility called rpi-eeprom!) and also show you how to make a recovery SD card if your firmware gets corrupted and needs to be reflashed.
If you are looking for information on how to change the boot order on the Raspberry Pi 4’s new bootloader firmware, check out my New Raspberry Pi 4 Bootloader USB Booting Guide.
Upgrading the Bootloader Firmware
Requirements
The Raspberry Pi 4 is available in different memory configurations all the way up to 8 GB. It’s about the size of a credit card and uses an extremely low amount of power making it ideal for all sorts of projects and ideas!
Links: AliExpress*, Amazon.com*, Amazon.ca*, Amazon.com.au*, Amazon*.co.jp*, Amazon.co.uk*, Amazon.de*, Amazon.es*, Amazon.fr*, Amazon.it*, Amazon.nl*, Amazon.pl*, Amazon.se*, Amazon.sg*

The Raspberry Pi 400 kit includes everything you need for a full Pi 400 desktop build. The Pi 400 is the fastest Raspberry Pi ever released and comes in the form factor of a keyboard!
Links: AliExpress*, Amazon.com*, Amazon.ca*, Amazon.com.au*, Amazon.co.jp*, Amazon.co.uk*, Amazon.de*, Amazon.es*, Amazon.fr*, Amazon.it*, Amazon.nl*, Amazon.pl*, Amazon.se*, Amazon.sg*
To upgrade the firmware you should be running the latest Raspberry Pi OS. Do not attempt this from another distribution. If you want to use another distribution afterward that is great!
Since the Raspberry Pi bootloader firmware is stored on a chip on the device you can update it to the latest with Raspberry Pi OS and then go right back to using whatever you want. I personally have a separate SD card just for Raspberry Pi OS that I use to periodically plug in and update the firmware.
The firmware and the utilities around it are changing so quickly that you are really playing with fire not attempting this with the latest and greatest officially supported distribution when you are talking about firmware / on-board chips / etc.
With that word of caution out of the way, let’s get started!
Install rpi-eeprom (older versions of Raspberry Pi OS / Raspbian)
Newer versions of Raspberry Pi OS come with this utility already but if you are upgrading / have upgraded from an older version you may not have it in some cases. We can install it with the following commands:
sudo apt update
sudo apt full-upgrade
sudo apt install rpi-eeprom
Once the utility is installed Raspberry Pi OS will check at boot whether there are any critical bootloader firmware updates for your Pi.
Checking for Updates Manually
If you are like me and don’t want to wait around for Raspberry Pi OS to decide whether do these updates there is a command to check for updates manually:
sudo rpi-eeprom-updateYou will see output like this:
BCM2711 detected
VL805 firmware in bootloader EEPROM
BOOTLOADER: up-to-date
CURRENT: Thu 3 Sep 12:11:43 UTC 2020 (1599135103)
LATEST: Thu 3 Sep 12:11:43 UTC 2020 (1599135103)
FW DIR: /lib/firmware/raspberrypi/bootloader/critical
VL805: up-to-date
CURRENT: 000138a1
LATEST: 000138a1
If the firmware isn’t up to date it will indicate an update is required like this:
BCM2711 detected
VL805 firmware in bootloader EEPROM
*** UPDATE AVAILABLE ***
BOOTLOADER: update available
CURRENT: Thu 3 Sep 12:11:43 UTC 2020 (1599135103)
LATEST: Tue 24 Nov 15:08:04 UTC 2020 (1606230484)
FW DIR: /lib/firmware/raspberrypi/bootloader/beta
VL805: up-to-date
CURRENT: 000138a1
LATEST: 000138a1
We now can see that there is updated firmware for our device. To install this update we will use the -a switch as well as the -d switch (which means to check the bootloader):
sudo rpi-eeprom-update -d -a
If there were updates available your output should look like this:
BCM2711 detected
VL805 firmware in bootloader EEPROM
*** INSTALLING EEPROM UPDATES ***
BOOTLOADER: update available
CURRENT: Thu 3 Sep 12:11:43 UTC 2020 (1599135103)
LATEST: Tue 24 Nov 15:08:04 UTC 2020 (1606230484)
FW DIR: /lib/firmware/raspberrypi/bootloader/beta
VL805: up-to-date
CURRENT: 000138a1
LATEST: 000138a1
BOOTFS /boot
EEPROM updates pending. Please reboot to apply the update.
Reboot the Pi by typing sudo reboot and then run sudo rpi-eeprom-update again. This time it should tell you it is now up to date!
Changing rpi-eeprom’s Release Channel
By default you will only receive updates from Raspberry Pi OS “critical” channel. This is a very conservative firmware update channel that will only give you very well tested firmware updates that are considered critical fixes for the device. Another channel that is available is “stable”.
If you are trying to get USB boot support working and other recently added features I would try the “stable” channel first. It’s a lot more well tested and you’re less likely to run into any bleeding edge issues.
If you want to get the absolute latest firmware updates and fixes you may want to try the “beta” channel. These updates haven’t been tested as long and could potentially break your bootloader so Raspberry Pi OS only recommends using it if you are comfortable using the recovery tool to reflash your bootloader if something goes wrong. Check out the recovery section below for instructions on how to do this.
To switch to the beta channel we are going to edit the file /etc/default/rpi-eeprom-update:
sudo nano /etc/default/rpi-eeprom-update
Change the line FIRMWARE_RELEASE_STATUS=”critical” to:
FIRMWARE_RELEASE_STATUS="stable"
Or alternatively:
FIRMWARE_RELEASE_STATUS="beta"
Now you can run:
sudo rpi-eeprom-update -a
and you should see a new update available. You will need to reboot your Pi before the update is applied. I’d recommend rebooting it right away and run the check one more time and make sure it states you are now up to date.
View Bootloader Firmware Patch Notes
The latest official patch notes for all versions and changes are available in the rpi-eeprom GitHub repository
Disable Automatic Bootloader Firmware Updates
If you want to control when the updates are applied instead of leaving it up to Raspberry Pi OS the autoupdating service can be disabled with the following command:
sudo systemctl mask rpi-eeprom-update
The startup service has now been disabled and automatic bootloader firmware updates will only be applied if you do it manually.
To undo this and reenable the service we will use the unmask command:
sudo systemctl unmask rpi-eeprom-update
Now automatic firmware updates are enabled again!
Bootloader Recovery
The downside of having an onboard bootloader is that if something breaks reformatting your SD card will not fix it. In this section I will cover how to use the official tools to reflash and recover your Pi’s bootloader.
Requirements
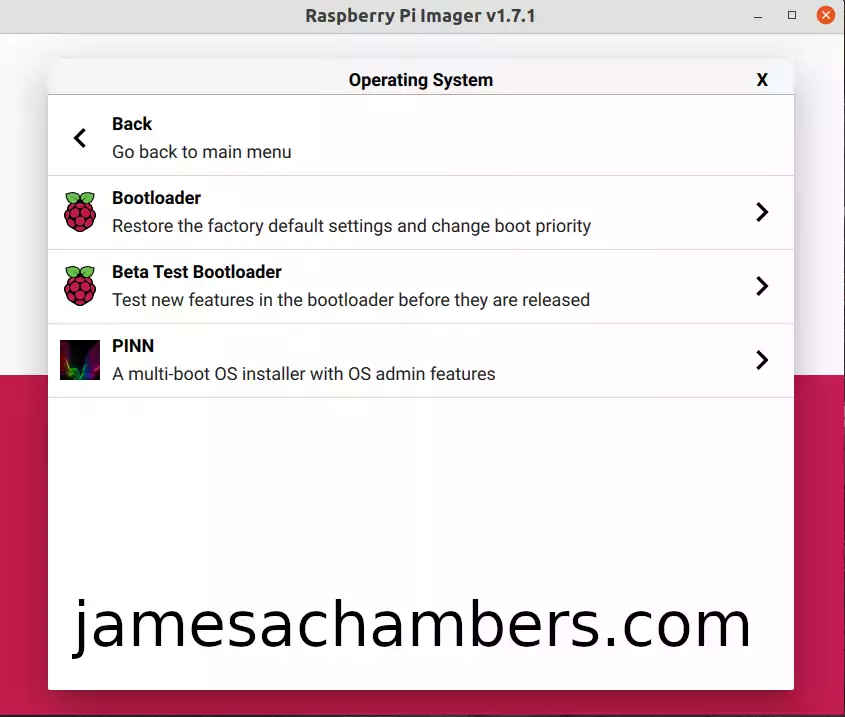
To do this we need to prepare a SD card with the Raspberry Pi 4 EEPROM boot recovery tool. The easiest way to do this is to use the official Raspberry Pi Imager tool from the Raspberry Pi foundation to prepare the recovery image.
Here is how we create the recovery image inside the utility. Choose the “Misc utility images” category as shown below:

Next choose the “Bootloader (restore the factory default settings and change boot priority)” option:
This will take you to a menu where you will select the default boot device for your Raspberry Pi like this:
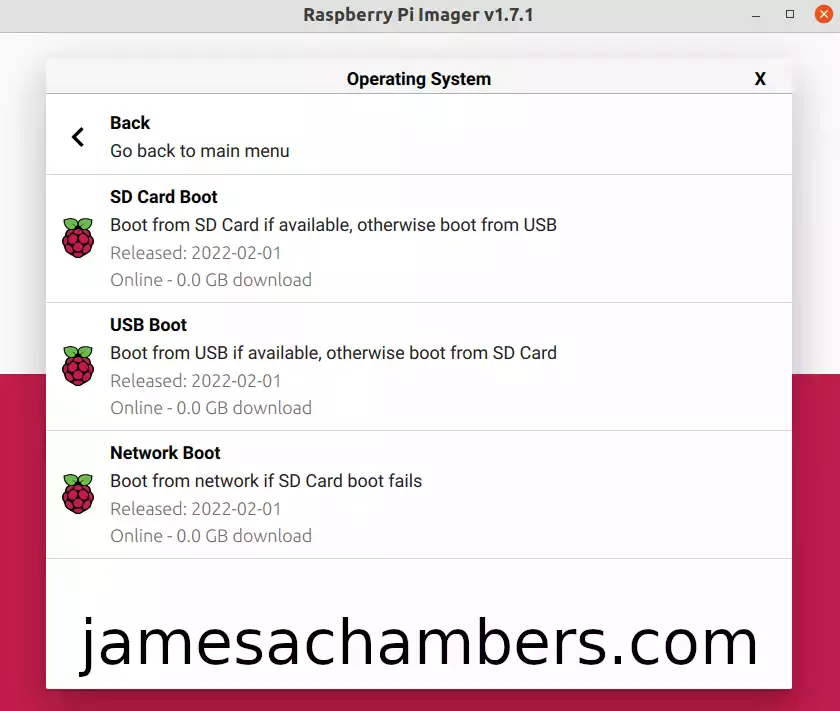
Notice that you are mostly just selecting the primary boot device. Modern versions of the firmware will fall back if the primary boot device fails. The first menu for example says “Boot from SD card if available, otherwise boot from USB”.
This means that if you took the SD card out you could still boot from a USB mass storage device if you selected the first option. Choosing the USB option would work similarly where if the USB mass storage boot failed it would fall back to booting from the SD card. Select the mode you would like and it should take you back to the main menu screen to pick the storage device to write to.
Next choose your SD card and then choose “Write”. Now unplug your Pi and put in the newly prepared SD card. Connect the power and let it boot. This will restore your bootloader to defaults. You should see a continuous rapid green blinking light. You may now disconnect the power and put your original SD card back / reinstall Raspberry Pi OS and boot the Pi normally!
When to Attempt Recovery
There is a simple procedure to tell if your bootloader is corrupt. Turn off your Pi completely and remove the SD card / all attached storage. Now plug your Pi back in with no storage media in it.
If your Pi’s bootloader is healthy you will see the green light blink a few times and then enter a pattern where it will blink 4 times and then have a long pause. It will repeat these 4 blinks / pause in an endless loop.
If your Pi’s bootloader is NOT healthy the green light will not blink. If this is the case it is time to do a bootloader recovery!
Another situation that can warrant a bootloader recovery is when your bootloader is missing a bunch of settings despite being up to date. For example other readers have seen cases where despite having the latest firmware according to rpi-eeprom-update they are missing key settings like the BOOT_ORDER setting. If anything is unusual with your settings many commenters have had success with this method when nothing else worked!
Recovery Procedure
Before powering up your device insert the “recovery” SD card that we made earlier in the requirements section above and make sure that all USB devices are removed. Even keyboards have been known to cause issues so make sure absolutely everything is unplugged!
Now insert the SD card into the Pi and connect the power.
If the bootloader recovery is successful the green activity light will start blinking rapidly continuously (forever). In this case you have successfully recovered your bootloader! You may now insert a normal fully imaged SD card and it will boot normally again.
If anything other than a continuous rapidly blinking green light happens the recovery was not successful.
If Recovery Doesn’t Work
- Try with a freshly imaged Raspberry Pi OS SD card. Sometimes there are unexpected things going on with an image that can prevent the newer firmware from being used (see next bullet point for example).
- Check your “boot” partition of your main OS and make sure there isn’t a file in there called “recovery.bin”. If this file is present it will load that version of the bootloader firmware instead of what is flashed on your Pi. This file should only be present on the “recovery” SD card we created but people are finding these files on their main OS “boot” partition. It’s worth checking to make sure it is not on the main OS SD card / drive you are trying to boot with.
- There is a known (and strange) issue with Raspberry Pi 4’s and 32 GB SD cards where the Pi will abort the boot. If this might apply to you then read this post.
- Make sure you created your SD card correctly. A common pitfall is using cards above 32 GB and formatting them with ex-FAT instead of regular FAT/FAT32.
- Make sure *all* USB devices are unplugged from the Pi
- Try a different SD card if you have one available. SD cards do go bad all the time. If there’s any doubt here check out my Raspberry Pi storage benchmarks page to see the highest performing SD cards (you definitely want an A1+ rated one).
- Check your power cord. Make sure you are using a high quality USB-C power cord that is compatible with the Pi. Even if it was working before I have had several old Pi power supplies that worked for years die on me. If there’s any doubt grab a known reliable one like the Canakit USB-C Raspberry Pi 4 Power Supply*
If you’ve gone through all the steps and are positive it’s not one of the above “gotcha” issues then it’s time to go deeper. You need to observe your Pi’s exact behavior when you plug it in (what the lights are doing). Here is a table of different blink patterns and what they mean:
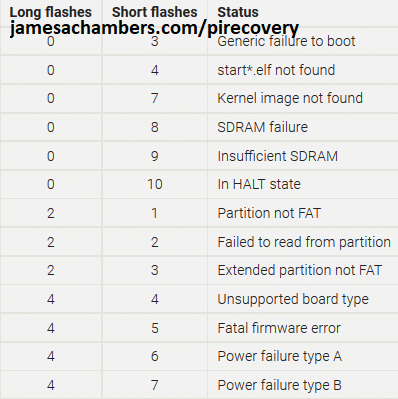
If your Pi’s LED behavior matches any of these codes then we now have much more to go on to diagnose why your Pi won’t boot. Some of them are very obvious but they’re all worth a quick web search once you have matched it to a code.
If your Pi’s behavior does not match one of these codes head to the official sticky post on the Raspberry Pi forums and scroll to the very bottom (post #4 specifically for Raspberry Pi). This tracks ongoing boot issues with the Pi 4 that may affect your Pi and a whole bunch of things to try. If you get through that post go all the way up to post #1 and start going down the list.
Could My Pi Be Dead?
It’s absolutely possible. Things like power issues (surges etc), wiring breadboards incorrectly, etc. can kill your Pi completely. That being said, if you have a Pi 4 that appears to be dead and you’ve gone through all my troubleshooting steps / the official sticky post / you aren’t covered by warranty then I would hold onto it for now as it’s still very new and some problems are still being investigated with the bootloader.
I have definitely killed a couple myself. I had a 3B+ that I had been using for a year building images (basically beating the crap out of it) on that finally had a hardware failure and would no longer boot. I wasn’t too sad about this one because I absolutely beat the crud out of these devices and push them to the absolute limit.
My more heartbreaking one was that I have killed a 4 GB Pi 4 that I got right at the Pi 4’s launch. I left this Pi in a very hot area running an experimental image that didn’t have proper firmware on it for about 2.5 weeks and now upon powering it up the green light will start blinking like it’s about to start booting then the green light will freeze and stay stuck on forever. I have a couple other Pi 4’s so I know all my cards and power supplies are good.
Make sure you’ve reviewed the official sticky post I linked in the previous section before jumping to this conclusion though. These things are not fragile and over all the years of running this blog it’s pretty amazing I’ve only killed 2 of them with the insane things I try on them all the time.
I may be able to help if you want to leave a comment here with *exactly* what behavior you’re seeing when you try these procedures, when you plug it in with no SD card in it, when you plug it in with a SD card in it, any little details will help!
Other Resources
For headless configuration of your Raspberry Pi using the Pi Imager
If you’re trying to setup USB mass storage booting (like with a SSD) check out my Raspberry Pi 4 Native USB Booting Guide
If you want to see which Pi storage performs the fastest and get an idea of what kind of drives to look for check out my 2020’s Fastest Raspberry Pi 4 Storage Benchmarks
If you have one of the new Raspberry Pi 400 kits *then don’t miss my Pi 400 Overclocking and SSD Setup Guide


Trying to update the firmware on an RPi4 8GB. When I run “sudo rpi-eeprom-update -a” it shows Current @ Mon 15 Jun 2020 and Latest @ Tue 06 Jul 2021 on the stable channel. It says
*** INSTALLING EEPROM UPDATES ***and gives me a message to reboot to apply. But… when I reboot and check, I am still at the Jun 2020 firmware. How do I force the EEPROM to update?Hey Jim,
The best way is to create the “Recovery Image” using the Raspberry Pi Imager utility on a spare SD card. This will completely wipe and reflash your bootloader with the latest. I have seen them get stuck before and this always gets them unstuck. After running this procedure rpi-eeproom-update -a should show the latest version.
There is another possibility which is that you have a “recovery.bin” file on your SD card that is replacing the current firmware every time you boot. I have definitely seen them get stuck before until using the recovery image though so I would try that first!
Hey James, I am at a loss…..I have tried everything to get one of my Pi 4 4GB to boot. When powered with no SD card only get the red LED….green does not light at all. I have tried the bootloader recovery using multiple SD cards ranging in size from 8GB all the way up to 128GB…….nothing happens….no green LED, just the red power one. I am using the real Pi power supply, in fact I have actually tried a couple since I am running about 5 Pi’s at the moment for various tasks. I am getting the 3V and 5V on the GPIO pins……Did it just die on me? If so first one out of at least 20 3’s and 4’s…..I should add this particular Pi was running unattended at my office during the brunt of the pandemic, it had a Geekworm power regulator and USB SATA hat on it and was getting pretty hammered being used as a network video recorder for months straight….Went down a couple of weeks ago and just stripped all the add-ons off figuring they were the problem (obv may be the case dare I test that theory on a working Pi)…..Anything else I should attempt before it goes in the trash?? Thanks!!!!!
Hey TechDad,
I have lost two heavily used Pis over time here. One was a 8GB “release” model (that one hurt) that behaved slightly differently than this and would always give the 5 blinks indicating it can’t find boot files no matter which SD card was in there or what was on it. Recently though I just had a Pi Zero fail exactly like this where it just wouldn’t boot although on that Pi the SD card port was physically peeling away from the board and barely holding the SD card down with enough pressure for it to maintain reliable contact with the pins but it was pretty clear in that case what the issue was.
In both cases it was the SD card port that had failed. The Pi itself was still working (could put it in gadget mode for the Pi Zero, the boot sequence was playing out normally on the Pi 4 but it could never find anything on the Pi 4 even with brand new SD cards, slightly different symptoms).
There’s a couple of things to check before tossing it. If you plug in the Pi do you see it trying to boot on the screen? Up to date Pis have basically a “BIOS” looking prompt where you can see the boot sequence. Does this appear at all? You may be able to USB boot it if it is just the SD card port that has failed.
It’s not sounding too good but those are a couple of things I would still check. If you know it has been getting hammered and you’re still getting nothing with a USB boot, with a monitor plugged in (should be trying and failing to find boot files), and if you’re still getting nothing then it’s time to toss it! I actually have kept my two failed ones to actually experiment more with what I might still be able to get them to do but when the SD card port goes it’s essentially dead outside of extremely inconvenient usage etc. or even worse you may have a chip failure in which case none of this will work at all for sure!
If you have a way to power the board with something other than the power adapter (like using a USB adapter for the Pi Zero that powers the board through alternative pins on the bottom like this. This can rule out if maybe there’s a problem with your power connection or some power circuitry along the way from that connection that gets “bypassed” by powering through the alternate pins. An example for the Pi 4 would be the PiSugar 2 Pro UPS which I have a guide about here (no soldering fortunately): UPS Backup Battery for Raspberry Pi? PiSugar Solderless Setup. Those are a couple of ideas to check at least!
I’m in the same boat as TechDad. Exactly the same symptoms. Only a red light. I’ve tried multiple SD cards, boot from USB, resetting the bootloader, etc, etc. Is there any way to know if it is truly dead? And more importantly, can I determine why it dies do I don’t do that again?
Hey RainMaker,
Is it an original model Pi 4? I have one that failed (but not exactly identically to yours) that I’ve held onto but it’s an original 2018 board Raspberry Pi 4 and they had several hardware issues that were fixed on all later revisions. I always suspected it may be the SD card reader itself. With the new Raspberry Pi Imager you can actually set it to boot from USB from the Pi Imager itself and I’ve been meaning to go back and try this and see if the SD card reader is bad but the Pi hardware itself is still good. That one behaves slightly differently though and does blink 4 times repeatedly (meaning it can’t find anything to boot from even with SD cards that boot fine on my other Pis).
Definitely check out this thread here. It’s one of the most comprehensive boot issues threads about the Pi 4. The Pi 4 specific information is the very last post or the 4th post on the page.
They say:
So even the most comprehensive source I know says if the bootloader recovery doesn’t work that “you can assume you somehow managed to blow up your Pi”. That isn’t very helpful, but what is a little bit more helpful is that this does seem to point to it being “fried” somehow. If you look a little bit further down the Pi actually blinks different codes for errors. Yours is not doing this which tells us that literally the hardware doesn’t seem to be functioning. Not even enough to post a diagnostic code.
The only thing worse it could be doing is not powering on at all (no lights whatsoever). When it’s actually “fried” that is usually the case but the Pi may also be detecting an electrical issue or shorting and is communicating that. This pretty much seems to be that since it won’t throw any codes (there is no code for staying stuck on red and seems to just be an error state of some kind).
As far as not doing that again I do have something referenced from that same post. Check out the 7 things that will instantly destroy your Raspberry Pi here. This is the best chance of figuring out what happened. If you see something from that list that you know happened / may have happened then that’s probably as close as anyone could diagnose this without actually examining the circuits on the board / chips with someone like a PCB expert / with those skills.
I should also mention it’s possible it’s nothing you did. It’s possible something came loose on the board that wasn’t soldered as tight as it should have been or something that is totally not your fault and would be more akin to a manufacturing defect or wear and tear taking it’s toll far earlier than it should (also suggesting some kind of manufacturing anomaly as the defect rate for Pis is pretty low from what I’ve seen).
I wish I could remember which post it is in but someone found a loose chip on their Pi once that wasn’t booting in a similar way. They took it out and resoldered it and it booted fine after that. I was pretty impressed and I believe they actually did have the same symptoms you did (a solid red light).
Definitely let me know if you solve this mystery as these cases are indeed highly mysterious!
There is a file somewhere that contains a list of available bootloader versions. I can’t get that file to update (also can’t find it again). I have a major kernel module “libraspberrypi0” that depends on bootloader version March 3, 2021. But my system configuration says that the “latest” bootloader version is Jan 8 2021. I have manually installed bootloader April 29, 2021, but still can’t get the apt upgrade to run because it says that the wrong (January) bootloader is installed.
Hey Greygeek,
I think you are looking for:
/lib/firmware/raspberrypi/bootloaderwhich has the symlinks to the “default” and “latest” firmware as well as the folders for stable, beta etc. containing all the firmware .bin files.
There’s one more thing I would check for too that is pretty common. Make sure there isn’t a file named “recovery.bin” in your /boot folder or “boot” if you put your SD card in a computer. If there is it will override the firmware with that version from “recovery.bin” so that is always worth checking for if it is seemingly refusing to update.
If recovery.bin is present delete it and try booting up and see if it will let you update your bootloader firmware. You can also try manually installing the bootloader updates like this:
sudo rpi-eeprom-update -a -dIf it’s successful it will say “RESTART REQUIRED” or something along those lines and you’ll see a version change in the output. Let us know what you find!
Hello,
Can we update the EEPROM from Win10 raspberry ?
Since, it s mentioned EEPROM update using microSD latest Rasbian. Can we by pass it ?
I ve just installed Win10 on Rasp 4 @8GB, in samsung evo+ 64GB microSD Ultra class10, and it s super slow and hopefully the SSD-M.2 can help .
Hey xavi,
Do you have a spare SD? The easiest way might be to just make the “recovery image” on a spare SD card using the Raspberry Pi imager tool (you can use this from Windows too).
Have you tried booting with the SSD yet? Depending on when you got your Pi it may have new enough firmware already as I have been hearing from others in the comments that theirs came with new enough firmware as well. It may be worth checking to see if you got lucky!
Ik weet niet of ik hier die vraag kan stellen, maar sinds een paar dagen start mijn Raspberry Pi4 4GB raar op.
Hij start als eerste in 640x480mode met het hele scherm vol met teksten en linksboven de raspberry afbeelding.
Dat is maar 2sec. om vervolgens in de 1920x1080p modes verder te gaan.
Wat is hier het probleem?
Hello, can we update the EEPROM via USB boot since we can boot on USB ?
Thanks
Hey Eric,
Absolutely! This is safe and fine to do. It’s all the same utilities and the EEPROM is stored separately on it’s own chip so as long as you have a utility that can communicate with it correctly it makes no difference.
Hopefully that helps!
Hello,
I recievec a PI 4 – 4 GB as a new year present,
It wont start at all.
With SD card: It is blinking 2 longs and 4 shorts with SD card plugged in / a pattern on the screen
Without SD Card: It is blinking 4 times short with no SD card plugged in../ nothing on the screen
Hey Chris,
That sounds like either the SD card isn’t imaged or the image didn’t go on it properly. Is it the card that came with it? My wife got one that wasn’t imaged with her Pi 400 and I got one that was, so you may just want to run the rpi-imager tool on that SD card to image it again!
Thank you for replying that fast.
I ran the rpi-imager tool on that SD card to imaged it again. I’ve tried with different SD Cards, (that are working fine on another PI4 (I borrowed from my son 🙂 )
Chris
Awesome, I’m glad to hear it and we had the same experience with one of ours. Usually they are supposed to come with Raspberry Pi OS preloaded with most kits (at least according to the descriptions).
I guess that’s the “actual” price we pay to get these for the price we do! They probably have a table with thousands of these things sitting on it where they package these kits and just grab one from there. Validating every one of those cards would take a *very* long time for a board that costs $XX.
Definitely enjoy and have fun!