
Recently I reviewed the Orange Pi Zero 2 and thought it was a fantastic board. I really like the amount of polish that the Orange Pi line of products have as it is the closest I have seen to anything approaching a Raspberry Pi experience. We also benchmarked the Orange Pi Zero 2 and determined it’s a very capable board.
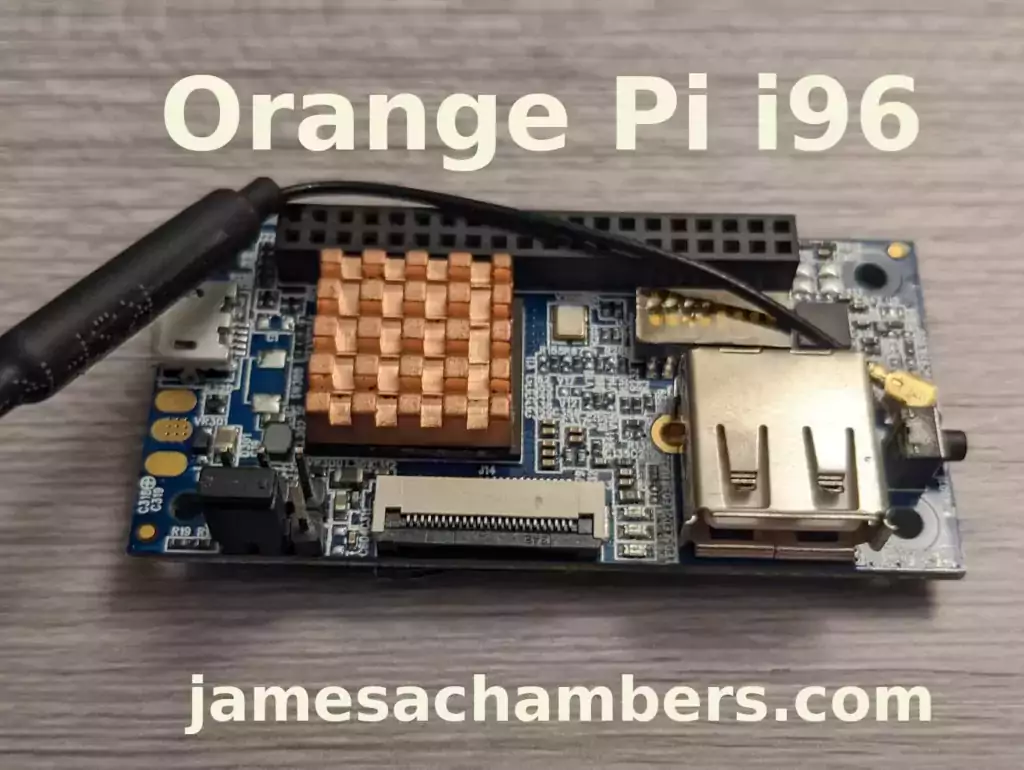
I recently got a Orange Pi i96 (thanks munecito!) and this board is very exciting because it was purchased on sale for ~$10! That is insanely cheap. The reason it’s so cheap is because it’s a headless board that doesn’t contain any display-out ports.
If you are going to be using the board headless anyway (I use most of my SBCs headlessly) you may be able to save a fortune with this board. Let’s get started!
Hardware Used
The Orange Pi i96 is a low-cost board from the Orange Pi line of SBCs. It uses the RDA8810 SoC and has 256MB LPDDR2 SDRAM. It’s well suited for headless tasks and is astonishingly cheap.
Links: Amazon.com*, AliExpress.com*, Amazon.ca*, Amazon.co.uk*, Amazon.de*, Amazon.es*, Amazon.fr*, Amazon.it*, Amazon.sg*

The Geekworm copper heatsink set is designed to fit many different single board computers. It uses thermal conductive adhesive which many “cheap” heatsink kits for SBCs don’t have. Eliminates hotspots and reduces throttling. Can be further enhanced by powered cooling over the heatsinks.
Links: Amazon.com*, Amazon.ca*, Amazon.co.jp*, Amazon.co.uk*, Amazon.de*, Amazon.es*, Amazon.fr*, Amazon.it*

The Orange Pi official mouse uses 2.4GHz wireless to give you a wireless mouse experience with the Orange Pi
Links: Amazon.com*, AliExpress*

The Orange Pi monitor is meant to be a portable monitor you can take anywhere. It has a resolution of 1080P and features a hinge in the back that folds out to support the monitor.
Links: Amazon.com*, AliExpress*
Getting Started
EDIT: I now recommend using my fixed Orange Pi i96 image as it will fix your USB port to be able to operate at full speed and give you a much newer OS of Debian Bullseye.
Alternatively you may use the official images (not recommended for this board). If you’d like to use the official images instead head to the official Orange Pi downloads page:
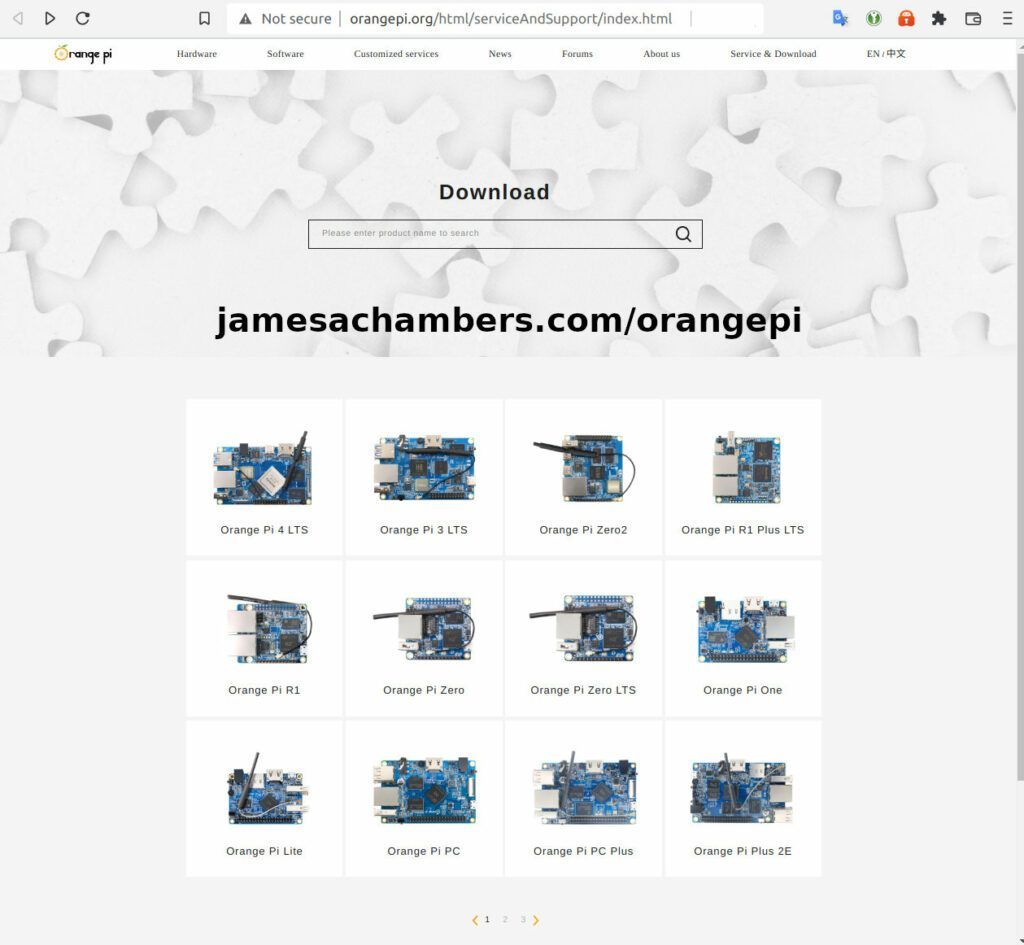
Now select the Orange Pi i96 from the list. I will be using Ubuntu Linux for this guide but you may use Armbian as well.
If you are wanting to try Android I highly recommend seeing my Orange Pi Android Installation Guide as the installation process is different than Linux.
Writing the Image
The images are typically distributed as a .tar.gz file. The name of the Ubuntu image tar.gz file at time of writing was OrangePi_i96_ubuntu_xenial_server_linux3.10.62_v0.0.4.tar.gz.
We will need to extract this file. If you are using Windows then grab 7-zip to be able to extract a .tar.gz file.
Inside this file will be a .img file. Since I downloaded the Ubuntu image the name of my file was OrangePi_i96_ubuntu_xenial_server_linux3.10.62_v0.0.4.img. This is the image that we are going to write to our SD card.
There are several choices to write the image to your SD card. If you are on Windows I recommend Win32DiskImager. Etcher is also available for Windows/Linux/Mac OS X.
Write the image to the SD card using your preferred software.
First Startup
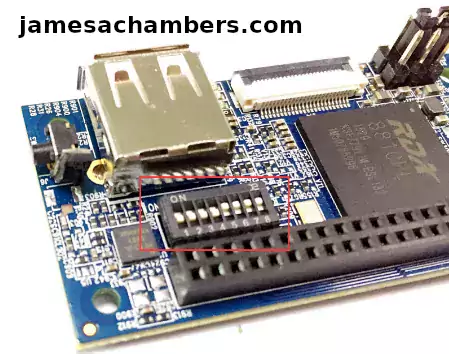
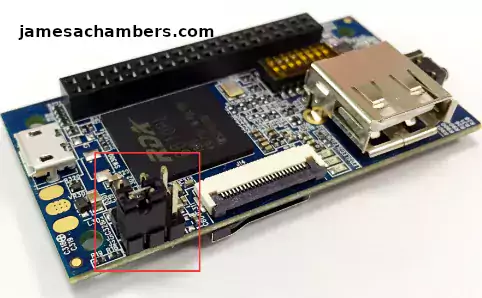
Before starting up you should make sure that the Orange Pi’s switches are in these positions (indicating to boot from SD card):
We’re ready to put the SD card into the Orange Pi i96. But how are we going to connect to the device? There’s no network port and the device isn’t configured to connect to our WiFi yet.
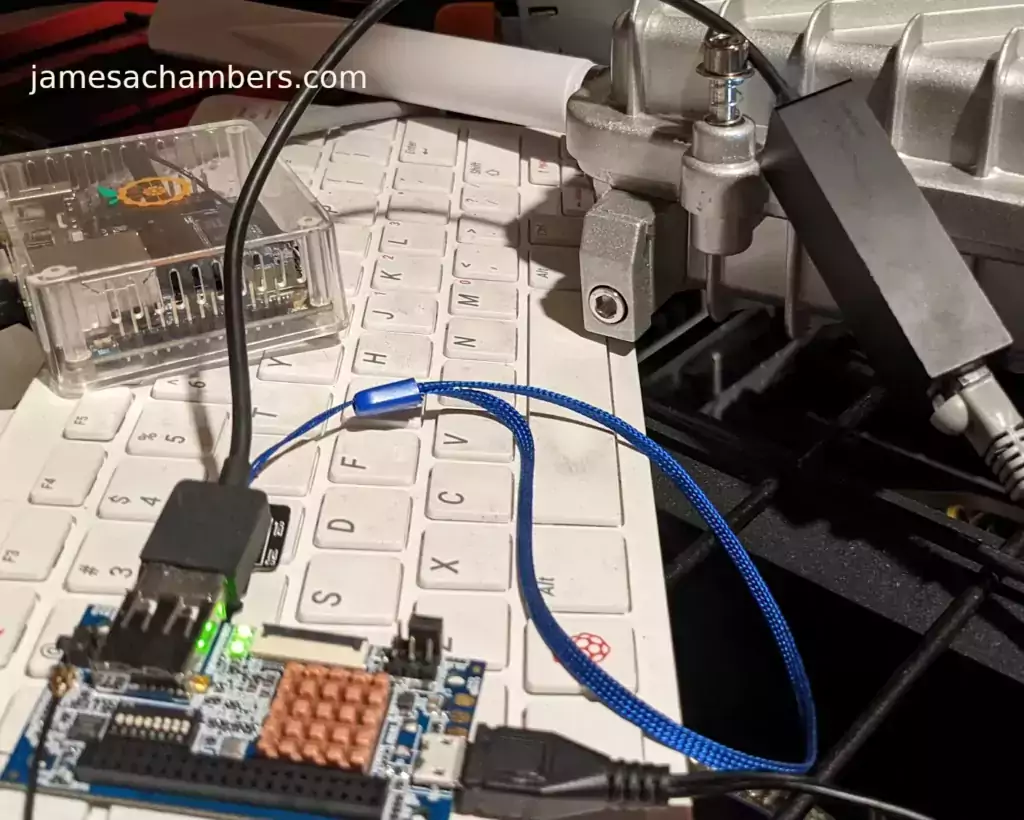
Connection Option #1
If you happen to have a USB to Ethernet adapter that is the easiest way to connect to the device for initial configuration:
Connection Option #2
If you have a TTL to USB serial debug adapter* you can use that as well. See the OrangePi instructions for that method.
Initial Configuration
orangepi-config Utility
Once you’ve connected it’s time to do some basic configuration. We will use the tool orangepi-config:
sudo orangepi-config
You may now set the WiFi settings, etc. The orangepi-config is just like raspi-config if you’ve ever used that on a Raspberry Pi.
Don’t reboot before doing the next section.
Fix Second Startup (Debian / Ubuntu)
You will notice if you reboot the device it will often not come up the second startup. This is especially likely if you performed a sudo apt dist-upgrade.
To prevent this I recommend removing the alsautils package. This will impact sound functionality on the board but as I was not using it and intended to use this more as a headless board this was fine for me.
sudo apt purge alsa-utils
If you need to have the sound working on the board there is an alternate solution available here.
This is not necessary in my Legendary image as it has kernel fixes for these issues (highly recommended)
Set Timezone
Replace my timezone with yours in the following commands:
rm /etc/localtime
ln -s /usr/share/zoneinfo/America/Denver /etc/localtime
Setup Locales
Setting the locales isn’t in orangepi-config (such as it is in raspi-config) but here’s a quick way to set them:
sudo apt install locales -y
sudo dpkg-reconfigure locales
Setup Wireless CRDA Regulatory Domain
For the wireless to function very well at all you need to set the wireless regulatory domain.
If you are not using my image then you will first need to install the crda package with:
sudo apt install crda -y
Now we can set the regulatory domain by editing the following file:
sudo nano /etc/default/crda
At the bottom of the file there is this line:
REGDOMAIN=
Put the 2 letter country code for your country. Mine is “US”. Once finished press Ctrl+X then Y to save the file.
Optional – Upgrade Debian OS to Buster/Bullseye
Note that this will not upgrade the kernel. You can upgrade everything else though including all the way up to Bullseye. You should do this one release at a time and start with “Stretch” and then do “Bullseye” afterward.
If you are using the Debian installation you can upgrade to Buster by editing your /etc/apt/sources.list file.
Change all instances of “stretch” in the file to “buster” and then do the following:
sudo apt update && sudo apt dist-upgrade -y
Once this has completed reboot the system (make sure you’ve done my fix second reboot section first by purging alsa-utils). Verify you are on Buster with
cat /etc/os-releasefor example:
root@orangepii96:/# cat /etc/os-release
PRETTY_NAME="Debian GNU/Linux 10 (buster)"
NAME="Debian GNU/Linux"
VERSION_ID="10"
VERSION="10 (buster)"
VERSION_CODENAME=buster
ID=debian
HOME_URL="https://www.debian.org/"
SUPPORT_URL="https://www.debian.org/support"
BUG_REPORT_URL="https://bugs.debian.org/"
Now you can upgrade to Bullseye. It’s almost the same as upgrading from Stretch to Buster but there has been a change in the security updates server format. Here is a working “Bullseye” apt sources file for the Debian Orange Pi i96 image:
root@orangepii96:/# cat /etc/apt/sources.list
deb http://ftp.debian.org/debian bullseye main contrib non-free
#deb-src http://ftp2.cn.debian.org/debian bullseye main contrib non-free
deb http://ftp.debian.org/debian bullseye-updates main contrib non-free
#deb-src http://ftp2.cn.debian.org/debian bullseye-updates main contrib non-free

deb http://security.debian.org/ bullseye-security main contrib non-free
#deb-src http://security.debian.org/ bullseye-security main contrib non-free
Once you’ve changed the files do a sudo apt update and make sure you don’t see any errors. If everything looks okay start the Bullseye upgrade with:
sudo apt full-upgrade -yAfter a reboot you should be on Bullseye! We can verify this with cat /etc/os-release:
orangepi@orangepii96:~$ cat /etc/os-release
PRETTY_NAME="Debian GNU/Linux 11 (bullseye)"
NAME="Debian GNU/Linux"
VERSION_ID="11"
VERSION="11 (bullseye)"
VERSION_CODENAME=bullseye
ID=debian
HOME_URL="https://www.debian.org/"
SUPPORT_URL="https://www.debian.org/support"
BUG_REPORT_URL="https://bugs.debian.org/"
orangepi@orangepii96:~$ uname -a
Linux orangepii96 3.10.62-rel5.0.2+ #4 PREEMPT Wed Mar 18 18:49:25 CST 2020 armv7l GNU/Linux
Notice that the kernel has not changed at all (as cautioned at the beginning of the section) but everything else on the system will be Bullseye!
Performance Benchmarking
I benchmarked the board using a SanDisk Extreme SD card on my Pi Benchmarks web site. This gives us comparable results between boards and there are over 30,000 benchmarks submitted for various boards / storage devices.
I had a total score of 497. This was below average or off from an average Raspberry Pi setup by about 47%.
To be clear the storage performance on the board is relatively low compared to the Orange Pi Zero 2 or a Raspberry Pi (Zero or 4). That is to be expected for a price of around ~$7-$10.
I’m not sure I would say this is a disappointing result though. We are talking about a board that is a single digit number of dollars. For the price point that is fantastic performance! In fact for the price point it’s a wonder that it works at all.
Conclusion
It’s a great board. At a price point of $7-$10 it reminds me of the really, really old Raspberry Pi Zero days where you could actually get a Raspberry Pi for around that price point.
The Zero 2 is a significantly more powerful board. It benchmarked much higher than the i96 but it also costs significantly more. If you need more power that board will be a better choice. If you’ve never had an Orange Pi before I would recommend the Zero 2 first as this board is quite a bit trickier and has more outdated software available for it.
The version of Ubuntu on this board is also quite old (Ubuntu 16.04 / Xenial) compared to the Orange Pi Zero 2 which is actually running a modern 5.X kernel whereas this one is a 3.X kernel. Make sure that is not going to be a problem or you will want to step up to a higher Orange Pi. The i96 is definitely meant for simple services / projects that don’t need a lot of power. It’s perfect for those.
If you need a headless board then the Orange Pi i96 may very well fit the bill for you, the price is certainly right! Don’t skip the heatsinks though. It got very warm during testing (warm enough to freeze once during consecutive benchmarks) and Orange Pis are known to get quite hot!
Other Resources
I highly recommend using the Legendary i96 Debian Bullseye image available here
I’ve also reviewed the Orange Pi portable monitor here
Don’t miss my Orange Pi Zero 2 Review / Tips / Guide for another great board (with display connections)
I’ve also reviewed the Orange Pi 3 LTS which is roughly equivalent in power to a 2GB Pi 4
If you’re trying to set up Android definitely see my Orange Pi Android Installation Guide
For the fastest storage options check out my Linux storage benchmarking script
")


Hi James, thanks for posting all your lab experiences. I successfully added SSD boot on Le Potato per your instructions and also added EMMC to Odroid-n2 but I have not been successful with i96. I got 3 of those last August for CN$8.07 each at Aliexpress. In summary, I first tried using your Legacy image 1.7 but Etcher complained it was not an image. I then downloaded Omegapi2g – Ubuntu and it booted and I got connected through ethernet/usb but could not ssh because it did not accept orangepi as password. Also, I added UART to USB and carefully connected to the board. I installed kermit on Ubuntu/iMac/Parallels and it found the USB0 and connected. I am a kind of stuck by now! If I cannot acess remotely, I do not have a screen to apply the updates nor TTL is providing the tracing information.
I may missed something but I cannot figure it out. Appreciate some clarity on where do you get your screen display or how to.
Hey Ron,
You definitely need to extract the download first. Don’t try to burn it as a compressed image. You need to extract the compressed archive completely and it will give you a .img file.
That is the file you will use with Etcher. That should take care of it here. Hopefully that helps!
Could you add auto wifi connect to orangepi network as in original image?
Hey Sative,
That never worked in the original image. You can reinstall it with:
sudo apt install hostapdAll this image did was remove that package. It never worked though. The service just crashes over and over which is why I removed it. This is a pretty tough board to work with without the USB to serial console.
In order to use hostapd I believe you’ll need to create a valid hostapd configuration which the image never shipped with. Hopefully that helps!
Good info and work. Unfortunately the sbc market is totally grazy. The cheapest Opi i96 I can find is €25,-
Good thing that the stock is high so good Availability
Do you know the Orange Pi 2G-IOT? I can get it for €23,- but don’t know the product. Info on the reseller site is low.
Hey Ray,
Great question! It’s definitely hard to find the Orange Pi i96 now. One important thing we found is that the i96 2G has a different pin layout than this board. That was actually some of the bugs we fixed in the original image. Some things on the regular i96 were broken because the image had the pin settings for the i96 2G which were different. Therefore I wouldn’t recommend the 2G model because you’d have to use the broken image again (nobody has ported this image to the 2G at least so far).
I do see one here on AliExpress for $16.50ish + $4.44 shipping to the US. I’m not sure what that will change to for you. Probably something similar but maybe it will come out cheaper.
That’s not too much more expensive than they were at around $21 because even when they were $6.99 on Amazon they wouldn’t ship them for free so it ended up being more. It was still incredibly cheap though. Here’s a look at me buying 2:
This was the best deal I got at the time. $6.99 listed price and I purchased 2 of them (because I already had a couple). There was no way to get free shipping on these when they were doing this deal (Orange Pi specifically had it set that way so you had to pay for individual shipping on each item). I would have ordered 10 of them if I could have paid for shipping once (and they knew it which is why they wouldn’t allow combined shipping, they were listing it artificially low then charging higher shipping that can’t be combined to bring the final price to something more palatable for them, a tale as old as time).
I still probably should have got more than 2 in retrospect. This was ordered from Orange Pi’s official listing on Amazon before they permanently went out of stock on the i96. I placed the order because someone here in the comments contacted Orange Pi and they said they only had a few thousand left and then they would be permanently gone. I honestly thought I’d probably get another chance or two to get more but they were gone very quickly after that (days, maybe a week). All that’s left now are reseller listings.
It was 2 boards shipped to the door for about $29 or $14.50 each or so after the shipping / taxes. There’s no question that’s a lot better than $20-$21 each though. $14 to $21 is more than a 30% price increase so it’s definitely not nothing.
It’s like you said though. It’s going to be hard to get even 1 of them for what I paid for 2 now but you might be able to do a little better on AliExpress potentially (but maybe not, I’ve heard mixed stories from Europe and I think it really depends on the listing). Hopefully that helps!
Hi James,
Thank you for providing this image.
I am having some difficulty and would appreciate some assistance.
I would like to change the I2C clock frequency to either 100kHz or 50kHz. Is it possible to do this through a configuration file or some other method? Additionally, do you happen to know the GPIO port number for I2C0?
I am attempting to use a temperature and humidity sensor called the AHT25, but it is not being recognized on the I2C1 or I2C2 interfaces. I also tried adding a pull-up resistor (4.7kΩ) to no avail.
Hey watanabe,
Absolutely! You will need to rebuild the kernel. It’s in OrangePiRDA/kernel/include/rda/tgt_ap_board_config.h:
/* I2C clocks */#define _TGT_AP_I2C0_CLOCK (100000)
#define _TGT_AP_I2C1_CLOCK (400000)
#define _TGT_AP_I2C2_CLOCK (200000)
For AHT19 I’ve never heard of it but it says this on Google:
Usage NotesThis driver does not probe for AHT10 devices, as there is no reliable way to determine if an i2c chip is or isn’t an AHT10. The device has to be instantiated explicitly with the address 0x38. See How to instantiate I2C devices for details.
It doesn’t look like detecting this chip is a thing. You will need to manually initialize it. I have no idea how you would do this but I suspect you’d have to hard code it into the kernel as well. Probably in OrangePiRDA/kernel/arch/arm/mach-rda/devices.c or if your lucky that can just be initialized right over i2c (via code sent directly over the i2c interface for example with 0x38, I’m not completely sure what your options are or if you have to put that directly in the device descriptors which are in the devices.c file I shared above).
EDIT: I actually clicked the “See How to instantiate I2C devices for details” link in the page I linked earlier after I wrote this reply and saw this:
i2c1: i2c@400a0000 {/* ... master properties skipped ... */
clock-frequency = <100000>;
flash@50 {
compatible = "atmel,24c256";
reg = <0x50>;
};
Oh yeah, that definitely looks like a device tree or on this board it’s going to be in the devices.c file I mentioned for sure. You will want to scroll to the “Declare the I2C devices in board files” section which says this:
In many embedded architectures, devicetree has replaced the old hardware description based on board files, but the latter are still used in old code. Instantiating I2C devices via board files is done with an array of struct i2c_board_info which is registered by calling i2c_register_board_info().Bingo. The Orange Pi i96 uses the old hardware description based on board files. Here is some code from the i96 devices.c:
void __init rda_init_devices(void){
i2c_register_board_info(_TGT_AP_I2C_BUS_ID_WIFI,
i2c_dev_rda_wlan_combo, 5);
#ifdef _TGT_AP_BOARD_HAS_ATV
i2c_register_board_info(_TGT_AP_I2C_BUS_ID_ATV,
i2c_dev_rda5888, 1);
So this will need to be hard coded on this board I believe but there are both places to do it. People have done some similar things before mostly with SPI but those *also* needed some hard-coded kernel configuration like this to get them working like the CAN modules, etc.
Hopefully that helps!
Hi James,
Thank you for responding to my message.
I appreciate the interesting information about DT that you provided.
I will definitely try rebuilding the kernel and may report any progress here.
Thank you again for your help!
Hey watanabe,
No problem at all! Let me know if I can help further but I think you will probably succeed here. After some reading and comparing it to similar things people have done here before this should be achievable.
Best of luck!
Hi James,
I tried all sorts of things, but in the end, I didn’t need to do any of it to get the sensor working. It all worked out without changing the I2C clock.
But building the OrangePi image was a pretty cool experience for me.
It took a little bit of trial and error, but I’m glad I was able to build it. Thanks a ton!
-Installed Ubuntu 18.04 on a virtual machine with 8GB of memory
-Installed libstdc++6:1386
-Changed “apt-get -y install debootstrap qemu-user-static” to “apt-get -y install debootstrap qemu-user-static:i386” around line 149 of ./OrangePiRDA/scripts/lib/distributions.sh
The log is now like this.
[ 1.473571] i2c /dev entries driver[ 1.474060] rda-i2c rda-i2c.0: set clk = 100 KHz, bus_clk = 200000000, divider = 399
[ 1.475341] rda-i2c rda-i2c.0: rda_i2c, adapter 0, bus 0, at 100kHz
[ 1.475952] v_i2c: Failed to create debugfs directory
[ 1.476623] rda-i2c rda-i2c.1: set clk = 100 KHz, bus_clk = 200000000, divider = 399
[ 1.477722] rda-i2c rda-i2c.1: rda_i2c, adapter 1, bus 1, at 100 kHz
[ 1.478332] v_i2c: Failed to create debugfs directory
[ 1.479003] rda-i2c rda-i2c.2: set clk = 400 KHz, bus_clk = 200000000, divider = 99
[ 1.480041] rda-i2c rda-i2c.2: rda_i2c, adapter 2, bus 2, at 400kHz
Hey watanabe,
Great work, excellent result! I’m glad you were able to build it as well. It’s definitely a little bit of trial for sure as each OS will need slightly different packages.
The build system is a lot nicer / easier to work with than it appears at first glance. I’ve actually tried the build system on some of the other Orange Pi boards and it works well too.
Thanks for sharing your resolution as well, enjoy and take care!
Hi James,
Thanks for all the work you’ve done on the i96. The “legendary” image you made for i96 literally saved me. I bought 12 of the boards from China and the images OrangePi provides are garbage but yours works great and actually makes the boards usable!
Hey Shane,
Thank you so much for the kind words, I’m so glad to hear it! I know that once the image was released there was basically a run on the remaining Orange Pi i96 boards. They were giving them away for something like $8-10 since they knew they hadn’t updated their image in years and that the board was nearly unusable.
I have 5 of them now as I did buy a few when people alerted me this was happening and that Orange Pi had officially confirmed they were down to a few hundred left and more were not going to be made. I’m not sure we will ever see a single board computer offered as cheap as the Orange Pi i96 again. It was being sold for cheaper than a Raspberry Pi Zero W (which had long ago become unavailable or at the very least exceedingly difficult to get for retail). If there is it will be because it’s RISC-V or it will have some other advantage to explain how it was able to get down to single digit dollars again like the i96.
I kind of wish they hadn’t been discontinued even if they had kept making this exact same older model rather than make an updated model / successor. There is a place for this board in the market especially right now. There is no budget option you can get like this was while it lasted (which is part of why there was a run on the remaining supplies once a not perfect but at least usable image was available). It doesn’t need to perform miracles and nobody expects it to at that price point. If people have a project that needs a fancy board they generally know that. If they want a board like this it’s because they just need something cheap that “works” and don’t need bells and whistles or a tremendously powerful CPU/GPU.
I haven’t done an update for a while but I will sometime before too long here if only to refresh all of the packages from apt (the same as you will get if you do a sudo apt update && sudo apt dist-upgrade, the updates would just be built into the updated image instead of having to come down as updates through apt). I think the reason for that is I just haven’t been hearing as much about the i96 because nobody can really get it anymore after the run on the supply (and the depletion of Orange Pi’s remaining stock which they did officially confirm when someone from the comments here asked them). If they would have had another 50,000 units I think there would have probably been a lot more recent activity still.
Enjoy and take care!
OK could you help me out a bit. I bought this to move on up from arduino and I am out of my depth but grimly hanging onto the slim twig of my knowledge to keep adrift on the plate glass surface of technology. I downloaded and unpacked the image and used etcher to successfully flash a micro SD card. I set the dipswitch and jumpers as illustrated. I set up the hotspot on my phone as orangepi / orangepi. The board shows two lit green led’s. The phone shows no device connected.
I am stuck.
Hey deckchairboy,
I think I can help! So that function never worked on the original image correctly and I removed it from this one (since it was broken). The best ways to connect to it initially are using a USB to serial TTY adapter or by using a USB to Ethernet adapter.
I realize that I had this old nonworking method in the guide and I have removed it. Sorry for the confusion!
Great stuff! I have one lying around doing nothing, since I could not get the wifi to run.
I will certainly test this.
Hey Joris,
Excellent, I think you’ll find it definitely will breathe some new life into it for sure. It was frankly almost unusable with the stock image. This will at least get you on Debian Bullseye and get the WiFi working.
I definitely would recommend following the first startup instructions and setting your timezone, regulatory WiFi country and all of that as it will help with the WiFi. Let us know how it goes!