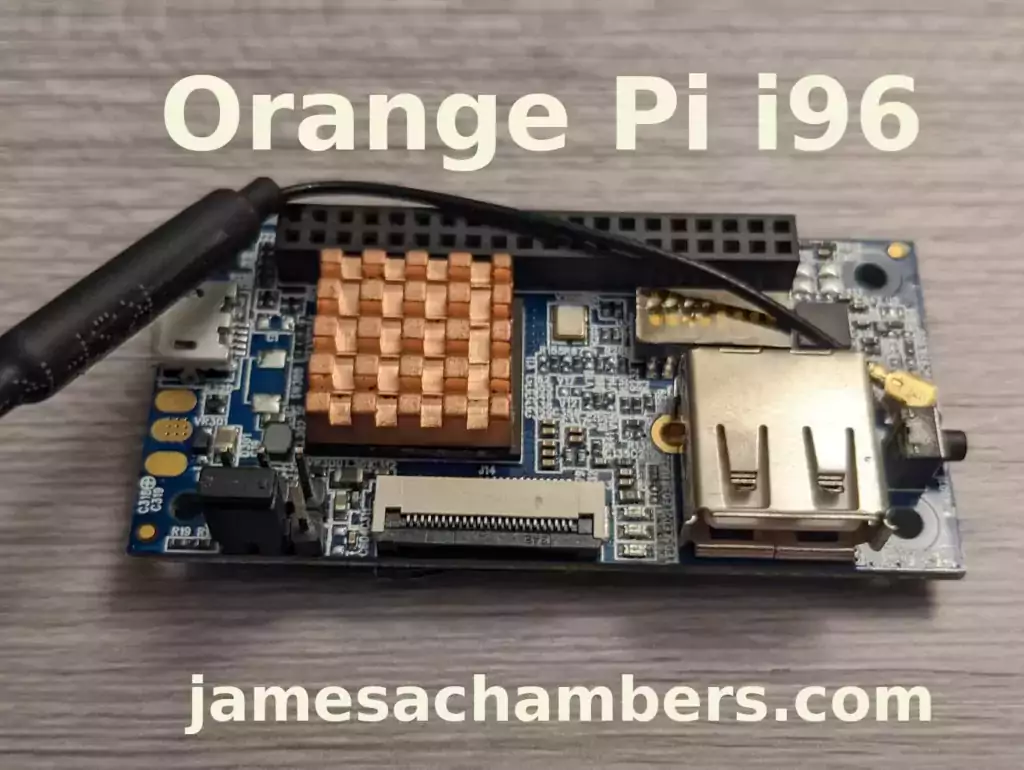
Recently I reviewed the Orange Pi Zero 2 and thought it was a fantastic board. I really like the amount of polish that the Orange Pi line of products have as it is the closest I have seen to anything approaching a Raspberry Pi experience. We also benchmarked the Orange Pi Zero 2 and determined it’s a very capable board.
I recently got a Orange Pi i96 (thanks munecito!) and this board is very exciting because it was purchased on sale for ~$10! That is insanely cheap. The reason it’s so cheap is because it’s a headless board that doesn’t contain any display-out ports.
If you are going to be using the board headless anyway (I use most of my SBCs headlessly) you may be able to save a fortune with this board. Let’s get started!
Hardware Used
The Orange Pi i96 is a low-cost board from the Orange Pi line of SBCs. It uses the RDA8810 SoC and has 256MB LPDDR2 SDRAM. It’s well suited for headless tasks and is astonishingly cheap.
Links: Amazon.com*, AliExpress.com*, Amazon.ca*, Amazon.co.uk*, Amazon.de*, Amazon.es*, Amazon.fr*, Amazon.it*, Amazon.sg*

The Geekworm copper heatsink set is designed to fit many different single board computers. It uses thermal conductive adhesive which many “cheap” heatsink kits for SBCs don’t have. Eliminates hotspots and reduces throttling. Can be further enhanced by powered cooling over the heatsinks.
Links: Amazon.com*, Amazon.ca*, Amazon.co.jp*, Amazon.co.uk*, Amazon.de*, Amazon.es*, Amazon.fr*, Amazon.it*

The Orange Pi official mouse uses 2.4GHz wireless to give you a wireless mouse experience with the Orange Pi
Links: Amazon.com*, AliExpress*

The Orange Pi monitor is meant to be a portable monitor you can take anywhere. It has a resolution of 1080P and features a hinge in the back that folds out to support the monitor.
Links: Amazon.com*, AliExpress*
Getting Started
EDIT: I now recommend using my fixed Orange Pi i96 image as it will fix your USB port to be able to operate at full speed and give you a much newer OS of Debian Bullseye.
Alternatively you may use the official images (not recommended for this board). If you’d like to use the official images instead head to the official Orange Pi downloads page:

Now select the Orange Pi i96 from the list. I will be using Ubuntu Linux for this guide but you may use Armbian as well.
If you are wanting to try Android I highly recommend seeing my Orange Pi Android Installation Guide as the installation process is different than Linux.
Writing the Image
The images are typically distributed as a .tar.gz file. The name of the Ubuntu image tar.gz file at time of writing was OrangePi_i96_ubuntu_xenial_server_linux3.10.62_v0.0.4.tar.gz.
We will need to extract this file. If you are using Windows then grab 7-zip to be able to extract a .tar.gz file.
Inside this file will be a .img file. Since I downloaded the Ubuntu image the name of my file was OrangePi_i96_ubuntu_xenial_server_linux3.10.62_v0.0.4.img. This is the image that we are going to write to our SD card.
There are several choices to write the image to your SD card. If you are on Windows I recommend Win32DiskImager. Etcher is also available for Windows/Linux/Mac OS X.
Write the image to the SD card using your preferred software.
First Startup
Before starting up you should make sure that the Orange Pi’s switches are in these positions (indicating to boot from SD card):
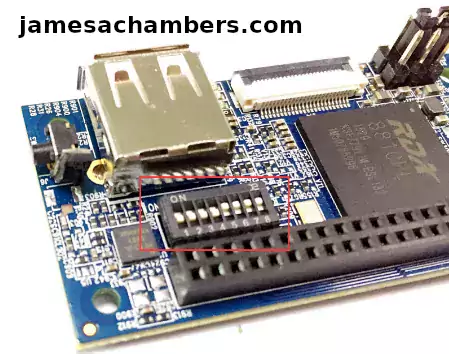
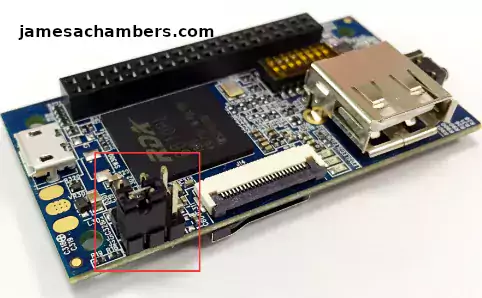
We’re ready to put the SD card into the Orange Pi i96. But how are we going to connect to the device? There’s no network port and the device isn’t configured to connect to our WiFi yet.
Connection Option #1
If you happen to have a USB to Ethernet adapter that is the easiest way to connect to the device for initial configuration:
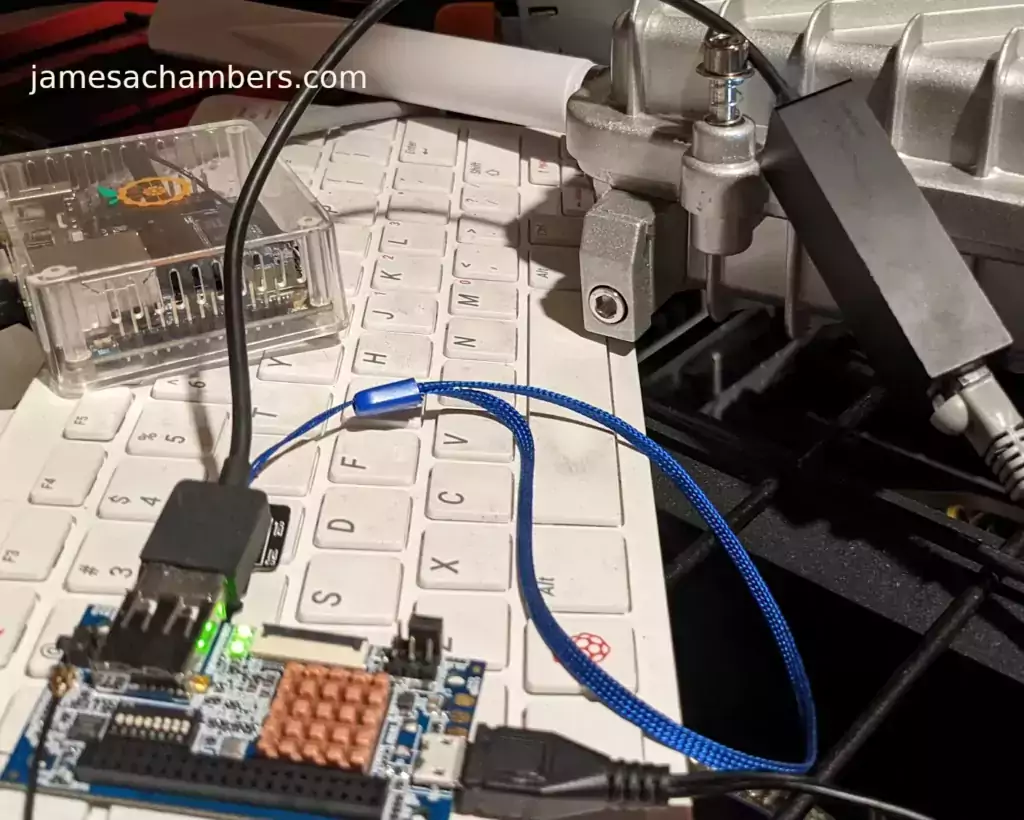
Connection Option #2
If you have a TTL to USB serial debug adapter* you can use that as well. See the OrangePi instructions for that method.
Initial Configuration
orangepi-config Utility
Once you’ve connected it’s time to do some basic configuration. We will use the tool orangepi-config:
sudo orangepi-config
You may now set the WiFi settings, etc. The orangepi-config is just like raspi-config if you’ve ever used that on a Raspberry Pi.
Don’t reboot before doing the next section.
Fix Second Startup (Debian / Ubuntu)
You will notice if you reboot the device it will often not come up the second startup. This is especially likely if you performed a sudo apt dist-upgrade.
To prevent this I recommend removing the alsautils package. This will impact sound functionality on the board but as I was not using it and intended to use this more as a headless board this was fine for me.
sudo apt purge alsa-utils
If you need to have the sound working on the board there is an alternate solution available here.
This is not necessary in my Legendary image as it has kernel fixes for these issues (highly recommended)
Set Timezone
Replace my timezone with yours in the following commands:
rm /etc/localtime
ln -s /usr/share/zoneinfo/America/Denver /etc/localtime
Setup Locales
Setting the locales isn’t in orangepi-config (such as it is in raspi-config) but here’s a quick way to set them:
sudo apt install locales -y
sudo dpkg-reconfigure locales
Setup Wireless CRDA Regulatory Domain
For the wireless to function very well at all you need to set the wireless regulatory domain.
If you are not using my image then you will first need to install the crda package with:
sudo apt install crda -y
Now we can set the regulatory domain by editing the following file:
sudo nano /etc/default/crda
At the bottom of the file there is this line:
REGDOMAIN=
Put the 2 letter country code for your country. Mine is “US”. Once finished press Ctrl+X then Y to save the file.
Optional – Upgrade Debian OS to Buster/Bullseye
Note that this will not upgrade the kernel. You can upgrade everything else though including all the way up to Bullseye. You should do this one release at a time and start with “Stretch” and then do “Bullseye” afterward.
If you are using the Debian installation you can upgrade to Buster by editing your /etc/apt/sources.list file.
Change all instances of “stretch” in the file to “buster” and then do the following:
sudo apt update && sudo apt dist-upgrade -y
Once this has completed reboot the system (make sure you’ve done my fix second reboot section first by purging alsa-utils). Verify you are on Buster with
cat /etc/os-releasefor example:
root@orangepii96:/# cat /etc/os-release
PRETTY_NAME="Debian GNU/Linux 10 (buster)"
NAME="Debian GNU/Linux"
VERSION_ID="10"
VERSION="10 (buster)"
VERSION_CODENAME=buster
ID=debian
HOME_URL="https://www.debian.org/"
SUPPORT_URL="https://www.debian.org/support"
BUG_REPORT_URL="https://bugs.debian.org/"
Now you can upgrade to Bullseye. It’s almost the same as upgrading from Stretch to Buster but there has been a change in the security updates server format. Here is a working “Bullseye” apt sources file for the Debian Orange Pi i96 image:
root@orangepii96:/# cat /etc/apt/sources.list
deb http://ftp.debian.org/debian bullseye main contrib non-free
#deb-src http://ftp2.cn.debian.org/debian bullseye main contrib non-free
deb http://ftp.debian.org/debian bullseye-updates main contrib non-free
#deb-src http://ftp2.cn.debian.org/debian bullseye-updates main contrib non-free

deb http://security.debian.org/ bullseye-security main contrib non-free
#deb-src http://security.debian.org/ bullseye-security main contrib non-free
Once you’ve changed the files do a sudo apt update and make sure you don’t see any errors. If everything looks okay start the Bullseye upgrade with:
sudo apt full-upgrade -yAfter a reboot you should be on Bullseye! We can verify this with cat /etc/os-release:
orangepi@orangepii96:~$ cat /etc/os-release
PRETTY_NAME="Debian GNU/Linux 11 (bullseye)"
NAME="Debian GNU/Linux"
VERSION_ID="11"
VERSION="11 (bullseye)"
VERSION_CODENAME=bullseye
ID=debian
HOME_URL="https://www.debian.org/"
SUPPORT_URL="https://www.debian.org/support"
BUG_REPORT_URL="https://bugs.debian.org/"
orangepi@orangepii96:~$ uname -a
Linux orangepii96 3.10.62-rel5.0.2+ #4 PREEMPT Wed Mar 18 18:49:25 CST 2020 armv7l GNU/Linux
Notice that the kernel has not changed at all (as cautioned at the beginning of the section) but everything else on the system will be Bullseye!
Performance Benchmarking
I benchmarked the board using a SanDisk Extreme SD card on my Pi Benchmarks web site. This gives us comparable results between boards and there are over 30,000 benchmarks submitted for various boards / storage devices.
I had a total score of 497. This was below average or off from an average Raspberry Pi setup by about 47%.
To be clear the storage performance on the board is relatively low compared to the Orange Pi Zero 2 or a Raspberry Pi (Zero or 4). That is to be expected for a price of around ~$7-$10.
I’m not sure I would say this is a disappointing result though. We are talking about a board that is a single digit number of dollars. For the price point that is fantastic performance! In fact for the price point it’s a wonder that it works at all.
Conclusion
It’s a great board. At a price point of $7-$10 it reminds me of the really, really old Raspberry Pi Zero days where you could actually get a Raspberry Pi for around that price point.
The Zero 2 is a significantly more powerful board. It benchmarked much higher than the i96 but it also costs significantly more. If you need more power that board will be a better choice. If you’ve never had an Orange Pi before I would recommend the Zero 2 first as this board is quite a bit trickier and has more outdated software available for it.
The version of Ubuntu on this board is also quite old (Ubuntu 16.04 / Xenial) compared to the Orange Pi Zero 2 which is actually running a modern 5.X kernel whereas this one is a 3.X kernel. Make sure that is not going to be a problem or you will want to step up to a higher Orange Pi. The i96 is definitely meant for simple services / projects that don’t need a lot of power. It’s perfect for those.
If you need a headless board then the Orange Pi i96 may very well fit the bill for you, the price is certainly right! Don’t skip the heatsinks though. It got very warm during testing (warm enough to freeze once during consecutive benchmarks) and Orange Pis are known to get quite hot!
Other Resources
I highly recommend using the Legendary i96 Debian Bullseye image available here
I’ve also reviewed the Orange Pi portable monitor here
Don’t miss my Orange Pi Zero 2 Review / Tips / Guide for another great board (with display connections)
I’ve also reviewed the Orange Pi 3 LTS which is roughly equivalent in power to a 2GB Pi 4
If you’re trying to set up Android definitely see my Orange Pi Android Installation Guide
For the fastest storage options check out my Linux storage benchmarking script



Hi James,
Thanks for the work done, it helped me a lot with several 2G_IoT boards. But I am faced with the problem of using multiple boards on the same network. The problem is that all the boards have the same Mac address and I can’t change it either through ifconfig or through macchanger. After a reboot, it remains the same. Please tell me how can I install a different Mac address from what is installed in your image?
Hey Alex,
Welcome, no problem at all! So the MAC address is stored in /data/misc/. The Bluetooth MAC address is there as well. Hopefully that helps!
I have an entry only: B9″.c. how can I enter a new address?
Oh, i see, HEX
Hey Alex,
Nice, you figured it out before I could reply but you’re absolutely right, it’s just in hex basically so the usual tricks should work!
Hey Alex,
Probably the easiest way to change it is to just delete the file and restart. It will regenerate a new random MAC address then.
It’s encoded into hex. For example to see the existing address:
cat /data/misc/wifi/WLANMAC | xxd -pOn my machine:
wlan0: flags=4163 mtu 1500inet 192.168.51.45 netmask 255.255.0.0 broadcast 192.168.255.255
inet6 fe80::dcb0:35ff:fe03:6b01 prefixlen 64 scopeid 0x20 ether de:b0:35:03:6b:01 txqueuelen 1000 (Ethernet)
RX packets 759 bytes 46842 (45.7 KiB)
RX errors 0 dropped 0 overruns 0 frame 0
TX packets 291 bytes 25434 (24.8 KiB)
TX errors 0 dropped 0 overruns 0 carrier 0 collisions 0
orangepi@orangepii96:/data/misc/wifi$ cat /data/misc/wifi/WLANMAC | xxd -p
deb035036b01
As far as setting your own… hmmm. Maybe something like:
root@orangepii96:/data/misc/wifi# printf '\xde\xb0\x35\x03\x6b\x01' > testroot@orangepii96:/data/misc/wifi# cat test | xxd -p
deb035036b01
Yeah that seems to work to create my own MAC address. Hopefully that helps!
Txh for help!
Hi James,
I recently got my hands on an i96 but have been unable to successfully connect to it via ttl -USB. I get absolutely nothing from the serial output. The board shows two green LEDs: [X][ ][X] when on and the data transmission LED on the USB-Serial adaptor flashes like it is successfully receiving something.
I have followed the procedure in the user manual and your guide to the letter but still no luck. Here are the things I have tested/tried/checked:
– Cables are connected to opposing sides (TX-RX0, RX-TX0). I have tried swapping them in case they are labelled incorrectly.
– I have loop tested the USB-Serial connection successfully so I believe it is working (LED indicates data being passed in same way as when turned on).
– I have tried flashing the SD card using various software from Windows and Ubuntu with both a Ubuntu image and Debian.
– The power supply is rated for up to 6A, 5V, 30W.
– I have tried various serial reading software (minicom, screen, picocom, Putty (Both windows and Linux) and Powershell scripting).
– I have tried every baud rate between 9600 and 1500000 and some random other parities etc. (I have always used a baseline of 921600 8N1).
I bought the board with a friend who also got one and we have exactly the same issue (Which hopefully means its an issue with our understanding not the board). We both use different power supplies and ttl-usb connectors and have both independently tried all of these checks to no avail. Our next step is to buy a USB-Ethernet adaptor instead but we would quite like to understand why serial output isn’t working.
Apologies if this turns out to be an extremely dumb issue, I am very new to this. Any help would be much appreciated!
Many thanks,
Cameron
Hey Cameron,
It’s not a dumb issue at all. I really struggled with this. I happen to have my i96 serial adapter still plugged in the right configuration:
Basically if you go to the Orange Pi i96 wiki and wire it how it says it is wrong. I believe that serial configuration is for the i96 2G. The Orange Pi i96 correct wiring configuration is how mine is above (with the TX and RX swapped, ground on the left still).
I have mine set to 2V5 right now but it works on both 2V5 and 3V3. I wonder if there’s a serial adapter issue? Not all serial adapters can handle running at these kinds of speeds I’ve seen some people saying online. Do you have any other adapters to try?
To be honest with you the way I found it was swapping the connections around until I started seeing keystrokes. It took a long time to find the right combination too as I didn’t happen to try swapping the TX and RX first and tried moving the GND everywhere (probably not a good idea).
Hopefully that helps!
Hi James,
Apologies for the late reply!
After double checking my configuration against yours (They were the same) I suspected you were correct about the serial adapter being the issue. I ordered a similar model but this time with a CP2102 chip (Old one was a PL2303HX) and it worked perfectly.
It could have been a bad chip but my friend had the same chip from a different source on a different board and had exactly the same issue. It could be the PL2303HX chips are not compatible but not sure why.
Thanks for the help!
Cameron
Hey Cameron,
Thanks for the update, I’m relieved you got this going! I had read online that it was picky about these. Thanks for letting us know how this turned out (as well as posting the models of the working and non-working adapters).
Enjoy and take care!
hi James, thanks for all the effort you’ve made to build the image for this board.
just wondering if there’s a possibility to use this i96 with a uvc webcam?
thanks again
SPI on GPIO Pins for External Device
Hi all experts,
after reading several comments I’m still uncertain about the result: Did somebody succeed in enabling the SPI2 on GPIO pins to be useful for an external device?
What is needed to be done?
(I understood that overlay technology, like used in RasPi, is not working with the old 3.10 kernel. But recompiling the kernel or a module with some different configuration or even patches could be the solution)
Thanks
Achim
Hey Achim,
Yes, MZA did this for a CAN module and it supports spidev out of the box. I would say the best way to find this information is to use the comment search box and search for “MZA”. That is the person who got the CAN module and spidev working.
Here’s a link to one of the more recent ones. I think that reading MZA’s posts is probably the best way to get up to speed on how to do this. I think he’s the only one who has fully got it working yet and you can watch his whole journey getting it working. He also has GitHub repositories with his changes you’ll see as well.
There’s definitely not any easy how-to on how to do this for sure. I’m not sure that anyone besides MZA has done it (although someone did get one of the digital displays working for sure vs. a TFT using spidev). It’s exactly how you say though basically. You’ll essentially enable the CAN module or whichever module you’ll need and rebuild the kernel.
The good news is that the groundwork has been laid to do this. The devices are all mapped properly and it’s just a matter of changing it for the specific device you are using. That was a lot of work compared to what it will be to just change it to a different device if that makes sense. Hopefully that helps!
You should have your legendary image as the first thing under “Getting started.” I was going to use the original one, thinking it would be better supported and tested, but I hadn’t realized the work you put in. It really isn’t emphasized enough.
Hey Steve,
Thanks, you are absolutely right about this. At this point it’s basically irresponsible for me to even link to the official image because we have an understanding at this point of how inadequate/broken the official image is and how much it holds the board back.
That’s mostly an artifact of the fact that the image didn’t exist when I wrote the original article. The image was actually born from a very early comment on this article. The consequence of this is that it has made my own guide basically obsolete/misleading! I’ve added some links and references here and there but honestly what it needs is a total rework because my mentality and the way I think about the i96 (and I would say this also includes most of the community of people who have used it or contributed to it as well) is completely different now than when I wrote it and I could do a much better job today.
I will definitely update this article this week to take this into account. Thank you for taking the time to leave this, I agree and thanks again!
James. I can’t believe the amount of interaction they the i96 is getting. Wow!
Hey munecito,
Welcome back, it’s great to see you again! The response has been absolutely amazing for sure. I only wish that Orange Pi had 100,000 more of them sitting in a warehouse or was still making them!
To me the project has proven that there is a fierce hunger for a sub $10 board out there. It doesn’t have to be perfect. The Raspberry Pi wasn’t perfect in the beginning when we built that community either (far from it). The Orange Pi i96 is far from perfect and everyone understands that.
It still was an amazing offering because the fact is there are great boards that are expensive and there are cheap boards that are “good enough”. The cheap boards market has essentially disappeared. Raspberry Pi cannot meet this demand and we need more companies offering products like the i96.
Orange Pi and Libre Computers are currently my two favorite board makers. Libre Computers is better at supporting their boards/images for sure than Orange Pi but Orange Pi has a much broader and more diverse product line that is also extremely aggressively priced. My site has always been about helping empower people through technology and for that to happen we need good competition and a robust low-end market.
I hope Orange Pi has taken notice of the interest and even though they aren’t producing the i96 anymore I hope it is entering in into their plans to make something in a similar spirit (I’d love to see an updated version with USB-C). Even if they could bring that to market and it still cost more than this one like $15-$20 there is absolutely a worldwide demand for it!
Faced to an issue with the Legendary i96 Debian Bullseye image: managed to flash sd card in balenaEtcher and connect the subj via TTL in picocom sign appears: orangepii96 login: and regardless what I type in (root, orangepi, whatsoever) I recieve: Debian GNU/Linux 11 orangepii96 ttyS0
What do I do wrong?
Thank you!
Hey Zhenya,
Hmmm. Does it seem like it’s letting you interact with the login prompt? Like if you type in a username does it move on to the password step?
Does it get stuck on the “Debian GNU/Linux 11 orangepii96 ttyS0” or does it take you back to the prompt and let you type again? I’ve seen before where it gets stuck for a little bit before showing the logged in screen (sometimes like even 10-20 seconds). It shouldn’t be much longer than that though for sure even on first sign in.
What is the baud rate you are using? You should be using 921600. If you use 115200 you will see a bunch of gibberish as it’s starting up and then *only* see the login prompt. Basically this is because there’s a lower level it will show at 115200 and then a higher level it will show at 921600 (the debug level). Even in the lower 115200 state it should work to let you log in but I wonder if there’s some serial issues going on here. If you are running at 115200 it may simply not be showing the screen after you logged in at that baud rate (I’m actually not sure about this off the top of my head, I thought it did show it but it would explain what you’re seeing).
I think with a little bit more information we can probably figure it out here!
James, thanks for the prompt reply! Every time I enter user name -> Debian GNU/Linux 11 orangepii96 ttyS0 appears
yes I run 115200, will try on 921600 and come back!
tried 921600 – same problem
then installed all over again on another sd card, and succeed logged in at 115200!
Hey Zhenya,
Excellent, it sounds like a bad image write or potentially even a bad SD card altogether! All too common and it’s definitely happened to me as well.
Considering that when I’m working on this I sometimes write images over and over again (like every 5-10 minutes sometimes trying new builds) it’s inevitable that I’m burning all the write cycles on these cards and some will fail (and some can fail prematurely of course as well).
I recently just picked up a 2 pack of A1 SanDisk Ultra 32GBs from Amazon for about $13 to replenish a couple of failing cards. The A1 cards are the fastest benchmarking ones and since A1 doesn’t require host support it does still benefit the i96 (A2 won’t as it requires host support which most things don’t have including the Pi).
I’m glad you got it going, enjoy and take care!