

The Orange Pi 5 has finally arrived! I received my pre-order and the board is great. So should you go out and buy it? Probably, but there are some things you should know first that you may not be expecting.
The biggest thing to know is that there is no WiFi/Bluetooth included. If you were planning on using Ethernet anyway this doesn’t have much of an impact. If you do need wireless capabilities we’ll cover what options are available.
In this review we’ll cover what you need to know about the Orange Pi 5 including it’s onboard capabilities, the available RAM options as well as benchmark the board. Let’s get started!
Hardware Used
The Orange Pi 5 the latest release from Orange Pi and is the most powerful model yet. It has a 6 core CPU and options from 4GB of RAM all the way up to 32GB of RAM!
Links: Amazon.com*, AliExpress*, Amazon.ca*, Amazon.co.uk*, Amazon.de*, Amazon.es*, Amazon.fr*, Amazon.it*, Amazon.nl*, Amazon.pl*

The Geekworm copper heatsink set is designed to fit many different single board computers. It uses thermal conductive adhesive which many “cheap” heatsink kits for SBCs don’t have. Eliminates hotspots and reduces throttling. Can be further enhanced by powered cooling over the heatsinks.
Links: Amazon.com*, Amazon.ca*, Amazon.co.jp*, Amazon.co.uk*, Amazon.de*, Amazon.es*, Amazon.fr*, Amazon.it*
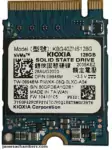
The Kioxia (Toshiba) 128GB M.2 2230 PCIe NVMe drive is much shorter than most NVMe drives (full size is 2280). It fits great with single board computers / tablets / other smaller form factors.
Links: Amazon.com*, Amazon.ca*, Amazon.co.uk*, Amazon.co.jp*, Amazon.com.au*, Amazon.de*, Amazon.es*, Amazon.fr*, Amazon.it*, Amazon.nl*, Amazon.pl*, Amazon.se*, Amazon.sg*

The Orange Pi official mouse uses 2.4GHz wireless to give you a wireless mouse experience with the Orange Pi
Links: Amazon.com*, AliExpress*

The Orange Pi monitor is meant to be a portable monitor you can take anywhere. It has a resolution of 1080P and features a hinge in the back that folds out to support the monitor.
Links: Amazon.com*, AliExpress*
Custom WiFi Module (Added 1/13/2023)
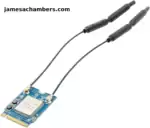
The Orange Pi 5 official wireless module is designed to fit into a M-keyed M.2 slot (the only one the Orange Pi 5 has). This WiFi adapter will work with both Linux and Android.
Links: Amazon.com*
Specifications
| CPU | 8-core 64-bit processor Big.Little Architecture: 4xCortex-A76 and 4xCortex-A55 Big core cluster is 2.4GHz Little core cluster is 1.8GHz frequency |
| GPU | Mali-G610 MP4 “Odin” GPU Compatible with OpenGL ES1.1/2.0/3.2 OpenCL 2.2 and Vulkan 1.2 3D graphics engine and 2D graphics engine |
| NPU | Built-in AI accelerator NPU with up to 6 TOPS Supports INT4/INT8/INT16 mixed operation |
| PMU | RK806-1 |
| RAM | 4GB/8GB/16GB/32GB (LPDDR4/4x) |
| Memory | QSPI Nor FLASH 16MB MicroSD (TF) Card Slot M.2 M-KEY Socket |
| USB | USB3.0 × 1 USB2.0 × 2 Type-C (USB3.1) ×1 |
| Video Output | HDMI2.1, up to 8K @60Hz DP1.4 (DisplayPort) DP 1.4 and USB 3.1 ports are multiplexed and the port is shared with Type-C 2 * MIPI D-PHY TX 4Lane Configurable up to 4K @60Hz |
| Camera | MIPI CSI 4Lane 2 * MIPI D-PHY RX 4Lane |
| Audio | CODEC: ES8388 3.5mm headphone jack audio input/output Input: Onboard MIC HDMI 2.1 eARC |
| Ethernet | 10/100/1000Mbps Ethernet |
| Expansion Port | For extending UART, PWM, I2C, SPI, CAN and GPIO interfaces. |
| M.2 M-KEY Socket Expansion Slot | Supports PCIe NVMe SSD Supports custom PCIe Wi-Fi 6 + Bluetooth 5.0 module |
| Button | 1×MaskROM key 1×Recovery key 1×On/Off key |
| Power Source | Support Type-C power supply 5V @ 4A |
| LED | Power indicator: red Status indicator: green |
| Debugging | 3 Pin debug serial port (UART) |
| Supported OS | OrangePi OS (Droid) OrangePi OS (Arch) Ubuntu Debian Android12 |
| Dimensions | 62mm*100mm |
| Weight | 46g |
Build Quality
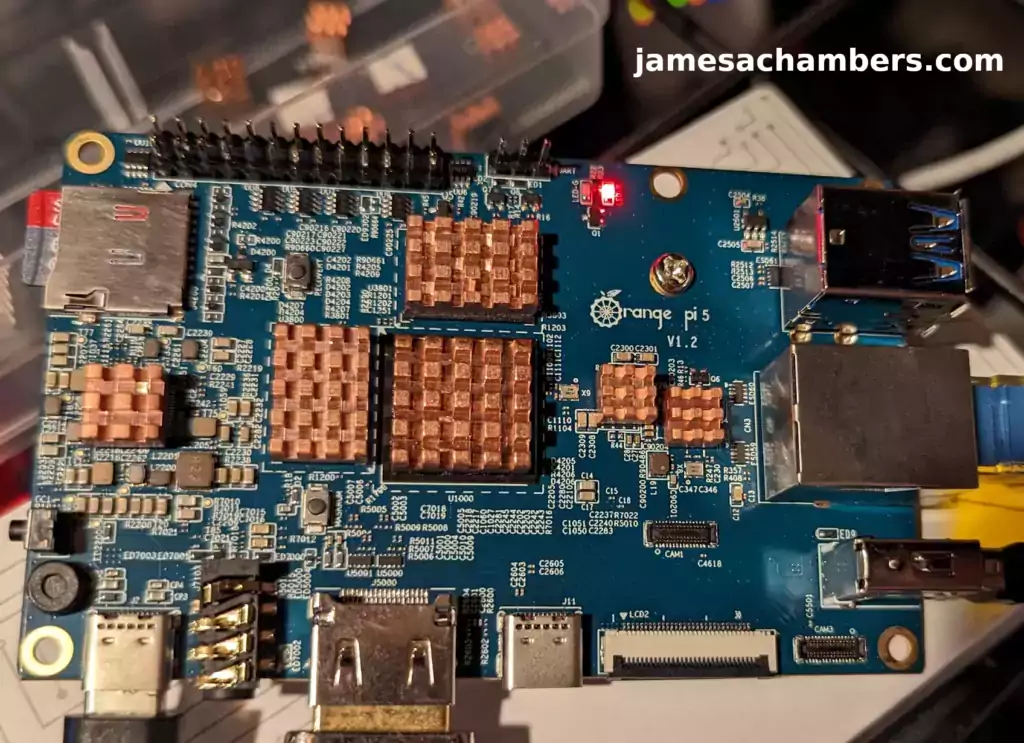
The Orange Pi 5 is built very well. Everything is clearly labeled and visible. The PCB is a nice blue color. I received board revision/version 1.2.
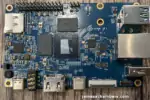
Here is the top view:

You can see the holographic effect on the RockChip CPU in the middle of the board. As you move it in the light you get a neat little effect.
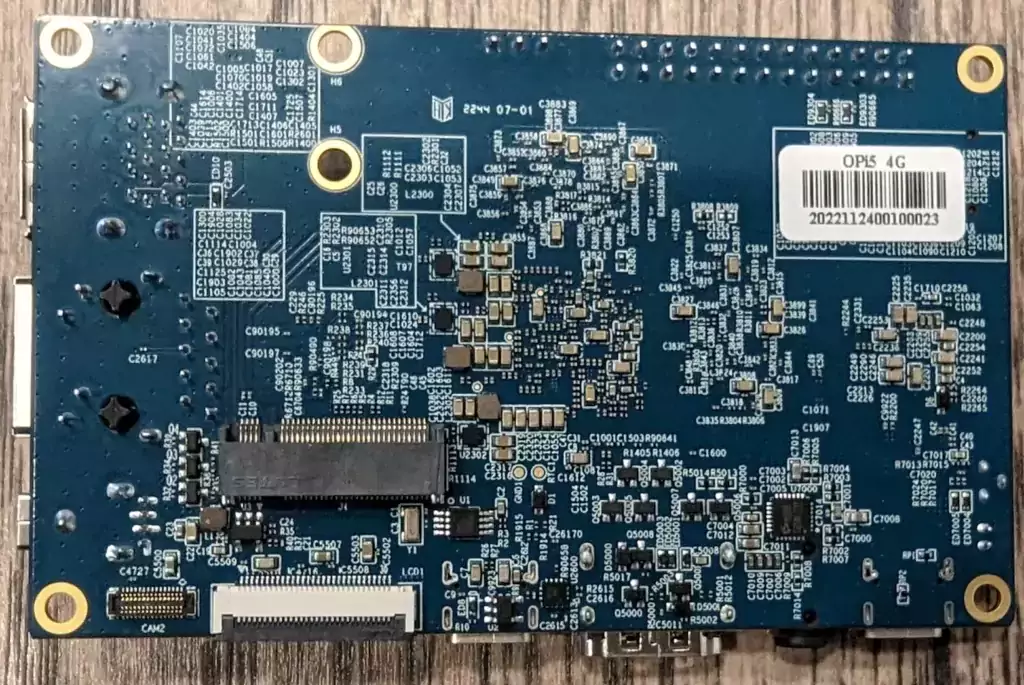
The bottom of the board only contains a few connections such as the M.2 slot, a CAM slot and a couple others.
Here’s the bottom view:
I/O Benchmarking
For the review I used a SSSTC 128GB 2230 M.2 NVMe drive. These are available on Amazon for around $10-12 (also see Kioxia 128GB M.2 2230 module*).
You can verify the performance of your drive on Pi Benchmarks using the following command:
sudo curl https://raw.githubusercontent.com/TheRemote/PiBenchmarks/master/Storage.sh | sudo bashHere are the results:
     Category                  Test                      Result
HDParm                    Disk Read                 375.32 MB/s
HDParm                    Cached Disk Read          381.15 MB/s
DD                        Disk Write                234 MB/s
FIO                       4k random read            47080 IOPS (188321 KB/s)
FIO                       4k random write           35128 IOPS (140514 KB/s)
IOZone                    4k read                   75628 KB/s
IOZone                    4k write                  67285 KB/s
IOZone                    4k random read            35874 KB/s
IOZone                    4k random write           70620 KB/s

                          Score: 17,718
The full Orange Pi 5 benchmark can be viewed here on Pi Benchmarks.
That is an outstanding score. We are getting NVMe performance. This score actually even beats my ODROID M1 benchmark.
The Orange Pi 5 is without a doubt a very powerful board and is performing exactly where it should be.
Keep in mind that this is PCIe 2.0 performance. This board does not have PCIe 3.0 (only the RK3588 proper has that, not the RK3588S).
UPDATE 1/2/2023: If you update the Orange Pi 5 firmware by using sudo orangepi-config and choosing “System->Firmware” and then choose to update the firmware I was able to get *low* PCIe 2.0 performance (about 280MB/s). I highly recommend updating the firmware with sudo orangepi-config. You may see some marginal improvements!
Due to this you should not use a powerful NVMe drive with the Orange Pi 5. You are limited in speeds to around 500MB/s at best (according to Orange Pi themselves via the user manual) and more like 250MB/s write according to the benchmarking.
If you need help setting up SSD booting see my Orange Pi 5 SSD Boot Guide here.
Benchmarking vs. Pi 4 (added 12/16/2022)
I’ve now installed my heat sinks which looks like this:
That means it’s time for a head-to-head benchmarking match against the Pi 4 to see how the Orange Pi 5 compares. For the benchmark I used the “hardinfo” benchmark which can be installed on most Linux flavors with:
sudo apt install hardinfoHere are the results:
| Test | Orange Pi 5 | Pi 4 |
| CPU Blowfish (lower is better) | 2.65s | 5.24s |
| CPU CryptoHash (higher is better) | 574.49 MiB/s | 466.37 MiB/s |
| CPU Fibonacci (lower is better) | 0.5s | 1.73s |
| CPU N-Queens (lower is better) | 4.24s | 8.74s |
| CPU Zlib (higher is better) | 0.80 | 0.31 |
| FPU FFT (lower is better) | 1.23s | 5.52s |
| FPU Raytracing (lower is better) | 2.86s | 2.18s |
| GPU Drawing (higher is better) | 2064.13 HiMarks | 1708.15 HiMarks |
That is almost a clean sweep for the Orange Pi 5! The only category it didn’t win was FPU raytracing interestingly enough. On GPU drawing performance however the Orange Pi 5 scored significantly higher and also won all other categories.
Pros / Cons
Pros
- 4 GB and 8 GB RAM variants cost under $100
- M.2 slot supports high speed NVMe storage
- RAM options from 4 GB all the way up to 32 GB available
Cons
- No WiFi or Bluetooth included (requires either adapter for the M.2 slot or a USB adapter to get WiFi/Bluetooth capabilities)
- No eMMC option
- PCIe speeds are limited to 500MB/s (PCIe 2.0, benchmarks show closer to 250MB/s write or PCIe 1.0 performance) — this is slower than SATA3
Conclusion
The Orange Pi 5 feels almost perfect except for the lack of built in WiFi / Bluetooth. This seems like a surprising choice on what seems like is portrayed as their “flagship” model. Fortunately it is easy to add WiFi/Bluetooth on the board via either the custom M.2 wireless PCB or by using one of your USB ports and just using a USB-based WiFi/BT chip.
The board performs extremely well. The GPU is powerful on the board and feels very snappy while using the desktop OS and applications. This board would be a good choice for almost any use case. It would make a great Minecraft server as well.
I’d recommend this one for just about anyone. The price is right. There are widely varying amounts of RAM available depending on what you need. There are good Linux and Android images available even at launch. At under $100 for the 4 GB – 8 GB the Orange Pi 5 is priced well in this market especially for the power and flexibility it offers!
Other Resources
I’ve also covered how to install Steam on the Orange Pi 5 here
I’ve also reviewed the Orange Pi portable monitor here (with the Orange Pi 5 connected)
If you’d like to use an alternative WiFi adapter see my E-key to M-key adapter guide here
Make sure to see my Orange Pi 5 SSD Boot Guide to see how to set up your NVMe drive to be the root partition for your OS
Don’t miss the rest of my single board computer reviews here
The Orange Pi Zero 2 is a great headless option from Orange Pi available for <$35 or so
I’ve also recently reviewed the Orange Pi 3 LTS which is a long term support variant equivalent in power roughly to a Pi 4


Hey, me again. Do you know why the Armbian builds aren’t getting built? The only builds I could find with the PR I mentioned were the ones under the heading “Rolling weekly releases,” which are based on Ubuntu 23.x and don’t seem stable (and also don’t really work with GPU acceleration).
Hey ByteAtATime,
Only the GitHub ones should be used as far as I’m aware. The ones on the site are really old. It has always been this way and I’m not sure how it works exactly but there are a lot of boards like this that you need to use the GitHub releases page to get the downloads and not the main web site. There will be issues that were fixed a long time ago plaguing the public releases quite often.
There were like 5 different versions of Armbian released just last week in the GitHub releases section. This seems to be what you are asking for. That is where the up-to-date builds are. Definitely don’t use the public site at all for any downloads.
Hopefully that helps!
Hi, I’m pretty sure they’re supposed to be rebuilt every Sunday. The update with the wifi drivers was merged on the 14th, but the latest release was over a week ago.
Hey ByteAtATime,
Was it merged into armbian-next? Or the main repository? And which repository does the main site use to generate the weekly builds?
The site says for the weekly builds “Images are receiving updates when master branch changes”. If it’s not in there I would guess that means that the changes are *not* merged into the master branch (probably main) and are instead merged into armbian-next. How long it will take to get those changes I honestly have no idea. The Armbian boot loader was broken on the main site for a good 1.5-2 months or so while the GitHub releases worked that entire time.
Definitely let me know if you figure out exactly how this build process works as I’d love to know myself!
It was merged into armbian/config:master, which I’m not sure how the logic works for.
Hey ByteAtATime,
Oh, that helps, that’s probably this then. It looks like it wasn’t showing all of the available overlays potentially.
So theoretically you shouldn’t need to wait for a new image for this. You can try running the development version (even on an older image) with:
git clone https://github.com/armbian/configcd config
bash debian-config
This will run the updated armbian-config utility. Can you try that and see if you see the option in there?
Not sure if I did it correctly, but it doesn’t seem to appear.
Oh, it just worked. Thanks!
Hey ByteAtATime,
No problem, enjoy and take care!
With the latest GITHUB code for the Orange Pi5 (Linux orangepi5-test 5.10.110-rockchip-rk3588 #1.1.2), the HARDINFO GPU Drawing scored a massive 8324.63 HiMarks.
Hey Maxwell,
That’s a very good sign! Perhaps it means that they’re finally getting the proper 3D driver support integrated into the official images. At least I’d assume that’s what it means because right now people have to use Armbian to get 3D support working properly.
Hopefully those images will be making it to the public downloads soon for everyone as that sounds very good!
The libmali-valhall-g610-g6p0-x11_1.9-1_arm64.deb croaked when I tried to create an Orange Pi5 image file, however, hacking the Ubuntu jammy install file allowed me to completed the image with the libmali-valhall-g610-g6p0-x11_1.9-1_arm64.deb installed after booting the newly created Orange Pi5 firmware. Another oddity is that compiling the kernel uses -Os (size) as the default and not speed e.g. -O2.
Hey Maxwell,
Very interesting results! Hopefully these changes get pushed out soon if they’re in the latest GitHub code. I’d love to see people getting the kind of performance you are achieving here for sure.
Thanks for sharing!
For information, I managed to recompiles the satellite tuners TBS drivers 5927 and 5520se on orange pi5 with Armbian. I had to rebuild the kernel for that, but I must admit that the process was pretty smooth.
Now with these drivers, tvheadend and kodi (with GPU hardware acceleration) I have a full satellite receiver.
Hey Tony,
Wow, fantastic work! I’ve had great experiences too rebuilding the Orange Pi kernels in the past. Their build system is pretty slick.
Thanks for sharing this! I’m sure others will want to do the same. Take care!
I have moved all addons from HA on Raspberry Pi 4 to Orange Pi 5 and left only the HA core on RPi4. The improvement of my Home Automations is enormous! I recommend to everybody. Docker, compose, mariadb, node red, influxdb, grafana, wireguard, pihole, and few others. Orange is 16GB RAM and never goes above 25%. CPU on long run never above 25%
Hey zygfryd homonto,
That’s honestly brilliant! I really should do the same. I’ve been doing a bunch of Home Assistant coverage and been using an old Tinker Board S and indeed it is slow to compile for sure.
Thanks for sharing!
Wowzers @Tony as awesome to see improvements to the user experience on the OPi 5!
@zygfyd homonto I really appreciate the work being done to have Home Assistant supported as now I have a real use case over using my RPi 4B 8GB SBC.
Hi, with my OPI 5 videos play with almost half frames dropped and there’s weird mouse “shadows” that stay there until I put my mouse over it. I’m using the official OPI OS (Ubuntu), and I’m also really new to this, so can you help solve this? Is something wrong with drivers? Thanks!
Hey ByteAtATime,
Welcome! So it’s absolutely the drivers. The only distro I know of that has 3D acceleration support is Armbian. Check out the instructions here:
Enable 3D Acceleration:sudo add-apt-repository ppa:liujianfeng1994/panfork-mesa
sudo add-apt-repository ppa:liujianfeng1994/rockchip-multimedia
sudo apt update
sudo apt dist-upgrade
sudo apt install mali-g610-firmware rockchip-multimedia-config
I have no idea if this would work on anything but Armbian. I haven’t tried that on the official OS. Those instructions are for Armbian though for sure.
I will leave it up to you whether you’d want to try using Armbian (definitely the best idea) or try using the drivers on the official OS. If you do try it on the official OS let me know if it works or not. These instructions aren’t for the official OS just to be clear though.
Hopefully that helps!
Hmm, do you think Armbian has support for the WiFi dongle? I used Armbian at first, but it didn’t seem to connect to WiFi (the official dongle).
Hey ByteAtATime,
Great question! So the issue most people have with using the WiFi on Armbian is that you need to configure the WiFi using armbian-config. Using the normal methods probably isn’t going to work (or if it works it probably won’t stick). If you go into armbian-config and set the WiFi that way it should connect pretty much immediately.
I’d try that first as Armbian definitely does have some quirks like that where they want you to do it the “Armbian way” for sure. Hopefully that helps!
I was referring to the official dongle. When I first tried to use Armbian, it didn’t install the drivers or something, but when I switched to OPI OS using
orangepi-configthere’s a System > Hardware > wifi-ap6275p option that I have to enable. Again, I’m new to this, so I’m not sure how it works, but I don’t think it works on Armbian.Hey ByteAtATime,
Got it, thanks for clarifying. Which version of Armbian are you using? Are you using the download from the Armbian site labeled “Release date: Jan 23, 2023”?
Don’t. Don’t use that one. It’s really, really old. The current version was actually only released 5 days ago. You can get it from here.
The official Orange Pi wireless adapter hasn’t been out/available for very long relatively speaking. If you go back in the comments we didn’t even have a link to this for like the first month or two of release. I think it’s definitely worth a try to try the latest version as I would be surprised if the latest builds from GitHub didn’t have support for this in by now. It’s much easier to get this adapter now / much more widely available for sure.
If you scroll down through the GitHub releases you will see how old that one on the public web site actually is. The whole first page of the releases will only take you back 2 weeks and the one on the main site is older than that. Can you try with the latest GitHub release and see if you still have this same problem with that version?
I just flashed that image, and through the same process with going into
armbian-config> System > Hardware there isn’t an option for wifi-ap6275p. I’m guessing it isn’t implemented yet. Again, I’m new, so you might come to another conclusion, but thanks for all your help!Hey ByteAtATime,
Thanks for confirming. I did some further research after your findings and I think I may have something for you. Take a look at this post here.
This looks like you just take the dtbo from the official operating system and then use it in Armbian as an overlay. I highly recommend trying this. This definitely sounds like what you need.
Hopefully that helps!
Thank you so much! I actually posted this question on the Armbian forums, and apparently it’s already been merged into Armbian. I think the best thing we can do now is wait for the weekly builds to add that in.
Post is here
PR is here
Thanks so much for all your help though! Really love your content.
Hey ByteAtATime,
Fantastic news, I’m so glad you got it going! Thanks so much for sharing those links as well. That is really help for others and to document this.
Take care!
Armbian works love ke a charm with hardware acceleration
RTL8821CU UPDATE
It appears that these USB RTL8821CU based dongles on Amazon are indeed RTL8821CUs but have tiny flash drive built in to allow for drivers to be installed in Windows. After trying to just desolder the chip, I found that it the actual chip for the RTL8821CU has a toggle mode that you can flip in Linux using the following command ‘usb_modeswitch” which you will have to download and install. Once you run it, it will switch over to the other mode and voila your RTL8821CU will show and give you 802.11ac AND Bluetooth capability. Update, I have restarted and it seemed to hold it setting, but not sure if it will from a cold boot, which means you will have to add it to your startup somewhere. Also not sure if you have add the RTL8821CU driver yourself as well since I did this very early on in the Armbian build. It might be included in the latest build.
Now this is great for Linux build (in my case Armbian w. Gnome) but not sure how I am going to solve this with Android. Hopefully a similar app exist (update: It does, but not sure if it will compatible) or I will have build it or figure out which pin puts it in this mode and either change its logic level.
In any case, a lot of progress with making my Armbian build into a little gaming system with my “GamingLens” (gamepad/QLED panel to PC/Laptop/Gaming system) that runs really well now with some network stack & a ton of GPU accelerated Waveland tweaks, as well as whitelisting the xbox controller (it is blacklisted in ‘/etc/modprobe/xboxdrv.conf’. Dare I say, it runs better than Android 12??? Yep, but sadly even Gnome doesn’t work well with touch. 🙁
Sadly, the APK did not work and this does seem to be an issue if one wants to use another cellular radio USB device, but I couldn’t get it to install because my Android 12 is not a legitimate Google Play Store device 🙁 I guess if I want it to work, I will need to compile my own version of ‘USB Modeswitch’ OR just buy a module and wire a USB connector to it, along with a separate 3.3 VDC input. The other interesting thing is these are made to be programmable via built-in UART programmer. I haven’t been able to find anything online, but I guess I can reach out to RealTek. Not sure why a vendor would only market a Windows only device anymore, but I have one more RTL8821CU based USB dongle coming in today from eBay, my hopes aren’t high that it too won’t have the built in ROM, but I hope not. If works, I will make sure to let everyone know.
Hey Owl Creek Tech,
Thanks for the update, we’ll definitely see how the last one goes here, thanks for continuing to work on it!
1st thank you James Chambers for your “how to” on setting up an NVME for Armbian. I actually cloned it using Etcher (in Armbian), but used your tips on changing the partition signature (and deleted the main partition on the SD card) so I can boot from SD to NVME. I did this so that I could change out NVMEs to boot back up into Android 12 since it the SPI was already set up to boot to it.
Armbian works pretty well for an Ubuntu/Debian build, but the work you have to go through to make to allow acceleration and then push it to Performance mode took some time. Luckily ChrisBread has some good tips and BASH terminal commands to push it to GLMARK2 ~ 5000. Sadly, I wanted to accomplish two things. Run Blender and use it for Cloud Gaming service since this is my main goal with this board. The former is next to impossible due to Blender 2.8+ requiring OpenGL 3.3 and the latest build for Ubuntu “Jammy” is Blender 3.01 which you can’t even run in software rendering mode since the 2D user interface is also OpenGL 3.3 accelerated. Others have said to just use Blender 2.79, but unless you want to break all your dependencies or go through the trouble of creating and independant build from source, Blender is not possible with Jammy. The sad thing is the Mail GPU doesn’t go past OpenGL 3.2 and Blender for ARM64 has not been optimized for Vulkan (yet). This might be the reason you don’t see Windows 11 on ARM running on anything but Snapdragon
Hey Owl Creek Tech,
Thanks, fantastic updates on Armbian! I’m glad you were able to adapt the technique. With some very slight variations (combined with working with some of the OS-specific configuration involved) you can kind of adapt that method to work with anything. Some of them are definitely trickier than others for sure though so I’m glad you met with success on yours.
Thanks for the Armbian acceleration and performance mode tips as well!