
Many things have changed since I wrote my last Raspberry Pi Minecraft Server guide. OpenJDK is now the better supported Java for Raspberry Pi and Oracle has discontinued support for Java 8 in January 2019. Java 11 is out and offers a ton of performance improvements.
The Raspberry Pi 4* has also arrived! After testing the server on the 4B 2GB version using OpenJDK 11 I was blown away by the performance and decided to write an updated guide and a script that will have you up and running in minutes.
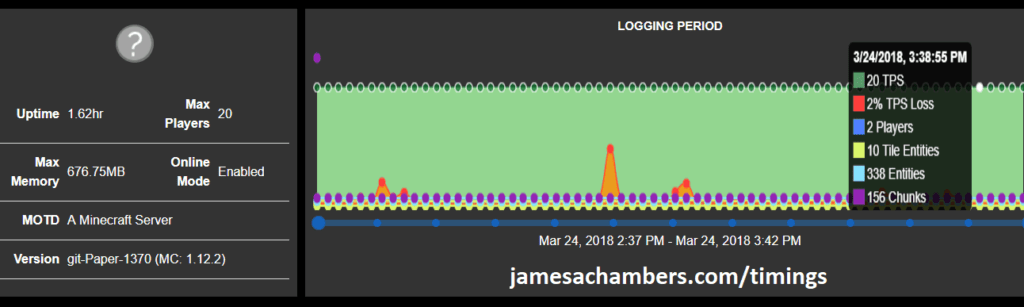
To give you a taste of how smooth the timings are in OpenJDK 11 headless using the Paper Spigot Minecraft Server here is a nearly 2 hour session I played with my girlfriend. This was played in survival mode on a brand new server so no blocks had been pregenerated and no settings were modified from the defaults. Nothing is overclocked except the SD card. There was even a village right by the spawn so many entities were in use. Here’s the timings output report:
RPI Minecraft Server Requirements

The Raspberry Pi 4 is available in different memory configurations all the way up to 8 GB. It’s about the size of a credit card and uses an extremely low amount of power making it ideal for all sorts of projects and ideas!
Links: AliExpress*, Amazon.com*, Amazon.ca*, Amazon.com.au*, Amazon*.co.jp*, Amazon.co.uk*, Amazon.de*, Amazon.es*, Amazon.fr*, Amazon.it*, Amazon.nl*, Amazon.pl*, Amazon.se*, Amazon.sg*
For a SSD setup:

The SanDisk Extreme Pro USB SSD is a true solid state drive. This is different than a typical “flash drive” which uses extremely cheap memory and has very low random I/O performance/throughput compared to a real solid state drive. I’ve used both the USB 3.1 and USB 3.2 variants with the Pi successfully and they benchmark very well!
Links: AliExpress*, Amazon.com*, Amazon.ca*, Amazon.com.au*, Amazon.co.jp*, Amazon.co.uk*, Amazon.de*, Amazon.es*, Amazon.fr*, Amazon.it*, Amazon.nl*, Amazon.pl*, Amazon.se*, Amazon.sg*
Optional and meant to be used in place of SSD. This is the best choice for performance but can be pricey. For further explanation about the benefits see this article about MicroSD vs. Solid State on the Raspberry Pi)
For a MicroSD setup:

The SanDisk Extreme A1-A2 SD card has the best scoring SD card on Pi Benchmarks for years and is second in popularity only to the SanDisk Ultra (often included in combo kits). The application class (A1) means random I/O speeds (very important when running an OS) have to meet a higher standard. There’s no benefit on the Pi for A2 right now so get whichever is cheaper/available.
Links: Amazon.com*, AliExpress*, Amazon.ca*, Amazon.com.au*, Amazon.co.jp*, Amazon.co.uk*, Amazon.de*, Amazon.es*, Amazon.fr*, Amazon.it*, Amazon.nl*, Amazon.pl*, Amazon.se*, Amazon.sg*

The CanaKit 3.5A adapter has an extra half an amp (500 mA) of capacity to give some breathing room to your accessories. This is bigger than the official Pi power supply which provides 3.0A.
Links: Amazon.com*, Amazon.ca*, Amazon.com.au*, Amazon.sg*
Minecraft Server Setup Script
I highly recommend using Docker over the standalone version for most people. Installing Docker is as simple as sudo apt install docker.io. There are 3 Docker options available:
- The Docker version that has Geyser + Floodgate installed (allowing people running Minecraft Bedrock Edition such as on iOS, Android, and console to connect)
- The Docker version that runs the Purpur Minecraft server with Geyser + Floodgate installed (allowing people running Minecraft Bedrock Edition to connect)
- The Docker version that only includes the Paper Minecraft server (the same as this standalone version)
SSH into your Raspberry Pi and type/paste the following commands:
curl https://raw.githubusercontent.com/TheRemote/RaspberryPiMinecraft/master/SetupMinecraft.sh | bash
This will start the server and configuration setup process. It will ask you some questions on how you want to configure the server and then automatically download, setup and start the server. Follow the Minecraft Server setup script in-depth guide here for a walkthrough.
… and we’re done! The Minecraft server is now in the folder “minecraft”. To start the server type:
cd minecraft
./start.sh
The server will start in the background using the screen application. To view the console type:
screen -r minecraft
From this console you can issue any command to the Minecraft server. The most important one you should know is the command to safely stop the server. This will save all players and states which is simply “stop” without the quotes.
To get out of the console without closing the server press Ctrl+A and then Ctrl+D. This will minimize the screen session and put you back in your main console session. The screen session will continue to run even if you disconnect from your SSH session to your Pi!
For a more in depth guide/walkthrough of the installation script check out this post covering the setup script in depth.
Pi Specific Performance Optimizations: Storage and GPU Memory
The most important optimization you can make is high performance storage. Read my Raspberry Pi Storage Benchmarks article to see why some storage mediums are over 1000% faster for I/O which is the most critical factor for a Raspberry Pi Minecraft server. You can also use USB adapters for mSATA SSDs (cheap on eBay) or a USB to SATA cable* if you have a 2.5″ older SSD.
If you are going to use MicroSD anyway you must use a high performance MicroSD card and overclock your SD card reader to obtain the best performance. It is normally 50hz to ensure compatibility with the cheap low quality cards but goes all the way up to 100hz. Storage speed is a major bottleneck on the Pi and this increases your read/write speeds.
The second most important optimization is setting your GPU to only use 16mb of RAM. Since RAM is at a premium on the Pi it needs need as much as possible (64 MB is used by default). This is all done in the Raspberry Pi’s /boot/config.txt file. Type:
sudo nano /boot/config.txt
Then place these lines at the bottom of your config.txt file:
dtparam=sd_overclock=100
gpu_mem=16
Now restart your Pi using
sudo reboot
That’s it! If your Pi won’t boot up after doing the SD card overclock don’t panic. Just put the SD card in any computer and remove the line dtparam=sd_overclock=100 from boot.txt. You can do it from Windows using notepad or any other text editor on any OS as the boot partition is always visible.
If you are using a older Raspberry Pi or a Raspberry Pi Zero then you may want to overclock it as well for smooth performance in game. My favorite guide for overclocking older Raspberry Pis is located at the one and only RetroPie project wiki page located here. The CPU and memory overclocking is going to be the most beneficial.
Minecraft Optimizations – The Timings Tool
If you are using an older Pi or have more than a few players using the server you may need to do some optimizations. The most important thing to understand about optimizing your Minecraft server is to understand what is slowing it down. There is an extremely useful tool built into the Paper Minecraft server called timings. In the intro to this post I posted a picture of the graphs from this report.
To start the timings measurements open up your Minecraft console with the screen -r minecraft command like I covered earlier. Once in the Minecraft console type:
timings on
The longer you take timings the better insight you will get into what is slowing down your server. It is best to play as you normally would when taking these timings so you are taking accurate measurements. To generate the report type the following:
timings report
This will give a link to paste in a web browser to view an incredibly detailed report.
Correctly Interpreting Timings
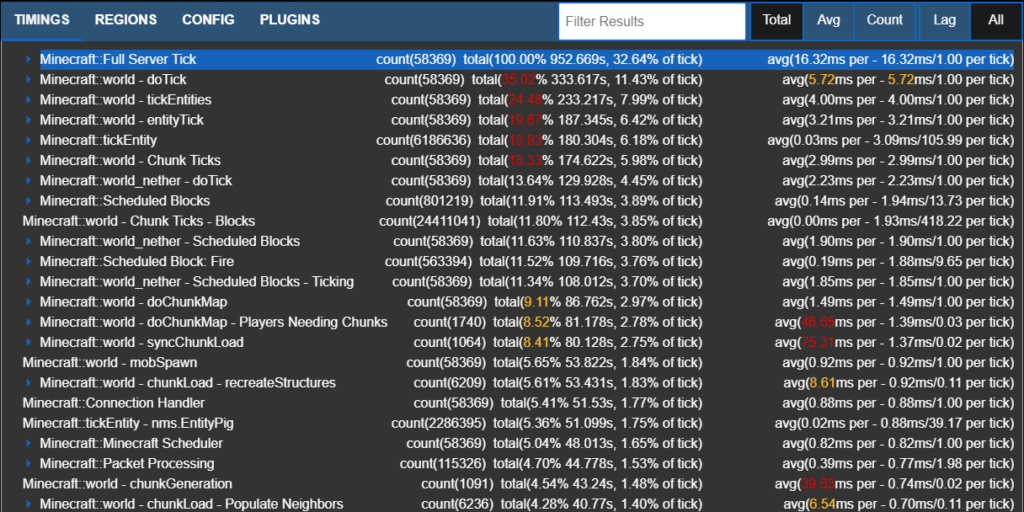
There are several different views available. It is important not to look only at the “Lag” category but also view the “All” category. If you only look at “Lag” you’re only seeing part of the picture. This is useful for identifying major “spikey” slowdowns but not the overall performance of the server. Check the “All” tab and toggle between total, average and count to understand how your server is performing.
In this example we can see some of the more expensive operations on my server are entities and chunks. Entities are monsters/animals/items/villagers/etc. Chunks are the map itself. If you are doing heavy exploring on a new server you may see very large numbers for chunks. This is due to the Pi generating them and storing them on the SD card (slow). If you are spending lots of time in villages or fighting monsters the entities may be high.
Applying Optimizations
If you are not getting good performance and you have ran the timings tool here are some of the usual suspects to look for and possible optimizations to apply:
- Be careful with mods/plugins – This is one of the most frequent causes of poor performance. Some mods massively increase the load on the server. The best way to find which plugin is doing this is to disable all plugins and enable them one at a time until you see the performance issues and have isolated the problem plugin.
- Check config files – Configuration files are server.properties, paper.yml, spigot.yml, and bukkit.yml. If unsure about what a setting does google it or consult the documentation. If you screw up your configuration unintentionally then you can revert it to default by removing the file and relaunching the server.
- Lower your entity counts/ranges – Type nano bukkit.yml and in the file you will find spawn-limits: monsters: 70 animals: 15 and several others. You may lower these numbers to limit the number of entities by type. Type nano spigot.yml and you will find entity-activation-range and entity-tracking-range. These control how close you have to be before the server starts making monsters see/track you.
- Disable the Nether and The End – In server.properties. In the sample report you will see the Nether uses CPU cycles (we never went there). When/if your group is ready to go to the Nether you can turn it back on in the properties to re-enable it. You may disable “The End” in bukkit.yml by setting allow-end: false.
- Lower the view distance – This should be a last resort but on older Pi hardware or if you want more than a handful of players this is an option. It will increase performance dramatically because it reduces chunk loading/generation. Since chunk loading/unloading/generation is very I/O intensive the Pi is not very good at it. Change it in server.properties and spigot.yml.
Benchmarking / Testing Storage
If you want to verify your drive’s performance you may want to run my storage benchmark with:
sudo curl https://raw.githubusercontent.com/TheRemote/PiBenchmarks/master/Storage.sh | sudo bash
If you search for the model of your drive on pibenchmarks.com you can compare your score with others and make sure the drive is performing correctly!
Conclusion
The Raspberry Pi performs just fine as a Minecraft server for under 5 players. You can have multiplayer in what feels and runs like a single player experience!
For optimization the most important things you can do are
- Pick the right storage (SSD or high quality Micro SD) to be able to keep up with block generation
- Run your timings! This will tell you exactly what is slowing your server down
- Keep plugins to a minimum to prevent swamping the Raspberry Pi with extra instructions
- If all else fails lower the view distance


")
> dtparam=sd_overclock=100This doesn’t seem to do anything on the pi 4. After adding to /boot/config.txt and rebooting:
root@raspberrypi:/home/pi/src# cat /sys/kernel/debug/mmc0/iosclock: 50000000 Hz
actual clock: 50000000 Hz
vdd: 21 (3.3 ~ 3.4 V)
bus mode: 2 (push-pull)
chip select: 0 (don't care)
power mode: 2 (on)
bus width: 2 (4 bits)
timing spec: 7 (sd uhs DDR50)
signal voltage: 1 (1.80 V)
driver type: 0 (driver type B)
Is there another way to overclock SD on a pi 4?
Thanks!
No. pi 4 doesn’t have overclocking of the SD.
I don’t seem to have a folder named “minecraft” anywhere.. Server appears to be running but I can’t connect on port 25565.
I used the full Rpi OS, not the lite. Hopefully that doesn’t matter.
Hi James,
How would you go about changing the world load for the server if I decide to reset, or load in an existing map?
Hey OBJ,
The world is stored in the following folders in your minecraft folder (can vary if you set the world name in server.properties, but defaults are below):
worldworld_nether
world_the_end
You can simply delete these folders or paste in other ones from somewhere else!
Thanks for the reply James, just a clarification now. So would I take the entire world folder from my pc and copy it onto the drive or just the map data?
Hey. Thank you for the guide. Unfortunately the game crashes constantly (not the pi). What can I do to fix that?
I tried undoing the overclock, changed the world. I absolutely followed your guide. Is that a known issue? Not sure if anybody will respond but I really hope so. The log says nothing about the crash.
The game crashing is a problem with the computer running it and not the Pi. Nothing changed on the Pi will address that but do some googling with any info about the crash on the PC in question and you should be able to get it going!
Hi, great guide! I had installed server version 1.12 but my client wouldn’t log in (I found I have version 1.13 on my tablet). So I started to search and found your guide. I installed everything successfully and started the server. But I can’t find it from my 1.13 client. The server is 1.14 and I don’t know how to change it (I’m running headless Raspi). At least the 1.12 I was able to see in the Friends tab 🙂
Any suggestion for me (a noob)? Thanks!