

Minecraft 1.17 (Caves and Cliffs Update) is here! This script and guide are written to help you get a great performing Raspberry Pi Minecraft server up and running in only a few minutes.
This is the standalone version. It runs on most flavors of Linux and should work on most architectures as well (arm, aarch64, etc.).
I highly recommend using Docker over the standalone version for most people. Installing Docker is as simple as sudo apt install docker.io. There are 3 Docker options available:
- The Docker version that has Geyser + Floodgate installed (allowing people running Minecraft Bedrock Edition such as on iOS, Android, and console to connect)
- The Docker version that runs the Purpur Minecraft server with Geyser + Floodgate installed (allowing people running Minecraft Bedrock Edition to connect)
- The Docker version that only includes the Paper Minecraft server (the same as this standalone version)
It’s now possible to convert your worlds between Bedrock and Java versions. Check out my guide on Chunker here for more information.
Features
- Sets up fully operational Minecraft server in a couple of minutes
- Runs the highly efficient “Paper” Minecraft server
- Raspbian / Ubuntu / Debian distributions supported
- Installs and configures OpenJDK 18
- Sets up Minecraft as a system service with option to autostart at boot
- Automatic backups to minecraft/backups when server restarts
- Updates automatically to the latest version when server is started
- Easy control of server with start.sh, stop.sh and restart.sh scripts
- Optional scheduled daily restart of Pi using cron
Requirements
- Raspberry Pi model with 1 GB of RAM or higher. Basically a Raspberry Pi 2B or higher. (No Zero unfortunately, 512MB is not enough RAM to do this, I’ve tried!)
- Headless Linux distribution such as Raspbian Buster Lite, Ubuntu Server 18.04.2, or any Debian based distribution (GUI distros can be used at the expense of available RAM and server performance)
- Solid state drive highly recommended but not required.
You can get a SSD setup on a Pi for less than most Micro SD cards cost. See my article here for details - If using MicroSD you want to be using a high range card otherwise you will really be hurting on IO when the server is reading/writing chunks of terrain! Click here for MicroSD card benchmarks/recommendations.
Recommended Gear


The Raspberry Pi 4 is available in different memory configurations all the way up to 8 GB. It’s about the size of a credit card and uses an extremely low amount of power making it ideal for all sorts of projects and ideas!
Links: Amazon.com*, AliExpress*, Amazon.ca*, Amazon.com.au*, Amazon*.co.jp*, Amazon.co.uk*, Amazon.de*, Amazon.es*, Amazon.fr*, Amazon.it*, Amazon.nl*, Amazon.pl*, Amazon.se*, Amazon.sg*

The Raspberry Pi 400 kit includes everything you need for a full Pi 400 desktop build. The Pi 400 is the fastest Raspberry Pi ever released and comes in the form factor of a keyboard!
Links: Amazon.com*, AliExpress*, Amazon.ca*, Amazon.com.au*, Amazon.co.jp*, Amazon.co.uk*, Amazon.de*, Amazon.es*, Amazon.fr*, Amazon.it*, Amazon.nl*, Amazon.pl*, Amazon.se*, Amazon.sg*

The Kingston A400 has been a great drive to use with the Pi for years. It’s reliable, widely available around the world, has low power requirements and performs very well. It’s also very affordable. This drive has been benchmarked over 1000 times at pibenchmarks.com and is the #1 most popular SSD among the Pi community!
Links: AliExpress*, Amazon.com*, Amazon.ca*, Amazon.com.au*, Amazon.co.jp*, Amazon.co.uk*, Amazon.de*, Amazon.es*, Amazon.fr*, Amazon.it*, Amazon.nl*, Amazon.pl*, Amazon.se*, Amazon.sg*

The USB 3.1 variant of the StarTech 2.5″ SATA adapter works well with the Pi 4. The USB 3.0 variant doesn’t have firmware updates available and is not recommended.
Links: Amazon.com*, Amazon.ca*, Amazon.com.au*, Amazon.co.jp*, Amazon.co.uk*, Amazon.de*, Amazon.es*, Amazon.fr*, Amazon.it*, Amazon.nl*, Amazon.pl*, Amazon.se*, Amazon.sg*
SD Card Setup:

The SanDisk Extreme A1-A2 SD card has the best scoring SD card on Pi Benchmarks for years and is second in popularity only to the SanDisk Ultra (often included in combo kits). The application class (A1) means random I/O speeds (very important when running an OS) have to meet a higher standard. There’s no benefit on the Pi for A2 right now so get whichever is cheaper/available.
Links: AliExpress*, Amazon.com*, Amazon.ca*, Amazon.com.au*, Amazon.co.jp*, Amazon.co.uk*, Amazon.de*, Amazon.es*, Amazon.fr*, Amazon.it*, Amazon.nl*, Amazon.pl*, Amazon.se*, Amazon.sg*
Choosing a Linux Distribution
The most important consideration when choosing which flavor of Linux to run the server on is simple: available RAM. Headless Linux distributions such as Raspbian Lite that don’t have a built in GUI have
Our biggest obstacle when running a Minecraft server on the Pi is available RAM since 1 GB is extremely low for this type of server. To have a playable experience you should not be running anything else on the Pi so all memory is available to be used.
After testing on many different distros I am finding Raspbian Lite and Ubuntu Server 18.04.4 32-bit to be the best choices. These distributions come with very few background processes and have rock solid support and performance.
64-bit vs 32-bit
There’s a lot of discussion in the Pi world about the up and coming aarch64 64-bit distributions vs. armhf 32-bit distributions. They have been and continue to improve dramatically. There are already use cases where 64-bit is far superior such as video encoding, advanced compression, etc.
So how about for running a Minecraft server? I have been testing extensively with Ubuntu Server 18.04 64-bit and the Debian Buster 64-bit. I have consistently had worse performance and stability than on 32-bit versions of the exact same distros.
But how can that be? It’s certainly true that Minecraft servers benefit in CPU performance from 64-bit versions of Java. The answer is actually incredibly simple: memory. The server running on a 64-bit Java Virtual Machine uses a minimum of about 100 MB more memory. This makes perfect sense because 64 bits > 32 bits by definition!
The Raspberry Pi’s 1 GB of memory has been the biggest obstacle for this project since the very beginning. Back when I first went into the Paper Minecraft developer IRC room and told them what I was trying to do I was practically laughed out of the chat room for even thinking of trying this. Most Minecraft server branches including vanilla can’t even start on the Pi because of the limited memory.
For a dedicated Minecraft server on the Pi I very highly recommend staying 32-bit. You will have more available memory which means it will be much faster and more stable. Since memory is our bottleneck the increased CPU throughput does not help us and losing *any* of our memory is disastrous!
If the Raspberry Pi 4 has more memory like we all expect it to this recommendation will change completely. Even 2 GB of memory would make the extra memory that 64-bit uses a non-issue and the CPU throughput performance gains very desirable. For now though stay 32-bit for a Minecraft server!
Tested Distributions
Raspberry Pi OS – It’s Raspbian. It has very low memory usage and is the official distribution of the Raspberry Pi. The server runs very well on this. It’s overall the best choice. The Buster release has made OpenJDK 11 available on it so it’s no longer behind the rest of the distros.
Ubuntu Server 18.04 / 20.04 – Ubuntu Server is my favorite Linux distro. I use it for nearly all of my projects. The performance of the 32-bit armhf version is on par with Raspbian. It’s a great choice! Click here for my Ubuntu setup guide for Raspberry Pi. The 64-bit version is not a fantastic choice and not recommended because of the higher memory usage. Stick with 32-bit and you’ll be a happy camper with Ubuntu Server.
Debian Buster 64-bit – Debian is the distribution Raspbian is based on. This version is a preview of Debian “Buster” which is the successor to Stretch and will be the next version of Raspbian when it is released. I like this distribution but it is currently still unofficial and unsupported. Performance and stability was less than Ubuntu and Raspbian.
Minecraft Server Installation
SSH into your Raspberry Pi and paste the following commands:
curl https://raw.githubusercontent.com/TheRemote/RaspberryPiMinecraft/master/SetupMinecraft.sh | bash
The script will setup the Minecraft sever and ask you some questions on how to configure it. I’ll explain here what they mean.
“Enter amount of memory in megabytes to dedicate to the Minecraft server” – The amount of memory that will be dedicated to the Minecraft server. The more the better, but you must leave some room for the operating system background processes.
If you exceed the total available memory either the server will crash or the Pi will get incredibly slow to the point where your SSH session will start timing out. The setup script will make a recommendation to you which is your available memory – 10% for headroom. If you aren’t sure what to put just go with the recommended amount.
Note for Raspberry Pi 4: Currently on 32-bit Raspbian 2700 MB is the maximum that Linux will let us allocate in a 32 bit environment. The script has been updated to check for this as the server will not start if it is set over 2700M on a 32 bit server. 64 bit operating systems will be able to allocate all available memory as Pi 4 support rolls out for them.
“Start Minecraft server at startup automatically (y/n)?” – This will set the Minecraft service to start automatically when your Pi boots. This is great because whenever you want to play you can just plug it in and go without having to SSH in.
“Automatically reboot Pi and update server at 4am daily (y/n)?” – This will add a cron job to the server that reboots the Pi every day at 4am. This is great because every time the server restarts it backs up the server and updates to the latest version. See the “Scheduled Daily Reboots” section below for information on how to customize the time or remove the reboot.
That is it for the setup script. The server will finish configuring and start!
Check Java Version
Sometimes if you have multiple versions of Java installed the wrong version of Java will be selected as the default. If the server didn’t start check that the right version of Java is selected with this command:
sudo update-alternatives --config java
If you get the message “update-alternatives: error: no alternatives for java” then you only have one version of Java installed and can skip to the next section.
If you are presented with a list of choices then your machine has multiple versions of Java installed. It will look like this:
update-alternatives: warning: /etc/alternatives/java has been changed (manually or by a script); switching to manual updates only
There are 2 choices for the alternative java (providing /usr/bin/java).

  Selection    Path                                            Priority   Status
------------------------------------------------------------
  0            /usr/lib/jvm/java-11-openjdk-amd64/bin/java      1101      auto mode
  1            /usr/lib/jvm/java-11-openjdk-amd64/bin/java      1101      manual mode
  2            /usr/lib/jvm/java-8-openjdk-amd64/jre/bin/java   1081      manual mode
You will usually want to just select the newest version of OpenJDK that is listed so you would type 0 and press enter. In some cases on some platforms you may want to switch to the official Oracle JDK although I strongly recommend sticking with OpenJDK!
First Run
The first time you run the server it will take a little longer to start since it is generating all the server data. If you try to log in before it fully starts you will get a connection timeout error. Watch for the line: “Timings Reset”. This is the last line that prints when the server is ready to rock and roll. At this point you will be able to connect successfully.
The very first time you log into the server it will be slow for about 1-2 minutes. This is because since nobody has logged in before the server has to scramble to generate all the chunks within your view distance (10 by default) and send them to you/store them. During this time you may not be able to see very far and if you try to destroy blocks there will be noticeable lag from when they break to when they actually disappear.
Don’t panic! This will go away within a couple of minutes as the Pi catches up with all the first time login stuff it needs to do. Performance stabilizes and it will feel very much like the offline experience after that.
If you are hosting for a few friends I’d recommend logging in for the first time right after you set up the server instead of having several people nail a blank server at first startup. This gets it out of the way and when everyone is ready to log in the starting area chunks will be fully fleshed out and the Pi just has to read them. It’s an order of magnitude faster for the Pi to read chunks than to generate and store chunks.
In my experience after the initial login exploring new parts of the server doesn’t cause any lag even though new chunks are being generated. The reason for this is that when you’re walking it’s really only having to generate a new chunk as you get close to the border instead of a huge square area of chunks in all directions and all at the same time like during the first login.
Benchmarking / Testing Storage
If you’re getting poor performance or just want to verify everything is working correctly you may want to run my storage benchmark with:
sudo curl https://raw.githubusercontent.com/TheRemote/PiBenchmarks/master/Storage.sh | sudo bash
If you search for the model of your drive on pibenchmarks.com you can compare your score with others and make sure the drive is performing correctly!
Changing Minecraft Server Version
To override the default version let’s grab a copy of the script locally:
wget https://raw.githubusercontent.com/TheRemote/RaspberryPiMinecraft/master/SetupMinecraft.shnano SetupMinecraft.sh
Now make these changes from inside nano:
Version="1.16.5"AllowLocalCopy="1"
Now press Ctrl+X to exit nano and answer “y” to save. Now let’s run the script:
chmod +x SetupMinecraft.sh
 ./SetupMinecraft.sh
And the setup will run and install the version of Minecraft you set at the top of the file!
Changing Minecraft Client Version
If you are wisely running the “stable” branch instead of the “development” branch there will be times where you need to select the version of Minecraft to run otherwise you will get an error message that your client is outdated when you try to log in.
Fortunately this is very easy. Open up the Minecraft launcher and instead of hitting “Play” choose “Launch Options” in the menu at the top of the window. It will look like this:
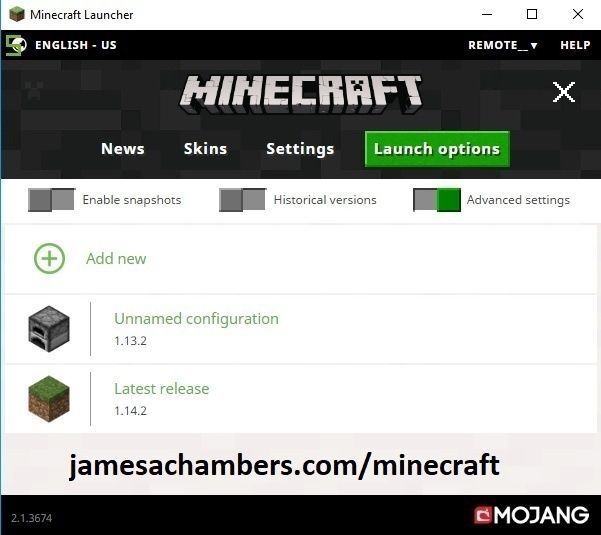
Click the “Add new” button and pick which version you want to add. You can optionally gave it a name or just click save.
Now when you go back to the “News” tab you will see a dropdown arrow where you can select which version of Minecraft you want to play!
Start, Stop and Restart Server
The server can be started, stopped and restarted two different ways. You can use the provided scripts in the Minecraft folder or you can use systemctl. Here are the commands:
cd ~/minecraft
./start.sh
./stop.sh
./restart.sh

-OR-

sudo systemctl start minecraft
sudo systemctl stop minecraft
sudo systemctl restart minecraft
Automatic Backups
The server backs up each time it starts. This helps you recover easily if something goes wrong. This system works best if you configured the server to restart daily since it means you will have a backup every day.
To access these backups type:
cd ~/minecraft/backups
ls
When a backup is made the filename will be the date and time the backup was taken. If you need to restore a backup it’s very easy. Substitute the timestamp in my example to the backup you want to roll back to. Type:
cd ~/minecraft
./stop.sh
rm -rf world world_nether world_the_end
tar -xf backups/2019.02.15.22.06.30.tar.gz
./start.sh
Your world has now been restored! It’s a good idea to download these backups off the Pi periodically just in case the Pi’s storage fails.
Scheduled Daily Reboots
The daily reboots are scheduled using cron. It’s very easy to customize the time your server restarts.
To change the time that the server restarts type: crontab -e
This will open a window that will ask you to select a text editor (I find nano to be the easiest) and will show the cronjobs scheduled on the Pi. The Minecraft one will look like the following:
0 4 * * * /home/ubuntu/minecraft/restart.sh
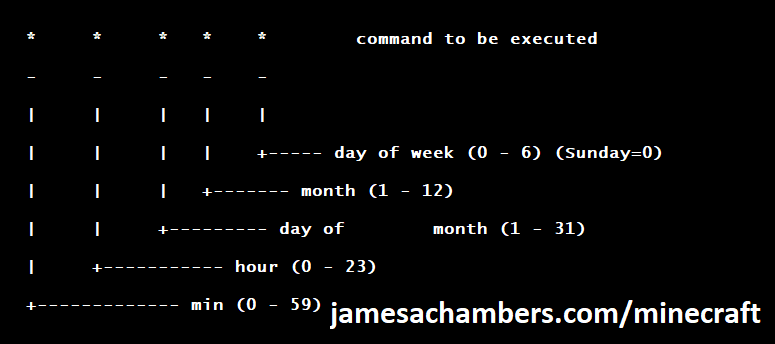
There are 5 fields here. The default restart time is set to reboot at 0 minutes of the 4th hour of the day (4 AM). The other 3 fields are left as * to represent every day of every month. Make any desired changes here and press Ctrl+X to exit nano and update the cronjob.
To remove the daily reboot simply delete the line and save.
Installing Mods / Plugins
The server supports plugins that are compatible with Bukkit / Spigot / Paper. A popular place that you can get plugins is at dev.bukkit.org where there are thousands of them!
To install a plugin you simply download the .jar to the minecraft/plugins folder and restart the server. For example, WorldGuard is a very popular plugin that lets you add protection to different areas of your server.
To install this plugin on our Minecraft server we would use the following commands:
cd ~/minecraft/plugins
curl -H "Accept-Encoding: identity" -H "Accept-Language: en" -L -A "Mozilla/5.0 (Windows NT 10.0; Win64; x64) AppleWebKit/537.36 (KHTML, like Gecko) Chrome/90.0.12.212 Safari/537.36" -o worldguard.jar https://dev.bukkit.org/projects/worldguard/files/latest
sudo systemctl restart minecraft
The reason the middle line is so long is that “robots” (roughly anything that isn’t a web browser being used by a user in this context) including scripts and utilities are blocked by the Bukkit server. The extra parameters we’re including in this line will add the location (-L) flag as well as a user agent and an identity / language header which will allow us to fetch the files without getting a 403 forbidden error.
Make sure to change “-o worldguard.jar” (second to last parameter) and the URL (very last parameter) to match the project you want to download.
The server will restart and the plugin will be installed. It’s that simple! To use the plugin refer to the documentation on the plugin download page to find out which commands you use to configure/interact with it.
Warning: be advised that plugins are the #1 issue for performance degradation on Minecraft servers. This isn’t because all plugins are bad. Some plugins are coded very inefficiently or perform features that require a lot of hooks in the code.
You should be careful about what plugins you install on the server and if you start having bad performance disable your plugins one by one until you find the culprit!
Reconfigure / Update Scripts
The scripts can always be reconfigured and updated by downloading the latest SetupMinecraft.sh and running the installer again. It will update all of the scripts in the Minecraft directory and reinstall the startup service for you.
Running SetupMinecraft.sh again will also give you a chance to reconfigure options such as the memory dedicated to the server, daily reboots, starting the server on boot, etc.
This will not overwrite your world or any other data so it is safe to run!
Port Forwarding
If everyone on your server is on the same LAN or WiFi network as you then you don’t need to do this. If you want people to connect from outside your local network then you need to set up port forwarding on your router.
The process for this is different for every router so the best thing to do is just look at your router and find the model # and put that in google with port forwarding for easy instructions on how to do it for your specific router.
You want to forward port 25565. The type of connection is TCP if your router asks. Once you do this people will be able to connect to your Minecraft server through your public IP address. This is different than your local IP which is usually a 192.x.x.x or 10.x.x.x. If you don’t know what that is just go to google and type “what’s my ip” and Google will kindly tell you!
Wired vs. Wireless
Going with an ethernet (wired) connection is going to be faster and more reliable. There’s so much wireless traffic and other interference in the air that running your server on WiFi is not recommended.
Even if it is working great 99% of the time it can ruin your experience very quickly if the WiFi drops for a couple of seconds and you get blown up by a creeper!
All that being said, the server works fine on wireless. The script will work fine as is with a wireless connection.
Upgrading
PLEASE BACK UP YOUR SERVER FIRST! The server makes automated backups by default for you in the backups folder but I recommend you back up the entire server folder yourself (basically the entire minecraft folder) any time you attempt to upgrade or downgrade. If you need to roll back to older versions it won’t work without a backup from that version or older!
The easiest way to upgrade an installation is to download the latest SetupMinecraft.sh and run it. This will automatically upgrade you to the latest version.
Upgrading and downgrading to versions that aren’t the default the script chooses is pretty simple. Simply change the Version line at the top in the SetupMinecraft.sh script:
#!/bin/bash
# Minecraft Server Installation Script - James A. Chambers - https://jamesachambers.com
# More information at https://jamesachambers.com/raspberry-pi-minecraft-server-script-with-startup-service/
# GitHub Repository: https://github.com/TheRemote/RaspberryPiMinecraft

# Minecraft server version
Version="1.16.1"
Edit this file in your favorite text editor (you can use nano or vi on the Pi like nano SetupMinecraft.sh) and change the Minecraft version to what you want.
Downgrading
PLEASE RESTORE USING A BACK UP FROM THE VERSION YOU ARE DOWNGRADING TO
If you are having problems on a newer version of Minecraft and want to downgrade you can do so using a complete backup of your server before you ran it on a newer version.
The reason you can’t take server data that has been touched by a version such as 1.17 and go back to 1.16 is that the new version adds all sorts of new data types/structures for the new content into your server data files. If you try to roll back the old versions of the Minecraft server will not understand these data types since they didn’t exist in that version and will crash.
As long as you use a backup for your server files from that version (or older) it’s as simple as changing the version in SetupMinecraft.sh just like I show in the “Upgrading” section.
You can upgrade any old version of Minecraft to any version, but again make sure you have a backup first as it is a one way street and you will need that backup if you want to roll back!
Troubleshooting Note – Oracle Virtual Machines
A very common problem people have with the Oracle Virtual Machine tutorials out there that typically show you how to use a free VM is that the VM is much more difficult to configure than just about any other product / offering out there.
It is because there are several steps you need to take to open the ports on the Oracle VM. You need to both:
- Set the ingress ports (TCP/UDP) in the Virtual Cloud Network (VCN) security list
- *and* set the ingress ports in a Network Security Group assigned to your instance
Both of these settings are typically required before you will be able to connect to your VM instance. This is purely configuration related and has nothing to do with the script or the Minecraft server itself.
I do not recommend this platform due to the configuration difficulty but the people who have gone through the pain of configuring an Oracle VM have had good experiences with it after that point. Just keep in mind it’s going to be a rough ride through the configuration for most people.
Troubleshooting Note – Hyper-V
There is a weird bug in Hyper-V that breaks UDP connections on the Minecraft server. The fix for this is that you have to use a Generation 1 VM with the Legacy LAN network driver.
Version History
To view the version history check out the GitHub README here:
Update History – RaspberryPiMinecraft – Official GitHub Page
Other Resources
If you’re trying to set up SSD / USB storage booting check out my Raspberry Pi USB booting setup guide
For benchmarks and recommendations on the fastest storage drives/adapters for the Raspberry Pi check out my 2021 Storage Roundup
If you’re having firmware issues and need to update/restore your firmware check out my Raspberry Pi firmware guide here


Hi James,
your Script seems to have a Bug. I have a Raspberry 3 Modell B with 1GB RAM. Your Script still recommends to dedicate 2700 MB of RAM to Minecraft Server.
Getting total system memory...Total memory: 976 - Available Memory: 869
Please enter the amount of memory you want to dedicate to the server. A minimum of 700MB is recommended.
Total memory: 976 - Available Memory: 2700
You must leave enough left over memory for the operating system to run background processes.
If all memory is exhausted the Minecraft server will either crash or force background processes into the paging file (very slow).
Enter amount of memory in megabytes to dedicate to the Minecraft server (recommended: 2700): 800
Amount of memory for Minecraft server selected: 800 MB
Ugh! Thanks for the heads up David, I have fixed it!
Thanks for your work man!
I wanted to push my pull request, but I wasn’t fast enough ::)
Great tutorial and script. Dumb question, though. Once I’ve exited the SSH session and relog into the Pi (which is running the server correctly), how do I re-access the server console instead of just the terminal screen for the pi?
Hey Drew,
It is screen -r minecraft to bring it back up!
Thanks much!
And use CTRL-A then CTRL-D to close it and leave the server running, if you use CTRL-C it kills the server process too.
Hi James,
How is the server performance when playing on a private server with friends on the 4GB board with SSD? Do you know how many concurrent players it can handle with those specs?
I’ll be playing mostly with 2-5 people at the most, maybe 6 (very rare) and would like to know if it would be a good investment or should I stick with my amazon server.
Thanks,
Lucas Cunha
Hey Lucas,
This is a great question and there are a few things to consider:
Is your Amazon server running great or is it not that awesome? Is it free/cheaper than a Pi? If it’s already not running that well or is costing a lot of money that would definitely weigh in the favor of trying it.
Is this a normal survival server or is it a creative server where everyone has admin and can fly at the speed of light? Survival will be fine, but a bunch of people flying everywhere can put the Pi under some pressure.
Are you using a lot of plugins or any really heavy performance impact plugins? A few is okay, if you are running a lot or some really demanding ones then you may have some slowdowns.
Are your other players relatively close to you (in your town or nearby) or are they spread out? Amazon pays for a much higher grade of bandwidth than consumers get at home and their routes to people (especially internationally) can go over shorter paths which leads to lower pings/latency.
How fast and stable is your home internet connection? If you have fiber or high quality/latency cable/DSL (>50 Mbps) you should be fine. If you have low grade DSL or cable (<30mbit) you may not want to subject your players to that.
Are you comfortable configuring the firewall on your router to allow for port forwarding? If no then definitely not!
My gut reaction is to tell you yes you should because I love playing with this stuff and think it's awesome! But because I don't want to give anyone here bad advice I am going to have to say it very much depends on a lot of things. If you want to elaborate any further on some of these points with more details about the setup I definitely can help giving ideas of things you may run into!
I would say that if the Pi isn't a significant investment for you that it would definitely be a lot of fun and a great learning experience to get one and give it a try!
Hey James,
Let me try to answers those the best I can.
It is a survival server on vanilla at the moment. We do not plan to use any plugins, might be a thing in the future but we are mostly focused on the vanilla experience. Using paper would be most to squeeze more performance out of it than anything plugin related (although like I said, we do not discard some plugins in the future).
It’s a new server and we only played with 3 people simultaneously, from what we could notice it’s doing pretty good right now but I’m being very conservative with the size of the instance that I’m using right now (t3.small). We could move to a bigger one if we start to notice some big issues with it. It’s not costing me much money because it automatically shuts down when there is nobody online. The advantage of the PI would be a 24/7 server that I don’t need to start it up every time we need to play and would only cost me the energy that is an insignificant cost (besides the initial investment). The Amazon server would cost me too much to stay online 24/7 and that’s why we turn it on when we need to use it and we shut it down when we don’t need. We do that because we are all adults with jobs and we don’t have too much time to play, so leaving an amazon machine running 24/7 is a waste of money. However, I don’t think that with a PI would be since I could use to something else if we decide to stop playing for example.
Players are a bunch of online friends from Brazil, some will be closer to my location (same town or 100 miles out), and there are a couple that will be a little bit further away (350 and 600 miles).
The internet is a Fiber connection >50Mbps, so I don’t think that’s a problem. Also, configuring the port forwarding would not be a problem too.
My only concern with the PI would be the slower clock rate of the processor, I don’t know how that would affect the experience of the scenario mentioned above. At the end of the day, if it would hold up and not lag for us, I would much prefer having my server hosted on a PI on my house than on an Amazon server.
Hope that my little wall of text above gave you some info of what we need.
Thanks for the attention James, much appreciated.
Hey Lucas,
That helps a ton! In my opinion your conditions are ideal to switch. I run almost exclusively vanilla settings myself and a very important part of this Minecraft project to me was that the Pi be able to run a full vanilla experience at view distance 10 (true vanilla settings). Although I’m all about the vanilla I still run all my servers on Paper for the performance gains!
You also have fiber internet and can port forward (these are the biggest obstacles that cause problems for home setups with people connecting from outside).
As far as the CPU usage goes the Pi 4 is doing really well. When 1.14 first came out it was horrible across the board (even 5 figure enterprise servers were lagging!) but they finally fixed the high CPU usage in 1.14.4. While running top there were times I was seeing as low as 15%. When I first started this project on the early Pi revisions the CPU usage was almost always 100% or higher (meaning it’s behind and losing some TPS) but the ARM processor was only 1000 (as low as 700 for even earlier models) and now we are up to 1500 MHz and 4 cores. The RAM speed has also MASSIVELY increased on the Pi 4 going from 500 MHz all the way up to 3200 MHz thanks to PCI Express.
There’s definitely been no better time to do a Pi Minecraft server with USB 3.0, 4 GB of RAM available and much faster processing and memory. Just a year or two ago on the first startup of the Minecraft server (like a brand new totally blank server that nobody has been on before) when using a SD card it would take literally 1-2 minutes for all the chunks to populate and after that it stabilized and you could move and break blocks normally without any visual delay. In contrast, during my 4 GB RAM testing last night it was maybe 5-6 seconds before everything populated which puts it really close to some of my 4-5 year old X86_64 garage boxes (crazy impressive for a SBC and not something I thought I’d see for a few more years).
Your storage pick will be a pretty important choice. I know you said you wanted to use a SSD which is 100% the right choice. Before you drop any cash though be sure to check out the storage benchmarks section of the site. I made this benchmark so Pi users all over the world with all kinds of devices could all benchmark using the exact same testing methodology so we have a better understanding of what people are using and most importantly which ones are the fastest/best value. It should come in handy when it comes time to compare storage options and performance!
For the entire setup including the Pi, a solid state drive and the USB to SATA adapter your total cost all together should be well under $100. The Kingston A400 drive I have linked in the article is only around 20 bucks and the adapter cable is around 6. Financially this should pay for itself very quickly!
Hey! Using the Pi 4 4gb with a fresh install of rasbian Buster. I keep getting this error…
“Setup is complete. Starting Minecraft server…
There is no screen to be resumed matching minecraft.”
I have tried executing start.sh a bunch of times and rebooted, ran setup a bunch, and it still wont start. Any ideas?
Hey Jordan,
It has been a minute since I have been on Buster but my new version fixed a lot of issues related to this. Can you try running my latest version on Buster and report back?
I am exceedingly new to the world of pi so maybe dumb question. Followed this guide but cannot seem to see the server on my local network. I can Ping the pi, but cannot seem to find the server. or connect to its IP. any useful Advice?
Hey Brandon,
Can you try downloading the latest version? I have gone through and fixed/cleaned up a bunch of things!
Found out my Java wasn’t up to date, and that when asked to choose the size of allotted space you should not put mb at the end. Thank you for you for the replay. Keep up the great work!
Awesome, I should probably check for M or MB and drop it just to help validate the input and prevent anyone from being stuck on that! Thanks for following up!
is there anyway to limit the amount of backups it can do before it starts deleting older saves for new ones?
Hey Jamie,
There isn’t currently because I had not thought of that! I think this is a worthy thing to add in as an option.
Hello,
Fantastic post, very easy to use. Everything installed like a charm on a brand new Raspbian Lite, v1.14.4, with a benchmark result of ~1100, using 100mhz sd card and 860mb or ram. As soon as I launch it though it says
[05:02:45 WARN]: Can't keep up! Is the server overloaded? Running 31619ms or 632 ticks behind[05:03:23 WARN]: Can't keep up! Is the server overloaded? Running 8019ms or 160 ticks behind
etc. etc.
I am wondering what I could do to help on this. Anyone has an idea?
Thanks!
Hey Jonathan,
This is fairly ordinary when you first start a server on 1.14. If you see the times in the log the first time it is behind by over 30 seconds (31619ms). Then the second delay is much shorter at 8 seconds. After this there may be one or two more messages with a delay of 100-200ms or something and then they should stop entirely.
This message should continue to appear less frequently and eventually go away as the server development continues. Right now it can be safely ignored unless the delays are increasing or it happens out of nowhere which would indicate something is causing lag on the server.
Thanks James for the quick answer!
I will try and let my kids play on it for a while and see if it continues.
Otherwise, what could cause a delay on the server since it is brand new?
Great question! The biggest cause of delays on brand new servers is that no blocks/chunks are generated on the server. When you log into the server it is completely empty and it needs to generate the entire world around you.
After this initial big area is generated the server will generate new blocks/chunks out on the edge as you explore. This is much less intense than calculating the entire starting region in every direction as far as you can see and generally you will not notice it unless you are “flying” across the server as fast as possible in which case sometimes you can see it getting behind as the chunks generate and appear.
Once the chunks are generated they are stored on the disk. This is much faster than calculating every single block again any time we need them. The faster the storage you have, the faster it is to retrieve/store these chunks.
On a new server once all these starting area chunks are generated subsequent loadups (and joins for new players) will be much faster since the server just has to load the chunk from the disk instead of calculate each block 1 by 1) and you should see the delay message less (maybe once or twice after restarting the server and then never again for the rest of the session).
Ahhh details! I like details!
Thanks for the details!
Now if I could make my external SSD work everything would be perfect!