

Minecraft 1.17 (Caves and Cliffs Update) is here! This script and guide are written to help you get a great performing Raspberry Pi Minecraft server up and running in only a few minutes.
This is the standalone version. It runs on most flavors of Linux and should work on most architectures as well (arm, aarch64, etc.).
I highly recommend using Docker over the standalone version for most people. Installing Docker is as simple as sudo apt install docker.io. There are 3 Docker options available:
- The Docker version that has Geyser + Floodgate installed (allowing people running Minecraft Bedrock Edition such as on iOS, Android, and console to connect)
- The Docker version that runs the Purpur Minecraft server with Geyser + Floodgate installed (allowing people running Minecraft Bedrock Edition to connect)
- The Docker version that only includes the Paper Minecraft server (the same as this standalone version)
It’s now possible to convert your worlds between Bedrock and Java versions. Check out my guide on Chunker here for more information.
Features
- Sets up fully operational Minecraft server in a couple of minutes
- Runs the highly efficient “Paper” Minecraft server
- Raspbian / Ubuntu / Debian distributions supported
- Installs and configures OpenJDK 18
- Sets up Minecraft as a system service with option to autostart at boot
- Automatic backups to minecraft/backups when server restarts
- Updates automatically to the latest version when server is started
- Easy control of server with start.sh, stop.sh and restart.sh scripts
- Optional scheduled daily restart of Pi using cron
Requirements
- Raspberry Pi model with 1 GB of RAM or higher. Basically a Raspberry Pi 2B or higher. (No Zero unfortunately, 512MB is not enough RAM to do this, I’ve tried!)
- Headless Linux distribution such as Raspbian Buster Lite, Ubuntu Server 18.04.2, or any Debian based distribution (GUI distros can be used at the expense of available RAM and server performance)
- Solid state drive highly recommended but not required.
You can get a SSD setup on a Pi for less than most Micro SD cards cost. See my article here for details - If using MicroSD you want to be using a high range card otherwise you will really be hurting on IO when the server is reading/writing chunks of terrain! Click here for MicroSD card benchmarks/recommendations.
Recommended Gear


The Raspberry Pi 4 is available in different memory configurations all the way up to 8 GB. It’s about the size of a credit card and uses an extremely low amount of power making it ideal for all sorts of projects and ideas!
Links: Amazon.com*, AliExpress*, Amazon.ca*, Amazon.com.au*, Amazon*.co.jp*, Amazon.co.uk*, Amazon.de*, Amazon.es*, Amazon.fr*, Amazon.it*, Amazon.nl*, Amazon.pl*, Amazon.se*, Amazon.sg*

The Raspberry Pi 400 kit includes everything you need for a full Pi 400 desktop build. The Pi 400 is the fastest Raspberry Pi ever released and comes in the form factor of a keyboard!
Links: Amazon.com*, AliExpress*, Amazon.ca*, Amazon.com.au*, Amazon.co.jp*, Amazon.co.uk*, Amazon.de*, Amazon.es*, Amazon.fr*, Amazon.it*, Amazon.nl*, Amazon.pl*, Amazon.se*, Amazon.sg*

The Kingston A400 has been a great drive to use with the Pi for years. It’s reliable, widely available around the world, has low power requirements and performs very well. It’s also very affordable. This drive has been benchmarked over 1000 times at pibenchmarks.com and is the #1 most popular SSD among the Pi community!
Links: AliExpress*, Amazon.com*, Amazon.ca*, Amazon.com.au*, Amazon.co.jp*, Amazon.co.uk*, Amazon.de*, Amazon.es*, Amazon.fr*, Amazon.it*, Amazon.nl*, Amazon.pl*, Amazon.se*, Amazon.sg*

The USB 3.1 variant of the StarTech 2.5″ SATA adapter works well with the Pi 4. The USB 3.0 variant doesn’t have firmware updates available and is not recommended.
Links: Amazon.com*, Amazon.ca*, Amazon.com.au*, Amazon.co.jp*, Amazon.co.uk*, Amazon.de*, Amazon.es*, Amazon.fr*, Amazon.it*, Amazon.nl*, Amazon.pl*, Amazon.se*, Amazon.sg*
SD Card Setup:

The SanDisk Extreme A1-A2 SD card has the best scoring SD card on Pi Benchmarks for years and is second in popularity only to the SanDisk Ultra (often included in combo kits). The application class (A1) means random I/O speeds (very important when running an OS) have to meet a higher standard. There’s no benefit on the Pi for A2 right now so get whichever is cheaper/available.
Links: AliExpress*, Amazon.com*, Amazon.ca*, Amazon.com.au*, Amazon.co.jp*, Amazon.co.uk*, Amazon.de*, Amazon.es*, Amazon.fr*, Amazon.it*, Amazon.nl*, Amazon.pl*, Amazon.se*, Amazon.sg*
Choosing a Linux Distribution
The most important consideration when choosing which flavor of Linux to run the server on is simple: available RAM. Headless Linux distributions such as Raspbian Lite that don’t have a built in GUI have
Our biggest obstacle when running a Minecraft server on the Pi is available RAM since 1 GB is extremely low for this type of server. To have a playable experience you should not be running anything else on the Pi so all memory is available to be used.
After testing on many different distros I am finding Raspbian Lite and Ubuntu Server 18.04.4 32-bit to be the best choices. These distributions come with very few background processes and have rock solid support and performance.
64-bit vs 32-bit
There’s a lot of discussion in the Pi world about the up and coming aarch64 64-bit distributions vs. armhf 32-bit distributions. They have been and continue to improve dramatically. There are already use cases where 64-bit is far superior such as video encoding, advanced compression, etc.
So how about for running a Minecraft server? I have been testing extensively with Ubuntu Server 18.04 64-bit and the Debian Buster 64-bit. I have consistently had worse performance and stability than on 32-bit versions of the exact same distros.
But how can that be? It’s certainly true that Minecraft servers benefit in CPU performance from 64-bit versions of Java. The answer is actually incredibly simple: memory. The server running on a 64-bit Java Virtual Machine uses a minimum of about 100 MB more memory. This makes perfect sense because 64 bits > 32 bits by definition!
The Raspberry Pi’s 1 GB of memory has been the biggest obstacle for this project since the very beginning. Back when I first went into the Paper Minecraft developer IRC room and told them what I was trying to do I was practically laughed out of the chat room for even thinking of trying this. Most Minecraft server branches including vanilla can’t even start on the Pi because of the limited memory.
For a dedicated Minecraft server on the Pi I very highly recommend staying 32-bit. You will have more available memory which means it will be much faster and more stable. Since memory is our bottleneck the increased CPU throughput does not help us and losing *any* of our memory is disastrous!
If the Raspberry Pi 4 has more memory like we all expect it to this recommendation will change completely. Even 2 GB of memory would make the extra memory that 64-bit uses a non-issue and the CPU throughput performance gains very desirable. For now though stay 32-bit for a Minecraft server!
Tested Distributions
Raspberry Pi OS – It’s Raspbian. It has very low memory usage and is the official distribution of the Raspberry Pi. The server runs very well on this. It’s overall the best choice. The Buster release has made OpenJDK 11 available on it so it’s no longer behind the rest of the distros.
Ubuntu Server 18.04 / 20.04 – Ubuntu Server is my favorite Linux distro. I use it for nearly all of my projects. The performance of the 32-bit armhf version is on par with Raspbian. It’s a great choice! Click here for my Ubuntu setup guide for Raspberry Pi. The 64-bit version is not a fantastic choice and not recommended because of the higher memory usage. Stick with 32-bit and you’ll be a happy camper with Ubuntu Server.
Debian Buster 64-bit – Debian is the distribution Raspbian is based on. This version is a preview of Debian “Buster” which is the successor to Stretch and will be the next version of Raspbian when it is released. I like this distribution but it is currently still unofficial and unsupported. Performance and stability was less than Ubuntu and Raspbian.
Minecraft Server Installation
SSH into your Raspberry Pi and paste the following commands:
curl https://raw.githubusercontent.com/TheRemote/RaspberryPiMinecraft/master/SetupMinecraft.sh | bash
The script will setup the Minecraft sever and ask you some questions on how to configure it. I’ll explain here what they mean.
“Enter amount of memory in megabytes to dedicate to the Minecraft server” – The amount of memory that will be dedicated to the Minecraft server. The more the better, but you must leave some room for the operating system background processes.
If you exceed the total available memory either the server will crash or the Pi will get incredibly slow to the point where your SSH session will start timing out. The setup script will make a recommendation to you which is your available memory – 10% for headroom. If you aren’t sure what to put just go with the recommended amount.
Note for Raspberry Pi 4: Currently on 32-bit Raspbian 2700 MB is the maximum that Linux will let us allocate in a 32 bit environment. The script has been updated to check for this as the server will not start if it is set over 2700M on a 32 bit server. 64 bit operating systems will be able to allocate all available memory as Pi 4 support rolls out for them.
“Start Minecraft server at startup automatically (y/n)?” – This will set the Minecraft service to start automatically when your Pi boots. This is great because whenever you want to play you can just plug it in and go without having to SSH in.
“Automatically reboot Pi and update server at 4am daily (y/n)?” – This will add a cron job to the server that reboots the Pi every day at 4am. This is great because every time the server restarts it backs up the server and updates to the latest version. See the “Scheduled Daily Reboots” section below for information on how to customize the time or remove the reboot.
That is it for the setup script. The server will finish configuring and start!
Check Java Version
Sometimes if you have multiple versions of Java installed the wrong version of Java will be selected as the default. If the server didn’t start check that the right version of Java is selected with this command:
sudo update-alternatives --config java
If you get the message “update-alternatives: error: no alternatives for java” then you only have one version of Java installed and can skip to the next section.
If you are presented with a list of choices then your machine has multiple versions of Java installed. It will look like this:
update-alternatives: warning: /etc/alternatives/java has been changed (manually or by a script); switching to manual updates only
There are 2 choices for the alternative java (providing /usr/bin/java).

  Selection    Path                                            Priority   Status
------------------------------------------------------------
  0            /usr/lib/jvm/java-11-openjdk-amd64/bin/java      1101      auto mode
  1            /usr/lib/jvm/java-11-openjdk-amd64/bin/java      1101      manual mode
  2            /usr/lib/jvm/java-8-openjdk-amd64/jre/bin/java   1081      manual mode
You will usually want to just select the newest version of OpenJDK that is listed so you would type 0 and press enter. In some cases on some platforms you may want to switch to the official Oracle JDK although I strongly recommend sticking with OpenJDK!
First Run
The first time you run the server it will take a little longer to start since it is generating all the server data. If you try to log in before it fully starts you will get a connection timeout error. Watch for the line: “Timings Reset”. This is the last line that prints when the server is ready to rock and roll. At this point you will be able to connect successfully.
The very first time you log into the server it will be slow for about 1-2 minutes. This is because since nobody has logged in before the server has to scramble to generate all the chunks within your view distance (10 by default) and send them to you/store them. During this time you may not be able to see very far and if you try to destroy blocks there will be noticeable lag from when they break to when they actually disappear.
Don’t panic! This will go away within a couple of minutes as the Pi catches up with all the first time login stuff it needs to do. Performance stabilizes and it will feel very much like the offline experience after that.
If you are hosting for a few friends I’d recommend logging in for the first time right after you set up the server instead of having several people nail a blank server at first startup. This gets it out of the way and when everyone is ready to log in the starting area chunks will be fully fleshed out and the Pi just has to read them. It’s an order of magnitude faster for the Pi to read chunks than to generate and store chunks.
In my experience after the initial login exploring new parts of the server doesn’t cause any lag even though new chunks are being generated. The reason for this is that when you’re walking it’s really only having to generate a new chunk as you get close to the border instead of a huge square area of chunks in all directions and all at the same time like during the first login.
Benchmarking / Testing Storage
If you’re getting poor performance or just want to verify everything is working correctly you may want to run my storage benchmark with:
sudo curl https://raw.githubusercontent.com/TheRemote/PiBenchmarks/master/Storage.sh | sudo bash
If you search for the model of your drive on pibenchmarks.com you can compare your score with others and make sure the drive is performing correctly!
Changing Minecraft Server Version
To override the default version let’s grab a copy of the script locally:
wget https://raw.githubusercontent.com/TheRemote/RaspberryPiMinecraft/master/SetupMinecraft.shnano SetupMinecraft.sh
Now make these changes from inside nano:
Version="1.16.5"AllowLocalCopy="1"
Now press Ctrl+X to exit nano and answer “y” to save. Now let’s run the script:
chmod +x SetupMinecraft.sh
 ./SetupMinecraft.sh
And the setup will run and install the version of Minecraft you set at the top of the file!
Changing Minecraft Client Version
If you are wisely running the “stable” branch instead of the “development” branch there will be times where you need to select the version of Minecraft to run otherwise you will get an error message that your client is outdated when you try to log in.
Fortunately this is very easy. Open up the Minecraft launcher and instead of hitting “Play” choose “Launch Options” in the menu at the top of the window. It will look like this:
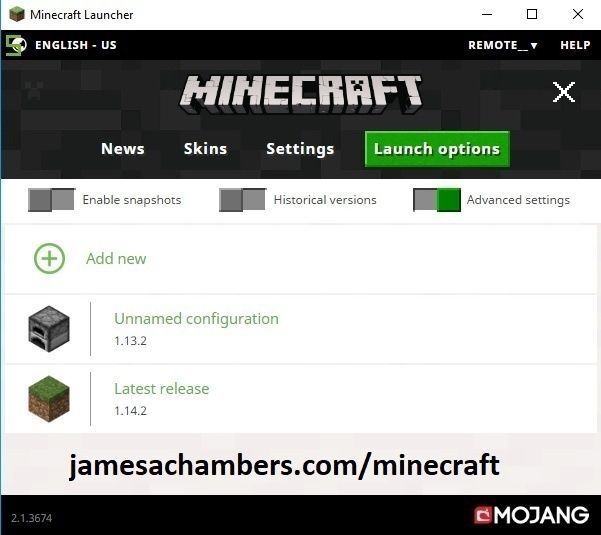
Click the “Add new” button and pick which version you want to add. You can optionally gave it a name or just click save.
Now when you go back to the “News” tab you will see a dropdown arrow where you can select which version of Minecraft you want to play!
Start, Stop and Restart Server
The server can be started, stopped and restarted two different ways. You can use the provided scripts in the Minecraft folder or you can use systemctl. Here are the commands:
cd ~/minecraft
./start.sh
./stop.sh
./restart.sh

-OR-

sudo systemctl start minecraft
sudo systemctl stop minecraft
sudo systemctl restart minecraft
Automatic Backups
The server backs up each time it starts. This helps you recover easily if something goes wrong. This system works best if you configured the server to restart daily since it means you will have a backup every day.
To access these backups type:
cd ~/minecraft/backups
ls
When a backup is made the filename will be the date and time the backup was taken. If you need to restore a backup it’s very easy. Substitute the timestamp in my example to the backup you want to roll back to. Type:
cd ~/minecraft
./stop.sh
rm -rf world world_nether world_the_end
tar -xf backups/2019.02.15.22.06.30.tar.gz
./start.sh
Your world has now been restored! It’s a good idea to download these backups off the Pi periodically just in case the Pi’s storage fails.
Scheduled Daily Reboots
The daily reboots are scheduled using cron. It’s very easy to customize the time your server restarts.
To change the time that the server restarts type: crontab -e
This will open a window that will ask you to select a text editor (I find nano to be the easiest) and will show the cronjobs scheduled on the Pi. The Minecraft one will look like the following:
0 4 * * * /home/ubuntu/minecraft/restart.sh
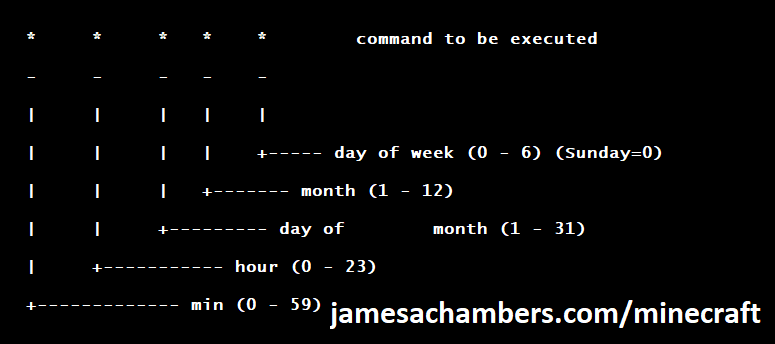
There are 5 fields here. The default restart time is set to reboot at 0 minutes of the 4th hour of the day (4 AM). The other 3 fields are left as * to represent every day of every month. Make any desired changes here and press Ctrl+X to exit nano and update the cronjob.
To remove the daily reboot simply delete the line and save.
Installing Mods / Plugins
The server supports plugins that are compatible with Bukkit / Spigot / Paper. A popular place that you can get plugins is at dev.bukkit.org where there are thousands of them!
To install a plugin you simply download the .jar to the minecraft/plugins folder and restart the server. For example, WorldGuard is a very popular plugin that lets you add protection to different areas of your server.
To install this plugin on our Minecraft server we would use the following commands:
cd ~/minecraft/plugins
curl -H "Accept-Encoding: identity" -H "Accept-Language: en" -L -A "Mozilla/5.0 (Windows NT 10.0; Win64; x64) AppleWebKit/537.36 (KHTML, like Gecko) Chrome/90.0.12.212 Safari/537.36" -o worldguard.jar https://dev.bukkit.org/projects/worldguard/files/latest
sudo systemctl restart minecraft
The reason the middle line is so long is that “robots” (roughly anything that isn’t a web browser being used by a user in this context) including scripts and utilities are blocked by the Bukkit server. The extra parameters we’re including in this line will add the location (-L) flag as well as a user agent and an identity / language header which will allow us to fetch the files without getting a 403 forbidden error.
Make sure to change “-o worldguard.jar” (second to last parameter) and the URL (very last parameter) to match the project you want to download.
The server will restart and the plugin will be installed. It’s that simple! To use the plugin refer to the documentation on the plugin download page to find out which commands you use to configure/interact with it.
Warning: be advised that plugins are the #1 issue for performance degradation on Minecraft servers. This isn’t because all plugins are bad. Some plugins are coded very inefficiently or perform features that require a lot of hooks in the code.
You should be careful about what plugins you install on the server and if you start having bad performance disable your plugins one by one until you find the culprit!
Reconfigure / Update Scripts
The scripts can always be reconfigured and updated by downloading the latest SetupMinecraft.sh and running the installer again. It will update all of the scripts in the Minecraft directory and reinstall the startup service for you.
Running SetupMinecraft.sh again will also give you a chance to reconfigure options such as the memory dedicated to the server, daily reboots, starting the server on boot, etc.
This will not overwrite your world or any other data so it is safe to run!
Port Forwarding
If everyone on your server is on the same LAN or WiFi network as you then you don’t need to do this. If you want people to connect from outside your local network then you need to set up port forwarding on your router.
The process for this is different for every router so the best thing to do is just look at your router and find the model # and put that in google with port forwarding for easy instructions on how to do it for your specific router.
You want to forward port 25565. The type of connection is TCP if your router asks. Once you do this people will be able to connect to your Minecraft server through your public IP address. This is different than your local IP which is usually a 192.x.x.x or 10.x.x.x. If you don’t know what that is just go to google and type “what’s my ip” and Google will kindly tell you!
Wired vs. Wireless
Going with an ethernet (wired) connection is going to be faster and more reliable. There’s so much wireless traffic and other interference in the air that running your server on WiFi is not recommended.
Even if it is working great 99% of the time it can ruin your experience very quickly if the WiFi drops for a couple of seconds and you get blown up by a creeper!
All that being said, the server works fine on wireless. The script will work fine as is with a wireless connection.
Upgrading
PLEASE BACK UP YOUR SERVER FIRST! The server makes automated backups by default for you in the backups folder but I recommend you back up the entire server folder yourself (basically the entire minecraft folder) any time you attempt to upgrade or downgrade. If you need to roll back to older versions it won’t work without a backup from that version or older!
The easiest way to upgrade an installation is to download the latest SetupMinecraft.sh and run it. This will automatically upgrade you to the latest version.
Upgrading and downgrading to versions that aren’t the default the script chooses is pretty simple. Simply change the Version line at the top in the SetupMinecraft.sh script:
#!/bin/bash
# Minecraft Server Installation Script - James A. Chambers - https://jamesachambers.com
# More information at https://jamesachambers.com/raspberry-pi-minecraft-server-script-with-startup-service/
# GitHub Repository: https://github.com/TheRemote/RaspberryPiMinecraft

# Minecraft server version
Version="1.16.1"
Edit this file in your favorite text editor (you can use nano or vi on the Pi like nano SetupMinecraft.sh) and change the Minecraft version to what you want.
Downgrading
PLEASE RESTORE USING A BACK UP FROM THE VERSION YOU ARE DOWNGRADING TO
If you are having problems on a newer version of Minecraft and want to downgrade you can do so using a complete backup of your server before you ran it on a newer version.
The reason you can’t take server data that has been touched by a version such as 1.17 and go back to 1.16 is that the new version adds all sorts of new data types/structures for the new content into your server data files. If you try to roll back the old versions of the Minecraft server will not understand these data types since they didn’t exist in that version and will crash.
As long as you use a backup for your server files from that version (or older) it’s as simple as changing the version in SetupMinecraft.sh just like I show in the “Upgrading” section.
You can upgrade any old version of Minecraft to any version, but again make sure you have a backup first as it is a one way street and you will need that backup if you want to roll back!
Troubleshooting Note – Oracle Virtual Machines
A very common problem people have with the Oracle Virtual Machine tutorials out there that typically show you how to use a free VM is that the VM is much more difficult to configure than just about any other product / offering out there.
It is because there are several steps you need to take to open the ports on the Oracle VM. You need to both:
- Set the ingress ports (TCP/UDP) in the Virtual Cloud Network (VCN) security list
- *and* set the ingress ports in a Network Security Group assigned to your instance
Both of these settings are typically required before you will be able to connect to your VM instance. This is purely configuration related and has nothing to do with the script or the Minecraft server itself.
I do not recommend this platform due to the configuration difficulty but the people who have gone through the pain of configuring an Oracle VM have had good experiences with it after that point. Just keep in mind it’s going to be a rough ride through the configuration for most people.
Troubleshooting Note – Hyper-V
There is a weird bug in Hyper-V that breaks UDP connections on the Minecraft server. The fix for this is that you have to use a Generation 1 VM with the Legacy LAN network driver.
Version History
To view the version history check out the GitHub README here:
Update History – RaspberryPiMinecraft – Official GitHub Page
Other Resources
If you’re trying to set up SSD / USB storage booting check out my Raspberry Pi USB booting setup guide
For benchmarks and recommendations on the fastest storage drives/adapters for the Raspberry Pi check out my 2021 Storage Roundup
If you’re having firmware issues and need to update/restore your firmware check out my Raspberry Pi firmware guide here


Hi! It’s me again, lol.
I have a question. Since my backups are quite big (around 15GB) and I only own a 128gb nvme, is it possible to route the backups to an external drive? I know this will slow things down but it’s kinda frustrating to go to ftp and delete the backups manually every now and then. Thank you! 🙂
Hey TopasMusic,
It’s usually best to just automate them using cron. If you search for setting up a crontab entry you could move the backups once every 24 hours for example.
You could modify the script as well manually to change the path to a custom folder for sure. It’s not a built-in option without moving the whole server.
Hopefully that helps!
Hi! So I set everything up and now I need to reload a backup. Is the command for this just tar -xf backups/mytimestamptar.gz ?
Hey TopasMusic,
Pretty much! You need to extract the files over the top of the existing server folder so the example you gave won’t work. Just extract the folder and copy the files over the top of the existing server as the instructions for restoring a backup indicate.
You can just extract it to the desktop and drag and drop it over the server folder if you want. All it contains is the normal server files.
Hopefully that helps!
Okay now the server won’t start it just flashes really quick after downloading paper. Then the following appears in the console: you are using a headless JRE distribution. This distribution is missing certain graphic libraries that the minecraft server needs to function.” Any ideas how I can fix this issue? Thank you for your help! <3
I restarted the server and now it works! Found that tip in one of your other guides. It’s all working now I’m so happy!!
Hey TopasMusic,
Excellent, you’ve done it, congratulations! I think you’ll be very happy with the performance. If you ever have to do something similar in the future it will be 10x easier now that you’ve done it once.
Let me know if anything else comes up, and enjoy and take care!
Hi! So Im using the Pi now for several years with your script and it works wonderfully. However, when I travel fast with the elytra, the map cant keep up generating and I often fly in the void and have to wait a little till it’s getting rendered. Even when the chunks are preloaded with the plugin chunkgen I have this problem. Is there a solution so the map gets loaded faster? Maybe a faster SSD or other storage solution? Is the writing speed the limit or the cpu/ram? Also, do you know a similar solution like the raspberry pi but a little faster or more powerful, but not a full server computer? Thank you for your time and your dedication for this wonderful script! Have a nice day and greetings
Hey TopasMusic,
Great question! So the truth is the Pi 4 is aging and isn’t really the best for this these days. Getting a faster SSD can help quite a bit with this but it’s also hard on the Pi’s CPU to keep up with it. If you already have a SSD then upgrading to much faster of one won’t help because you have to use SSDs through USB 3.0 on the Pi which is pretty slow.
The Orange Pi 5 which I’ve covered here is a lot more modern of a board to do this on. It actually has a M.2 NVMe slot to give you (truly) fast storage. This board would definitely be able to keep up with it. The 4GB of RAM version (the cheapest one, around $80-90) would be totally perfect for this. It’s 8 cores instead of 4 cores and the cores perform faster.
Hopefully that helps!
Hey! So Im located in Europe and I see no option to buy it. Maybe I can ship it to here. I only find this one and Its more expensive.
Can you maybe send me a link to the one I should order and is there a EU option?
Hey TopasMusic,
I don’t think it’s on Amazon in Europe. You’ll probably need to use AliExpress for there.
I’ve been told it’s more expensive to get these in Europe. You probably won’t be able to get it for $90 there. I think it depends on exactly where you live though.
My links to AliExpress are showing $90 (with $10.38 shipping) but they won’t show up for that for you. There’s some law in Europe where the shipping has to be included in the listed prices (or something)? I’m showing $90 with $10.38 shipping but it won’t be that low for you I don’t think.
I know people from Australia have told me it’s cheaper to order from Amazon.us which is possible for there. Not sure if people in Europe can do that too but it’s worth checking.
This is going to vary by country. I’m sure you would have posted this one if you had saw it but for me it is $99 with free overnight shipping from Amazon.com. That would make it both $100 for the 4GB version for me from AliExpress and Amazon.com (including the shipping).
If you aren’t seeing the 4GB versions for approximately $100 (including shipping) then it’s due to your location for sure. I’ve definitely heard unfortunately that it can vary widely. It’s too bad that it’s not carried on the European Amazon stores as I think it’s the shipping mostly that makes it this way (and the fact that they have to include shipping in the retail price which they do not do for Americans so it will end up looking *much* more expensive than the prices we’re used to quoting over here).
I hope they *never* pass any laws like that here making them show shipping combined in the retail price. I get what they’re trying to do and that they think it’s preventing people from being misled but it makes it extremely difficult to see how much board you are paying for and how much of it is shipping/taxes. I like knowing that information and not knowing it leads to confusion like this about pricing. There’s probably a way to see how it breaks down somehow (I’d hope) but I’ve been told this is a real thing by multiple people before going through the same thing you are now.
I think they even bundle in VAT taxes and have to list those too if I understand correctly. In the US many states don’t even have sales taxes at all (mine does, Utah, 6.10%) and there’s no such thing as VAT so that’s going to have an impact as well. It’s why we typically don’t quote those as it’s literally a different rate for every state (and 5 have none) and it would be a horrific mess if there was a law forcing those to be in the listed prices. You see all of that when you check out instead based on your location (not in the listed prices).
I’m not sure why it’s so much more difficult to get Orange Pis in Europe for a reasonable price. To be honest I kind of always suspected there was some sort of protectionism going on or some kind of trade war stuff. Raspberry Pi is one of the few big European tech brands I can think of so this always made sense to me. It’s a UK brand though and with Brexit I’m not sure how that complicates things. The reality might be Orange Pi has weaker distribution there and is doing this themselves though (maybe they aren’t as confident in that market with it being the home of Raspberry Pi). I really don’t know what it is.
One of the listings you linked to for me showed a 16GB board for $150 (with free shipping). That’s a pretty beefy board. I only have a 4GB model. One of the other listings you mentioned is for the Orange Pi 5B though. Don’t get the Orange Pi 5B. That’s a different board that doesn’t have a M.2 slot. It’s not what you want. You need the Orange Pi 5 proper for sure.
If the listings say they are from Shenzen Electronics that is Orange Pi. They have a lot of different names and distribution labels but all of the ones I have linked here are official. On Amazon (some of them at least) it will say it’s from Orange Pi. If it says “Sold by Orange Pi” on Amazon those are also legitimate listings.
You can also see Orange Pi’s approved listing links from their web site here. Look in the top right and you will see links to their official Amazon and AliExpress listings (AliExpress Store Buy and Amazon Store Buy).
Can you check those listings and see what you find?
Thanks for the detailed reply! So I finally found a good offer from the states and they ship to Europe. I also bought the Toshiba nvme card from your orange pi blog post. This is the device I ordered I hope that’s the correct one?
Also, is there a Guide for setting up a Java server on the orange pi? I’m looking forward to see how fast the nvme is compared to my old ssd on the rasppi 4.
Hey TopasMusic,
This installer will work on the Orange Pi 5 and most Linux installations. That definitely looks like the right one. Everything looks good, I’m excited for you to get it!
Thank you! Also, is there a way to just transfer the Server I’m running right now to the new orange pi without reconfigurations? Also, I have a Dynmap running which is approx. 20-30gb big and has over 30m files which would take ages to transfer so I’m thinking to just exclude the dynmap and let it render again on the new Pi? Last question; should I just leave all settings the same or is it necessary or even recommended to tweak them a little to make them more fitting to the orange pi? Like render distance etc. or a different OS?
Hey TopasMusic,
Great questions! So the easiest way to transfer it is to probably just run the script on the Orange Pi 5 and let it set up a fresh server. After it’s done close the server and extract one of your backups from the previous system onto the Orange Pi 5. This will basically let it set up the services and everything like that and then you will basically just replace the fresh server with one of your backups.
The Dynmap question is a bit trickier. If that is included in your compressed backup it may not be that big within the compressed backup file. If it is though it may be best to let it regenerate it. I could see that going either way for sure.
As far as the settings go the only change I would make on the Orange Pi 5 is to give it more RAM if it’s available. Other than that it should be safe to keep the settings exactly the same.
Hopefully that helps, let me know how it goes when it arrives!
Awesome I’ll do it like you say. And for the OS, due to having 4gb of ram and the orange being more powerful, should I use a 64 bit operating system, and which one would you recommend? I hope I’m not annoying with all my questions! 😀
Hey TopasMusic,
No problem! So there’s no such thing as a 32 bit OS for the Orange Pi 5 or most modern boards. That only exists because the Raspberry Pi is so old / obsolete.
If Raspberry Pi hadn’t completely stagnated something like 4-5 years ago it wouldn’t be an option there either maybe other than older boards like the Pi Zero. You don’t need to worry about this anymore with modern boards. The newer boards are all 64-bit only (just like newer PCs). That’s just one of many issues with the Raspberry Pi you’ll leave behind and never think about again once you switch.
As far as what flavor to use that is purely your preference. There’s Ubuntu and Debian mainly just like the Raspberry Pi as far as flavors. Armbian is pretty popular and that’s what I have installed on mine. It literally won’t make any difference though for performance or anything else for the server which flavor you choose.
Hopefully that helps!
Hey James! I have been using your website heavily as I learn more about my new Raspberry Pi 4. I am running into an issue that I can’t figure out when trying to get this set up. The server never seems to start and I have no logs being generated. I have a full install log here along with some other useful info that I have seen you reference in other comments while I was search through to try and troubleshoot.
The thing that stands out to me in the install log is this:
bash: line 323: [[: bash: line 322: /home/admin/minecraft/jre/bin/java: No such file or directory: syntax error in expression (error token is ": line 322: /home/admin/minecraft/jre/bin/java: No such file or directory")But I am not sure what to do about that. When I use cd it certainly looks like that path exists:
admin@pihole:~/minecraft/jre/bin $ tree.
├── java
├── jfr
├── jrunscript
├── jwebserver
├── keytool
└── rmiregistry
0 directories, 6 files
You can also see that trying to run paperclip.jar straight through java also gives me an error at the end.
Sorry if this is already addressed! I wish there was an easy way to search all of the comments on here. I appreciate the hard work you’ve done and shared with us!
admin@pihole:~ $ sudo update-alternatives --config javaThere are 2 choices for the alternative java (providing /usr/bin/java).
Selection Path Priority Status
------------------------------------------------------------
* 0 /usr/lib/jvm/java-17-openjdk-armhf/bin/java 1711 auto mode
1 /usr/lib/jvm/java-11-openjdk-armhf/bin/java 1111 manual mode
2 /usr/lib/jvm/java-17-openjdk-armhf/bin/java 1711 manual mode
Press to keep the current choice[*], or type selection number:
admin@pihole:~ $ curl https://raw.githubusercontent.com/TheRemote/RaspberryPiMinecraft/master/SetupMinecraft.sh | bash
% Total % Received % Xferd Average Speed Time Time Time Current
Dload Upload Total Spent Left Speed
100 18234 100 18234 0 0 91628 0 --:--:-- --:--:-- --:--:-- 92090
Minecraft Server installation script by James A. Chambers - https://jamesachambers.com/
Version 1.19.4 will be installed. To change this, open SetupMinecraft.sh and change the "Version" variable to the version you want to install.
Latest version is always available at https://github.com/TheRemote/RaspberryPiMinecraft
Don't forget to set up port forwarding on your router! The default port is 25565
Installing screen, sudo, net-tools, curl...
Hit:1 http://archive.raspberrypi.org/debian bullseye InRelease
Get:2 http://raspbian.raspberrypi.org/raspbian bullseye InRelease [15.0 kB]
Fetched 15.0 kB in 1s (19.2 kB/s)
Reading package lists... Done
Reading package lists... Done
Building dependency tree... Done
Reading state information... Done
net-tools is already the newest version (1.60+git20181103.0eebece-1).
The following packages were automatically installed and are no longer required:
libfuse2 raspinfo
Use 'sudo apt autoremove' to remove them.
0 upgraded, 0 newly installed, 0 to remove and 0 not upgraded.
Directory minecraft already exists! Updating scripts and configuring service ...
bash: line 323: [[: bash: line 322: /home/admin/minecraft/jre/bin/java: No such file or directory: syntax error in expression (error token is ": line 322: /home/admin/minecraft/jre/bin/java: No such file or directory")
Getting total system memory...
Total memory: 1849 - Available Memory: 1549
Total memory: 1849 - Available Memory: 1549
Please enter the amount of memory you want to dedicate to the server. A minimum of 700MB is recommended.
You must leave enough left over memory for the operating system to run background processes.
If all memory is exhausted the Minecraft server will either crash or force background processes into the paging file (very slow).
INFO: You are running a 64-bit architecture, which means you can use more than 2700MB of RAM for the Minecraft server.
Enter amount of memory in megabytes to dedicate to the Minecraft server (recommended: 1149): 1149
Amount of memory for Minecraft server selected: 1149 MB
Grabbing start.sh from repository...
% Total % Received % Xferd Average Speed Time Time Time Current
Dload Upload Total Spent Left Speed
100 12104 100 12104 0 0 49606 0 --:--:-- --:--:-- --:--:-- 49606
Grabbing stop.sh from repository...
% Total % Received % Xferd Average Speed Time Time Time Current
Dload Upload Total Spent Left Speed
100 1631 100 1631 0 0 12643 0 --:--:-- --:--:-- --:--:-- 12742
Grabbing restart.sh from repository...
% Total % Received % Xferd Average Speed Time Time Time Current
Dload Upload Total Spent Left Speed
100 2207 100 2207 0 0 14331 0 --:--:-- --:--:-- --:--:-- 14331
Grabbing fixpermissions.sh from repository...
% Total % Received % Xferd Average Speed Time Time Time Current
Dload Upload Total Spent Left Speed
100 826 100 826 0 0 3529 0 --:--:-- --:--:-- --:--:-- 3529
Grabbing update.sh from repository...
% Total % Received % Xferd Average Speed Time Time Time Current
Dload Upload Total Spent Left Speed
100 853 100 853 0 0 6272 0 --:--:-- --:--:-- --:--:-- 6318
% Total % Received % Xferd Average Speed Time Time Time Current
Dload Upload Total Spent Left Speed
100 312 100 312 0 0 1950 0 --:--:-- --:--:-- --:--:-- 1950
Minecraft can automatically start at boot if you wish.
Start Minecraft server at startup automatically (y/n)?y
Setting server file permissions...
Your time zone is currently set to America/New_York. Current system time: Mon 27 Mar 19:08:50 EDT 2023
You can adjust/remove the selected reboot time later by typing crontab -e
Automatically reboot Pi and update server at 4am daily (y/n)?y
Daily reboot scheduled. To change time or remove automatic reboot type crontab -e
Minecraft installation scripts have been updated to the latest version!
admin@pihole:~ $ uname -a
Linux pihole 6.1.19-v8+ #1637 SMP PREEMPT Tue Mar 14 11:11:47 GMT 2023 aarch64 GNU/Linux
admin@pihole:~ $ java -jar -paperclip.jar
Unrecognized option: -paperclip.jar
Error: Could not create the Java Virtual Machine.
Error: A fatal exception has occurred. Program will exit.
Hey Andrew,
I just added code to delete your jre folder if it can’t find the java binary. You seem to have the folder but it’s not valid.
Can you try running SetupMinecraft.sh again? Are you running it as instructed in the article or are you trying to run SetupMinecraft.sh with sh instead of bash?
Also make sure you run start.sh. SetupMinecraft.sh will not start the server. This is expected. Try starting it with start.sh and we need to look at the “logs” folder to see what is going wrong!
I also highly recommend the Docker version instead as it has more features and you don’t have to deal with any of this. This is a legacy version.
I have not recommended running a standalone Minecraft server like this since the log4j hack. Anyone running the Docker version wouldn’t have been impacted by that hack. The standalone version very much would have. Docker runs the server inside a separate virtual operating system which gives it a layer of protection from these hacks.
Switching to the Docker version is as simple as:
sudo apt update && sudo apt install docker-cedocker run -it -v yourvolumename:/minecraft -p 25565:25565 -p 19132:19132/udp -p 19132:19132 --restart unless-stopped 05jchambers/legendary-minecraft-geyser-floodgate:latest
Basically the only reason this version exists is because I made it long before the log4j hacks happened. I’ll never make another one like this again and I should probably discontinue this one at some point. We simply know better now and that it’s too dangerous to run these standalone. That’s before even mentioning that with Docker you don’t have to deal with any of common problems this one has at all.
Hopefully that helps!
Thanks for the quick reply! I will definitely look into the Docker install, but the sudo apt install docker-ce returns an error that there is no valid target.
I was hoping to get something up to test with some other players this evening, so I tried the install again and it failed with the same error. I am running it exactly copy and pasted with bash, not with sh.
I went ahead and manually deleted the entire /minecraft directory and everything in it, then ran the script again to start complete blank. This is what I got this time:
Creating minecraft server directory...Installing OpenJDK...
% Total % Received % Xferd Average Speed Time Time Time Current
Dload Upload Total Spent Left Speed
0 0 0 0 0 0 0 0 --:--:-- --:--:-- --:--:-- 0
100 45.6M 100 45.6M 0 0 29.3M 0 0:00:01 0:00:01 --:--:-- 48.6M
main: line 244: [[: main: line 243: /home/admin/minecraft/jre/bin/java: No such file or directory: syntax error in expression (error token is ": line 243: /home/admin/minecraft/jre/bin/java: No such file or directory")
OpenJDK installation completed.
Hey Andrew,
Something is very wrong with this image. Is this Raspberry Pi OS? Or is this that preconfigured PiHole image? Can you share your:
cat /etc/os-releaseYou can just try:
/home/admin/minecraft/jre/bin/java -versionI don’t support images like that with this generally speaking. The current Raspberry Pi OS 64 bit kernel is 5.15. So what on earth is this?
Linux pihole 6.1.19-v8+ #1637 SMP PREEMPT Tue Mar 14 11:11:47 GMT 2023 aarch64 GNU/LinuxIt can’t even run the aarch64 Java binary by the looks of it. We’ll see what your commands above show but I really don’t think this looks like a supported configuration (or ever one that’s even been tested). To be honest with you it seems like it’s having a hard time even understanding double brackets. Does this machine even have bash installed or is it just POSIX shell/sh format?
If this was a standard Raspberry Pi OS install this wouldn’t happen and the kernel wouldn’t be that new. I need to know what we’re dealing with. It’s extraordinarily unlikely I will update this legacy script to support some custom image configuration (or any other configuration). You would want to use Docker for something like this where you don’t have to worry about problems like this.
It’s another reason why this is legacy and hasn’t received any of the new features my Docker versions have. It’s not just bad for me to try to support, it’s bad for you to try to use it. Docker would have been up in 2 minutes with this. The whole point of Docker is you don’t have to mess with weird configurations and your container will still work (on anything). This is definitely a weird configuration and I’m curious to see what you say this actually is. It’s completely nonstandard and not anything on the supported OS list.
The package name on yours might be docker.io. It shouldn’t be though. It would be another sign you are running something totally different than a normal operating system on there:
sudo apt install docker.ioIf that is not it then you are going to have to find out what the Docker package name is for whatever operating system this happens to be (something that would have been very useful to mention). It’s clearly not the same as Raspberry Pi OS or my PopOS install at that point so I’d have no clue what is being used here. There might not even be one available depending on what it is.
You could try a manual Docker install with:
curl -fsSL https://get.docker.com -o get-docker.shsudo bash get-docker.sh
I wouldn’t though. Docker officially supports Raspberry Pi OS. I doubt it supports whatever this image ends up being though but you can certainly try and see if it’s close enough. If you get a bunch of errors then you can safely assume that image can’t handle Docker either and should strongly consider installing Raspberry Pi OS. You can still install PiHole on a normal Raspberry Pi OS installation.
Hopefully that helps!
Hi James,
Thank you so much for you hard work putting this guide together, I’ve learned so much in the past couple days! I’m trying to run a server for myself and a couple friends on a RPi 4 Model B with 1 GB of RAM, using Bullseye Lite on your recommend Kingston A400 SSD with the StarTech adapter. So far, I’ve found it pretty much impossible to run 1.19, with max memory of 700 MB the Pi is extremely slow over SSH but runs the server, however mobs are severely lagging to the point where it’s unplayable. Any other tricks you’d suggest, or should I give up and run 1.12 or something? Also wondering what your thoughts were on adding more swap as described here.
Thanks!
Hey GinjaNinja,
Welcome! Are you running the 32 bit version of Raspberry Pi OS or the 64 bit version? Most people are running the 32 bit version. If you do a:
uname -aIt should show as aarch64 or arm64 for the architecture. If it’s showing armhf or armv7 or something like that it’s 32 bit. This can make a bit of a difference.
Are there any add-ons / mods installed? Those will definitely increase the memory usage for sure so it’s always worth checking. You may want to disable them (one at a time) to see if any of them make a significant performance impact.
There’s a lot more you can do in the paper.yml file and some of the other files in the server folder. I’d highly recommend checking out this guide here. This will explain a bunch of performance settings within Paper that will help you improve your performance.
Some of the sections on there that will probably make a big difference are entity counts (mob caps), view distance and some of the other ones I see on the list. I think that guide should help you improve the performance further here without anything too drastic! It will explain the tradeoffs of each setting which is really useful as many of the tradeoffs won’t apply to your server at all (meaning you can safely enable them without worrying about anything working differently).
The swap might make a difference but unless you have more than a few players memory probably isn’t the bottleneck. What does your CPU usage look like when you run top? If it says it’s at like 100-400% CPU usage it’s probably the CPU that is the bottleneck. That is where the Paper optimizations will help a lot.
Hopefully that helps!
Hi James, for
uname -aI have armv7, so 32 bit. I don’t have any mods/add-ons installed. Thanks for sending that guide over, I’ll check it out! CPU usage was around 190% last time, so it would make sense that CPU is struggling.Hey GinjaNinja,
Thanks for confirming, that sounds fantastic! It’s not too unusual for it to be above 100% but you can get it under that using a SSD instead of a SD card for example. The SSD would be the other major upgrade that people do to improve performance for sure. You already have this one covered.
It’s when it reaches 400% and things like that it’s *really* bad. That basically means every CPU core is at 100% (which is how it gets to 400%). 190% would mean that essentially two of your cores are pegged. This probably means things like monster spawns are keeping it busy.
I can give you a tip on the monsters lagging the server (the most common cause, or entities rather). To fix that you can lower the entities in the bukkit.yml config file:
spawn-limits:monsters: 70
animals: 10
water-animals: 5
water-ambient: 20
water-underground-creature: 5
axolotls: 5
ambient: 15
If you turn some of these down it will greatly reduce the CPU strain on your server. The side effect is there will be less monsters. In reality though a lot of the lag is coming from monsters that are underneath you in cave systems (and can’t ever get to you) as well as background animals. Many people can turn these down without even noticing a difference in gameplay.
Things like cows / chickens / the water entities swimming around really create a lot of lag. You can usually get away with turning those down a bit. You will notice a reduction in CPU usage for sure. It’s entities that tend to create the most strain (as well as saving/loading chunks which a SSD helps with a lot, something you already have covered).
Hopefully that helps!
Hi ! Thank you for your great work, the tutorial is clear and well written.
I have a problem however : when starting the server, it seems to crash during the ” Preparing level “world” ” step (monitoring with screen).
I use a Pi 3B+ with a 64GB Kingston micro SD card.
I did the installation several times, testing different memory allocations, and nothing changes.
Here is the log :
[12:23:25] [ServerMain/INFO]: Building unoptimized datafixer[12:23:42] [ServerMain/INFO]: Environment: authHost='https://authserver.mojang.com', accountsHost='https://api.mojang.com', sessionHost='https://sessionserver.mojang.com', servicesHost='https://api.minecraftservices.com', name='PROD'
[12:25:49] [ServerMain/INFO]: Loaded 7 recipes
[12:26:07] [Server thread/INFO]: Starting minecraft server version 1.19.3
[12:26:07] [Server thread/INFO]: Loading properties
[12:26:07] [Server thread/INFO]: This server is running Paper version git-Paper-386 (MC: 1.19.3) (Implementing API version 1.19.3-R0.1-SNAPSHOT) (Git: 4da844f)
[12:26:08] [Server thread/INFO]: Server Ping Player Sample Count: 12
[12:26:08] [Server thread/INFO]: Using 4 threads for Netty based IO
[12:26:11] [Server thread/INFO]: [ChunkTaskScheduler] Chunk system is using 1 I/O threads, 1 worker threads, and gen parallelism of 1 threads
[12:26:28] [Server thread/INFO]: Default game type: SURVIVAL
[12:26:28] [Server thread/INFO]: Generating keypair
[12:26:40] [Server thread/INFO]: Starting Minecraft server on *:25565
[12:26:47] [Server thread/INFO]: Using default channel type
[12:26:47] [Server thread/INFO]: Paper: Using Java compression from Velocity.
[12:26:47] [Server thread/INFO]: Paper: Using Java cipher from Velocity.
[12:26:53] [Server thread/INFO]: [Chunky] Loading Chunky v1.3.52
[12:26:53] [Server thread/INFO]: Server permissions file permissions.yml is empty, ignoring it
[12:26:53] [Server thread/INFO]: Preparing level "world"
The weird thing is that it actually started once, and I managed to play for about 20 minutes, before being disconnected and not being able to launch the server again.
The only mod I downloaded is, as you can see, Chunky, but it’s the same without the mod installed.
Any idea where the error could come from ?
Thank you very much !
Hey Doudowski,
There’s no crash in that log at all actually. None. What that means is that it’s not crashing. It’s getting terminated by your operating system almost certainly due to lack of memory.
Can you share your:
freecommand? Most likely you will be able to use like 400-500MB of memory on a Pi 3 (or less). What do you have your memory value set to?
The free command is likely going to show us that you have almost zero free memory before you even start the server on a Pi 3 would be my estimate. If it’s a fairly fresh install without a lot of stuff running you might have a few hundred megabytes of memory left over after your OS.
Almost everyone who runs the script on a device that old will try to set the memory to like 1GB or 800MB. That’s not going to happen. You do not have those kind of resources on a Pi 3. You’re going to be able to use 400-500MB and only if it’s a server installation (and not a desktop installation which you should definitely be using a server one with a Pi 3 because there’s just not much to work with there memory-wise). If it’s 1000 try 500 and 500 will probably still be too high but hopefully it will start crashing instead of just being terminated by your OS due to lack of resources.
Try setting the memory to half what it is now and see if that helps! It’s hard to set it too low. Almost everyone sets it too high though. Yours is so much higher than what you have now it’s not even crashing. It’s getting sent the SIGTERM or terminated (the same as if you pressed ctrl+C). That’s why there’s no crash in your log.
If there are other things running on your OS you may need to reinstall the server/lite version of Raspberry Pi OS so you at least have a few hundred MB of free memory. If it’s less than that it simply doesn’t have the resources to run it at all. People have ran it before on the Pi 3 though lots of times. It will just need to be stripped pretty clean for you to even have access to 400-500MB of memory to run the server with.
It used to be easier on a Pi 3. I originally designed this script using the Pi 3 primarily. It used to even run on a Pi Zero with 512MB but that was 5 years ago and probably Minecraft 1.12 or 1.13. Now days it’s real tough with 512MB and even 1GB Pis are quite a squeeze. There’s just a lot more features and higher requirements for something like 1.19.3 than it was with 1.12 when the Pi 2/3 were being used a lot more. Just like every other piece of software the requirements slowly rise over the years and we’re getting to the point where it’s tough with 512MB-1GB devices anymore (but not impossible).
Hopefully that helps!
Thank you for your very fast answer !
Okay, I assumed it crashed since it didn’t launch, I get the difference now.
Here is the free command :
~ $ free
total used free shared buff/cache available
Mem: 944268 56280 373512 964 514476 834324
Swap: 102396 0 102396
So yes that seems to be the problem !
The thing is that the script does not let me put less than 600MB of memory… So my previous log was an attempt at 600.
I noticed before that the recommended amount for my system was around 400MB, but since you wrote “A minimum of 700MB is recommended”, and that I couldn’t actually put less than 600, I thought it was normal..!
So what is the solution to bypass that 600MB limit ? And do you think the Pi3B+ will still work properly for the purpose of a Minecraft server ?
Hey Doudowski,
No problem at all! So what I would do in this case is just go into start.sh and edit it manually. You should see a -Xmx600M in the file. Change that one to 400M and try starting again like that and let’s see if it works here!
Ok I figured it out! hahaha
To access your server terminal you need to type screen -ls and you will get a list of screened processes.
With that take the number and type: screen -r $number
And it will load the process that has been detached from terminal to be able to close all ssh connections and keep running!
With that you can OP you user with: op %user
And just execute commands ingame without the need to re-open the terminal + screen to access the server command line
Hey Xavi Banús,
Excellent, you got it and are exactly right. I’m so glad that it’s working well.
Thanks for sharing your commands as you figured them out as well, that will help others here too. Enjoy and take care!