
I recently covered all the pieces you need for a complete setup to work with the Raspberry Pi Compute Module 4. Today I want to cover the whole reason I wanted to investigate the Compute Module 4: The PCI express capabilities!
In this guide I’ll cover a couple of 1x PCIe to NVMe adapters I picked up to try doing this with as well as full configuration and setup instructions. Let us begin!
Prerequisites

The Compute Module 4 by the Raspberry Pi Foundation is a single-board computer (SBC) that is meant to be used in embedded devices. It has many new capabilities that have not been seen on other Pis before such as a built in eMMC module (optional) and has PCI express capabilities when used with the IO board.
Links: Amazon.com*, AliExpress*, Amazon.ca*, Amazon.com.au*, Amazon.co.uk*, Amazon.de*, Amazon.es*, Amazon.fr*, Amazon.it*, Amazon.nl*, Amazon.pl*, Amazon.se*, Amazon.sg*
Make sure you’ve imaged your NVMe drive with an operating system of your choice such as Raspberry Pi OS, Ubuntu or your preferred distro. You may have to actually put the drive into a PC temporarily (you can use the 1x adapter in one) or if you have a USB to NVMe adapter (lots of Pi users should have one of these already) you’re good to go.
This guide will assume you’ve done this and the drive is prepped. The official Raspberry Pi Imager tool is a great choice to take care of imaging needs for you and is available for Windows / Mac OS X / Linux. Here’s a suggested drive if you don’t have one yet:
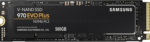
The Samsung 970 EVO Plus is a fantastic drive and has fallen in price substantially. It’s widely available around the world. The smaller capacities (such as the 250GB version) of this drive are perfect for the Pi! This is the top performance option without going into the “Pro” series of the lineup which are much more expensive.
Links: AliExpress*, Amazon.com*, Amazon.ca*, Amazon.com.au*, Amazon.co.jp*, Amazon.co.uk*, Amazon.de*, Amazon.es*, Amazon.fr*, Amazon.it*, Amazon.nl*, Amazon.pl*, Amazon.se*, Amazon.sg*
You will also need a IO board that has a PCI express slot:
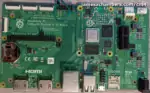
This is essentially the “motherboard” of the compute module. This IO breakout board lets us work with the compute module and get the ports we need to interface with it. This includes a SD card slot for models that don’t have eMMC, a PCI express slot (very exciting), 2 USB ports and more.
Links: AliExpress*, Amazon.com*, Amazon.ca*, Amazon.com.au*, Amazon.co.jp*, Amazon.co.uk*, Amazon.de*, Amazon.es*, Amazon.fr*, Amazon.it*, Amazon.nl*, Amazon.pl*, Amazon.se*, Amazon.sg*
Power requirements are also an issue. If you are using a powerful (or power hungry) NVMe drive you will for sure need something like this:

Delivers a full 12V DC to the IO board so that there’s enough power to run very powerful NVMe drives / accessories
Links: AliExpress*, Amazon.com*, Amazon.ca*, Amazon.com.au*, Amazon.co.jp*, Amazon.co.uk*, Amazon.de*, Amazon.es*, Amazon.fr*, Amazon.it*, Amazon.nl*, Amazon.pl*, Amazon.se*, Amazon.sg*
If your NVMe drive is performing extremely slowly / booting into emergency mode / things like that it’s very likely that it’s not receiving enough power!
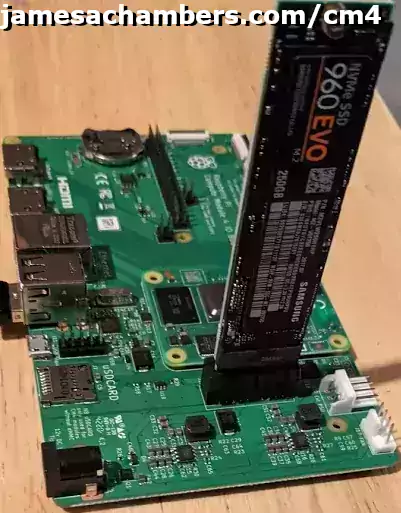
PCIe to NVMe 1x Adapters
I picked up two different style adapters from Amazon to test. The first one is a very simple vertical standing adapter. My full benchmark for this adapter is available here: Pi Benchmarks – #48606
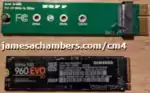
The Cablecc 1x PCIe M.2 NVMe adapter sticks straight up out of the board. It doesn’t take up a lot of space and ends up being pretty compact (as long as you have vertical space!)
Links: Amazon.com*, Amazon.ca*, Amazon.com.au*, Amazon.co.jp*, Amazon.co.uk*, Amazon.de*, Amazon.es*, Amazon.fr*, Amazon.it*, Amazon.nl*, Amazon.pl*, Amazon.se*, Amazon.sg*
Next up we have an adapter that sits horizontally and comes with some optional mounting brackets. This adapter scored about 400 points higher (may be a slightly better chipset) and has a green LED indicator light (the cablecc has no light of any kind). Benchmark available here: Pi Benchmarks – #48607

The Xiwai PCI-E 3.0 x1 Lane to M.2 NGFF M-Key SSD NVMe AHCI adapter card sits horizontally and comes with a couple of different size shrouds meant for mounting (not required). This takes up less vertical space but more horizontal space.
Links: AliExpress*, Amazon.com*, Amazon.ca*, Amazon.com.au*, Amazon.co.jp*, Amazon.co.uk*, Amazon.de*, Amazon.es*, Amazon.fr*, Amazon.it*, Amazon.nl*, Amazon.pl*, Amazon.se*, Amazon.sg*
Changing Boot Order
While the PCIe to NVMe adapters are pretty much plug and play in this setup switching the boot order of the Compute Module 4 is a little bit more in depth. It requires using the rpiboot tool on a different computer / Pi with the CM4’s “disable eMMC boot” jumper (j2) bridged with the pin directly below it so the Pi is able to boot into USB mass storage mode and be flashed with bootloader/firmware updates.
To do this we need to get a copy of the rpiboot/usbboot utility’s source tree. If you followed my CM4 setup guide you will already have the ‘usbboot’ folder and can skip cloning. If you are using Windows you will need to do this on your Pi and we will copy the final resulting folder over to Windows (for now just do the instructions on your Pi).
git clone --depth=1 https://github.com/raspberrypi/usbboot
cd usbboot
make
Now we’re going to enter the ‘recovery’ subdirectory and edit the bootloader configuration like this to change the boot priority:
cd recovery
sed -i -e '/^BOOT_ORDER=/ s/=.*$/=0xf25416/' boot.conf
./update-pieeprom.sh
You can also change boot.conf manually using nano followed by running ./update-pieeprom.sh. The boot type for PCI express is 6, so that should be your first type (which means it should be the number at the end of the string like I have in the above example) if you want to boot from PCI express.
(Optional) Choose / Update Firmware Version
The CM4 will have the exact firmware that is in your git source tree as the file “pieeprom.original.bin” inside the “recovery” folder at the end of this process.
We need to use the rpiboot utility to update the firmware. I will use the latest firmware at time of writing but check for the latest firmware at: the official rpi-eeprom Raspberry Pi GitHub Repository (if there is a newer one replace the pieeprom-2022-07-26.bin in the curl command below with the newer version file name).
Use these commands (from inside the usbboot/recovery directory):
rm -f pieeprom.original.bin
curl -L -o pieeprom.original.bin https://github.com/raspberrypi/rpi-eeprom/raw/master/firmware/stable/pieeprom-2022-07-26.bin
./update-pieeprom.sh
Mine looked like this when updating from my Pi 400:
pi@pi400:~/usbboot/recovery $ ./update-pieeprom.sh
+ /home/pi/usbboot/tools/rpi-eeprom-config --config boot.conf --out pieeprom.bin pieeprom.original.bin
+ set +x
new-image: pieeprom.bin
source-image: pieeprom.original.bin
config: boot.conf
pi@pi400:~/usbboot/recovery $
(Optional) Further Bootloader Configuration Changes
If there are any other bootloader parameters you would like to change you can do so using the file boot.conf like this (from inside the usbboot/recovery directory):
nano boot.conf
Make changes and press Ctrl+X then type 'y' to save
./update-pieeprom.sh
Flashing New Boot Order / Firmware / Configuration
We are now ready to run the rpiboot utility and use it to flash the new bootloader configuration and firmware to our Pi. You should still be in the “recovery” directory from the previous steps. Go to the base of the “usbboot” directory with:
$ cd ..
$ ls
bin2c    debian      imager   main.c    msd   Readme.md  rpiboot
bin2c.c  fmemopen.c  LICENSE  Makefile  recovery   win32
You should see the “rpiboot” utility like the above example if you’re in the base of the usbboot directory. If your host PC you will be plugging the USB cable into for flashing runs Linux use the command:
sudo ./rpiboot -d recovery
Make sure your Compute Module 4 IO board’s “disable MMC boot” jumper J2 is bridged with the lower pin to disable eMMC boot. Now connect the power:
api@pi:~/usbboot $ sudo ./rpiboot -d recovery
Loading: recovery/bootcode4.bin
Waiting for BCM2835/6/7/2711...
Loading: recovery/bootcode4.bin
Sending bootcode.bin
Successful read 4 bytes
Waiting for BCM2835/6/7/2711...
Loading: recovery/bootcode4.bin
Second stage boot server
Loading: recovery/config.txt
File read: config.txt
Loading: recovery/pieeprom.bin
Loading: recovery/pieeprom.bin
Loading: recovery/pieeprom.sig
File read: pieeprom.sig
Loading: recovery/pieeprom.bin
File read: pieeprom.bin
Second stage boot server done
pi@pi:~/usbboot $
(Optional) Windows Specific Instructions
If you are using Windows transfer the “recovery” folder you generated using the Pi over to Windows and run it in “Command Prompt” like this (make sure you’ve installed the rpiboot utility for Windows first, see my CM4 setup guide for links/instructions):
"C:\Program Files (x86)\Raspberry Pi\rpiboot.exe" -d recovery
or you can fully qualify your paths with:
"C:\Program Files (x86)\Raspberry Pi\rpiboot.exe" -d "C:\YourPathTo\recovery"
and connect the IO board (with the disable eMMC boot jumper set). You will see the same output as the Linux example above and the CM4 will be updated!
Preconfigure NVMe Device for CM4
If you attempt to boot now you will not have working USB ports, ssh, or any wireless configuration. We can preconfigure your NVMe device by plugging the device into a computer / Pi. You should see the “boot” volume where we can preconfigure our CM4 to be working right from the start.
Enable USB Ports
When mounted in the IO board the USB ports will not function without making a change to config.txt and adding an overlay.
Add the following line to config.txt:
dtoverlay=dwc2,dr_mode=host
After adding this line the two USB ports (as well as the “External USB” header) will function the next time the CM4 boots.
Enable SSH
It’s very useful to have SSH enabled when working with the Compute Module 4. It is enabled simply by creating an empty file named:
sshin the root folder of the “boot” volume (the top-most folder of the drive where start4x.elf, fixup.dat and those files are located)
Now when the Pi starts up SSH will automatically be enabled!
Preconfigure WiFi / Wireless
You can also preconfigure the Compute Module 4 (and any Pi) by creating wpa-supplicant.conf at the base of the “boot” volume like we did with “ssh” file.
Create a new file named wpa-supplicant.conf that contains the following:
ctrl_interface=DIR=/var/run/wpa_supplicant GROUP=netdev
country=US
update_config=1

network={
 ssid="YourNetwork"
 psk="YourPassword"
}
When this file is created in the base of the “boot” volume it will automatically be applied to the Pi upon the next startup. Make sure to adjust your country=US line to your own country as this can impact what channels and functionality are available from your WiFi card!
First Boot
You are now ready to boot your Compute Module 4. Go ahead and remove the jumper now from J2 and the pin below it and connect your prepped NVMe drive. If you’re using a monitor connect it to the IO board first before turning on the power.
Now connect power to the IO board and the PCIe/NVMe boot process will start. Your OS should boot with your preconfigured settings! My first boot was a little sluggish (most likely first boot operations on your drive) so give it a little bit of extra time here before assuming it failed.
You should verify your boot device by running:
sudo mount | grep "/dev/"
Make sure that the first line (usually your root) is something like /dev/nvme0n1p2 (the NVMe drive) and not /dev/mmcblk0p2 (that would be the eMMC or a SD card)!
Benchmarking / Testing Storage
Once you’ve booted up you can verify your drive’s performance using my storage benchmark with:
sudo curl https://raw.githubusercontent.com/TheRemote/PiBenchmarks/master/Storage.sh | sudo bash
If you search for the model of your drive / eMMC / etc. on Pi Benchmarks you can compare your score with others and make sure the drive is performing correctly!
Verify Bootloader / Firmware
You can verify your firmware version once you boot the Compute Module 4 by running rpi-eeprom-update which should look like this:
sudo CM4_ENABLE_RPI_EEPROM_UPDATE=1 rpi-eeprom-update

BOOTLOADER: up to date
   CURRENT: Tue 06 Jul 2021 10:44:53 AM UTC (1625568293)
    LATEST: Tue 06 Jul 2021 10:44:53 AM UTC (1625568293)
   RELEASE: stable (/lib/firmware/raspberrypi/bootloader/stable)
            Use raspi-config to change the release.

  VL805_FW: Using bootloader EEPROM
     VL805: up to date
   CURRENT:
    LATEST:
The firmware version for “CURRENT” should match the exact version you used for pieeprom.original.bin in our curl command we used when we were preparing the “nvme” folder earlier regardless of what is available in the repository.
Conclusion
These are by far the highest benchmarking scores I’ve ever got and at a score of nearly 20,000 it put me on the top scores page and was definitely well worth the setup and configuration!
I’m excited to experiment more with the PCI express capabilities and see what more the Compute Module 4 is capable of. I also have ordered a 8 GB CM4 that has eMMC as well as the built in WiFi (missing on my current model and it’s only a 2GB) which should let me experiment with some of the other smaller IO boards available and some of the other compute module specific capabilities that look really exciting as well.
I have 1x PCI risers that I use for cryptocurrency mining with GPUs that would theoretically allow me to connect some interesting things like a GPU, a Intel Optane 900p PCI express drive, and a few other wild ideas! This is just scratching the surface of what the PCIe capabilities could enable on the Pi.
Other Resources
Definitely don’t miss my Shapes, Sizes and Features of Compute Module 4 IO Boards guide to see which IO boards may work best for your project
For an explanation of the Pico W (a microcontroller) check out my Pico W Explained article or if you want to jump right into the action and see what it’s like to work with a Pico check out my Pico W Getting Started guide


 w/ Pi4B Adapter Review")


So, if the PI can’t boot from the NVME, because I did something wrong in the above procedure, will I be able to boot from the EMMC? I just have to remove the NVME?
Hey Russel,
Absolutely! It will try all of the different boot modes in a loop that you set when you change the boot order. As long as you don’t set it to NVMe only (the guide doesn’t do this) it will fall back to the other boot modes.
Absolute worst case scenario is that you could use the usbboot tool and change it back to whatever mode you had before (which basically fully reverses anything we’d done). Hopefully that helps!
Ok, so I’m booting from NVME. I also enabled the serial console and ssh. The desktop comes up but does not respond to my USB keyboard and mouse. I did add “dtoverlay=dwc2,dr_mode=host” to the /boot/config.txt (last line in the file).
# Russ stuff...enable_uart=1
dtoverlay=dwc2,dr_mode=host
No luck. My keyboard/mouse work on the EMMC boot.
I can ssh in and the I can also log in with the serial. So, I have the PI command line.
I’ve also proven I am booting from the NVME.
I’m almost there. Any suggestions?
Russ
Here the output from “lsusb::
pi@raspberrypi:~ $ lsusbBus 002 Device 001: ID 1d6b:0003 Linux Foundation 3.0 root hub
Bus 001 Device 001: ID 1d6b:0002 Linux Foundation 2.0 root hub
pi@raspberrypi:~ $
Never mind.
I just rebooted again and it works.
Your above instructions are great! Thank you for providing them.
Now, on to testing the NVME performance…
Russ
Hey Russel,
Excellent work, you figured it out before I was up and going here! I have been working on the storage site and adding some of the new models people have been submitting (there was quite a few of them).
Looking good, I look forward to seeing the scores!
Hello! I have tried this so many times and am writing here as a last ditch effort so hopefully someone hears me! I’d even be willing to provide financial compensation for your time! My first step seemed as it was going well but:
$ git clone --depth=1 https://github.com/raspberrypi/usbbootcd usbboot
make
Cloning into 'usbboot'...
remote: Enumerating objects: 71, done.
remote: Counting objects: 100% (71/71), done.
remote: Compressing objects: 100% (59/59), done.
remote: Total 71 (delta 7), reused 38 (delta 2), pack-reused 0
Receiving objects: 100% (71/71), 20.61 MiB | 906.00 KiB/s, done.
Resolving deltas: 100% (7/7), done.
cc -Wall -Wextra -g -o bin2c bin2c.c
./bin2c msd/bootcode.bin msd/bootcode.h
./bin2c msd/start.elf msd/start.h
./bin2c msd/bootcode4.bin msd/bootcode4.h
./bin2c msd/start4.elf msd/start4.h
cc -Wall -Wextra -g -o rpiboot main.c
pkg-config --cflags --libs libusb-1.0-DGIT_VER="\"d49a1a2d\"" -DPKG_VER="\"20220111~130126\""Package libusb-1.0 was not found in the pkg-config search path.
Perhaps you should add the directory containing `libusb-1.0.pc'
to the PKG_CONFIG_PATH environment variable
No package 'libusb-1.0' found
main.c:1:10: fatal error: libusb.h: No such file or directory
1 | #include
| ^~~~~~~~~~
compilation terminated.
make: *** [Makefile:4: rpiboot] Error 1
I proceeded with the second step but to no avail… see below.
pi@raspberrypi:~/usbboot $ cd nvmesed -i -e '/^BOOT_ORDER=/ s/=.*$/=0xf25416/' boot.conf
./update-pieeprom.sh
bash: cd: nvme: No such file or directory
sed: can't read boot.conf: No such file or directory
bash: ./update-pieeprom.sh: No such file or directory
Thanks so much for your time. I’ve poured so much time into this and am trying my best here! I hate asking for help.
Sincerely,
Matt
Hey Matt,
Welcome! I think I can help. Some of it has changed like the nvme folder is for sure gone now. Check out this thread from Graham here.
It looks like you’re missing:
sudo apt install libusb-1.0-0-devThis is covered in my first guide mentioned at the beginning but I’ve added it to this one as you aren’t the first person that hasn’t had it so it needs to be in here as well.
The update-pieeprom.sh script appears to be moved to the “tools” folder but it’s also in the recovery folder and the msd folder. They don’t even seem to cover the type of booting I used to do in the documentation or how to just change the general parameters. Now there’s a completely new “secure boot” mode. To see what I mean check out the usbboot GitHub repository.
It doesn’t even resemble these instructions anymore. They’re basically useless *unless* you download the older beta version. I’ll have to put it on my to-do list to completely rewrite them. I’m not sure whether to recommend to try to do the updated version or to just download the version this guide uses from the GitHub’s “releases” section which is certainly an option. Once you get it booted up you will just update it all to the latest with apt anyways.
It’s not even clear to me that you need to do anything with the newest Raspberry Pi image other than write it to the NVMe drive and change the boot order on the CM4. The instructions here confuse me even more.
Check out this section:
BootloaderYou might need to use rpiboot to update the CM4 bootloader. Instructions for building rpiboot and configuring the IO board to switch the ROM to usbboot mode are in the usbboot Github repository.
Remember to add the NVMe boot mode 6 to BOOT_ORDER in recovery/boot.conf.
Wait, so this documentation now says that we are supposed to use…. the recovery folder? What?!
It’s a mess. I’m not sure what to make of it but I’ll definitely fire mine up and do a fresh NVMe image. Hopefully that gives you some ideas of things to look into while I’m investigating it. I would honestly just try burning the latest 64 bit Raspberry Pi OS like Graham did as that was the only thing that really got him going. I would just try booting off that and see what happens. It’s quite possible you’ll still need to change the BOOT_ORDER, but it looks different and I’m seeing so many conflicting things as it has been changing so fast.
I definitely see why you’re stuck. It’s changed so much that it’s almost unrecognizable and it doesn’t look like anyone else has very much more updated instructions than I have. Sorry about that Matt, it almost feels like one I wrote years ago but it wasn’t even that long ago (it’s one of the more recent ones I’ve done for the Pi!) and it’s changed a *lot* even since we did Graham’s.
I’m actually still running the original image I did for NVMe for this article and it’s working fine. Once you can get it going apt will update it (mostly, but enough for almost everyone’s purposes and it can be flashed newer firmware further with the usbboot tool). It’s just the prep process that has changed here so it’s time to do it again and update these.
Definitely let us know what you try / find and I will try to get this updated within the next week or so. Thanks!
Thanks so much for your detailed reply and your time, James. I see how prompt you were to and that just speaks to the quality of your forum here, sir. So from a stranger, great work! Your blogs have inspired me to try a lot and fail a lot but THATS OK! That’s how we learn. Ok anyways. I gave up for a little bit after trying the updated way. Then when doing that, I now have the 1/29/22 version of raspiboot so I thought I remember reading that I can’t undo that update now. I may be wrong on that. I have so much info that I’m having trouble keeping it straight!
Right now, I have a 2TB M key NVME plugged into a usb3.0 adapter (actually the one you have pictured in another one of your blogs – impossible to find right now) and that is plugged into the 2.0 port. I know, probably makes you cringe reading it! It does for me too lol 😂 I have another spare NVME and I’m going to image a copy of the latest 64 bit raspberry pi os because I’ve been using the latest image on raspberry pi imager which is 32 bit.
You’re saying that this may solve the problem by itself because it has the latest firmware? Also if that doesn’t work, I’ll try to start fresh and download the July or august 2021 usbboot file and try to follow your instructions that way. I am fairly new to this but am trying my best and thanks again for all of the effort and information, James.
Sincerely
Matt
Hey Matt,
No problem at all, I’m so glad you have picked up on the most important lesson you can learn and frankly my secret weapon! It usually doesn’t hurt to just jump in and start trying things on the cutting edge as long as you’ve done some due diligence to know what to watch out for and you’ll learn so much that you never even knew existed or to ask about. Over time, this accumulates over years and years and eventually you reach a place where it all starts to come together. I think you are well on your way to that place. I’m not there yet but I’m closer than I’ve ever been before and wake up excited to try new stuff each day!
Those are some great questions. I had my tests tentatively scheduled in my mind for today/tomorrow. I think I’ll probably do it today as the other thing on my agenda is to write more articles. Depending on how different the steps are for the new process I may actually make it a new article and just leave this one alone other than a bunch of bolded warnings saying it’s here for historical purposes for documentation if people still download the old version, etc.
So that’s a great question about trying the latest 64 bit image. The reason I said that in the last post (I’m glad you asked me to clarify as I didn’t expand too much on it) is I was tentatively reading the new documentation and saw this:
So according to this the NVMe software soon came out of beta after I wrote this article. It is now in the stable branch after July 2021. Theoretically this means that the 32 bit image should work as well. I’ve personally never had anyone on here get it working with the 32 bit and I definitely did a 64 bit install on mine. The person I linked to earlier that we got working a few months ago before things had changed quite as much as they have now was able to burn the 64 bit image and it just worked. Since we did just have a major Raspberry Pi release (bullseye) I expect it should work on both. I will definitely test it today for sure.
So basically yes I think if you have your bootloader to July or later that would be new enough. If it’s before that it probably isn’t new enough yet and needs updated firmware flashed with the usbboot tool.
There’s only one problem which is that I saw something saying that we still need to change the bootloader to boot from NVMe first instead of SD card first. That part is done with that old “nvme” folder but it looks different now. It shouldn’t be too much different though.
To sum things up I think if the right boot order is set on the device (requires the usbboot tool) then probably both images should work according to the documentation. I’ll definitely update a bit later here though as I learn new things. Hopefully that helps in the mean time!
EDIT: I did finish this. It looks like the changes were mostly superficial/it got easier! The image doesn’t need to be updated with rpi-update anymore so I’ve removed that section. I used the “Raspberry Pi Imager” and wrote the latest 32 bit Raspberry Pi OS to my NVMe drive plugged in through USB. I updated my CM4 to the latest firmware using the “recovery” folder and changed the boot order to boot from nvme first. It then fired right up!
I’ve updated the guide here if you want to give it a try (to be used with the latest usbboot)!
Hey James,
I tried again and am not sure what I’m missing. So I downloaded Raspberry Pi OS to my NVME. Does it need to be in any certain format (FAT or NTFS)? I adjusted the boot configuration to 0x6 (6 being nvme) and then saved and took it from my usb 3.0 adapter to the nvme 1x adapter and its still not reading it. It goes from SD card to network and loops and doesnt boot because I don’t have anything plugged into the SD card. You said that you updated the CM4 to the latest firmware using the recovery folder. I know where to update the NVME boot but how do you update the firmware from here? Also, how does the system know to follow the directions of this folder to boot? I ask because I’ve tried to edit the boot.conf file several times and it doesn’t seem to do anything. Thanks again for everything, James and thanks for your hope in me and your patience! I have all of the required things I need except for the know-how but really want this to boot from NVME.
Thanks for everything and you’re awesome!
-Matt
0xf6**
Hey Matt,
I don’t think editing the conf files does anything if you don’t flash it with the USB boot utility. It’s not like config.txt or any of those. The CM4 will be permanently stuck however you flash it and it can’t be updated unless you use the USB boot tool again. You actually have to connect the micro USB to a computer running the usbboot application and it will literally flash the firmware on the device. Once it’s done you just reboot it basically as it will never boot up when it’s connected to a computer for updates.
I would definitely follow the entire guide from scratch. It will do all of that. I cover updating the firmware to the version you specify as well.
I would set the boot value to like what I have in the guide and not set it to 0x6 exclusively. The reason is I’m not sure you’re going to get a “real” NVMe boot through a USB mass storage device boot. If you set the fallback modes it should find it. The value I used in the guide is 0xf25416.
You will need to pretty much do literally everything in the guide. I took out everything you don’t have to do anymore if that makes sense. I’d almost just delete your usbboot folder and start from scratch. You do need to run usbboot on another computer running Linux and plug in the CM4 to that device to “flash” it. I have all of the output you should be seeing in the guide like in the “Flashing New Boot Order / Firmware / Configuration”:
pi@pi400:~/usbboot/recovery $ api@pi:~/usbboot $ sudo ./rpiboot -d recoveryLoading: recovery/bootcode4.bin
Waiting for BCM2835/6/7/2711...
Loading: recovery/bootcode4.bin
Sending bootcode.bin
Successful read 4 bytes
Waiting for BCM2835/6/7/2711...
Loading: recovery/bootcode4.bin
Second stage boot server
Loading: recovery/config.txt
File read: config.txt
Loading: recovery/pieeprom.bin
Loading: recovery/pieeprom.bin
Loading: recovery/pieeprom.sig
File read: pieeprom.sig
Loading: recovery/pieeprom.bin
File read: pieeprom.bin
Second stage boot server done
pi@pi:~/usbboot $
Basically rpiboot will never run on the Pi, nor will any of the files be copied to it. You have to flash them by plugging the CM4’s IO board’s micro USB port into a computer running Linux and “listening” with the usbboot tool.
I’d definitely start from scratch though. Forget everything I told you for sure or anything the old guide said, that was before I got it all updated here. I updated the guide 100% and it should be right now! It’s probably honestly just doing a USB mass storage boot and you are putting it to NVMe only but you aren’t using a real NVMe adapter so I’m guessing that is the issue!
Hey again, I’ve used usbboot before when flashing all of the contents of my Nebra Helium Miner off of it’s emmc to a nice fast SD card. It worked fine and it was straight forward using windows and usbboot because all I was doing is flashing the emmcs contents onto the sd card. This is a little more complicated to me (even though I just may be making it that way).
This time I’m working on a raspberry pi 4 as the host and am trying to do it via Linux and am following your instructions step by step beginning with your “Full Compute Module 4 Setup and Imaging Guide” Tutorial and I am running into a wall. I imaged a fresh copy of Raspian 64 bit and installed the updates at the beginning that it gave me the option to install and besides that, I started right away with the tutorial’s instructions.
pi@raspberrypi:~ $ git clone --depth=1 https://github.com/raspberrypi/usbbootcd usbboot
make
ls
fatal: destination path 'usbboot' already exists and is not an empty directory.
cc -Wall -Wextra -g -o rpiboot main.c
pkg-config --cflags --libs libusb-1.0-DGIT_VER="\"d49a1a2d\"" -DPKG_VER="\"20220111~130126\""bin2c eeprom-erase main.c Readme.md secure-boot-example tools
bin2c.c fmemopen.c Makefile recovery secure-boot-msd win32
debian LICENSE msd rpiboot secure-boot-recovery
pi@raspberrypi:~/usbboot $ sudo make install
install -m 755 rpiboot /usr/bin/
install -d /usr/share/rpiboot
install -m 644 msd/bootcode.bin /usr/share/rpiboot/
install -m 644 msd/bootcode4.bin /usr/share/rpiboot/
install -m 644 msd/start.elf /usr/share/rpiboot/
install -m 644 msd/start4.elf /usr/share/rpiboot/
pi@raspberrypi:~/usbboot $ ./rpiboot
RPIBOOT: build-date Feb 4 2022 version 20220111~130126 d49a1a2d
Waiting for BCM2835/6/7/2711...
Loading embedded: bootcode4.bin
Permission to access USB device denied. Make sure you are a member of the plugdev group.
The above line is the wall I’m running into. I’ve tried with many USB cords including some thick ones definitely used for data transfer as I’ve used them for the usbboot on windows and it recognized the mass media. Thanks again for all of your time.
Sincerely,
Matt
Hey Matt,
Wow, that was unexpected! So it looks like on the Pi you need a:
sudo adduser pi plugdevAlternatively you can run the program as sudo with a:
sudo ./rpibootwhich should run as root permissions and have access. It’s a permissions error basically but it’s something I should add to the guide as I bet a lot of others will run into this as well. The plugdev group is just a group that gives lower level USB device permissions (enough to flash the firmware at least) to regular non-root users. Windows doesn’t really have a similar group other than just running it as admin which is basically the same as sudo but I believe when I tried on Windows it didn’t even need to be ran as admin but it has been a few months.
I’m so relieved you were able to get it working! I’m sure you can get your Linux copy up and running now too if you wanted to do further flashing/modification. You can basically edit those conf files and run the main update .sh script again and flash those changed settings to the Pi as well / update firmware.
I actually have my Nebra outdoor miner that has arrived I need to get setup. I want to replace my Bobcat which is on the inside of my house with an ugly antenna out on the deck. I’m pretty excited but it has been 15 degrees here so I haven’t done it yet but I definitely am looking forward to it. I want to do a second placement with the Bobcat but I honestly have no idea where that would be yet!
Thanks for posting your resolution as well, I will get that added in the guide for the plugdev group!
Yah great! I’m going to try that. Hey speaking of bobcat I saw that you wrote a tutorial including the bobcat 300. Do you know what that runs off of. With many other helium miners, it’s obvious what they run off of (pi 4 for raks, cm3 for Nebra, pi 4 also for sensecap m1) but I’m still very unsure about what the bobcat is. It looks like a cm4 but isn’t of course. They boast a quad core processor like the cm4 and it looks like they have the rocketchip for their processor which as you know is the chip used by some of the cm4 competitor boards.
Bobcats “cm4 type” board is soldered on so if you have problems, you would have to be unsoldering and soldering parts. If the emmc fails, the bobcat does have an sd card slot and a slave USB port so it appears as if it would be possible to upgrade the stock emmc to an sd if it failed. Just figured id pick your brain about these things since.. well you’re the perfect person to talk with about it haha. Talk to you soon after I try what you’ve suggested.
Ohhhhh my… THANK THE RASPBERRY PI GODS!! You helped me out so much and I finally figured it out. Now I have one of the best raspberry pi setups possible at the moment and a very nice 3D glow-in-the-dark case I made for the cm4. I also have the fan installed on the cpu and am able to mess around with the fan speed and such. I have the 64 bit raspian setup on the 2tb nvme and this thing is FAST!!!
THANK YOU SO MUCH. THANK YOU THANK YOU THANK YOU!! Its so hard to find someone who is willing to lend such a helping hand like you did for me. Thanks again for that. I look forward to your response about the helium miner post I just posted.
Sincerely,
Matt
Category Test ResultHDParm Disk Read 349.01 MB/s
HDParm Cached Disk Read 348.59 MB/s
DD Disk Write 254 MB/s
FIO 4k random read 39309 IOPS (157236 KB/s)
FIO 4k random write 16636 IOPS (66547 KB/s)
IOZone 4k read 116196 KB/s
IOZone 4k write 69966 KB/s
IOZone 4k random read 37408 KB/s
IOZone 4k random write 104396 KB/s
Score: 19634
AGAIN THANK YOU SO MUCH SIR!! I made it on page two of the highest bench-marked scores! Alias
“Mursch”.
Hey Matt,
Holy smoke, that’s definitely real NVMe performance score there and is right up there in the top 50 ever recorded! Not a ton of people have done this yet (as the instructions were so bad). Thanks for bearing with me, the scores look worth it as that is pretty much as fast as it gets right now!
I was a little worried you weren’t going to get NVMe performance (I’ve seen some storage adapters in the past that prevent this and don’t allow anything to do with NVMe to be seen) but that is definitely NVMe performance or you wouldn’t be able to hit anywhere near the top 50 even with an excellent drive.
Congratulations on a top-tier end-result setup and thanks so much again for bearing with me and helping me get the guide updated!
Hey 👋
Is it possible to Plug the SSD just in to the io board and have already a working System like in article before? And an other question is: after i Set the Comput Module 4 with eMMC in the rpiboot-System like in the article befor and then just Flash the eMMC with an OS like Windows?
Thanks if you answer me.
Hey BlackSurimi,
I believe the answer is yes to both of your questions. You should more or less be able to plug in the SSD from another Pi and have it work. There are a couple of changes you will need to make to config.txt though to enable the USB ports. Once you did this though you could absolutely use it on multiple Pis.
Once it’s in eMMC flash mode you can absolutely just plug it into your computer and it will show up as a drive you can image normally. Hopefully that helps!
Hey James.
I didn‘t thought that you answer so fast, so I am very happy.
Yes every single word helps me but I don‘t know wich changes in the config.txt I have to make and where I can find them?
Thanks for your help!
Hi James,
Been trying out a few different WD Black SN750 and noticing that the “SE” (aka Gen4 I believe) don’t show up in the results when I submit them. I’ve a both G3 and G4 versions of the 250G one and the G3 shows up, but not the G4 which is a bit faster. G4 500GB doesn’t show up, but the G3 1TB does show up. Any ideas? Doesn’t show up on Latest Results page, or my user page (Lazvon).
This is an interesting thing to play with. Seeing Pi’s run this fast with reliable storage is really cool. I’m running an 8GB w/WiFi w/32GB eMMC (useless 😉 ) board on an CMIO. I have a Waveshare PCIx1 to NVME and a couple of NFHK (think that’s right, vertical one is covered up at the moment, and horizontal one is in the Pi where with the G4 500GB just scored 22669… best score yet I’ve got! Woot!
Boards seems to overclock reliably at 2300/850 with 8 over_voltage. CM4 Heatsink and an Noctua NF-A4x10 12v PWM fan above it in a PETG printed case from Thingaverse.
Scores from the pictures of the screen I’ve taken are:
G4 250G: 22320, 22204, 21956, 22141G4 500G: 22025, 22669
Anyway, any thoughts on “WD Black SN750 SE” aka Gen4 not showing up?
Laz
Hey Lazvon,
I think I can explain. I need to run the SQL queries and add some of the newer models in as it has probably been around ~6 months or so since the last round. It’s almost certainly my fault!
It’s all automated but there is a list of “recognized drives” and I just need to get that one up there with a stock photo of it. Your results are still in there and will actually show once I do this. I actually do see them and they should show up shortly here.
It looks like the model of the G4 coming through is BLACKSN750SE500GB. That’s interesting because it means we aren’t getting a HDParm result or a lshw result from that drive. Some adapters do block this information. That wouldn’t make sense though if it does catch the G3 version of the drive.
Those are very impressive scores!
I’ve added this drive in. The results should now show publicly in your profile. Thanks for letting me know and let me know if you find anymore missing drives!
Thanks, James! Nice. #1 for a minute. 🙂 I have a Sabrent coming that theoretically has “faster” synthetic benchmarks, so we’ll see. Even a couple of the bare
barely overclocked scores were in the 21,500 range.
And I think I’m done playing Pi storage bench marking. 🙂
Received the Sabrent Rocket 4 Plus NVMe 4.0 1TB … on the Waveshare card. First score was 223xx and the second score after waiting a minute for things to settle 22432 … 8v/2300/850 overclock.
HDParm and DD were both faster than I’ve seen. But FIO wasn’t as good, and I’m pretty sure IOZone wasn’t quite as good either.
Thanks again for the bench marking site and the instructions. Was fun to learn how to set this up and see how things work!
Hey Lazvon,
Wow, I thought that was pretty high up there but I didn’t realize it was the top score since I was multitasking on a bunch of different things! That is higher than a lot of high end Samsung performance drives so the SE definitely seems to be a winner on the Pi.
Thanks a ton for reporting this and following up!
Hey Lazvon,
Excellent, that should be a great test! I have it on my to-do list to go through and add all the new drives in the database that haven’t been entered yet. I look forward to your new Sabrent results!
Hey James,
Just thought I’d stop by and update, I have been playing with the Bullseye OS update and that also appears to work well on the CM4 / IO Board configuration.
It doesnt appear to need the Rpi-Update steps so it looks like it ships with the firmware to boot right from the image 64bit image, thought I’d also try a WD SN850 drive and some overclocking and it flies! Massive overkill on the SSD I know but it was lay on the bench at the time and I thought “what the heck..”
Category Test ResultHDParm Disk Read 374.83 MB/s
HDParm Cached Disk Read 374.16 MB/s
DD Disk Write 176 MB/s
FIO 4k random read 71358 IOPS (285435 KB/s)
FIO 4k random write 21467 IOPS (85870 KB/s)
IOZone 4k read 113346 KB/s
IOZone 4k write 80069 KB/s
IOZone 4k random read 61950 KB/s
IOZone 4k random write 119546 KB/s
Score: 23170
Cheers
Graham
Hey Graham,
Welcome back, that is great news and thanks for the update! Score looking fantastic, congratulations!
The WD850 is a fantastic drive for sure. I love testing my faster performance drives when they are on the bench as well. Take care!
Hi James,
Great post this, I’m following the steps to get my CM4 booting from nvme but it looks like the files i get from usbboot dont have the nvme folder as per your directions.
I’m digging to see if its just me being silly (highly likely) or something may have changed on the github files, will come back when I find something.
Cheers
G
Hey Graham,
Thanks for the heads up! I can confirm your findings. It looks like it was removed in the last update to usbboot here.
I can clearly see that the NVMe beta files were removed in this Git change but I’m not sure why. I’m not sure if this means it’s out of beta and you just use the mass storage folder or what the deal is. My guess is that it is out of beta and no longer needs the special “nvme” folder and that just using one of the other ones will likely work but I haven’t confirmed this yet.
The latest “release” version of the files available on GitHub still have the nvme folder and are from Jul 1st. It’s only the cloned git repository that doesn’t have them. I would definitely recommend downloading the official stable CM4 “release” version. This will still have everything unlike the live branch.
I’m guessing when they update the GitHub release they will also give us some notes explaining what is going on but that this is a tentative change in the live source tree but hasn’t been pushed as the latest stable release yet (meaning we don’t really have notes beyond what I linked to in the GitHub commit).
I will update too as I investigate but I figured I’d add the pieces I was able to figure out so far!
Hi James,
I have tried using the updated usbboot but it doesnt seem to work, I simply used the recovery folder in place of the nvme folder but no joy.
I have downloaded the stable CM4 version so will give that a go.
Thanks
Graham
Hey Graham,
That sounds like the best plan until we have confirmation / instructions to use a different process. There may be something out there but if there is I couldn’t find it either.
The stable should have everything you need (I did verify this before replying initially). I look forward to you getting a chance to confirm this will work!
Hi James,
Doesn’t look like the setup for NVMe use is working for me, I tried using the stable CM4 version as recommended but something isnt quite right. On trying to boot we see “NVMe error 8” and a complaint it needs newer software.
I’ll have another look at it and report back when I have a little more time.
Cheers
G
Hey Graham,
Did you still use the beta version of the firmware as outlined in the instructions. In other words, did you download the stable zip file but then otherwise follow the guide from there or did you use the firmware that came with that stable version instead of the beta firmware? If not then it’s flashing old firmware and not doing anything and you need to update the firmware file in the nvme folder as per this guide.
All the nvme folder has is a few text files in it as well as a base firmware file. That’s why it looks so much like the msd folder etc. if that makes sense. There’s some tiny bootcode.bin files and a base config and then the firmware file. This sounds like it’s not using the beta firmware to me if you’re getting that message. Yes they removed a couple of text files but they’re easy to still get and the firmware literally hasn’t changed since I wrote the original guide so it will definitely work as you will be working with the same tools / versions as we know for sure will work.
There hasn’t been an update since I wrote this guide to the firmware. It’s still pieeprom-2021-07-06.bin from the beta folder. It should still be
curl -L -o pieeprom.original.bin https://github.com/raspberrypi/rpi-eeprom/raw/master/firmware/beta/pieeprom-2021-07-06.binto get the correct firmware. Can you verify you’ve done this? I suspect that usbboot was ran with what came in the folder and that updating that will take care of it!Hi James,
Sorry for the delay in reply, I can confirm i did get the beta firmware as per the guide but still nothing.
Going to burn a fresh OS to the NVMe ssd and try gain.
Thanks
Graham
Hey Graham,
Welcome back! Are you using the Raspberry Pi imager to prepare the device initially or is this image being written in another way?
Did you mount the boot and root partitions of the image per the guide and run rpi-update on them? You for sure have to do this or it isn’t going to boot. What did your depmod look like, was there an error? Did it complete without any errors saying rpi-update was able to update the firmware successfully on your mounted SSD partitions?
Which OS are you trying to boot with? Is it Raspberry Pi OS / Ubuntu and is it 32 bit or 64 bit?
Here’s the Raspberry Pi documentation on NVMe booting.
That is the current Pi documentation for it and it’s extremely similar to what I do in this guide but a different process to create it but it would also work.
Can you confirm / let me know what you’ve done so far as far as what image you are using and what additional prep work you’ve done? Basically there’s a few steps beyond burning the image and we may need to check those steps to see if something is going wrong along the way here to explain this. It’s a pretty delicate process. Not only is it the beta firmware we downloaded earlier, it’s also using rpi-update directly on the SSD to update the firmware on there too as well as the kernel to a beta image.
If you’ve been using the 32 bit Raspberry Pi OS it may be worth giving the 64 bit version a try (can see my guide at Where to get the 64 bit Raspberry Pi OS image for Pi 4 / 400. That is the entire beta 64 bit image for Raspberry Pi so it has the newest everything in it.
Basically some piece of firmware must still not be updated somewhere. There’s a couple of things to check at least!
Hey James,
Thanks for the reply, to answer some of the questions:
I have been trying to use Ubuntu server 64bit (I have tried 21.04 & 20.04.3, i prepped the NVMe and the SD cards using RPI Imager. I also tried a downloaded image from Ubuntu (just in case :)).
I do mount the drives as per your directions to run rpi-update, I have also tried with the fat32 & ext4 names also.
I’ll give it a go with the 64bit image you call out, basically I image the SDCard and the NVMe in a usb to M.2 adaptor (the same I used to run on my RPi 4 usb boot build). once thats done I start at the top of your directions and work my way down (i have tried the USBBoot that you recommended with the NVMe folder and the RPi one that no longer has that folder).
If I see any errors in the process I usually roll back and start again but its not often I see an error to be honest, it all looks great until we get to booting from the NVMe and its does nothing hehehe
plug it into the HDMi and we see nvme error 8, failed to open device: ‘nvme’
as you say, I must be missing something.
latest try was using Raspian desktop to copy the sdcard to the NVMe, on reboot it still throws the error 8 / failed to open device so I must be missing something on the rpiboot part or the rpi-update. it works if I have it boot from the SD and run root on the NVMe but that kind feels like a copout hehehe
I’ll keep going at it.
Thanks for the time and effort helping on this.
G
Hey Graham,
Thanks for verifying all of this. Everything looks to be in order to me. You may not be missing anything. It’s possible something has changed (as we know for sure the nvme folder is gone and that things are starting to change). I wanted to know exactly what you had done before I start my own validation. Your description sounds quite complete. If you’ve been watching for errors you definitely would have seen them and I trust your judgement here for sure!
I’m going to fire up my bench and test with all of this stuff and make sure I can recreate my original results. I do have a new fully loaded CM4 with 8GB of RAM, the WiFi + 64GB eMMC that has never been flashed before from the factory. I want to make sure that nothing else has been changed in a way that would break/impact these instructions for sure.
We should double check a couple of things here. What is your power source? Like how are you powering your IO board that your CM4 is connected to, with what size adapter/voltage? Also what is the size and type of your NVMe SSD?
The reason I ask these is that power issues are really common with NVMe on Raspberry Pi. I have a 1 TB Samsung 960 EVO drive that will not get enough power from a 5V adapter but if I plug in a 12V adapter it will. I also have a smaller capacity 256GB Samsung 960 EVO drive and that one *will* work with just the 5V. We should definitely double check our power requirements and the drive you are using can help too to determine this. The adapter/enclosure you are using will help as well as I definitely will recognize a lot of the common troublemakers as far as high power usage etc. but I’m assuming this is a PCIe 1x adapter.
Maybe it’s Ubuntu that is the problem. I think I tried booting with Ubuntu on NVMe (if I did it would have been prepped with the Raspberry Pi Imager tool) but I will check this too and see if maybe it’s Ubuntu that doesn’t support this type of booting on the Pi yet. That definitely could explain a lot of this in which case you may have already met with success if you tried with the 64 bit Pi OS image in the mean time. It does kind of sound like something weird may be going on like the wrong label names for the partitions. Maybe they aren’t being seen as /dev/nvme by the device you are connecting to which I assume it is by the box you are connecting it to when you mount and update the drives. I’ll try it on my end with Ubuntu as well though.
I’m sure we can figure it out!
Hey James,
the 64bit image boots from NVMe 🙂
pi@raspberrypi:~ $ lsblkNAME MAJ:MIN RM SIZE RO TYPE MOUNTPOINT
nvme0n1 259:0 0 232.9G 0 disk
├─nvme0n1p1 259:1 0 256M 0 part /boot
└─nvme0n1p2 259:2 0 232.6G 0 part /
just for good measure I blew away rpiboot on my machine and started again from scratch, fres copy of the 64bit image you suggested and went back through the whole process and we now have a working machine.
Thanks for the help and tips, very much appreciated!
for ref:
PSU: 12v 2.5a (Im a data network engineer so have a few of these laying about as they are used on the older Cisco stuff)SSD: WD_Black SN750 250G
CM4: 8GB Lite (wifi)
Thanks again for the guidance.
G
Hey Graham,
Excellent, I’m relieved to hear you met with success! That’s awesome that you’re a data network engineer, when I asked you for a description of what you had done I could tell you had some kind of technical background from the answer and I knew I didn’t really need to ask anymore questions about whether you followed each step or not because of the level of detail / steps you gave.
This is not always the case and this article is I would rate one of the harder ones on the site to follow for non-technical backgrounds because you have to do every single one of those steps correctly (and there’s so many places to go wrong and not even realize it’s going wrong if you’ve never seen that type of output before) but it’s not going to be difficult with your background and I’m sure was relatively simple to execute (yet frustrating with the mysterious boot error codes). The description of your steps definitely strongly reassured me we were on the right track and that I hadn’t missed/overlooked anything.
I thought a little bit more about this and I am guessing there isn’t a piece in place for Ubuntu that needs to be there to enable NVMe boot. It makes sense because it’s a beta feature so they are not likely to implement anything like that into the mainline Ubuntu image until it’s completely and officially in “stable” status. This must have been what we were fighting with. It might even require the “beta” image which is the 64 bit Raspberry Pi OS image but things are rapidly developing and it looks like some changes are coming.
It’s really a pain of a process to be honest. It’s the most difficult preparation / imaging of a Raspberry Pi to set up for this of any setup I’ve ever done for one. It’s really really fast though! My 960 easily outscores brand new 980 SSDs on my pibenchmarks.com storage benchmark site.
Thanks for your detailed follow-up and notes. This is one of the first major conversations I’ve had on this thread and I actually learned a few things that I would have caught a lot earlier next time to watch out for. On a lot of my other threads I’ve seen what the answer is a bunch of times before which helps but this time you were the “guinea pig” for diagnosing a CM4 boot issue. Precisely which flavor and architecture of OS is one that I should have been asking / thinking about several questions earlier. I have to almost “learn” how to help troubleshoot these myself in a way. Thanks for bearing with me, enjoy the speed / performance and take care!
no problem at all, i dont mind working through stuff like this.
As you say it could be that Ubuntu is missing a few pieces of the puzzle, in the early days of USB Boot it was the same too. its easy for someone to read something on a web page and then get very frustrated when it doesnt work, this stuff is forever changing and hopefully this conversation will help others if they run into issues too.
Its great when you can interact with someone and get the issues resolved, if someone reads this far down, they likely think “but why?”
Well for me, its because a tuned CM4 with NVMe boot just ran a Score:21,920, it does make a difference when its used to run a number of containers in docker and a few other bits and pieces.
Thanks again for the great writeup.
Cheers
G
I’m sorry but you need to install libusb-1.0-0-dev also for CM4 before running “make”… If not, you will get an error.
Hey Truc,
It is covered in the per-requisite article here. You’ll actually be missing more than just libusb if you don’t install the prerequisites. The first sentence of the article is:
If you only followed this guide without doing the usbboot utility setup you would actually have no dependencies installed of any kind (at least on a fresh Raspberry Pi OS install without doing anything else). How do have git and build-essential already as well for make, etc.? Here’s the full list of prerequisites:
sudo apt-get install git libusb-1.0-0-dev build-essentialHopefully that helps!