
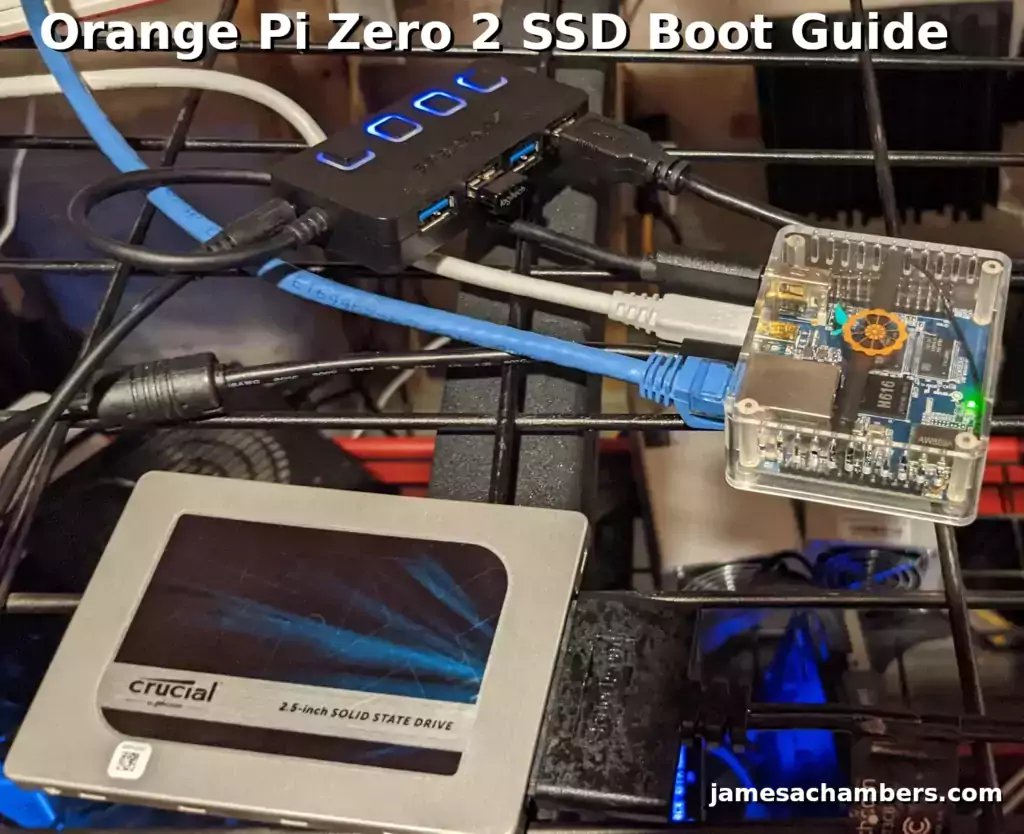
During my recent coverage of SBCs I’ve been benchmarking them using SSDs. The process for booting from a SSD varies across different boards. I’ve found the documentation for some of these to be lacking / nonexistent and the Orange Pi Zero 2 is one of these.
Today I wanted to benchmark the Orange Pi Zero 2 with the SSD and given the lack of documentation I’m going to document my process for setting it up. The Orange Pi Zero 2 will require a sacrificial SD card to bootstrap the process and has USB 2.0 ports. With those limitations in mind let’s set it up and see how it performs!
Hardware Used
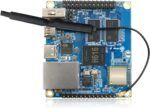
The Orange Pi Zero 2 is a low-cost board from the Orange Pi line of SBCs. It has both a 512 MB or 1 GB RAM option available. Built-in WiFi with included external antenna. Also includes case and a short USB-c power cable. Seems to be pretty widely available in most countries.
Links: Amazon.com*, AliExpress.com*, Amazon.ca*, Amazon.co.jp*, Amazon.co.uk*, Amazon.de*, Amazon.es*, Amazon.fr*, Amazon.it*, Amazon.nl*, Amazon.pl*, Amazon.se*
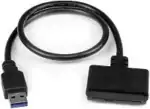
The StarTech USB 3.1 to 2.5″ SATA adapter is one I have recommended for many years for use with all kinds of devices including the Raspberry Pi and Orange Pi. It’s widely compatible and works with gaming consoles as well.
Links: Amazon.com*, Amazon.ca*, Amazon.com.au*, Amazon.co.jp*, Amazon.co.uk*, Amazon.de*, Amazon.es*, Amazon.fr*, Amazon.it*, Amazon.nl*, Amazon.pl*, Amazon.se*, Amazon.sg*
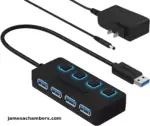
The Sabrent powered USB hub delivers a whopping 2.5A of dedicated power for your USB attached devices. It will easily power the most thirsty of setups such as NVMe enclosures.
Links: Amazon.com*, Amazon.ca*, Amazon.com.au*, Amazon.co.uk*, Amazon.es*, Amazon.it*, Amazon.nl*, Amazon.pl*, Amazon.se*
Note: Make sure Amazon doesn’t try to take you to the non-powered version and that it’s the one with the AC adapter that plugs in to provide extra power

The Orange Pi official mouse uses 2.4GHz wireless to give you a wireless mouse experience with the Orange Pi
Links: Amazon.com*, AliExpress*

The Orange Pi monitor is meant to be a portable monitor you can take anywhere. It has a resolution of 1080P and features a hinge in the back that folds out to support the monitor.
Links: Amazon.com*, AliExpress*
Choosing a Drive
Some possible drive types include 2.5″ SATA, M.2 SATA, mSATA and M.2 NVMe.
I do not recommend using a NVMe drive with the Orange Pi Zero 2 because it has USB 2.0 ports. That is a total and complete waste as we are definitely going to max out the USB 2.0 bus with even a garbage-tier unbranded 2.5″ SSD.
I typically do not recommend USB flash drives either. No matter how fast you think it is unless it is a REAL solid state drive (SSD) it’s slower than your SD card.
The best choices are definitely something like an older cheap 2.5″ SATA or M.2 SATA SSD. I will be using a 2.5″ SATA drive (Crucial MX200 250GB*) to write this guide.
First Step – Have Working Installation
The first step in this method is to already have a working installation of the OS you want to use for SSD booting installed on your SD card.
Many of you will have this already unless you’re installing something totally new. The next thing you should do is make sure it is fully updated with:
sudo apt update && sudo apt full-upgrade -yHaving a fully updated installation will make everything much simpler as we are going to clone a fully working and up to date installation to our SSD instead of try to do a fresh image on a board that isn’t really intended for SSD booting.
Clone Installation
With the Orange Pi Zero 2 booted up using your working installation it’s time to plug your SSD into the Orange Pi Zero 2 using your USB to X adapter.
You should see devices pop up for /dev/sda in lsblk:
orangepi@orangepizero2:~$ sudo lsblk
NAME        MAJ:MIN RM   SIZE RO TYPE MOUNTPOINT
sda           8:0    0 232.9G  0 disk
├─sda1        8:1    0     1M  0 part
├─sda2        8:2    0    15M  0 part
└─sda3        8:3    0 232.9G  0 part
mmcblk1     179:0    0  59.5G  0 disk
└─mmcblk1p1 179:1    0  58.9G  0 part /
zram0       252:0    0 492.1M  0 disk [SWAP]
zram1       252:1    0    50M  0 disk /var/log
zram2       252:2    0 492.1M  0 disk /tmp
First clean off the SSD by running:
sudo fdisk /dev/sda
Delete all partitions until it is completely blank.
Now we can copy the entire SD card to our SSD with the following command:
sudo cat /dev/mmcblk1 > /dev/sda
Wait for the operation to complete (there won’t be any output but you will have a cursor again and be able to type new commands).
If you are having any trouble with permissions try becoming “root” first with:
sudo su
Now try running the command again and as the superuser you should not encounter any permission errors.
Change SD card’s UUID
Now unplug the SSD and plug it back in. We need to change our SD card’s UUID so that it doesn’t try to boot from that partition. We can set it to a random one with the following command:
sudo tune2fs -U random /dev/mmcblk1p1
We can verify that it has changed with blkid like this:
orangepi@orangepizero2:~$ sudo blkid
/dev/mmcblk1p1: UUID="9c0a441b-5aaf-4cf1-bec7-b457d3966cb6" BLOCK_SIZE="4096" TYPE="ext4" PARTUUID="e8ce0794-01"
/dev/zram0: UUID="66b180ff-2899-431b-b8b7-8347d9af85eb" TYPE="swap"
/dev/zram1: LABEL="log2ram" UUID="d87403e0-1d2f-4356-905d-9dfaba14b6ee" BLOCK_SIZE="4096" TYPE="ext4"
/dev/zram2: LABEL="tmp" UUID="9abe5f8e-49b7-41d6-839b-3d2e0aa3b9cd" BLOCK_SIZE="4096" TYPE="ext4"
/dev/sda1: UUID="5dd5b836-fb32-4678-908e-d23f7a028780" BLOCK_SIZE="4096" TYPE="ext4" PARTUUID="e8ce0794-01"
Notice that /dev/sda1 and /dev/mmcblk1p1 no longer have matching UUIDs. This is exactly what we want.
Run fsck
Before we reboot run e2fsck on the drive like this:
sudo e2fsck -yf /dev/sda1
This will prevent you from having to run fsck on the CLI the first time you try to boot.
Reboot and Verify
Now reboot the Orange Pi with:
sudo reboot
With any luck you should be booted using your SSD! We can verify this with the mount command like this:
orangepi@orangepizero2:~$ mount
sysfs on /sys type sysfs (rw,nosuid,nodev,noexec,relatime)
proc on /proc type proc (rw,nosuid,nodev,noexec,relatime)
udev on /dev type devtmpfs (rw,nosuid,relatime,size=431840k,nr_inodes=107960,mode=755)
devpts on /dev/pts type devpts (rw,nosuid,noexec,relatime,gid=5,mode=620,ptmxmode=000)
tmpfs on /run type tmpfs (rw,nosuid,nodev,noexec,relatime,size=100776k,mode=755)
/dev/sda1 on / type ext4 (ro,noatime,errors=remount-ro,commit=600)
/dev/sda1 on /var/log.hdd type ext4 (ro,noatime,errors=remount-ro,commit=600)
/dev/zram1 on /var/log type ext4 (rw,relatime,discard)
tmpfs on /run/user/1000 type tmpfs (rw,nosuid,nodev,relatime,size=100772k,nr_inodes=25193,mode=700,uid=1000,gid=1000)
Here we can see that our root partition (/) is indeed on /dev/sda and not /dev/mmcblk1. Success!
Resize SSD Partition
Once you’ve rebooted and verified you are booted from the SSD we can resize the SSD’s partition to be the same size.
We can use a built in service on the Orange Pi to do this. Use the following command:
sudo systemctl start orangepi-resize-filesystem.service
This will take a few minutes depending on how large your SSD is. Once it is finished verify you are using the full space on your SSD with:
orangepi@orangepizero2:~$ lsblk
NAME        MAJ:MIN RM   SIZE RO TYPE MOUNTPOINT
sda           8:0    0 232.9G  0 disk
└─sda1        8:1    0 230.5G  0 part /
mmcblk1     179:0    0  59.5G  0 disk
└─mmcblk1p1 179:1    0  58.9G  0 part
zram0       252:0    0 492.1M  0 disk [SWAP]
zram1       252:1    0    50M  0 disk /var/log
Here we can see that my SSD’s partition is now the correct size for a 250GB SSD and is no longer only 58.9G like our original partition from the SD card.
Troubleshooting Note
The first time you try rebooting you may get an initramfs screen that says you need to do a manual fsck. This usually means you didn’t completely clean the partitions off the SSD (don’t be ashamed, I didn’t the first time either which is why I know it can be fixed). That can be fixed by using:
e2fsck /dev/sda1 -y
or:
fsck.ext4 /dev/sda1
It should say the filesystem is clean after this and let you boot normally. Once it boots up it wouldn’t hurt to give it a:
sudo e2fsck /dev/sda1 -y
Fixing these may take a while. I had to do this second fsck because even though my system booted after the first fsck the disk was mounted as read-only due to additional errors (which is why it will let you fsck the root partition while actively booted which is normally a no-go, it’s in a protected read-only mode due to errors).
After this comes out clean reboot one more time and you should be all set with a read-write root partition on your SSD!
Testing Performance
You can verify the performance of your SSD on Pi Benchmarks using the following command:
sudo curl https://raw.githubusercontent.com/TheRemote/PiBenchmarks/master/Storage.sh | sudo bash
I ran the benchmark with full knowledge that we were using USB 2.0 and were going to be limited in our score. Nevertheless I wanted to see what the improvement over using the SD card was.
Here are the results:
     Category                  Test                      Result
HDParm                    Disk Read                 37.08 MB/s
HDParm                    Cached Disk Read          36.94 MB/s
DD                        Disk Write                37.8 MB/s
FIO                       4k random read            4745 IOPS (18980 KB/s)
FIO                       4k random write           4426 IOPS (17704 KB/s)
IOZone                    4k read                   8094 KB/s
IOZone                    4k write                  10667 KB/s
IOZone                    4k random read            8020 KB/s
IOZone                    4k random write           10652 KB/s

                          Score: 2,593
You may view the full benchmark on Pi Benchmarks for the Orange Pi Zero 2 here.
Wow, that is a score of 2,593! That absolutely smashes any other tests for the Orange Pi Zero 2 on the site and is the new world record.
To give some context here the maximum score you can achieve over USB 2.0 is something around 2500-2600 points. This is true on Raspberry Pi Model 3s and older which only have USB 2.0 ports. They also max out around the same score.
This is more than double the fastest SD card score anyone has ever achieved on the board. That means it is absolutely worth it to use a SSD with the Orange Pi Zero 2!
Conclusion
It’s working 100%! We are getting full USB 2.0 speeds and maxing out the bus and substantially outperforming any micro SD card. It’s not too difficult to achieve this setup using this method.
It’s also very cheap. You can find 2.5″ SATA drives for less than $20 as well as M.2 SATA drives and those will more than max out the bus.
I highly recommend trying this for all Orange Pi Zero 2 owners! It was worth it on the Raspberry Pi 3 even over USB 2.0 (and I was doing it back then like in this benchmark with an almost identical score on the Pi 3 due to the USB 2.0 bus just like with this one). It’s worth it on the Orange Pi Zero 2 over USB 2.0 as well. A 2x-2.5x increase in speed is worth it for a relatively easy setup process.
Just make sure to use a cheap drive as anything more is massive overkill / a waste due to USB 2.0 limitations!
Other Resources
I’ve also reviewed the Orange Pi portable monitor here
Make sure you check out my Orange Pi Zero 2 review and tips/tricks guide
If you have the Orange Pi i96 check out my updated image available for it here
Want to see an even insanely cheaper board than the Orange Pi Zero 2? Check out my guide on the Orange Pi i96 headless board which is available for something like $7.
If you like retro gaming you may be interested in my ODROID Go Super Guide!


Cheers for the guide. Are there any SBC’s around $20 that have HDMI / VGA and SSD boot and can run a used laptop touchpad from a usb+ arduino? It’s for a book kiosk using a recycled LCD form a laptop for kids in Nepal and Bolivia. cheers!
Hey Antony,
I think the Orange Pi Zero 2 is about as close as you’ll be able to get. While there are some that hit the price point of $20 it’s very rare. Almost nobody is even trying to hit that price point anymore. The only people that claim to be selling single board computers that cheap pretty much is Raspberry Pi but it is basically a lie. They haven’t been able to provide them reliably at those prices for years (and they keep raising them).
I think the floor is around $30-$35 which is where this board falls in line with. Going below that will usually take you into pretty obscure choices or ones that came out many years ago and aren’t very powerful anymore. Prices for SBCs are going up across the board as Raspberry Pi still can’t reliably supply their supposedly cheap ones. Every day that continues the other board manufacturers get more confident in raising their prices since everyone sees that Raspberry Pi can’t provide any availability at the prices they claim to be selling the boards for. That’s before even mentioning the global inflation that has been going on relentlessly for some time now raising the prices of everything.
Hopefully that helps!
Thank you vert much for this instructions. I’ve tested on orangepi 3 LTS and works perfectly!
Hey Manel,
No problem at all, thank you very much for leaving this! I’ve reviewed the Orange Pi 3 LTS but had not got around to writing a SSD boot guide for that specific model yet.
I’m very glad to hear that this version of it works well on there. Enjoy and take care!
You can also buy physical SD to SSD Sata adapters for 7-8 dollars. I wonder if they will work ? I don’t see why not ?
Hey Ian,
That’s fascinating, I’ve actually never seen one for SD to SSD! Theoretically it should work if you’re talking about what I think you’re talking about, yes. I’ve only ever seen ones that are meant to go the other way. Those look like 2.5″ SATA trays that you put a SD card in and then you can access it on the computer. That definitely would not work for this.
I feel like it would need to get power somehow (probably it would need an adapter I’d think). There’s no way you’re powering some of these 2.5″ SATA drives through the SD card port. That’s all totally possible theoretically though. I just don’t see it happening for $8.99. That sounds like it would possibly be one of the SATA powered ones meant to let you plug SD cards into a PC (through SATA I guess?).
When I search Amazon for SD to SSD adapter literally every product I see on that page goes the wrong way. It wouldn’t let you plug a SSD into a SD card port. It would let you plug a SD card into a SATA port basically as if it was a SSD (and using that form factor for the tray).
The closest thing I see to what you are saying is something like this camera is using. That is $129 though. Look at the little wire with the card connected to it and then a SSD on the other end of a giant tray. Even that I’ve never seen anything like in person before but it’s exactly what I pictured in my mind when you described a SD to SSD adapter. That one isn’t even actually SD to SSD either and is CFast to SSD. I can’t find anything like what you’re saying at any price.
This would be similar to SD to eMMC adapters. Not only do those work but you can get 4-5x higher performance scores than even the top SD cards with them. I’ve actually covered these before here on the site.
I’ve literally never seen or heard of anyone testing one of these before. If you do get a hold of one (or if you already have one) I’d love it if you’d be willing to test it on pibenchmarks.com. I’d be fascinated to see the result!
Hee James,
Thanks for the guide. I’ve got everything working on the sdd.
The only thing I can’t get to work is the resize. When I run the comand it does nothing, not even an error it just goes back to root@orangepizero2:~#
Do you know how to fix this?
Hey Twan,
That is pretty strange. There is a way we can see more of what is going on. Can you try a:
sudo systemctl status orangepi-resize-filesystem.servicesudo journalctl -xe
This should tell you what is actually happening when it tries to resize. You may also just want to try:
sudo systemctl enable orangepi-resize-filesystem.servicefollowed by a reboot. Maybe it’s having trouble resizing it live potentially. The status command from your message should give us some hints about what is going wrong perhaps as well.
Hopefully that helps!
Hee James,
I couldn’t get it to work. It said sudo.service was masked and couldn’t get it to unmask.
I did find a way to resize it tho. I loaded a different SD card with Ubuntu desktop (for orangepi zero 2) and used gparted to resize te ssd with (debian server). Probably a weird way to do it, but it worked.
Hey Twan,
No worries at all, your solution of using gparted is fantastic! I’ve actually suggested doing that very thing for some of my other guides where there either wasn’t a resize service available with the OS they were using or it wasn’t working.
This is a great tip for others as well if anyone else is struggling with this. Thanks for sharing and take care!
Hello maybe you know that i could not find an answer online i have some western digital hard drives with the GPN number as: xxxxxx – xxx instead of letters and numbers whats is that meaning?
Hey Jim,
On WD drives the suffix is usually marked as “for internal use”. In other words they don’t really tell us what the suffixes mean. If I were to guess from my experience the suffixes probably represent deals with other manufacturers they have made. Western Digital sells a lot of their drives to other manufacturers that use them internally and resell them and I’d imagine a lot of these end up with the suffixes but there are probably other reasons as well.
Can you still decode the first part of the # using this sheet? Sometimes they are completely different and in that case you are probably really seeing something like HP or Dell codes are being returned from the drive (possible when the companies they are selling the drives to are big enough to get them to do this). I may be able to help with the GPN # as well to figure out what it is!
Thanks i thought they were not original wd drives clones or something, do they put also this xxx in warranty replacment drives??
Or only in hp/dell boxes??
Hey Jim,
I’d definitely imagine that is one of the other uses they would have. That would be a smart way to mark them internally so that if the company/employee encounters one they know exactly what it is. They definitely don’t publish those parts of the codes though. There are probably other uses as well I’m not even imagining but since they don’t give us a list nobody but them knows for sure!
Hey.
It’s all wonderful. Only this does not allow you to boot the operating system from a USB drive. The bootloader (U-boot) is located on the SD card. The system will not start without an SD card.
Hey Wano,
Welcome! Yes, this is correct. You have to leave your SD card in for exactly that reason. The bootloader is on the SD card. Your root filesystem will be on the SSD though.
This is a very old trick that you used to have to do on Raspberry Pis many years ago before there was native bootloader support for USB booting. You will need a sacrificial SD card for this method which will stay in there just to hold the bootloader. It definitely makes sense to pick your slowest and smallest/cheapest SD cards for this purpose as they will be doing nothing but starting the boot process (then it all switches over to SSD).
Basically you’re right, but if you follow the guide exactly you will still be using your SD card to serve that purpose. The Orange Pi Zero 2 doesn’t support natively doing this that I’m aware of without using the SD card bootloader method. You can get just about any device (almost, some devices have really strange boot processes) to do it though using the SD card as just the bootloader and then using the SSD for rootfs. Hopefully that helps!
You are absolutely right: this trick was originally used on raspberries. The only difference is that raspbian uses a DOS partition for /boot.
I tried to learn methods of transferring the bootloader to spi-flash. But I understood almost nothing and did not try because of the fear of turning zero2 into a brick.
But anyway, thanks for your instructions! Using a usb drive is still better than using a sd card.
Hey Wano,
No problem at all! That was why I ended up writing this is even though it’s USB 2.0 it’s still generally better than a SD card especially for SSDs (or even higher end HDDs). I wasn’t sure it would be until I tried and tested it though but it does turn out to be worthwhile on this board.
I’ve wrote a bunch of articles like this for the Raspberry Pi in the past but they are so expensive and so difficult to get that I think it’s creating an environment where people (including myself) are willing to examine these boards a little more closely and even publish some work on them. I’m trying to do more stuff like this since there’s hardly anything out there for boards like this yet/still. Everyone and their dog is making content about the Raspberry Pi now though (and they’re getting cultish about it where they defend things that shouldn’t be defended, maybe they always were and I just see it now, I don’t know).
Definitely let me know if you get brave enough to try using the bootloader from SPI flash again as that would be very interesting to see working. Take care!
Thank you for these instructions, but I wasn’t able to run the ‘sudo tune2fs -U random /dev/mmcblk1’ step due to the partition manager being Msdos and GPT. This seems to be done at the balanafetch stage of copying debian server image onto the microsd. Do you have any suggestions.
Hey David,
Welcome and great question! Can you give me the exact output you are getting? Theoretically for this step you should be booted into the SD card already. Are you booted into the system when running this (as in the Orange Pi itself)?
There’s definitely an issue with Etcher where it will not delete or remake your old partition types. You’d think it would do this but I’ve seen it on the Raspberry Pi and many other devices before. If you think Etcher isn’t cleaning everything off the way it should there are a couple of ways to fix it. The easiest way is to use the official SD card association’s formatting tool. This tool is completely free but is unfortunately only available for Windows and Mac.
You may be also to edit the UUID manually using these instructions. Both fdisk and gdisk both have expert options that let you change this and that may work better than tune2fs for you.
You should not have a MSDOS boot partition on your device. Here’s what mine looks like:
orangepi@orangepizero2:~$ lsblkNAME MAJ:MIN RM SIZE RO TYPE MOUNTPOINT
sda 8:0 0 232.9G 0 disk
└─sda1 8:1 0 58.9G 0 part /
mmcblk1 179:0 0 59.5G 0 disk
└─mmcblk1p1 179:1 0 58.9G 0 part
zram0 252:0 0 492.1M 0 disk [SWAP]
zram1 252:1 0 50M 0 disk /var/log
You can see here there is only one partition on the SD card and one partition on the SSD. It does not sound like this is the case for yours but it should be. There should be no MSDOS partition on this one. I actually see that my SSD partition is exactly the same size as my SD card’s partition so I probably need to add another step on the guide to resize the SSD to use all available space. (EDIT: I added a new section called “Resize SSD Partition” to address this).
If you are on Linux only what I would try to do is completely delete all partitions off of the SD card completely before imaging it. This may or may not be good enough but it sounds like Etcher is not overwriting your old partitioning scheme and that something from before is still on there. I’d have to see the exact error to know for sure but those are a couple of things to start with at least!