
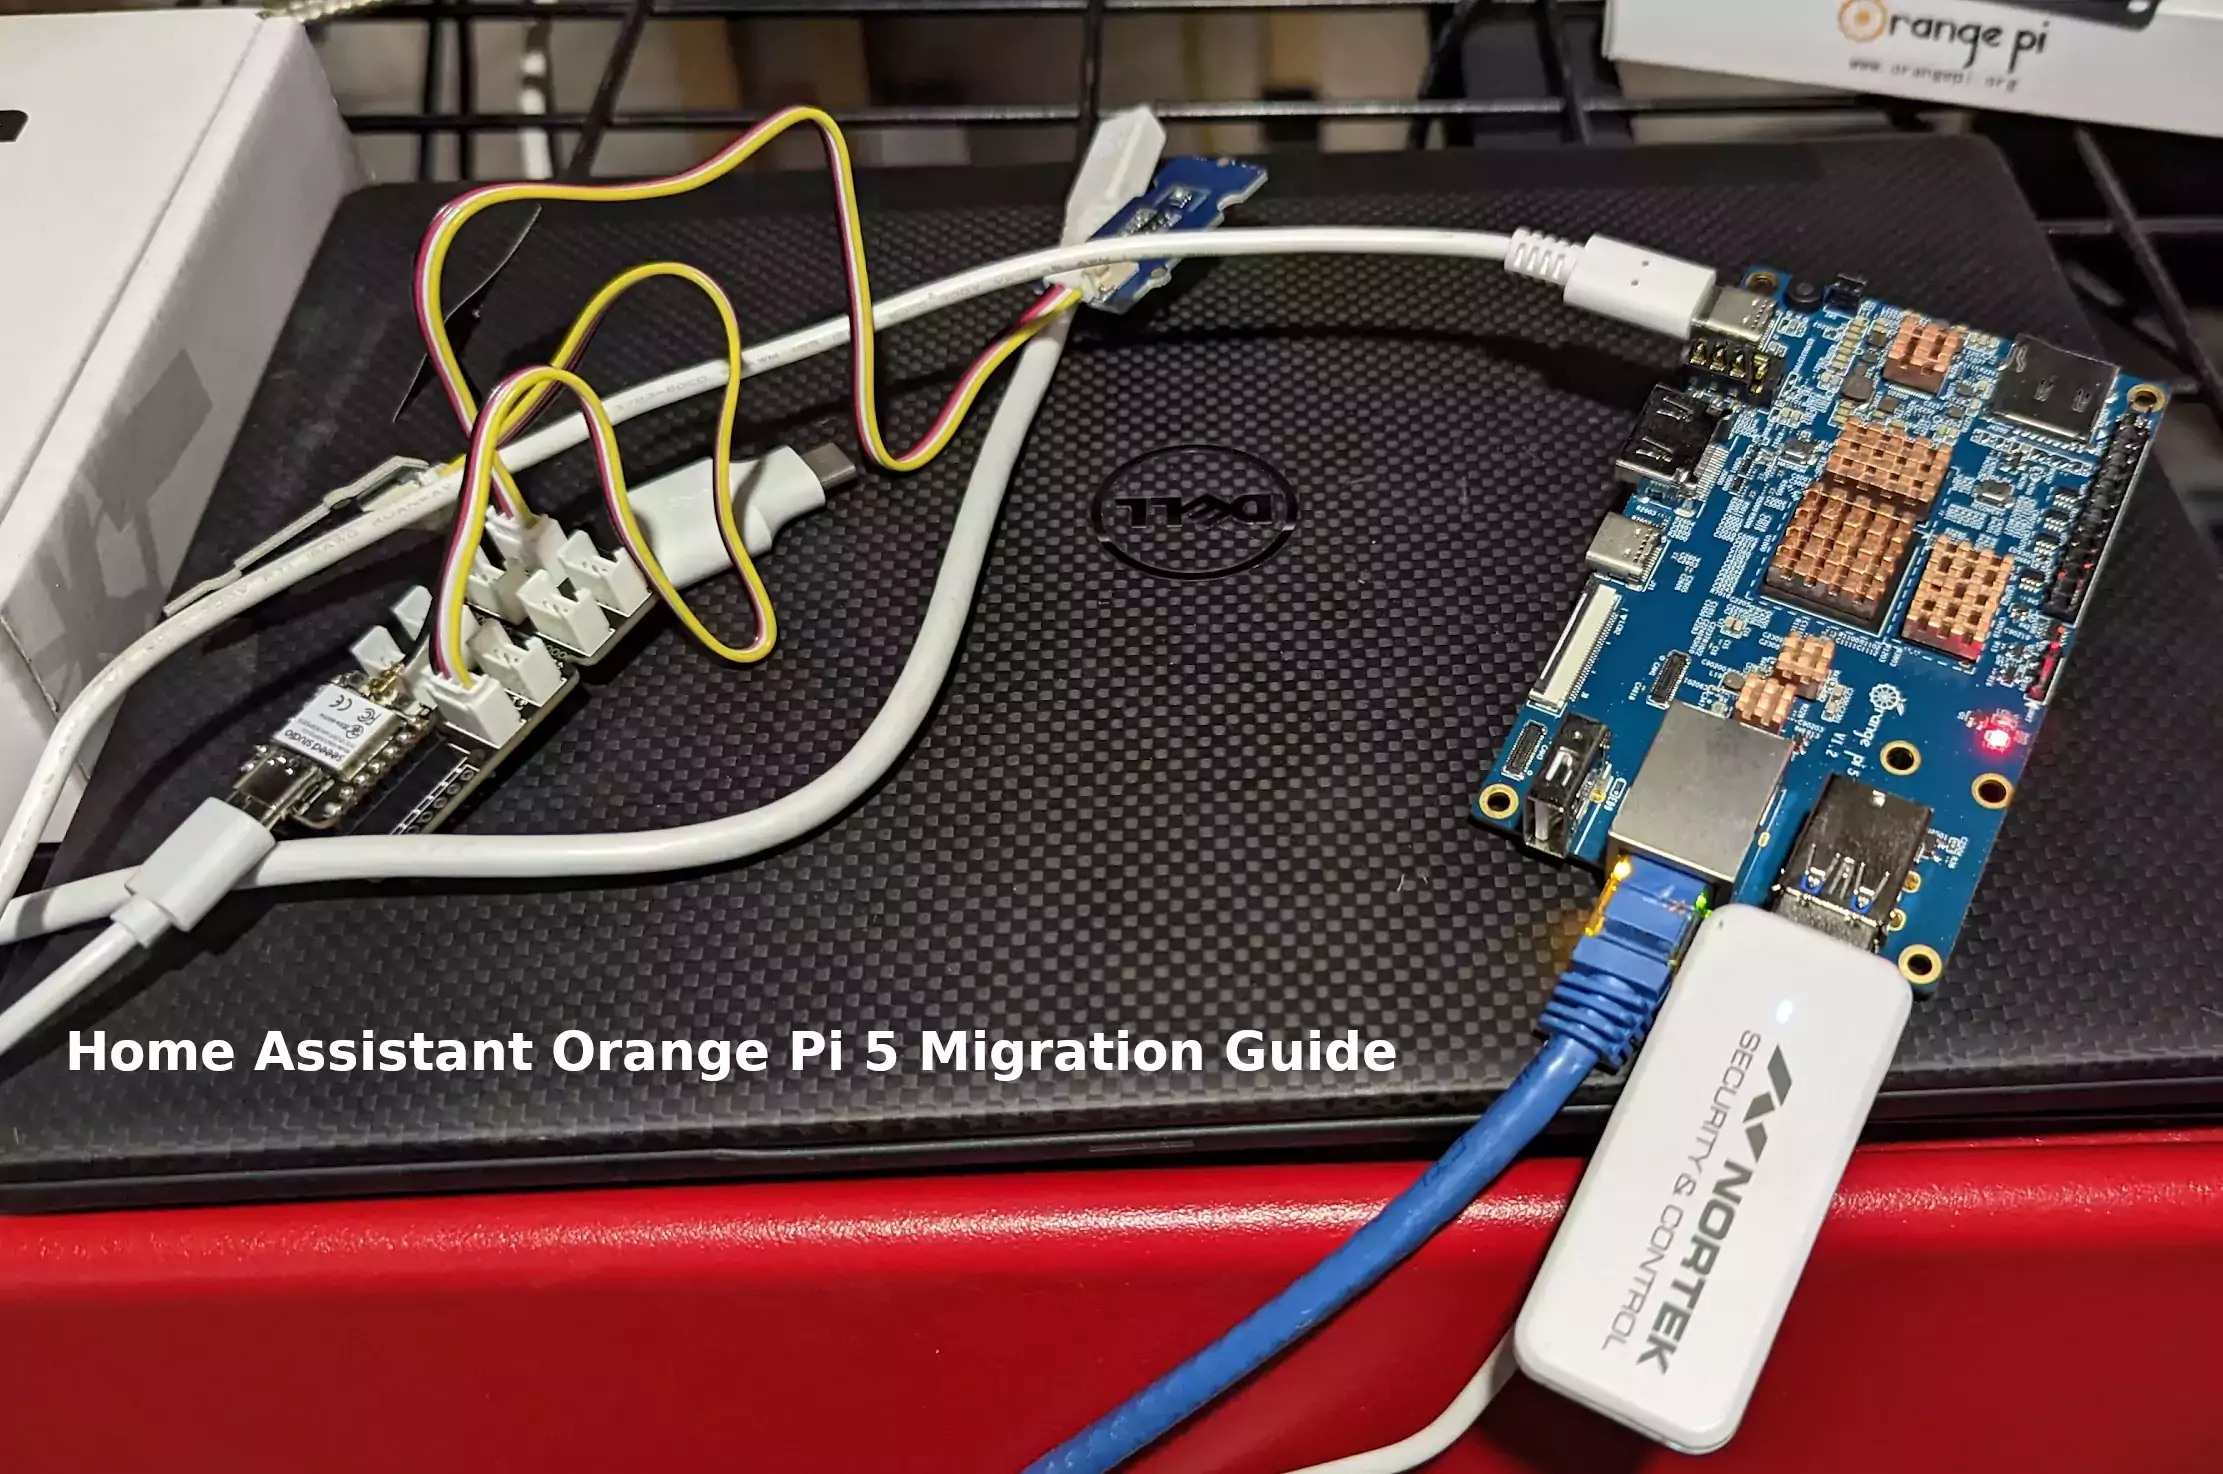
I’ve been running my Home Assistant instance on a very old Tinker Board S with a 16GB eMMC. This has been working fine for a month or two but I recently started getting notifications that my Home Assistant instance was out of drive space. Sure enough, even after removing all of my backups there is almost no space left.
I’ve already received reports from my readers about how much better of an experience Home Assistant is running on an Orange Pi 5. Not only is the CPU much more powerful than something like a Raspberry Pi 4 or Tinker Board S but it has a NVMe storage slot. These two things combined make it a great choice for running your Home Assistant instance.
My previous install is a core installation but I’m going to use supervised on the Orange Pi 5. In this guide I’ll show you how I migrated my instance step by step and evaluate the performance improvement at the end. Let’s get started!
Hardware Used

The Orange Pi 5 the latest release from Orange Pi and is the most powerful model yet. It has a 6 core CPU and options from 4GB of RAM all the way up to 32GB of RAM!
Links: Amazon.com*, AliExpress*, Amazon.ca*, Amazon.co.uk*, Amazon.de*, Amazon.es*, Amazon.fr*, Amazon.it*, Amazon.nl*, Amazon.pl*

The Geekworm copper heatsink set is designed to fit many different single board computers. It uses thermal conductive adhesive which many “cheap” heatsink kits for SBCs don’t have. Eliminates hotspots and reduces throttling. Can be further enhanced by powered cooling over the heatsinks.
Links: Amazon.com*, Amazon.ca*, Amazon.co.jp*, Amazon.co.uk*, Amazon.de*, Amazon.es*, Amazon.fr*, Amazon.it*

The Kioxia (Toshiba) 128GB M.2 2230 PCIe NVMe drive is much shorter than most NVMe drives (full size is 2280). It fits great with single board computers / tablets / other smaller form factors.
Links: Amazon.com*, Amazon.ca*, Amazon.co.uk*, Amazon.co.jp*, Amazon.com.au*, Amazon.de*, Amazon.es*, Amazon.fr*, Amazon.it*, Amazon.nl*, Amazon.pl*, Amazon.se*, Amazon.sg*
Backup Instance
The first thing we need to do is back up your existing Home Assistant installation. To do this go to Settings->System->Backups.
I recommend creating a fresh one right at the time you do your migration. Click “+ Create backup” in the bottom right of the screen. Choose to do a full backup.
Once it’s done click on the backup and you should see this screen:
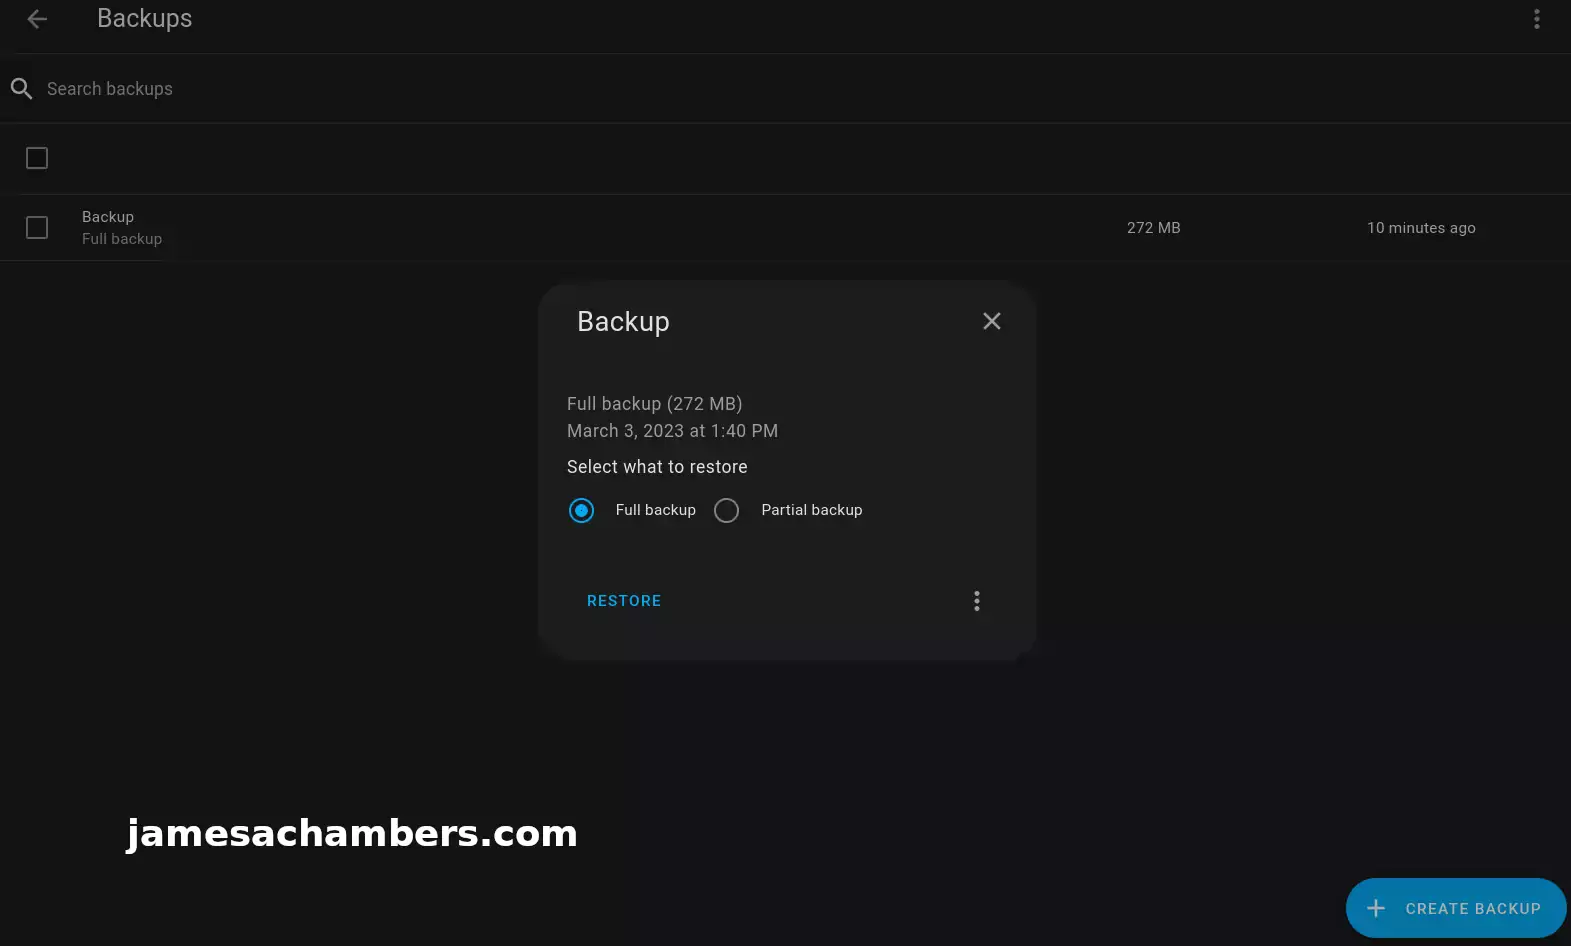
Click the 3 dots in the bottom right of the popup to get an option to download the full backup. Go ahead and download a copy now for us to restore later.
Orange Pi 5 Configuration
Installing Dependencies
I first recommend becoming root with:
sudo su
Now install the dependencies with:
apt-get install jq wget curl udisks2 libglib2.0-bin network-manager dbus apparmor-utils systemd-journal-remote lsb-release -y
Install OS Agent
Check what the latest version of the OS Agent is here at their GitHub page. At time of writing it was 1.5.1. You should update the commands below with the latest version from the GitHub page instead of 1.5.1. Download the aarch64.deb version.
We’re now going to install the Home Assistant OS Agent with:
wget https://github.com/home-assistant/os-agent/releases/download/1.5.1/os-agent_1.5.1_linux_aarch64.deb
dpkg -i os-agent_1.5.1_linux_aarch64.deb
Install Docker
Docker is required as well. To install it:
curl -fsSL https://get.docker.com -o get-docker.sh
sudo sh ./get-docker.sh
Install Supervisor
Next up is the Home Assistant supervisor. We can install the latest version with:
wget https://github.com/home-assistant/supervised-installer/releases/latest/download/homeassistant-supervised.deb
dpkg -i homeassistant-supervised.deb
Choose raspberrypi4-64 as the type in the menu that comes up.
Trick Supervisor to install on Armbian/Ubuntu (optional)
Recently I moved my installation to Armbian using Ubuntu. I did this by editing /etc/os-release:
PRETTY_NAME="Debian GNU/Linux 11 (bullseye)"
NAME="Ubuntu"
VERSION_ID="22.04"
VERSION="22.04.2 LTS (Jammy Jellyfish)"
VERSION_CODENAME=jammy
ID=ubuntu
ID_LIKE=debian
HOME_URL="https://www.ubuntu.com/"
SUPPORT_URL="https://help.ubuntu.com/"
BUG_REPORT_URL="https://bugs.launchpad.net/ubuntu/"
PRIVACY_POLICY_URL="https://www.ubuntu.com/legal/terms-and-policies/privacy-policy"
UBUNTU_CODENAME=jammy
If you are having trouble installing the homeassistant-supervised.deb package try changing the PRETTY_NAME in your /etc/os-release file like I am showing above. This tricks the supervisor into thinking you are running the correct operating system. I have not experienced any problems doing this with Armbian.
If you are using Armbian then when you reach the “Configure orangepienv.txt” section below your file will actually be armbianEnv.txt. You should put the extraargs in that step in /boot/armbianEnv.txt instead of /boot/orangepienv.txt.
Change Hostname (optional)
I wanted to give my Orange Pi 5’s installation the exact same host name as my core Home Assistant installation. To do this you can use this command:
sudo hostnamectl set-hostname homeassistant
I also changed the static lease in my router to point to the Orange Pi with the old IP address instead of the Tinker Board S.
Configure orangepienv.txt
We need to make some changes to the kernel boot parameters so that you don’t receive warnings related to AppArmor. Add the following line to the bottom of /boot/orangepiEnv.txt:
extraargs=apparmor=1 security=apparmor systemd.unified_cgroup_hierarchy=false systemd.legacy_systemd_cgroup_controller=false
Now reboot the Orange Pi with:
sudo reboot
Restore Backup
Now you should be able to navigate in your browser to your Home Assistant IP address on port 8123 with:
http://192.168.X.X:8123
You should see this screen:
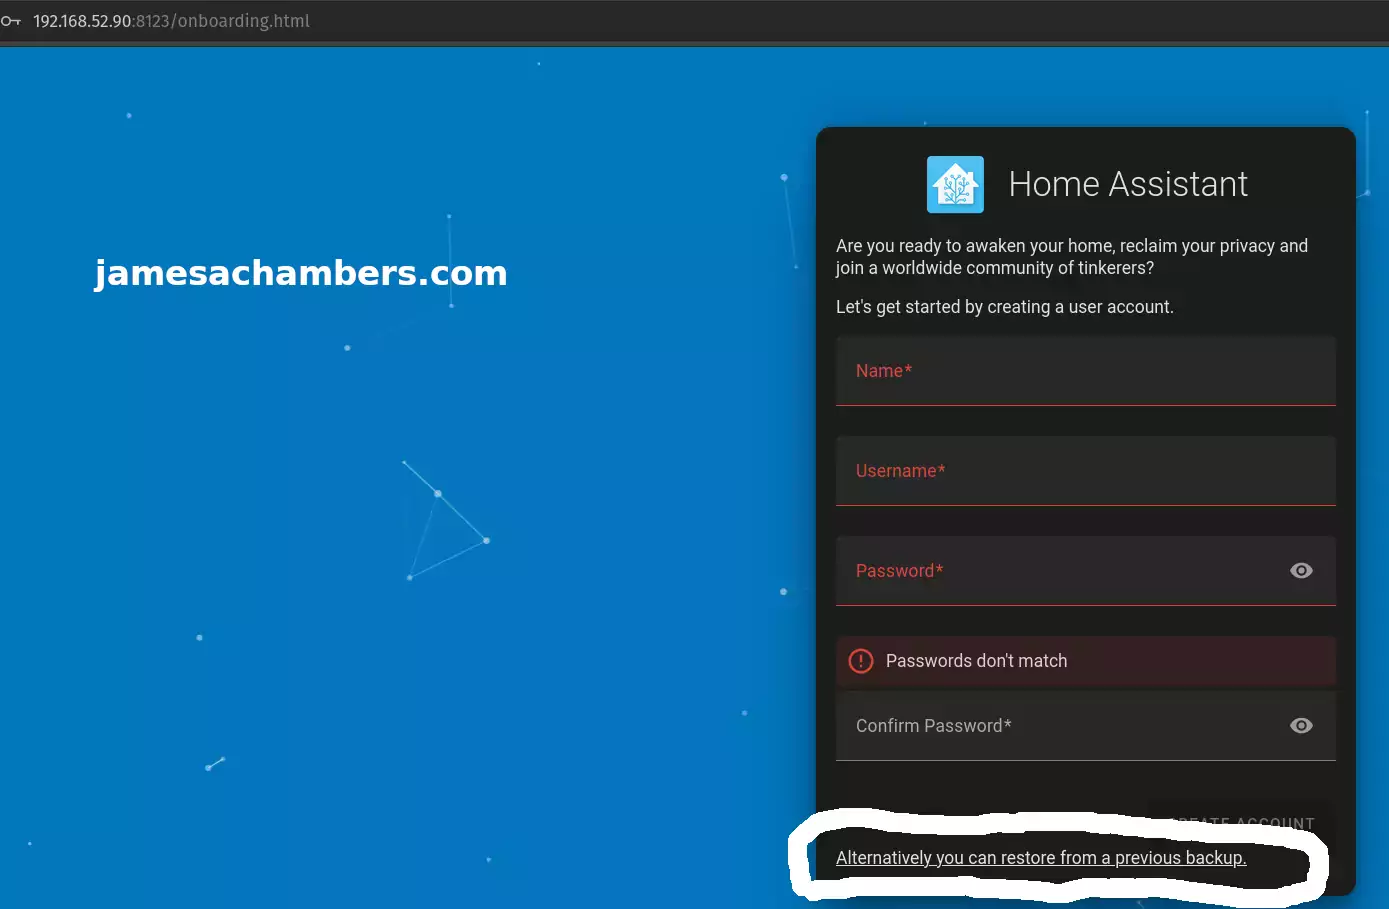
Click to restore from a backup as I’ve circled in the screenshot above. Choose your backup you downloaded earlier.
You’ll get a confirmation on whether you’d like to wipe the device and restore the backup. Confirm your choice and it will begin restoring the backup.
Final Result
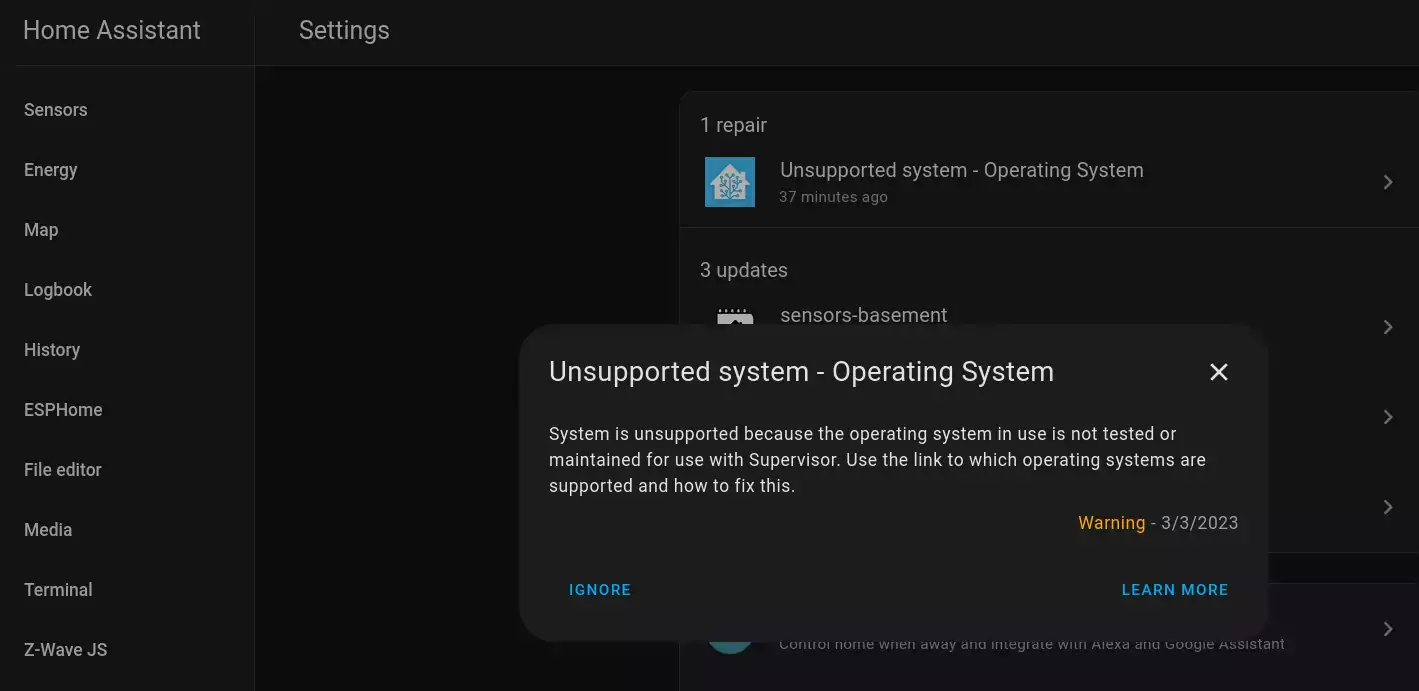
Since I used Armbian I get a “Unsupported system – Operating System” warning. You can safely ignore this warning honestly. They even give you an “Ignore” option.
The Armbian distribution is based on Debian Bullseye so I am not expecting any problems from this.
Everything is back to how it was:
Recompiling my devices in things like ESPHome is *much* faster now. I never doubted it because the tips my readers give me are usually outstanding.
I also now have access to NVMe storage which is not only much faster but much larger than my Tinker Board’s built in eMMC. I don’t expect my Orange Pi 5’s 128GB drive to get filled up very quickly but if it does I’ll put one of my 512GB or 1TB modules in there. This process was easy enough that swapping out the drive wouldn’t be too big of a deal (even reinstalling the OS).
I highly recommend the Orange Pi 5 as a Home Assistant host and will be keeping mine on there!
Other Resources
I’ve also covered how to install Steam on the Orange Pi 5 here
Make sure to check out my Orange Pi 5 review here
I’ve also made a smart button and a smart one-key action key for Home Assistant


sorry I meant to say Container and no Core …
Hey Mario,
Yes, it is very dumb that they do this. It’s easy to defeat though. I’m running it on an unapproved operating system (Armbian). All I did was edit /etc/os-release. Their installer was too stupid to tell the difference. This is documented in the article. I used:
PRETTY_NAME="Debian GNU/Linux 11 (bullseye)"NAME="Ubuntu"
VERSION_ID="22.04"
VERSION="22.04.2 LTS (Jammy Jellyfish)"
VERSION_CODENAME=jammy
ID=ubuntu
ID_LIKE=debian
HOME_URL="https://www.ubuntu.com/"
SUPPORT_URL="https://help.ubuntu.com/"
BUG_REPORT_URL="https://bugs.launchpad.net/ubuntu/"
PRIVACY_POLICY_URL="https://www.ubuntu.com/legal/terms-and-policies/privacy-policy"
UBUNTU_CODENAME=jammy
Notice that I didn’t even bother to change any line other than the first one (PRETTY_NAME). That was enough to defeat their protections against installing this on other operating systems. Once you do this when you try to install the homeassistant-supervised.deb it will no longer tell you that it’s unsupported on your OS and the package will install normally. That’s the only check / protection that it has. I don’t even get an “unsupported operating system” warning anymore. It can’t tell the difference.
I definitely admire your spirit and agree with you. There’s no reason you can’t do what you’re doing unless you need access to plugins/add-ons. For example I use Z-wave so the container-only version was not an option for me. I needed supervised so I’d be able to install add-ons/plugins so I could use my Z-Wave stick. It’s trivially easy to defeat their protections as I’m installed on Armbian (Ubuntu Armbian, not even the Debian Armbian).
Hopefully that helps!
I have stopped using HA supervised … They turning into Apple, not allowing other software/docker images than the ones they approve of. I go now with HA core and watchtower for updating.
Hello, I have HA running on an RPi4 on a 128GB NVMe,the power consumption on it is around 6,5W. On my Orange Pi 5,with the same Nvme and running only PiHole it consumes 2w. How much watt is your OP5 with HA consuming? Thank you
Hey TuzoGT,
Great findings! You are absolutely right. I was able to confirm this using my handy dandy USB power meter tool:
It appears the Orange Pi 5 is thrice as efficient as the Raspberry Pi 4 when using NVMe. This makes sense actually because the Raspberry Pi 4 sucks at using NVMe unfortunately while the Orange Pi 5 is a natural at it having a real M.2 slot. I’m measuring 2.58W with Home Assistant running.
Hopefully that helps!
Thank you, that’s really awesome. I will try your tutorial with the containers. I just bought another OPi5, I just like to run HA, PiHole and OMV (Rock 5 with 2TB NVMe with 4,5W btw…) on separate sbc’s, so I can shut them down remotely and separately via shelly smart plugs.
Hey TuzoGT,
Excellent, that’s very exciting! I think it will be fantastic for all of those use cases. It’s only going to be better than just about everything else on the market and at the price they are selling it for the value is definitely there to have more than one. Add on top of it that the Orange Pi 5 is actually easily available and has not gone through any of the supply shocks of the Raspberry Pi (and I doubt that it will, Orange Pi is a very different beast from Raspberry Pi in the way they produce and distribute their boards).
I love the smart plug usage to control them as well. That makes perfect sense to me. I’ve done a lot of similar things in HA such as putting my whole network setup on one that can easily be rebooted via smart plugs. I think this will work out great for you. Definitely let us know how it all turns out!
Hey James,
so my OPi5 is running HA flawlessly. The power consumption ist just around 1,9-2,1 watt. Thank you for your detailed instructions.
Hey TuzoGT,
Excellent, mine is still going strong as well! I think you’ll really enjoy the setup. Take care!
Hi James,
Thanks for posting this tutorial as you convinced me to swap over from a RPi 4B to the OPi 5 and so far its very stable and doesn’t cut out my wireless network like the RPi did.
I’m certain the 16GB RAM is overkill but it should allow me to grow my setup as I start integrating new devices and just as well as I have some more ESP32 gear on the way.
Hey Razor Burn,
Great work, that should end up being a fantastic setup! With the 16GB of RAM you’ll be able to add lots of other services to that Orange Pi. You could run multiple other servers and applications easily with plenty of room to spare.
I think the best part though is that ESPHome and anything that requires Home Assistant to build from code will be at least 4x faster. This makes a very big difference when you are updating the firmware of ESP modules one at a time. That took forever to build on the RPI4 and Tinker Board.
Just how much time you’ll save during updates rebuilding your ESP devices will be more than worth the time to upgrade. Thanks for sharing how this turned out!
Could this be done on the orange pi3 LTS?
I can’t seem to find any information on it .. I can install for but I want supervised version
Thanks
Hey Jimmy,
It should be exactly the same for the Orange Pi 3 LTS. That one still has up-to-date operating systems so you shouldn’t have any trouble doing it with that one.
I’d try exactly the same process here with that one. Hopefully that helps!
I did the install and got an error saying it didn’t support Ubuntu 22.4.0.. what version of Ubuntu should I be running?
Thanks
Hey Jimmy,
Here’s what I used:
root@homeassistant:~# cat /etc/os-releasePRETTY_NAME="Orange Pi 1.1.0 Bullseye"
NAME="Debian GNU/Linux"
VERSION_ID="11"
VERSION="11 (bullseye)"
VERSION_CODENAME=bullseye
ID=debian
HOME_URL="https://www.debian.org/"
SUPPORT_URL="https://www.debian.org/support"
BUG_REPORT_URL="https://bugs.debian.org/"
root@homeassistant:~#
The OS agent GitHub page says it’s only meant for Debian here.
They’re all going to say “unsupported” though. I have a screenshot of this in the “Final Result” section. Mine said unsupported as well and you just click ignore so I doubt you even really need to change operating systems. It won’t tell you it’s supported if you switch to Debian either as the article outlines. It doesn’t seem to recognize Orange Pi’s operating systems as a pure official Debian (probably because it isn’t).
It’s just a warning meant to cover their butts by letting you know “we don’t recognize this as an officially sanctioned configuration” so theoretically weird problems could be coming from the Orange Pi operating system. It means they’ve never tested it with that exact configuration / OS flavor which isn’t really surprising given there are now *hundreds* of different single board computers. I’ve never even thought about it again since I hit ignore and I haven’t had any problems.
Almost all of the action is happening in Docker containers anyways. If you are running an operating system that is the latest version of Ubuntu 22.04 or Debian Bullseye then those are going to have access to all the same Docker packages. I’d imagine anyone trying to run it on older versions of operating systems that aren’t up to date are going to have problems though as people do with my Docker containers that I’ve developed.
Hopefully that helps!
Am I supposed to be running docker? or is this stand alone?
and I really want to thank you for your help!!
Hey Jimmy,
No. Just follow the article normally and press ignore when it tells you it’s not supported. Definitely don’t overthink it and you are massively here. Mine did the *exact same thing* in this very article. This is completely expected. There is nothing you can do about it, everyone else’s will do the same thing, and it doesn’t mean anything. It’s just a warning and you will literally never see it again once you hit that “Ignore” button.
It sounds like you were already done to me if you had just hit the ignore button. It was already finished. This whole setup is like a 5-10 minute process. There are no tricks. There’s no advanced configuration to fix this. Just click ignore.
If you are getting some kind of other error and it’s not letting you get to the ignore part then you need to get rid of Ubuntu. Home Assistant says you can only run this on Debian officially. I used Armbian but the official Orange Pi Debian would be fine as well.
Again, it’s still going to tell you it’s unsupported and you will have to click “Ignore” as shown in the screenshots but I’m wondering if you aren’t even getting that far on Ubuntu. Will the package not even install? Because that’s a different problem and yes you’re going to have to switch operating systems in that case. Installing the package is definitely required and your OS doesn’t meet the official requirements I linked to above. There’s no Ubuntu support listed:
There are only two supported operating systems to run the Supervisor on:Home Assistant OS
Debian 11 (Bullseye)
These operating systems are actively tested and maintained, for use with the Supervisor.
You can’t use Home Assistant OS unless you are using a Raspberry Pi 4 or Tinker Board. You should not want to even do that though. That’s what I *upgraded* from and man do I not miss running Home Assistant OS. The Pi 4 and Tinker Board are *so slow*. Those are 4+ year old boards. They’ve already stated multiple times that no new boards will *ever* get Home Assistant OS support as it’s essentially obsolete. The whole idea of distributing a unique OS image for every board is incredibly obsolete and might even be impossible these days for a team of that size.
That means you need to use Debian 11 (Bullseye) with a supervised installation if you want to use any modern board that isn’t slow as molasses. Core is not the same thing as Home Assistant OS. Core is the *worst* type of installation you can do. Docker is slightly better than core but still not fully featured. You want a supervised install. I’ve covered this before in other comments but let’s share this image:
There is no such thing as “standalone” but most people who say standalone mean core which is literally the worst type of installation you can do. This has confused people in the comments already and when I pointed this out they never replied. I don’t blame them though because once you see the chart there’s nothing to say. Do you still want a core/standalone install after seeing that? Probably not. You won’t even have add-ons or most of the major features with a core install. You won’t be able to do a managed restore either with core.
It’s basically this simple. You can’t install Home Assistant OS on the boards outside of the choices on the installation page and they are few. The boards that support it are old / slow / outdated. Supervised will give you every single feature except a “Managed OS”.
This is actually good because if you install Home Assistant OS on your device you can’t do anything else with it. At all. You can use some plugins/addons to try to squeeze a bit more functionality out of it but frankly it’s a joke compared to a real OS like Debian Bullseye. With supervised installs you just have a normal OS that you can run anything you want to on *and* Home Assistant. It’s the replacement for Home Assistant OS and you won’t give up anything. You’ll actually gain full control over your device as well and can run all sorts of other things on the OS.
Hopefully that helps!
arn][warn] If you want more control over your own system, run
[warn] Home Assistant as a VM or run Home Assistant Core
[warn] via a Docker container.
[warn]
Adding 'diversion of /etc/NetworkManager/NetworkManager.conf to /etc/NetworkManager/NetworkManager.conf.real by homeassistant-supervised'
Adding 'diversion of /etc/NetworkManager/system-connections/default to /etc/NetworkManager/system-connections/default.real by homeassistant-supervised'
Adding 'diversion of /etc/docker/daemon.json to /etc/docker/daemon.json.real by homeassistant-supervised'
Adding 'diversion of /etc/network/interfaces to /etc/network/interfaces.real by homeassistant-supervised'
Unpacking homeassistant-supervised (1.4.2) ...
dpkg: dependency problems prevent configuration of homeassistant-supervised:
homeassistant-supervised depends on docker-ce; however:
Package docker-ce is not installed.
this is the message i receivedwhen i dpkg
I don’t mind running docker ..if i was able to find it.. every install I’ve tried ties back to docker.com and it returns file not found
thanks Jimmy
i was able to get it running …the problem now is docker doesnt have any ports assigned to homeassistant so i cant actually see that its running but docker says it is
thanks Jimmy
Hey Jimmy,
Excellent! I looked at what the supervisor set up on my Docker and it looked like this:
root@homeassistant:~# docker container lsCONTAINER ID IMAGE COMMAND CREATED STATUS PORTS NAMES
40082e9e3a70 ghcr.io/home-assistant/raspberrypi4-64-homeassistant:2023.3.6 "/init" 23 hours ago Up 23 hours homeassistant
ae136d112437 ghcr.io/home-assistant/aarch64-hassio-supervisor:latest "/init" 23 hours ago Up 23 hours hassio_supervisor
8624cb5cc9a6 homeassistant/aarch64-addon-configurator:5.5.0 "/init" 2 days ago Up 2 days addon_core_configurator
5b36eef6e0db ghcr.io/esphome/esphome-hassio:2023.3.1 "/init" 2 days ago Up 2 days addon_5c53de3b_esphome
097761481c32 homeassistant/aarch64-addon-zwave_js:0.1.76 "/init" 2 days ago Up 2 days addon_core_zwave_js
ee1be21aac4d homeassistant/aarch64-addon-ssh:9.6.1 "/init" 2 days ago Up 2 days addon_core_ssh
d7d7c66cc026 ghcr.io/home-assistant/aarch64-hassio-multicast:2022.02.0 "/init" 2 days ago Up 2 days hassio_multicast
71f979d6df3c ghcr.io/home-assistant/aarch64-hassio-audio:2022.07.0 "/init" 2 days ago Up 2 days hassio_audio
7207d8c501ba ghcr.io/home-assistant/aarch64-hassio-dns:2022.04.1 "/init" 2 days ago Up 2 days hassio_dns
6d9518856792 ghcr.io/home-assistant/aarch64-hassio-cli:2022.11.0 "/init" 2 days ago Up 2 days hassio_cli
c58b67be3367 ghcr.io/home-assistant/aarch64-hassio-observer:2021.10.0 "/init" 3 weeks ago Up 2 days 0.0.0.0:4357->80/tcp, :::4357->80/tcp hassio_observer
root@homeassistant:~#
Try a sudo docker container ls and that may reveal them. I think it’s running as root.
You shouldn’t need to do much maintenance on the installation. It’s literally the supervisor’s job to manage it. That being said if you have a small disk it sometimes is a good idea to clean out Docker’s cache. This can give you free disk space back.
For example I tried this for the first time after installing this installation on mine with:
sudo docker system prune -aHere were the results:
root@homeassistant:~# docker system prune -aWARNING! This will remove:
- all stopped containers
- all networks not used by at least one container
- all images without at least one container associated to them
- all build cache
Are you sure you want to continue? [y/N] y
Deleted Images:
untagged: homeassistant/aarch64-addon-letsencrypt:4.12.8
untagged: homeassistant/aarch64-addon-letsencrypt@sha256:613f425a8ebea4f2f0538c6e4c23ca843a58788031c446396f578f33bf8d5935
deleted: sha256:8a7e6f0c5cc1677942535a875c60012beea4ce8d0342aa95cc75abe52326ab1a
deleted: sha256:756aba0d3039760c4ce8a1ae0b19f453be82e101850e48b705a5403a4f98b606
deleted: sha256:cbf58397e989da06c683f76b0e84e7fc34b7920b3e306d720fbbf055c881230a
deleted: sha256:d1ade764fa188ab93afb800cbf2dbf10f6cee5b5f19342b03e50e4234751b6e4
deleted: sha256:7731dc0aa1eb60c0aff5c04573fc84259e988d5b7d5e981b3c6e508176ae0e31
deleted: sha256:250d63d744cdcafd1bb757c550e42b19bcb4241440737324b953842c0925d09e
deleted: sha256:11f7233ab1923b06ffef6c5c9702c44e35e042b25d2004cbfa07e3cb9d3047d6
deleted: sha256:ef2e55302e255917cc7715ca5a0453ac3bac23dcdc8266be2b0571734e18c751
deleted: sha256:5b5d1f6ed69b81ab35aefa024eba0c7813eb5349c0917d695932d41d9e9d3d29
deleted: sha256:28c3ef0014837b8fb539a449c1da6bbf960c8551d8c25ca51dbdca25c8bb790b
untagged: ghcr.io/home-assistant/aarch64-hassio-supervisor:2023.03.2
Total reclaimed space: 465.8MB
root@homeassistant:~#
It looks like I got 500MB back. My SSD is 128GB so this is basically nothing for me (even with the smallest SSD size unless the SSD is 5+ years old). If I was running on a 16GB or 32GB (definitely not recommended, I tried this on my Tinker Board S 16GB eMMC and it didn’t even last a month before it was completely full) it would make a big difference to clean it.
I’ve literally never even checked my Docker until you posted this though. It’s not something you need to deal with unless your storage is way too undersized. If you are still running it on Ubuntu I’ve since found even more warnings about why you shouldn’t do that. Definitely use Debian if you’re having any residual issues:
This installation method has very strict requirements, for example, it only supports Debian (and Ubuntu, Armbian, Raspberry Pi OS are not supported). So, make sure you understand the requirements from step 1 above.Even I got called out for using Armbian specifically. Home Assistant specifically says no. That’s probably why mine was unsupported as well. Again, I’ve never had a problem with it but if you are you’re really just rolling the dice not using Debian 11. Any problems you run into can probably be attributed to that. Here’s even more:
Docker CE (Community Edition) is the only supported containerization method for Home Assistant Supervised. We only support FHS 3.0 on the host file system.Docker CE >= 20.10.17
Systemd >= 239
NetworkManager >= 1.14.6
udisks2 >= 2.8
AppArmor == 2.13.x (built into the kernel)
Debian Linux Debian 11 aka Bullseye (no derivatives)
Home Assistant OS-Agent (Only the latest release is supported)
Only the above-listed version of Debian Linux is supported for running this installation method. When a new major version of Debian is released, the previous major version is dropped, with a deprecation time of 4 months. An exception to this rule occurs if the new version does not meet the requirements of the Supervisor.
There you go. Fortunately my Armbian is literally the Debian 11 (Bullseye) version of Armbian so I meet all of these package requirements. That’s probably why I’ve had no issues. It’s really anyone’s guess though which version exactly Ubuntu or any other operating system is using. Does it have exactly the right version of AppArmor, all of that stuff? Who knows. Not only that but they say that when the next version of Debian is released the old one will be discontinued within 4 months. Even the *version* of Debian you must be running is very harsh so any problems you’re having are going to be explained by that.
If my Armbian installation has any problems the first thing I’ll probably do is install the official Debian Bullseye version from Orange Pi. That one should be even closer than mine. I’ve had no need to do any such thing so far fortunately.
Thanks for sharing how it turned out!
Hey Jimmy,
You can try sudo apt update && sudo apt install docker-ce. If this doesn’t work then please try with a different operating system (Debian).
If apt is saying file not found it means you’ve literally never ran sudo apt update before. That’s basically all that is. Every other board and Linux system would do the same if you’ve never updated your repository.
Hopefully that helps!
This is where I went to get Docker install instructions.
He’s not on Debian unfortunately so it’s going to be different. This should take all of 5 minutes to set up and he was fighting with it for days on Ubuntu. The Ubuntu instructions would actually be here.
Hopefully he did end up just installing Debian after all! I spent several days in back and forths trying to explain you need to be running Debian according to the Home Assistant requirements.
I’d venture to guess that he finally installed Debian and it “just worked” which is why he stopped replying (pretty typical). Nobody should have to struggle with it that much to get it going unless they’re running the wrong operating system.
Bonjour,
Merci pour votre post
J’ai acheté un orangepi5
J’ai essayé d’installer HA sur OS debian 11 mais au moment d’installer le dpkg -i homeassistant-supervised.deb j’ai une erreur .. j’ai choisi l’os agent armv7 ? Est ce la mon erreur ?
Qu’avez vous choisi comme image pour le système d’exploitation de l’orange Pi svp ?
Cordialement
E.Roy
Hey Roy,
Welcome! So the issue is that you won’t choose arm7 for the package type. That’s 32 bit ARM. You’ll want aarch64/ARM64:
os-agent_1.4.1_linux_aarch64.debThat one should be the right one for the Orange Pi 5. Hopefully that helps!
I am completely new to homeassistant in SBCs. Is it possible to install Home Assistant core on orange pi 5? If so can you provide a little guidance with that.
Hey michael,
Why would you want to install core on there? Its exceptionally hard. It also doesn’t do anything different at all. I migrated from an “OS” install (which is better than core) to supervised. There’s also a third installation method using Docker. That’s called a “container installation” so there’s actually 3 different types.
You can go here to read the difference. There’s a checkbox list showing the difference between core, supervised and container as well as the full OS install:
You can probably see why I asked why you wanted to install core from this chart. There’s literally no reason to install core. It’s actually *worse* than mine! Look how much you’ll be missing if you installed core vs. supervised.
The only reason core exists is because they used to offer pre-packaged images for really old devices like the Raspberry Pi 4 and Tinker Board S. They stopped offering this because it was stupid. There’s new SBCs released every day. They’d never be able to keep up with them all.
Core is now actually one of the *worst* installations you can do. You will have the least amount of features. Do you want to use “Addons” for example? Not with core you won’t. You can’t install the full “OS” because that doesn’t exist for anything except Tinker Board and Raspberry Pi.
I don’t miss my core installation at all. This was actually easier to set up than core. I’m guessing most people just don’t understand the difference between core vs. supervised vs. container. If they did they would understand that core is the same (actually worse now) as supervised and they’re probably confusing it with containers/Docker.
I was going to link you to the installation instructions for a core installation just so you’d see them and immediately realize there’s absolutely no point in putting yourself through that. I actually can’t find any core installation instructions for you though for the Orange Pi. I don’t think anyone has ever done it (and nobody should). It wouldn’t be impressive at all if anyone did it. It would be sad. They would end up with an installation that can’t even install addons. Not a good outcome.
A core installation would be completely worthless to me because I use ESPHome (an addon). I actually came from a Tinker Board so I had a full OS install. Again, I lost nothing giving this up, and it performs a million times better on the Orange Pi 5. The full OS install only “manages your OS updates”. Do you know why? Because Home Assistant IS your OS on that one. If it didn’t you’d never get any updates. On mine I just use apt update && apt dist-upgrade as per normal. I can also use it for a lot of other things than just Home Assistant because it’s running a regular OS.
Core installations are basically obsolete. They only work on 5+ year old boards like the Raspberry Pi and Tinker Board and they are never planning on adding more because like I said core is obsolete. If they had gone down this path there would be *hundreds* of different Home Assistant OS images now. They stopped doing core/OS installations a long, long time ago. Years ago. It is the worst type of installation that you can do. I guarantee that the list I posted above will only continue to get worse for core and that any new features will be exclusively for supervised and container (and probably be backported to the full OS installs, for now).
The Docker/container one has more features available than that and supervised has all features available. The funny thing about people viewing Docker as the lowest tier of Home Assistant installation is that the one they think is the best (core) is still considered inferior to Docker by the Home Assistant developers/team. Core is probably the one they wish they had *never* done and has basically been halted for anything but the Raspberry Pi and Tinker Board.
Thus I’m sure you understand my confusion at this point. You’re asking me how to set up the worst and most difficult type of Home Assistant installation which will yield you the least amount of features of anything you can do. Needless to say this makes no sense and I highly recommend just using a normal supervised install. You’ll be up as fast as I was in this guide.
If you were doing a brand new install the only difference from my guide is that instead of importing a backup you’d just create a new account at that screen. That’s it. It should be exactly the same.
Hopefully that helps!