
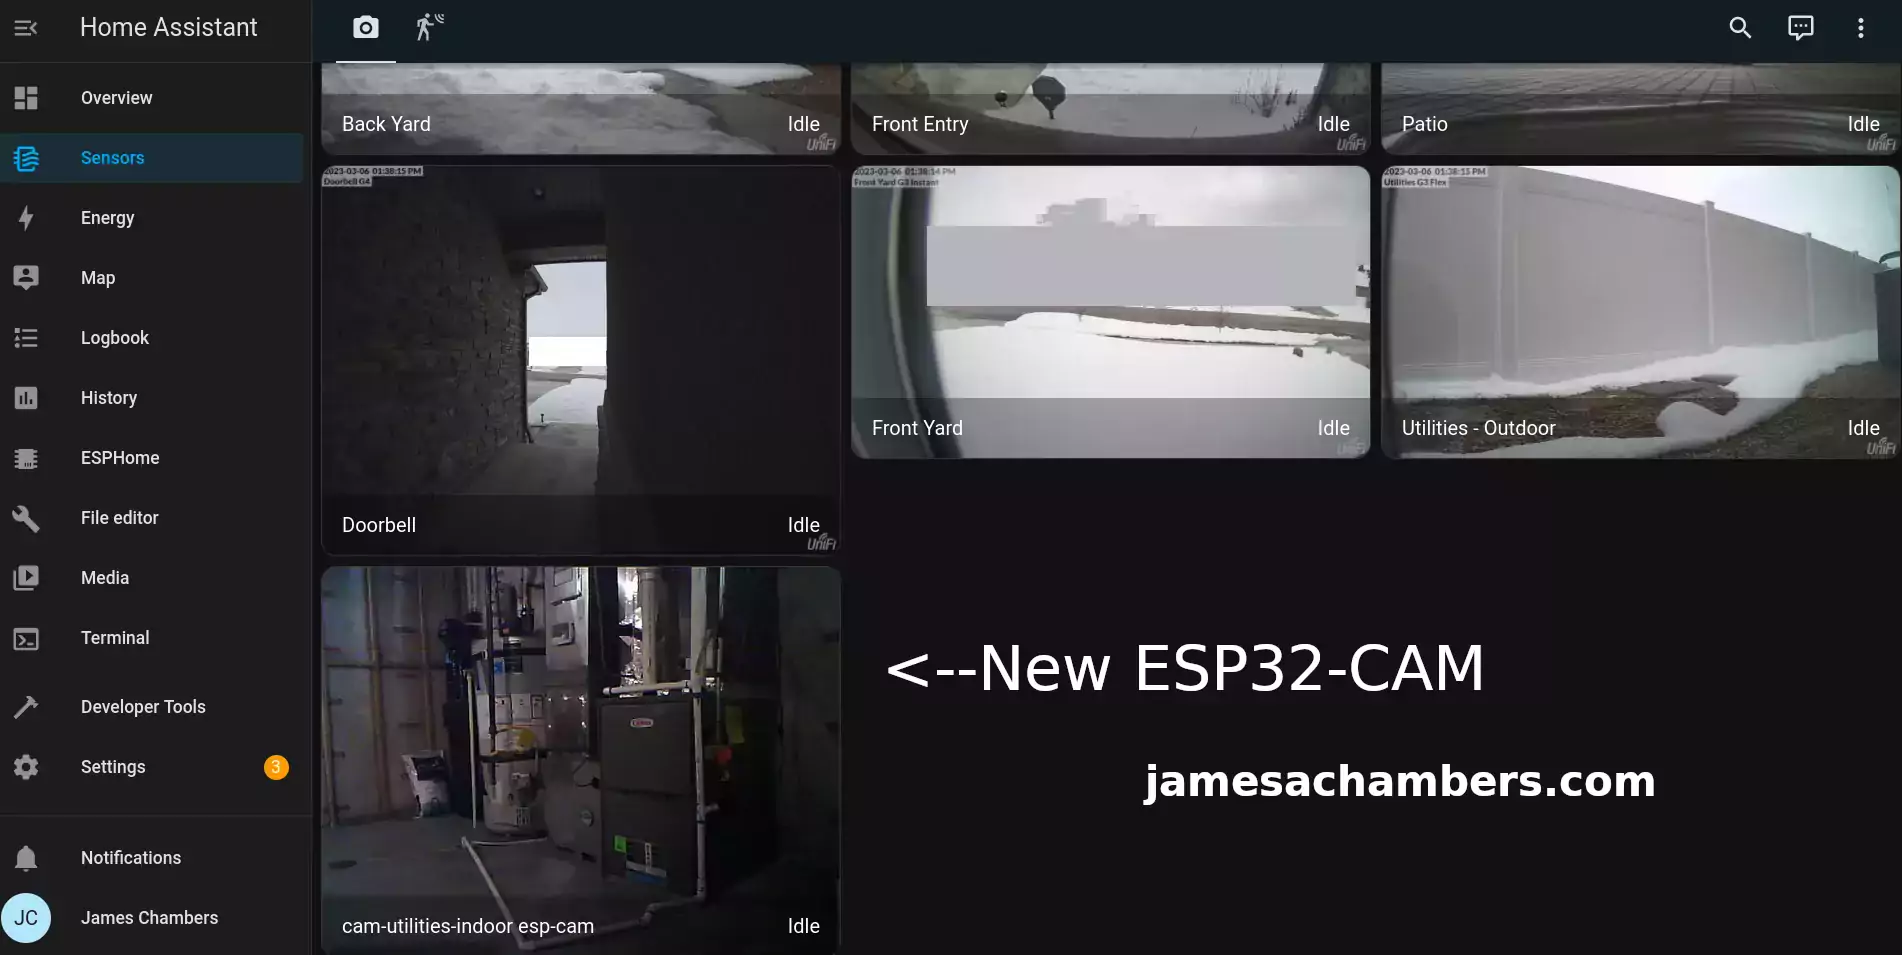
I’ve been integrating my entire home into Home Assistant using as much open-source software and hardware as possible. Recently I’ve wanted to add some additional cameras to my home such as a camera to monitor my HVAC / water heater.
Although I already have 6 Unifi cameras integrated into the home those are extremely expensive (and frankly availability is poor on them as well). I don’t need a camera that costs hundreds of dollars to watch my utilities area.
Fortunately there’s an extremely widely available and cheap solution called the ESP32-CAM! These have been around for years and are one of the most popular ESP32 products. Since it uses ESP32 we can use ESPHome and Home Assistant to add a super cheap camera anywhere you’d like.
In this guide I’ll show my ESP32-CAM setup and how to configure it within Home Assistant and ESPHome. Let’s get started!
Hardware Used

The ESP32-CAM-MB supports WiFi / Bluetooth / BTLE for connectivity and uses a OV2640 2MP camera module
Links: Amazon.com*, AliExpress*, Amazon.com.au*, Amazon.ca*, Amazon.co.uk*, Amazon.co.jp*, Amazon.de*, Amazon.es*, Amazon.fr*, Amazon.it*, Amazon.nl*, Amazon.pl*, Amazon.se*
Overview
First let’s take a look at the ESP32-CAM:
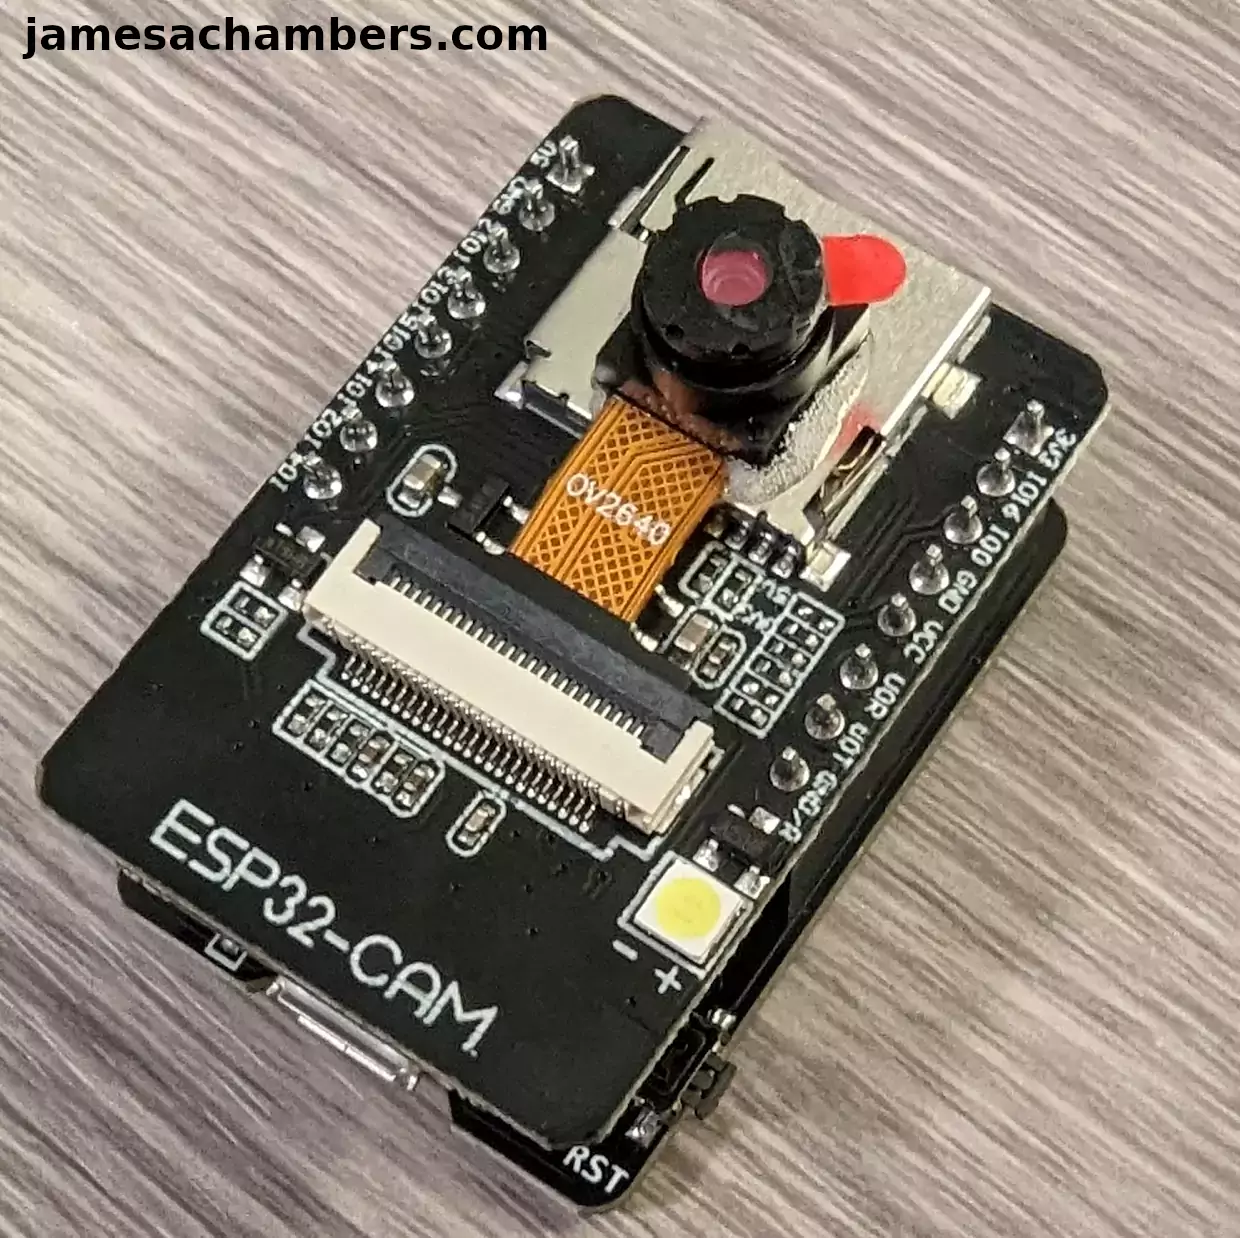
This is exactly how it came except you can see that I glued the image sensor in place. It comes detached but I intend to mount it pretty much exactly how you see it so I used some glue and permanently attached the sensor to the SD card slot. Be careful not to get any glue inside the SD card slot if you try this (and use less glue than I did).
Notice that there are two pieces here:
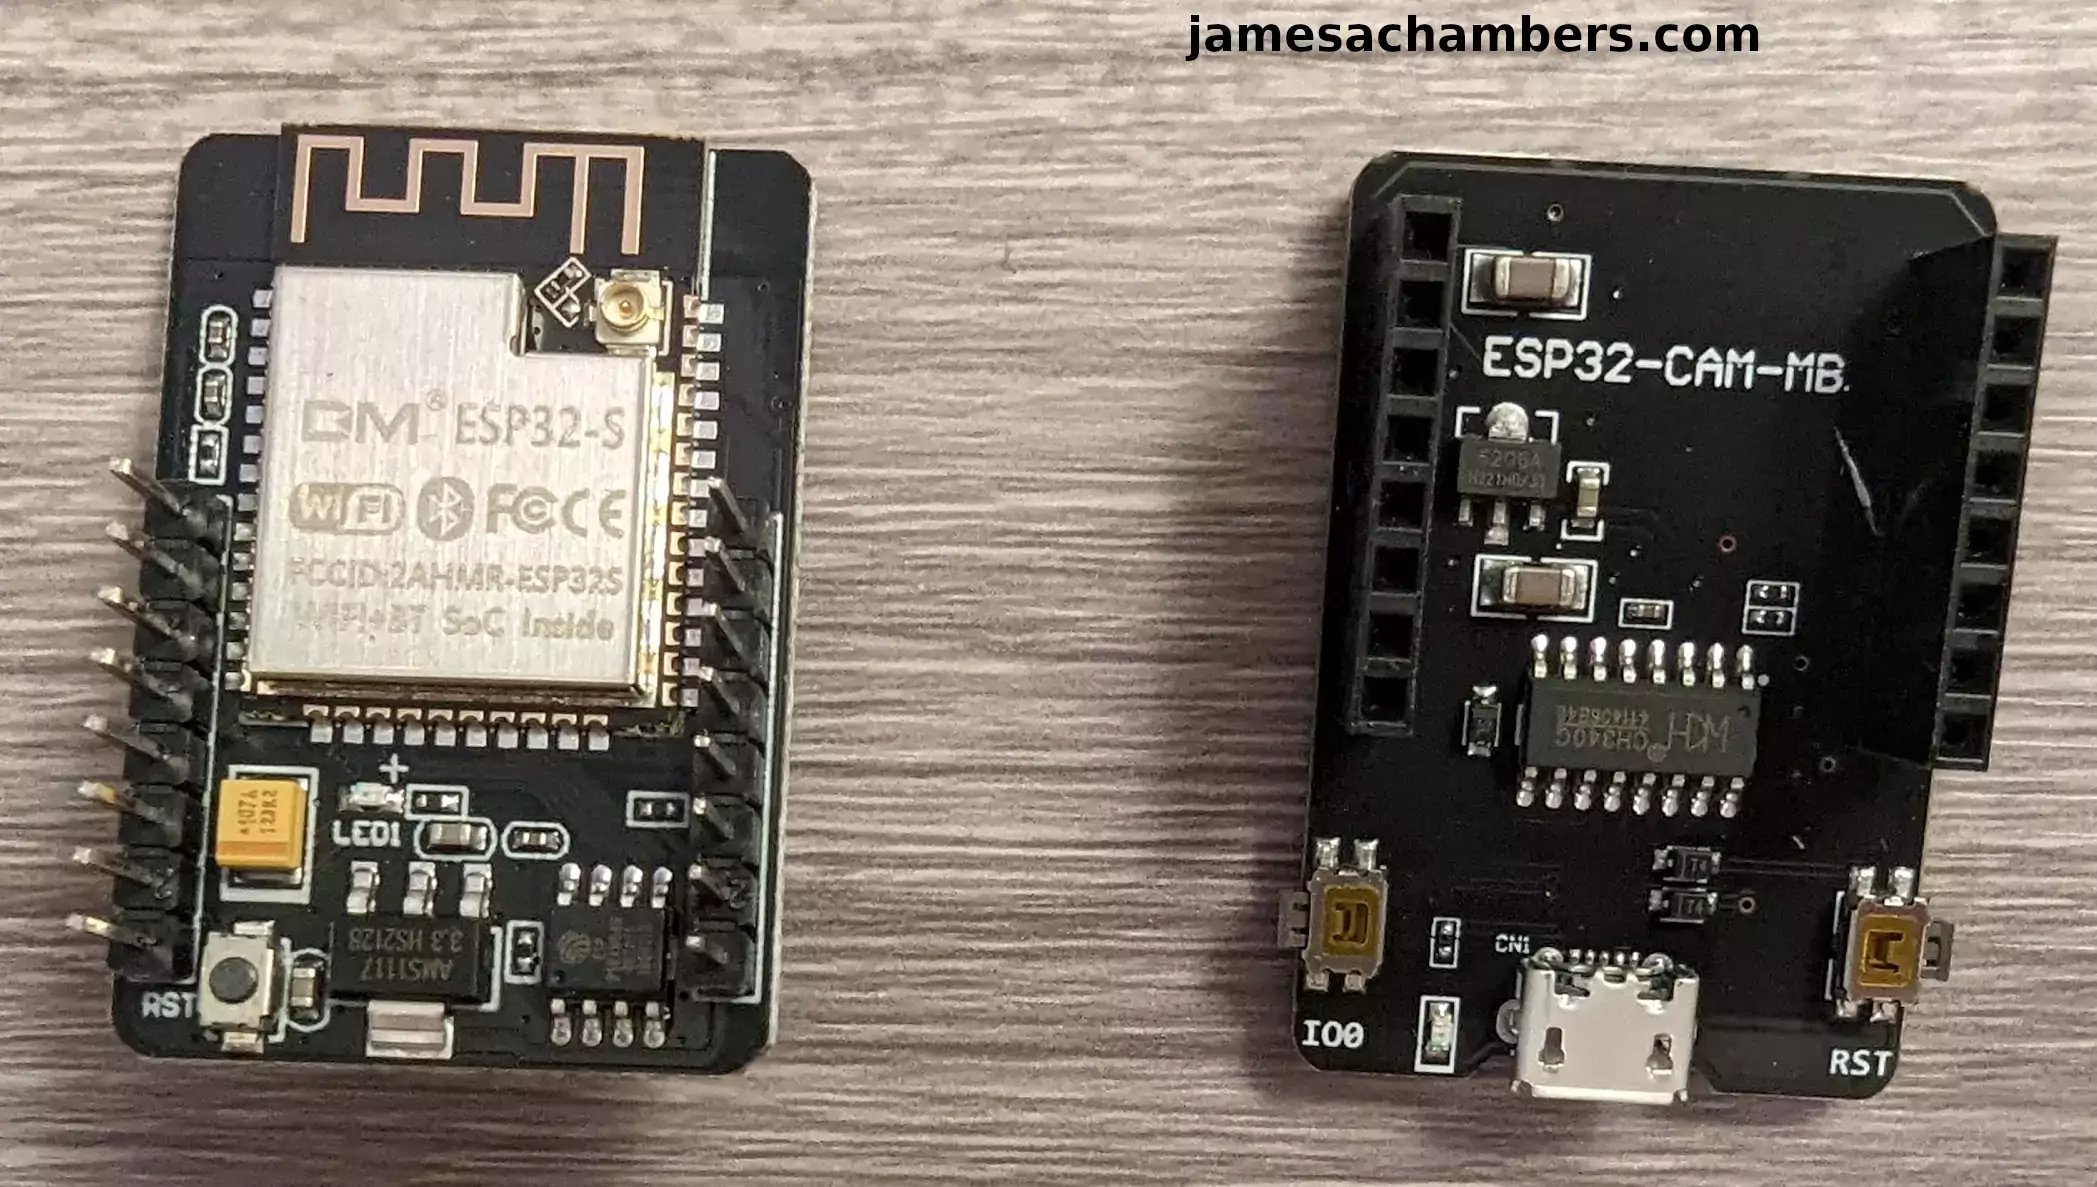
Not all listings give you both and some will only give you the ESP32-CAM part of the board. If you already have devices you can use with it to power the camera this is fine but most people will want to pick up the listing that comes with both boards. The micro USB port to power the board is on the second board as you can see above.
Here is the area I wanted to add a camera to:
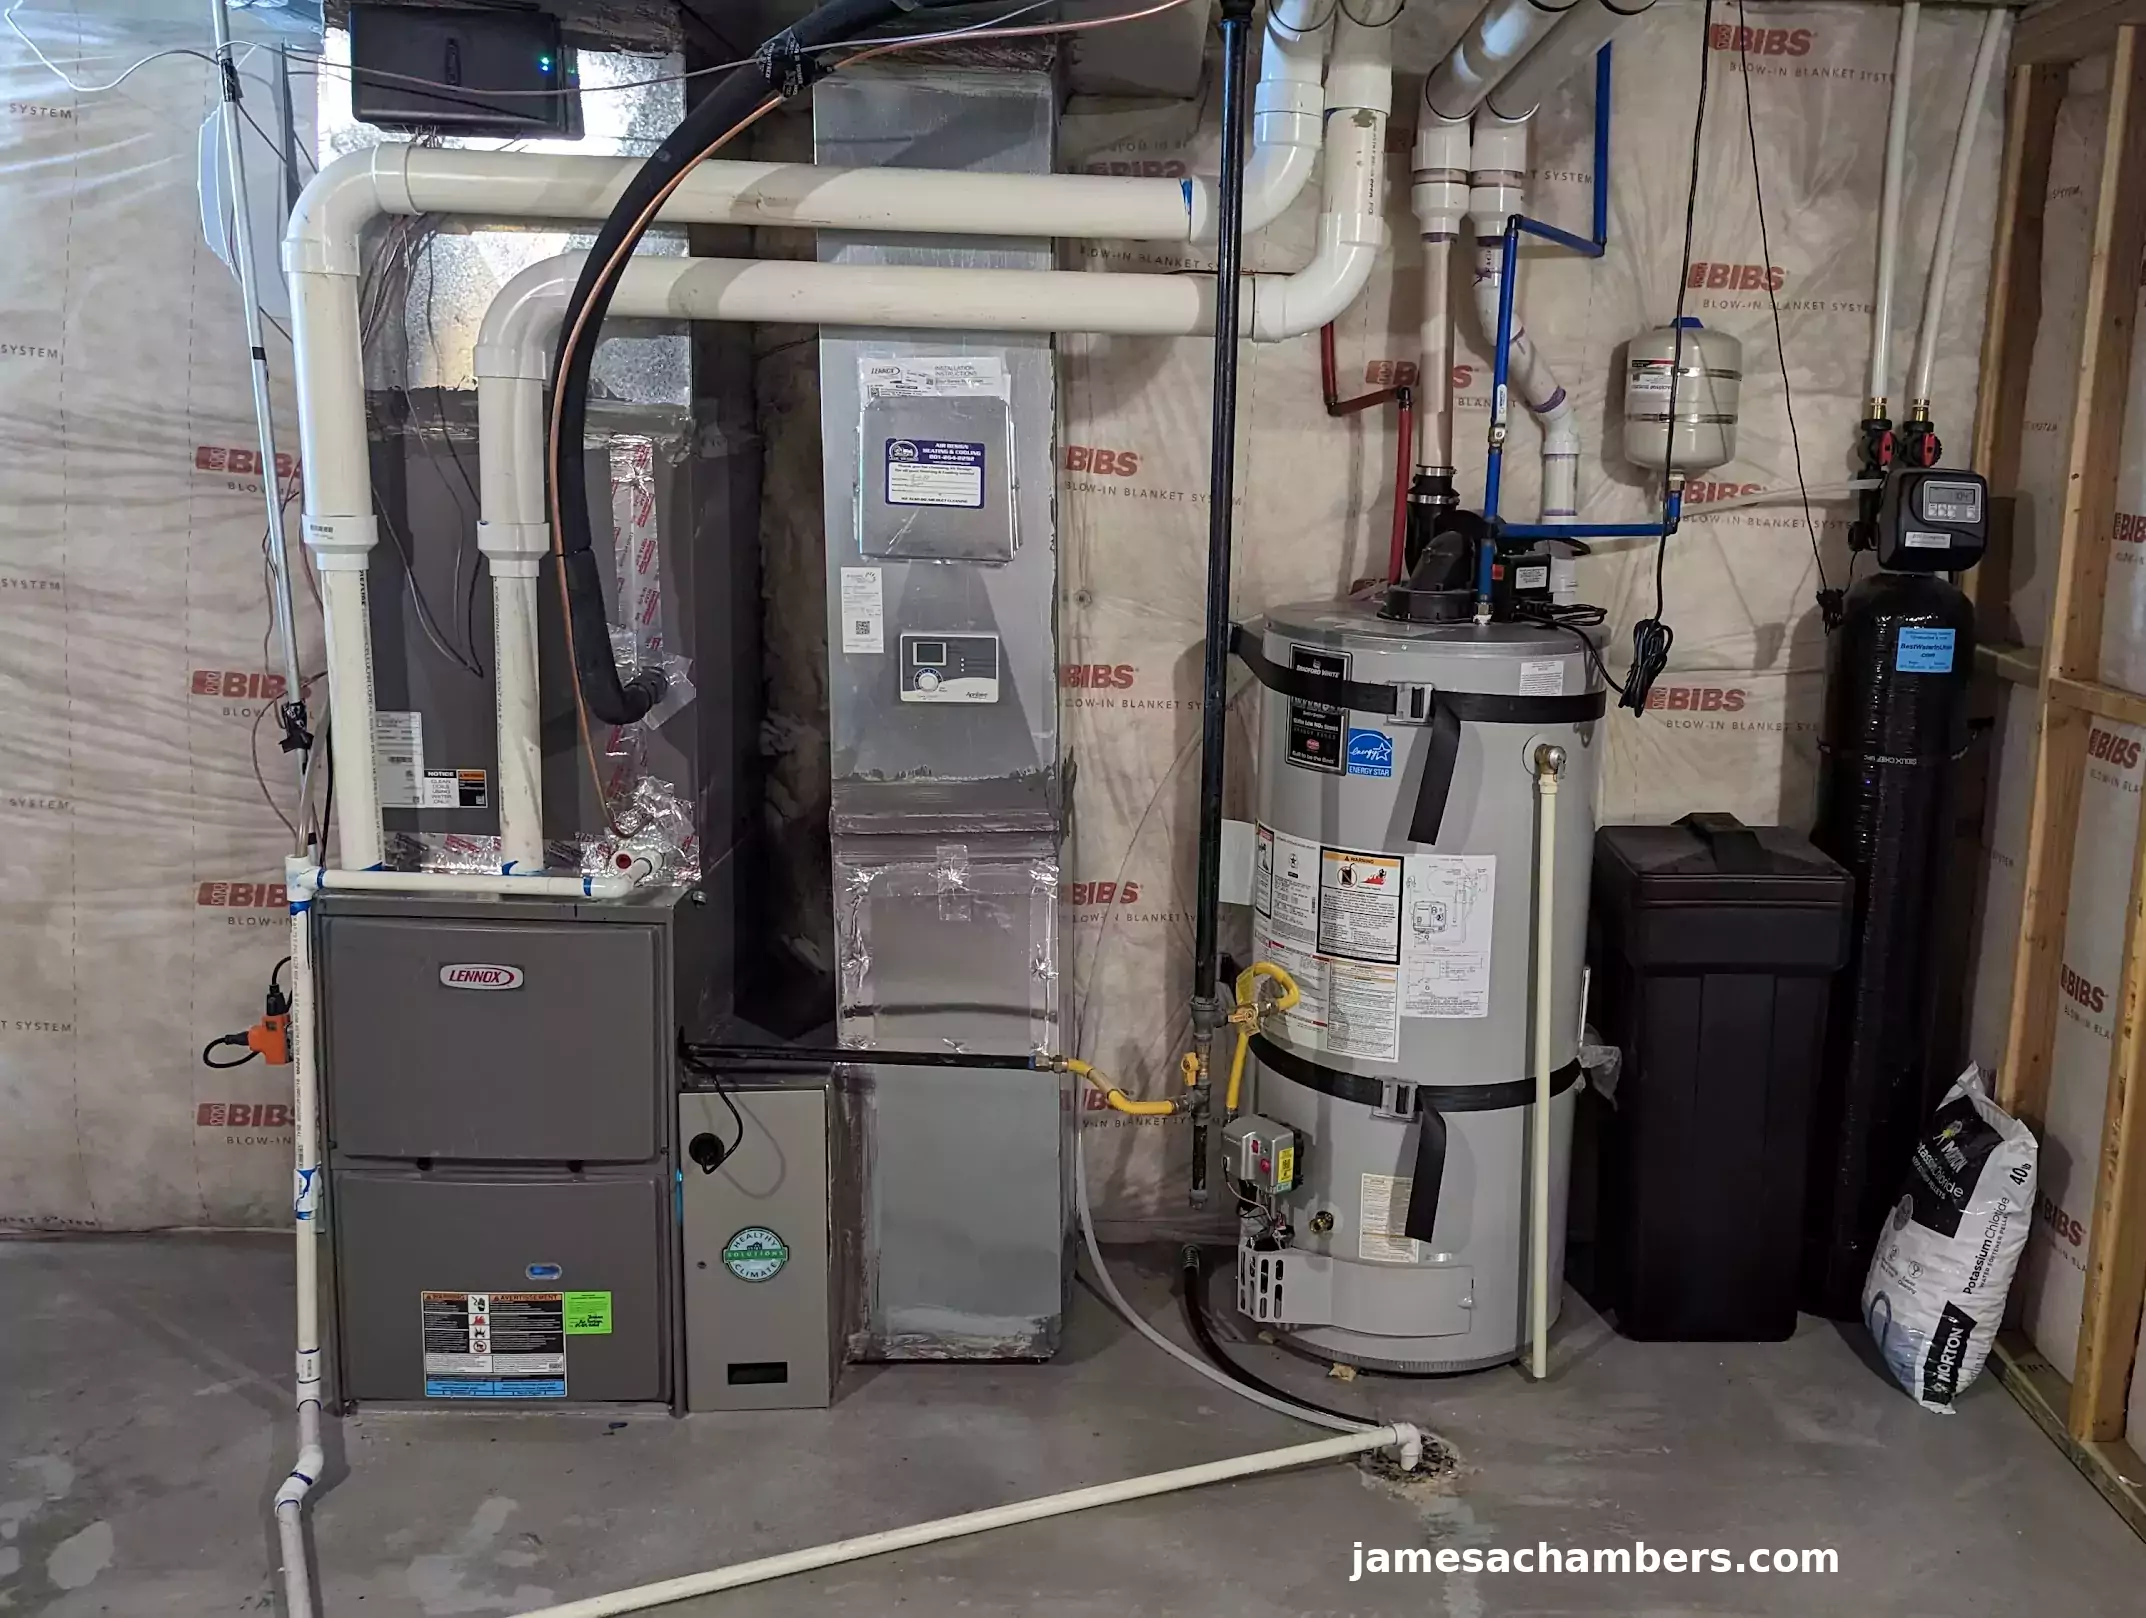
This is my HVAC / utilities indoor area. On the very far right is a newer type of water softener that is much more efficient (which is why it has that really small salt can next to it). In the middle is my water heater and the on the left is the HVAC system.
I’ve had issues before where the pipe leading from the HVAC system has got knocked away from the drain and the water will start backing up. Having a camera here lets me easily spot problems like this and address them before it becomes a *really* big problem.
Adding ESPHome to Home Assistant
We are going to assume you have Home Assistant installed as installing Home Assistant is outside the scope of this guide. You can absolutely follow along though and see if it looks like something you’d like to explore. I have it installed as a supervised installation on an Orange Pi 5.
Sign into your Home Assistant instance and go to “Settings” and then “Add-ons”. Next click the “Add-on Store”.
ESPHome has it’s own section like this:
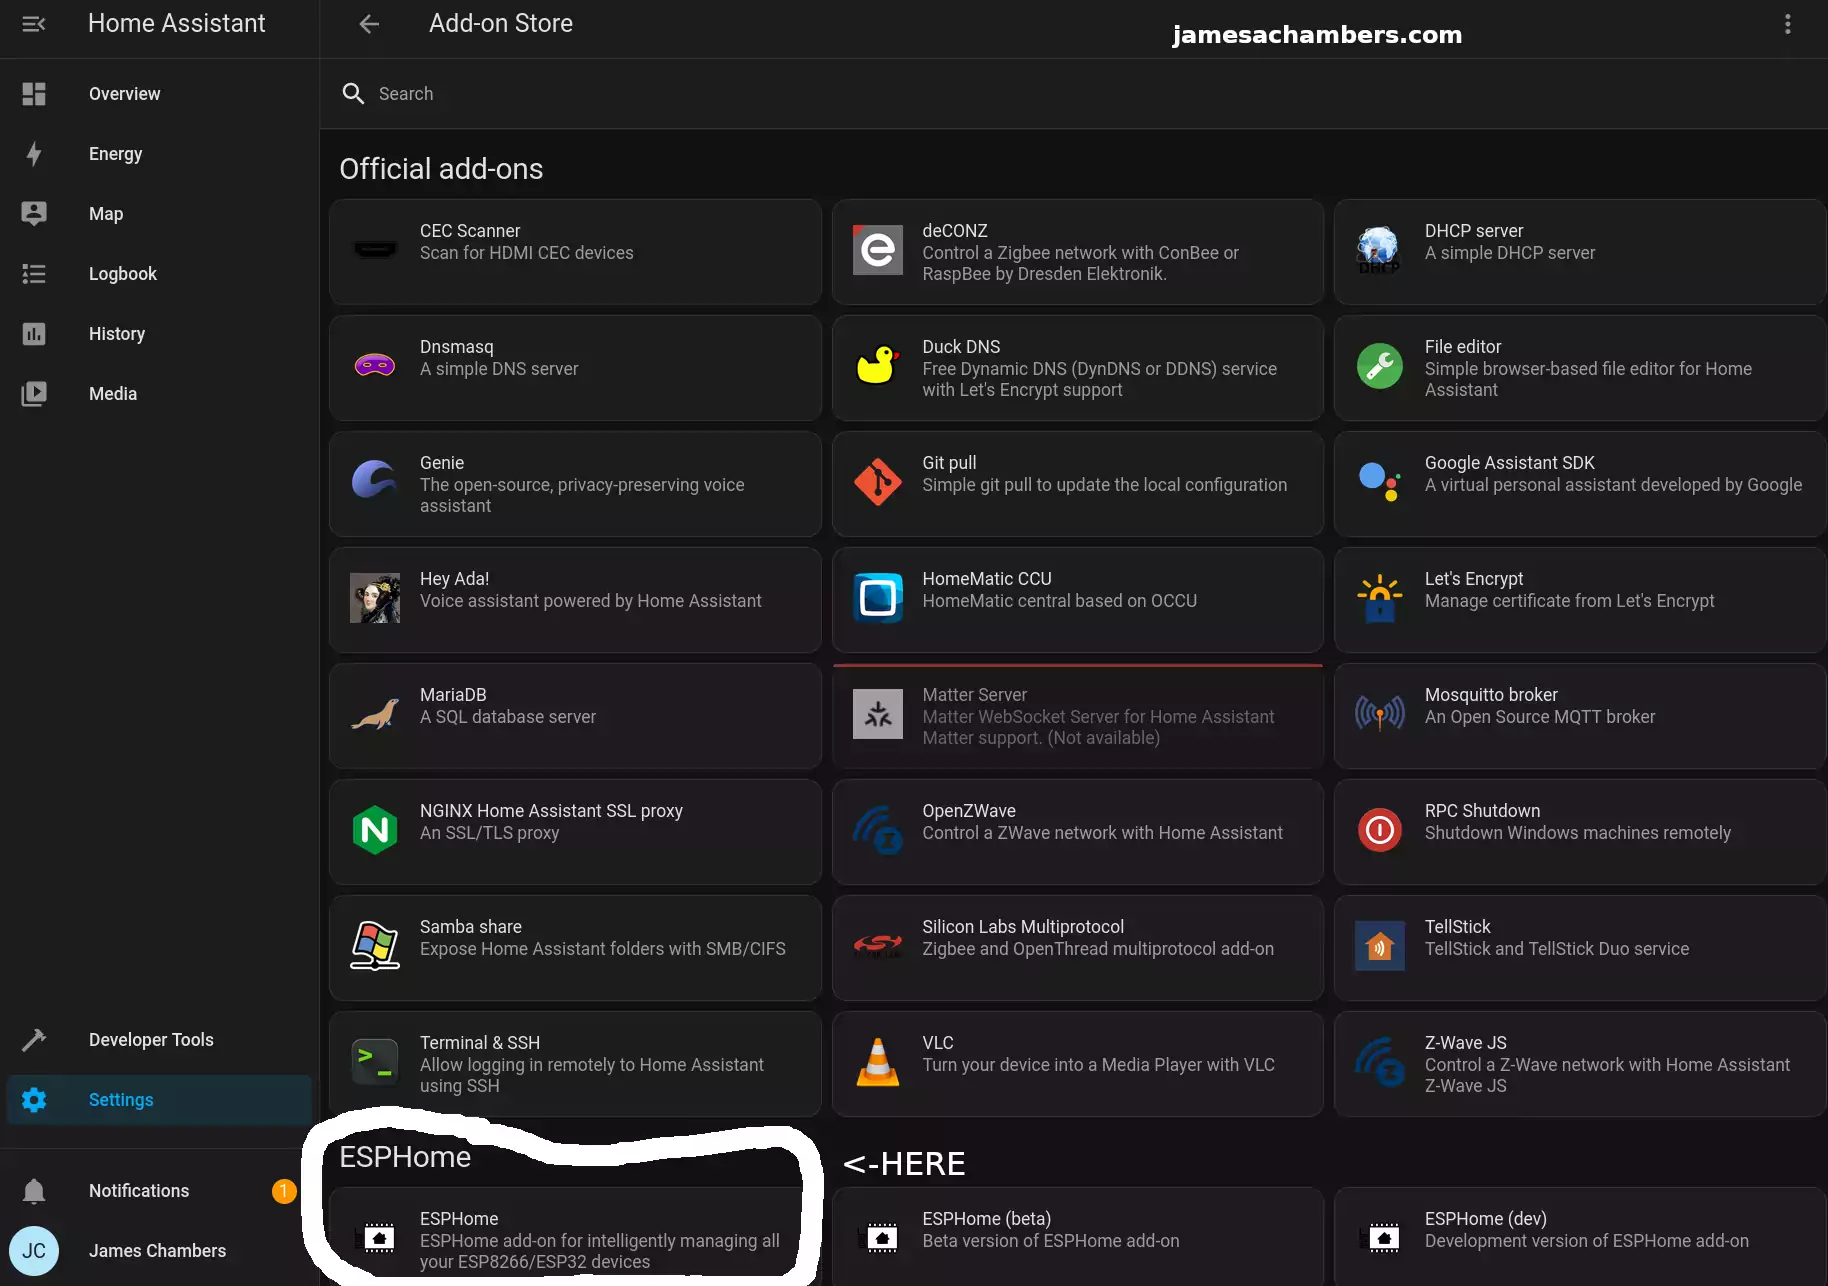
Select ESPHome and then click “Install”. Once the installation is finished you can click “Start” to start the service.
To make things easier choose to add the ESPHome option to your sidebar. That way you’ll see a menu choice specifically for ESPHome going forward.
Configuring ESPHome
First head to the ESPHome menu option:
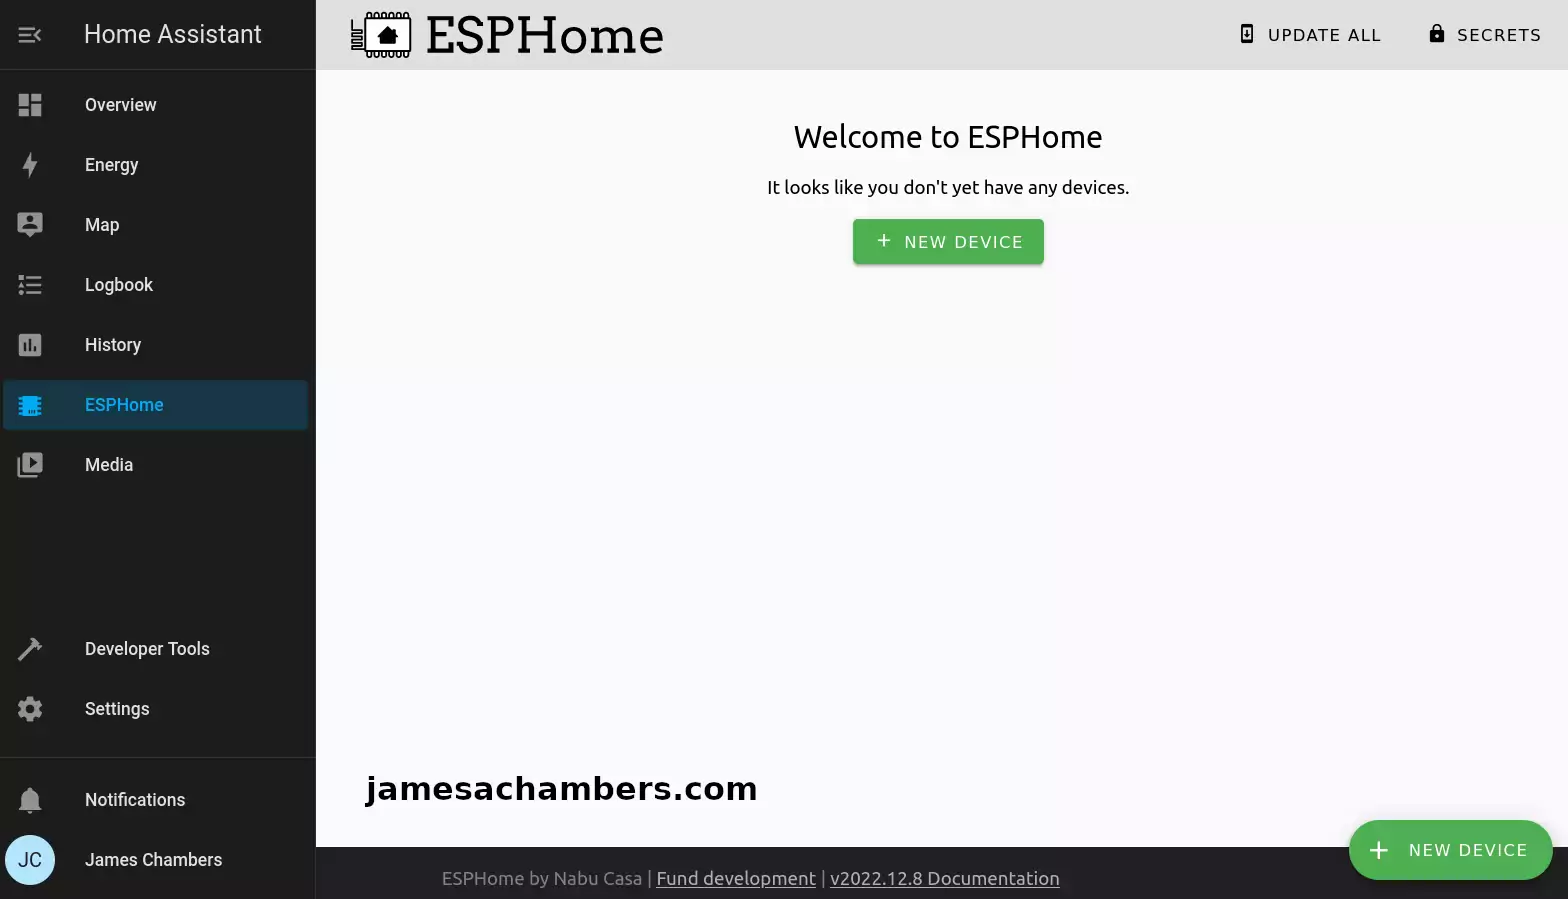
If you don’t see the ESPHome menu option then go back to the “Add-on Store” from the previous step. Select ESPHome and enable “Show in sidebar”.
For setup we need to connect your camera to your device running Home Assistant with USB. This is only required for setup. It will communicate wirelessly after you’ve completed setup (if you configure it that way).
You also have the option of connecting it to a different computer but *only* if your Home Assistant instance is configured to run in HTTPS.
Click “New Device” in the bottom right hand menu. Follow the menus to add the device into your ESPHome instance. Choose “ESP32” as the device type.
Now install the configuration to the device.
Adding Device to Home Assistant
Now head back to your “Settings” menu for Home Assistant and click “Devices”. You should see your new sensor with the name you specified in the configuration.
Check to see if the sensor is online. With any luck it is like my example above. Now click “Configure”:
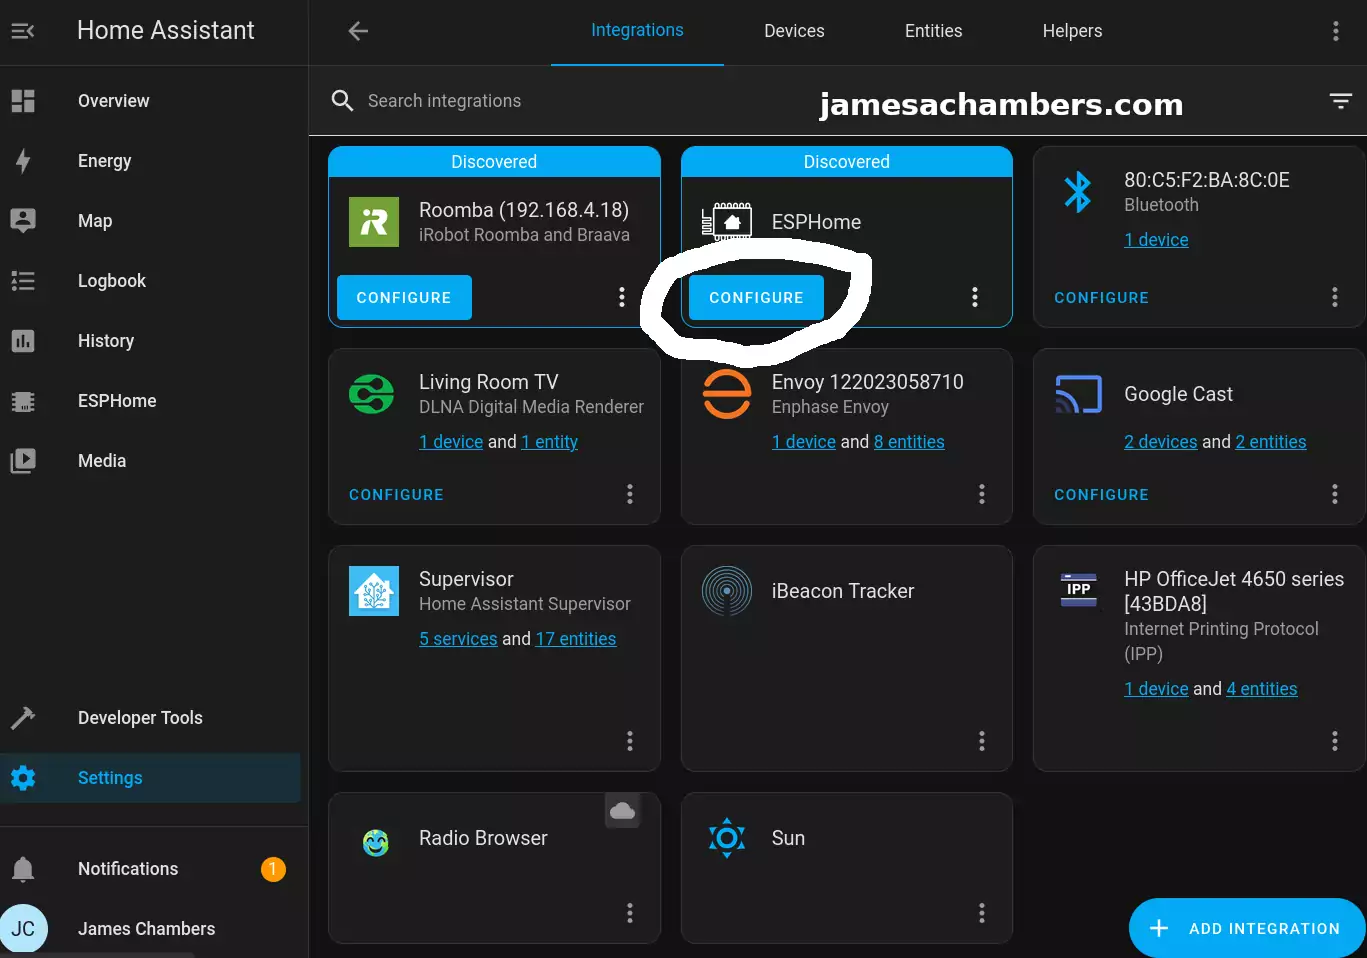
It should ask you if you want to add the node to Home Assistant. Select “Submit” and then it will ask you for your encryption key it gave us earlier. If you don’t have this just go back to the ESPHome menu and select “Edit”. You will see the key in plain text under “encryption” and then “key”.
If everything goes well the device should come online and be successfully paired with Home Assistant. From this point forward we will be able to update and push the configuration wirelessly to the device.
Adding Camera to YAML
Now your device should be available in Home Assistant but you won’t see a camera feed yet. We’re going to add that now. Go back to ESPHome and go to your new camera. Click “Edit”.
esphome:
  name: cam-utilities-indoor
  friendly_name: cam-utilities-indoor

esp32:
  board: esp32dev
  framework:
    type: arduino

# Enable logging
logger:
  level: VERBOSE
  tx_buffer_size: 256

# Enable Home Assistant API
api:
  encryption:
    key: "XXXX"
  services:  # change camera parameters on-the-fly
  - service: camera_set_param
    variables:
      name: string
      value: int
    then:
      - lambda: |-
          bool state_return = false;
          if (("contrast" == name) && (value >= -2) && (value <= 2)) { id(espcam).set_contrast(value); state_return = true; }
          if (("brightness" == name) && (value >= -2) && (value <= 2)) { id(espcam).set_brightness(value); state_return = true; }
          if (("saturation" == name) && (value >= -2) && (value <= 2)) { id(espcam).set_saturation(value); state_return = true; }
          if (("special_effect" == name) && (value >= 0U) && (value <= 6U)) { id(espcam).set_special_effect((esphome::esp32_camera::ESP32SpecialEffect)value); state_return = true; }
          if (("aec_mode" == name) && (value >= 0U) && (value <= 1U)) { id(espcam).set_aec_mode((esphome::esp32_camera::ESP32GainControlMode)value); state_return = true; }
          if (("aec2" == name) && (value >= 0U) && (value <= 1U)) { id(espcam).set_aec2(value); state_return = true; }
          if (("ae_level" == name) && (value >= -2) && (value <= 2)) { id(espcam).set_ae_level(value); state_return = true; }
          if (("aec_value" == name) && (value >= 0U) && (value <= 1200U)) { id(espcam).set_aec_value(value); state_return = true; }
          if (("agc_mode" == name) && (value >= 0U) && (value <= 1U)) { id(espcam).set_agc_mode((esphome::esp32_camera::ESP32GainControlMode)value); state_return = true; }
          if (("agc_value" == name) && (value >= 0U) && (value <= 30U)) { id(espcam).set_agc_value(value); state_return = true; }
          if (("agc_gain_ceiling" == name) && (value >= 0U) && (value <= 6U)) { id(espcam).set_agc_gain_ceiling((esphome::esp32_camera::ESP32AgcGainCeiling)value); state_return = true; }
          if (("wb_mode" == name) && (value >= 0U) && (value <= 4U)) { id(espcam).set_wb_mode((esphome::esp32_camera::ESP32WhiteBalanceMode)value); state_return = true; }
          if (("test_pattern" == name) && (value >= 0U) && (value <= 1U)) { id(espcam).set_test_pattern(value); state_return = true; }
          if (true == state_return) {
            id(espcam).update_camera_parameters();
          }
          else {
            ESP_LOGW("esp32_camera_set_param", "Error in name or data range");
          }

ota:
  password: "XXXX"

wifi:
  ssid: !secret wifi_ssid
  password: !secret wifi_password
  domain: .jamesachambers.net
  power_save_mode: none

  manual_ip:
    static_ip: 192.168.4.76
    gateway: 192.168.1.1
    subnet: 255.255.0.0
    dns1: 192.168.1.1
    dns2: 8.8.8.8

esp32_camera:
  id: espcam
  name: esp-cam
  external_clock:
    pin: GPIO0
    frequency: 10MHz
  i2c_pins:
    sda: GPIO26
    scl: GPIO27
  data_pins: [GPIO5, GPIO18, GPIO19, GPIO21, GPIO36, GPIO39, GPIO34, GPIO35]
  vsync_pin: GPIO25
  href_pin: GPIO23
  pixel_clock_pin: GPIO22
  power_down_pin: GPIO32
  resolution: 800x600
  jpeg_quality: 10  # max. 63
  max_framerate: 1.0fps
  idle_framerate: 0.2fps
  vertical_flip: true
  horizontal_mirror: false
  brightness: 2 # -2 to 2
  contrast: 1 # -2 to 2
  special_effect: none
  # exposure settings
  aec_mode: auto
  aec2: false
  ae_level: 0
  aec_value: 300
  # gain settings
  agc_mode: auto
  agc_gain_ceiling: 2x
  agc_value: 0
  # white balance setting
  wb_mode: auto
output:
# white LED
  - platform: ledc
    channel: 2
    pin: GPIO4
    id: espCamLED
# red status light
  - platform: gpio
    pin:
      number: GPIO33
      inverted: True
    id: gpio_33
light:
  - platform: monochromatic
    output: espCamLED
    name: esp-cam light
  - platform: binary
    output: gpio_33
    name: esp-cam led
switch:
  - platform: restart
    name: esp-cam restart
binary_sensor:
  - platform: status
    name: esp-cam status
sensor:
  - platform: wifi_signal
    name: esp-cam WiFi Signal
Make sure to update with your own encryption keys (or use the ones that were automatically generated). I’ve replaced mine with XXXX.
Final Result
I ended up installing the camera here:
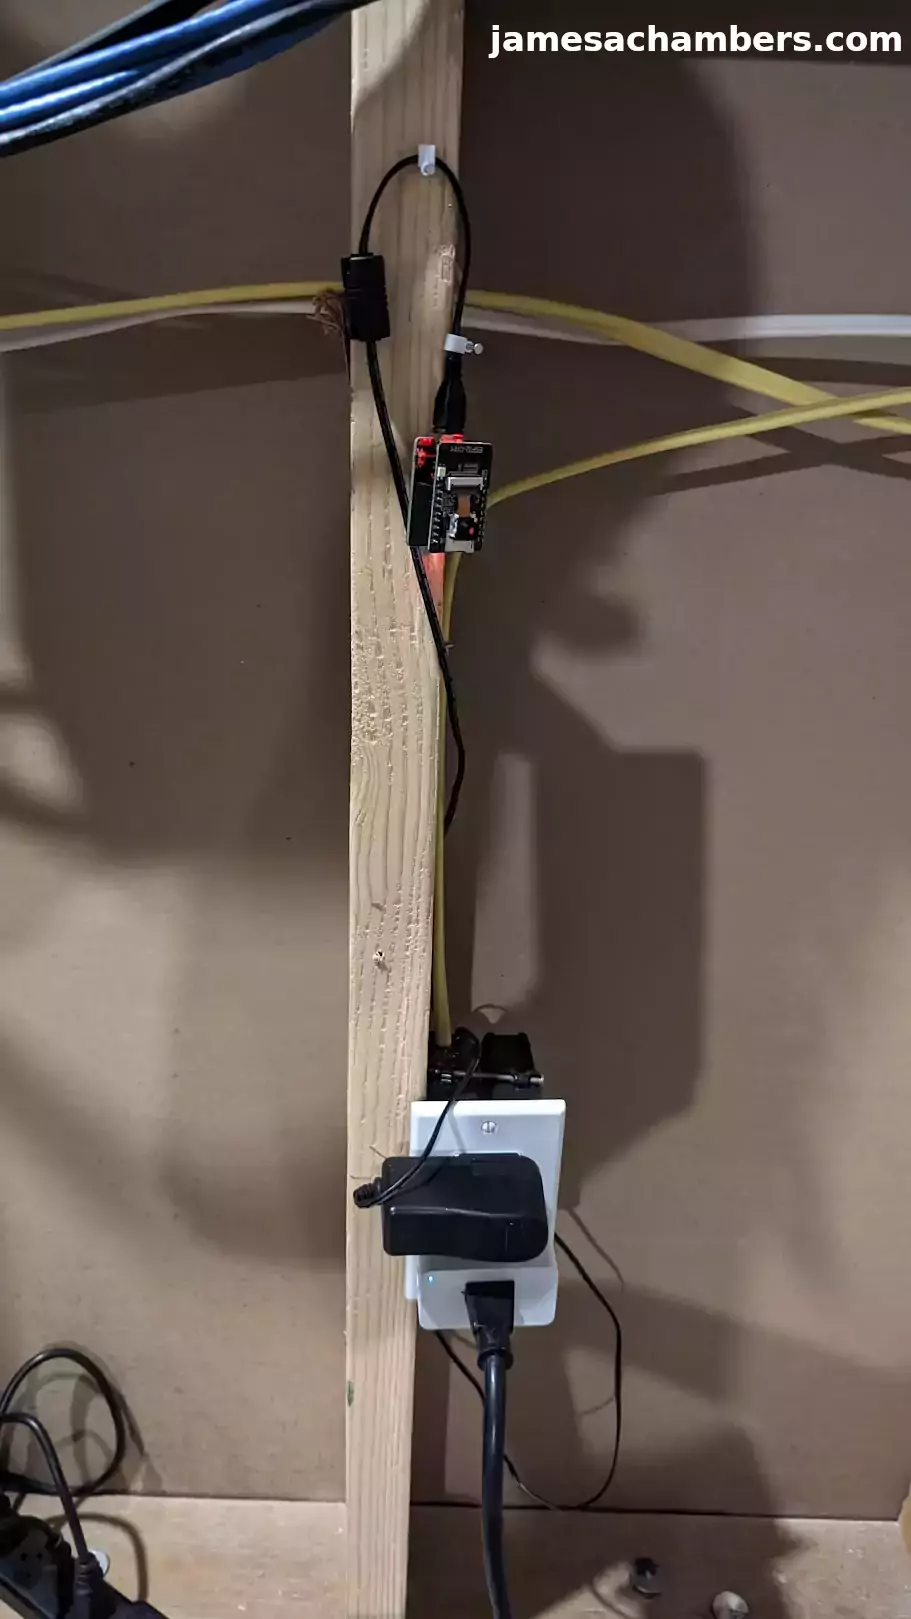
This is the top port of my network setup plug showing the Minoston Z-Wave power monitoring plug. I’ve covered that here and have more pictures of it in that article if you’d like to see a wider shot.
Within Home Assistant it looks like this:
And here’s the device entities:
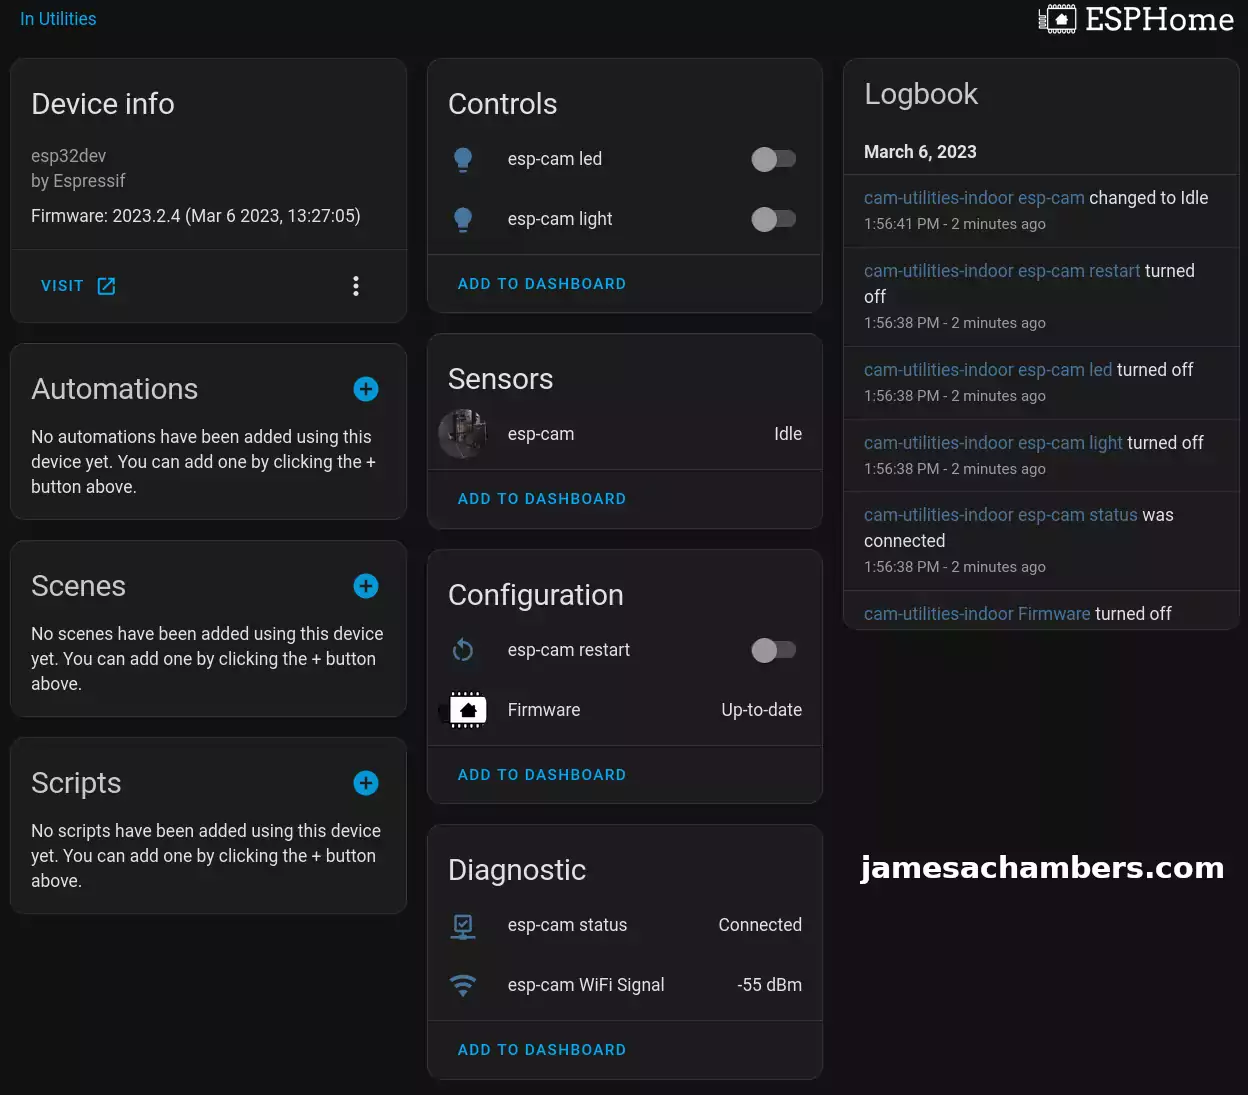
You can see here we have a WiFi signal indicator, a restart switch and controls to turn on the ESP32-CAM’s LED as well as the white onboard light.
Conclusion
The ESP32-CAM is an incredibly good and cost effective choice to use for Home Assistant. With ESPHome we can ensure we are programming the device ourselves using open source software and not sharing any of our data with the cloud. At a cost of less than $20 it’s a really easy and cheap way to add a camera view anywhere you have a decent WiFi signal.
Getting it working can be pretty tricky to be honest mostly because there’s a lot of different models out there so the example configs might not always work properly. I have a few tricks in my YAML that seem to stabilize things such as setting the external clock frequency to 10MHz. If I set the resolution very far above 800×600 I’d get messages in my log file that my TCP send buffer was full. The device is definitely starting to show some age. It’s using a pretty old ESP32 chip (ESP32-S1).
If you have a spot that you need to monitor in a low resolution then this is a great <$20 completely open source solution. It doesn’t perform very well in high resolutions with the included ESP32 module. Undoubtedly you can use a better/newer ESP32 module and get better performance.
I’ll be exploring some slightly more expensive camera options that may be appropriate for places you need a higher resolution or better performance. This solution has been around for a long time and it’s starting to show it’s age which is why I only recommend it for a use case like this.
I’ll be covering some other ESP32 camera options coming up on the site including options from Adafruit and Seeed Studios (Grove). I’ll also be covering some thermal camera modules that can be used with ESP32 in the near future here. These will all cost more but will deliver higher performance. Definitely stay tuned!
Other Resources
I’ve also made a really cool Home Assistant / ESPHome WiFi action key here
You can also make a Home Assistant / ESPHome enabled action button
I’ve covered making a ESP32 air quality sensor (7-in-1) without soldering here


Thanks for this excellent tutorial.
I was able to get things running and I’ll have to spend time exploring options.
There seem to be some changes since this was posted. I got a message PSRAM required so I added it to the yaml.
On compiling the yaml there were a few warnings which might have been from changes:
WARNING GPIO0 is a strapping PIN and should only be used for I/O with care.
Attaching external pullup/down resistors to strapping pins can cause unexpected failures.
See https://esphome.io/guides/faq/#why-am-i-getting-a-warning-about-strapping-pins
WARNING GPIO5 is a strapping PIN and should only be used for I/O with care.
Attaching external pullup/down resistors to strapping pins can cause unexpected failures.
See https://esphome.io/guides/faq/#why-am-i-getting-a-warning-about-strapping-pins
WARNING The i2c_pins: config option is deprecated. Use i2c_id: with a dedicated i2c: definition instead.
Hello MarkS,
Thanks for bringing this up. I recently experienced this myself when updating locally. I will definitely get the guide updated!
I’ve now updated the post with the newer code! I can confirm that the other two warnings are normal for the ESP32CAM but the i2cpins one is new.
The new code has a dedicated i2c section that now specifies the values that used to be in i2cpins!
I’m really glad I found this site. It’s the best resource I’ve found so far on the ESP32-CAM. I’m finding that not all of these “on the fly” settings actually work. It also seems that every one of them reset to the default if the camera reboots or restarts. I’m also having an issue with some of the options such as “vertical flip.” I’m trying to flip the image because it’s in the wrong orentation but nothing is happening.
Hi James,
awesome project!
Does this instance of a Home Assistant camera also have a streaming URL? I would like to also use it on my MotionEye install on HA.
Cheers!
BC
So this is crucial info that offers streaming in ESPHome.
It works for me when accessing the camera on port 8080, but MotionEye does not accept it (yet).
Thanks for posting this YAML, it worked on my esp32cam right out of the box! I also don’t quite understand the frame rate control. It is taking pics every 5 seconds, which looks like it’s going at the “idle” speed in the YAML. Why are there other numbers for frame rate and what do they do? I tried changing the brightness in a script but it doesn’t seem to make any change to the image. Is there a way to verify the number went to the camera? do I have to put “brightness” in quotes in the script?