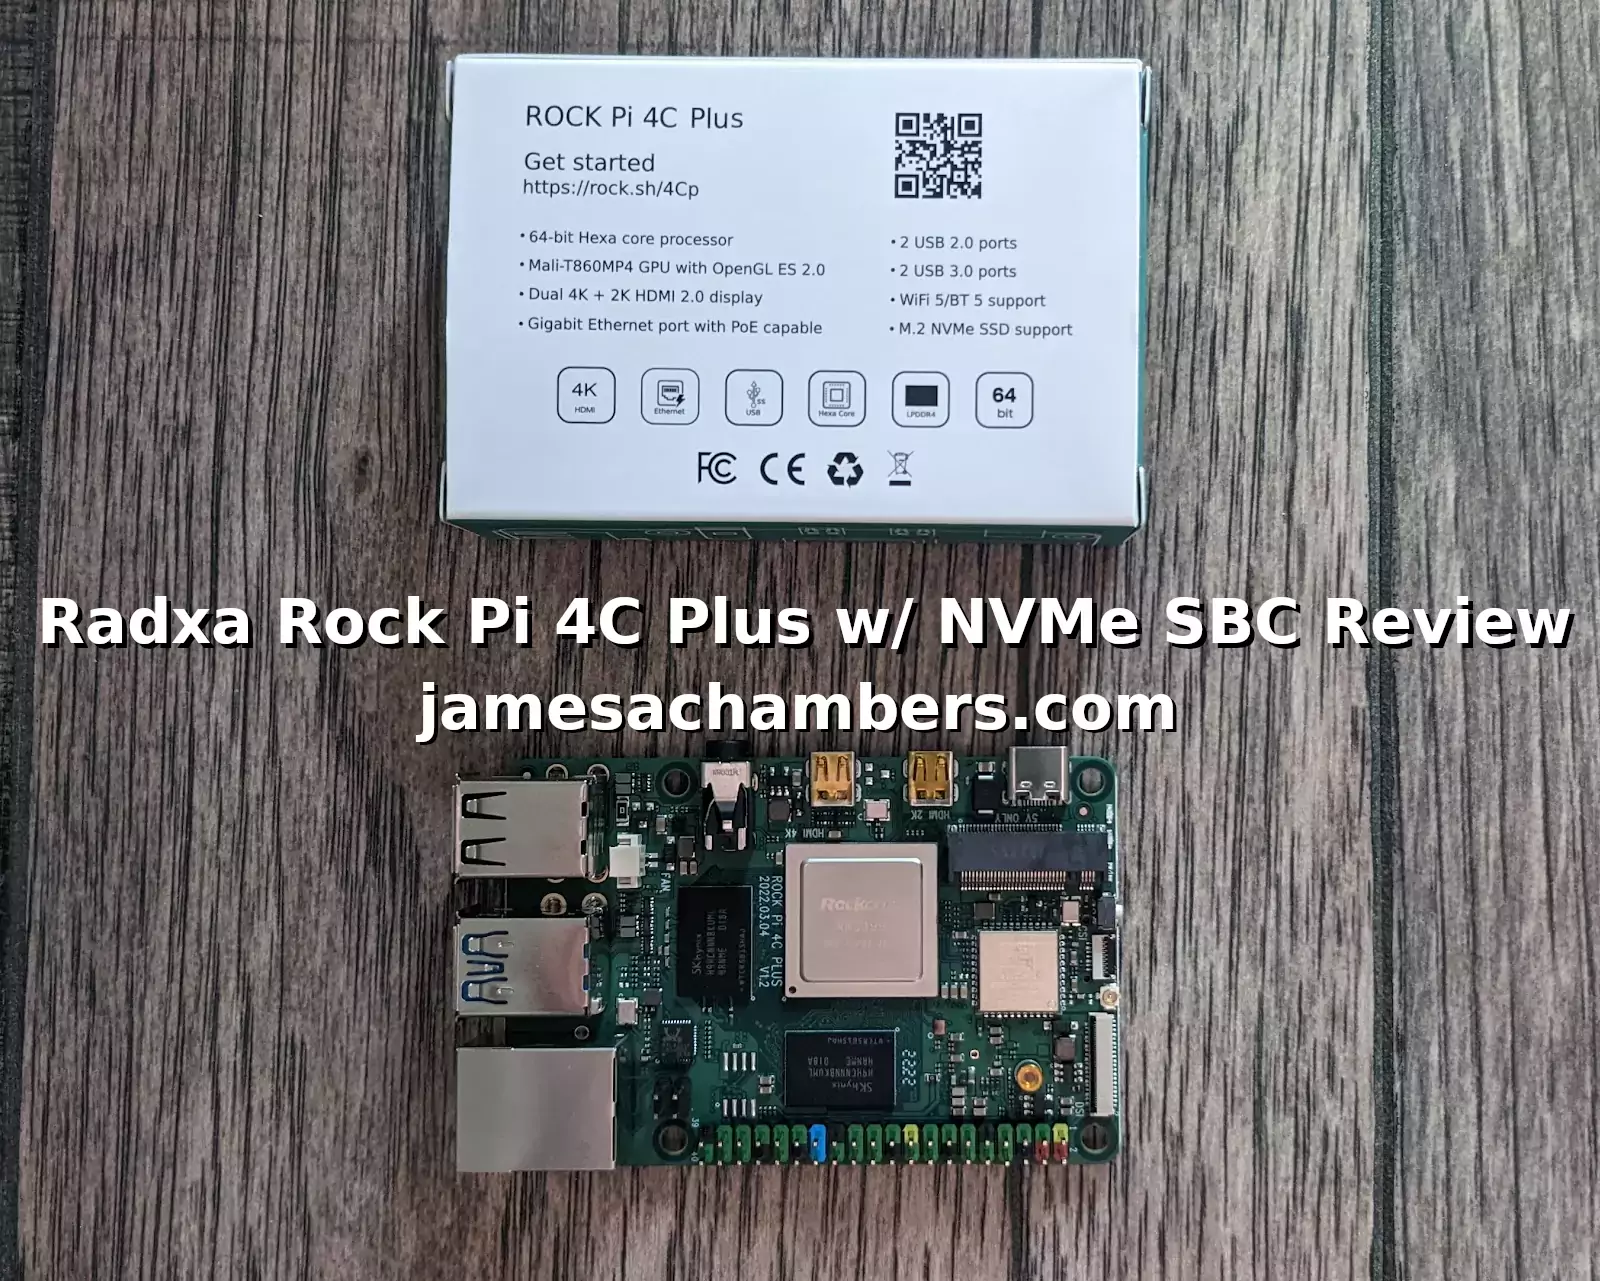
We continue to see a storage technology evolution take place with single board computers. NVMe slots are becoming more and more prevalent on newer models. This is great news for consumers as a M.2 NVMe SSD can actually be cheaper than a SD card (and is much cheaper GB per GB).
Today I’m taking a look at the Radxa Rock Pi 4C Plus V1.2 single board computer. Previous iterations of this board have had NVMe slots but it has been moved to the top of the board on this model and can properly mount a 2230 NVMe SSD. The SSD I’m using today was only $13 for a 128GB capacity drive*.
The board is quite powerful hardware-wise having 4GB of RAM and an hexa-core (6 cores) CPU configuration. We’ll be benchmarking what kind of performance we get using a configuration like this.
Let’s get started!
Hardware Used

The Rock Pi 4C Plus model always comes with 4GB of RAM. It has a hexa-core processor (6 cores) and a Mali T860MP4 GPU as well as a top-mounted M.2 slot (2230).
Links: AliExpress*, Amazon.com*, Amazon.ca*, Amazon.co.uk*, Amazon.de*, Amazon.es*, Amazon.fr*, Amazon.it*, Amazon.nl*, Amazon.pl*, Amazon.se*
The Kioxia (Toshiba) 128GB M.2 2230 PCIe NVMe drive is much shorter than most NVMe drives (full size is 2280). It fits great with single board computers / tablets / other smaller form factors.
Links: Amazon.com*, Amazon.ca*, Amazon.co.uk*, Amazon.co.jp*, Amazon.com.au*, Amazon.de*, Amazon.es*, Amazon.fr*, Amazon.it*, Amazon.nl*, Amazon.pl*, Amazon.se*, Amazon.sg*

The Geekworm copper heat sink set is designed to fit many different single board computers. It uses thermal conductive adhesive which many “cheap” heat sink kits for SBCs don’t have. Eliminates hot spots and reduces throttling. Can be further enhanced by powered cooling over the heat sinks.
Links: Amazon.com*, Amazon.ca*, Amazon.co.jp*, Amazon.co.uk*, Amazon.de*, Amazon.es*, Amazon.fr*, Amazon.it*
Specifications
- 64bit hexa-core processor
- Rockchip RK3399-T
- Dual Cortex-72, frequency 1.5GHz
- Quad Cortex-A53, frequency 1.0GHz
- 4GB RAM
- Dual-channel LPDDR4@3200Mb/s
- Mali T860MP4 GPU
- OpenGL ES 2.0
- Dual 4K + 2K HDMI display
- Gigabit Ethernet with PoE support
- 2 USB 3.0 ports
- 2 USB 2.0 ports
- WiFi 5 support
- Bluetooth 5 support
- M.2 NVMe support
Build Quality
The board is built extremely well. The Rock Pi 4C Plus has several predecessors that have given a chance for the board to be refined over time and the bugs to be worked out.
The components are of high quality. You can see the SKHynix memory chips (and RockChip parts) below:
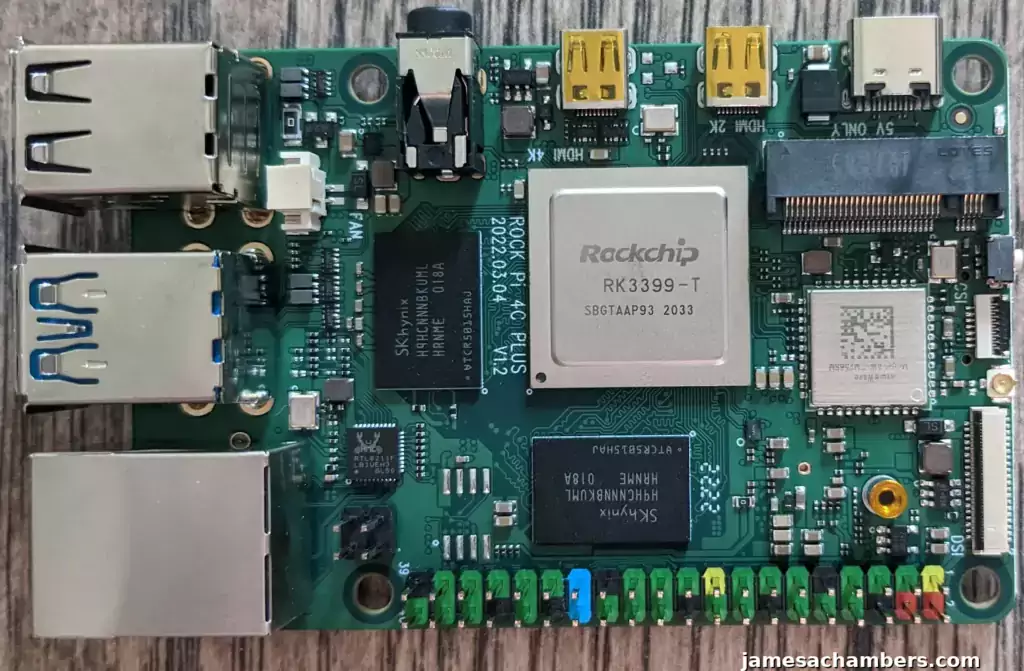
We can see they did use color-coded GPIO on this board which definitely makes things easier if you’re using GPIO extensively.
And the bottom view:
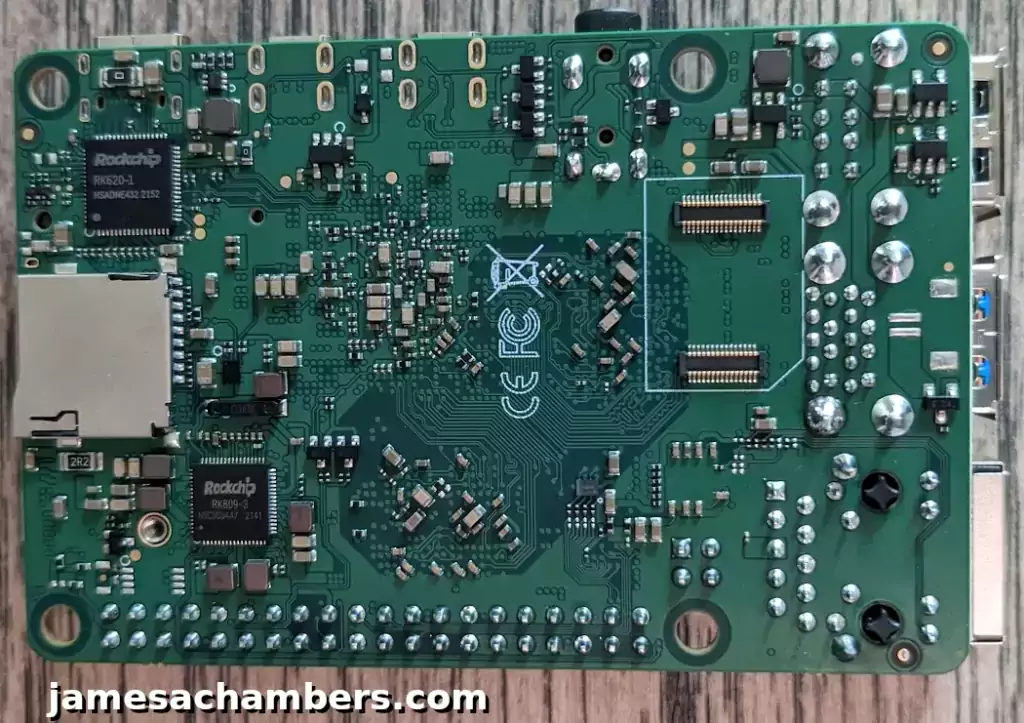
There is an eMMC slot on the bottom shown above. There’s a white outline around the slot showing where the eMMC would be if the slot was populated.
On earlier versions of the board the M.2 slot was sometimes on the bottom of the board which made it difficult to use without an extension cable / adapter board. You can tell that they learned from this and only put the eMMC slot on the bottom of the board (because it’s flat enough that it won’t interfere with most cases or designs).
Images Available
The official page for Rock Pi 4 downloads is here. The official images include:
- Android 11
- Ubuntu Server 20.04
- Debian Bullseye Desktop
The official image selection is decent maybe with the exception of Ubuntu 20.04 which is not the current LTS version.
There is a much wider selection of unofficial images including:
- Armbian
- Manjaro
- Recalbox
- LibreELEC
- DietPi
- Many others
This selection is honestly quite good but one thing to note is that not all of these have been updated for the 4C Plus model yet (most of them in fact at time of writing). This should improve over time as support is added for the new model (although there are variations between the images for different revisions so be careful). Make sure you get the version for the 4C+ (and not the 4C).
Imaging M.2 NVMe Module
The Rock Pi 4C Plus works differently than the 4A / 4B / 4C. This model does not have onboard SPI flash so you must use a sacrificial SD card to hold the boot loader to boot from the SSD with this model.
The way this works is it uses your SD card to start the earliest parts of the boot process but then it mounts the SSD as your root partition instead of the SD card.
Make sure you see my Radxa Rock Pi 4C Plus SSD boot guide for instructions on how to do this as I found very little instruction available online outside the Radxa wiki.
For this review I used the official Debian Bullseye desktop image.
Mounting M.2 NVMe Module
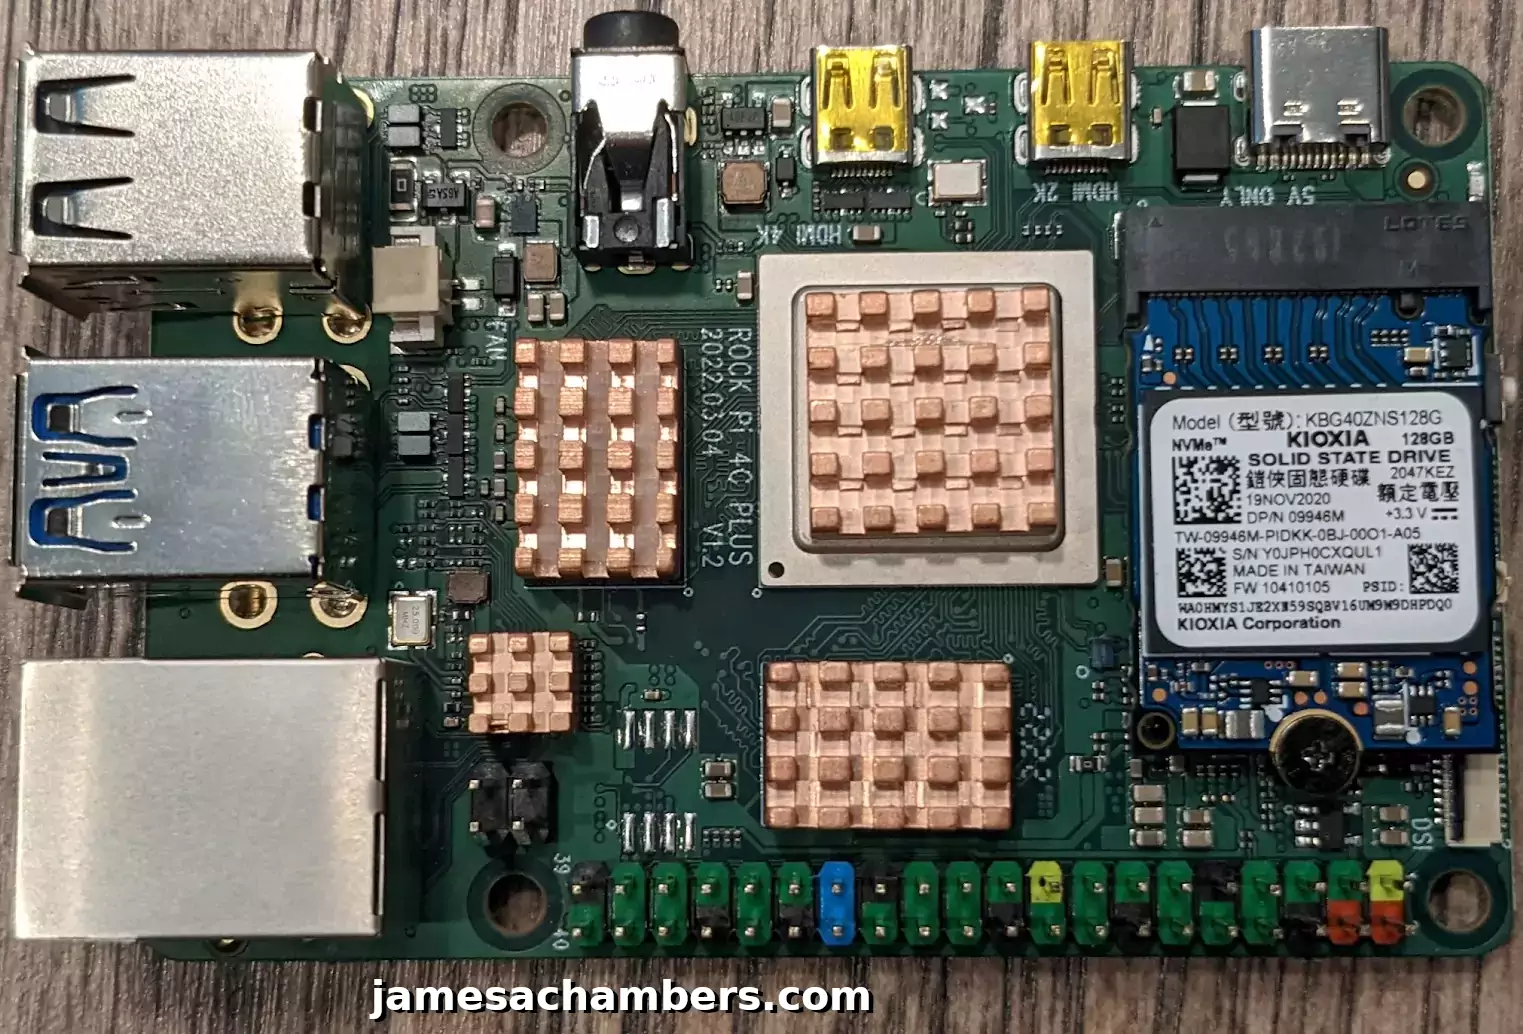
Provided that you have a 2230 size module you can use the built in mounting hole to mount your M.2 NVMe drive securely to the board.
Here’s what mine looks like mounted:
Benchmarking NVMe
You can verify the performance of your drive on Pi Benchmarks using the following command:
sudo curl https://raw.githubusercontent.com/TheRemote/PiBenchmarks/master/Storage.sh | sudo bashHere are the results:
     Category                  Test                      Result
HDParm                    Disk Read                 370.59 MB/s
HDParm                    Cached Disk Read          349.16 MB/s
DD                        Disk Write                211 MB/s
FIO                       4k random read            47962 IOPS (191850 KB/s)
FIO                       4k random write           12760 IOPS (51040 KB/s)
IOZone                    4k read                   56308 KB/s
IOZone                    4k write                  56392 KB/s
IOZone                    4k random read            38025 KB/s
IOZone                    4k random write           59999 KB/s

                          Score: 14,003
The full Rock Pi 4C Plus benchmark can be viewed here on Pi Benchmarks.
Oh yeah, that’s definitely NVMe performance for sure! I’ve only scored higher than this on 2 other boards: the CM4 and the ODROID M1. Once you get it set as your root partition this board is smoking fast.
Pros / Cons
Pros
- Extremely powerful board widely available for <$100
- Top mounted 2230 M.2 NVMe slot gives incredible I/O performance
- Expandable eMMC option
Cons
- No higher or lower memory options than 4GB
- Image selection is limited for newer 4C Plus model at time of writing
- Does not have SPI flash (nor can any be added) unlike 4A / 4B / 4C — to boot from NVMe you need to use a SD card as the boot loader
Conclusion
This was my first board I’ve reviewed from Radxa and I really like it! I do have a Radxa Zero (with eMMC) that I preordered a while ago that I will be reviewing as soon as I get my hands on it. I’m impressed by how much support there is for the Rock Pi series of boards from third party images / vendors.
This board makes a lot more sense to buy to me than a Raspberry Pi 4 right now. They are under $100 and are more powerful than a Pi 4. They have a GPU that is capable of good desktop performance. They’re relatively easy to get your hands on at time of writing as well.
I definitely recommend picking up one of the cheap $10-$13 128GB 2230 M.2 NVMe drives. They are essentially cheaper than most SD cards (and much cheaper than a 128GB SD card) and you can use it as a permanent mount in the board and enjoy much higher performance and larger storage capacities right from the start. This will enhance your experience.
We are going to see more and more single board computers with M.2 NVMe connectors like this. It is literally cheaper and the performance is an order of magnitude higher than even the best application-class SD cards. I will be surprised if the Pi 5 doesn’t have one of these.
I recommend the Rock Pi 4C Plus as a pretty powerful alternative to the Pi. It’s not perfect since you have to sacrifice a SD card to actually boot from the NVMe but for the price and in this market it’s definitely worth considering!
Other Resources
SSD booting on the Rock Pi 4C Plus is a little tricky so definitely see my SSD / NVMe boot guide for the Rock Pi 4C Plus
I have a pretty steadily growing collection of reviews for other single board computers available here


Hello,
Have you tried runing the Rock Pi 4c+ with Android? What are CPU and NVMe temperatures? It looks like way to high… around 65C in idle… is it OK? I have almost cubic (20x20x15mm) aluminium radiator installed to Rock PI CPU
Hey Andrey,
It does seem a lot higher than it would be in Linux idle. You might need something like this. This would be an example of a small fan you would just connect to the GPIO pins. You would stick it right on top of your existing heat sink / radiator.
This will definitely give you the most stable performance. You don’t have to necessarily do it this way though. Even pointing a room fan at the heat sink will have the same effect if it’s not too far away. The moving air will pull a lot more heat from the heat sink though and should get your temperatures stable / under control.
Hopefully that helps!
I have a ROCK 4C Plus V1.2 purchased from Allnet. Mine has the M.2 socket, but also has 8MB of SPI NOR Flash located where your picture shows space for an 8-pin chip to the right of the PoE pins. The 4C Plus is easy to differentiate from the other ROCK 4 devices as it is currently the only one where the SOC is mounted on the top of the board.
Hey Ray,
Fascinating, thanks for sharing that! That is where I got my Radxa Zero. I ordered my Rock 4C+ from Amazon. If I ordered one today I probably would order it from allnetchina to be honest with you. The only advantage of ordering from Amazon is it will come a lot faster (depending on your country of course, but for NA and Europe probably). Allnetchina is usually cheaper but takes a bit longer to come.
It sounds like they have the “best” version though as the UK version of the 4C+ doesn’t even have the M.2 slot as has come up in the comments here previously. My North America version didn’t seem to come with the SPI flash at all. It sounds like the most full featured version is probably the allnetchina version from what you’re describing for sure. Thanks for sharing!
The UK version of a Rock 4C Plus doesn’t have the M2 socket. It has the same name, manufactured by Radxa, but branded Okdo
Hey Tony K,
Wow, that is incredibly frustrating! It’s already so confusing that it isn’t the same board as the 4C / 4B / 4A. When I go to Radxa’s site for the Rock 4 and scroll down to the comparisons according to their spec sheets (the storage comparison section) mine shouldn’t have a M.2 slot either.
Except it does have one, was sold to me as a 4C+ and identifies itself as a 4C+. Check out the Radxa Rock Pi 4C+ page here on pibenchmarks.com. If you click on one of these tests the board definitely identifies itself as a Radxa Rock Pi 4C+ (and almost all of the tests are NVMe). The Amazon listing I bought mine from also identifies it that way. One additional thing to consider though is my board did come in a box marked as the 4C+ as well.
The specification sheets on Radxa’s site match what you’re saying though. The RK3399-T with the M.2 slot is supposed to be the SE but that is not what mine was sold to me as and it doesn’t identify itself as that model. It makes me wonder though if that’s just because I used a 4C+ image with it because that’s what I was told it was (in other words maybe it really is a SE but since I used the 4C+ image it thinks it’s a 4C+).
The allnetchina.cn listing for it though looks exactly like mine despite it not matching the wiki. The SE on the wiki doesn’t have the M.2 slot on the top of the board like mine either. This definitely seems to debunk my “SE” theory as it does not match the SE design at all. I don’t see any of them on radxa.org/radxa.com’s wiki pages that look like mine with the M.2 slot on top. There isn’t a single one of them here that looks like mine. They look like the one you linked to.
The Ameridroid listing (an official and I believe our only official Radxa redistributor for NA) also matches mine. How can my board design listed at an official Radxa reseller not even be on the official Radxa wiki? I don’t get it. Maybe I just don’t understand how the whole Radxa thing works. I know a lot of the early supporters get them first or something (like the Radxa Zero 2 for example). I guess I need to dive into it to understand what exactly is going on here. If anyone knows I’d be appreciative if you explained it in the comments.
Radxa could not be doing a more terrible job naming their boards. This is quite a mess. If it doesn’t have the same capabilities it should be a totally separate model Radxa! Varying board capabilities by region/distributor muddies the waters even more than the already confusing reuse of 4A / 4B / 4B+ / 4C / 4C+ / 4SE / who even knows what I’m leaving out at this point.
Thank you for sharing this as I think this is something everyone should watch out for when you are shopping/looking at these. Make sure the version of the board you are looking at has the components/capabilities you are expecting as the model name tells you precious little about Radxa boards compared to their competition. They’re absolutely worthwhile boards but this is a “quirk” with Radxa to definitely watch out for.
Take care!
Do traditional rpi 40-pin hats work without completely reprogramming the applications? Eg waveshare GSM, LoRa? Does it support being powered through the 40pin gpio, like with a stacking ups or psu?
Hey Sean,
The Raspberry Pi is a closed source platform. All alternatives to it need some kind of translation layer to run all of the Pi stuff. This is usually in the form of WiringPi. I don’t even think the Rock Pi 4C+ has one of these to be honest with you. It’s not really a platform to run the Pi’s closed-source ecosystem.
As far as capabilities it can absolutely be powered by GPIO or by PoE. I don’t think this is the right choice of board for you though. If you want a really, really good experience going away from the Pi see my switching from Pi to Libre Computers board. I do not recommend the Radxa boards for trying to use a Pi hat or any of the closed-source Pi components. Libre Computers provides all the tools to do this but Radxa doesn’t basically!
The way it usually works is you will use a tool like WiringPi to reassign the GPIO pins to what they need to be to work with your accessory. Libre has a tool called the libretech-wiring-tool that actually lets you not only work with the GPIO assignments but you can actually merge overlays! A lot of your hats will probably use overlays/dt_overlay.
I suspect that you’ll find that most of these are easy to get to work (on a Libre board) and that a couple of them (for complicated reasons, maybe some sort of conflicting pin assignment, who knows) might indeed require tweaking the applications to resolve some kind of conflict. I’d imagine most of the big/popular stuff not only works but has probably been tried before. Some of the more boutique (or more complicated) hats/accessories you might have to modify some code to resolve a conflict. That should at least give you an idea of how it would work to configure it. It doesn’t need you to reprogram the apps ideally but since it’s not perfect 1 to 1 mapping like we’ve been talking about some conflicts are bound to come up that may require a source change.
There is no plug and play platform that does what you are suggesting though with pin-perfect compatibility with the Pi. That’s not possible because the Pi is not an open source platform. I know people think it is but it’s absolutely completely closed source hardware-wise even though the OS is open source. Everything Broadcom has been closed-source since day 1 which power almost all of their stuff. Nearly all official Raspberry Pi accessories are closed-source as well including even the camera module (which you’d think they’d be able to manage an open source camera sensor in the year 2022 unless they didn’t want to).
I definitely would recommend easing into some alternatives but Libre Computers will probably be less of a shock for sure. With those it’s possible to use the Pi overlays and GPIO with their provided tools so it’s as easy for transitioning away from a closed-source platform as it’s going to get (which unfortunately is never easy, every penny you’ve spent toward the Pi was money spent on closed-source hardware/accessories like Apple/NVIDIA/etc. who literally design it not to do what you’re trying to do, it’s not an open source platform and it’s not meant to play nice with others nor does it).
Hopefully that helps!
Just bought this earlier today for ps1 emulation and appreciate the review!
Hey PaqMan3D,
Thank you so much, I’m glad you enjoyed it!
I think you’ll be happy with it (especially paired with a NVMe module) as although the setup is a bit quirky the final setup turns out extremely clean and compact (only requiring a sacrificial SD card).
Enjoy and take care!