
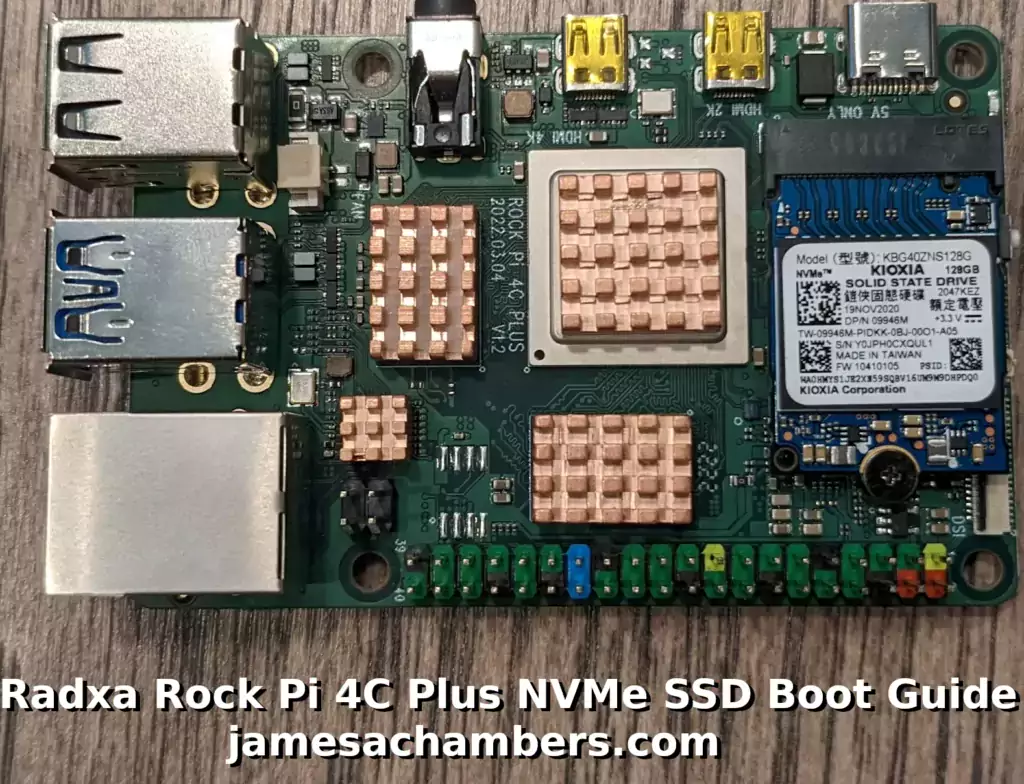
The Rock Pi 4C Plus is a bit different to boot with a SSD than it’s predecessors. It does not have a SPI flash (nor can you solder one onto the board) so to use the NVMe slot for our root filesystem we need to use a SD card as the boot loader.
In this guide I’ll walk you through the process to clone a working SD card installation to your NVMe drive and then use some tricks with the drive’s UUID identifiers and essentially pass the boot process off from the SD card and have the NVMe SSD take over.
Let’s get started!
Hardware Used

The Rock Pi 4C Plus model always comes with 4GB of RAM. It has a hexa-core processor (6 cores) and a Mali T860MP4 GPU as well as a top-mounted M.2 slot (2230).
Links: AliExpress*, Amazon.com*, Amazon.ca*, Amazon.co.uk*, Amazon.de*, Amazon.es*, Amazon.fr*, Amazon.it*, Amazon.nl*, Amazon.pl*, Amazon.se*
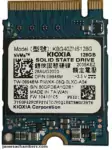
The Kioxia (Toshiba) 128GB M.2 2230 PCIe NVMe drive is much shorter than most NVMe drives (full size is 2280). It fits great with single board computers / tablets / other smaller form factors.
Links: Amazon.com*, Amazon.ca*, Amazon.co.uk*, Amazon.co.jp*, Amazon.com.au*, Amazon.de*, Amazon.es*, Amazon.fr*, Amazon.it*, Amazon.nl*, Amazon.pl*, Amazon.se*, Amazon.sg*
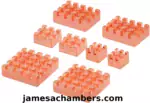
The Geekworm copper heat sink set is designed to fit many different single board computers. It uses thermal conductive adhesive which many “cheap” heat sink kits for SBCs don’t have. Eliminates hot spots and reduces throttling. Can be further enhanced by powered cooling over the heat sinks.
Links: Amazon.com*, Amazon.ca*, Amazon.co.jp*, Amazon.co.uk*, Amazon.de*, Amazon.es*, Amazon.fr*, Amazon.it*
The eMMC module compatible with the Rock 4C+/5B. Available from 16GB up to 128GB.
Links: Amazon.com*, AliExpress*, Amazon.com.au*, Amazon.ca*, Amazon.co.uk*, Amazon.co.jp*, Amazon.de*, Amazon.es*, Amazon.fr*, Amazon.it*, Amazon.nl*, Amazon.pl*, Amazon.se*
Preparing SD Card
First you should have a completely working installation on a SD card of the OS that you would like to use. I used the official Debian desktop image for this guide (recommended) so if your partitions are different it may be your flavor of Linux and need slightly altered instructions.
If you have an already working installation you want to move to your SSD you can use this as well most likely.
You should completely update first with:
sudo apt update && sudo apt full-upgradeMounting SSD
Mounting your SSD in the board should look like this:
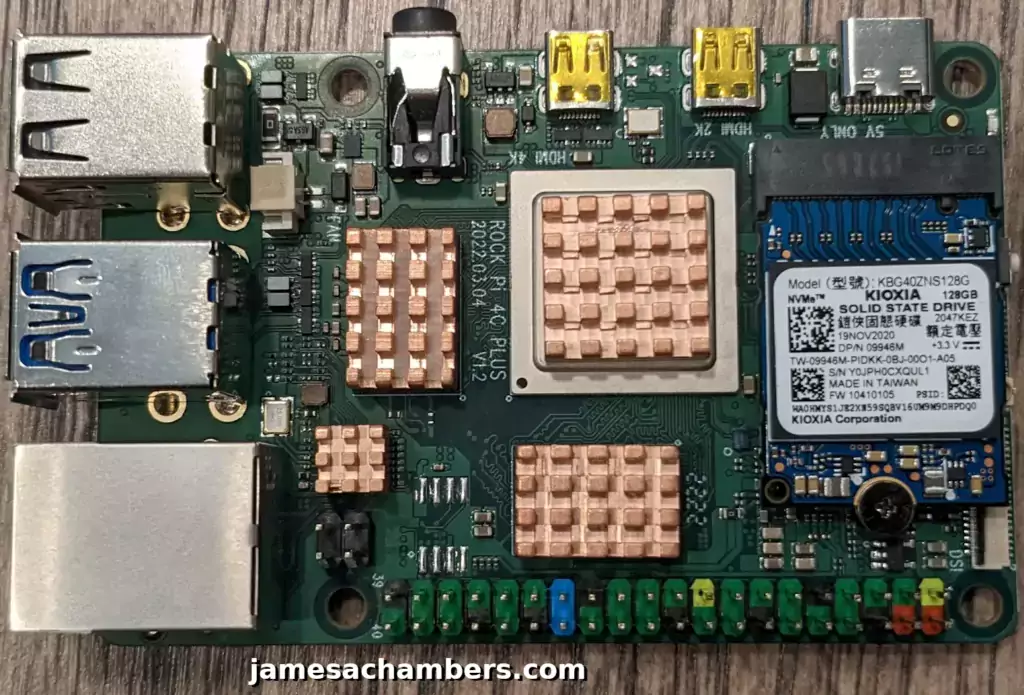
Preparing SSD
First we are going to completely remove all partitions from the drive so it’s completely blank. Your drive should typically be /dev/nvme0n1:
sudo gdisk /dev/nvme0n1
Now remove all partitions from the device. If you press “p” it will print out the partitions. You can then use “d” to delete them.
Here’s an example on mine:
rock@rockpi-4cplus:/boot$ sudo gdisk /dev/nvme0n1
GPT fdisk (gdisk) version 1.0.6

Partition table scan:
  MBR: protective
  BSD: not present
  APM: not present
  GPT: present

Found valid GPT with protective MBR; using GPT.

Command (? for help): p
Disk /dev/nvme0n1: 250069680 sectors, 119.2 GiB
Sector size (logical/physical): 512/512 bytes
Disk identifier (GUID): E3017ECA-4571-4F62-A39F-4BA2A4323BD8
Partition table holds up to 128 entries
Main partition table begins at sector 2 and ends at sector 33
First usable sector is 34, last usable sector is 250069646
Partitions will be aligned on 64-sector boundaries
Total free space is 8350 sectors (4.1 MiB)

Number  Start (sector)    End (sector)  Size       Code  Name
   1              64            8063   3.9 MiB     0700  loader1
   2           16384           24575   4.0 MiB     0700  loader2
   3           24576           32767   4.0 MiB     0700  trust
   4           32768         1081343   512.0 MiB   EF00  boot
   5         1081344       250069646   118.7 GiB   8300  rootfs

Command (? for help): d
Keep pressing d until all the partitions are deleted. Once they are gone use the ‘w’ command to write your changes.
Cloning Installation to SSD
We’re now ready to clone your installation to the SSD. We can now copy your drive to the SSD with the following command:
cat /dev/mmcblk0 > /dev/nvme0n1
Wait for the operation to complete (there won’t be any output but you will have a cursor again and be able to type new commands). Remember that you are copying an entire drive from one to another basically with that one command.
Mine took about 30-45 minutes (although I was using a 64GB SD card and the larger SD card you use the longer it will take to copy the whole drive).
If you are having any trouble with permissions try becoming “root” first with:
sudo su
Now try running the command again and as the superuser you should not encounter any permission errors.
Change SD card’s rootfs UUID
We need to change our SD card’s UUID so that it doesn’t try to boot from that partition. We can set it to a random one with the following command:
sudo tune2fs -O metadata_csum_seed -U random /dev/mmcblk0p5
We can verify that it has changed with blkid like this:
rock@rockpi-4cplus:~$ sudo blkid
/dev/nvme0n1p1: PARTLABEL="loader1" PARTUUID="5a15e3e6-dd19-480e-811a-7d9ba59b1963"
/dev/nvme0n1p2: PARTLABEL="loader2" PARTUUID="469f0b94-69ab-442d-aa9c-9b34c317a851"
/dev/nvme0n1p3: PARTLABEL="trust" PARTUUID="1263ff37-cd88-4bb1-952c-8dca6a25d854"
/dev/nvme0n1p4: UUID="AAAA-1111" BLOCK_SIZE="512" TYPE="vfat" PARTLABEL="boot" PARTUUID="256f45f9-30af-4374-85c9-2b8eaa1cc816"
/dev/nvme0n1p5: LABEL="rootfs" UUID="4d9b395f-fc57-41f9-8cad-54ea930a6506" BLOCK_SIZE="4096" TYPE="ext4" PARTLABEL="rootfs" PARTUUID="0cc2b5ce-8997-4920-a9fb-3a1db3303230"
/dev/mmcblk0p1: PARTLABEL="loader1" PARTUUID="5a15e3e6-dd19-480e-811a-7d9ba59b1963"
/dev/mmcblk0p2: PARTLABEL="loader2" PARTUUID="469f0b94-69ab-442d-aa9c-9b34c317a851"
/dev/mmcblk0p3: PARTLABEL="trust" PARTUUID="1263ff37-cd88-4bb1-952c-8dca6a25d854"
/dev/mmcblk0p4: LABEL_FATBOOT="boot" LABEL="boot" UUID="8138-1398" BLOCK_SIZE="512" TYPE="vfat" PARTLABEL="boot" PARTUUID="256f45f9-30af-4374-85c9-2b8eaa1cc816"
/dev/mmcblk0p5: LABEL="rootfs" UUID="101adf3b-0bbf-4891-8a20-d8d789b3a232" BLOCK_SIZE="4096" TYPE="ext4" PARTLABEL="rootfs" PARTUUID="0cc2b5ce-8997-4920-a9fb-3a1db3303230"
Notice that /dev/nvme0n1p5 and /dev/mmcblk0p5 no longer have matching UUIDs. This is exactly what we want.
Change SSD’s boot UUID
Next we are going to change the boot partition’s UUID on the SSD. This will make it so that the mounted /boot folder inside your operating system actually mounts the SD card (which is your actual boot loader in this configuration).
First make sure you have mtools with:
sudo apt install mtools -y
Now we can change the UUID with:
sudo mlabel -N aaaa1111 -i /dev/nvme0n1p4 ::
You can verify these are different using the same sudo blkid command as the previous section.
Run fsck
Before we reboot run fsck on the drive like this:
sudo fsck -yf /dev/nvme0n1p5
This will prevent you from having to run fsck on the CLI the first time you try to boot.
Reboot and Verify
Now reboot the Rock Pi 4C Plus with:
sudo rebootWith any luck you should be booted using your SSD! We can verify this with the mount command like this:
rock@rockpi-4cplus:~$ mount
/dev/nvme0n1p5 on / type ext4 (rw,relatime,data=ordered)
/dev/mmcblk0p4 on /boot type vfat (rw,relatime,fmask=0022,dmask=0022,codepage=936,iocharset=utf8,shortname=mixed,errors=remount-ro,x-systemd.automount)
Here we can see that our root partition (/) is indeed on /dev/nvme0n1p5 and not /dev/mmcblk0p5. We can also see that my /boot folder is properly mounted is /dev/mmcblk0p4 (the SD card which is serving as our boot loader). Success!
Testing Performance
You can verify the performance of your SSD on Pi Benchmarks using the following command:
sudo curl https://raw.githubusercontent.com/TheRemote/PiBenchmarks/master/Storage.sh | sudo bash
Here are the results:
     Category                  Test                      Result
HDParm                    Disk Read                 370.59 MB/s
HDParm                    Cached Disk Read          349.16 MB/s
DD                        Disk Write                211 MB/s
FIO                       4k random read            47962 IOPS (191850 KB/s)
FIO                       4k random write           12760 IOPS (51040 KB/s)
IOZone                    4k read                   56308 KB/s
IOZone                    4k write                  56392 KB/s
IOZone                    4k random read            38025 KB/s
IOZone                    4k random write           59999 KB/s

                          Score: 14,003
The full Rock Pi 4C Plus benchmark can be viewed here on Pi Benchmarks.
Conclusion
The Rock Pi 4C Plus is a bit of a pain to get to boot from the NVMe storage but it’s well worth the performance gains. If you are using a different OS than the official OS you may need to adjust some of the partitions to get this to work but you can follow the same process.
I highly recommend the little M.2 NVMe modules. They will save you money over SD cards and give you much higher performance and access to much greater storage capacities. If you want to spend more than $13 then you can get much, much higher storage capacities (but the price rises accordingly). It’s definitely worth it!
Other Resources
I’ve written a review about the Rock Pi 4C Plus here


I have a ROCK 4 SE on order and have read your very detailed SSD Boot Guide – many thanks. I noticed on the radxa wiki that the boot setup has changes. It looks like /boot in now included in the root file system. How does this impact on using the uSD to boot and then use NVMe as /. Hope this makes sense.
Hey Richard,
Thanks so much! So all it should mean is that it may not be necessary to change the UUIDs of the boot volume anymore. In other words the section “Change SSD’s boot UUID” might not be necessary anymore as there would not be a separate boot partition anymore.
I have a lot of similar guides on this site for SSD booting that use that style of partitioning where the boot folder is on the rootfs. You’d just want to update your paths to use /dev/nvme0n1 instead of /dev/nvme0n2 for example.
Hopefully that helps!
Thanks James. Sorry about my last two posts – I just missed this some how. My device is arriving next week and I will try your suggestion and see how it goes. Cheers
Hey Richard,
No worries at all, I’m excited to see how it goes. Take care!
Hey, does this solution also works for a ssd that is connected using a usb cable to the rockpi 4C plus (i bought an adapter for that).
Hey Oliver,
Great question! Yes, it should work theoretically. You’re going to have to use slightly different paths as it will probably be /dev/sda instead of /dev/nvme0np1 but if you make some changes to the device paths you should be able to use the same process here.
Hopefully that helps!
Hi James
I have a 4cplus as well and I would like to do the same with the official android image. Have you tried? Do you think it will be possible?
P. S. Official Android image has huge bug with wifi that keep disconnecting every 15minutes. Have anyone managed to solve this?
Hey Ronzino,
I’m sorry to hear the Android experience is so frustrating on this device! So I don’t think it will be possible to use this method to install it on SSD. It’s not even supported with Linux realistically but this method is “tricking” it basically to do it anyway. It wasn’t meant to do it though or designed to do it. I think this is a lot harder to do with Android and it works completely differently unfortunately.
As far as the Android image having the WiFi bug I definitely found recent references to this on reddit:
The problem, huge problem, is that wifi (I hope driver) is bugged. And after 15minute the wifi chip crash and you will be disconnect. Android is not able to re activate it automatically, you have to do it manually.6 months have been passed without a fix...
This sounds exactly like what you’re describing. That’s definitely disappointing to hear. It sounds like the Linux experience is much better on this board and that perhaps people wanting to run Android should potentially avoid it from these experiences. Hopefully they fix this soon as it sounds like it has been going on for a while!
thanks for answering that quick. yes, I wrote that reddit topic. the main reason I chose this SBC is the raspberry 1:1layout and official android support with google playservices preinstalled and working. the secon reason was the nvme slot.
unfortunatly both point were disattended as a wifi dropping every 15minute is dramatic for my use case. a mitigating workaround is to use tasker app, that will re-enable wifi everytime it drop.
another good question for you, at this point is…..do you know another good sbc with official android support with playstore and google services installed ?
Hey ronzino,
Nothing comes to mind as a super clear choice. Most of them can run Android but I actually don’t know of any that are “Play Protect Certified” out of the box which can create some headaches.
A lot of people have been using the Orange Pi 5 though with Android. That one requires buying an additional adapter but it is supposed to work correctly in Android. Hopefully that helps!
Hi!
I found this very helpful! Thank you!
There is a small typo “sudo mlabel -N aaaa1111 -i /dev/sdb1 ::” I think it should read “sudo mlabel -N aaaa1111 -i /dev/mmcblk0p4 ::”
Hey Alexander,
I’m glad you found it helpful! So basically the reason we change it on the SSD is because it’s actually booting from your SD card. The boot partition on the SSD will not be used. Only the “root” partition.
The reason is simply because it can’t. This device can’t boot from the SSD. If it could do this we wouldn’t need the SD card at all. By changing the SSD’s boot partition you make sure that when the OS is mounted it gets apt updates to the right partition (which is the /dev/mmcblk0p4 partition that is actually being used).
You can actually completely skip the step of changing the boot partition UUID and everything will still boot normally. It won’t actually boot from the SSD’s boot partition though because it can’t. It boots from the SD card’s boot partition no matter what because this device doesn’t have a SPI flash chip or any kind of boot loader and is just hard-coded essentially to boot from SD card. It just means that apt will update the wrong files when you do sudo apt dist-upgrade if you don’t do this step or change the wrong one. Your boot partition will never be updated by apt because your OS will be mounting the boot partition from the SSD which is never used and will update those files instead.
When you use your mount command you actually want your /boot mountpoint to have /dev/mmcblk0p4 mounted. If it’s not then you aren’t getting real updates to your SD card since they’ll be going to the boot partition on a device (the SSD) that it can’t actually boot from. Basically if you change the SD card’s boot UUID instead of the SSD’s boot UUID this will break OS updates to your “boot” partition. They’ll go to the wrong device and it will use the SD card’s files when you boot no matter what (otherwise you wouldn’t need the SD). Following the guide will just make sure your OS ignores the SSD’s boot drive and mounts the SD card’s boot drive instead so your OS updates from apt are actually used/effective.
Many people would not even notice if the wrong boot partition is mounted. Their OS will likely continue to work and boot (at least until the next major upgrade or after years of time pass). They might be confused if they are trying to edit config files in /boot and nothing is effective though. The time when it’s likely to break something is when that installation is upgraded to a new version (especially a major version). That’s when it’s probably going to finally catch up with it that apt is updating the wrong boot partition and they’ll get some crazy errors / a failed boot and need to start over (since things will have changed enough that running the same boot files from when the drive was originally cloned won’t cut it anymore for the newer version).
Hopefully that helps!
Hi, very intrigued. Do you think this is the same process with the rock4SE? Recently got one and have been trying a multitude of settups but none are quite stable.
Hey sugimoto,
Welcome! So yes, I do think this will work on the Rock 4 SE as well. It’s quite similar.
Which SSD are you using with it? There are firmware updates available for many SSDs that can help (especially for like Samsung, Crucial, the big names).
It depends on exactly what you mean by they aren’t quite stable. Are they booting okay but occasionally freezing? That issue is a good candidate for drive firmware updates for sure.
Another common reason is power but we see that a lot more on the Raspberry Pi than on the Rock Pi boards typically. Nevertheless I wanted to mention it as power can absolutely create these same symptoms.
Hopefully that helps!
I haven’t gotten an SSD yet, just looking still. Power could very much be the issue but currently just using a 128 uSD card and sometimes just won’t boot up, so have to reflash it and start over. Which is fine as I’m still learning so much about it as I try to setup my own web server and internal photo site for the family.
I thought is the SSD better with power failures or stability..as opposed to the uSD card, so anyway to just have a read only OS on the uSD and use the SSD for everything else, not sure what the best setup is. Currently trialing to have virtualmin and photoprism and possibly even plex if i’m greedy.
I wish I had seen this before I ordered my new hardware. I am on the RockPi 4A 1.4 – so I ended up buying the M.2 Extension board v1.6 ($10) +Heatsink ($8) plus delivery to Manila ($12) which is $30 before even ordering the M2 module. Perhaps with that small one, the 2230, which I did not know even existed – the extra heatsink would not be required and, although a little ugly, would be be ok to hang out of the 4A. I don’t know…. Also I am running DietPi – so will be very interested to see how it differs from this article. Thanks for writing it ! 🙏🏻😊
Hey Sean,
Welcome, thanks for your kind words! I know, it was very confusing when I wrote this trying to understand the differences between the models. It actually makes even less sense because there is already a 4C (that looks just like the 4A). They didn’t even call this the 4D, they called it the 4C+ so you would think it has some kind of relation to the 4C but it doesn’t. I would say that the 2230 slot is one of the most positive changes about the 4C+ over the 4A / 4B / 4B+ / 4C but they really probably should have chosen a different name (or at least a different letter than C giving us some sort of indication it is in fact different).
This one is a completely different design. The CPU and everything on this one is on the top of the board (there’s almost nothing on the bottom) whereas the 4A / 4B / 4B+ / 4C had the components mixed pretty strangely between the top and the bottom of the board (strange at least compared to traditional boards, it works fine). It really, really shouldn’t be labeled so similarly to these other boards that have a completely different CPU and layout.
I think it will work just fine for the 4A using the extender board. The extender itself works great. The only downsides are that it’s ugly (like you mentioned) and you have to pay for it and order / wait for it to arrive. It definitely saves some money to get the newer revision if you are willing to run a 2230 module. If you want to run a larger module you still can (although I don’t believe this adapter board works with the 4C+). Thanks for commenting, definitely let us know how it turns out!
Am moving forward sleoly, step by step – I received the M2 extender and heatsink, and installed those 😊 Unlike your RockPi, I have an extra step to make my RockPi4A bootable (as per https://wiki.radxa.com/Rockpi4/Linux_system_runs_on_M.2_NVME_SSD ) — am currently searching for a USB-A (male) to USB-A (male) cable to do an SPI flash…. In parallel, the cat /dev/mmc > /dev/nvme step is running, as I write this… I am curious, my SD is 64gb and the SSD is 256gb. After copying the SD to the SSD – I think there will be a 64gb partition on the SSD. True ? Therefore – will need a few additional steps to reclaim the other 200gb (approx) of space ?? Maybe I have misunderstood something ? I am running DietPi — Thanks again James. Keep posting your work ! 🙏🏻👍
Hey Sean,
They are honestly all different. I don’t think anyone has ever done DietPi before that I’ve heard of. Theoretically you would need to follow the process but for your root partition.
Does DietPi have a /boot partition? To be honest only the best and most popular operating systems won’t. The worst operating systems will *always* have a nasty /boot partition that you have to edit. Some of them even need boot.scr recompiled with the mkimage command which I’ve covered here in the comments with some other people.
Basically if it doesn’t just work as it is written then you are using an OS that has a /boot partition with a bunch of hard coded paths. If you go into the /boot folder you can usually figure out how to fix it but you’d be the first DietPi.
If you’re trying it for the first time I’d honestly recommend not trying anything nobody has ever done before for the first time. You can adapt it for any OS but it’s going to be varying degrees of difficulty. The better supported / bigger your OS is the more likely it can support doing something like this with extremely little effort. The smaller and more exotic the project is the more likely it’s going to have a really old school boot process with a bunch of hard coded paths.
I should note that if you actually have a model that has SPI flash (most of them don’t have it, you have to solder it on the older Rock Pis, not sure which ones do but it’s not many of them) you don’t have to use a SD card. That is because the Rock Pi 4C+ does not have a SPI flash chip or a place you can solder one. You may have other options to set it up with the flash chip without using a SD card as the boot loader. The instructions for using this type of SPI flash are here. They are an order of magnitude harder and more complicated than this method (and Radxa expects you to adapt it even more than this guide).
For expanding the free space most operating systems will take care of this for you. You can also just do a resize2fs command but almost every OS has something like armbian-config etc. that will have an option to resize the filesystem for you automatically. Hopefully that helps!
James – thanks reply ! 😊 Am making progress. Will give an update later today
Hey Sean,
No problem, best of luck!
Hi James – I need some help 😭
Just wanting to boot from the SSD – why should that be so difficult ?
1. first approach – as I have RockPi 4A v1.4 – it has an SPI Flash. I successfully flashed a “bootable bootloader” into that SPI. As per https://wiki.radxa.com/Rockpi4/dev/spi-install . Then what happens ( either with bootable SD in place or not ) is – nothing. Power-on results in hard blue light – which indicates it is “stuck in the bootloader”. What I do not know is – where is the bootloader trying to boot from ? Maybe it *IS* trying to boot from my SSD, but my SSD is not bootable.. My SSD was prepared as per article above ( using the cat command ) , ie cloned from the SD. Without a serial console – that requires some weird ass custom cable – I am not going to see any messages to explain what the (SPI) bootloader is doing and where it is hanging… So seems like a deadend for the “SPI flash method”.
2. next approach: use your article as a template. Seems simple enough. As the SPI method ends with a deadend, I can just remove that “SPI bootloader” so it always boots from the SD card. And then – using your approach – “the SD card contains a Bootloader” which points to the SSD…. But for some reason – this doesn’t work either … It just only boots from the SD card. and if the SD card is not inserted – it does not boot at all.
3. Try something else – there’s a forum entry about creating a “multi-boot SD card” … https://forum.radxa.com/t/about-multiboot/2838 Maybe there’s something there to followup. He also says ” The uboot searches for /extlinux/extlinux.conf and load kernel,dtb on first partition or partition which set bootable flag.” — maybe that information can be used to get #1 working ??? That would be the best option .
But I think I need some pointers or advice – otherwise I may never get this working.
What do you think James ? Which way would have most promise to pursue ?
[Thu Nov 24] root@batopi: ~$ fdisk -lDisk /dev/mmcblk0: 59.63 GiB, 64021856256 bytes, 125042688 sectors
Units: sectors of 1 * 512 = 512 bytes
Sector size (logical/physical): 512 bytes / 512 bytes
I/O size (minimum/optimal): 512 bytes / 512 bytes
Disklabel type: dos
Disk identifier: 0xb670ed71
Device Boot Start End Sectors Size Id Type
/dev/mmcblk0p1 32768 125042687 125009920 59.6G 83 Linux
Disk /dev/nvme0n1: 238.47 GiB, 256060514304 bytes, 500118192 sectors
Disk model: GIGABYTE GP-GSM2NE3256GNTD
Units: sectors of 1 * 512 = 512 bytes
Sector size (logical/physical): 512 bytes / 512 bytes
I/O size (minimum/optimal): 512 bytes / 512 bytes
Disklabel type: gpt
Disk identifier: C1BC056C-BD7C-4813-885E-927C6E0F6051
[Thu Nov 24] root@batopi: ~$ lsblk
NAME MAJ:MIN RM SIZE RO TYPE MOUNTPOINT
mmcblk0 179:0 0 59.6G 0 disk
└─mmcblk0p1 179:1 0 59.6G 0 part /
nvme0n1 259:0 0 238.5G 0 disk
Seems like I got no *bootable* partitions ! 🤣 At least the SD has a partition, the SSD does not. And the system *does* boot from the SD.
Hey Sean,
It’s different with every operating system. Your OS likely has hard-coded paths. The best and most modern operating systems do not work this way. They work purely on UUIDs.
It’s literally a sign of the quality of your OS how easy this is. Nobody likes a OS with a bunch of hardcoded paths and this is *incredibly* common on SBC’s (and considered completely unacceptable for PCs for the most part and I can’t think of many PC ones that are hard coded like this anymore). The harder it is then I would say the poorer quality and more obscure your OS is as a rule of thumb.
With yours you will have to go in and do some surgery on the /boot folder. Go look through the files and they will contain references to /dev/mmcblk0p1. You will have to manually update these. This process is completely different for various operating systems. Some of them like Armbian have to have boot.scr recompiled like Armbian. Others only have text files that you would just change from /dev/mmcblk0p1.
All of the questions people have had with others have been the same thing. It will need /boot folder surgery or you should use a larger more popular operating system as these are easier. Hopefully that helps!
Thanks for reply 😊🙏🏻
Working now 😁 – booting from NVMe. The SD is removed from the system. Seems ok 😉
— using your benchmark tool — my results: https://pibenchmarks.com/user/SeanPH/
Category Test ResultHDParm Disk Read 676.39 MB/s
HDParm Cached Disk Read 395.64 MB/s
DD Disk Write 252 MB/s
FIO 4k random read 57047 IOPS (228189 KB/s)
FIO 4k random write 21557 IOPS (86231 KB/s)
IOZone 4k read 100387 KB/s
IOZone 4k write 95103 KB/s
IOZone 4k random read 44117 KB/s
IOZone 4k random write 152130 KB/s
Score: 25950
Easier to check speed just with:
hdparm -Tt --direct /dev/nvme0n1p1Thanks again for great article ! and for your comments and replies 🙏🏻
Hey Sean,
Congratulations on getting everything working! That’s an amazing score.
So the only thing I’d say about using HDParm to test your speed is that it’s pretty meaningless for performance. Your drive never actually writes a ton of sequential data in a giant ideal read/write operation like this. That’s just a raw performance throughput test and will have almost no reflection on how fast the OS / machine feels to use.
The benchmark measures things like random read/write performance (although it does take HDParm for completeness, it’s the least weighted score in the entire benchmark, the random/read write scores count for 5x the raw HDParm score, each). This is what will actually determine how fast using your device feels. That’s because what your OS is actually really doing is updating lots of small files in random places all over the drive. It’s constantly updating this log file here, this config file there, etc.
How often is it copying a giant bulk file like the HDParm test? Almost never. SSD manufacturers do the same thing on the computer. They sell you big bulk read/write numbers and then they don’t tell you it’s actually terrible at random read/write performance. Except that is 99.9% of what people will be doing with it and 0.1% of the time they will be copying a giant, large sequential file (the numbers the manufacturers give you because they look the best but they mean the least).
The only people that should care about raw read/write performance are people who are constantly bulk copying giant files such as photos and video for editing (which any single board computer would be a terrible choice for this kind of work). The only time this should ever matter is when you literally image the device on a single board computer. You should not be copying 1+ GB videos on a single board computer for editing.
It’s random read/write performance that will determine the quality of your experience and that is true on the PC as well. Drives with high random read/write performance are much more expensive and higher quality (think like the top Samsung NVMe drives and drives like that which are known to excel with random read/write and cost more because of it).
This is actually a huge problem with SD cards too. There are lots of SD cards that have high sequential read/write performance (meaning writing a giant file all at once, an ideal operation). Some of them are also the slowest SD cards you could possibly use for a single board computer. The A1 cards are much faster at random read/write performance (and they have to be).
It was so much more obvious on single board computers though using SD cards though that this was a thing. I created the benchmark because it was so clear that some of my SD cards were performing *much* better than others. You could literally feel how much faster they are when using the device. Except they had nearly identical HDParm scores. That was when I learned how worthless HDParm was and that the truth was more complicated and made pibenchmarks.com (it has been a few years now).
Sure enough as people submitted benchmarks over time it became clear that just because it’s harder “feel” the difference on a SSD vs. a SD card (because SD cards are so slow to start with) doesn’t mean it isn’t the same situation. It absolutely is. They have wildly different random 4k read/write performance and many drives with high sequential scores have low random read/write.
In other words the A1 standard was created to solve this problem for SD cards by telling you it’s actually fast at random read/write (the A1 is a minimum random read/write speed rating). It was created because the manufacturers are tricking people using raw throughput numbers from tests like HDParm but that’s not how anyone uses their computer nor will it reflect how fast it performs in normal operation. There is no such standard for SSDs unfortunately and they still play this game to this day with SSDs. The only way to know is to benchmark the random read/write performance which HDParm can’t do.
The benchmark is meant to help give consumers a real reference and some kind of protection against these misleading practices. It was very common for people to buy expensive SD cards boasting high throughput rates like this and then and come on the site asking why they felt so slow on the Pi/other SBC. This is on purpose. The manufacturers are misleading you by giving you the numbers they want to give you. They do *not* give you the numbers they don’t want you to see (or even act like random read/write is a metric you’d want to be looking at a lot of the time).
The only way you’ll find those is using a more comprehensive benchmark (or feel free to use my iozone and fio tests from the benchmark, it’s open source, there is nothing magic in it and you can run them all yourself if you want if you think that’s faster, but don’t use HDParm for sure). CrystalDiskMark is a popular Windows one that actually measures random read/write performance. You shouldn’t take any benchmark seriously that doesn’t measure random read/write. It’s the most important and the one that most drive manufacturers won’t want you to see (if they actually give random read/write numbers it’s because they’re proud of it since they had to use higher quality components to achieve it).
Your random read/write scores are outstanding by the way. I’m only writing this up to explain the pitfalls of using HDParm as I originally started out benchmarking that way and the shortcomings from it are what led to me making the benchmark (and the reason it has the additional tests added which are annoying to get dependencies for but necessary to get a more accurate and comprehensive benchmark/test on it).
Fantastic results, enjoy and take care!
Totally agree 🙏🏻😁 ! My SD experience is some are fast and some are slow (unusable) – and never could know for sure until try to run it in one of my systems. Hopefully the NVMe drive will solve those problems. Now to arrange some backup protocols – like a spare NVMe with bootable image on standby. I fear the m2 card itself getting zapped – though such a power event that would probably fry the whole RockPi. Thanks again – I took alot of time to make sure I am getting the gen2 performance from my m2. This link helped a lot. And for the image copy of DietPi from SD to M2, this was my guide …. I am not sure – but I think the whole SPI flash was a red herring. I disabled it. Then – just removing the SD card – and it boots from the M.2 NVMe… Go figure ? Seems like I over-thought it from the beginning.
Hey Sean,
Great findings! I totally agree with you about SD cards and think you will have a much better experience!
So I think the SPI flash chip on these is mostly a red herring. I don’t know which model came with it (hardly any of them) but almost all of them you have to buy the flash chip and solder it to the board. They dropped this altogether on the 4C+ and there’s nowhere to even solder it anymore. Radxa describes it as “very difficult to flash for end users”.
I wouldn’t bother with this even if I had the version that it could be soldered to the board. It’s a part you have to buy and solder and even once that’s done the support is very poor and very difficult to navigate. This is literally no different than buying a SD card except you don’t have to solder a SD card to the board. It’s still an extra part you have to buy and once you buy the chip you still have to deal with how it works (not well compared to comparable boards where this capability is actually built in and intended to be used without having to solder anything).
In contrast we’ve been doing the SD card bootstrapped SSD boot since the Raspberry Pi. My first article on doing that is from something like 2017. It’s definitely a tried and true method.
Thanks for leaving your experience with it! I definitely think you made all of the right choices. Enjoy and take care!
(Have comments been disabled? They do not display on my browser – Edge)
Hey Rob,
Comments should be on for sure! Can you verify you can see this?