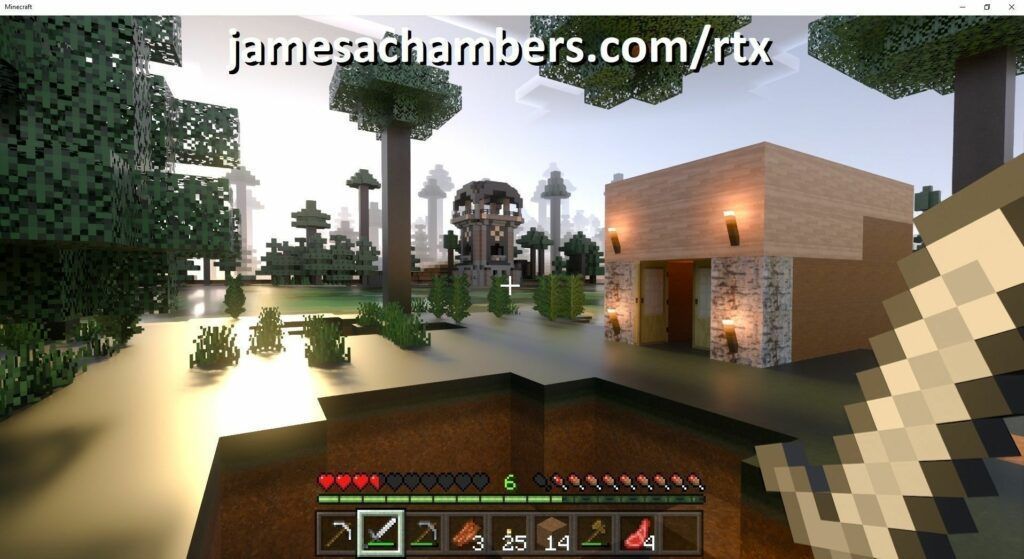
On December 8th NVIDIA officially released RTX support on Minecraft Bedrock Edition for Windows 10. To use this feature you need to have a resource pack installed.
Fortunately the dedicated server not only supports resource packs, but in this guide I will show you how to set it up so that resource packs are automatically downloaded to your player’s device and activated!
The featured image for this article is not single player. It is running on my Minecraft Bedrock dedicated server
Prerequisites
If you don’t have a Minecraft Bedrock Edition dedicated server already view my automatic setup script and guide first to get one up and running.
You will also need to have a resource pack / packs in mind. For this guide I will use the RTX enabled 512×512 feature pack. This resource pack is available on GitHub for free.
All of these versions support cross-platform play with each other (but not with the Java edition).
This is the PC Minecraft for Windows 10 (Bedrock) edition of Minecraft. It is able to play cross-platform with other players on Android / iOS / Playstation / Xbox / Switch. Available as a code that is instantly activated to give you permanent access to the game!
Links: Amazon.com*, Amazon.co.jp*, Amazon.co.uk*, Amazon.de*, Amazon.es*, Amazon.fr*, Amazon.it*
The Sony PlayStation version of Minecraft: Bedrock edition.
Links: Amazon.com*, Amazon.ca*, Amazon.com.au*, Amazon.co.jp*, Amazon.co.uk*, Amazon.de*, Amazon.es*, Amazon.fr*, Amazon.it*, Amazon.nl*, Amazon.se*, Amazon.sg*

This is the Nintendo Switch version of Minecraft: Bedrock edition.
Links: Amazon.com*, Amazon.ca*, Amazon.com.au*, Amazon.co.jp*, Amazon.co.uk*, Amazon.de*, Amazon.es*, Amazon.fr*, Amazon.it*, Amazon.nl*, Amazon.pl*, Amazon.se*, Amazon.sg*
This is the Microsoft Xbox version of Minecraft: Bedrock edition.
Links: Amazon.com*, Amazon.ca*, Amazon.com.au*, Amazon.co.uk*, Amazon.de*, Amazon.es*, Amazon.fr*, Amazon.it*, Amazon.nl*, Amazon.sg*
Preparing the Resource Pack
Resource packs can be bundled a couple of different ways. The first way is the way that the example we are using in this guide is packaged. It looks like this:

We have the main folder (Tokomiki_Resource_Pack) that will contain a manifest (manifest.json). If your resource pack looks like this you’re good to go. You can skip to the next step.
The second way that resource packs are often distributed is as one solid .mcpack file. An example of this is NVIDIA’s RTX texture example pack (scroll down to “NVIDIA and Partner Resource Packs” section, they have a few different ones you can play with, the one in this example is the PBR textures).
If your resource pack looks like this and is a .mcpack it is not good to go and we’re going to have to extract the files we want out of it. Fortunately this is very easy. All you have to do is rename it from a .mcpack file to a .zip file. I’m not joking, go ahead and try it:

Perfect, that looks exactly like what we want and our previous example! Go ahead and extract the zip archive into a new folder. It actually doesn’t matter what you name the folder because the pack will be located by UUID so just pick something short and descriptive.
Examine the Manifest
Every resource pack contains a UUID, or a “universally unique identifier”. This is what the server uses to identify which resource pack is which. Your resource pack’s UUID is located in the manifest.json file. Let’s take a look at our 512×512 example pack’s manifest.json:
{
    "format_version": 2,
    "header": {
        "name": "Tokomiki Test Textures 512k",
        "description": "Reducing RTX textures size",
        "uuid": "75a26ecc-8351-11ea-bc55-0242ac130003",
        "version": [ 1, 0, 1 ],
        "min_engine_version": [ 1, 15, 0 ]
    },
    "modules": [
        {
            "type": "resources",
            "uuid": "75a27110-8351-11ea-bc55-0242ac130003",
            "version": [ 1, 0, 1 ]
        }
    ],
    "capabilities" : [
            "raytraced"
    ]
}
There it is. This particular resource pack’s UUID is 75a26ecc-8351-11ea-bc55-0242ac130003. The version is [ 1, 0, 1 ]. Perfect, we’re now ready to configure the dedicated server!
Configuring Dedicated Server for Resource Packs
First we need to copy/upload your resource pack to the server’s “resource_packs” folder:

Your folder’s structure may vary slightly depending on version and whether you are running on Windows or Linux. Either way, you should have this folder. We are going to place the folder of our resource pack here. Usually there will already be a “vanilla” folder and a “chemistry” folder in there that are included with the server. We’re going to add a third folder by coping in our new resource pack like this:

Excellent, there’s just one last step now to enable the resource pack.
Create world_resource_packs.json
First you need to locate the folder on the server that your “world” is stored in. The base folder is just “worlds” but inside there will be another directory inside of it. If you left your server.properties as the default it will likely be “Bedrock level”. If you set a custom “level-name” variable in your server.properties file it should be that. This is your world’s folder.
The final step to enabling our resource pack is to create the world_resource_packs.json file inside our world’s folder you just located. This file is actually created and used on the client side as well when you modify your resource packs (it’s at C:\Users\XyouruserX\AppData\Local\Packages\Microsoft.MinecraftUWP_8wekyb3d8bbwe\LocalState\games\com.mojang\minecraftWorlds\XyourworldX\world_resource_packs.json).
You can actually use that exact file if you’ve applied the same feature pack you’re trying to install on the server. The format of it is pretty simple though, so it’s a lot easier to just create it yourself.
Go ahead and create a new file called world_resource_packs.txt (if on Linux you can just create it as world_resource_packs.json) and type/paste the following matching the pack_id to your resource pack’s UUID and version from the earlier steps:
[
         {
                 "pack_id" : "75a26ecc-8351-11ea-bc55-0242ac130003",
                 "version" : [ 1, 0, 1 ]
         }
 ]
Now save the file and rename it from world_resource_packs.txt to world_resource_packs.json.
That’s it, now restart the server! Upon connecting new players will now automatically download and apply your feature pack. They do not have to download or install it themselves. It will look like this when they join:
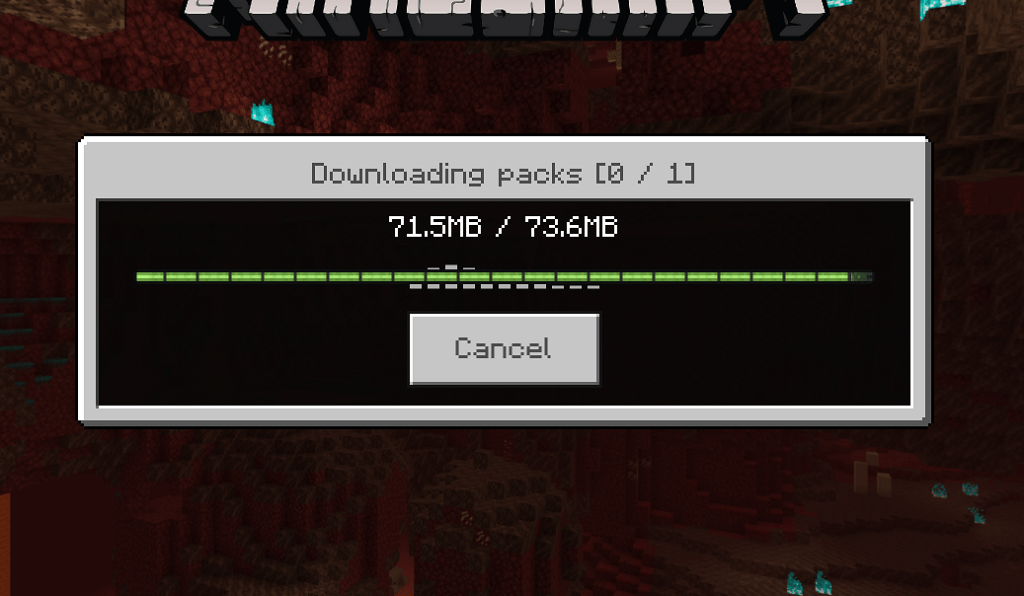
This download works on all platforms. For example, for this guide I tested connecting with my Android phone to try without using Windows and see if it would still work. When you log on with a platform that doesn’t support RTX they will still see the new textures. They just won’t have the fancy RTX lighting and raytracing but it still looks great compared to vanilla!
Adding Multiple Resource Packs
You can add as many resource packs as you want. Copy the additional resource pack folder to your resource_packs folder by before.
Updating the world_resource_packs.json file is similar to what we did earlier but the JSON syntax can get a little tricky. Here is how you want to format adding multiple entries to world_resource_packs.json:
[
        {
                "pack_id" : "75a26ecc-8351-11ea-bc55-0242ac130003",
                "version" : [ 1, 0, 1 ]
        },
        {
                "pack_id" : "a1673412-cb04-4604-8000-04b6396afe80",
                "version" : [ 0, 9, 0 ]
        }
]
Notice the comma after the closing brace of the first entry. It’s super common to miss it and it is invalid JSON without it. The last entry will NOT have a comma, but if you add a second, third, fourth it will like this:
[
        {
                "pack_id" : "75a26ecc-8351-11ea-bc55-0242ac130003",
                "version" : [ 1, 0, 1 ]
        },
        {
                "pack_id" : "a1673412-cb04-4604-8000-04b6396afe80",
                "version" : [ 0, 9, 0 ]
        },
        {
                "pack_id" : "fake example 1",
                "version" : [ 0, 5, 1 ]
        },
        {
                "pack_id" : "fake example 2",
                "version" : [ 0, 2, 4 ]
        }
]
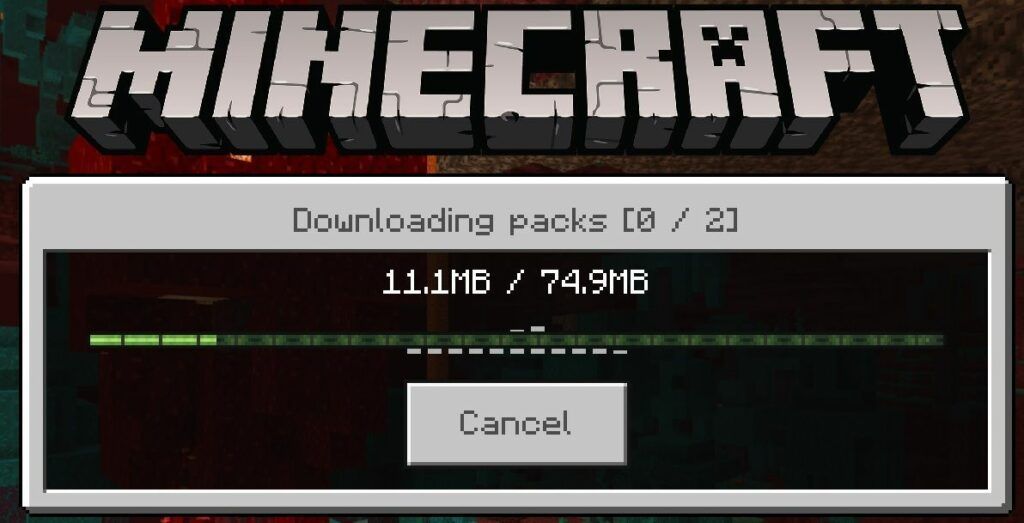
That’s it! After restarting your server newly connecting players that haven’t downloaded the resource pack yet will see 2 (or more) resource packs queued like this:
Force Resource Pack Using server.properties
The default settings for Minecraft is that connecting players will automatically download and apply the resource packs they need so usually this isn’t necessary. In some cases though you may want to actually force them to use the resource pack. Otherwise they can unload it or load different ones.
There is an option in server.properties that will absolutely force them to use them if you desire. Open your server.properties file and look for these lines:
texturepack-required=false
# Force clients to use texture packs in the current world
# Allowed values: "true" or "false"
Change to true to force texture packs to be used!
Bedrock Server Automatic Deployment Script
Here’s my one-liner to deploy a new Minecraft server on Linux:
curl https://raw.githubusercontent.com/TheRemote/MinecraftBedrockServer/master/SetupMinecraft.sh | bash
See Minecraft Bedrock Edition – Linux Dedicated Server automatic installation/updating/backup script for full breakdown!



I’m having an issue where I have a server that I’m running. Some folks have Raytracing, and others do not. Forcing the RTX texture pack works for RTX and my behavior pack, but for those without RTX I’m trying to provide an alternate pack that can be used. I can get either one working independently of one another this way, but not without the texturepack required option.
When I connect via the client, I have no options to activate any resource or behavior packs at all. texturepack-required option is OFF on the server.properties.
Am I doing something wrong?
Hey AC,
I think this partially depends on the pack. On my testing server I used the NVIDIA example pack from the article I linked to and it seems to have upgrades to “regular” textures as well as the new RTX textures.
The regular textures will still be displayed but if the resource pack doesn’t have any of those in there then there won’t be anything to see. I would try grabbing a couple other resource packs and testing with them and see if you can get one with the desired behavior. Hopefully that helps!
Hey James, I have setup the server for my kids and we have had all kinds of fun! I am trying to figure out how to “op” someone. If you please help me out with this that would be great! Thanks again.
Hey Kasey,
Absolutely! The easiest way is right from the server console. You can pull that up with screen -r yourservername. Once you have the console up type:
op playernameOnce you’ve done that you can create other ops in game using /op playername and will get access to a whole bunch of other commands.
You can also add players to the ops.json file but you have to do it by UUID so it’s a bit more of a pain but it’s possible. Hopefully that helps!
First of all I’d like to say a huge thanks for this resource. My kids have been delighted that I’ve been able to set up a server with their favourite mods to share with their friends!
I’ve come back to my server after a couple of months away, and for some reason our mods are no longer being activated. Even running the same worlds that used to work results in no mods. I’ve tried both setting them up manually like this guide explains, and uploading a world from my phone where the mods were installed and working, but nothing I’m doing now results in the mods working on the server. I presume something has changed in one of the latest versions of the server.
Can anyone throw any light on this? You’d make myself and my kids very happy again!
I’ve filed a bug report with mojang for anyone who’s interested. Watch this space.
Hey Rich,
Sorry for the slow reply, I’ve been tied up with real life stuff. Have you checked if the mods that you are using need to be updated? They’ve done a ton of huge updates and it’s definitely possible there’s a newer version of some of them to address this. There may be one you can drop in there that will fix it again!
Have you tried restoring a backup of the server from before? Sometimes permissions on the folders get messed up when trying stuff like this and making a lot of changes. You may want to check who the “owner” of the files is on the server and change them to yourself (or the username running the server). I actually added a utility script that does this on Linux in my Linux dedicated Bedrock server guide so if you are running that then it may be worth trying to run the fixpermissions.sh script on it. It’s located right in the server folder.
If you’re on Windows you can right click on the folder and choose “Properties”, then go to the “Security” tab and click the “Advanced” button at the top. It will tell you who the owner is and let you change it to a different user (you want it to be yourself). Enable permission inheritance if it isn’t already by clicking “Enable inheritance” at the bottom of the dialog and hit ok.
It may indeed be a bug though. Can you link us to your official Mojang bug report? I’d love to follow it!
My turn to apologise! I had no idea you’d replied sorry. I presumed I’d get an email notification if there was a reply as lazily didn’t check back…
The bug report is here.
No action on it yet. I get the impression they don’t take the bedrock addition very seriously
Thanks for pointing to the permissions being a possible issue. Unfortunately that’s not it. I also presume it’s not because of outdated mods since they work on the latest version of the app on my phone. It’s very sad for my kids, but hopefully either mojang will fix it or I’ll realise I did something stupid!
Hey Rich,
Not a problem at all! I specifically chose not to use everyone’s submitted email addresses in any way or for anything except anti-spam verification but your assumption is understandable as most places will auto-subscribe you to the notifications, etc.
Thanks for letting us know the bug report, I have bookmarked it and will keep an eye on it!
Followed the instructions. When I join the server, it downloads the resource pack. But it doesn’t apply it, and I can’t turn on RTX.
Hey Roger,
What happens if you turn on the “texturepack-required” option (second to last section of the article)?
Without this option it will let players change the texture pack. Do you have any texture packs applied in your client already? Regardless, the force option should override it.
If you’re seeing the files download then it sounds like the UUIDs are correct. If you go in the Minecraft menus to your texture pack options do you see the server’s texture pack in there as a choice? I am assuming this is also a PC running Windows 10 and not any other platform as well since only Windows has RTX support.
When I tested my RTX server from my Android phone it still loaded the texture pack but obviously there were no RTX effects. It should still load even on other platforms with the base texture changes and just the fancy RTX lighting/reflection effects will be absent. I’ll be interested to see what you find out!
Cab you give us an example server ?
That isn’t a bad idea, I’ll see if I can get one together!
Does this work with any custom pack or only with ray tracing ones? Cause it doesn’t work for me, i’ve tried so many things, still no luck
Hey Ectos,
Great question! It will absolutely work with any pack.
The only thing you’d want to be careful with is that if it’s a non-raytraced pack you want to make sure you don’t add this part into your configuration file:
"capabilities" : [

            "raytraced"

]
You don’t want to have this line in there if it’s a non-raytracing resource pack and should be using the original file that came with the pack and just modifying that one. Otherwise you’ll end up with something like this. This is because the ID and other capabilities won’t match up with the pack itself so make sure you’re using the original and then modifying that original using the guide.
What have you tried and what are you seeing so far? Are you seeing any errors in Minecraft or on the server console? Usually if something is going wrong with the packs there will be some sort of indication somewhere. If we can find that it will usually lead us to the solution!
Nothing happening at all would point to the files haven’t been placed in the right folder or something more fundamental like that. It could also be a resource pack that isn’t meant for Bedrock but even then I’d expect an error. Still, make sure you aren’t trying to use a Java Minecraft resource pack with Minecraft Bedrock. I’d recommend a double check that the pack is compatible with Bedrock.
Another thing to double check is try setting it up with a different resource pack and see if that one works. Some resource packs might be really outdated / have bugs / something like that, so this helps rule a bunch of things out. If it won’t work even with well-known popular Bedrock compatible resource packs then something must be wrong with the configuration. This helps to narrow things down to whether it is a configuration problem or a resource pack problem.
Can you check to see if any of these warnings/errors are appearing in any of these places? I’m sure we can get it going!
Thank you!!1
Thanks to you as well, I wasn’t sure if anyone had even seen this newer article yet until you commented!