

Microsoft’s System Center Configuration Manager (SCCM) seems to usually work pretty well for 95-97% of the computers at the environments I’ve worked in. Unfortunately for the remaining few percentage points of computers that SCCM is *not* working pretty well for when SCCM does break it does so spectacularly with style and pizzazz.
This script was developed for those computers. It first tries to uninstall SCCM gracefully if the installer is present, but regardless of whether it fails or not afterward it will wipe all traces of SCCM from the hard drive and registry. This allows you to do a new “clean” installation of SCCM afterward on machines that would not let you previously reinstall.
We are going to use PowerShell to accomplish this and explain each step in this guide!
Running SCCM Uninstaller
It’s usually a good idea to let SCCM try to uninstall itself even if we are going to forcefully remove everything anyways later. The SCCM uninstaller, being officially supported, knows every trace that should be on there and has a much easier time stopping everything than we will.
I broke my code up into “functions”. Go ahead and create a new PowerShell .ps1 file:
# Attempt to run the SCCM uninstaller
function uninstallSCCM() {
    if (Test-Path -Path "$Env:SystemDrive\Windows\ccmsetup\ccmsetup.exe") {
        # Stop SCCM services
        Get-Service -Name CcmExec -ErrorAction SilentlyContinue | Stop-Service -Force -Verbose
        Get-Service -Name ccmsetup -ErrorAction SilentlyContinue | Stop-Service -Force -Verbose

        # Run the SCCM uninstaller
        Start-Process -FilePath "$Env:SystemDrive\Windows\ccmsetup\ccmsetup.exe" -ArgumentList '/uninstall'

        # Wait for the uninstaller to finish
        do {
            Start-Sleep -Milliseconds 1000
            $Process = (Get-Process ccmsetup -ErrorAction SilentlyContinue)
        } until ($null -eq $Process)

        Write-Host "SCCM uninstallation completed"
    }
}

uninstallSCCM
This piece of the guide isn’t too difficult to explain so we won’t go into too much detail. Basically first we stop SCCM’s services (CCMExec and CCMSetup) and then we launch the uninstaller. If the SCCM uninstaller is present it will always be in the Windows\ccmsetup folder.
The “do” loop just sleeps for 1000 milliseconds and then checks to see if the uninstaller is done. Once it is it writes a line to the host console to let us know the uninstallation has finished. The very last line of the script calls the “uninstallSCCM” function we created above. Pretty simple!
One possible exception to trying the graceful uninstallation first is if the uninstaller isn’t working/freezing/stuck. I’ve seen some computers occasionally where the uninstaller will run and literally never finish even if you leave it overnight. If this is the case you may need to jump straight to manual removal otherwise try letting it finish.
Force Removal of SCCM
Next we are going to forcefully remove all SCCM files, registry traces, certificates, caches, WMI namespaces, etc. Let’s create a new function called “removeSCCM”:
# Forcefully remove all traces of SCCM from the computer
function removeSCCM() {
    # Stop SCCM services
    Get-Service -Name CcmExec -ErrorAction SilentlyContinue | Stop-Service -Force -Verbose
    Get-Service -Name ccmsetup -ErrorAction SilentlyContinue | Stop-Service -Force -Verbose

    # Take ownership of/delete SCCM's client folder and files
    $null = takeown /F "$($Env:WinDir)\CCM" /R /A /D Y 2>&1
    Remove-Item -Path "$($Env:WinDir)\CCM" -Force -Recurse -Confirm:$false -Verbose -ErrorAction SilentlyContinue

    # Take ownership of/delete SCCM's setup folder and files
    $null = takeown /F "$($Env:WinDir)\CCMSetup" /R /A /D Y 2>&1
    Remove-Item -Path "$($Env:WinDir)\CCMSetup" -Force -Recurse -Confirm:$false -Verbose -ErrorAction SilentlyContinue

    # Take ownership of/delete SCCM cache of downloaded packages and applications
    $null = takeown /F "$($Env:WinDir)\CCMCache" /R /A /D Y 2>&1
    Remove-Item -Path "$($Env:WinDir)\CCMCache" -Force -Recurse -Confirm:$false -Verbose -ErrorAction SilentlyContinue
First we need to take ownership of the SCCM client/setup/cache folders to avoid getting permission errors when we remove them. After taking ownership we remove all the files recursively with one command using the -Recurse switch of Remove-Item. That’s it for the files, now let’s get the registry:
    # Remove CCM registry keys
    Remove-Item -Path 'HKLM:\SOFTWARE\Microsoft\CCM' -Force -Recurse -Verbose -ErrorAction SilentlyContinue
    Remove-Item -Path 'HKLM:\SOFTWARE\Wow6432Node\Microsoft\CCM' -Force -Recurse -Confirm:$false -Verbose -ErrorAction SilentlyContinue

    # Remove SMS registry keys
    Remove-Item -Path 'HKLM:\SOFTWARE\Microsoft\SMS' -Force -Recurse -Confirm:$false -Verbose -ErrorAction SilentlyContinue
    Remove-Item -Path 'HKLM:\SOFTWARE\Wow6432Node\Microsoft\SMS' -Force -Recurse -Confirm:$false -Verbose -ErrorAction SilentlyContinue

    # Remove CCMSetup registry keys
    Remove-Item -Path 'HKLM:\Software\Microsoft\CCMSetup' -Force -Recurse -Confirm:$false -Verbose -ErrorAction SilentlyContinue
    Remove-Item -Path 'HKLM:\Software\Wow6432Node\Microsoft\CCMSetup' -Force -Confirm:$false -Recurse -Verbose -ErrorAction SilentlyContinue
That’s it for all the registry keys. Let’s remove the services and the WMI namespaces next:
    # Remove CcmExec and ccmsetup services
    Remove-Item -Path 'HKLM:\SYSTEM\CurrentControlSet\Services\CcmExec' -Force -Recurse -Confirm:$false -Verbose -ErrorAction SilentlyContinue
    Remove-Item -Path 'HKLM:\SYSTEM\CurrentControlSet\Services\ccmsetup' -Force -Recurse -Confirm:$false -Verbose -ErrorAction SilentlyContinue

    # Remove SCCM namespaces from WMI repository
    Get-CimInstance -Query "Select * From __Namespace Where Name='CCM'" -Namespace "root" -ErrorAction SilentlyContinue | Remove-CimInstance -Verbose -Confirm:$false -ErrorAction SilentlyContinue
    Get-CimInstance -Query "Select * From __Namespace Where Name='CCMVDI'" -Namespace "root" -ErrorAction SilentlyContinue | Remove-CimInstance -Verbose -Confirm:$false -ErrorAction SilentlyContinue
    Get-CimInstance -Query "Select * From __Namespace Where Name='SmsDm'" -Namespace "root" -ErrorAction SilentlyContinue | Remove-CimInstance -Verbose -Confirm:$false -ErrorAction SilentlyContinue
    Get-CimInstance -Query "Select * From __Namespace Where Name='sms'" -Namespace "root\cimv2" -ErrorAction SilentlyContinue | Remove-CimInstance -Verbose -Confirm:$false -ErrorAction SilentlyContinue
Next we are going to delete SCCM’s certificates and GUID file (smscfg.ini) and add the closing brace (“}”) by adding these commands:
    # Remove SCCM's smscfg file (contains GUID of previous installation)
    Remove-Item -Path "$($Env:WinDir)\smscfg.ini" -Force -Confirm:$false -Verbose -ErrorAction SilentlyContinue

    # Remove SCCM certificates
    Remove-Item -Path 'HKLM:\Software\Microsoft\SystemCertificates\SMS\Certificates\*' -Force -Confirm:$false -Verbose -ErrorAction SilentlyContinue

    # Completed
    Write-Host "All traces of SCCM have been removed"
}

removeSCCM
And that’s it! I’m sure there’s more traces that SCCM leaves that my script potentially aren’t getting but these are the critical pieces that can prevent you from reinstalling.
Final Script
Here is the final script all put together:
# Attempt to run the SCCM uninstaller
function uninstallSCCM() {
    if (Test-Path -Path "$Env:SystemDrive\Windows\ccmsetup\ccmsetup.exe") {
        # Stop SCCM services
        Get-Service -Name CcmExec -ErrorAction SilentlyContinue | Stop-Service -Force -Verbose
        Get-Service -Name ccmsetup -ErrorAction SilentlyContinue | Stop-Service -Force -Verbose

        # Run the SCCM uninstaller
        Start-Process -FilePath "$Env:SystemDrive\Windows\ccmsetup\ccmsetup.exe" -ArgumentList '/uninstall'

        # Wait for the uninstaller to finish
        do {
            Start-Sleep -Milliseconds 1000
            $Process = (Get-Process ccmsetup -ErrorAction SilentlyContinue)
        } until ($null -eq $Process)

        Write-Host "SCCM uninstallation completed"
    }
}

# Forcefully remove all traces of SCCM from the computer
function removeSCCM() {
    # Stop SCCM services
    Get-Service -Name CcmExec -ErrorAction SilentlyContinue | Stop-Service -Force -Verbose
    Get-Service -Name ccmsetup -ErrorAction SilentlyContinue | Stop-Service -Force -Verbose

    # Take ownership of/delete SCCM's client folder and files
    $null = takeown /F "$($Env:WinDir)\CCM" /R /A /D Y 2>&1
    Remove-Item -Path "$($Env:WinDir)\CCM" -Force -Recurse -Confirm:$false -Verbose -ErrorAction SilentlyContinue

    # Take ownership of/delete SCCM's setup folder and files
    $null = takeown /F "$($Env:WinDir)\CCMSetup" /R /A /D Y 2>&1
    Remove-Item -Path "$($Env:WinDir)\CCMSetup" -Force -Recurse -Confirm:$false -Verbose -ErrorAction SilentlyContinue

    # Take ownership of/delete SCCM cache of downloaded packages and applications
    $null = takeown /F "$($Env:WinDir)\CCMCache" /R /A /D Y 2>&1
    Remove-Item -Path "$($Env:WinDir)\CCMCache" -Force -Recurse -Confirm:$false -Verbose -ErrorAction SilentlyContinue

    # Remove SCCM's smscfg file (contains GUID of previous installation)
    Remove-Item -Path "$($Env:WinDir)\smscfg.ini" -Force -Confirm:$false -Verbose -ErrorAction SilentlyContinue

    # Remove SCCM certificates
    Remove-Item -Path 'HKLM:\Software\Microsoft\SystemCertificates\SMS\Certificates\*' -Force -Confirm:$false -Verbose -ErrorAction SilentlyContinue

    # Remove CCM registry keys
    Remove-Item -Path 'HKLM:\SOFTWARE\Microsoft\CCM' -Force -Recurse -Verbose -ErrorAction SilentlyContinue
    Remove-Item -Path 'HKLM:\SOFTWARE\Wow6432Node\Microsoft\CCM' -Force -Recurse -Confirm:$false -Verbose -ErrorAction SilentlyContinue

    # Remove SMS registry keys
    Remove-Item -Path 'HKLM:\SOFTWARE\Microsoft\SMS' -Force -Recurse -Confirm:$false -Verbose -ErrorAction SilentlyContinue
    Remove-Item -Path 'HKLM:\SOFTWARE\Wow6432Node\Microsoft\SMS' -Force -Recurse -Confirm:$false -Verbose -ErrorAction SilentlyContinue

    # Remove CCMSetup registry keys
    Remove-Item -Path 'HKLM:\Software\Microsoft\CCMSetup' -Force -Recurse -Confirm:$false -Verbose -ErrorAction SilentlyContinue
    Remove-Item -Path 'HKLM:\Software\Wow6432Node\Microsoft\CCMSetup' -Force -Confirm:$false -Recurse -Verbose -ErrorAction SilentlyContinue

    # Remove CcmExec and ccmsetup services
    Remove-Item -Path 'HKLM:\SYSTEM\CurrentControlSet\Services\CcmExec' -Force -Recurse -Confirm:$false -Verbose -ErrorAction SilentlyContinue
    Remove-Item -Path 'HKLM:\SYSTEM\CurrentControlSet\Services\ccmsetup' -Force -Recurse -Confirm:$false -Verbose -ErrorAction SilentlyContinue

    # Remove SCCM namespaces from WMI repository
    Get-CimInstance -Query "Select * From __Namespace Where Name='CCM'" -Namespace "root" -ErrorAction SilentlyContinue | Remove-CimInstance -Verbose -Confirm:$false -ErrorAction SilentlyContinue
    Get-CimInstance -Query "Select * From __Namespace Where Name='CCMVDI'" -Namespace "root" -ErrorAction SilentlyContinue | Remove-CimInstance -Verbose -Confirm:$false -ErrorAction SilentlyContinue
    Get-CimInstance -Query "Select * From __Namespace Where Name='SmsDm'" -Namespace "root" -ErrorAction SilentlyContinue | Remove-CimInstance -Verbose -Confirm:$false -ErrorAction SilentlyContinue
    Get-CimInstance -Query "Select * From __Namespace Where Name='sms'" -Namespace "root\cimv2" -ErrorAction SilentlyContinue | Remove-CimInstance -Verbose -Confirm:$false -ErrorAction SilentlyContinue

    # Completed
    Write-Host "All traces of SCCM have been removed"
}

uninstallSCCM
removeSCCM
If you know of more traces that are missing, especially if they stopped you from reinstalling or can cause a problem that perhaps I have yet to encounter, leave a comment and I will add them!
Further Troubleshooting – WMI
If you still can’t reinstall SCCM and you’re sure it has nothing to do with your environment there are a couple “gotchas” that come up a lot with SCCM you should check for. The first one is your computer’s WMI repository. You can verify this with:
winmgmt /verifyrepository
A good result is that your “WMI repository is consistent” like this:

If it tells you that the WMI repository is inconsistent your WMI repository is broken on that machine. You can attempt a repair with:
winmmgmt /salvagerepository
winmgmt /verifyrepository
If it came back as consistent now, then the built in tools actually successfully fixed it, nice! If it’s still broken, you did not get lucky and your “good” options are running out. There is another command we can use that resets WMI back to the default state the machine had when it was installed.
Before you try it, I must WARN you, this can sometimes cause problems if you have other applications that have added custom WMI that won’t be there when you reset the WMI repository back to the original default state. It’s not a “safe” command to just run willy-nilly. Specifically:
Rebuilding the WMI repository may result in some third-party products not working until their setup is re-run & their Microsoft Operations Framework re-added back to the repository.
If your only other option is to reimage the machine anyways and you have nothing to lose, YOLO:
winmgmt /resetrepository
winmgmt /verifyrepository
Hopefully that one got it for you but if not you can get really desperate and try rebuilding the WMI .mof files yourself following this article here.
However, if your WMI is this broken that you are manually trying to repair .mof files, it’s definitely time to seriously consider a reimage at this point. It’s way outside the norm to get this far down the list of WMI troubleshooting and still be having problems when there aren’t a dozen other things wrong with that image on there that haven’t been found yet!
If you’re really determined to fix WMI on that machine there’s more you can do but it’s beyond the scope of this article but at least you know the problem and can do some further research here.
Further Troubleshooting – DISM
DISM stands for “Deployment Image Servicing and Management”. This tool helps you manage your Windows image itself. Windows also has it’s own repository of packages and this tool verifies that they are all there and in the condition they should be.
We can run the DISM command to check our Windows image with PowerShell and make sure it’s “Healthy” like this:
Repair-WindowsImage -Online -CheckHealth
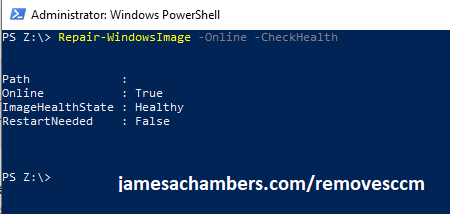
The other possible results are “Repairable” and “Unrepairable”. It’s pretty unusual to encounter straight up fully “unrepairable” ones, most of the ones you are likely to encounter will show as “Repairable”. If it’s unrepairable then it’s absolutely hilariously broken and essentially needs a straight-up reimage at that point.
The CheckHealth command is a great command and only takes a few seconds to run but it only checks the Windows logs for errors. There’s a more comprehensive scan you can perform if you don’t trust the result you got:
Repair-WindowsImage -Online -ScanHealth
The ScanHealth command actually computes all the hashes and checks every single file in the repository one at a time. It can take several minutes or much longer (15-20+ minutes) than that on old machines still using HDDs instead of solid state storage, but if that one comes back clean it’s a pretty definitive result and it’s time to consider other possibilities.
If it shows repairable you can repair it with:
Repair-WindowsImage -Online -RestoreHealth
If the repair was successful there’s one more step you need to do. All we’ve done with the DISM command is fix the repositories Windows uses to update and replace broken files. Now we need to run the System File Checker tool like this to actually replace the damaged files:
sfc /scannow
There’s definitely some problems you can run into when running DISM (different types of errors) but they’re outside the scope of the article and what to do next can be pretty easily found by putting your error into your favorite search engine. You may also feel free to leave a comment with what you’re seeing! Definitely check out my other PowerShell articles as well for more ideas!

")
 Using PowerShell / Uploading CSV Files")
")
I’m reading this article after I already resolved my issue, but I noticed that some time after uninstalling ccmsetup my C: drive was full again.
This time it was C:\Windows\CCM\ServiceData\Messaging\EndpointQueues\LS_ScheduledCleanup
The culprit ended up being CcmExec, a/k/a “SMS Agent Host”.
I stopped/disabled the service and was able to delete all files, but when I rebooted the server was again Automatic Delayed.
I then ran “sc delete ccmexec” to be done with this.
I would suggest adding “Remove-Service -Name CcmExec” to one of your functions, although it appears to require a minimum of PowerShell version 6.
Hey R Duran,
That’s a great find. sc delete ccmexec will indeed remove the service on the next boot and is basically what the PS6 Remove-Service -Name CCMExec.
I’m about to deploy this via Intune lol
Best of luck! I imagine that ultimately the legacy of this script will probably is cleaning SCCM off of a *whole* bunch of machines when enterprises move to other solutions. Take care!
I added ‘netsh winhttp reset proxy’ at the end (before running the reinstall), to remove any traces from proxies or TOR.
This could be one reason why the CCM client updates gets so out of date.
Hey Justin,
Ahh yes, the good old winhttp reset proxy command! You’re right, this is usually from malware when I’ve seen it but if it’s from something legitimate it would be proxies/Tor.
Definitely a great command to have in your arsenal for sure. Thanks for sharing!
Hi,
Thank you very much for your help with this. I was looking for this type of solution but found none until now.
With the force command, the SCCM is removed. I checked the files concerned and found none of them except one which is mentioned in the removal SOP of SCCM provided in my organization.
Please delete files and folders from the path below.C:\ProgramData\Microsoft\Crypto\RSA\MachineKeys
Please delete all files whose name started from [19c5cF] which exist in the folder above.
Can you add these files to the script?
Hi,
Also, if you can please help me in below as well
1. Way to run this script remotely.
2. Way to install SCCM via script.
Regards
Hey Shivs,
Thanks for the kind words! To run it remotely you can use the same tricks you would use to run anything remotely. You can wrap the entire script (or just about any script) in Invoke-Command -ComputerName $Computer like this:
$Target = "ComputerName"Invoke-Command -ComputerName $Target {
# Attempt to run the SCCM uninstaller
function uninstallSCCM() {
if (Test-Path -Path "$Env:SystemDrive\Windows\ccmsetup\ccmsetup.exe") {
# Stop SCCM services
Get-Service -Name CcmExec -ErrorAction SilentlyContinue | Stop-Service -Force -Verbose
Get-Service -Name ccmsetup -ErrorAction SilentlyContinue | Stop-Service -Force -Verbose
# Run the SCCM uninstaller
Start-Process -FilePath "$Env:SystemDrive\Windows\ccmsetup\ccmsetup.exe" -ArgumentList '/uninstall'
# Wait for the uninstaller to finish
do {
Start-Sleep -Milliseconds 1000
$Process = (Get-Process ccmsetup -ErrorAction SilentlyContinue)
} until ($null -eq $Process)
Write-Host "SCCM uninstallation completed"
}
}
# Forcefully remove all traces of SCCM from the computer
function removeSCCM() {
# Stop SCCM services
Get-Service -Name CcmExec -ErrorAction SilentlyContinue | Stop-Service -Force -Verbose
Get-Service -Name ccmsetup -ErrorAction SilentlyContinue | Stop-Service -Force -Verbose
# Take ownership of/delete SCCM's client folder and files
$null = takeown /F "$($Env:WinDir)\CCM" /R /A /D Y 2>&1
Remove-Item -Path "$($Env:WinDir)\CCM" -Force -Recurse -Confirm:$false -Verbose -ErrorAction SilentlyContinue
# Take ownership of/delete SCCM's setup folder and files
$null = takeown /F "$($Env:WinDir)\CCMSetup" /R /A /D Y 2>&1
Remove-Item -Path "$($Env:WinDir)\CCMSetup" -Force -Recurse -Confirm:$false -Verbose -ErrorAction SilentlyContinue
        # Take ownership of/delete SCCM cache of downloaded packages and applications

        $null = takeown /F "$($Env:WinDir)\CCMCache" /R /A /D Y 2>&1

        Remove-Item -Path "$($Env:WinDir)\CCMCache" -Force -Recurse -Confirm:$false -Verbose -ErrorAction SilentlyContinue
# Remove SCCM's smscfg file (contains GUID of previous installation)
Remove-Item -Path "$($Env:WinDir)\smscfg.ini" -Force -Confirm:$false -Verbose -ErrorAction SilentlyContinue
# Remove SCCM certificates
Remove-Item -Path 'HKLM:\Software\Microsoft\SystemCertificates\SMS\Certificates\*' -Force -Confirm:$false -Verbose -ErrorAction SilentlyContinue
# Remove CCM registry keys
Remove-Item -Path 'HKLM:\SOFTWARE\Microsoft\CCM' -Force -Recurse -Verbose -ErrorAction SilentlyContinue
Remove-Item -Path 'HKLM:\SOFTWARE\Wow6432Node\Microsoft\CCM' -Force -Recurse -Confirm:$false -Verbose -ErrorAction SilentlyContinue
# Remove SMS registry keys
Remove-Item -Path 'HKLM:\SOFTWARE\Microsoft\SMS' -Force -Recurse -Confirm:$false -Verbose -ErrorAction SilentlyContinue
Remove-Item -Path 'HKLM:\SOFTWARE\Wow6432Node\Microsoft\SMS' -Force -Recurse -Confirm:$false -Verbose -ErrorAction SilentlyContinue
# Remove CCMSetup registry keys
Remove-Item -Path 'HKLM:\Software\Microsoft\CCMSetup' -Force -Recurse -Confirm:$false -Verbose -ErrorAction SilentlyContinue
Remove-Item -Path 'HKLM:\Software\Wow6432Node\Microsoft\CCMSetup' -Force -Confirm:$false -Recurse -Verbose -ErrorAction SilentlyContinue
# Remove CcmExec and ccmsetup services
Remove-Item -Path 'HKLM:\SYSTEM\CurrentControlSet\Services\CcmExec' -Force -Recurse -Confirm:$false -Verbose -ErrorAction SilentlyContinue
Remove-Item -Path 'HKLM:\SYSTEM\CurrentControlSet\Services\ccmsetup' -Force -Recurse -Confirm:$false -Verbose -ErrorAction SilentlyContinue
# Remove SCCM namespaces from WMI repository
Get-CimInstance -Query "Select * From __Namespace Where Name='CCM'" -Namespace "root" -ErrorAction SilentlyContinue | Remove-CimInstance -Verbose -Confirm:$false -ErrorAction SilentlyContinue
Get-CimInstance -Query "Select * From __Namespace Where Name='CCMVDI'" -Namespace "root" -ErrorAction SilentlyContinue | Remove-CimInstance -Verbose -Confirm:$false -ErrorAction SilentlyContinue
Get-CimInstance -Query "Select * From __Namespace Where Name='SmsDm'" -Namespace "root" -ErrorAction SilentlyContinue | Remove-CimInstance -Verbose -Confirm:$false -ErrorAction SilentlyContinue
Get-CimInstance -Query "Select * From __Namespace Where Name='sms'" -Namespace "root\cimv2" -ErrorAction SilentlyContinue | Remove-CimInstance -Verbose -Confirm:$false -ErrorAction SilentlyContinue
# Completed
Write-Host "All traces of SCCM have been removed"
}
uninstallSCCM
removeSCCM
}
That’s it. It’s now ready to run remote, and so is every script you should ever need to run. If you have other scripts you already use and wish you could run remote it really is that easy.
Now the reason it doesn’t delete those machine keys by default is that all crypto RSA machine keys are stored there. That means not just SCCM but any other Active Directory autoenrollments and other types of enrollments may be in here as well.
But the whole idea of scripts is they are super easy to modify. In theory you should never have to ask for either of these things. I’m not saying that to lecture you or anything like that, this is a site of learning and everyone is welcome to ask everything! I’m saying you will find it empowering to be able to tweak these to do whatever you want.
Let’s take your question here. We need to remove an additional file and folder path. So I do a whole lot of that in the script already. Let’s just duplicate one of those lines and add your path:
# Take ownership of/delete SCCM cache of downloaded packages and applications$null = takeown /F "$($Env:WinDir)\CCMCache" /R /A /D Y 2>&1
Remove-Item -Path "$($Env:WinDir)\CCMCache" -Force -Recurse -Confirm:$false -Verbose -ErrorAction SilentlyContinue
copied and changed to:
# Take ownership of/delete Microsoft Crypto RSA keys$null = takeown /F "C:\ProgramData\Microsoft\Crypto\RSA\MachineKeys" /R /A /D Y 2>&1
Remove-Item -Path "C:\ProgramData\Microsoft\Crypto\RSA\MachineKeys" -Force -Recurse -Confirm:$false -Verbose -ErrorAction SilentlyContinue
Ought to do it. The reason it doesn’t do it by default is other types of keys are stored here. *All* crypto related Microsoft RSA keys are stored here and not just SCCM. It would not be desirable to delete these universally as lots of other companies use additional keys that will be stored here that will be wiped out by the above modification. This may not be your problem if the SOP calls for it (even if the SOP is wrong) although depending on your position you should be aware of this as you may be the one that has to deal with it if the SOP is wrong and catches other keys in the mix. It meets SOP but SOP is only SOP until there’s a problem and it needs to be fixed/adjusted, then that is the new SOP.
You could probably use environment variables like $Env:ProgramFiles or whatever the environment variable is (I’d even have to google it and wouldn’t remember off the top of my head writing this). I’d test it and make sure it works first but it should be that easy to take these/modify and it’s the whole idea of PowerShell.
Hopefully that helps!
Hi,
Thanks for your response. I really wasn’t hoping to get the response, and definitely not that prompt.
That’s why I didn’t come here till now.
The shared script works like a charm. Although, in my environment, the “WinRM service” is not running on the machines. Therefore, I am encountering the below error.
Test1:
Connecting to remote server CWSHPMU1848 failed with the following error message : The client cannotconnect to the destination specified in the request. Verify that the service on the destination is running and is
accepting requests. Consult the logs and documentation for the WS-Management service running on the destination, most
commonly IIS or WinRM. If the destination is the WinRM service, run the following command on the destination to
analyze and configure the WinRM service: "winrm quickconfig". For more information, see the
about_Remote_Troubleshooting Help topic.
+ CategoryInfo : OpenError: (Test1:String) [], PSRemotingTransportException
+ FullyQualifiedErrorId : CannotConnect,PSSessionStateBroken
To resolve that, I had to enable the remote scripting first by “Enable-PSRemoting -Force” on the target machine.
Also, regarding the file removal, At the time of asking questions, I forget to use my brain. Hence the silly question.
All in all, this script will help us in our deployment project. And with your help, we could save some time and manual labor.
Thanks a lot.
Regards,
Hey Shivs,
Don’t sweat it all, thanks for leaving this nice comment and followup! That makes sense that you’ve encountered the WinRM service not enabled by default. At my previous state government position for the entire state they did not have WinRM turned on. This made them as effective at managing workstations as anyone ever could be without utilizing PowerShell (not very).
Fortunately I was able to write some scripts that helped them see the usefulness of the feature and we got it turned on (securely) for a limited number of machines. Usually when you encounter this at an organization they will either have not really heard of PowerShell remoting (I’d be shocked if they hadn’t heard of PowerShell itself as that means they should not be in that job) or they will say it’s way too dangerous. It doesn’t need to be. It supports SSL and Kerberos authentication. If you can trust a network share you can trust PowerShell remoting (set up with SSL and a good allow workstation/IP whitelist) because they use the exact same Kerberos authentication and tokens.
Enable-PSRemoting -Force is a great way to do it on a per machine basis. To do it organization wide it would be Group Policy. You can do it just on the machines you need it on though with Enable-PSRemoting. The advantage of group policy is it’s a lot easier to set up organization-wide SSL certificates for it but you can also do this manually. It’s also way more secure than the defaults that Enable-PSRemoting will set it up with.
It’s best practice to set these group policies even if you *aren’t* using it for this reason. Otherwise you never know which machines out there may have had Enable-PSRemoting called on them but never set up with any additional security. I see this (and have even been responsible for it in some cases) in a lot of organizations because most of the time you won’t remember to call Disable-PSRemoting when you’re done even if you intended to. If they aren’t setting this policy then it will be whatever is locally set on the computer (as with all group policies without a setting, these can be edited with the local machine’s “Edit Group Policy” app).
Don’t sweat asking about the file removal either. It really helps the bounce this stuff off others (at least for me) when you’re trying to digest these ideas for the first time. Some of this stuff ends up being really obvious to the point where it seems embarrassing. The truth is even for me, someone who has not only been doing this for a lifetime and worked professionally for various “Enterprise” IT organizations/the government but know their systems so well I could breach them at any time without any additional access being given, I would ask a question like that when working with a topic like this.
I don’t know your particular position/skillset so this isn’t meant to be personalized toward you specifically and is meant to be generalized advice for anyone reading it (that I would tell to anyone in IT at pretty much any level). You may encounter some prickly higher-end engineers / techs / whatever with this approach who snap back like you should know this stuff or may explain it in a way to make you seem stupid.
Don’t worry about it. These guys respect knowledge and abilities above all else, and they’ve always ended up respecting me *more* eventually and they learn what you can/can’t do which can open up a lot of opportunities later on. It’s because that super smart guy is almost always super overloaded and often needs to offload work to other people. Even if you had a bad encounter before they’ll know that you can more or less do it, or can definitely do it now after the negative encounter (thanks to them in their eyes). It’s almost never actually personal. If you’re lucky they even see you as someone they took under their wing and molded you into the IT asset you are now!
Don’t shy away from these guys (or capitulate really, it won’t help, try to get them to show you or back off for now if things are heated and try at a better time when they’re happier) because you can learn from them once you get past their lack of socialization skills. I’m generalizing, obviously this doesn’t apply to everyone, but it’s such a common thing to encounter. Everywhere I’ve worked (from companies with an IT team of about 8 to the government with thousands) had at least one of these. It also made my career to persist until I actually understood it even if they tried to yell at me / humiliate me a couple of times early on. Not just at one organization either. I repeated this several times until there was nothing more to move up to at that given place without becoming an executive basically.
Thanks for the kind words and for leaving your solution. I sometimes overlook things like this as they tend to be more structural but everyone who uses this script likely works within an organization and will bump into restrictions of this kind. I’m glad it helped and thanks again for leaving the solution!