

Minecraft Bedrock Edition is the version of Minecraft that powers the iPhone / Android versions (formerly Minecraft Pocket Edition), the Xbox / PlayStation / Nintendo Switch editions and the free Windows 10 Minecraft edition.
Mojang has released a dedicated server which is considered to be in alpha testing. I have found it to be very stable and able to run on a wide variety of hardware.
This script and guide are written to help you get a robust Minecraft Bedrock dedicated server up and running in only a few minutes!
This is the standalone version. The easiest and most problem-free way to run this is using Docker (installed as simply as sudo apt install docker.io): Legendary Minecraft Bedrock Container
I’ve also released a way for Java and Bedrock players to play on the same server using Geyser: Minecraft Java + Bedrock Server Together – Geyser + Floodgate
It’s now possible to convert your worlds between Bedrock and Java versions. Check out my guide on Chunker here for more information.
Features
- Sets up the official Minecraft Bedrock Server (currently in alpha testing)
- Fully operational Minecraft Bedrock edition server in a couple of minutes
- Ubuntu / Debian distributions supported
- Sets up Minecraft as a system service with option to autostart at boot
- Automatic backups when server restarts
- Supports multiple instances — you can run multiple Bedrock servers on the same system
- Updates automatically to the latest or user-defined version when server is started
- Easy control of server with start.sh, stop.sh and restart.sh scripts
- Adds logging with timestamps to “logs” directory
- Optional scheduled daily restart of server using cron
Requirements
- A computer with a 64 bit processor (if you are trying to use ARM read my article on the limitations). 32 bit binaries of the official server are not available so it needs to be 64 bit!
- 1 GB of RAM or higher
- The only officially supported platform by Microsoft is Ubuntu 22.04 / 20.04 (current LTS, recommended)
- Other Linux flavors supported by this script as well as long as they use systemd (for the service). The script assumes apt is installed but there are minimal dependencies so you could install these on another distro (that doesn’t have apt present) and use the script normally.
Recommended Gear
Game Editions
Minecraft: Bedrock Edition is the “Windows 10” version of Minecraft as well as the version of Minecraft on the Xbox / Playstation / Switch. The versions of Minecraft for Android and iOS are also the Bedrock edition.
All of these versions support cross-platform play with each other (but not with the Java edition).

This is the PC Minecraft for Windows 10 (Bedrock) edition of Minecraft. It is able to play cross-platform with other players on Android / iOS / Playstation / Xbox / Switch. Available as a code that is instantly activated to give you permanent access to the game!
Links: Amazon.com*, Amazon.co.jp*, Amazon.co.uk*, Amazon.de*, Amazon.es*, Amazon.fr*, Amazon.it*

The Sony PlayStation version of Minecraft: Bedrock edition.
Links: Amazon.com*, Amazon.ca*, Amazon.com.au*, Amazon.co.jp*, Amazon.co.uk*, Amazon.de*, Amazon.es*, Amazon.fr*, Amazon.it*, Amazon.nl*, Amazon.se*, Amazon.sg*

This is the Nintendo Switch version of Minecraft: Bedrock edition.
Links: Amazon.com*, Amazon.ca*, Amazon.com.au*, Amazon.co.jp*, Amazon.co.uk*, Amazon.de*, Amazon.es*, Amazon.fr*, Amazon.it*, Amazon.nl*, Amazon.pl*, Amazon.se*, Amazon.sg*

This is the Microsoft Xbox version of Minecraft: Bedrock edition.
Links: Amazon.com*, Amazon.ca*, Amazon.com.au*, Amazon.co.uk*, Amazon.de*, Amazon.es*, Amazon.fr*, Amazon.it*, Amazon.nl*, Amazon.sg*
Recommended Storage (Solid State Drive)
I strongly recommend a Solid State drive (SSD) for your server. This is because Minecraft is constantly reading/storing chunks to the disk which makes I/O performance very important.
These are much cheaper than they used to be. Here’s a decent 120 GB one (higher capacity options are available) at a very low price:

The Kingston A400 is reliable, widely available around the world, has low power requirements and performs very well. It’s also very affordable. This drive has been benchmarked over 1000 times at Pi Benchmarks and is the #1 most popular SSD among the community!
Links: AliExpress*, Amazon.com*, Amazon.ca*, Amazon.com.au*, Amazon.co.jp*, Amazon.co.uk*, Amazon.de*, Amazon.es*, Amazon.fr*, Amazon.it*, Amazon.nl*, Amazon.pl*, Amazon.se*, Amazon.sg*
If you have a M.2 NVME slot in your motherboard you can go with a high end drive. This will give your server maximum performance even if a large number of players are running around on the server changing blocks and triggering disk writes.
This is the one I have in my machine. These range from 250 GB to 2 TB depending on how big your server might grow:

The Samsung 980 Pro (NVMe) is a professional grade SSD and one of the fastest in the world. The Samsung NVMe drives have been at the top of this category for a long time and are well trusted for both their performance and reliability / long life.
Links: AliExpress*, Amazon.com*, Amazon.ca*, Amazon.com.au*, Amazon.co.jp*, Amazon.co.uk*, Amazon.de*, Amazon.es*, Amazon.fr*, Amazon.it*, Amazon.nl*, Amazon.pl*, Amazon.se*, Amazon.sg*
Computer / CPU / Memory
Almost any PC made in the last few years will be a x86_64 bit computer. If you have an older computer around that isn’t being used then it will most likely have the right CPU and amount of memory (as well as fast storage) to run a basic server.
Throwing a SSD in one of these older computers will provide an excellent server experience for small and larger player counts.
The speed of your storage will make the largest difference. Older HDDs are going to have significantly slower performance than any modern SSD even with all other hardware equal. This is because the Minecraft server is constantly reading/writing chunks of your world as well as updates to it to the disk so this tends to be the bottleneck.
Operating System
I highly recommend using Ubuntu Server to run the Minecraft dedicated server. It is available here.
At the time of writing the current version is Ubuntu Server 20.04. This is a secure and robust operating system and will leave plenty of resources available for the server to run.
The script should run on any Debian based flavor of Linux but since the Minecraft Bedrock server is compiled natively for Ubuntu I recommend sticking with it. If you have a GUI flavor of Ubuntu and a decent PC (>= 2 GB of RAM) the server will work just fine on it.
Note: People have reported in the comments that Ubuntu 16.x is no longer working with the latest official Mojang binaries. Ubuntu 18.04 is the minimum requirement for the latest versions, and 20.04 is recommended!
Installation
Log into your Linux server either using SSH or a mouse and keyboard and paste/type the following command:
curl https://raw.githubusercontent.com/TheRemote/MinecraftBedrockServer/master/SetupMinecraft.sh | bashThe script will setup the Minecraft sever and ask you some questions on how to configure it. I’ll explain here what they mean.
The first question will be the installation path. This is the root installation path for ALL servers you will have. If you add additional servers later you should select the exact same installation path. It should always be left as the default (~).
The only exception is if you have something like a completely dedicated disk for the Minecraft server. In that case you should always use the same root path of /mnt/yourdrive or wherever the path is for every new/additional server you install.
“Start Minecraft server at startup automatically (y/n)?” – This will set the Minecraft service to start automatically when your server boots. This is a great option to set up a Minecraft server that is always available.
“Automatically restart and backup server at 4am daily (y/n)?” – This will add a cron job to the server that reboots the server every day at 4am. This is great because every time the server restarts it backs up the server and updates to the latest version. See the “Scheduled Daily Reboots” section below for information on how to customize the time or remove the reboot.
That is it for the setup script. The server will finish configuring and start!
First Run
The server will start up and start displaying output to the console.
[2019-03-30 20:25:12 INFO] Starting Server
[2019-03-30 20:25:12 INFO] Version 1.10.0.7
[2019-03-30 20:25:12 INFO] Level Name: Bedrock level
[2019-03-30 20:25:12 INFO] Game mode: 0 Survival
[2019-03-30 20:25:12 INFO] Difficulty: 1 EASY
[2019-03-30 20:25:20 INFO] IPv4 supported, port: 19132
[2019-03-30 20:25:20 INFO] IPv6 supported, port: 19133
[2019-03-30 20:25:23 INFO] Server started.
Once you see the “Server started” line you will be able to connect from the client.
To add the server to the client open Minecraft and click “Play”. Then at the top of the screen select the “Servers” tab and click “Add Server”.
This will ask you for a Server Name and Server IP Address. For the name you can put anything and for the server IP address put the address of your Linux server. Leave the port as the default 19132. For more information on how to let people from outside your network on go to the “Port Forwarding” section below.
Now choose the server you just added in the list and connect!
Start, Stop and Restart Server
The server can be started, stopped and restarted two different ways. You can use the provided scripts in the Minecraft folder or you can use systemctl. Here are the commands:
cd ~/minecraftbe
./start.sh
./stop.sh
./restart.sh

-OR-

sudo systemctl start minecraftbe
sudo systemctl stop minecraftbe
sudo systemctl restart minecraftbe
Automatic Backups
The server backs up each time it starts. This helps you recover easily if something goes wrong. This system works best if you configured the server to restart daily since it means you will have a backup every day.
To access these backups type:
cd ~/minecraftbe/backups
ls
When a backup is made the filename will be the date and time the backup was taken. If you need to restore a backup it’s very easy. Substitute the timestamp in my example to the backup you want to roll back to. Type:
cd ~/minecraftbe
./stop.sh
rm -rf worlds
tar -xf backups/2019.02.15.22.06.30.tar.gz
./start.sh
Your world has now been restored! It’s a good idea to download these backups off the server periodically just in case the server’s storage fails.
Installing Resource Packs / RTX Support
For instructions on how to install resource packs (including optional RTX support) view my step by step Minecraft Bedrock Dedicated Server Resource Packs guide here.
Scheduled Daily Reboots
The daily reboots are scheduled using cron. It’s very easy to customize the time your server restarts.
To change the time that the server restarts type: crontab -e
This will open a window that will ask you to select a text editor (I find nano to be the easiest) and will show the cronjobs scheduled on the server. The Minecraft one will look like the following:
0 4 * * * /home/ubuntu/minecraftbe/restart.sh
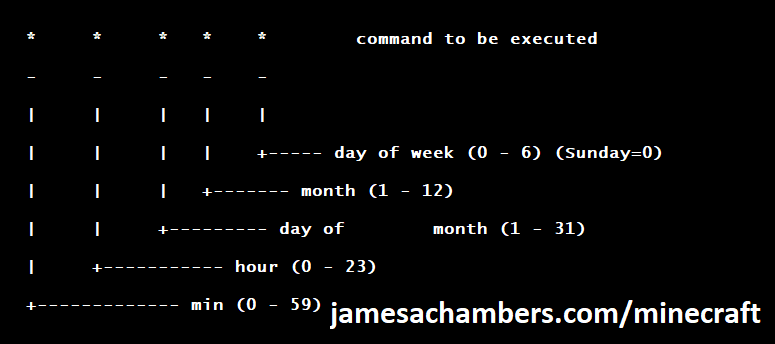
There are 5 fields here. The default restart time is set to reboot at 0 minutes of the 4th hour of the day (4 AM). The other 3 fields are left as * to represent every day of every month. Make any desired changes here and press Ctrl+X to exit nano and update the cronjob.
To remove the daily reboot simply delete the line and save.
Reconfigure / Update Scripts
The scripts can always be reconfigured and updated by downloading the latest SetupMinecraft.sh and running the installer again. It will update all of the scripts in the Minecraft directory and reinstall the startup service for you.
Running SetupMinecraft.sh again will also give you a chance to reconfigure options such as the memory dedicated to the server, daily reboots, starting the server on boot, etc.
This will not overwrite your world or any other data so it is safe to run!
Port Forwarding
If everyone on your server is on the same LAN or WiFi network as you then you don’t need to do this. If you want people to connect from outside your local network then you need to set up port forwarding on your router.
The process for this is different for every router so the best thing to do is just look at your router and find the model # and put that in google with port forwarding for easy instructions on how to do it for your specific router.
You want to forward port 19132. The type of connection is both TCP and UDP. On some routers you need to do both a TCP entry and then a second entry as UDP.
Once you do this people will be able to connect to your Minecraft server through your public IP address. This is different than your local IP which is usually a 192.x.x.x or 10.x.x.x. If you don’t know what that is just go to google and type “what’s my ip” and Google will kindly tell you!
Version Override
You can revert to a previous version with the revert.sh script included in your directory like this:
james@jamesgigabyte-linux:~/minecraftbe/james$ ./revert.sh
Set previous version in version_pin.txt: bedrock-server-1.19.10.20.zip
If you have a specific version you would like to run you can also create version_pin.txt yourself like this:
echo "bedrock-server-1.18.33.02.zip" > version_pin.txt
The version hold can be removed by deleting version_pin.txt. This will allow it to update to the latest version again!
Wired vs. Wireless
Going with an ethernet (wired) connection is going to be faster and more reliable. There’s so much wireless traffic and other interference in the air that running your server on WiFi is not recommended.
Even if it is working great 99% of the time it can ruin your experience very quickly if the WiFi drops for a couple of seconds and you get blown up by a creeper!
All that being said, the server works fine on wireless. The script will work fine as is with a wireless connection.
Benchmarking / Testing Storage
If you’re getting poor performance you may want to run my storage benchmark with:
sudo curl https://raw.githubusercontent.com/TheRemote/PiBenchmarks/master/Storage.sh | sudo bash
PC results won’t show up on the site yet (it’s meant for Raspberry Pi) but it will run on Linux just fine and give you a score. If you search for the model of your drive on Pi Benchmarks you can compare your score with others and make sure the drive is performing correctly!
Troubleshooting Note – Oracle Virtual Machines
A very common problem people have with the Oracle Virtual Machine tutorials out there that typically show you how to use a free VM is that the VM is much more difficult to configure than just about any other product / offering out there.
It is because there are several steps you need to take to open the ports on the Oracle VM. You need to both:
- Set the ingress ports (TCP/UDP) in the Virtual Cloud Network (VCN) security list
- *and* set the ingress ports in a Network Security Group assigned to your instance
Both of these settings are typically required before you will be able to connect to your VM instance. This is purely configuration related and has nothing to do with the script or the Minecraft server itself.
I do not recommend this platform due to the configuration difficulty but the people who have gone through the pain of configuring an Oracle VM have had good experiences with it after that point. Just keep in mind it’s going to be a rough ride through the configuration for most people.
Troubleshooting Note – Hyper-V
There is a weird bug in Hyper-V that breaks UDP connections on the Minecraft server. The fix for this is that you have to use a Generation 1 VM with the Legacy LAN network driver.
Conclusion
The Minecraft Bedrock Edition dedicated server runs much better than previous third party servers in the past that were missing critical features. The performance is very good even on low end hardware. It has never been easier to set up a Minecraft Bedrock server.
If you have any feedback or suggestions let me know in the comment section. A lot of the changes and developments in this script and guide are directly from readers.
Have fun!
Other Resources
For a guide on how to set up resource packs check out my Minecraft Bedrock Resource Pack guide
If you’re trying to run this on the Raspberry Pi check out the Raspberry Pi specific guide here


I’ve been trying to understand why the server continues to just… well, die on startup – it states that the server is just starting, and then the screen terminates. Any help is appreciated. Running it on a fairly low end VPS, but it has 3gb of ram to go off of, so I don’t believe it is a RAM allocation issue. Problem is I can’t find any logs regarding why it won’t start.
Turns out it isn’t compatible with ubuntu 16.x – Upgraded to 18.x and it worked fine. Turns out there was a reference to a system file in the bedrock code itself that didn’t exist in 16.x, odd.
Thanks for letting us know AJ, I have not tried it on 16.x!
I added a note into the post that Ubuntu 16.x does not have the libraries necessary to run the latest server to hopefully save others some time in the future.
this is greeat and all but how do I set up a custom seed. and if I wanted to move a world file from my single player worlds to the server (because i’m too cheap to turn it into a realm) how would I do this?
Hey Helmsman,
Open up server.properties and fill in the level-seed= option as level-seed=yourseedhere
To bring over your old world, just delete the ‘world’ directory and put the one from your single player in!
ok thatnks one more question I started the server and did the port forwarding on my laptop (running linux mint cinnamon) and tried to connect on my desktop (win 10) it just says Locating server and there is a red circle where the playercount and ping bars should be
It generally just takes the Bedrock edition a while to get that data. For me, it will change to player count after like a minute. If you click on it, and you can connect to the server just fine, no need to worry.
Hi James, thanks for the great work! I have a few notes:
– If you choose “n” during “Start Minecraft server at startup automatically (y/n)?” you don’t see “Automatically restart and backup server at 4am daily (y/n)?”. I’m unsure if this is a feature or a bug.
– My ubuntu server got taken over and helped contribute to a DDoS attack today. I’m doubtful this was your code, but I also only have this and the server files on my system, so I’m currently trying to figure out how someone gained access. It could have been a mobile app I was using to connect via SSH, but I was wondering if you/anyone else has experienced this.
Hey Jacob,
The reason it doesn’t set up the automatic restart without starting the server is because the system service isn’t enabled if it isn’t starting up automatically. I could potentially change this and just make the service inactive at startup but I figured that if people didn’t want it to start automatically that they wanted to manage the server on their own.
There’s definitely nothing bad or risky that would open your server up to an attack in the bash scripts. The Minecraft scripts are basically just a very small wrapper around the official Mojang server. The scripts and service all run in userspace and do not run as root or sudo. The main intent of them is to keep the server up to date by checking the Mojang website for new versions / reboot daily / take a backup in the minecraftbe/backups folder. This is all easy to do yourself but it’s definitely helpful to automate and keeps things running well. Security is also the reason they are fully open source on GitHub so everyone can scrutinize the code publicly and make sure there’s nothing unwanted in there!
I do have some thoughts about your recent attack though. I also run jamesachambers.com on Ubuntu Server and I am attacked *thousands* of times per day. Take a look at my /var/log/auth.log from just the last 3 minutes!
May 26 09:00:11 sshd[1497]: Invalid user program from 200.55.x.x port 21257May 26 09:00:11 sshd[1497]: pam_unix(sshd:auth): authentication failure; logname= uid=0 euid=0 tty=ssh ruser= rhost=200.55.x.x
May 26 09:00:14 sshd[1497]: Failed password for invalid user program from 200.55.x.x port 21257 ssh2
May 26 09:00:14 sshd[1497]: Connection closed by invalid user program 200.55.x.x port 21257 [preauth]
May 26 09:03:03 sshd[1520]: pam_unix(sshd:auth): authentication failure; logname= uid=0 euid=0 tty=ssh ruser= rhost=112.85.x.x user=root
May 26 09:03:05 sshd[1520]: Failed password for root from 112.85.x.x port 27859 ssh2
May 26 09:03:09 sshd[1520]: message repeated 2 times: [ Failed password for root from 112.85.x.x port 27859 ssh2]
May 26 09:03:10 sshd[1520]: Received disconnect from 112.85.x.x port 27859:11: [preauth]
May 26 09:03:10 sshd[1520]: PAM 2 more authentication failures; logname= uid=0 euid=0 tty=ssh ruser= rhost=112.85.x.x user=root
May 26 09:03:31 sshd[1522]: Invalid user bao from 103.104.x.x port 59606
May 26 09:03:31 sshd[1522]: pam_unix(sshd:auth): authentication failure; logname= uid=0 euid=0 tty=ssh ruser= rhost=103.104.x.x
May 26 09:03:33 sshd[1522]: Failed password for invalid user bao from 103.104.x.x port 59606 ssh2
May 26 09:03:33 sshd[1522]: Received disconnect from 103.104.x.x port 59606:11: Bye Bye [preauth]
May 26 09:03:33 sshd[1522]: Disconnected from invalid user bao 103.104.x.x port 59606 [preauth]
May 26 09:04:16 sshd[1529]: pam_unix(sshd:auth): authentication failure; logname= uid=0 euid=0 tty=ssh ruser= rhost=112.85.x.x user=root
It’s definitely like this around the clock 24 hours a day 7 days per week. It sounds like you have access to the server so I would do a cd /var/log and take a look particularly at auth.log, syslog, and if you are running web services take a look at those logs as well. Last night I installed fail2ban which bans these turkeys when they fail to authenticate a few times so they can’t hit your server over and over again which causes them to move to other targets that are lower hanging fruit. Here’s a list of essential things to check:
I’ll probably write a full Ubuntu Server hardening guide before too long here as I have invested hundreds of hours at this point to keep these bots out of my server. Keep in mind that most of these are just automated bots that try weak authentication and newly discovered exploits. The key is to make it so you aren’t the low hanging fruit by implementing a few measures that make your server too frustrating to attack so they move on to the next IP!
Thanks James! I’ve been using digitalocean droplet servers to run the MC server, and I assumed they had automatic firewalls set up, but it looks like you have to do that manually. Thanks for all the work you’ve put into this, I’ll be sure to check out the Ubuntu Server Hardening guide if/when you post it.
Best,
-Jacob
Is there a way to run this on a remote server? I can’t exactly setup port forwarding on a router in an Amazon datacenter in Oregon.
I can’t speak to your exact hosting situation but generally you won’t need forwarding set up in a data center. Usually they expect you to protect your servers with firewalls. Every host is different though, you may want to contact your host and see if there is anything special they need to do but it will probably just work fine without port forwarding.
With AWS you need to open the port in “security groups” this is essentially the firewall, and all ports but 22 are closed until opened there.
The server doesn’t come back online when it restarts itself at the scheduled time.
Thank you for the report. I found the problem. I had a space after the stop command in restart.sh. After removing the space restart.sh is working correctly again.
I have committed these changes to the latest version. Just run SetupMinecraft.sh again and it will pull down the latest scripts!
After installation server don’t running. Trying to start.sh got this:
root@test:~/minecraftbe# ./start.shChecking for the latest version of Minecraft Bedrock server ...
--2019-05-22 02:53:56-- https://www.minecraft.net/en-us/download/server/bedrock
Resolving minecraft.net (minecraft.net)... 13.32.57.36, 13.32.57.54, 13.32.57.35, ...
Connecting to minecraft.net (minecraft.net)|13.32.57.36|:443... connected.
HTTP request sent, awaiting response... 302 Moved Temporarily
Location: https://www.minecraft.net/en-us/download/server/bedrock [following]
--2019-05-22 02:53:57-- https://www.minecraft.net/en-us/download/server/bedrock
Resolving www.minecraft.net (www.minecraft.net)... 152.199.20.92, 2606:2800:233:18f9:1142:8f:20aa:11e2
Connecting to www.minecraft.net (www.minecraft.net)|152.199.20.92|:443... connected.
HTTP request sent, awaiting response... 200 OK
Length: 300992 (294K) [text/html]
Saving to: 'downloads/version.html'
downloads/version.h 100%[===================>] 293.94K --.-KB/s in 0.06s
2019-05-22 02:53:57 (4.52 MB/s) - 'downloads/version.html' saved [300992/300992]
Minecraft Bedrock server is up to date...
Starting Minecraft server. To view window type screen -r minecraft.
To minimize the window and let the server run in the background, press Ctrl+A then Ctrl+D
Can you try running the server manually to see what happens?
To run it manually cd to the minecraftbe directory and type:
LD_LIBRARY_PATH=. ./bedrock_serverLet’s see if you get any errors. Also which distro are you running?
I had the same problem. It looks like bedrock_server requires libcurl4 which was not installed by default on my system. I just had to run “sudo apt install libcurl4” and the server starts correctly now.
Thanks for letting us know Greg, I have added this dependency into the script to prevent this in the future
Worked perfect! Screen threw me off until I figured out the commands… question, is it possible to run multiple worlds?
Hey Jose,
It’s definitely possible to run multiple worlds. The easiest way would be to create a copy of the folder and then change the ports in server.properties to different ones.
If you don’t want to run the different worlds at the same time you can also look in the “worlds” folder. These can be switched to by changing the world in server.properties or moving/renaming the folders.
Let me know how it goes. I could definitely look into adding support into this natively in the script if there’s some interest!
Hi James.
runs like a charm on a ubuntu server 18.04.
Absolutely perfect for me cause I’m a total linux noob… 😉
I used your script to fulfill my son’s desperate wish for a dedicated minecraft server.
So thanks on his behalf too.
And that’s also the reason I would be very interested in a native support for more than 1 minecraft instance on one server.
Maybe, perhaps it would be possible to add some plugins too ? Like lucky blocks for e.g. but I don’t want to get an inch and try to take an ell.
*thumbs up*
Cheers
Jürgen
Thanks for the great feedback Jürgen, I’m glad it is working well!
I will add support for multiple servers in the next couple of weeks since there seems to be some interest!
Thanks for looking into the Multiple Server enhancement, I’m going to be doing the same thing…
Multiple instances are working perfect !
Thanks a lot.
Now lets see if I get the thing with the plugins/versions 🙂
Cheers
Jürgen
Definitely try to add support for multiple worlds in the script if you can, this little trick you gave us really helped.
Good job, it enabled the auto backups and auto updates on my little MC server.
if possible during the installation process add in things like:
name folder, confirm y/n
then tie all the scripts to that directory so that each server app runs separately if configured correctly.
You could even force the use of different ports during that installation to prevent conflicts, just a suggestion.
Also allow configuring of the properties file during the installation.
Final suggestion, schedule weekly system reboot, with a prompt y/n
Good luck.