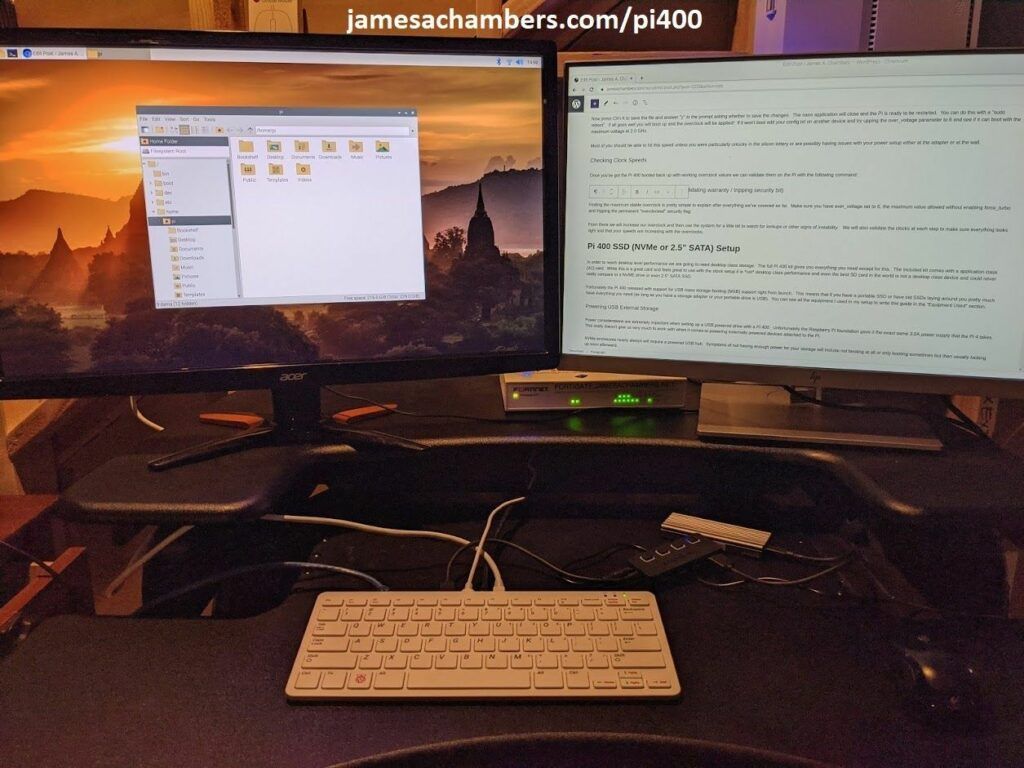
Raspberry Pi 400 Setup (in dark basement) w/ NVMe SSD
The Raspberry Pi 400 is the first offering from the Raspberry Pi lineup that is meant to approach desktop level performance. The official raspberrypi.org site lists the Pi 400 kit as the “Raspberry Pi 400 Personal Computer Kit”. It comes in the very interesting form factor of a keyboard with all the ports right in the back!
Although the performance on stock clock speeds and with a SD card is really exceptional, especially for a Raspberry Pi, I would not call it desktop class performance. Fortunately we *can* make it desktop class performance with a few tweaks! This guide will show how to overclock the Pi 400 as well as set it up with a NVMe SSD to get the maximum possible performance we can out of it!
Hardware Used
Raspberry Pi 400 Kit
The Raspberry Pi 400 kit includes everything you need for a full Pi 400 desktop build. The Pi 400 is the fastest Raspberry Pi ever released and comes in the form factor of a keyboard!
The Samsung 980 Pro (NVMe) is a professional grade SSD and one of the fastest in the world. The Samsung NVMe drives have been at the top of this category for a long time and are well trusted for both their performance and reliability / long life.
If you really want to take things over the top the ASUS Rog Strix M.2 NVMe enclosure uses the latest USB 3.2 Gen2 specification, is RGB capable and works with the Pi! Unsurprisingly, adding the extra lighting does take extra power! A powered USB hub is also required for this enclosure. More widely available than the ICY BOX but tends to be on the expensive side.
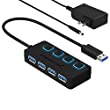
The Sabrent powered USB hub delivers a whopping 2.5A of dedicated power for your USB attached devices. This is almost as much as the Pi adapter itself is rated for (3.0A). It will easily power the most thirsty of setups such as NVMe enclosures.
Note: Make sure Amazon doesn’t try to take you to the non-powered version and that it’s the one with the AC adapter that plugs in to provide extra power
Overclocking
The stock clock speed for the Pi 400 is 1.8 GHz out of the box. This is a big jump from the Pi 4’s 1.5 GHz right out of the box. It also has plenty of headroom for overclocking!
Exactly how much headroom your specific Pi 400 will have will depend on how lucky you got in the “silicon lottery” since each chip produced has a varying overclocking potential as well as having a stable high quality power source (both the adapter and at the wall).
The only other thing to consider is your power source “at the wall”. As long as you aren’t plugging it into a really dirty or unstable power source such as a building with known bad wiring / a failing overextend power strip you should be okay.
Attaching additional USB accessories also draws from the Pi’s available power so be careful attaching too many power drawing accessories. For high power drawing SSDs you may need a powered USB hub* but we’ll cover that later in the SSD section.
For initial configuration I recommend plugging in as few accessories as possible to keep the power drain on the Pi low while you make sure everything else is stable under normal conditions before attaching your power drawing devices. These can interact with your overclocks!
NOTE: Setting any overclocking parameters to values other than those used by raspi-config may set a permanent bit within the SoC, making it possible to detect that your Pi has been overclocked. The specific circumstances where the overclock bit is set are if force_turbo is set to 1 and any of the over_voltage_* options are set to a value > 0.
Basically using the option “force_turbo=1” combined with “over_voltage” > 0 will set the overclocking sticky bit. This could cause headaches if you were trying to get a warranty replacement from your reseller as an example.
So just don’t use “force_turbo=1” and you’re all set, right? Yes, except there’s a catch. Without the force_turbo option the maximum value you can use for over_voltage is 6. This means if you want to go to the absolute top limits your Pi could potentially hit you will need to trigger the sticky bit.
I personally did not void mine to write this guide and never went above 6 before I hit an overclock I was satisfied with (more on that later) but I wanted to clarify what is/isn’t allowed according to the Pi Foundation before we start changing things and your Pi gets “flagged” with the naughty “extreme” overclocker sticky bit.
Now would be a good time to make sure you don’t happen to have force_turbo=1 in your config.txt already before we set over_voltage in the next section if you want to make sure you don’t get flagged. It is the combination of the two together that triggers it!
Basic Overclocking
Since every Pi 400 will have different overclocking potential it’s best to think of these steps as a process to narrow down the best values for your specific Pi. I will give the numbers I was able to achieve on mine as a guideline but yours will be slightly and may even be wildly different. The important part is if you follow the process and narrow it down you will find the right numbers for your Pi!
There are two important parameters in the Pi’s /boot/config.txt file we’ll be adding/editing to adjust our CPU overclock (with their default values for the Pi 400):
arm_freq=1800
over_voltage=0
arm_freq is the Pi’s CPU frequency. The name of the parameter is due to the Pi having an ARM type processor and this parameter represents the frequency in MHz that the processor runs at. The second parameter is a little bit more self explanatory. It allows more voltage to flow the Pi than is normally allowed up to a maximum of 6 and is relatively safe to that point (theoretically higher voltage can reduce the life and wear on the device but 6 is not getting into dangerous territory yet and won’t even void the warranty/set the overclock bit).
As we discussed in the previous section to go higher than 6 you have to set the flag force_turbo=1 which will set the sticky bit that your Pi has been “overclocked” permanently. Definitely don’t do this and leave force_turbo out of your config for now. Remove it if it is in there already. If you want to go higher later you can but I recommend seeing what your board can do within the safe “approved” limits first.
Before we start understand that this is a trial and error process. Take a backup of your existing config.txt file before beginning. If we pick a bad set of overclock parameters your Pi will often not even bootuntil you correct it from another PC. The easiest way to fix this is to put your SD card into a different device and edit /boot/config.txt and set the parameters back to something more reasonable / restore a backup version / etc. I know some of you reading may not have a PC available despite having your Pi so if this is the case I would wait or make sure you have some way to restore config.txt back if we set an overclock that won’t boot!
For now let’s start with a 200 MHz overclock and try for a nice round 2.0 GHz. Let’s set the over_voltage to 6. On my Pi 400 I initially tried an over_voltage of 2 and it would not boot at all. I bumped it up to 4 in the config.txt file and was able to get a stable boot. I then adjusted it to 3 and was able to boot but got lockups a couple of times per hour (a working but unstable overclock). I would recommend just going straight to 6 for testing the overclockability of your board. Once you find the optimal frequencies with your board you can try stepping down the voltage afterward working from those.
We are going to edit config.txt. To edit it on the Pi open a terminal window and type:
sudo nano /boot/config.txt
This will open your Pi’s configuration file. If this is your first time editing the file arm_freq and over_voltage will typically be commented out/missing completely. This is fine, we are just going to add them ourselves with the rest of our parameters that aren’t commented out. Here’s what mine ended up looking like:
 # Enable audio (loads snd_bcm2835)
 dtparam=audio=on
 over_voltage=6
 arm_freq=2000
 [pi4]
 # Enable DRM VC4 V3D driver on top of the dispmanx display stack
 dtoverlay=vc4-fkms-v3d
 max_framebuffers=2
 [all]
 dtoverlay=vc4-fkms-v3d
Note that I did not add the parameters in the [pi4] or [all] sections. Let’s add it with the rest of the global parameters like right after your audio is enabled as these are essentially applying hardware-level operational changes just like enabling/disabling the audio device is.
Now press Ctrl+X to save the file and answer “y” to the prompt asking whether to save the changes. The nano application will close and the Pi is ready to be restarted. You can do this with a “sudo reboot”. If all goes well you will boot up and the overclock will be applied! If it won’t boot edit your config.txt on another device and try upping the over_voltage parameter to 6 and see if it can boot with the maximum voltage at 2.0 GHz.
Most of you should be able to hit this speed unless you were particularly unlucky in the silicon lottery or are possibly having issues with your power setup either at the adapter or at the wall.
Finding Maximum Overclock (without invalidating warranty / tripping security bit)
Finding the maximum stable overclock is pretty simple to explain after everything we’ve covered so far. Make sure you have over_voltage set to 6, the maximum value allowed without enabling force_turbo and tripping the permanent “overclocked” security flag.
From there we will increase our overclock and then use the system for a little bit to watch for lockups or other signs of instability. Make sure you try things like browsing the internet or other activities that will work the SSD and the CPU to make sure that you are in fact on a stable overclock!
If you are getting random lockups or it won’t start up some of the time then reduce the overclock or increase the over_voltage.
Pi 400 SSD (NVMe or 2.5″ SATA) Setup
In order to reach desktop level performance we are going to need desktop class storage. The full Pi 400 kit gives you everything you need except for this. The included kit comes with a application class (A1) card. While this is a great card and feels great to use with the stock setup it is *not* desktop class performance and even the best SD card in the world is not a desktop class device and could never really compare to a NVME drive or even 2.5″ SATA SSD.
Fortunately the Pi 400 released with support for USB mass storage booting (MSB) support right from launch. This means that if you have a portable SSD or have old SSDs laying around you pretty much have everything you need (as long as you have a storage adapter or your portable drive is USB). You can see all the equipment I used in my setup to write this guide in the “Equipment Used” section.
Powering USB External Storage
Power considerations are extremely important when setting up a USB powered drive with a Pi 400. Unfortunately the Raspberry Pi foundation gave it the exact same 3.0A power supply that the Pi 4 takes. This really doesn’t give us very much to work with when it comes to powering externally powered devices attached to the Pi.
NVMe enclosures nearly always will require a powered USB hub. Symptoms of not having enough power for your storage will include not booting at all or only booting sometimes but then usually locking up soon afterward.
Preparing Drive
If you already have a image downloaded and are already ready to write it using your preferred method then you can go ahead and image your drive now the exact same way you would prepare a SD card and skip to the next section. With the new bootloader support that comes included with the Pi 400 we don’t need to do anything more than this.
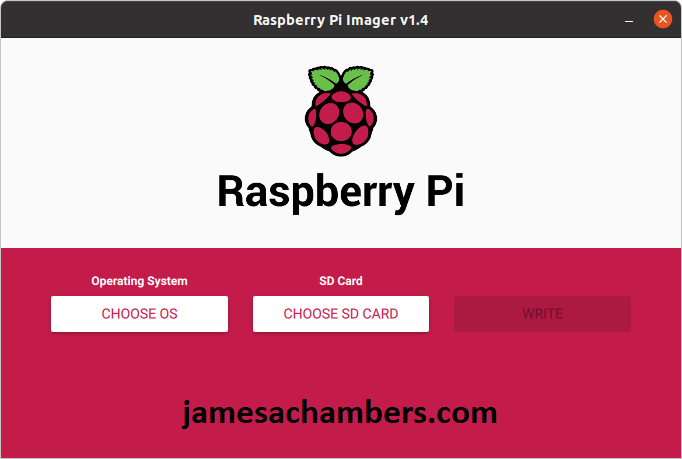
If you don’t have an image yet or are just using the OS that came on the Pi’s SD card I highly recommend using the official Pi Imager tool available here. It’s available for every operating system and it catches and prevents a lot of really frustrating and hard to diagnose issues that can come up when preparing and imaging drives. It looks like this:
Raspberry Pi Imager – Main Menu
Once you’ve downloaded and ran the Pi Imager tool select the OS option you’d like to use. I recommend doing the 64 bit Raspberry Pi desktop option on the Pi 400 and taking adantage of the 64 bit capabilities. Other options like Ubuntu are also available (I recommend the newest version available for Ubuntu to avoid problems, 20.10 at time of writing works better than 20.04).
Next plug your USB external drive into the computer and it will show up as an available option when you click the “Choose SD card” option. Don’t worry about it saying the “SD card” part, every one of my external drives has shown up anyway. Finally go ahead and click third and final “Write” button.
If your drive doesn’t show you can always image it the old fashioned way using your favorite image writing utility but I have had nothing but great experiences with the official Pi Imager tool. Nevertheless, I have heard of issues like compatibility with Lint Minux in the past and other similar very specific configuration related / version issues breaking the utility. If you are having trouble with the utility the old fashioned way will still work whether that’s a utility like Etcher or dropping all the way down to the command line and using dd.
First Boot
Once you’ve prepared the drive shut down your Pi 400 and remove the SD card from the slot. Leave only your SSD plugged in.
When you connect the power you may / may not see it resize your file system to the drive’s free space initially and then it will boot into your OS.
Give it at least a good 60 seconds before you assume it hasn’t worked as the first boot can take a bit longer due to the initial “first boot” steps.
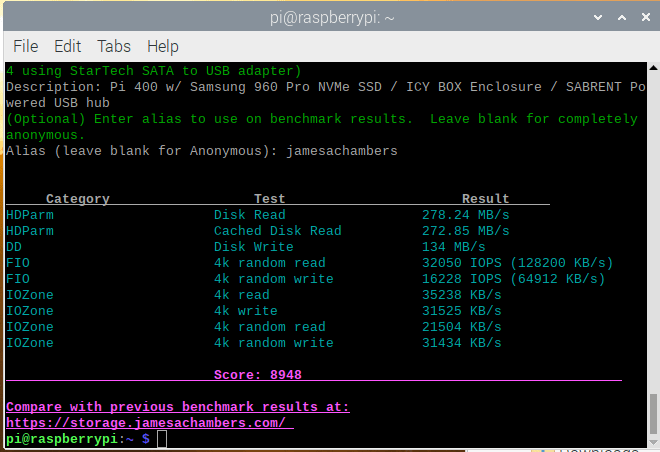
Benchmarking Storage
A quick way to verify everything is working correctly and you’re getting proper performance is to run my quick Raspberry Pi Storage Benchmark. You can run it with this one liner:
This will run a few quick standard tests (DD write speed, iozone, fio) and give you a cumulative score. You can compare it with mine or you can compare it with others at Pi Benchmarks. There are thousands of benchmarks already to compare with to give you an idea of whether you are getting the performance you should out of your drive!
Here were my results:
Raspberry Pi NVMe SSD Benchmark Results
You can also view the result on my storage benchmark results site at Pi Benchmarks – #41663
Other Resources
If you are having trouble with your firmware or think your firmware may be causing an issue check out my firmware update / restore guide
For a lot more information about setting up USB booting as well as troubleshooting / which adapters work and don’t work check out my new Raspberry Pi USB boot guide here
If you are trying to USB boot Ubuntu (especially Ubuntu Server) you may want to check out my Ubuntu Native USB boot guide as well!
easiest way for me to check whether my overclock stable or not..
by using GIMP, open a FHD file (1920×1080) or any larger picture file.. then go to filter->enhance->sharpen.. drag all the way to the right.. and hit ok..
if your overclock stable… then it will run in.. if not .. it will reboot..
i have tested my seems stable 2147 (ov 6).. with hours of stress test.. but failed on this one..
keep lowering down.. until set at only 1700 (ov 2)..
Really? They sell 64-bit machines but the default OS is 32-bit only?

Hmmm… have you considered trying another distribution then? I would say this even more with the uproar that the RPI foundation made recently with installing a corporate partner's repository (Microsoft) without notification.
The problem with 32-bit builds is that they are a lot less tested nowadays, so we regularly have weird bugs which stay unfixed for very long because none can reproduce them. Don't get me wrong, bugs are bugs, we should still fix them and we still support 32-bit officially, but since GIMP relies entirely on volunteer development, if none of the dev reproduce bugs because we don't use 32-bit machines, then they just stay under the radar for longer. 🤷
Also even if you stick to this 32-bit OS, at least install the last version. If RPI OS repository are so outdated, you should install our flatpak build at the very least, and see if the bug still happens. I don't see us taking a lot of volunteer time investigating a bug on a barely used architecture for a bug which might have been fixed in the last 2+ years (thousands of changes happened in 2 years).
They had a lot more to say than this about this and another dev jumped in as well. To say they are not impressed with the version in the Raspberry Pi repositories would be an understatement. They straight up recommend switching to Ubuntu right off the bat (and to go 64 bit, which I also recommend especially for 4GB-8GB Pis). It has not been updated a single time since he posted all this.
Basically if this is the 32 bit version of GIMP that is from the Raspberry Pi OS repositories this is not considered a reliable version at all. This type of crashing definitely doesn’t necessarily mean you have an unstable overclock. It means your higher overclock makes it far more likely for the right conditions to arise for some ancient GIMP bugs to occur! It doesn’t really make a lot of sense for you to be able to stress test it for multiple hours and that this one software action takes it down. It could possibly be power related but I assume you’re probably using the official Pi adapter that came with it but if you aren’t (or perhaps you have a defective PSU but probably unlikely) it may be worth trying a different/spare one or even one from a cell phone etc. as a test.
The good news is I don’t think you got a Pi 400 that can only get a stable overclock to 1700. That would be literally the worst Pi 400 silicon I’ve ever heard of by a mile! Given the developer’s lack of faith in these several year old 32 bit releases on the Pi unless you can find other reproducible symptoms I wouldn’t assume that this is solely because of your overclock and may be bringing out some instability in the several-year-old 32 bit GIMP package.
It’s hard because it happens when the overclock is on and doesn’t when it’s off, but the numbers don’t add up and there’s a lot of reasons to believe (including all the developer talk) that this may actually be GIMP bug/instability related from the several year old 32 bit build even though the overclock is the seemingly the trigger for this condition. It would still be a bug though that’s not supposed to happen even if the overclock is creating the conditions for the bug to manifest itself. It almost sounds like a kernel panic if the whole system is going down / restarting.
I definitely recommend over_voltage=6 if you can as I’ve found that some of these newer types of instability that show up seem to often be warded off by more power. It’s the “spikes” like when you’re pressing the start button on that specific GIMP task that seem to create the conditions for whatever underlying bug is in that code to occur. Minimal USB accessories plugged in will help as well as each USB accessory will draw from your power budget which reduces your maximum overclock potential/increases instability. I think you’d be seeing more problems across the board though instead of something this specific though if you were completely starved for power. Some of your bench tests should have had some sign somewhere of something but if they’re clean it points more toward the package.
From a software point of view there’s a lot of reasons that this could happen like race conditions and all sorts of weird things that may not occur at stock speeds and a million others as well. It would be far more remarkable though if you got a Pi 400 that can only reach 1700 than if this is related to the Pi OS having what should be a criminally ancient build of GIMP in their repositories. The Pi OS version is apparently missing a minimum of 7 major releases and literally years of fixes according to the devs.
It may be worth installing the updated package using one of these flatpaks or to build it (or try Ubuntu or a 64 bit Raspberry Pi OS beta which almost always has newer packages) just as a test to see if this fixes it without changing your overclock potentially!
nyrlem
2 years ago
Thank you for your guide? I already installed ubuntu on external 2.5″ SSD disk connected via usb 3.0, but when I tried to overclock, system started freezing. I bought 5V/2A usb hub, but ssd disk connected into it does not boot. Do you think it is caused by low current? Besides your guide I did not find verified usb hub, but yours is not available in czech rep. Thx 🙂
For sure I agree it is power related without the hub since the overclock starts the freezing which is a classic symptom. One trick I’ve seen help for that is setting the over_voltage to 6 (the maximum without enabling force_turbo and voiding the warranty) regardless of what your actual overclock is. This can sometimes stabilize the drive by allowing more overcurrent to flow into the Pi making it available for the drive which might eliminate or at least reduce your freezing when not using a hub.
I do have a trick you can try for the hub as well. Some of the hubs feed back power. Try leaving the hub’s USB connection to the Pi unplugged (with the drive still plugged into the hub and the hub still plugged into power) and then after you connect the Pi’s power quickly plug in the hub’s USB connector to the Pi afterwards. It’s also possible to mod the hubs sometimes depending on which one you have and cut one of the lines that feeds back power but you have to be careful or you’ll destroy it etc.
The other thing you should check for is firmware updates for your storage adapter/enclosure. These are widely available and do make a difference a lot of the time with issues like this. For example, if you had the StarTech USB 3.1 to 2.5″ SATA adapter you could get firmware updates for it from here. Basically you plug it into a Windows PC and run the application and it updates the firmware. In this example those firmware updates fix “trim” support which really helps the performance of your SSD but in other cases they can fix boot issues as well. Definitely let us know what you find!
Luca
3 years ago
Fantastic work!
When using a 2.5 “SSD is it necessary to power it externally?
Thank’s
Great question! Not usually unless you are using a 2.5″ enclosure instead of a normal adapter (just the cable vs. a powered bay it sits in). Hopefully that helps!
Old6Fitty
3 years ago
Fantastic work James!
Q: What did you use for cabling between the M.2-SSD case and the USB hub?
Q2: Was there a USB C cable that came with the Icy Box?
Also – hearty thanks for all your work in developing the media testing metric tools, and for collecting and tracking the data from user tests. Having real-world data that others have collected really helps a newb make an informed decision about storage upgrades.
Thanks for the kind words! The ICY BOX actually came with two USB cables. One regular USB-A to USB-C and then another USB-C to USB-C! They are relatively short but they worked fine for me. Let me give some better closeups of the setup here:
The two different USB cables it comes with are actually branded which I thought was a cute touch. Here’s a closeup:
Thanks for what you said about the storage benchmark tools as well! The web site front end is still pretty barebones but it’s still a good comparison tool and it helps me know people are using it! It actually motivates me to keep adding the different “comparable” sections that I’ve been working on getting in there. One example is that when you click on the “brand” of a storage device it brings up an info card page of the top 5 scores and some general information but I actually want to expand this to show things like similar drives, other drives from that manufacturer, and other things you’d expect to find on a storage benchmark!


easiest way for me to check whether my overclock stable or not..
by using GIMP, open a FHD file (1920×1080) or any larger picture file.. then go to filter->enhance->sharpen.. drag all the way to the right.. and hit ok..
if your overclock stable… then it will run in.. if not .. it will reboot..
i have tested my seems stable 2147 (ov 6).. with hours of stress test.. but failed on this one..
keep lowering down.. until set at only 1700 (ov 2)..
please try..
Is it that super ancient 2.10.8 version from the Raspberry Pi OS repositories? This is what one of the GIMP developers said about that about 6 months ago:
Really? They sell 64-bit machines but the default OS is 32-bit only?Hmmm… have you considered trying another distribution then? I would say this even more with the uproar that the RPI foundation made recently with installing a corporate partner's repository (Microsoft) without notification.
The problem with 32-bit builds is that they are a lot less tested nowadays, so we regularly have weird bugs which stay unfixed for very long because none can reproduce them. Don't get me wrong, bugs are bugs, we should still fix them and we still support 32-bit officially, but since GIMP relies entirely on volunteer development, if none of the dev reproduce bugs because we don't use 32-bit machines, then they just stay under the radar for longer. 🤷
Also even if you stick to this 32-bit OS, at least install the last version. If RPI OS repository are so outdated, you should install our flatpak build at the very least, and see if the bug still happens. I don't see us taking a lot of volunteer time investigating a bug on a barely used architecture for a bug which might have been fixed in the last 2+ years (thousands of changes happened in 2 years).
They had a lot more to say than this about this and another dev jumped in as well. To say they are not impressed with the version in the Raspberry Pi repositories would be an understatement. They straight up recommend switching to Ubuntu right off the bat (and to go 64 bit, which I also recommend especially for 4GB-8GB Pis). It has not been updated a single time since he posted all this.
Basically if this is the 32 bit version of GIMP that is from the Raspberry Pi OS repositories this is not considered a reliable version at all. This type of crashing definitely doesn’t necessarily mean you have an unstable overclock. It means your higher overclock makes it far more likely for the right conditions to arise for some ancient GIMP bugs to occur! It doesn’t really make a lot of sense for you to be able to stress test it for multiple hours and that this one software action takes it down. It could possibly be power related but I assume you’re probably using the official Pi adapter that came with it but if you aren’t (or perhaps you have a defective PSU but probably unlikely) it may be worth trying a different/spare one or even one from a cell phone etc. as a test.
The good news is I don’t think you got a Pi 400 that can only get a stable overclock to 1700. That would be literally the worst Pi 400 silicon I’ve ever heard of by a mile! Given the developer’s lack of faith in these several year old 32 bit releases on the Pi unless you can find other reproducible symptoms I wouldn’t assume that this is solely because of your overclock and may be bringing out some instability in the several-year-old 32 bit GIMP package.
It’s hard because it happens when the overclock is on and doesn’t when it’s off, but the numbers don’t add up and there’s a lot of reasons to believe (including all the developer talk) that this may actually be GIMP bug/instability related from the several year old 32 bit build even though the overclock is the seemingly the trigger for this condition. It would still be a bug though that’s not supposed to happen even if the overclock is creating the conditions for the bug to manifest itself. It almost sounds like a kernel panic if the whole system is going down / restarting.
I definitely recommend over_voltage=6 if you can as I’ve found that some of these newer types of instability that show up seem to often be warded off by more power. It’s the “spikes” like when you’re pressing the start button on that specific GIMP task that seem to create the conditions for whatever underlying bug is in that code to occur. Minimal USB accessories plugged in will help as well as each USB accessory will draw from your power budget which reduces your maximum overclock potential/increases instability. I think you’d be seeing more problems across the board though instead of something this specific though if you were completely starved for power. Some of your bench tests should have had some sign somewhere of something but if they’re clean it points more toward the package.
From a software point of view there’s a lot of reasons that this could happen like race conditions and all sorts of weird things that may not occur at stock speeds and a million others as well. It would be far more remarkable though if you got a Pi 400 that can only reach 1700 than if this is related to the Pi OS having what should be a criminally ancient build of GIMP in their repositories. The Pi OS version is apparently missing a minimum of 7 major releases and literally years of fixes according to the devs.
It may be worth installing the updated package using one of these flatpaks or to build it (or try Ubuntu or a 64 bit Raspberry Pi OS beta which almost always has newer packages) just as a test to see if this fixes it without changing your overclock potentially!
Thank you for your guide? I already installed ubuntu on external 2.5″ SSD disk connected via usb 3.0, but when I tried to overclock, system started freezing. I bought 5V/2A usb hub, but ssd disk connected into it does not boot. Do you think it is caused by low current? Besides your guide I did not find verified usb hub, but yours is not available in czech rep. Thx 🙂
Hey nyrlem,
For sure I agree it is power related without the hub since the overclock starts the freezing which is a classic symptom. One trick I’ve seen help for that is setting the over_voltage to 6 (the maximum without enabling force_turbo and voiding the warranty) regardless of what your actual overclock is. This can sometimes stabilize the drive by allowing more overcurrent to flow into the Pi making it available for the drive which might eliminate or at least reduce your freezing when not using a hub.
I do have a trick you can try for the hub as well. Some of the hubs feed back power. Try leaving the hub’s USB connection to the Pi unplugged (with the drive still plugged into the hub and the hub still plugged into power) and then after you connect the Pi’s power quickly plug in the hub’s USB connector to the Pi afterwards. It’s also possible to mod the hubs sometimes depending on which one you have and cut one of the lines that feeds back power but you have to be careful or you’ll destroy it etc.
Here’s an older example to check out (might be slightly different process for the Pi 4 and USB 3.0 but gives the idea of what to look for).
Here’s a more recent discussion about these hubs and how people are dealing with different shortcomings of them.
And another really good one.
The other thing you should check for is firmware updates for your storage adapter/enclosure. These are widely available and do make a difference a lot of the time with issues like this. For example, if you had the StarTech USB 3.1 to 2.5″ SATA adapter you could get firmware updates for it from here. Basically you plug it into a Windows PC and run the application and it updates the firmware. In this example those firmware updates fix “trim” support which really helps the performance of your SSD but in other cases they can fix boot issues as well. Definitely let us know what you find!
Fantastic work!
When using a 2.5 “SSD is it necessary to power it externally?
Thank’s
Hey Luca,
Great question! Not usually unless you are using a 2.5″ enclosure instead of a normal adapter (just the cable vs. a powered bay it sits in). Hopefully that helps!
Fantastic work James!
Q: What did you use for cabling between the M.2-SSD case and the USB hub?
Q2: Was there a USB C cable that came with the Icy Box?
Also – hearty thanks for all your work in developing the media testing metric tools, and for collecting and tracking the data from user tests. Having real-world data that others have collected really helps a newb make an informed decision about storage upgrades.
TY!
Hey Old6Fitty,
Thanks for the kind words! The ICY BOX actually came with two USB cables. One regular USB-A to USB-C and then another USB-C to USB-C! They are relatively short but they worked fine for me. Let me give some better closeups of the setup here:
The two different USB cables it comes with are actually branded which I thought was a cute touch. Here’s a closeup:
Thanks for what you said about the storage benchmark tools as well! The web site front end is still pretty barebones but it’s still a good comparison tool and it helps me know people are using it! It actually motivates me to keep adding the different “comparable” sections that I’ve been working on getting in there. One example is that when you click on the “brand” of a storage device it brings up an info card page of the top 5 scores and some general information but I actually want to expand this to show things like similar drives, other drives from that manufacturer, and other things you’d expect to find on a storage benchmark!
Hopefully all that helps, take care!