Blog

All blog posts by James A. Chambers — focused on technology, hardware, SBC / Microboards, programming, scripting, gaming, and others!

Radxa Rock 5B Steam Installation Guide for Armbian

Running Stardew Valley on Rock 5B

I recently went through the trouble of figuring out how to install Steam on the Orange Pi 5 and it worked really well. Now that I’ve already gone through the pain of figuring out how to do this I figured I might as well write one of these guides for the Radxa Rock 5B as well.

The new RK3588/RK3588S boards have much more power than we’ve typically had available to us in the past on ARM boards. With a whopping 8 CPU cores and a Mali 610 GPU the Orange Pi 5 is capable of running Steam using Box64/Box86. It’s even able to play basic games pretty well (with some tinkering usually).

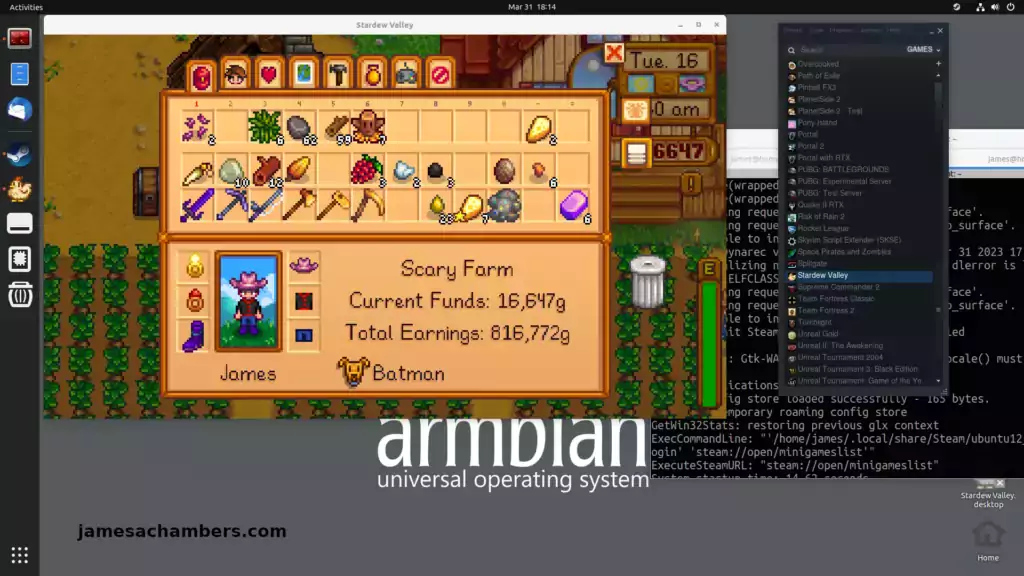
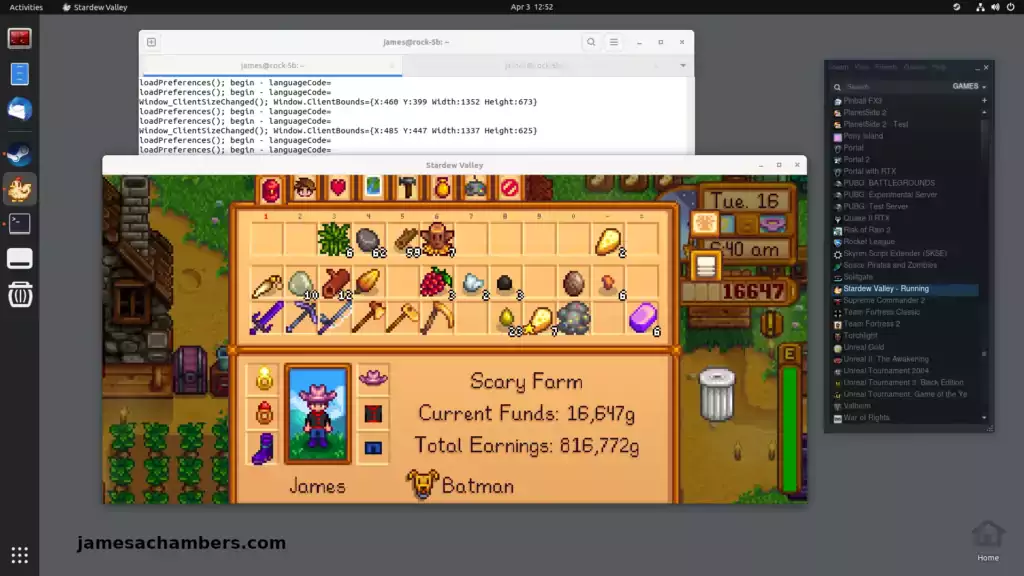
In this guide I’ll show you how to set up Steam on the Radxa Rock 5B and run Stardew Valley on it. You should keep your expectations in line though because there is no native ARM client for Steam. We are using emulation and instruction translation. You will also likely be missing libraries for most games you try which will require some fiddling.

This guide is only for Armbian running the Ubuntu Jammy variant with the Gnome desktop installed (rolling support status). The official Radxa distributions will not have 3D support and I don’t care about whatever other flavor of Linux you are running either. I’m not going to install your preferred flavor of Linux and try to figure out how to do this on there nor am I interested in troubleshooting it. Please don’t ask.

With all of that being said let’s get started!

Radxa Rock 5B Steam Installation Guide for Armbian Read More »

Installing Steam on the Orange Pi 5 with Armbian

Orange Pi 5 running Steam and Stardew Valley

The new RK3588/RK3588S boards have much more power than we’ve typically had available to us in the past on ARM boards. With a whopping 8 CPU cores and a Mali 610 GPU the Orange Pi 5 is capable of running Steam using Box64/Box86. It’s even able to play basic games pretty well (with some tinkering usually).

In this guide I’ll show you how to set up Steam on the Orange Pi 5 and run Stardew Valley on it. You should keep your expectations in line though because there is no native ARM client for Steam. We are using emulation and instruction translation. You will also likely be missing libraries for most games you try which will require some fiddling.

This guide is only for Armbian running the Ubuntu Jammy variant with the Gnome desktop installed only (platinum support status). The Orange Pi official distributions will not have 3D support and I don’t care about whatever other flavor of Linux you are running either. I’m not going to install your preferred flavor of Linux and try to figure out how to do this on there nor am I interested in troubleshooting it. Please don’t ask.

With all of that being said let’s get started!

Installing Steam on the Orange Pi 5 with Armbian Read More »

Google Pixel Watch 3 Month Review

Google Pixel Watch

It had been a while since I had given using a wearable device a try. I had not used one since the original Apple Watch all the way back in 2015. I had switched away from Apple many years ago though to Android phones. Since then I had not seen any reason to try a wearable again although I heard the Samsung Android ones had been improving.

I’d been using a Google Pixel phone for the past several generations as I really like the Google out-of-box experience of having all of the native apps be proper Google apps. It was a clean experience that felt a lot more like Apple. Other Android phones I’d used such as Samsung pushed their own suite of apps which usually were not as good as the native Google apps.

As a fan of the clean first-party OS/application experience I was pretty excited to give the Google Pixel Watch a try. I’ve now had it for 3 months so this will be a 3 month usage review. In this review I’ll cover the good, the bad and the ugly about the Google Pixel Watch.

Let’s begin!

Google Pixel Watch 3 Month Review Read More »

DIY Open Source Handheld Battery Powered Thermal Camera

DIY Battery Powered Thermal Camera

I’ve been exploring using Adafruit Stemma QT to create really cool DIY prototypes without any soldering here on the site. It allows you to very quickly throw together prototypes and do testing for various ideas.

I recently ordered a bunch of new Stemma QT devices including the Adafruit ESP32-S3 Reverse TFT Feather and a MLX90640 IR camera module that I wanted to turn into a DIY thermal camera. I wanted it to be small and battery powered.

In this guide I’ll show you the parts I used to build it as well as the code. Let’s get started!

DIY Open Source Handheld Battery Powered Thermal Camera Read More »

ESP-EYE Cheap Home Assistant ESPHome Camera Guide

ESP-EYE within Home Assistant

I recently covered the extremely cheap and popular ESP32-CAM here on the site. That is still a good choice but I wanted to evaluate some of the other camera options out there.

One of the camera modules I chose to try was the ESP-EYE. This is actually an official product by Espressif (the company who make the ESP modules). It comes as one solid piece unlike the ESP32-CAM. It also has beefier on-board specs than the ESP32-CAM.

In this guide I’ll show you how to set up a completely open-source Home Assistant camera view with the ESP-EYE using ESPHome. Let’s get started!

ESP-EYE Cheap Home Assistant ESPHome Camera Guide Read More »

Radxa Rock 3 Compute Module Review

Radxa CM3 - Top View

I’ve reviewed the Pine64 SOQuartz compute module alternative in the past. While it works great Pine64 is working toward mainline support and doesn’t have very many choices available for a well-supported image as mainline kernel support for that board is not quite complete yet.

The Radxa Rock 3 Compute Module (CM3) is Radxa’s current production alternative to a Raspberry Pi Compute Module 4. They promise that “Radxa CM3, CM3 SODIMM will remain in production until at least Sep 2029” meaning that they have made a very long term commitment to support this board.

In this review I’m going to be taking a look at the Radxa Rock 3 compute module and see how it stacks up against the Pine64 SOQuartz as well as the Raspberry Pi CM4. Let’s begin!

Radxa Rock 3 Compute Module Review Read More »

Cheap ESP32-CAM Home Assistant ESPHome Camera Guide

ESP32-CAM within Home Assistant

I’ve been integrating my entire home into Home Assistant using as much open-source software and hardware as possible. Recently I’ve wanted to add some additional cameras to my home such as a camera to monitor my HVAC / water heater.

Although I already have 6 Unifi cameras integrated into the home those are extremely expensive (and frankly availability is poor on them as well). I don’t need a camera that costs hundreds of dollars to watch my utilities area.

Fortunately there’s an extremely widely available and cheap solution called the ESP32-CAM! These have been around for years and are one of the most popular ESP32 products. Since it uses ESP32 we can use ESPHome and Home Assistant to add a super cheap camera anywhere you’d like.

In this guide I’ll show my ESP32-CAM setup and how to configure it within Home Assistant and ESPHome. Let’s get started!

Cheap ESP32-CAM Home Assistant ESPHome Camera Guide Read More »

Migrate Home Assistant to Orange Pi 5

Orange Pi 5 running Home Assistant

I’ve been running my Home Assistant instance on a very old Tinker Board S with a 16GB eMMC. This has been working fine for a month or two but I recently started getting notifications that my Home Assistant instance was out of drive space. Sure enough, even after removing all of my backups there is almost no space left.

I’ve already received reports from my readers about how much better of an experience Home Assistant is running on an Orange Pi 5. Not only is the CPU much more powerful than something like a Raspberry Pi 4 or Tinker Board S but it has a NVMe storage slot. These two things combined make it a great choice for running your Home Assistant instance.

My previous install is a core installation but I’m going to use supervised on the Orange Pi 5. In this guide I’ll show you how I migrated my instance step by step and evaluate the performance improvement at the end. Let’s get started!

Migrate Home Assistant to Orange Pi 5 Read More »

Adafruit WiFi Action Key for Home Assistant / ESPHome

Adafruit One Key w/ RGB colors set

I’ve covered making a wireless Adafruit IoT button that can run any action within Home Assistant when you press the button using automations. These are great because they also have a RGB LED built in that you can use to show the status of something being controlled by the button.

For example if you used it to control your garage door you could make the button red when your garage door is open and green when it’s shut. This way just by looking at the button you know what the state of the garage door is.

Today I am going to cover something really similar: a single WiFi action key using gear from Adafruit as well as a RISC-V ESP32-C3 module. These also have individual RGB LEDs for each key just like the IoT button giving them the same advantages. Let’s begin!

Adafruit WiFi Action Key for Home Assistant / ESPHome Read More »

Home Assistant / ESPHome Air Quality Monitor (No Soldering)

QT Py + Grove SEN54 - Deployment (Closeup)

I’ve previously covered creating a Home Assistant air quality monitor system using a XAIO ESP32-C3 module and ESPHome / Home Assistant to create a 7-in-1 air quality monitor sensor. My previous article though did require a little bit of soldering to get it going.

Today I’m going to show you my latest sensor build which has completely eliminated the soldering. It’s plug and play using ESPHome and Home Assistant. I did this using the Adafruit QT Py module which has a built-in connector for connecting to a I2C (Stemma QT) device like the Grove SEN54 environmental sensor. In addition to eliminating any soldering this also saved me money by not having to buy an expansion board.

Today I’ll show you the updated build for my air quality sensor setup I’ll be using throughout my home. Let’s get started!

Home Assistant / ESPHome Air Quality Monitor (No Soldering) Read More »

Minoston Z-wave Smart Plugs w/ Home Assistant Review

Minoston Z-Wave Smart Plug - Installed

I’ve been covering integrating my entire home into Home Assistant here on the site. I want to have the capability to monitor everything going on in my home and control it with an open-source system such as Home Assistant.

Although I have a strong WiFi network in my home there are some areas where using a wireless technology that is more energy efficient (such as Z-wave and Zigbee) makes a lot more sense. These especially include devices that need to run on a battery or are in awkward areas with poor WiFi coverage.

I decided to try the Minoston Z-wave mini plug to see how it integrated with my Home Assistant setup as it was very commonly recommended online. In this review we’ll take a look at this device and see if it’s worth using. Let’s begin!

Minoston Z-wave Smart Plugs w/ Home Assistant Review Read More »

Zooz 700 Z-Wave Door/Window Sensors w/ Home Assistant

Zooz 700 series door/window sensor - Review

I’ve been upgrading all of the devices in my home to work with Home Assistant and eliminate subscriptions to proprietary services. One of the last remaining subscription services I have in my home is the Ring door and window sensors. The Ring ones have honestly been fine but the subscription is not free. Since I know these sensors will be installed in my home for 10+ years it will save me money to switch to something else that has no subscription.

That is why I was excited to see that Zooz has released a new series of Z-Wave door and window sensors that are completely self-managed by either a Z-Wave hub or Home Assistant running as a Z-Wave hub. The advantage of Z-Wave and Zigbee devices is they use much less power than WiFi so it’s a much better suited technology for devices that run on battery power (such as wireless door and window sensors).

In this review I’ll cover the Zooz 700 Z-Wave door and window sensors and cover the upsides and downsides of the system. Let’s get started!

Zooz 700 Z-Wave Door/Window Sensors w/ Home Assistant Read More »

Genie Garage Door Opener Aladdin Smart Home Upgrade

Genie Aladdin Connect - Installed

I’ve been investigating ways to make my garage doors on my home “smart”. My overall goal is to implement them into Home Assistant. I’ve been investigating various options to do this including do-it-yourself with ESP modules (which I’ve used for a lot of other parts of my home automation).

My home is only about 3 years old and came preinstalled with a “dumb” Genie garage door system that does not have smart capabilities. I decided to investigate the official upgrade option offered by the company via their Aladdin smart home upgrade kit as it only cost about $60.

In this guide I’ll cover installing the upgrade kit for Genie garage doors and how well it performed. I’ll also cover implementing it within Home Assistant. Let’s get started!

Genie Garage Door Opener Aladdin Smart Home Upgrade Read More »

Adafruit Stemma QT Arduino Getting Started Guide

Adafruit 7 Segment Display + Rotary Encoder + QT Py

I’ve been doing a lot of coverage of ESP32-related chips lately on the site. One thing that is a bit painful with them though is that they usually require a lot of soldering. That’s why I find the Adafruit QT Py series of ESP32 chips so exciting. They eliminate the soldering!

Unfortunately once I got all of my parts and tried to get started I ran into several issues that are not covered at all (or very poorly covered) by the official documentation and guides available. None of the things I’m going to cover were particularly difficult once you know what they are and how to address them. I did however lose days or closer to a week of time messing with this as I had to figure it all out from piecing together scraps here and there from forum posts.

In this guide I’ll show you how to get Arduino working with the Adafruit QT Py boards using Stemma and how to avoid all the pitfalls that I lost a lot of time on getting started. Let’s begin!

Adafruit Stemma QT Arduino Getting Started Guide Read More »

Best 2023 Raspberry Pi Alternatives

Radxa Rock 5B Review

The Raspberry Pi continues to suffer from supply chain issues. They have promised there are a lot of their very old models that should be coming up for purchase within the next 6 months. I’ve been hearing that for years though to be honest with you.

Fortunately you don’t need to wait. There are more and better alternatives to the Raspberry Pi in 2023 than there have ever been before. In this article I’ll cover the best Raspberry Pi alternatives in 2023.

Let’s get started!

Best 2023 Raspberry Pi Alternatives Read More »